

Page 1

Art.-Nr.: 20.303.35 I.-Nr.: 01019
Art.-Nr.: 20.303.45 I.-Nr.: 01019
Originalbetriebsanleitung
Starthilfekabel
Original operating instructions
Jumper Cables
Manual de instruções original
cabo auxiliar de arranque
BT-BO 16 A
BT-BO 25 A
Anleitung_BT_BO_16A_25A_SPK7:Anleitung LE-CU III 16 mm2 14.05.2009 14:25 Uhr Seite 1
Page 2
2
1
Anleitung_BT_BO_16A_25A_SPK7:Anleitung LE-CU III 16 mm2 14.05.2009 14:25 Uhr Seite 2
Page 3

Achten Sie darauf,
쎲 dass die Kapazität der stromgebenden Batterie
(z.B. 45 Ah) nicht wesentlich unter der der
entladenen liegt
쎲 dass nur Batterien gleicher Nennspannung (z.B.
12 V) verbunden werden dürfen
쎲 dass zwischen den Fahrzeugen kein
Karosseriekontakt hergestellt werden darf
(Kurzschlussgefahr)
쎲 dass Zündquellen (z.B. offenes Licht, brennende
Zigaretten oder elektrische Funken) von den
Batterien fernzuhalten sind (Verpuffungsgefahr)
und dass wegen der Verätzungsgefahr man sich
nicht über die Batterien beugt
쎲 dass das Elektrolyt der entladenen Batterie auch
bei niedriger Temperatur flüssig ist
쎲 dass die entladene Batterie nicht von dem
dazugehörigen Bordnetz getrennt wird und die
Zündungen der Fahrzeuge vor dem Anklemmen
der Starthilfekabel ausgeschaltet sind: bei
Schaltgetrieben der Schalthebel in LeerlaufStellung; bei Automatikgetrieben der Wählhebel
in Stellung «P» steht und die Feststellbremse
angezogen ist
쎲 dass die Leitungen des Starthilfekabels nicht von
den sich drehenden Teilen im Motorraum erfasst
werden können
쎲 wie und in welcher Reihenfolge Starthilfekabel
an- und abzuklemmen sind
쎲 dass beim Entfernen der Leitungen des Start-
hilfekabels, diese nicht in Kontakt mit sich
drehenden Teilen des Motors kommen.
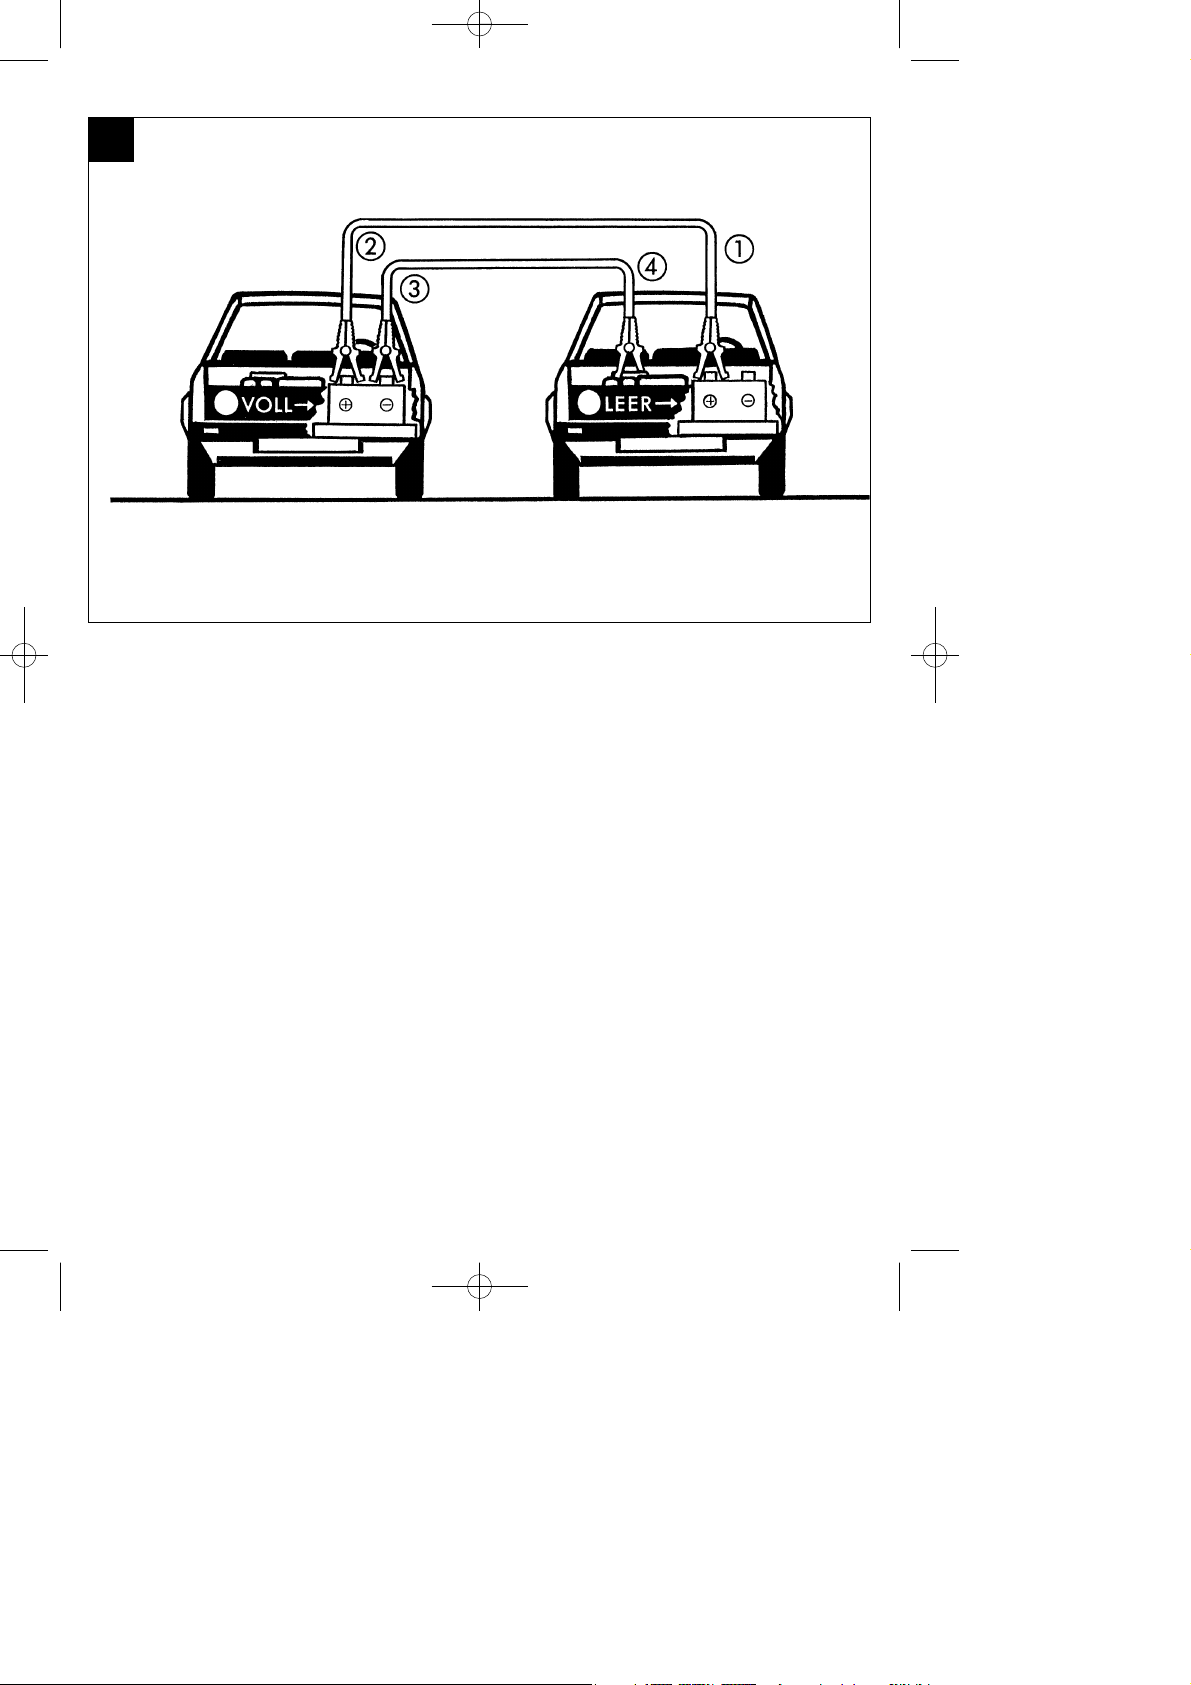
Anklemmen:
Leitung mit den roten Polzangen zuerst am Pluspol
der entladenen Batterie (siehe Bild/Position 1) und
dann am Pluspol der Spenderbatterie (siehe
Bild/Position 2) anklemmen. Anschliessend die
Leitung mit den schwarzen Polzangen am Minuspol
der Spenderbatterie (siehe Bild/Position 3) und
danach an die Fahrzeugmasse des
liegengebliebenen Fahrzeuges, z.B. am Masseband
oder einer anderen blanken Stelle am Motorblock
(siehe Bild/Position 4), soweit wie möglich von der
Batterie entfernt anklemmen, um das Zünden von
möglicherweise entwickeltem Knallgas zu
verhindern.
Starten:
Danach Motor des Spenderfahrzeugs starten und auf
mittlere Drehzahl bringen. Anschliessend Motor des
liegengebliebenen Fahrzeugs starten. Nach einem
Startvorgang, der nicht länger als 15 Sekunden
dauern soll, ist eine Wartezeit von 1 Minute
einzulegen.
Abklemmen:
Wenn der Motor rund läuft (nach 2 bis 3 Minuten)
Starthilfekabel in umgekehrter Reihenfolge
abklemmen: Zuerst schwarze Polzange vom
Masseband oder Motorblock des liegengebliebenen
Fahrzeuges abnehmen (siehe Bild/Position 4). Dann
die andere schwarze Polzange vom Minuspol der
Spenderbatterie (siehe Bild/Position 3) und
anschliessend die beiden roten Polzangen in
beliebiger Reihenfolge abnehmen.
Technische Daten:
BT-BO 16 A
Querschnitt 25 mm
2
Länge 3 m
geeignet für Ottomotoren mit max. 2500 ccm (12 V
oder 24 V Batterie
BT-BO 25 A
Querschnitt 40 mm
2
Länge 3,5 m
geeignet für Ottomotoren mit max. 5500 ccm und
Dieselmotoren mit max. 3000 ccm (12 V oder 24 V
Batterie
Hinweise:
Starten von Katalysator-Autos
Bei nicht startfähiger Batterie den Motor nur mit
Starthilfekabel und Spenderbatterie starten. Durch
Anschieben oder Abschleppen kann Benzin in den
Auspuff gelangen und den Katalysator beschädigen.
Vor dem Abklemmen einen großen Stromverbaucher
einschalten, um Spannungsspitzen in der Bordelektronik zu vermeiden. Bedienungsanleitung des
Autos bzw. der Zusatzgeräte (wie z.B. Autotelefon,
Bordcomputer usw.) auf eventuelle Hinweise zur
Ladung der Batterie und zur Starthilfe beachten.
D
3
Anleitung_BT_BO_16A_25A_SPK7:Anleitung LE-CU III 16 mm2 14.05.2009 14:25 Uhr Seite 3
Page 4

It is vital to make sure that
쎲 the capacitance of the battery supplying the
power (e.g. 45 Ah) does not lie substantially
below that of the discharged battery;
쎲 only batteries of identical nominal voltage (e.g.
12 V) are connected together;
쎲 there is no contact between the body work of the
vehicles involved (risk of short-circuiting);
쎲 sources of ignition (e.g. naked lights, burning
cigarettes or electric sparks) are kept away from
the batteries (risk of detonation) and that you
avoid bending over the batteries due to risk of
caustic burns;
쎲 the electrolyte of the discharged battery is still
fluid at low temperature;
쎲 the discharged battery is not disconnected from
its vehicleʼs electric system and that the ignition
of both vehicles is switched off before connecting
up the jumper cables: vehicles with manual
transmissions - place the shift lever in neutral;
vehicles with automatic transmissions - place the
selector lever in position „P“ and pull the hand
brake;
쎲 the leads of the jumper cable cannot get caught
up in any moving parts inside the engine
compartment;
쎲 you know how and in which order you have to
connect and disconnect the jumper cables.
쎲 when you remove the leads of the jumper cable
they do not come into contact with any moving
parts of the engine.
Connecting the jumper leads:
Connect the lead with the red pole clamps first to the
positive pole of the discharged battery (see
Figure/Item 1) and then to the positive pole of the
supplier battery (see Figure/Item 2). Now connect the
lead with the black pole clamps to the negative pole
of the supplier battery (see Figure/Item 3) and then
to ground on the receiver vehicle, e.g. the ground
strap or some other bare point on the engine block
(see Figure/Item 4). Choose a point as far away as
possible from the battery in order to avoid the ignition
of any electrolytic gas which may develop.
Starting:
Start the engine of the supplier vehicle and rev up to
the medium speed range. Then start the engine of
the receiver vehicle. Try for no longer than 15
seconds to start the vehicle, then wait for 1 minute
before trying again.
Disconnecting the jumper leads:
When the engine is running smoothly (after 2 to 3
minutes), disconnect the jumper cables in reverse
order: First disconnect the black pole clamp from the
ground strap or the engine block of the receiver
vehicle (see Figure/Position 4). Then disconnect the
other black pole clamp from the negative pole of the
supplier battery (see Figure/Item 3). Finally, remove
the two red pole clamps in any order.
Technical data:
BT-BO 16 A
Cross cut 25 mm
2
Length 3 m
Suitable for petrol engines with max 2500 cc (12 V or
24 V battery)
BT-BO 25 A
Cross cut 40 mm
2
Length 3.5 m
Suitable for petrol engines with max 5500 cc and
diesel engines with max. 3000 cc (12 V or 24 V
battery)
Notes:
Starting cars with catalytic converters
If the battery is not able to start the engine, only jump
start it with the jump cables and auxiliary battery. If
you attempt to push off the car or tow it, petrol may
get into the exhaust and damage the catalytic
converter. Switch on a large power consumer before
disconnecting so as to prevent voltage surges in the
electrical system. Refer to the ownerʼs manual for the
car or additional equipment (such as car phone, onboard computer, etc.) for instructions on charging the
battery and jump starting.
GB
4
Anleitung_BT_BO_16A_25A_SPK7:Anleitung LE-CU III 16 mm2 14.05.2009 14:25 Uhr Seite 4
Page 5

Assegure-se de que,
쎲 a capacidade da bateria que fornece a corrente
(p. ex. 45 Ah) não é muito inferior à capacidade
da bateria que se encontra descarregada
쎲 conecta apenas baterias com a mesma tensão
nominal (p. ex. 12 V)
쎲 não se pode estabelecer qualquer contacto entre
a carroçaria dos dois veículos (perigo de curtocircuito)
쎲 mantém as fontes de ignição (p. ex. fontes de luz
aberta, cigarros acesos ou faíscas eléctricas)
afastadas das baterias (perigo de deflagração) e
não se debruça sobre as baterias devido à
causticidade das mesmas
쎲 o electrólito da bateria descarregada se encontra
em estado líquido, mesmo a baixas
temperaturas
쎲 a bateria descarregada não é separada do
respectivo sistema eléctrico do veículo e de que
as ignições dos veículos se encontram
desligadas antes de conectar os cabos auxiliares
de arranque: nas caixas de velocidade manuais
a alavanca das mudanças se encontra em
ponto-morto e nas caixas de velocidade
automáticas a alavanca selectora se encontra na
posição «P» e o travão de mão puxado
쎲 os cabos auxiliares de arranque não podem ser
apanhados por peças em movimento dentro do
compartimento do motor
쎲 da sequência e da forma correcta de ligar e
desligar os cabos auxiliares de arranque
쎲 Quando remover o cabo auxiliar de arranque,
certifique-se de que este não entra em contacto
com as peças do motor em rotação.
Conectar:
Conecte primeiro o cabo com a garra para o pólo
vermelha ao pólo positivo da bateria descarregada
(consulte a figura/posição 1) e depois ao pólo
positivo da bateria de alimentação (consulte a
figura/posição 2). Conecte de seguida o cabo com a
garra para o pólo preta ao pólo negativo da bateria
de alimentação (consulte a figura/posição 3) e
depois à massa do veículo que tem a bateria
descarregada, p. ex. à fita de ligação à massa ou
noutro local livre no bloco do motor (consulte a
figura/posição 4). Conecte este cabo o mais
afastado possível da bateria, de forma a evitar a
ignição de gás detonante que eventualmente se
tenha formado.
Dar arranque:
Ligue de seguida o motor do veículo alimentador e
acelere-o a um regime de rotações médio. Dê
seguidamente arranque ao motor do veículo com a
bateria descarregada. Após cada tentativa de
arranque, que não deve demorar mais de 15
segundos, deve aguardar sempre 1 minuto antes de
tentar novamente.
Desconectar:
Volte a desconectar os cabos auxiliares de arranque
pela sequência inversa quando o motor estiver a
trabalhar de forma regular (após 2 a 3 minutos):
Retire primeiro a garra para o pólo preta da fita de
ligação à massa ou do bloco do motor do veículo
com a bateria descarregada (consulte a
figura/posição 4). Retire de seguida a outra garra
para o pólo preta do pólo negativo da bateria de
alimentação (consulte a figura/posição 3) e depois
ambas as garras para os pólos vermelhas sem
nenhuma ordem específica.
Dados técnicos:
BT-BO 16
Secção transversal 25 mm
2
Comprimento 3 m
indicado para motores a gasolina com 2500 cm3, no
máx. (bateria de 12 V ou de 24 V)
BT-BO 25
Secção transversal 40 mm
2
Comprimento 3,5 m
indicado para motores a gasolina com 5500 cm3, no
máx. e motores a gasóleo com 3000 cm
3
, no máx.
(bateria de 12 V ou de 24 V)
Instruções:
Dar arranque a veículos com catalisador
Quando a bateria se encontra descarregada proceda
à tentativa de arranque apenas com cabos auxiliares
de arranque e com uma bateria de alimentação.
Empurrar ou rebocar um veículo com catalisador
pode fazer com que entre gasolina para o sistema
de escape, danificando o catalisador. Antes de
desconectar, ligue um grande consumidor de
electricidade para evitar picos de tensão no sistema
electrónico de bordo. Consulte o manual de
instruções do veículo ou dos aparelhos auxiliares
(como p. ex. telefone, computador de bordo, etc.)
para se inteirar de eventuais indicações sobre o
carregamento da bateria e o arranque auxiliado.
P
5
Anleitung_BT_BO_16A_25A_SPK7:Anleitung LE-CU III 16 mm2 14.05.2009 14:25 Uhr Seite 5
Page 6

Der Nachdruck oder sonstige Vervielfältigung von Dokumentation und
Begleitpapieren der Produkte, auch auszugsweise ist nur mit ausdrücklicher Zustimmung der ISC GmbH zulässig.
The reprinting or reproduction by any other means, in whole or in part,
of documentation and papers accompanying products is permitted only
with the express consent of ISC GmbH.
A reprodução ou duplicação, mesmo que parcial, da documentação e
dos anexos dos produtos, carece da autorização expressa da ISC
GmbH.
6
Anleitung_BT_BO_16A_25A_SPK7:Anleitung LE-CU III 16 mm2 14.05.2009 14:25 Uhr Seite 6
Page 7

7
Technische Änderungen vorbehalten
Technical changes subject to change
Salvaguardem-se alterações técnicas
Anleitung_BT_BO_16A_25A_SPK7:Anleitung LE-CU III 16 mm2 14.05.2009 14:25 Uhr Seite 7
Page 8

8
Anleitung_BT_BO_16A_25A_SPK7:Anleitung LE-CU III 16 mm2 14.05.2009 14:25 Uhr Seite 8
Page 9

9
t
GUARANTEE CERTIFICATE
Dear Customer,
All of our products undergo strict quality checks to ensure that they reach you in perfect condition. In the unlikely
event that your device develops a fault, please contact our service department at the address shown on this
guarantee card. Of course, if you would prefer to call us then we are also happy to offer our assistance under
the service number printed below. Please note the following terms under which guarantee claims can be made:
1. These guarantee terms cover additional guarantee rights and do not affect your statutory warranty rights.
We do not charge you for this guarantee.
2. Our guarantee only covers problems caused by material or manufacturing defects, and it is restricted to the
rectification of these defects or replacement of the device. Please note that our devices have not been
designed for use in commercial, trade or industrial applications. Consequently, the guarantee is invalidated
if the equipment is used in commercial, trade or industrial applications or for other equivalent activities. The
following are also excluded from our guarantee: compensation for transport damage, damage caused by
failure to comply with the installation/assembly instructions or damage caused by unprofessional
installation, failure to comply with the operating instructions (e.g. connection to the wrong mains voltage or
current type), misuse or inappropriate use (such as overloading of the device or use of non-approved tools
or accessories), failure to comply with the maintenance and safety regulations, ingress of foreign bodies
into the device (e.g. sand, stones or dust), effects of force or external influences (e.g. damage caused by
the device being dropped) and normal wear resulting from proper operation of the device. This applies in
particular to rechargeable batteries for which we nevertheless issue a guarantee period of 12 months.
The guarantee is rendered null and void if any attempt is made to tamper with the device.
3. The guarantee is valid for a period of 2 years starting from the purchase date of the device. Guarantee
claims should be submitted before the end of the guarantee period within two weeks of the defect being
noticed. No guarantee claims will be accepted after the end of the guarantee period. The original guarantee
period remains applicable to the device even if repairs are carried out or parts are replaced. In such cases,
the work performed or parts fitted will not result in an extension of the guarantee period, and no new
guarantee will become active for the work performed or parts fitted. This also applies when an on-site
service is used.
4. In order to assert your guarantee claim, please send your defective device postage-free to the address
shown below. Please enclose either the original or a copy of your sales receipt or another dated proof of
purchase. Please keep your sales receipt in a safe place, as it is your proof of purchase. It would help us if
you could describe the nature of the problem in as much detail as possible. If the defect is covered by our
guarantee then your device will either be repaired immediately and returned to you, or we will send you a
new device.
Of course, we are also happy offer a chargeable repair service for any defects which are not covered by the
scope of this guarantee or for units which are no longer covered. To take advantage of this service, please send
the device to our service address.
Anleitung_BT_BO_16A_25A_SPK7:Anleitung LE-CU III 16 mm2 14.05.2009 14:25 Uhr Seite 9
Page 10

10
O
CERTIFICADO DE GARANTIA
Estimado(a) cliente,
Os nossos produtos são submetidos a um rigoroso controlo de qualidade. Se, ainda assim, o aparelho não
funcionar nas devidas condições, lamentamos esse facto e pedimos-lhe que se dirija ao nosso serviço de
assistência técnica na morada indicada no presente certificado de garantia. Se preferir, também pode
contactar-nos telefonicamente através do número de assistência técnica abaixo indicado. O exercício dos
direitos de garantia está sujeito às seguintes condições:
1. As presentes condições de garantia regem as prestações de garantia complementar e não afectam os
seus direitos legais de garantia. O nosso serviço de garantia é prestado gratuitamente.
2. A garantia cobre exclusivamente os defeitos de material ou de fabrico e limita-se à reparação de tais
defeitos ou à substituição do aparelho. Chamamos a atenção para o facto de os nossos aparelhos não
terem sido concebidos para uso comercial, artesanal ou industrial. Não haverá, por isso, lugar a um
contrato de garantia no caso de o aparelho ser utilizado em empresas do comércio, do artesanato ou da
indústria ou em actividades equiparáveis. A nossa garantia exclui, além disso, quaisquer indemnizações
por danos de transporte, danos resultantes da não observância das instruções de montagem ou de uma
instalação incorrecta, da não observância das instruções de funcionamento (por exemplo, ligação a uma
tensão de rede ou a um tipo de corrente errado), de uma utilização abusiva ou indevida (como, por
exemplo, sobrecarga do aparelho ou utilização de ferramentas ou acessórios não autorizados), da não
observância das regras de manutenção e segurança, da penetração de corpos estranhos no aparelho (por
exemplo, areia, pedras ou pó), do uso da força ou de impactos externos (como, por exemplo, danos
causados pela queda do aparelho), bem como do desgaste normal resultante da utilização do aparelho.
Isto é válido especialmente para os acumuladores aos quais concedemos uma garantia de 12 meses.
O direito de garantia extingue-se no caso de já ter havido uma tentativa de reparação do aparelho.
3. O período de garantia é de 2 anos a contar da data de compra do aparelho. Os direitos de garantia devem
ser reclamados dentro do período de garantia, no prazo de duas semanas após ter sido detectado o
defeito. Está excluída a reclamação de direitos de garantia após o termo do período de garantia. A
reparação ou a substituição do aparelho não implica o prolongamento do período de garantia nem dá
origem à contagem de um novo período de garantia para o aparelho ou para eventuais peças de
substituição montadas no mesmo. O mesmo se aplica no caso de a assistência técnica ter sido prestada
no local.
4. Para activar a garantia deverá enviar o aparelho defeituoso à cobrança para a morada abaixo indicada,
juntamente com o talão de compra original ou qualquer outro documento comprovativo da data de compra.
Por isso, é importante que guarde o talão de compra como comprovativo. Descreva o mais
detalhadamente possível o motivo da reclamação. Se o defeito do aparelho estiver abrangido pelo nosso
serviço de garantia, ser-lhe-á imediatamente enviado um aparelho novo ou reparado.
Naturalmente, também teremos todo o gosto em efectuar reparações que não estão, ou deixaram de estar,
abrangidas pelo serviço de garantia. Nesse caso, terá de suportar os custos da reparação. Para este efeito,
deverá enviar o aparelho para a morada do nosso serviço de assistência técnica.
Anleitung_BT_BO_16A_25A_SPK7:Anleitung LE-CU III 16 mm2 14.05.2009 14:25 Uhr Seite 10
Page 11

11
k
GARANTIEURKUNDE
Sehr geehrte Kundin, sehr geehrter Kunde,
unsere Produkte unterliegen einer strengen Qualitätskontrolle. Sollte dieses Gerät dennoch einmal nicht einwandfrei funktionieren, bedauern wir dies sehr und bitten Sie, sich an unseren Servicedienst unter der auf dieser Garantiekarte angegebenen Adresse zu wenden. Gern stehen wir Ihnen auch telefonisch über die unten
angegebene Servicerufnummer zur Verfügung. Für die Geltendmachung von Garantieansprüchen gilt Folgendes:
1. Diese Garantiebedingungen regeln zusätzliche Garantieleistungen. Ihre gesetzlichen Gewährleistungsansprüche werden von dieser Garantie nicht berührt. Unsere Garantieleistung ist für Sie kostenlos.
2. Die Garantieleistung erstreckt sich ausschließlich auf Mängel, die auf Material- oder Herstellungsfehler zurückzuführen sind und ist auf die Behebung dieser Mängel bzw. den Austausch des Gerätes beschränkt.
Bitte beachten Sie, dass unsere Geräte bestimmungsgemäß nicht für den gewerblichen, handwerklichen
oder industriellen Einsatz konstruiert wurden. Ein Garantievertrag kommt daher nicht zustande, wenn das
Gerät in Gewerbe-, Handwerks- oder Industriebetrieben sowie bei gleichzusetzenden Tätigkeiten eingesetzt wird.
Von unserer Garantie sind ferner Ersatzleistungen für Transportschäden, Schäden durch Nichtbeachtung
der Montageanleitung oder aufgrund nicht fachgerechter Installation, Nichtbeachtung der Gebrauchsanleitung (wie durch z.B. Anschluss an eine falsche Netzspannung oder Stromart), missbräuchliche oder unsachgemäße Anwendungen (wie z.B. Überlastung des Gerätes oder Verwendung von nicht zugelassenen
Einsatzwerkzeugen oder Zubehör), Nichtbeachtung der Wartungs- und Sicherheitsbestimmungen, Eindringen von Fremdkörpern in das Gerät (wie z.B. Sand, Steine oder Staub), Gewaltanwendung oder
Fremdeinwirkungen (wie z. B. Schäden durch Herunterfallen) sowie durch verwendungsgemäßen, üblichen
Verschleiß ausgeschlossen. Dies gilt insbesondere für Akkus, auf die wir dennoch eine Garantiezeit von
12 Monaten gewähren
Der Garantieanspruch erlischt, wenn an dem Gerät bereits Eingriffe vorgenommen wurden.
3. Die Garantiezeit beträgt 2 Jahre und beginnt mit dem Kaufdatum des Gerätes. Garantieansprüche sind vor
Ablauf der Garantiezeit innerhalb von zwei Wochen, nachdem Sie den Defekt erkannt haben, geltend zu
machen. Die Geltendmachung von Garantieansprüchen nach Ablauf der Garantiezeit ist ausgeschlossen.
Die Reparatur oder der Austausch des Gerätes führt weder zu einer Verlängerung der Garantiezeit noch
wird eine neue Garantiezeit durch diese Leistung für das Gerät oder für etwaige eingebaute Ersatzteile in
Gang gesetzt. Dies gilt auch bei Einsatz eines Vor-Ort-Services.
4. Für die Geltendmachung Ihres Garantieanspruches übersenden Sie bitte das defekte Gerät portofrei an die
unten angegebene Adresse. Fügen Sie den Verkaufsbeleg im Original oder einen sonstigen datierten Kaufnachweis bei. Bitte bewahren Sie deshalb den Kassenbon als Nachweis gut auf! Beschreiben Sie uns bitte
den Reklamationsgrund möglichst genau. Ist der Defekt des Gerätes von unserer Garantieleistung erfasst,
erhalten Sie umgehend ein repariertes oder neues Gerät zurück.
Selbstverständlich beheben wir gegen Erstattung der Kosten auch gerne Defekte am Gerät, die vom Garantieumfang nicht oder nicht mehr erfasst sind. Dazu senden Sie das Gerät bitte an unsere Serviceadresse.
iSC GmbH • Eschenstraße 6 • 94405 Landau/Isar (Deutschland)
Telefon: +49 [0] 180 5 120 509 • Telefax +49 [0] 180 5 835 830 (Anrufkosten: 0,14 Euro/Minute, Festnetz der T-Com)
E-Mail: info@isc-gmbh.info
• Internet: www.isc-gmbh.info
Anleitung_BT_BO_16A_25A_SPK7:Anleitung LE-CU III 16 mm2 14.05.2009 14:25 Uhr Seite 11
Page 12

EH 05/2009 (01)
Name:
Service Hotline: 01805 120 509 · www.isc-gmbh.info
(0,14 € / min. Festnetz T-Com) - Mo-Fr. 8:00-20:00 Uhr
Straße / Nr.:
PLZ Ort
Mobil:
Telefon:
Retouren-Nr. iSC:
Kaufbeleg-Nr. / Datum:
Garantie:
JA
NEIN
Welcher Fehler ist aufgetreten (genaue Angabe): Art.-Nr.: I.-Nr.:
Sehr geehrte Kundin, sehr geehrter Kunde,
bitte beschreiben Sie uns die von Ihnen festgestellte Fehlfunktion Ihres Gerätes als Grund Ihrer Beanstandung möglichst genau. Dadurch können wir
für Sie Ihre Reklamation schneller bearbeiten und Ihnen schneller helfen. Eine zu ungenaue Beschreibung mit Begriffen wie „Gerät funktioniert nicht“
oder „Gerät defekt“ verzögert hingegen die Bearbeitung erheblich.
Service Hotline kontaktieren oder bei iSC-Webadresse anmelden - es wird Ihnen eine Retourennummer zugeteilt l Ihre Anschrift eintragen l Fehlerbeschreibung
und Art.-Nr. und I.-Nr. angeben l Garantiefall JA/NEIN ankreuzen sowie Kaufbeleg-Nr. und Datum angeben und eine Kopie des Kaufbeleges beilegen
Anleitung_BT_BO_16A_25A_SPK7:Anleitung LE-CU III 16 mm2 14.05.2009 14:25 Uhr Seite 12
 Loading...