

Page 1

k
Originalbetriebsanleitung
Kompressor
t
Original operating instructions
Compressor
C
Istruzioni per l’uso originali
Compressore
q
Alkuperäiskäyttöohje
Air-Tech Kompressori
Art.-Nr.: 40.103.80 I.-Nr.: 11010
BT-AC
320/50/10
Anleitung_BT_AC_320_50_10_SPK7:_ 02.03.2011 10:20 Uhr Seite 1
Page 2

2
1
11
4
4
A
15
2 3
2
1
14
P
13
16
13
10
8
14
1
9
12
6
8
7
3
5
Anleitung_BT_AC_320_50_10_SPK7:_ 02.03.2011 10:20 Uhr Seite 2
Page 3

3
4
5 6
F
E
D
7 8
(2x) 3
(2x) A
(2x) G (2x) E
(2x) C
(2x) D
(2x) 4
(2x) D
(2x) E
(2x) F
4
C,D
J
K
1
3
G
EH
L
(2x) H
M
N
O
Anleitung_BT_AC_320_50_10_SPK7:_ 02.03.2011 10:21 Uhr Seite 3
Page 4

4
11
9 10
9
JK
14
MAX
MIN
13
Anleitung_BT_AC_320_50_10_SPK7:_ 02.03.2011 10:21 Uhr Seite 4
Page 5

5
“WARNUNG - Zur Verringerung des Verletzungsrisikos Bedienungsanleitung lesen”
Tragen Sie einen Gehörschutz.
Die Einwirkung von Lärm kann Gehörverlust bewirken.
Warnung vor elektrischer Spannung
Warnung vor heißen Teilen
D
Anleitung_BT_AC_320_50_10_SPK7:_ 02.03.2011 10:21 Uhr Seite 5
Page 6

D
6
Achtung!
Beim Benutzen von Geräten müssen einige
Sicherheitsvorkehrungen eingehalten werden, um
Verletzungen und Schäden zu verhindern. Lesen Sie
diese Bedienungsanleitung deshalb sorgfältig durch.
Bewahren Sie diese gut auf, damit Ihnen die
Informationen jederzeit zur Verfügung stehen. Falls
Sie das Gerät an andere Personen übergeben
sollten, händigen Sie diese Bedienungsanleitung
bitte mit aus.
Wir übernehmen keine Haftung für Unfälle oder
Schäden, die durch Nichtbeachten dieser Anleitung
und den Sicherheitshinweisen entstehen.
1. Sicherheitshinweise
1.1 Sicherheitshinweise
Achtung! Beim Gebrauch dieses Kompres-
sors sind zum Schutz gegen elektrischen Schlag,
Verletzungs- und Brandgefahr folgende
grundsätzlichen Sicherheitsmaßnahmen zu
beachten. Lesen und beachten Sie diese
Hinweise, bevor Sie das Gerät benutzen.
1. Halten Sie Ihren Arbeitsbereich in Ordnung
– Unordnung im Arbeitsbereich ergibt Unfallgefahr.
2. Berücksichtigen Sie Umgebungseinflüsse
– Setzen Sie den Kompressor nicht dem Regen
aus. Benutzen Sie den Kompressor nicht in
feuchter oder nasser Umgebung. Sorgen Sie
für gute Beleuchtung. Benutzen Sie den
Kompressor nicht in der Nähe von brennbaren
Flüssigkeiten oder Gasen.
3. Schützen Sie sich vor elektrischem Schlag
– Vermeiden Sie Körperberührung mit geerdten
Teilen, zum Beispiel Rohren, Heizkörpern,
Herden, Kühlschränken.
4. Halten Sie Kinder fern!
– Lassen Sie andere Personen nicht den Kompressor oder das Kabel berühren, halten Sie sie
von Ihrem Arbeitsbereich fern.
5. Bewahren Sie Ihren Kompressor sicher auf
– Der unbenutzte Kompressor sollte in einem
trockenen, verschlossenen Raum und für Kinder
nicht erreichbar aufbewahrt werden.
6. Überlasten Sie Ihren Kompressor nicht
– Sie arbeiten besser und sicherer im angegebenen Leistungsbereich.
7. Tragen Sie geeignete Arbeitskleidung
– Tragen Sie keine weite Kleidung oder
Schmuck. Sie können von beweglichen Teilen
erfasst werden. Bei Arbeiten im Freien sind
Gummihandschuhe und rutschfestes
Schuhwerk empfehlenswert. Tragen Sie bei langen Haaren ein Haarnetz.
8. Zweckentfremden Sie nicht das Kabel
– Ziehen Sie den Kompressor nicht am Kabel,
und benutzen Sie es nicht, um den Stecker aus
der Steckdose zu ziehen. Schützen Sie das
Kabel vor Hitze, Öl und scharfen Kanten.
9. Pflegen Sie Ihren Kompressor mit Sorgfalt
– Halten Sie Ihren Kompressor sauber, um gut
und sicher zu arbeiten. Befolgen Sie die
Wartungsvorschriften. Kontrollieren Sie regelmäßig den Stecker und das Kabel, und lassen
Sie diese bei Beschädigung von einem anerkannten Fachmann erneuern. Kontrollieren Sie
Verlängerungskabel regelmäßig und ersetzen
Sie beschädigte.
10. Ziehen Sie den Netzstecker
– Bei Nichtgebrauch, vor der Wartung.
11. Vermeiden Sie unbeabsichtigten Anlauf
– Vergewissern Sie sich, dass der Schalter beim
Anschluss an das Stromnetz ausgeschaltet ist.
12. Verlängerungskabel im Freien
– Verwenden Sie im Freien nur dafür zugelassene und entsprechend gekennzeichnete
Verlängerungskabel.
13. Seien Sie stets aufmerksam
– Beobachten Sie Ihre Arbeit. Gehen Sie vernünftig vor. Verwenden Sie den Kompressor
nicht, wenn Sie unkonzentriert sind.
14. Kontrollieren Sie Ihren Kompressor auf
Beschädigungen
– Vor weiterem Gebrauch des Kompressors die
Schutzeinrichtungen oder leicht beschädigte
Teile sorgfältig auf ihre einwandfreie und
bestimmungsgemäße Funktion überprüfen.
Überprüfen Sie, ob die Funktion beweglicher
Teile in Ordnung ist, ob sie nicht klemmen oder
ob Teile beschädigt sind. Sämtliche Teile müssen richtig montiert sein um die Sicherheit
des Gerätes zu gewährleisten. Beschädigte
Schutzvorrichtungen und Teile müssen
sachgemäß durch eine Kundendienstwerkstatt
repariert oder ausgewechselt werden, soweit
nichts anderes in der Betriebsanleitung
angegeben ist. Beschädigte Schalter müssen
bei einer Kundendienstwerkstatt ersetzt werden.
Benutzen Sie keine Werkzeuge, bei denen sich
der Schalter nicht ein- und ausschalten lässt.
15. Achtung!
– Zu Ihrer eigenen Sicherheit, benutzen Sie nur
Zubehör und Zusatzgeräte, die in der
Bedienungsanleitung angegeben oder vom
Hersteller empfohlen oder angegeben werden.
Der Gebrauch anderer als der in der
Bedienungsanleitung oder im Katalog empfoh-
Anleitung_BT_AC_320_50_10_SPK7:_ 02.03.2011 10:21 Uhr Seite 6
Page 7

D
7
lenen Einsatzwerkzeuge oder Zubehöre kann
eine persönliche Verletzungsgefahr für Sie
bedeuten.
16. Reparaturen nur vom Elektrofachmann
– Reparaturen dürfen nur von einer
Elektrofachkraft ausgeführt werden, andernfalls
können Unfälle für den Betreiber entstehen.
17. Geräusch
– Bei Verwendung des Kompressors
Gehörschutz tragen.
18. Austausch der Anschlussleitung
– Wenn die Anschlussleitung beschädigt wird,
muss sie vom Hersteller oder einer Elektrofachkraft ersetzt werden, um Gefährdungen zu
vermeiden.
1.2 Sicherheitshinweise zum Arbeiten mit
Druckluft und Ausblaspistolen
Verdichter und Leitungen erreichen im Betrieb
hohe Temperaturen. Berührungen führen zu
Verbrennungen.
Die vom Verdichter angesaugten Gase oder
Dämpfe sind frei von Beimengungen zu halten,
die in dem Verdichter zu Bränden oder
Explosionen führen können.
Beim Lösen der Schlauchkupplung ist das
Kupplungsstück des Schlauches mit der Hand
festzuhalten, um Verletzungen durch den
zurückschnellenden Schlauch zu vermeiden.
Bei Arbeiten mit der Ausblaspistole Schutzbrille
tragen. Durch Fremdkörper und weggeblasene
Teile können leicht Verletzungen verursacht
werden.
Mit der Ausblaspistole keine Personen anblasen
oder Kleidung am Körper reinigen.
1.3 Sicherheitshinweise beim Farbspritzen
Keine Lacke oder Lösungsmittel mit einem
Flammpunkt von weniger als 55° C verarbeiten.
Lacke und Lösungsmittel nicht erwärmen.
Werden gesundheitsschädliche Flüssigkeiten
verarbeitet, sind zum Schutz Filtergeräte
(Gesichtsmasken) erforderlich. Beachten Sie
auch die von den Herstellern solcher Stoffe
gemachten Angaben über Schutzmaßnahmen.
Die auf den Umverpackungen der verarbeiteten
Materialien aufgebrachten Angaben und
Kennzeichnungen der Gefahrstoffverordnung
sind zu beachten. Gegebenenfalls sind
zusätzliche Schutzmaßnahmen zu treffen,
insbesondere geeignete Kleidung und Masken
zu tragen.
Während des Spritzvorgangs sowie im
Arbeitsraum darf nicht geraucht werden. Auch
Farbdämpfe sind leicht brennbar.
Feuerstellen, offenes Licht oder
funkenschlagende Maschinen dürfen nicht
vorhanden sein bzw. betrieben werden.
Speisen und Getränke nicht im Arbeitsraum
aufbewahren oder verzehren. Farbdämpfe sind
schädlich.
Der Arbeitsraum muss größer als 30 m
3
sein und
es muss ausreichender Luftwechsel beim
Spritzen und Trocknen gewährleistet sein. Nicht
gegen den Wind spritzen. Grundsätzlich beim
Verspritzen von brennbaren bzw. gefährlichen
Spritzgütern die Bestimmungen der örtlichen
Polizeibehörde beachten.
In Verbindung mit dem PVC-Druckschlauch
keine Medien wie Testbenzin, Butylalkohol und
Methylenchlorid verarbeiten (verminderte
Lebensdauer).
1.4 Betrieb von Druckbehältern
Wer einen Druckbehälter betreibt, hat diesen in
einem ordnungsgemäßen Zustand zu erhalten,
ordnungsgemäß zu betreiben, zu überwachen,
notwendige Instandhaltungs- und
Instandsetzungsarbeiten unverzüglich
vorzunehmen und die den Umständen nach
erforderlichen Sicherheitsmaßnahmen zu treffen.
Die Aufsichtsbehörde kann im Einzelfall
erforderliche Überwachungsmaßnahmen
anordnen.
Ein Druckbehälter darf nicht betrieben werden,
wenn er Mängel aufweist, durch die Beschäftigte
oder Dritte gefährdet werden.
Kontrollieren Sie den Druckbehälter vor jedem
Betrieb auf Rost und Beschädigungen. Der
Kompressor darf nicht mit einem beschädigten
oder rostigen Druckbehälter betrieben werden.
Stellen Sie Beschädigungen fest, so wenden sie
sich bitte an die Kundendienstwerkstatt.
Bewahren Sie die Sicherheitshinweise gut auf.
Anleitung_BT_AC_320_50_10_SPK7:_ 02.03.2011 10:21 Uhr Seite 7
Page 8

D
8
2. Gerätebeschreibung
1. Ansaug-Luftfilter
2. Druckbehälter
3. Rad
4. Standfuß
5. Schnellkupplung (geregelte Druckluft)
6. Manometer (eingestellter Druck kann abgelesen
werden)
7. Druckregler
8. Ein-/ Aus-Schalter
9. Transportgriff
10. Sicherheitsventil
11. Ablassschraube für Kondenswasser
12. Manometer (Kesseldruck kann abgelesen
werden)
13. Öl-Schauglas
14. Öl-Verschlußstopfen (Öl-Einfüllöffnung)
15. Öl-Ablassschraube
16. Schnellkupplung (ungeregelte Druckluft)
3. Anwendungbereich
Der Kompressor dient zum Erzeugen von Druckluft
für druckluftbetriebene Werkzeuge.
Das Gerät darf nur nach seiner Bestimmung
verwendet werden. Jede weitere darüber
hinausgehende Verwendung ist nicht
bestimmungsgemäß. Für daraus hervorgerufene
Schäden oder Verletzungen aller Art haftet der
Benutzer/Bediener und nicht der Hersteller.
Bitte beachten Sie, dass unsere Geräte
bestimmungsgemäß nicht für den gewerblichen,
handwerklichen oder industriellen Einsatz konstruiert
wurden. Wir übernehmen keine Gewährleistung,
wenn das Gerät in Gewerbe-, Handwerks- oder
Industriebetrieben sowie bei gleichzusetzenden
Tätigkeiten eingesetzt wird.
4. Technische Daten
Die Geräuschemissionswerte wurden entsprechend
EN ISO 3744 ermittelt.
Netzanschluss: 230 V ~ 50 Hz
Motorleistung kW: 2,2
Betriebart S1
Kompressor-Drehzahl min-1: 2850
Betriebsdruck bar: max. 10
Druckbehältervolumen (in Liter): 50
Theo. Ansaugleistung l/min.: 320
Schalleistungspegel LWAin dB: 96
Gerätegewicht in kg: 61
5. Hinweise zur Aufstellung
Überprüfen Sie das Gerät auf Transportschäden.
Etwaige Schäden sofort dem
Transportunternehmen melden, mit dem der
Kompressor angeliefert wurde.
Die Aufstellung des Kompressors sollte in der
Nähe des Verbrauchers erfolgen.
Lange Luftleitungen und lange Zuleitungen
(Verlängerungskabel) sind zu vermeiden.
Auf trockene und staubfreie Ansaugluft achten.
Den Kompressor nicht in feuchtem oder nassem
Raum aufstellen.
Der Kompressor darf nur in geeigneten Räumen
(gut belüftet, Umgebungstemperatur +5°C bis
40°C) betrieben werden. Im Raum dürfen sich
keine Stäube, keine Säuren, Dämpfe, explosive
oder entflammbare Gase befinden.
Der Kompressor ist geeignet für den Einsatz in
trockenen Räumen. In Bereichen, in denen mit
Spritzwasser gearbeitet wird, ist der Einsatz nicht
zulässig.
Vor Inbetriebnahme muss der Ölstand in der
Kompressorpumpe kontrolliert werden.
Anleitung_BT_AC_320_50_10_SPK7:_ 02.03.2011 10:21 Uhr Seite 8
Page 9

D
9
6. Montage und Inbetriebnahme
Achtung!
Vor der Inbetriebnahme das Gerät unbedingt
komplett montieren!
6.1. Montage der Räder (3)
Die beiliegenden Räder müssen entsprechend Bild 5
montiert werden.
6.2. Montage des Standfußes (4)
Der beiliegende Gummipuffer muss entsprechend
Bild 6 montiert werden.
6.3. Austausch des Öl-Verschlussstopfens (14)
Entfernen Sie mit einem Schraubenzieher den
Transportdeckel der Öleinfüllöffnung und setzen Sie
den beiliegenden Öl-Verschlussstopfen (14) in die
Öleinfüllöffnung ein. (Abb. 9)
6.4. Netzanschluß
Achten Sie vor Inbetriebnahme darauf, dass die
Netzspannung mit der Betriebsspannung lt.
Maschinenleistungsschild übereinstimmt. Lange
Zuleitungen, sowie Verlängerungen, Kabeltrommeln
usw. verursachen Spannungabfall und können den
Motoranlauf verhindern. Bei niedrigen Temperaturen
unter +5°C ist der Motoranlauf durch
Schwergängigkeit gefährdet.
6.5 Aus-/ Einschalter (8)
Durch Herausziehen des Knopfes (8) wird der
Kompressor eingeschaltet.
Zum Ausschalten des Kompressors muss der Knopf
(8) gedrückt werden. (Bild 2)
6.6 Druckeinstellung: (Abb. 1)
Mit dem Druckregler (7) kann der Druck am
Manometer (6) eingestellt werden.
Der eingestellte Druck kann an der
Schnellkupplung (5) entnommen werden.
Am Manometer (12) kann der Kesseldruck
abgelesen werden.
Der Kesseldruck kann an der Schnellkupplung
(16) entnommen werden.
6.7 Druckschaltereinstellung
Der Druckschalter ist werkseitig eingestellt.
Einschaltdruck ca. 7,5 bar
Ausschaltdruck ca. 10 bar
6.8 Montage des Transportgriffs (Abb. 11)
Schieben Sie den Transportgriff (9) in die
Halterungen am Behälter. Schrauben sie dann den
Transportgriff mit den Befestigungsschrauben (K)
fest.
6.9 Überlastschutz (Abb. 1)
Der Motor dieses Gerätes ist mit einem
Überlastschalter (P) gegen Überlastung geschützt.
Bei Überschreiten des Nennstroms schaltet der
Überlastschalter (P) das Gerät aus. Nach einer
kurzen Abkühlpause kann das Gerät durch Betätigen
des Überlastschalters (P) wieder eingeschaltet
werden.
7. Austausch der
Netzanschlussleitung
Wenn die Netzanschlussleitung dieses Gerätes
beschädigt wird, muss sie durch den Hersteller oder
seinen Kundendienst oder eine ähnlich qualifizierte
Person ersetzt werden, um Gefährdungen zu
vermeiden.
8. Reinigung, Wartung und Ersatzteil-
bestellung
Achtung!
Ziehen Sie vor allen Reinigungs- und
Wartungsarbeiten den Netzstecker.
Achtung!
Warten Sie bis der Verdichter vollständig
abgekühlt ist! Verbrennungsgefahr!
Achtung!
Vor allen Reinigungs- und Wartungsarbeiten ist
der Kessel drucklos zu machen.
8.1 Reinigung
Halten Sie Schutzvorrichtungen so staub- und
schmutzfrei wie möglich. Reiben Sie das Gerät
mit einem sauberen Tuch ab oder blasen Sie es
mit Druckluft bei niedrigem Druck aus.
Wir empfehlen, dass Sie das Gerät direkt nach
jeder Benutzung reinigen.
Reinigen Sie das Gerät regelmäßig mit einem
feuchten Tuch und etwas Schmierseife.
Verwenden Sie keine Reinigungs- oder
Lösungsmittel; diese könnten die Kunststoffteile
des Gerätes angreifen. Achten Sie darauf, dass
kein Wasser in das Geräteinnere gelangen kann.
Schlauch und Spritzwerkzeuge müssen vor
Reinigung vom Kompressor getrennt werden.
Der Kompressor darf nicht mit Wasser,
Lösungsmitteln o. Ä. gereinigt werden.
Anleitung_BT_AC_320_50_10_SPK7:_ 02.03.2011 10:21 Uhr Seite 9
Page 10

8.2 Kondenswasser
Achtung! Für dauerhafte Haltbarkeit des
Druckbehälters (2) ist nach jedem Betrieb das
Kondenswasser durch Öffnen der
Ablassschraube(11) abzulassen.
Kontrollieren Sie den Druckbehälter vor jedem
Betrieb auf Rost und Beschädigungen. Der
Kompressor darf nicht mit einem beschädigten oder
rostigen Druckbehälter betrieben werden. Stellen Sie
Beschädigungen fest, so wenden sie sich bitte an die
Kundendienstwerkstatt.
Achtung!
Das Kondenswasser aus dem Druckbehälter enthält Ölrückstände. Entsorgen Sie das
Kondenswasser umweltgerecht bei einer
entsprechenden Sammelstelle.
8.3 Sicherheitsventil (10)
Das Sicherheitsventil ist auf den höchstzulässigen
Druck des Druckbehälters eingestellt. Es ist nicht
zulässig, das Sicherheitsventil zu verstellen oder
dessen Plombe zu entfernen. Damit das
Sicherheitsventil im Bedarfsfall richtig funktioniert,
sollte dies von Zeit zu Zeit betätigt werden. Ziehen
Sie so stark am Ring, bis die Druckluft hörbar
abbläst. Anschließend lassen Sie den Ring wieder
los.
8.4 Ölstand regelmäßig kontrollieren (Abb. 10)
Kompressor auf eine ebene, gerade Fläche stellen.
Der Ölstand muss sich zwischen MAX und MIN des
Schauglases befinden.
Ölwechsel: Empfohlenes Öl: SAE 15W/40 oder
gleichwertiges.
Die Erstfüllung soll nach 100 Betriebsstunden
gewechselt werden. Danach ist alle 500 Betriebsstunden das Öl abzulassen und neues nachzufüllen.
8.5 Ölwechsel
Schalten Sie den Motor ab und ziehen Sie den
Netzstecker aus der Steckdose. Nachdem Sie den
eventuell vorhandenen Luftdruck abgelassen haben,
können Sie die Öl-Ablassschraube (15) an der
Verdichterpumpe herausschrauben. Damit das Öl
nicht unkontrolliert herausläuft, halten Sie eine kleine
Blechrinne darunter und fangen Sie das Öl in einem
Behälter auf. Falls das Öl nicht vollständig
herausläuft, empfehlen wir den Kompressor ein
wenig zu neigen.
Das Altöl entsorgen Sie bei einer
entsprechenden Annahmestelle für Altöl.
Ist das Öl herausgelaufen, setzen Sie die ÖlAblassschraube (15) wieder ein. Füllen Sie das neue
Öl in die Öleinfüllöffnung (14) ein, bis der Ölstand
das Soll erreicht hat. Anschließend setzen Sie den
Öl-Verschlussstopfen (14) wieder ein.
8.6 Reinigung des Ansaug-Luftfilters (Abb. 7, 8)
Der Ansaugfilter verhindert das Einsaugen von Staub
und Schmutz. Reinigen Sie diesen Filter mindestens
alle 300 Stunden. In Umgebung mit höherer Staubund Schmutzbelastung muss die Reinigung häufiger
durchgeführt werden.
Ein verstopfter Ansaugfilter vermindert die Leistung
des Kompressors erheblich. Der Kompressor darf nur
mit einem intakten Ansaug-Luftfilter betrieben
werden.
Entfernen Sie den Filter vom Kompressor, indem Sie
die beiden Schrauben (L) öffnen.
Entnehmen Sie den Filterschaum (N) aus den
Gehäusehälften des Filters (M, O). Klopfen Sie das
Filtermaterial aus und blasen Sie es bei niedrigem
Druck (ca. 3 bar) aus.
Der Zusammenbau und die Montage des AnsaugLuftfilters erfolgt in umgekehrter Reihenfolge.
8.7 Lagerung
Achtung!
Ziehen Sie den Netzstecker, entlüften Sie das Gerät
und alle angeschlossenen Druckluftwerkzeuge.
Stellen Sie den Kompressor so ab, dass dieser nicht
von Unbefugten in Betrieb genommen werden kann.
Achtung!
Den Kompressor nur in trockener und für
Unbefugte unzugänglicher Umgebung
aufbewahren. Nicht kippen, nur stehend
aufbewahren!
8.8 Ersatzteilbestellung
Bei der Ersatzteilbestellung sollten folgende
Angaben gemacht werden;
Typ des Gerätes
Artikelnummer des Gerätes
Ident-Nummer des Gerätes
Ersatzteilnummer des erforderlichen Ersatzteils
Aktuelle Preise und Infos finden Sie unter
www.isc-gmbh.info
D
10
Anleitung_BT_AC_320_50_10_SPK7:_ 02.03.2011 10:21 Uhr Seite 10
Page 11

D
11
9. Entsorgung und Wiederverwertung
Das Gerät befindet sich in einer Verpackung um
Transportschäden zu verhindern. Diese Verpackung
ist Rohstoff und ist somit wieder verwendbar oder
kann dem Rohstoffkreislauf zurückgeführt werden.
Der Kompressor und dessen Zubehör bestehen aus
verschiedenen Materialien, wie z.B. Metall und
Kunststoffe. Führen Sie defekte Bauteile der
Sondermüllentsorgung zu. Fragen Sie im
Fachgeschäft oder in der Gemeindeverwaltung nach!
Anleitung_BT_AC_320_50_10_SPK7:_ 02.03.2011 10:21 Uhr Seite 11
Page 12

D
12
10. Mögliche Ausfallursachen
Problem Ursache Lösung
Kompressor läuft nicht 1. Netzspannung nicht vorhanden 1. Kabel, Netzstecker, Sicherung
und Steckdose überprüfen.
2. Netzspannung zu niedrig 2. Zu lange Verlängerungskabel
vermeiden. Verlängerungskabel mit ausreichendem
Aderquerschnitt verwenden.
3. Außentemperatur zu niedrig 3. Nicht unter +5° C Außentemperatur betreiben.
4. Motor überhitzt 4. Motor abkühlen lassen ggf.
Ursache der Überhitzung beseitigen.
Kompressor läuft, jedoch
kein Druck
1. Rückschlagventil undicht 1.Rückschlagventil austauschen.
2. Dichtungen kaputt. 2. Dichtungen überprüfen, kaputte
Dichtungen bei einer
Fachwerkstatt ersetzen lassen.
3. Ablass-Schraube für Kondens-
wasser (11) undicht.
3. Schraube per Hand nachziehen.
Dichtung auf der Schraube
überprüfen, ggf. ersetzen.
Kompressor läuft, Druck
wird am Manometer angezeigt,
jedoch Werkzeuge laufen nicht.
1. Schlauchverbindungen undicht. 1. Druckluftschlauch und Werkzeuge überprüfen, ggf. austauschen.
2. Schnellkupplung undicht. 2. Schnellkupplung überprüfen,
ggf. ersetzen.
3. Zu wenig Druck am Druckregler
eingestellt.
3. Druckregler weiter aufdrehen.
Anleitung_BT_AC_320_50_10_SPK7:_ 02.03.2011 10:21 Uhr Seite 12
Page 13

GB
13
“Caution - Read the operating instructions to reduce the risk of inquiry”
Wear ear-muffs.
The impact of noise can cause damage to hearing.
Beware of electrical voltage
Beware of hot parts
Anleitung_BT_AC_320_50_10_SPK7:_ 02.03.2011 10:21 Uhr Seite 13
Page 14

Important!
When using equipment, a few safety precautions
must be observed to avoid injuries and damage.
Please read the complete operating manual with due
care. Keep this manual in a safe place, so that the
information is available at all times. If you give the
equipment to any other person, give them these
operating instructions as well.
We accept no liability for damage or accidents which
arise due to non-observance of these instructions
and the safety information.
1. Safety instructions
1.1 General safety instructions
Important! The following basic safety
precautions have to be taken when using this
compressor in order to guard against the risk of
electric shock, injury and fire. Read and note
these instructions before you use the
compressor.
1. Keep your work area tidy
- There is a higher risk of accident in an untidy
work area.
2. Make allowance for environmental conditions
- Never leave the compressor in the rain. Never
use the compressor in damp or wet conditions.
Provide good lighting. Never use the compressor
near combustible liquids or gases.
3. Protect yourself from electric shocks
- Avoid physical contact with earthed parts, e.g.
pipes, radiators, cookers, refrigerators.
4. Keep children away!
- Do not allow other persons to touch the
compressor or its cable. Keep them out of your
work area.
5. Keep your compressor in a safe place
- When the compressor is not being used it
should be kept in a dry, locked room out of the
reach of the children.
6. Do not overload your compressor
- It is better and safer to work within the quoted
power range.
7. Wear suitable work clothes
- Do not wear loose garments or jewellery. There
is a risk of them catching on moving parts.
Rubber gloves and non-slip shoes are
recommended when working outdoors. Put on a
hair net if you have long hair.
8. Never use the cable for any purpose other
than that intended
Never tow the compressor by its cable and never
pull the power plug out of the socket by the
cable. Protect the cable from heat, oil and sharp
edges.
9. Look after your compressor
- Keep your compressor clean so that it works
well and reliably. Follow the maintenance
instructions. Check the power plug and
cable regularly and have them replaced by a
specialist if you discover any damage. Check
any extension cables regularly and replace if
damaged.
10. Pull out the power plug
- Whenever the compressor is not being used
and before carrying out any maintenance work.
11. Avoid accidental starts
- Make sure that the switch is turned to OFF
before you connect the compressor to the power
supply.
12. Extension cables for outdoor use
- Use extension cables outdoors only if they are
approved and marked accordingly.
13. Concentrate at all times
- Watch your work. Be sensible. Do not use the
compressor if your mind is not on your work.
14. Examine your compressor for signs of
damage
- Before you use the compressor again, carefully
check its safety devices or any slightly damaged
parts to make sure that they are working properly
and as intended. Check moving parts to make
sure that they are in good working order and are
not jammed or damaged. All parts have to be
properly fitted in order to be sure of meeting all
the machine’s requirements. Damaged safety
devices and parts have to be repaired or
replaced by a customer service workshop unless
otherwise stated in this manual. Damaged
switches have to be replaced by a customer
service workshop. Do not use any tools with a
switch that cannot be turned on and off.
15. Important!
- For your own safety, use only such
accessories and auxiliary equipment as are listed
in this manual or which are recommended and
specified by the manufacturer. There is a high
risk of suffering a serious accident if you use
tools or accessories which are not listed in this
manual or in the catalogue of recommended
tools and accessories.
16. Have an electrician carry out repairs
- Repairs are to be carried out only by a qualified
electrician. If not, the user may suffer serious
accidents.
17. Noise
Use ear muffs when you use the compressor.
18. Replacing the power cable
To prevent injury, damaged power cables may
GB
14
Anleitung_BT_AC_320_50_10_SPK7:_ 02.03.2011 10:21 Uhr Seite 14
Page 15

only be replaced by the manufacturer or a
qualified electrician.
1.2 Safety instructions for working with
copressed air and blasting guns
Compressors and lines reach high temperatures
during operation. Avoid contact! Risk of burns!
Gases or vapours drawn in by the compressor
have to be kept free of constituents that may
cause fire or explosions inside the compressor.
When you disconnect the hose coupling, hold the
coupling element in your hand to prevent injury
from the whiplashing hose.
Wear goggles when working with the blow-out
gun. Injuries may easily result from foreign
bodies and blasted parts.
Never point the blow-out gun at other persons
and never use it to clean clothes that are still
being worn.
1.3.Safety information for paint spraying
Never process paints or solvents with a flash
point below 55°C.
Never heat paints or solvents.
It is imperative to use filtering equipment (face
masks) when processing harmful liquids. Note
also the information concerning safety
precautions published by the manufacturers of
these liquids.
Smoking is prohibited during the spraying
operation and in the work room. Paint vapours
are highly flammable.
Make sure there are no open fires or open lights
in the work room. Sparking machines are not to
be used.
Do not keep or consume food and drink in the
work room. Paint vapours are harmful.
The details and designations of the Ordinance on
Hazardous Substances, which are displayed on
the outer packaging of the processed material,
must be observed. Additional protective
measures are to be undertaken if necessary,
particularly the wearing of suitable clothing and
masks.
The work room has to be bigger than 30 m
3
and
have sufficient ventilation for spraying and
drying. Never spray into the wind.
It is always imperative to observe the regulations
of your local police authorities when spraying
combustible or hazardous substances.
Never process media such as white petroleum
spirit, butyl alcohol and methylene chloride with
the PVC pressure hose (reduced life span).
1.4 Operating pressure vessels
An operator of a pressure vessel is required to
keep the pressure vessel in good working order,
to operate it properly, to supervise its use,
to carry out essential maintenance and repair
work immediately, and to introduce essential
safety measures according to requirements.
The supervisory authorities may order essential
safeguards from case to case.
A pressure vessel may not be operated if it has
any defects which constitute a danger to
employees or third parties.
Check the pressure vessel for signs of rust and
damage each time before using. Do not use the
compressor with a damaged or rusty pressure
vessel. If you discover any damage, please
contact the customer service workshop.
Keep these safety instructions in a safe place.
2. Layout
1. Intake air filter
2. Pressure vessel
3. Wheel
4. Supporting foot
5. Quick-lock coupling (regulated compressed air)
6. Pressure gauge
(for reading the preset tank pressure)
7. Pressure regulator
8. ON/OFF switch
9. Transportation handle
10. Safety valve
11. Drain screw for condensation water
12. Pressure gauge (for reading the tank pressure)
13. Oil level window
14. Oil sealing plug (oil filler opening)
15. Oil drainage screw
16. Quick-lock coupling (unregulated compressed
air)
3. Scope of use
The compressor is designed for generating
compressed air for tools operated by compressed
air.
Please note that our equipment has not been
designed for use in commercial, trade or industrial
applications. Our warranty will be voided if the
machine is used in commercial, trade or industrial
businesses or for equivalent purposes.
GB
15
Anleitung_BT_AC_320_50_10_SPK7:_ 02.03.2011 10:21 Uhr Seite 15
Page 16

The machine is to be used only for its prescribed
purpose. Any other use is deemed to be a case of
misuse. The user / operator and not the
manufacturer will be liable for any damage or injuries
of any kind caused as a result of this.
4. Technical data
The noise emission values were measured in
accordance with EN ISO 3744.
Power supply: 230 ~ 50 Hz
Motor rating in kW: 2.2
Operating mode S1
Compressor speed in rpm: 2850
Operating pressure in bar: 10
Pressure vessel volume in litre: 50
Theoretical intake rate in l/min.: 320
Sound power level LWAin dB: 96
Machine weight in kg: 61
5. Points to note when setting up the
compressor
Examine the machine for signs of transit
damage. Report any damage immediately to the
company which delivered the compressor.
The compressor should be set up near the
working consumer.
Avoid long air lines and long supply lines
(extensions).
Make sure the intake air is dry and dust-free.
Do not set up the compressor in damp or wet
rooms.
The compressor may only be used in suitable
rooms (with good ventilation and an ambient
temperature from +5°C to +40°C). There must be
no dust, acids, vapors, explosive gases or
inflammable gases in the room.
The compressor is designed to be used in dry
rooms. It is prohibited to use the compressor in
areas where work is conducted with sprayed
water.
The oil level in the compressor pump has to be
checked before putting the equipment into
operation.
6. Assembly and starting
Important!
You must fully assemble the appliance before
using it for the first time.
6.1 Fitting the wheels (3)
Fit the supplied wheels as shown in Fig. 5.
6.2 Fitting the supporting foot (4)
Fit the supplied rubber stopper as shown in Fig. 6.
6.3 Replacing the oil sealing plug (14)
Remove the transportation cover from the oil filler
opening with a screwdriver and insert the supplied oil
sealing plug (14) into the oil filler opening (Fig. 9).
6.4 Voltage
Before you use the machine, make sure that the
mains voltage complies with the specifications on the
rating plate. Long supply cables, extensions, cable
reels etc. cause a drop in voltage and can impede
motor start-up. In the case of low temperatures
below +5°C, motor start-up is jeopardized as a result
of stiffness.
6.5 On/Off switch (8)
To switch on the compressor, pull out the knob (8).
To switch off the compressor, press the knob (8) in
again. (Fig. 2)
6.6 Adjusting the pressure: (Fig. 1)
You can adjust the pressure on the pressure
gauge (6) using the pressure regulator (7).
The set pressure can be taken from the quick-
lock coupling (5).
The tank pressure can be read on the pressure
gauge (12).
The tank pressure can be taken from the quick-
lock coupling (16).
6.7 Setting the pressure switch
The pressure switch is set at the factory.
Switch-on pressure 7,5 bar
Switch-off pressure 10 bar
6.8 Fitting the transport handle (Fig. 11)
Push the transport handle (9) into the mountings on
the tank. Then screw the transport handle tight with
the fastening screws (K).
GB
16
Anleitung_BT_AC_320_50_10_SPK7:_ 02.03.2011 10:21 Uhr Seite 16
Page 17

6.9 Overload cut-out (Fig. 1)
The motor of this equipment is protected against
overload by an overload switch (P). If the rated
current is exceeded, the overload switch (P) shuts
down the equipment. After a short cooling down
period, the equipment can be reactivated by pressing
the overload switch (P).
7. Replacing the power cable
If the power cable for this equipment is damaged, it
must be replaced by the manufacturer or its aftersales service or similarly trained personnel to avoid
danger.
8. Cleaning and maintenance
Important!
Pull the power plug before doing any cleaning
and maintenance work on the appliance.
Important!
Wait until the compressor has completely cooled
down. Risk of burns!
Important!
Always depressurize the tank before carrying out
any cleaning and maintenance work.
8.1 Cleaning
Keep the safety devices free of dirt and dust as
far as possible. Wipe the equipment with a clean
cloth or blow it with compressed air at low
pressure.
We recommend that you clean the appliance
immediately after you use it.
Clean the appliance regularly with a damp cloth
and some soft soap. Do not use cleaning agents
or solvents; these may be aggressive to the
plastic parts in the appliance. Ensure that no
water can get into the interior of the appliance.
You must disconnect the hose and any spraying
tools from the compressor before cleaning. Do
not clean the compressor with water, solvents or
the like.
8.2 Condensation water
Important. To ensure a long service life of the
pressure vessel (2), drain off the condensed water by
opening the drain valve (11) each time after using.
Check the pressure vessel for signs of rust and
damage each time before using. Do not use the
compressor with a damaged or rusty pressure vessel.
If you discover any damage, please contact the
customer service workshop.
Important! The condensation water from the
pressure vessel will contain residual oil.
Dispose of the condensation water in an
environmentally compatible manner at the
appropriate collection point.
8.3 Safety valve (10)
The safety valve has been set for the highest
permitted pressure of the pressure vessel. It is
prohibited to adjust the safety valve or remove its
seal. Actuate the safety valve from time to time to
ensure that it works when required. Pull the ring with
sufficient force until you can hear the compressed air
being released. Then release the ring again.
8.4 Check the oil level at regular intervals (Fig.10)
Place the compressor on a level and straight surface.
The oil level must be between the two marks MAX
and MIN on the oil oil level window.
Changing the oil: Recommended hydraulic oil: SAE
15W/40 or an alternative of the same quality.
It should be refilled for the first time after 100 hours
of operation. Thereafter the oil should be drained and
refilled after every 500 hours in service.
8.5 Changing the oil
Switch off the engine and pull the mains plug out of
the socket. After releasing any air pressure you can
unscrew the oil drainage screw (15) from the
compressor pump. To prevent the oil from running
out in an uncontrolled manner, hold a small metal
chute under the opening and collect the oil in a
vessel. If the oil does not drain out completely, we
recommend tilting the compressor slightly.
Dispose of the old oil at a drop-off point for old
oil.
When the oil has drained out, re-fit the oil drainage
screw (15). Fill new oil through the oil filler opening
(14) until it comes up to the required level. Then
replace the oil sealing plug (14).
GB
17
Anleitung_BT_AC_320_50_10_SPK7:_ 02.03.2011 10:21 Uhr Seite 17
Page 18

8.6 Cleaning the intake air filter (Fig. 7, 8)
The intake filter prevents dust and dirt being drawn in.
Clean this filter at least every 300 hours. In
environments with increased dust and dirt pollution
the cleaning process must be carried out more
frequently.
A clogged intake filter will decrease the compressor’s
performance dramatically. Only use the compressor
with an intact intake air filter.
Remove the filter from the compressor by unscrewing
the two screws (L).
Remove the filter foam (N) from the two housing parts
of the filter (M, O). Clean the filter material by tapping
and blowing it at low pressure (approx. 3 bar).
Assemble and fit the intake air filter in reverse.
8.7 Storage
Important!
Pull the mains plug out of the socket and ventilate
the appliance and all connected pneumatic tools.
Switch off the compressor and make sure that it is
secured in such a way that it cannot be started up
again by any unauthorized person.
Important!
Store the compressor only in a dry location
which is not accessible to unauthorized persons.
Always store upright, never tilted!
8.8 Ordering replacement parts
Please quote the following data when ordering
replacement parts:
Type of machine
Article number of the machine
Identification number of the machine
Replacement part number of the part required
For our latest prices and information please go to
www.isc-gmbh.info
9. Disposal and recycling
The unit is supplied in packaging to prevent its being
damaged in transit. This packaging is raw material
and can therefore be reused or can be returned to
the raw material system.
The unit and its accessories are made of various
types of material, such as metal and plastic.
Defective components must be disposed of as
special waste. Ask your dealer or your local council.
GB
18
Anleitung_BT_AC_320_50_10_SPK7:_ 02.03.2011 10:21 Uhr Seite 18
Page 19

GB
19
10. Possible causes of failure
Problem Cause Solution
The compressor does not start 1. No supply voltage 1. Check the supply voltage, the
power plug and the
socket-outlet.
2. Insufficient supply voltage 2. Make sure that the extension
cable is not too long. Use an
extension cable with large
enough wires.
3. Outside temperature is too low 3. Never operate with an outside
temperature of below +5°C.
4. Motor is overheated 4. Allow the motor to cool down. If
necessary, remedy the cause of
the overheating.
The compressor starts but there is
no pressure
1. Leak in the non-return valve 1. Replace the non-return valve
2. The seals are damaged. 2. Check the seals and have any
damaged seals replaced by a
service center
3. The drainage screw for
condensation water (11) leaks.
3. Tighten the screw by hand.
Check the seal on the screw
and replace if necessary.
The compressor starts, pressure is
shown on the pressure gauge, but
the tools do not start.
1. Loose hose connections 1. Check the compressed air hose
and tools and replace if
necessary.
2. Leak in a quick-lock coupling 2. Check the quick-lock coupling
and replace if necessary.
3. Insufficient pressure set on the
pressure regulator.
3. Open the pressure regulator
further.
Anleitung_BT_AC_320_50_10_SPK7:_ 02.03.2011 10:21 Uhr Seite 19
Page 20

I
20
Fate attenzione alla tensione elettrica
Fate attenzione alle parti molto calde
“Avvertimento – Per ridurre il rischio di lesioni leggete le istruzioni per l’uso”
Portate cuffie antirumore.
L’effetto del rumore può causare la perdita dell’udito.
Anleitung_BT_AC_320_50_10_SPK7:_ 02.03.2011 10:21 Uhr Seite 20
Page 21

Attenzione!
Nell’usare gli apparecchi si devono rispettare diverse
avvertenze di sicurezza per evitare lesioni e danni.
Quindi leggete attentamente queste istruzioni per
l’uso. Conservatele bene per avere a disposizione le
informazioni in qualsiasi momento. Se date
l’apparecchio ad altre persone consegnate loro
queste istruzioni per l’uso insieme all’apparecchio!
Non ci assumiamo alcuna responsabilità per incidenti
o danni causati dal mancato rispetto di queste
istruzioni e delle avvertenze di sicurezza.
1. Indicazioni per la sicurezza
1.1 Avvertenze generali sulla sicurezza
Attenzione! Usando questo compressore si
devono osservare le seguenti misure
fondamentali sulla sicurezza per la protezione
contro scosse elettriche, pericolo di lesioni e
d’incendio. Leggete ed osservate queste
istruzioni, avanti di adoperare l’apparecchio.
1. Tenete in ordine i Vostri indumenti da lavoro
- Dal disordine sul posto di lavoro ne consegue
un pericolo d’infortunio.
2. Tenete conto dell’influenza ambientale
- Non esponete il compressore alla pioggia. Non
adoperate l’apparecchio in ambiente umido o
bagnato. Operate con adeguata
illuminazione. Non adoperate il compressore
vicino a liquidi infiammabili o gas.
3. Proteggete Voi stesso dalle scosse elettriche
- Evitate di toccare col corpo parti con messa a
terra, ad es. tubi, radiatori, fornelli, frigoriferi.
4. Tenete lontano i bambini!
- Non consentite ad altre persone di toccare il
compressore o il cavo, teneteli lontano dal posto
di lavoro.
5. Conservate il compressore in luogo sicuro
- Se non adoperate il compressore, conservatelo
in una stanza chiusa ed irraggiungibile per i
bambini.
6. Non sovraccaricate il compressore
- Lavorate meglio e più sicuramente nell’ambito
di potenza specificato.
7. Portate indumenti da lavoro adeguati
- non portate indumenti larghi o gioielli. Potreste
venire afferrato da parti mobili.
Lavorando all’aperto si consigliano guanti di
gomma e calzature con suole antiscivolo. Se
avete i capelli lunghi, copriteli con una rete
per capelli.
8. Non usate il cavo per uno scopo diverso da
quello previsto
- Non tirate il compressore prendendolo per il
cavo, che non userete per staccare la
spina dalla presa di rete. Proteggete il cavo da
forte calore, olio e spigoli taglienti.
9. Curate con diligenza il Vostro compressore
- Tenete pulito il Vostro compressore, per cosi
lavorare bene e in modo sicuro. Rispettate le
prescrizioni per la manutenzione. Controllate
regolarmente la spina ed il cavo e, se
danneggiati, fateli mettere a posto da uno
specialista di fiducia. Controllare regolarmente i
cavi di prolunga e sostituite quelli danneggiati.
10. Staccate la spina dalla presa di corrente
- Non utilizzandolo, prima della manutenzione.
11. Evitate avviamenti involontari
- Collegandolo alla tensione di rete, accertateVi
che l’interruttore sia spento.
12. Cavi di prolunga all’aperto
- Utilizzate all’aperto solamente relativi cavi di
prolunga con impiego autorizzato ed
adeguatamente contrassegnati.
13. State sempre all’erta
- Tenete d’occhio il Vostro lavoro. Operate
razionalmente. Non utilizzate il compressore con
mente concentrata altrove.
14. Verificate che il Vostro compressore non
presenti danni
- Prima di ulteriormente adoperare il
compressore, verificate accuratamente che i
dispositivi di sicurezza o le parti lievemente
danneggiate funzionino perfettamente e
regolamentarmente. Verificate che le parti mobili
funzionino a dovere, che non s’impiglino e che
non vi siano componenti danneggiati. Tutti i
componenti devono essere esattamente
installati, per garantire tutte le condizioni
operative dell’apparecchio.I dispositivi di
sicurezza ed i componenti danneggiati devono
venire riparati o ricambiati in un’officina di
servizio clientela, salvo altre disposizioni
espresse nelle istruzioni per l’uso. Gli interruttori
danneggiati devono venire ricambiati in
un’officina di servizio clientela.
Non adoperate attrezzi il di cui interruttore non si
lascia né accendere e né spegnere.
15. Attenzione!
Per ragioni della Vostra sicurezza, adoperate
solamente attrezzi addizionali ed accessori che
sono specificati nelle modalità d’impiego o
consigliati oppure specificati dal produttore
stesso. L’uso di attrezzi necessari o di accessori,
non specificati nelle istruzioni per l’uso o nel
catalogo, possono rappresentare un pericolo
personale di lesione per Voi stesso.
I
21
Anleitung_BT_AC_320_50_10_SPK7:_ 02.03.2011 10:21 Uhr Seite 21
Page 22

16. Riparazioni soltanto da un elettricista
specializzato
- Fare effettuare eventuali riparazioni soltanto da
un elettricista specializzato, altrimenti l’operatore
potrebbe incorrere in gravi infortuni.
17. Rumore
Quando utilizzate il compressore indossate cuffie
antirumore.
18. Sostituzione del cavo di alimentazione
Se il cavo di alimentazione viene danneggiato,
deve essere sostituito dal produttore stesso o da
un elettricista specializzato così da evitare
incidenti.
1.2 Avvertenze di sicurezza per lavori da
eseguire con aria compressa e pistole di
soffiaggio
Organo compressore e condutture raggiungono
alte temperature durante il funzionamento.
Toccandoli ci si potrebbe scottare.
I gas o i vapori assorbiti dall’organo compressore
devono essere senza sostanze aggiuntive, le
quali potrebbero causare incendi ed esplosioni
nell’organo compressore.
Staccando l’organo di raccordo del tubo, lo si
dovrà tenere fermo con la mano, per cosi evitare
ferite causate dal tubo rapidamente
retrocedente.
Lavorando con la pistola soffiaaria compressa,
portare gli occhiali protettivi. I corpi estranei e le
particele soffiate via possono facilmente causare
delle ferite.
Non puntare la pistola soffiaaria compressa
contro persone o indumenti portati sul corpo.
1.3 Avvertenze di sicurezza per quando si
spruzza colore
Non lavorate con vernici o solventi con punto
d’infiam-mabilità inferiore ai 55° C.
Non si devono riscaldare le vernici o i solventi.
Lavorando liquidi nocivi alla salute, si dovrà
utilizzare dispositivi filtranti protettivi (maschere
per il viso). Osservate anche le dichiarazioni fatte
dal produttore di queste sostanze riguardanti le
misure di sicurezza.
Durante il procedimento di spruzzatura, nonché
sul luogo di lavoro, non si deve fumare.
Anche i vapori emessi dai colori sono facilmente
infiammabili.
Focolari, luce aperta o macchine produttrici di
scintille non devono trovarsi oppure operare sul
luogo.
Non custodire o consumare nella stanza da
lavoro cibi o bevande. I vapori emessi dai
colori sono nocivi.
Si devono osservare le indicazioni ed i codici
dell'Ordinamento sulle sostanze pericolose
applicati sulle confezioni dei materiali lavorati.
Eventualmente si devono prendere ulteriori
misure di protezione, in particolare l'uso di
indumenti e maschere adatti.
Il volume della stanza da lavoro deve superare i
30 m
3
, e si deve far si che lo cambio dell’aria sia
garantito durante la spruzzatura o
l’asciugamento. Non spruzzare contro vento.
Spruzzando delle sostanze infiammabili oppure
pericolose, osservare le disposizioni prefissate
dalle autorità di polizia locale.
Utilizzandolo col tubo a pressione in PVC non
operare con benzina di prova, alcole
butilico e cloruro metilico (riduzione della
longevità).
1.4 Esercizio di contenitori a pressione
Chi si serve di un recipiente a pressione, dovrà
tenere lo stesso in stato regolamentare,
servirsene e sorvegliarlo regolamentarmente e a
fare tempestivamente eseguire i lavori di
manutenzione necessari, nonché a prendere le
misure di sicurezza rispettivamente occorrenti.
L’ispettorato può singolarmente ordinare le
necessarie misure di sorveglianza.
Non ci si deve servire di un recipiente in
pressione evidenziante dei difetti, i quali
potrebbero causare danni agli operatori o a terzi.
Prima di ogni utilizzo controllate che il recipiente a
pressione non presenti danni e ruggine. Il
compressore non deve venire usato con un
recipiente a pressione danneggiato o arrugginito.
Se notate dei danni, rivolgetevi all’officina del
servizio assistenza clienti.
Conservate bene le Avvertenze sulla sicurezza.
I
22
Anleitung_BT_AC_320_50_10_SPK7:_ 02.03.2011 10:21 Uhr Seite 22
Page 23

2. Descrizione dell’apparecchio
1. Filtro dell’aria di aspirazione
2. Serbatoio a pressione
3. Ruota
4. Base di appoggio
5. Accoppiamento rapido (aria compressa regolata)
6. Manometro (indica la pressione impostata)
7. egolatore di pressione
8. Interruttore ON/OFF
9. Impugnatura di trasporto
10. Valvola di sicurezza
11. Vite di scarico dell’acqua di condensa
12. Manometro (indica la pressione del serbatoio)
13. Indicatore di livello a vista dell’olio
14. Tappo di chiusura dell’olio (apertura di
riempimento olio)
15. Vite di scarico dell’olio
16. Accoppiamento rapido (aria compressa non
regolata)
3. Settore d’impiego
Il compressore serve per produrre aria compressa
per utensili azionati con aria compressa.
Tenete presente che i nostri apparecchi non sono
stati costruiti per l’impiego professionale, artigianale o
industriale. Non ci assumiamo alcuna garanzia
quando l’apparecchio viene usato in imprese
commerciali, artigianali o industriali, o in attività
equivalenti.
L’apparecchio deve venire usato solamente per lo
scopo a cui è destinato. Ogni altro tipo di uso che
esuli da quello previsto non è un uso conforme.
L’utilizzatore/l’operatore, e non il costruttore, è
responsabile dei danni e delle lesioni di ogni tipo che
ne risultino.
4. Dati tecnici
I valori di emissione dei rumori sono stati rilevati
secondo la norma EN ISO 3744.
Collegamento rete elettrica: 230 V ~ 50 Hz
Potenza del motore kW: 2,2
Modalità operativa S1
Numero giri del compressore/min-1: 2850
Pressione al funzionamento in bar: 10
Volume del recipiente a pressione (in litri): 50
Potenza teorica d’assorbimento l/min: 320
Livello potenza acustica LWAin dB: 96
Peso dell’apparecchio in kg: 61
5. Avvertenze sul collocamento
Verificate che l’apparecchio non presenti danni di
trasporto. Comunicare tempestivamente gli
eventuali danni rilevati all’impresa trasporti, che
ha provveduto alla consegna del compressore.
Il collocamento del compressore dovrebbe
avvenire vicino al consumatore.
Sono da evitare lunghe condutture dell’aria e
lunghe condutture di raccordo (cavi di prolunga).
Verificate che l’aria assorbita sia asciutta e
senza polvere.
Non collocare il compressore in una stanza
umida o bagnata.
Il compressore deve venire usato soltanto in
luoghi adatti (ben aerati, temperatura ambiente
+5°C - +40°C). Il luogo deve essere privo di
polvere, acidi, vapori, gas esplosivi o
infiammabili.
Il compressore è adatto per l’uso in luoghi
asciutti. L’uso non è concesso nelle zone dove si
lavora con spruzzi d’acqua.
Prima della messa in esercizio si deve
controllare il livello dell’olio nella pompa del
compressore.
I
23
Anleitung_BT_AC_320_50_10_SPK7:_ 02.03.2011 10:21 Uhr Seite 23
Page 24

6. Montaggio e messa in esercizio
Attenzione!
Prima della messa in esercizio montate
assolutamente l’apparecchio in modo completo!
6.1 Montaggio delle ruote (Fig. 3)
Le ruote accluse devono venire montate secondo la
figura 5.
6.2 Montaggio della base di appoggio (4)
Gli spessori di gomma allegati devono venire montati
secondo la Fig. 6
6.3 Sostituzione del tappo di chiusura dell’olio
(14)
Con un cacciavite togliete il coperchio dell’apertura di
riempimento dell’olio e mettete il tappo di chiusura
dell’olio (14) in tale apertura (Fig. 9).
6.4 Allacciamento alla rete
Prima della messa in esercizio fate attenzione che la
tensione di rete corrisponda a quella di esercizio
indicata sulla targhetta delle caratteristiche
dell’apparecchio. I cavi lunghi di alimentazione
nonché prolunghe, avvolgicavi, ecc. causano un calo
di tensione e possono impedire l’avvio del motore. In
caso di basse temperature inferiori a +5°C l’avvio del
motore può essere più difficile.
6.5 Interruttore ON/OFF (8)
Il compressore viene inserito estraendo il pulsante
(8).
Per disinserire il compressore occorre premere il
pulsante (8). (Fig. 2)
6.6 Impostazione della pressione (Fig. 1)
Con il regolatore della pressione (7) si può
impostare la pressione sul manometro (6).
La pressione impostata può essere prelevata
sull’accoppiamento rapido (5).
Sul manometro (12) si può vedere la pressione
del serbatoio.
La pressione del serbatoio può essere rilevata
sull’accoppiamento rapido (16).
6.7 Regolazione del pulsante
Il pulsante è stato regolato nello stabilimento.
Pressione d’accensione 7,5 bar
Pressione di spegnimento 10 bar
6.8 Montaggio dell’impugnatura di trasporto
(Fig. 11)
Spingete l’impugnatura di trasporto (9) nei supporti
sul contenitore. Serrate quindi l’impugnatura di
trasporto con le viti di fissaggio (K).
6.9 Protezione da sovraccarico (Fig. 1)
Il motore di questo apparecchio è protetto con un
interruttore di protezione da sovraccarico (P). In caso
di superamento della corrente nominale l’interruttore
di protezione da sovraccarico (P) disinserisce
l’apparecchio. Dopo una breve pausa di
raffreddamento l’apparecchio può essere
nuovamente inserito azionando l’interruttore di
protezione da sovraccarico (P).
7. Sostituzione del cavo di
alimentazione
Se il cavo di alimentazione di questo apparecchio
viene danneggiato deve essere sostituito dal
produttore, dal suo servizio di assistenza clienti o da
una persona al pari qualificata al fine di evitare
pericoli.
8. Pulizia e manutenzione
Attenzione!
Prima di qualsiasi lavoro di pulizia e di
manutenzione staccate la spina dalla presa di
corrente.
Attenzione!
Attendete fino a quando il compressore si sia
completamente raffreddato! Pericolo di ustioni!
Attenzione!
Prima di ogni lavoro di pulizia e manutenzione si
deve eliminare la pressione del serbatoio!
8.1 Pulizia
Tenete i dispositivi di protezione il più possibile
liberi da polvere e sporco. Strofinate
l’apparecchio con un panno pulito o soffiatelo
con l’aria compressa a pressione bassa.
Consigliamo di pulire l’apparecchio subito dopo
averlo usato.
Pulite l’apparecchio regolarmente con un panno
asciutto ed un po’ di sapone. Non usate
detergenti o solventi perché questi ultimi
potrebbero danneggiare le parti in plastica
dell’apparecchio. Fate attenzione che non possa
penetrare dell’acqua all’interno dell’apparecchio.
I
24
Anleitung_BT_AC_320_50_10_SPK7:_ 02.03.2011 10:21 Uhr Seite 24
Page 25

Il tubo e gli strumenti di spruzzo devono essere
separati dal compressore prima della pulizia. Il
compressore non deve venire pulito con acqua,
solventi ecc.
8.2 Acqua di condensa
Attenzione! Per una prolungata durata del recipiente
a pressione (2), dopo ogni utilizzo, è necessario
scaricare l’acqua di condensa aprendo la vite di
scarico (11).
Prima di ogni utilizzo controllate che il recipiente a
pressione non presenti danni e ruggine. Il
compressore non deve venire usato con un recipiente
a pressione danneggiato o arrugginito. Se notate dei
danni, rivolgetevi all’officina del servizio assistenza
clienti.
Attenzione! L’acqua di condensa del
recipiente a pressione contiene tracce di olio.
Smaltite l’acqua di condensa in modo rispettoso
dell’ambiente in un apposito centro di raccolta.
8.3 Valvola di sicurezza (10)
La valvola di sicurezza è impostata sulla massima
pressione consentita per il recipiente a pressione.
Non è consentito modificare la regolazione della
valvola di sicurezza o togliere il sigillo di piombo. La
valvola di sicurezza deve essere attivata di quando
in quando in modo che funzioni correttamente in
caso di necessità. Tirate brevemente l’anello fino a
quando si sente l’aria compressa che fuoriesce. Poi
mollate di nuovo l’anello.
8.4 Controllare regolarmente il livello dell’olio
(Fig. 10)
Mettete il compressore su una superficie piana e
liscia. Il livello dell’olio deve trovarsi tra MAX e MIN
tubo di livello .
Cambio dell’olio: olio consigliato: SAE 15W/40 o
equivalente.
La prima carica di olio deve essere sostituita dopo
100 ore di esercizio. In seguito si deve scaricare
l’olio ogni 500 ore di esercizio e riempire di olio
nuovo.
8.5 Cambio dell’olio
Spegnete il motore e staccate la spina dalla presa di
corrente. Dopo di aver scaricata l’eventuale
pressione dell’aria presente, potete svitare il tappo a
vite di scarico dell’olio (15) della pompa del
compressore. Per evitare che l’olio fuoriesca in
modo incontrollato tenete sotto una piccola canaletta
di lamiera e raccogliete l’olio in un recipiente. Se
l’olio non fuoriesce completamente consigliamo di
inclinare leggermente il compressore.
Smaltite l’olio usato negli appositi centri di
raccolta.
Una volta scaricato l’olio rimettete il tappo di scarico
a vite (15). Versate l’olio nuovo attraverso l’apposita
apertura (14) fino a raggiungere il livello designato.
Poi rimettete il tappo di chiusura dell’olio (14).
8.6 Pulizia del filtro dell’aria di aspirazione
(Fig. 7, 8)
Il filtro di aspirazione impedisce che vengano aspirati
polvere e sporco. Pulite questo filtro almeno ogni 300
ore di utilizzo. In ambienti con elevata concentrazione
di polvere e di sporco, la pulizia deve essere eseguita
più spesso.
Un filtro di aspirazione ostruito riduce notevolmente il
rendimento del compressore. Il compressore deve
venire usato solo con un filtro dell’aria di aspirazione
integro.
Togliete il filtro dal compressore svitando entrambe le
viti (L).
Togliete la schiuma filtrante (N) dalle metà
dell’involucro del filtro (M, O). Date dei leggeri colpi al
materiale filtrante e pulitelo con un getto d’aria a
bassa pressione (ca. 3 bar).
L’assemblaggio e il montaggio del filtro dell’aria di
aspirazione avviene nell’ordine inverso.
8.7 Conservazione
Attenzione!
Staccate la spina dalla presa di corrente, sfiatate
l’apparecchio e tutti gli utensili ad aria compressa ad
esso collegato. Tenete il compressore in modo tale
che non possa essere messo in funzione da persone
non autorizzate.
Attenzione!
Tenere il compressore solo in un ambiente
asciutto e non accessibile per persone non
autorizzate. Non ribaltarlo, conservarlo solo
diritto!
8.8 Commissione dei pezzi di ricambio
Volendo commissionare dei pezzi di ricambio, si
dovrebbe dichiarare quanto segue:
modello dell’apparecchio
numero dell’articolo dell’apparecchio
numero d’ident. dell’apparecchio
numero del pezzo di ricambio del ricambio
necessitato.
Per i prezzi e le informazioni attuali si veda
www.isc-gmbh.info
I
25
Anleitung_BT_AC_320_50_10_SPK7:_ 02.03.2011 10:21 Uhr Seite 25
Page 26

9. Smaltimento e riciclaggio
L’apparecchio si trova in una confezione per evitare i
danni dovuti al trasporto. Questo imballaggio
rappresenta una materia prima e può perciò essere
utilizzato di nuovo o riciclato.
L’apparecchio e i suoi accessori sono fatti di
materiali diversi, per es. metallo e plastica.
Consegnate i pezzi difettosi allo smaltimento di rifiuti
speciali. Per informazioni rivolgetevi ad un negozio
specializzato o all’amministrazione comunale!
I
26
Anleitung_BT_AC_320_50_10_SPK7:_ 02.03.2011 10:21 Uhr Seite 26
Page 27

I
27
10. Possibili cause di anomalie
Problema Causa Soluzione
Il compressore non funziona 1. Manca la tensione di rete 1. Controllare cavo, spina di rete,
fusibile e presa di corrente
2. Tensione di rete troppo bassa 2. Evitate cavi di prolunga troppo
lunghi. Usate cavi di prolunga
con una sezione sufficiente del
conduttore
3. Temperatura esterna troppo
bassa
3. Non farlo funzionare ad una
temperatura esterna inferiore a
+5°C
4. Motore surriscaldato 4. Fate raffreddare il motore ed
eventualmente eliminate la
causa del surriscaldamento
Il compressore funziona, ma non
produce aria compressa
1. Valvola antiritorno perde 1.Sostituite la valvola antiritorno
2. Guarnizioni rovinata 2. Controllate le guarnizioni, fare
sostituire le guarnizioni difettose
da un’officina specializzata
3. Tappo a vite di scarico
dell’acqua di condensa (11)
perde
3. Serrate a mano il tappo a vite.
Controllate la guarnizione della
valvola, eventualmente
sostituitela
Il manometro indica pressione,
ma gli utensili non funzionano
1. Perdite nei collegamenti del
tubo
1. Controllate il tubo dell’aria
compressa, eventualmente
sostituitelo
2. Perdite all’accoppiamento rapido 2. Controllate ed eventualmente
sostituite l’accoppiamento rapido
3. Impostata pressione troppo
bassa sul regolatore di
pressione
3. Aprite maggiormente il
regolatore di pressione.
Anleitung_BT_AC_320_50_10_SPK7:_ 02.03.2011 10:21 Uhr Seite 27
Page 28
FIN
28
Varo sähkövirtaa
Varo kuumia osia
„Varoitus – Tapaturmavaaran vähentämiseksi lue käyttöohje“
Käytä kuulosuojuksia.
Melun vaikutus saattaa aiheuttaa kuulon heikkenemistä.
Anleitung_BT_AC_320_50_10_SPK7:_ 02.03.2011 10:21 Uhr Seite 28
Page 29

FIN
29
Huomio!
Laitteita käytettäessä tulee noudattaa tiettyjä
turvallisuusvarotoimia tapaturmien ja vaurioiden
välttämiseksi. Lue sen vuoksi tämä käyttöohje
huolellisesti läpi. Säilytä se hyvin, jotta siinä olevat
tiedot ovat myöhemminkin milloin vain
käytettävissäsi. Jos luovutat laitteen muille
henkilöille, anna heille myös tämä käyttöohje laitteen
mukana.
Emme ota mitään vastuuta tapaturmista tai
vaurioista, jotka ovat aiheutuneet tämän
käyttöohjeen tai turvallisuusohjeiden noudattamisen
laiminlyönnistä.
1. Turvallisuusohjeet
1.1 Yleiset turvallisuus ohjeet
Huomio! Tätä kompres soria käytettäessä on
nou datettava seuraavia periaat teellisia
turvallisuusmää räyksiä säh köiskujen, vammojen
ja palo vaaran välttämiseksi. Lue ja huo mioi nämä
ohjeet ennen laitteen käyttöä.
1. Pidä työalue siistinä
- Työalueen epäjärjestys li sää onnettomuusris kejä.
2. Huomioi ympäristö vaiku tukset
- Älä aseta kompresso ria alttiiksi sateelle. Älä
käytä kompressoria kos teassa tai märässä
ympäristössä. Huolehdi hyvästä valaistuk sesta.
Älä käytä kompres soria helposti syttyvien nestei den tai kaasujen lä hellä.
3. Suojaudu sähköiskun varalta
- Vältä koskettamasta maadoitettuihin kappa lei siin, kuten esim. put kiin, lämmittimiin, liesiin ja
jää kaappeihin.
4. Pidä lapset poissa!
- Älä anna muitten kos kea kompressoriin tai
johtoihin, pidä heidät poissa työ alueelta.
5. Säilytä kompressori tur vallisessa paikassa
- Käytön väliaikoina tulee kompressori säilyttää
kui vassa, suljetussa ti lassa poissa lasten ulot tuvilta.
6. Älä ylikuormita komp ressoria
- Työskentelet helpom min ja turvallisemmin
annetulla tehoalueella.
7. Käytä sopivaa työvaa tetusta
- Älä käytä väljiä vaattei ta tai koruja, ne voivat
taker tua liikkuviin osiin.
Työs kennellessä ulkona suositel laan kumikäsi neitä ja pitäviä jalkineita. Käytä hiusverkkoa, jos
hiuksesi ovat pitkät.
8. Älä käytä johtoa väärin
- Älä vedä kompressoria johdosta, äläkä irroita
pis toketta vetämällä johdosta. Suojaa johto
kuumuudelta, öljyltä ja teräviltä reunoilta.
9. Hoida kompressoria huo lella
- Pidä kompressori puh taana voidaksesi työsken nellä hyvin ja tur vallisesti. Noudata huol tomääräyk siä. Tarkista pistoke ja johto säännöl lisin väliajoin, ja toimita ne asiantuntevan am mattiliikkeen vaihdetta vaksi, jos huomaat
vau rioita. Tarkista jatkojoh dot säännöllisesti ja
vaihda vahingoittunut johto.
10. Irroita kaikki verkko
pis tokkeet
- kun kompressoria ei käytetä tai sitä huolle taan.
11. Vältä tahatonta käyn nistystä
- Varmistu siitä, että laite on kytketty pois ennen
verkkoliitäntää.
12. Jatkojohto ulkona
Käytä ulkona vain tähän soveltuvia, vastaavasti
merkittyjä jatkojohtoja.
13. Ole aina valppaana
Seuraa työsi kulkua. Työs kentele järkevästi. Älä
käytä kompressoria, jos olet hajamielinen.
14. Tarkista kompressorin vauriot
- Ennen kompressorin käytön jatkamista on
suoja varusteiden tai vähän va hingoittuneiden
osien esteetön, sään nönmukai nen
toiminta tarkistettava. Tarkasta, että liikkuvien
osien toi mento on häiriötön ja etteivät ne jää
kiinni tai ole vahingoittuneet. Kaik kien
osien tulee olla oikein asennettuja ja nii den tulee
täyttää niille asetetut edel lytykset.
Vahingoittuneet turvalait teet ja osat on korjattava
tai vaihdettava asianmukai sesti
ammattiliikkeessä, mikäli käyttöohjeessa ei ole
toisin sanottu. Vahingoittu neet kytkimet on
korjattava ammattiliikkeessä. Älä käytä sellaisia
työkaluja, joiden kytkin ei toimennu oikein.
15. Huomio!
Oman turvallisuutesi vuoksi käytä aina vain
valmistajan ohjeissa suo siteltuja lisä varusteita ja
lisälaitteita. Muiden kuin käyttöohjeessa
tai luette lossa mainittujen työka lujen tai
lisätarvik keiden käyttö voi aiheuttaa louk kaantumisvaaran.
16. Korjaukset tekee vain alan ammattimies
- Korjaukset saa suorit taa vain asiantunteva
sähkö mies, muuten voi niistä ai heutua
käyttäjälle onnet tomuuksia.
17. Melunpäästöt
Käytä kuulosuojuksia kompressorin käydessä.
18. Liitäntäjohdon vaihto
Jos liitäntäjohto on vahingoittunut, niin
valmistajan tai sähköalan ammattihenkilön tulee
vaihtaa se uuteen, jotta vältetään vaaratilanteet.
Anleitung_BT_AC_320_50_10_SPK7:_ 02.03.2011 10:21 Uhr Seite 29
Page 30

1.2 Paineilman ja puhalluspistoolien käyttöä
koskevat turvallisuusmääräykset
Ahtimen ja johtojen käyttö lämpötilat ovat korkeat.
Kosketus aiheuttaa palo vammoja.
Ahtimen imemien kaasujen tai höyryjen on oltava
ilman aineosia, jotka voivat joh taa ahtimen
paloon tai räjähdykseen.
Letkuliitosta irroitettaessa on liitoskappaleesta
pidet tävä kiinni, ettei se aiheuta vammoja
sinkoutumalla irti.
Paineilmapistoolia käsitel lessä on käytettävä
suo jalaseja. Roskat ja poispu hallettu lika voivat
helposti aiheuttaa vammoja.
Paineilmapistoolia ei saa suunnata kohti ihmisiä,
eikä sillä myöskään saa puhdistaa päällepuettuja
vaatekappaleita.
1.3 Ruiskumaalausta koskevat
turvallisuusmääräykset
Älä työstä maalia tai liuotetta, jonka sytty mispiste
on alle 55°C.
Älä lämmitä maalia tai liuotteita.
Terveydelle vaarallisia nesteitä työstettäessä on
käytettävä suojana suodattimia (kasvonaa maria).
Noudata myös tällaisten aineiden val mistajan
antamia turva ohjeita.
Työstettävien materiaalien pakkauksissa olevia
tietoja sekä vaarallisten aineiden käsittelylain
mukaisia merkintöjä tulee noudattaa.
Tarvittaessa tulee ryhtyä muihin turvatoimiin,
erityisesti käyttää tarkoituksenmukaista
suojapukua ja naamaria.
Ruiskutuksen aikana tai työtiloissa ei saa tupa -
koida. Maalihöyrytkin ovat helposti syttyviä.
Avoliekkihellat, avotuli tai kipinöitä aikaansaa vat
koneet on poistet tava tai niitä ei saa käyttää.
Ruokia ja juomia ei saa säilyttää tai nauttia työti -
loissa. Maalihöyryt ovat vahingollisia.
Työtilan on oltava suu rempi kuin 30 m
3
, ja
ruiskutuksen sekä kui vauksen aikana on
huolehdittava riittävästä ilmanvaihdosta. Ei saa
ruiskuttaa vastatuuleen. Helposti syttyviä tai
muuten vaarallisia ruis kutusaineita käsitellessä
on noudatettava paikal lisen poliisilaitoksen
määräyksiä.
PVC-muovisella paine letkulla ei saa käyttää
koestusbensiiniä, butyy lialkoholia tai metylee nikloridia (lyhentää elin ikää).
1.4 Painesäiliöiden käyttö
Painesäiliön käyttäjän on pidettävä säiliö
asianmukaisessa kun nossa, käytettävä ja val vottava sitä ohjeiden mukaisesti, suoritettava
tarpeelliset kunnossa pito- ja korjaustyöt vii pymättä ja noudatettava tilanteen mukaisia
turvallisuusmääräyksiä.
Valvontavirasto voi mää rätä yksittäistapauk sessa
tarvittavia valvon tatoimenpiteitä.
Painesäiliötä ei saa käyttää, jos siinä on käyttäjiä
tai muita henki löitä vaarantavia puut teita.
Tarkasta ennen joka käyttöä, onko painesäiliössä
ruostetta tai vaurioita. Kompressoria ei saa
käyttää, jos painesäiliö on vahingoittunut tai
ruosteinen. Jos havaitset vaurioita, ole hyvä ja
käänny valtuutetun huoltokorjaamon puoleen.
Säilytä nämä turvalli suusohjeet hyvin.
2. Laitteen kuvaus
1. Imuilmansuodatin
2. Painesäiliö
3. Pyörä
4. Tukijalka
5. Pikaliitin (säädelty paineilma)
6. Manometri (säädetyn paineen voi lukea tästä)
7. Paineensäädin
8. Päälle-/pois-katkaisin
9. Työntökahva
10. Turvaventtiili
11. Lauhdeveden laskuruuvi
12. Manometri (säiliön paineen voi lukea tästä)
13. Öljyn tarkastuslasi
14. Öljyn sulkutulppa (öljyntäyttöaukko)
15. Öljyn laskuruuvi
16. Pikaliitin (säätelemätön paineilma)
FIN
30
Anleitung_BT_AC_320_50_10_SPK7:_ 02.03.2011 10:21 Uhr Seite 30
Page 31

FIN
31
3. Käyttötarkoitus
Kompressori on tarkoitettu kehittämään paineilmaa
paineilmakäyttöisiä työkaluja varten.
Ole hyvä ja ota huomioon, että laitteitamme ei ole
suunniteltu ja valmistettu käytettäväksi pienteollisuustai teollisuustarkoituksiin. Emme siksi ota mitään
vastuuta vaurioista, jos laitetta käytetään
pienteollisuus-, käsityöläis- tai teollisuustyöpaikoilla
tai näihin verrattavissa olevissa toimissa.
Konetta saa käyttää ainoastaan sille määrättyyn
tarkoitukseen. Kaikkinainen tämän ylittävä käyttö ei
ole määräysten mukaista. Kaikista tästä aiheutuvista
vahingoista tai loukkaantumisista on vastuussa
laitteen omistaja/käyttäjä eikä suinkaan sen
valmistaja.
4. Tekniset tiedot
Melunpäästöarvot on mitattu standardin EN ISO 3744
mukaan.
Verkkoliitäntä: 230 V ~ 50 Hz
Moottorin teho kW: 2,2
Käyttötapa S1
Kompressorin kierrosluku min-1: 2850
Käyttöpaine baria: 10
Painesäiliön tilavuus (litraa): 50
Laskettu imuteho l/min: 320
Aänen tehotaso LWA, dB: 96
Laitteen paino kg: 61
5. Asennusohjeet
Tarkasta, onko laitteessa kuljetusvaurioita.
Ilmoita mahdoliset vahingot heti kompressorin
toimittaneelle huolitsijalle.
Kompressori tulee asettaa kulutuslaitteen
lähistölle.
On vältettävä pitkiä ilma johtoja ja pitkiä tuontijoh -
toja (jatkojohtoja).
Huolehdi siitä, että imuilma on kuivaa ja
pölytöntä.
Älä asenna kompressoria kosteaan tai märkään
ti laan.
Kompressoria saa käyttää ainoastaan
tarkoituksenmukaisissa tiloissa (hyvä tuuletus,
ympäristön lämpötila +5°C - +40°C).
Käyttötiloissa ei saa olla pölyä tai happoja,
höyryjä, räjähdysalttiita tai helposti syttyviä
kaasuja.
Kompressori soveltuu käytettäväksi kuivissa
tiloissa. Sitä ei saa käyttää tiloissa, joissa
esiintyy myös vesiroiskeita.
Ennen käyttöönottoa tulee tarkastaa
kompressoripumpun öljymäärä.
6. Asennus ja käyttöönotto
Huomio!
Ennen käyttöönottoa tulee laite ehdottomasti
asentaa kokonaan!
6.1 Pyörien (3) asennus
Mukana toimitetut pyörät tulee asentaa kuvan 5
mukaisesti.
6.2 Tukijalan (4) asennus
Mukana toimitetut tukijalan tulee asentaa kuvan 6
mukaisesti.
6.3 Öljyn sulkutulpan (14) vaihto
Ota öljyn täyttöaukon kuljetuskansi pois
ruuviavaimen avulla ja pane mukana toimitettu öljyn
sulkutulppa (14) öljyn täyttöaukkoon (kuva 9).
Anleitung_BT_AC_320_50_10_SPK7:_ 02.03.2011 10:21 Uhr Seite 31
Page 32

6.4 Verkkoliitäntä
Tarkasta ennen käyttöönottoa, että käytettävissä
oleva verkkojännite vastaa laitteen tyyppikilvessä
annettua käyttöjännitettä. Pitkät liitäntäjohdot sekä
jatkojohdot, johtokelat jne. aiheuttavat jännitehäviötä
ja saattavat vaikeuttaa moottorin käynnistymistä.
Alhaisissa, alle +5° C lämpötiloissa on moottorin
käynnistyminen vaikeaa raskaskulkuisuuden vuoksi.
6.5 Pois-/päälle-katkaisin (8)
Kompressori käynnistetään vetämällä nuppi (8) ulos.
Kompressorin sammutetaan painamalla nuppi (8)
sisään. (kuva 2)
6.6 Paineen säätö: (Kuva 1)
Paineensäätimellä (7) voit säätää manometrin
(6) osoittamaa painetta.
Säädetyn paineen voit ottaa pikaliittimestä (5).
Manometristä (12) voidaan lukea painesäiliössä
vallitseva paine.
Painesäiliössä vallitsevan paineen voit ottaa
pikaliittimestä (16).
6.7 Painekytkimen säätö
Painekytkin on säädetty tehtaalla.
Käynnistyspaine 7,5 baria
Sammutuspaine 10 baria
6.8 Kuljetuskahvan asentaminen (kuva 11)
Työnnä kuljetuskahva (9) säiliössä oleviin pidikkeisiin.
Kiinnitä kuljetuskahva sitten tiukasti paikalleen
kiinnitysruuveilla (K).
6.9 Ylikuormitussuojaus (kuva 1)
Tämän laitteen moottoria suojataan ylikuormitukselta
ylikuormituskatkaisimella (P). Jos nimellisvirta
ylitetään, niin ylikuormituskatkaisin (P) sammuttaa
laitteen. Lyhyen jäähdytystauon jälkeen voi laitteen
käynnistää uudelleen painamalla
ylikuormituskatkaisinta (P).
7. Verkkojohdon vaihtaminen
Kun tämän laitteen verkkojohto vahingoittuu sen on
korvattava joko valmistaja tai hänen asiakas-, huoltoja varaosapalvelunsa tai vastaavan pätevyyden
omaava henkilö, jotta vaaratilanteita ei pääse
syntymään.
8. Puhdistus ja huolto
Huomio!
Irroita verkkopistoke ennen kaikkia puhdistus- ja
huoltotoimia.
Huomio!
Odota, kunnes tiivistin on jäähtynyt täysin!
Palovamman vaara!
Huomio!
Ennen kaikkia puhdistus- ja huoltotoimia tulee
kattila tehdä paineettomaksi.
8.1 Puhdistus
Pidä turvalaitteet niin puhtaina pölystä ja liasta
kuin suinkin mahdollista. Pyyhi laite puhtaalla
rievulla tai puhalla lika pois paineilmalla käyttäen
alhaista paineasetusta.
Suosittelemme laitteen puhdistamista aina heti
käytön jälkeen.
Puhdista laite säännöllisin väliajoin kostealla
rievulla käyttäen hieman saippuaa. Älä käytä
puhdistusaineita tai liuotteita; ne saattavat
syövyttää laitteen muoviosia. Huolehdi siitä, ettei
laitteen sisälle pääse vettä.
Letku ja ruiskutustyökalut tulee ennen
puhdistusta irroittaa kompressorista.
Kompressoria ei saa puhdistaa vedellä, liuotteilla
tms.
8.2 Lauhdevesi
Lauhdevesi tulee laskea pois päivittäin avaamalla
vedenpoistoventtiili (11) (painesäiliön pohjapuolella).
Tarkasta ennen joka käyttöä, onko painesäiliössä
ruostetta tai vaurioita. Kompressoria ei saa käyttää,
jos painesäiliö on vahingoittunut tai ruosteinen. Jos
havaitset vaurioita, ole hyvä ja käänny valtuutetun
huoltokorjaamon puoleen.
Huomio! Painesäiliöstä peräisin olevassa
lauhdevedessä on öljynjäämiä.
Hävitä lauhdevesi ympäristönsuojelumääräysten
mukaan vastaavan keräyspisteen kautta.
8.3 Turvaventtiili (10)
Turvaventtiili on säädetty painesäiliön suurinta
sallittua painetta vastaavaksi. Turvaventtiilin säätöä
ei saa muuttaa ja siihen pantua sinettiä ei saa ottaa
pois. Jotta turvaventtiili toimii hätätilanteessa oikein,
tulee se toimentaa kokeeksi aika ajoin. Vedä
renkaasta niin voimakkaasti, että kuulet paineilman
purkautuvan. Päästä sitten rengas jälleen irti.
FIN
32
Anleitung_BT_AC_320_50_10_SPK7:_ 02.03.2011 10:21 Uhr Seite 32
Page 33

FIN
33
8.4 Öljymäärän säännöllinen tarkastus (kuva 10)
Aseta kompressori tasaiselle. vaakasuoralle pinnalle.
Öljymäärän tulee olla tarkastuslasi MAX ja MIN
välillä.
Öljynvaihto: Suositeltu öljy: SAE 15W/40 tai
samanarvoinen.
Alkuperäinen öljy tulee vaihtaa 100 käyttötunnin
jälkeen. Sen jälkeen tulee käytetty öljy laskea pois ja
uutta öljyä täyttää aina 500 käyttötunnin välein.
8.5 Öljynvaihto
Sammuta moottori ja irroita verkkopistoke
pistorasiasta. Sen jälkeen kun olet päästänyt
mahdollisen ilmanpaineen pois, voit ruuvata öljyn
laskuruuvin (15) irti tiivistinpumpusta. Jotta öljy ei
virtaa pois hallitsematta, pidä ruuvin alapuolella
pientä peltikourua ja ota öljy talteen astiaan. Mikäli
öljy ei valu täysin pois, suosittelemme kompressorin
kallistamista hieman.
Hävitä käytetty öljy toimittamalla se määräysten
mukaiseen keräyspisteeseen.
Kun öljy on valunut pois, voit panna öljyn laskuruuvin
(15) takaisin paikalleen. Täytä öljyn täyttöaukkoon
(14) uutta öljyä, kunnes öljymäärä on noussut
tavoitearvoon saakka. Sen jälkeen voit panna öljyn
sulkutulpan (14) takaisn paikalleen.
8.6 Imuilmansuodattimen puhdistus (kuvat 7, 8)
Imusuodatin estää pölyn ja lian imemisen laitteeseen.
Puhdista tämä suodatin vähintään aina 300 tunnin
jälkeen. Jos laitetta käytetään pölyisessä tai
likaisessa ympäristössä, täytyy suodatin puhdistaa
useammin.
Tukkeutunut imusuodatin vähentää kompressorin
tehoa huomattavasti. Kompressoria saa käyttää
ainoastaan moitteettoman imuilmasuodattimen kera.
Ota suodatin pois kompressorista avaamalla ensin
kaksi ruuvia (L).
Nyt voit ottaa suodatinvaahdon (N) suodattimen
kotelon puoliskoista (M, O) pois. Koputtele
suodatinmateriaali tyhjäksi ja puhalla se alhaisella
paineella (n. 3 baaria) puhtaaksi.
Imuilmansuodattimen kokoaminen ja asennus
tehdään päinvastaisessa järjestyksessä.
8.7 Säilytys
Huomio!
Irroita verkkopistoke, poista ilma laitteesta ja kaikista
siihen liitetyistä paineilmatyökaluista. Säilytä
kompressoria niin, että sitä ei voi ottaa luvattomasti
käyttöön.
Huomio!
Säilytä kompressoria vain kuivissa tiloissa
poissa sitä mahdollisesti luvatta käyttävien
henkilöiden ulottuvilta. Älä kallista laitetta,
säilytä se vain pystyasennossa!
8.8 Varaosien tilaus
Varaosia tilatessasi anna seuraavat tiedot:
Laitteen tyyppi
Laitteen tuotenumero
Laitteen tunnusnumero
Tarvittavan varaosan varaosanumero.
Ajankohtaiset hinnat ja muut tiedot löydät osoitteesta
www.isc-gmbh.info
9. Käytöstäpoisto ja uusiokäyttö
Laite on pakattu kuljetuspakkaukseen, jotta vältetään
kuljetusvauriot. Tämä pakkaus on raaka-ainetta ja
sitä voi siksi käyttää uudelleen tai sen voi toimittaa
kierrätyksen kautta takaisin raaka-ainekiertoon.
Laite on ja sen varusteet on valmistettu eri
materiaaleista, kuten esim. metallista ja muoveista.
Toimita vialliset rakenneosat
oneglmajätehävitykseen. Tiedustele asiaa alan
ammattiliikkeestä tai kunnanhallitukselta!
Anleitung_BT_AC_320_50_10_SPK7:_ 02.03.2011 10:21 Uhr Seite 33
Page 34
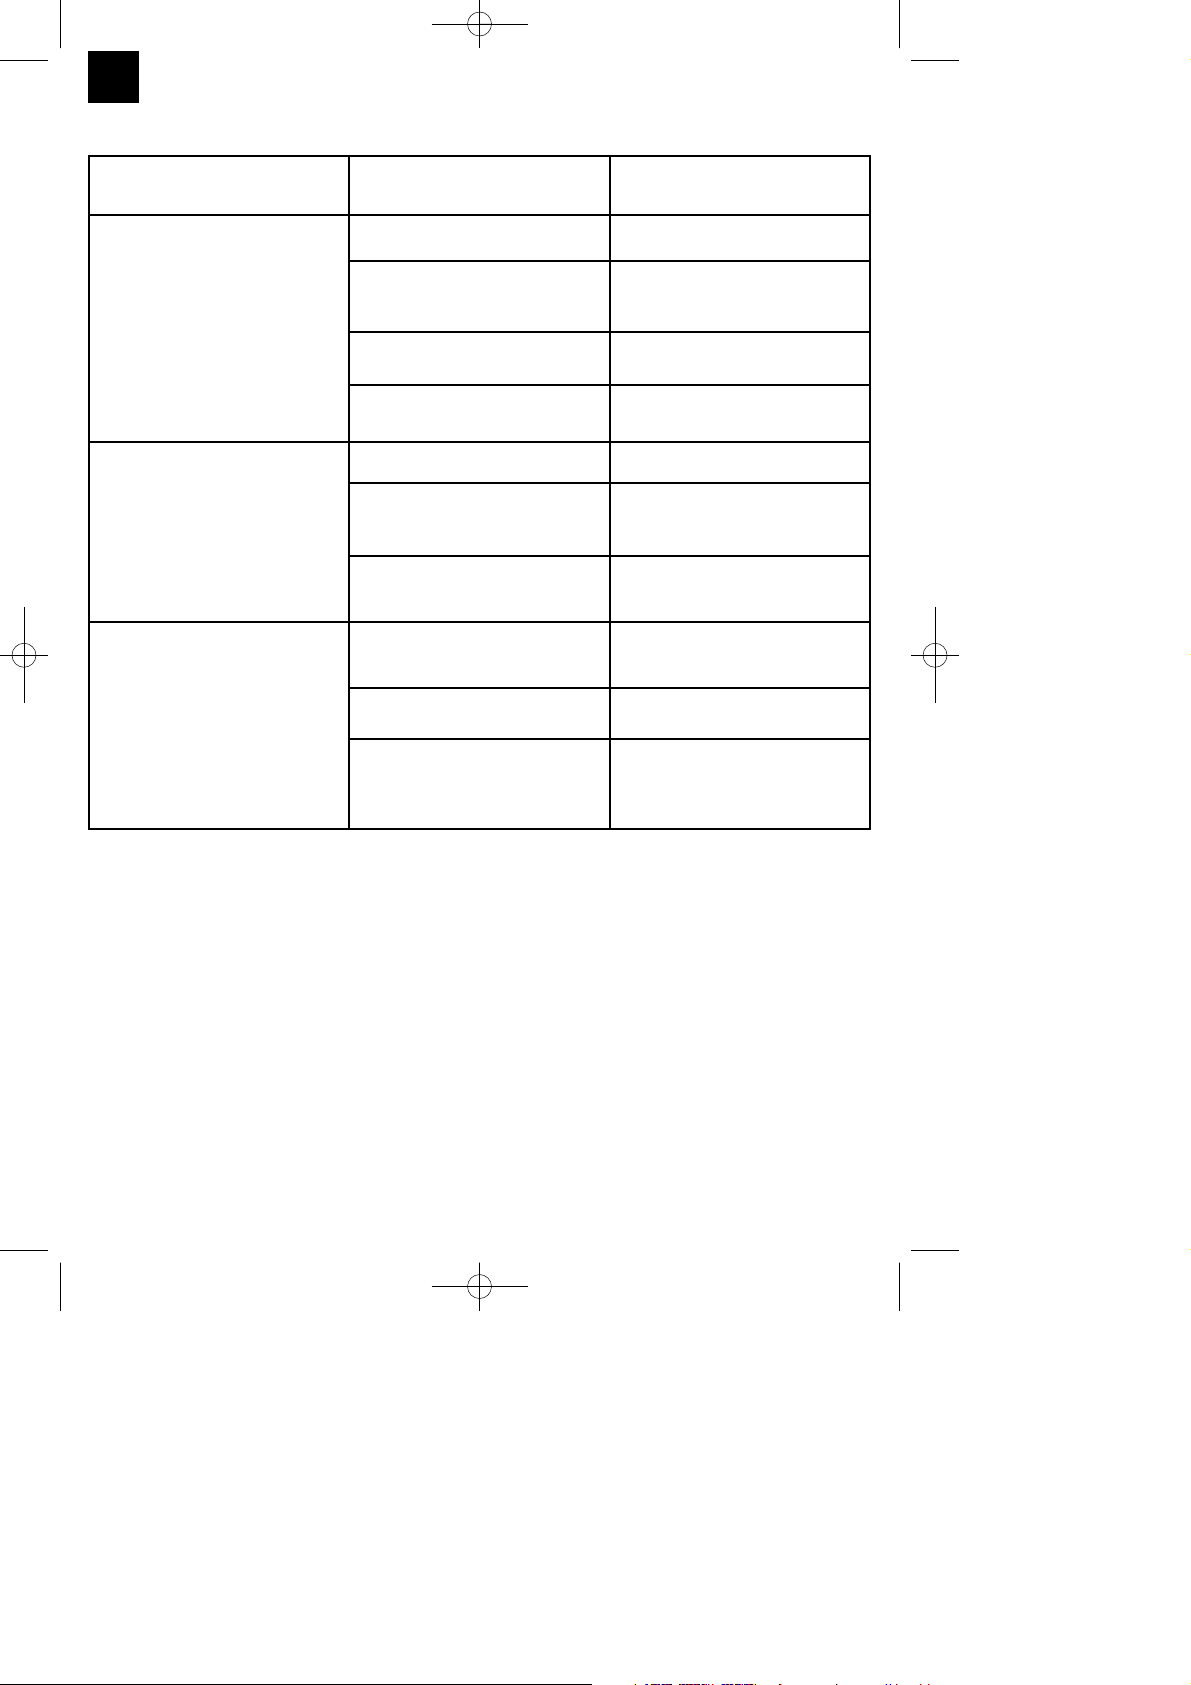
FIN
34
10. Mahdolliset häiriönsyyt
Ongelma Syy Ratkaisu
Kompressori ei käy 1. Ei verkkovirtaa 1. Tarkasta johto, verkkopistoke,
varoke ja pistorasia
2. Verkkojännite liian alhainen 2. Vältä liian pitkiä jatkojohtoja.
Käytä jatkojohtoa,jonka
johdinhalkaisija on riittävän suuri
3. Ulkolämpötila liian alhainen 3. Älä käytä alle +5°C
ulkolämpötilassa
4. Moottori ylikuumentunut 4. Anna moottorin jäähtyä tai
poista ylikuumenemisen syy
Kompressori käy, mutta painetta
ei ole
1. Takaiskuventtiili ei ole tiivis 1. Vaihda takaiskuventtiili uuteen
2. Tiivisteet ovat rikki 2. Tarkasta tiivisteet, anna alan
korjaamon vaihtaa vialliset
tiivisteet uusiin
3. Lauhdeveden laskuruuvi (11) ei
ole tiivis.
3. Kiristä ruuvi käsin. Tarkasta
ruuvin tiiviste ja vaihda
tarvitessa uuteen
Kompressori käy, manometrissä
näkyy painetta, mutta työkalut
eivät käy
1. Letkuliitokset eivät ole tiiviit 1. Tarkasta paineilmaletku ja
työkalut, vaihda tarvitessa
uuteen
2. Pikaliitin ei ole tiivis 2. Tarkasta pikaliitin, vaihda
tarvitessa uuteen.
3. Painesäätimeen säädetty liian
vähän painetta.
3. Käännä paineensäädintä
enemmän auki tai liitä letku
säätämättömän säiliöpaineen
liitäntään
Anleitung_BT_AC_320_50_10_SPK7:_ 02.03.2011 10:21 Uhr Seite 34
Page 35
35
k erklärt folgende Konformität gemäß EU-Richtlinie und
Normen für Artikel
t explains the following conformity according to EU
directives and norms for the following product
p déclare la conformité suivante selon la directive CE et les
normes concernant l’article
C dichiara la seguente conformità secondo la direttiva UE e
le norme per l’articolo
N verklaart de volgende overeenstemming conform EU
richtlijn en normen voor het product
m declara la siguiente conformidad a tenor de la directiva y
normas de la UE para el artículo
O declara a seguinte conformidade, de acordo com a
directiva CE e normas para o artigo
l attesterer følgende overensstemmelse i medfør af
EU-direktiv samt standarder for artikel
U förklarar följande överensstämmelse enl. EU-direktiv och
standarder för artikeln
q vakuuttaa, että tuote täyttää EU-direktiivin ja standardien
vaatimukset
. tõendab toote vastavust EL direktiivile ja standarditele
j vydává následující prohlášení o shodě podle směrnice
EU a norem pro výrobek
X potrjuje sledečo skladnost s smernico EU in standardi za
izdelek
W vydáva nasledujúce prehlásenie o zhode podľa smernice
EÚ a noriem pre výrobok
A a cikkekhez az EU-irányvonal és Normák szerint a
következő konformitást jelenti ki
P deklaruje zgodność wymienionego poniżej artykułu z
następującymi normami na podstawie dyrektywy WE.
e декларира съответното съответствие съгласно
Директива на ЕС и норми за артикул
H paskaidro šādu atbilstību ES direktīvai un standartiem
G apibūdina šį atitikimą EU reikalavimams ir prekės
normoms
Q declară următoarea conformitate conform directivei UE
şi normelor pentru articolul
z δηλώνει την ακόλουθη συμμόρφωση σύμφωνα με την
Οδηγία ΕΚ και τα πρότυπα για το προϊόν
B potvrđuje sljedeću usklađenost prema smjernicama EU
i normama za artikl
f potvrđuje sljedeću usklađenost prema smjernicama EU
i normama za artikl
4 potvrđuje sledeću usklađenost prema smernicama EZ i
normama za artikal
T следующим удостоверяется, что следующие
продукты соответствуют директивам и нормам ЕС
1 проголошує про зазначену нижче відповідність
виробу директивам та стандартам ЄС на виріб
5 ја изјавува следната сообрзност согласно
ЕУ-директивата и нормите за артикли
Z Ürünü ile ilgili AB direktifleri ve normları gereğince
aşağıda açıklanan uygunluğu belirtir
L erklærer følgende samsvar i henhold til EU-direktivet
og standarder for artikkel
E Lýsir uppfyllingu EU-reglna og annarra staðla vöru
Konformitätserklärung
ISC GmbH · Eschenstraße 6 · D-94405 Landau/Isar
Kompressor BT-AC 320/50/10 (Einhell)
Standard references:
EN 1012-1; EN 60204-1; EN 55014-1; EN 55014-2; EN 61000-3-2; EN 61000-3-11
Landau/Isar, den 26.10.2010
First CE: 10 Archive-File/Record: 4010380-13-4142860-10
Art.-No.: 40.103.80 I.-No.: 11010 Documents registrar: Roider
Subject to change without notice Wiesenweg 22, D-94405 Landau/Isar
Weichselgartner/General-Manager Wang/Product-Management
x
x
x
87/404/EC_2009/105/EC
2005/32/EC_2009/125/EC
2006/95/EC
2006/28/EC
2004/108/EC
2004/22/EC
1999/5/EC
97/23/EC
90/396/EC_2009/142/EC
89/686/EC_96/58/EC
x
x
x
2006/42/EC
2004/26/EC
Emission No.:
2000/14/EC_2005/88/EC
Annex IV
Notified Body:
Notified Body No.:
Reg. No.:
Annex V
Annex VI
Noise: measured LWA= 94 dB (A); guaranteed LWA= 96 dB (A)
P = 2,2 KW; L/Ø = cm
Notified Body: 0499; SNCH Societe Nationale de Certification et d`Homolongation,
Luxembourg
Anleitung_BT_AC_320_50_10_SPK7:_ 02.03.2011 10:21 Uhr Seite 35
Page 36

36
k Nur für EU-Länder
Werfen Sie Elektrowerkzeuge nicht in den Hausmüll!
Gemäß europäischer Richtlinie 2002/96/EG über Elektro- und Elektronik-Altgeräte und Umsetzung in
nationales Recht müssen verbrauchte Elektrowerkzeuge getrennt gesammelt werden und einer
umweltgerechten Wiederverwertung zugeführt werden.
Recycling-Alternative zur Rücksendeaufforderung:
Der Eigentümer des Elektrogerätes ist alternativ anstelle Rücksendung zur Mitwirkung bei der sachgerechten Verwertung im Falle der Eigentumsaufgabe verpflichtet. Das Altgerät kann hierfür auch einer
Rücknahmestelle überlassen werden, die eine Beseitigung im Sinne der nationalen Kreislaufwirtschaftsund Abfallgesetze durchführt. Nicht betroffen sind den Altgeräten beigefügte Zubehörteile und Hilfsmittel
ohne Elektrobestandteile.
t For EU countries only
Never place any electric tools in your household refuse.
To comply with European Directive 2002/96/EC concerning old electric and electronic equipment and its
implementation in national laws, old electric tools have to be separated from other waste and disposed of
in an environment-friendly fashion, e.g. by taking to a recycling depot.
Recycling alternative to the demand to return electrical devices:
As an alternative to returning the electrical device, the owner is obliged to cooperate in ensuring that the
device is properly recycled if ownership is relinquished. This can also be done by handing over the used
device to a returns center, which will dispose of it in accordance with national commercial and industrial
waste management legislation. This does not apply to the accessories and auxiliary equipment without
any electrical components which are included with the used device.
C Solo per paesi membri dell'UE
Non gettate gli utensili elettrici nei rifiuti domestici.
Secondo la Direttiva europea 2002/96/CE sui rifiuti di apparecchiature elettriche ed elettroniche e
l'applicazione nel diritto nazionale gli elettroutensili usati devono venire raccolti separatamente e smaltiti
in modo ecologico.
Alternativa di riciclaggio alla richiesta di restituzione
Il proprietario dell’apparecchio elettrico è tenuto in alternativa, invece della restituzione, a collaborare in
modo che lo smaltimento venga eseguito correttamente in caso ceda l’apparecchio. L’apparecchio
vecchio può anche venire consegnato ad un centro di raccolta che provvede poi allo smaltimento
secondo le norme nazionali sul riciclaggio e sui rifiuti. Non ne sono interessati gli accessori e i mezzi
ausiliari senza elementi elettrici forniti insieme ai vecchi apparecchi.
Anleitung_BT_AC_320_50_10_SPK7:_ 02.03.2011 10:21 Uhr Seite 36
Page 37

37
q Koskee ainoastaan EU-jäsenmaita
Älä heitä sähkötyökaluja kotitalousjätteisiin.
Sähkökäyttöisiä ja elektronisia vanhoja laitteita koskevan Euroopan direktiivin 2002/96/EY mukaan, joka
on sisällytetty kansallisiin lakeihin, tulee loppuun käytetyt sähkökäyttöiset työkalut kerätä erikseen ja
toimittaa ympäristöystävälliseen kierrätykseen uusiokäyttöä varten.
Kierrätys vaihtoehtona takaisinlähettämiselle:
Sähkölaitteen omistajan velvollisuus on takaisinlähettämisen vaihtoehtona avustaa laitteen asianmukai
sta hävittämistä kierrätyksen kautta, kun laite poistetaan käytöstä. Laitteen voi toimittaa myös
kierrätyspisteeseen, joka suorittaa laitteen hävittämisen paikallisten kierrätys- ja jätteenpoistomääräysten
mukaisesti hyödyntäen käyttökelpoiset raaka-aineet. Tämä ei koske käytöstä poistettaviin laitteisiin
kuuluvia lisävarusteita tai apulaitteita, joissa ei ole sähköosia.
Anleitung_BT_AC_320_50_10_SPK7:_ 02.03.2011 10:21 Uhr Seite 37
Page 38

38
k
앬 Das Produkt erfüllt die Anforderungen der EN 61000-3-11 und unterliegt Sonderanschlussbedingungen. Das heißt, dass
eine Verwendung an beliebigen frei wählbaren Anschlusspunkten nicht zulässig ist.
앬 Das Gerät kann bei ungünstigen Netzverhältnissen zu vorübergehenden Spannungsschwankungen führen.
앬 Das Produkt ist ausschließlich zur Verwendung an Anschlusspunkten vorgesehen, die
a) eine maximale zulässige Netzimpedanz “Z
sys
= 0,35 Ω” nicht überschreiten, oder
b) die eine Dauerstrombelastbarkeit des Netzes von mindestens 100 A je Phase haben.
앬 Sie müssen als Benutzer sicherstellen, wenn nötig in Rücksprache mit Ihrem Energieversorgungsunternehmen, dass Ihr
Anschlusspunkt, an dem Sie das Produkt betreiben möchten, eine der beiden genannten Anforderungen a) oder
b) erfüllt.
C
앬 Il prodotto soddisfa i requisiti della norma EN 61000-3-11 ed è soggetto a condizioni speciali di collegamento. Ciò
significa che non ne è consentito l’uso con collegamento prese scelte a piacimento.
앬 In caso di condizioni di rete sfavorevoli l’apparecchio può causare delle variazioni temporanee di tensione.
앬 Il prodotto è concepito solo per l’utilizzo collegato a prese che
a) non superino una massima impedenza di rete „Z
sys
= 0,35 Ω“, oppure
b) che abbiano una resistenza di corrente continua della rete almeno di 100 A per fase.
앬 In qualità di utilizzatore, dovete assicurare, se necessario rivolgendovi al vostro ente di fornitura dell’energia elettrica, che
la presa di collegamento dalla quale volete azionare il prodotto soddisfi uno dei due requisiti citati a) oppure b).
t
앬 The product meets the requirements of EN 61000-3-11 and is subject to special connection conditions. This means that
use of the product at any freely selectable connection point is not allowed.
앬 Given unfavorable conditions in the power supply the product can cause the voltage to fluctuate temporarily.
앬 The product is intended solely for use at connection points that
a) do not exceed a maximum permitted supply impedance “Z
sys
= 0,35 Ω”, or
b) have a continuous current-carrying capacity of the mains of at least 100 A per phase.
앬 As the user, you are required to ensure, in consultation with your electric power company if necessary, that the
connection point at which you wish to operate the product meets one of the two requirements, a) or b), named above.
q
앬 Tuote täyttää standardin EN 61000-3-11 asettamat vaatimukset ja sitä koskevat erityiset liitäntäehdot. Tämä tarkoittaa
sitä, että laitetta ei saa käyttää vapaasti valittavissa liitäntäkohdissa.
앬 Laite saattaa aiheuttaa ohimeneviä jännitevaihteluita, jos verkko-olosuhteet ovat epäedulliset.
앬 Tuote on tarkoitettu käytettäväksi ainoastaan liitäntäkohdissa, joissa
a) suurinta sallittua verkkoimpedanssia “Z
sys
= 0,35 Ω” ei ylitetä, tai
b) verkon jatkuva jännitteenkestoiävyys on vähintään 100 A vaihetta kohti.
앬 Käyttäjänä sinun tulee varmistaa, tarvittaessa tarkistamalla asia energiantoimittajalaitokseltasi, että se liitäntäsi, jossa
haluat käyttää laitetta, täyttää jommankumman yllämainituista vaatimuksista a) tai b).
Anleitung_BT_AC_320_50_10_SPK7:_ 02.03.2011 10:21 Uhr Seite 38
Page 39

39
Der Nachdruck oder sonstige Vervielfältigung von Dokumentation und
Begleitpapieren der Produkte, auch auszugsweise ist nur mit ausdrücklicher Zustimmung der ISC GmbH zulässig.
The reprinting or reproduction by any other means, in whole or in part,
of documentation and papers accompanying products is permitted only
with the express consent of ISC GmbH.
La ristampa o l’ulteriore riproduzione, anche parziale, della
documentazione o dei documenti d’accompagnamento dei prodotti è
consentita solo con l’esplicita autorizzazione da parte della ISC GmbH.
q
Tuotteiden dokumentaatioiden ja muiden mukaanliitettyjen asiakirjojen
vain osittainenkin kopiointi tai muunlainen monistaminen on sallittu
ainoastaan ISC GmbH:n nimenomaisella luvalla.
Technische Änderungen vorbehalten
Technical changes subject to change
Con riserva di apportare modifiche tecniche
q Oikeus teknisiin muutoksiin pidätetään
Anleitung_BT_AC_320_50_10_SPK7:_ 02.03.2011 10:21 Uhr Seite 39
Page 40

40
t
GUARANTEE CERTIFICATE
Dear Customer,
All of our products undergo strict quality checks to ensure that they reach you in perfect condition. In the unlikely
event that your device develops a fault, please contact our service department at the address shown on this
guarantee card. Of course, if you would prefer to call us then we are also happy to offer our assistance under
the service number printed below. Please note the following terms under which guarantee claims can be made:
1. These guarantee terms cover additional guarantee rights and do not affect your statutory warranty rights.
We do not charge you for this guarantee.
2. Our guarantee only covers problems caused by material or manufacturing defects, and it is restricted to the
rectification of these defects or replacement of the device. Please note that our devices have not been
designed for use in commercial, trade or industrial applications. Consequently, the guarantee is invalidated
if the equipment is used in commercial, trade or industrial applications or for other equivalent activities. The
following are also excluded from our guarantee: compensation for transport damage, damage caused by
failure to comply with the installation/assembly instructions or damage caused by unprofessional
installation, failure to comply with the operating instructions (e.g. connection to the wrong mains voltage or
current type), misuse or inappropriate use (such as overloading of the device or use of non-approved tools
or accessories), failure to comply with the maintenance and safety regulations, ingress of foreign bodies
into the device (e.g. sand, stones or dust), effects of force or external influences (e.g. damage caused by
the device being dropped) and normal wear resulting from proper operation of the device. This applies in
particular to rechargeable batteries for which we nevertheless issue a guarantee period of 12 months.
The guarantee is rendered null and void if any attempt is made to tamper with the device.
3. The guarantee is valid for a period of 2 years starting from the purchase date of the device. Guarantee
claims should be submitted before the end of the guarantee period within two weeks of the defect being
noticed. No guarantee claims will be accepted after the end of the guarantee period. The original guarantee
period remains applicable to the device even if repairs are carried out or parts are replaced. In such cases,
the work performed or parts fitted will not result in an extension of the guarantee period, and no new
guarantee will become active for the work performed or parts fitted. This also applies when an on-site
service is used.
4. In order to assert your guarantee claim, please send your defective device postage-free to the address
shown below. Please enclose either the original or a copy of your sales receipt or another dated proof of
purchase. Please keep your sales receipt in a safe place, as it is your proof of purchase. It would help us if
you could describe the nature of the problem in as much detail as possible. If the defect is covered by our
guarantee then your device will either be repaired immediately and returned to you, or we will send you a
new device.
Of course, we are also happy offer a chargeable repair service for any defects which are not covered by the
scope of this guarantee or for units which are no longer covered. To take advantage of this service, please send
the device to our service address.
Anleitung_BT_AC_320_50_10_SPK7:_ 02.03.2011 10:21 Uhr Seite 40
Page 41

41
C
CERTIFICATO DI GARANZIA
Gentili clienti,
i nostri prodotti sono soggetti ad un rigido controllo di qualità. Se l’apparecchio non dovesse tuttavia funzionare
correttamente, ci scusiamo e vi preghiamo di rivolgervi al nostro servizio di assistenza clienti all’indirizzo
indicato in questa scheda di garanzia. Siamo a vostra disposizione anche telefonicamente al numero del
servizio assistenza sotto indicato. Per la rivendicazione dei diritti di garanzia vale quanto segue:
1. Queste condizioni di garanzia regolano ulteriori prestazioni di garanzia. La presente garanzia non tocca i
vostri diritti al ricorso di garanzia previsti dalla legge. Le nostre prestazioni di garanzia sono per voi gratuite.
2. La prestazione di garanzia riguarda esclusivamente le anomalie riconducibili a difetti del materiale o di
produzione ed è limitata all’eliminazione di queste anomalie o alla sostituzione dell’apparecchio. Tenete
presente che i nostri apparecchi non sono stati costruiti per l’impiego professionale, artigianale o
industriale. Un contratto di garanzia non viene concluso quando l’apparecchio viene usato in imprese
commerciali, artigianali o industriali, o con attività equivalenti. Dalla nostra garanzia sono escluse inoltre le
prestazioni di risarcimento per danni dovuti al trasporto o danni causati dalla mancata osservanza delle
istruzioni per il montaggio o per installazione non corretta, dalla mancata osservanza delle istruzioni per
l’uso (come per es. collegamento a tensione di rete o tipo di corrente non corretto), dall’uso improprio o
illecito (come per es. sovraccarico dell’apparecchio o utilizzo di utensili o accessori non consentiti), dalla
mancata osservanza delle norme di sicurezza e di manutenzione, dalla penetrazione di corpi estranei
nell’apparecchio (come per es. sabbia, pietre o polvere), dall’impiego della forza o dall’influsso esterno
(come per es. danni dovuti a caduta) e dall’usura normale e dovuta all’impiego. Ciò vale particolarmente per
batterie, per esse concediamo tuttavia 12 mesi di garanzia
Il diritti di garanzia decadono quando sono già effettuati interventi sull’apparecchio.
3. Il periodo di garanzia è 2 anni e inizia alla data d’acquisto dell’apparecchio. I diritti di garanzia devono
essere fatti valere prima della scadenza del periodo di garanzia, entro due settimane dopo avere accertato
il difetto. È esclusa la rivendicazione di diritti di garanzia dopo la scadenza del relativo periodo. La
riparazione o la sostituzione dell’apparecchio non comporta una proroga del periodo di garanzia e con
questa prestazione per l’apparecchio o per pezzi di ricambio eventualmente installati non inizia un nuovo
periodo di garanzia. Questo vale anche nel caso si ricorra ad un servizio sul posto.
4. Per la rivendicazione dei vostri diritti di garanzia inviate l’apparecchio difettoso franco di porto all’indirizzo
sotto indicato. Allegate lo scontrino di cassa in originale o un’altra prova d’acquisto che riporti la data.
Conservate bene perciò lo scontrino di cassa come prova! Indicate il motivo di reclamo nel modo più
dettagliato possibile. Se il difetto dell’apparecchio rientra nella nostra prestazione di garanzia, ricevete
l’apparecchio riparato o un apparecchio nuovo a stretto giro di posta.
Naturalmente effettuiamo a pagamento anche riparazioni sull’apparecchio che non rientrano o non rientrano più
nella garanzia. A tale scopo inviate l’apparecchio all’indirizzo del servizio assistenza.
Anleitung_BT_AC_320_50_10_SPK7:_ 02.03.2011 10:21 Uhr Seite 41
Page 42

42
q
TAKUUTODISTUS
Arvoisa asiakas,
tuotteemme läpikäyvät erittäin tiukan laadunvalvontatarkastuksen. Mikäli tämä laite ei kuitenkaan toimi
moitteettomasti, valitamme tapahtunutta suuresti ja pyydämme sinua kääntymään teknisen asiakaspalvelumme
puoleen käyttäen tässä takuukortissa annettua osoitetta. Voit halutessasi myös ottaa yhteyttä puhelimitse
allaolevaan palvelunumeroon. Takuuvaateiden esittämistä koskevat seuraavat säädökset:
1. Nämä takuumääräykset koskevat laajennettuja takuusuorituksia. Ne eivät vaikuta lakimääräisiin
takuusuoritusvaateisiisi millään tavalla. Takuumme on sinulle maksuton.
2. Takuusuoritus kattaa ainoastaan sellaiset puutteellisuudet, jotka aiheutuvat materiaali- tai
valmistusvirheistä, ja se on rajattu ainoastaan näiden puutteellisuuksien korjaamiseen tai laitteen
korvaamiseen uudella. Ole hyvä ja ota huomioon, että laitteitamme ei ole suunniteltu ja valmistettu
käytettäväksi pienteollisuus-, käsityöläis- tai teollisuustarkoituksiin. Takuusopimusta ei siksi synny, jos
laitetta käytetään pienteollisuus-, käsityöläis- tai teollisuustyöpaikoilla tai näihin verrattavissa olevissa
toimissa. Takuumme ei myöskään sisällä kuljetusvaurioiden tai sellaisten vaurioiden korvaussuorituksia,
jotka ovat aiheutuneet asennusohjeen noudattamatta jättämisestä tai asiantuntemattomasta asennuksesta,
käyttöohjeen noudattamatta jättämisestä (esim. liitäntä vääräntyyppiseen verkkovirtaan), väärinkäytöstä tai
virheellisestä käytöstä (esim. laitteen ylikuormittaminen tai hyväksymättömien työkalujen tai lisävarusteiden
käyttäminen), huolto- ja turvallisuusmääräysten noudattamatta jättämisestä, vieraiden esineiden (esim.
hiekan, kivien tai pölyjen) pääsystä laitteen sisään, väkivaltaisesta käsittelystä tai ulkopuolisista tekijöistä
(esim. putoamisesta aiheutuneet vauriot) sekä käytöstä aiheutuvasta tavallisesta kulumisesta. Tämä
koskee erityisesti niitä akkuja, joille me kuitenkin myönnämme 12 kuukauden pituisen takuun.
Takuuvaateet raukeavat, jos laitteelle on jo tehty jotain toimenpiteitä.
3. Takuuaika on 2 vuotta ja se alkaa laitteen ostopäivästä. Takuuvaateet tulee esittää ennen takuuajan
päättymistä kahden viikon kuluessa siitä, kun olet havainnut vian. Takuuvaateiden esittäminen takuuajan
päätyttyä ei ole mahdollista. Laitteen korjaus tai vaihto ei johda takuuajan pitenemiseen tai laitteen tai siihen
mahdollisesti asennettujen varaosien takuuajan alkamiseen uudelleen alusta. Tämä koskee myös paikan
päällä suoritettuja palveluja.
4. Takuuvaateesi esittämiseksi tulee viallinen laite lähettää postikulut maksettuna allaolevaan osoitteeseen.
Ole hyvä ja liitä mukaan alkuperäinen maksukuitti tai muu päiväyksellä varustettu ostotosite. Säilytä tämän
vuoksi kassakuitti huolella tositteena! Ole hyvä ja kuvaa valituksen syy meille mahdollisimman tarkoin. Jos
takuumme kattaa laitteessa olevan vian, saat korjatun tai uuden laitteen välittömästi takaisin.
Tietysti korjaamme mielellämme korvausta vastaan myös sellaiset laitteiden viat, jotka eivät kuulu tai eivät enää
kuulu takuumme piiriin. Lähetä tätä varten laite tekniseen asiakaspalveluumme allaolevalla osoitteella.
Anleitung_BT_AC_320_50_10_SPK7:_ 02.03.2011 10:21 Uhr Seite 42
Page 43

43
k
GARANTIEURKUNDE
Sehr geehrte Kundin, sehr geehrter Kunde,
unsere Produkte unterliegen einer strengen Qualitätskontrolle. Sollte dieses Gerät dennoch einmal nicht einwandfrei funktionieren, bedauern wir dies sehr und bitten Sie, sich an unseren Servicedienst unter der auf dieser Garantiekarte angegebenen Adresse zu wenden. Gern stehen wir Ihnen auch telefonisch über die unten
angegebene Servicerufnummer zur Verfügung. Für die Geltendmachung von Garantieansprüchen gilt Folgendes:
1. Diese Garantiebedingungen regeln zusätzliche Garantieleistungen. Ihre gesetzlichen Gewährleistungsansprüche werden von dieser Garantie nicht berührt. Unsere Garantieleistung ist für Sie kostenlos.
2. Die Garantieleistung erstreckt sich ausschließlich auf Mängel, die auf Material- oder Herstellungsfehler zurückzuführen sind und ist auf die Behebung dieser Mängel bzw. den Austausch des Gerätes beschränkt.
Bitte beachten Sie, dass unsere Geräte bestimmungsgemäß nicht für den gewerblichen, handwerklichen
oder industriellen Einsatz konstruiert wurden. Ein Garantievertrag kommt daher nicht zustande, wenn das
Gerät in Gewerbe-, Handwerks- oder Industriebetrieben sowie bei gleichzusetzenden Tätigkeiten eingesetzt wird.
Von unserer Garantie sind ferner Ersatzleistungen für Transportschäden, Schäden durch Nichtbeachtung
der Montageanleitung oder aufgrund nicht fachgerechter Installation, Nichtbeachtung der Gebrauchsanleitung (wie durch z.B. Anschluss an eine falsche Netzspannung oder Stromart), missbräuchliche oder unsachgemäße Anwendungen (wie z.B. Überlastung des Gerätes oder Verwendung von nicht zugelassenen
Einsatzwerkzeugen oder Zubehör), Nichtbeachtung der Wartungs- und Sicherheitsbestimmungen, Eindringen von Fremdkörpern in das Gerät (wie z.B. Sand, Steine oder Staub), Gewaltanwendung oder
Fremdeinwirkungen (wie z. B. Schäden durch Herunterfallen) sowie durch verwendungsgemäßen, üblichen
Verschleiß ausgeschlossen. Dies gilt insbesondere für Akkus, auf die wir dennoch eine Garantiezeit von
12 Monaten gewähren
Der Garantieanspruch erlischt, wenn an dem Gerät bereits Eingriffe vorgenommen wurden.
3. Die Garantiezeit beträgt 2 Jahre und beginnt mit dem Kaufdatum des Gerätes. Garantieansprüche sind vor
Ablauf der Garantiezeit innerhalb von zwei Wochen, nachdem Sie den Defekt erkannt haben, geltend zu
machen. Die Geltendmachung von Garantieansprüchen nach Ablauf der Garantiezeit ist ausgeschlossen.
Die Reparatur oder der Austausch des Gerätes führt weder zu einer Verlängerung der Garantiezeit noch
wird eine neue Garantiezeit durch diese Leistung für das Gerät oder für etwaige eingebaute Ersatzteile in
Gang gesetzt. Dies gilt auch bei Einsatz eines Vor-Ort-Services.
4. Für die Geltendmachung Ihres Garantieanspruches übersenden Sie bitte das defekte Gerät portofrei an die
unten angegebene Adresse. Fügen Sie den Verkaufsbeleg im Original oder einen sonstigen datierten Kaufnachweis bei. Bitte bewahren Sie deshalb den Kassenbon als Nachweis gut auf! Beschreiben Sie uns bitte
den Reklamationsgrund möglichst genau. Ist der Defekt des Gerätes von unserer Garantieleistung erfasst,
erhalten Sie umgehend ein repariertes oder neues Gerät zurück.
Selbstverständlich beheben wir gegen Erstattung der Kosten auch gerne Defekte am Gerät, die vom Garantieumfang nicht oder nicht mehr erfasst sind. Dazu senden Sie das Gerät bitte an unsere Serviceadresse.
iSC GmbH • Eschenstraße 6 • 94405 Landau/Isar (Deutschland)
Telefon: +49 [0] 180 5 120 509 • Telefax +49 [0] 180 5 835 830 (Festnetzpreis: 14 ct/min, Mobilfunkpreise maximal: 42 ct/min)
Außerhalb Deutschlands fallen stattdessen Gebühren für ein reguläres Gespräch ins dt. Festnetz an.
E-Mail: info@isc-gmbh.info
• Internet: www.isc-gmbh.info
Anleitung_BT_AC_320_50_10_SPK7:_ 02.03.2011 10:21 Uhr Seite 43
Page 44
EH 11/2010 (02)
Name:
Service Hotline: 01805 120 509 · www.isc-gmbh.info · Mo-Fr. 8:00-20:00 Uhr
(Festnetzpreis: 14 ct/min, Mobilfunkpreise maximal: 42 ct/min; Außerhalb Deutschlands fallen stattdessen Gebühren für ein reguläres Gespräch ins dt. Festnetz an.)
Straße / Nr.:
PLZ Ort
Mobil:
Telefon:
Retouren-Nr. iSC:
Kaufbeleg-Nr. / Datum:
Garantie:
JA
NEIN
Welcher Fehler ist aufgetreten (genaue Angabe): Art.-Nr.: I.-Nr.:
Sehr geehrte Kundin, sehr geehrter Kunde,
bitte beschreiben Sie uns die von Ihnen festgestellte Fehlfunktion Ihres Gerätes als Grund Ihrer Beanstandung möglichst genau. Dadurch können wir
für Sie Ihre Reklamation schneller bearbeiten und Ihnen schneller helfen. Eine zu ungenaue Beschreibung mit Begriffen wie „Gerät funktioniert nicht“
oder „Gerät defekt“ verzögert hingegen die Bearbeitung erheblich.
Service Hotline kontaktieren oder bei iSC-Webadresse anmelden - es wird Ihnen eine Retourennummer zugeteilt l Ihre Anschrift eintragen l Fehlerbeschreibung
und Art.-Nr. und I.-Nr. angeben l Garantiefall JA/NEIN ankreuzen sowie Kaufbeleg-Nr. und Datum angeben und eine Kopie des Kaufbeleges beilegen
Anleitung_BT_AC_320_50_10_SPK7:_ 02.03.2011 10:21 Uhr Seite 44
 Loading...