


Instruction Manual Manuel d’instructions Manual de instrucciones

EN
FR-CA
ES-LATAM
Instruction Manual 2
Manuel d’instructions 31
Manual de instrucciones 58
Congratulations on the purchase of your ECOVACS ROBOTICS WINBOT! We hope it brings you many years of satisfaction. We believe that your new robot will help keep your home clean and provide you with more quality time to do other things.
Live Smart. Enjoy Life.
Should you have any problems programming the robot or getting your robot to function properly, please call us before contacting or returning it to the place of purchase. Call our toll-free number 1-844-ECOVACS (1-844-326-8227) or 1-330-994-1760 from outside the United States of America or Canada for assistance.
For more information, please visit the ECOVACS ROBOTICS official website: www.ecovacs.com
The company reserves the right to make technological and/or design changes to this product for the purpose of continuous improvement.
Thank you for choosing WINBOT

Contents
1. |
Important Safety Instructions |
4 |
2. |
Package Contents and Technical Specifications |
8 |
3. Operating WINBOT.......................................................................................................................................................... |
12 |
|
4. |
Maintenance..................................................................................................................................................................... |
21 |
5. |
Status Indicator Light and Sounds ............................................................................................................................... |
26 |
6. |
Troubleshooting .............................................................................................................................................................. |
27 |
3 EN

1. Important Safety Instructions
IMPORTANT SAFETY INSTRUCTIONS
SAVE THESE INSTRUCTIONS
WARNING – When using electric appliances, basic precautions should always be followed, including the following:
1.This Appliance is not intended to be used by children under 8 or anyone lacking knowledge on proper use. Supervision may be necessary. Do not allow children to play with the Appliance.
2.Do not use the Appliance in extremely hot, cold or humid environments (below 0˚C/32˚F, above 40˚C/104˚F, above 65% humidity). The Appliance can be used to clean outside windows if it is properly tethered to the Safety Pod, winds are calm, and it is not raining or snowing.
3.Do not leave the Appliance unattended during operation.
4.For household use ONLY. Do not use the Appliance in commercial or industrial environments.
5.Do not use the Appliance on cracked glass, or glass with posters attached or raised dots on it.
6.Only use the Appliance as instructed by the instruction manual. Only use accessories recommended or supplied by the manufacturer. Only use the Rechargeable Battery and Power Adapter supplied by the manufacturer.
7.Please make sure your power supply voltage matches the power voltage marked on the Power Adapter.
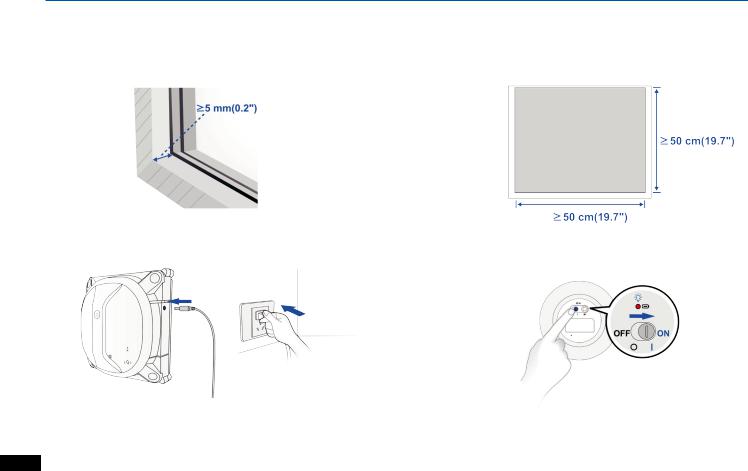
8.Do not use the Appliance on a framed window with a frame smaller than 5 mm(0.2 inches).
9.Do not use the Appliance on wet or greasy windows.
10.Store the Appliance away from heat and flammable materials.
11.Do not use the Appliance if it does not firmly attach to the glass or has visible signs of damage.
12.To reduce the risk of electrical shock, do not put the Appliance in water or any other liquid. Do not place or store Appliance where it could fall or be pulled into a bathtub or sink.
13.Do not touch the power plug or the Appliance with wet hands.
14.Do not charge theAppliance in extremely hot or cold environments, as doing so may affect battery life span.
15.When charging the Appliance, do not place it on top of other electrical appliances and keep it away from fire and liquid.
16.Take care not to damage the power cord. Do not pull on or carry the Appliance by the power cord, use the power cord as a handle, or put heavy weights on the power cord. Keep the power cord from hot surfaces.
17.Do not use with a damaged power cord or receptacle. Do not use the Appliance if it is not working properly, has been dropped, damaged, or has come into contact with water. It must be repaired by the manufacturer or its service agent in order to avoid a hazard.
18.If the supply cord is damaged, it must be replaced by the manufacturer or its service agent in order to avoid a hazard.
19.The plug must be removed from the receptacle before cleaning or maintaining the Appliance.
20.Do not unplug the Power Adapter by pulling on the power cord.
EN 4
1. Important Safety Instructions
21.The Battery must be replaced by the manufacturer or its service agent in order to avoid a hazard.
22.The Battery must be removed and discarded according to local laws and regulations before disposal of the Appliance.
23.The Appliance must be disconnected from the receptacle before removing the battery for disposal of the Appliance.
24.Please dispose of used batteries according to local laws and regulations.
25.Do not incinerate the Appliance even if it is severely damaged.
The battery can explode when exposed to fire.
26.The Appliance must be used in accordance with the directions in this Instruction Manual. The manufacturer cannot be held liable or responsible for any damages or injuries caused by improper use.
27.Read all instructions before using this appliance.
28.Risk of Electric Shock. Do not expose to rain, store indoors.
29.To reduce the risk of injury, close supervision is necessary when an appliance is used near children.
30.Do not contact moving parts.
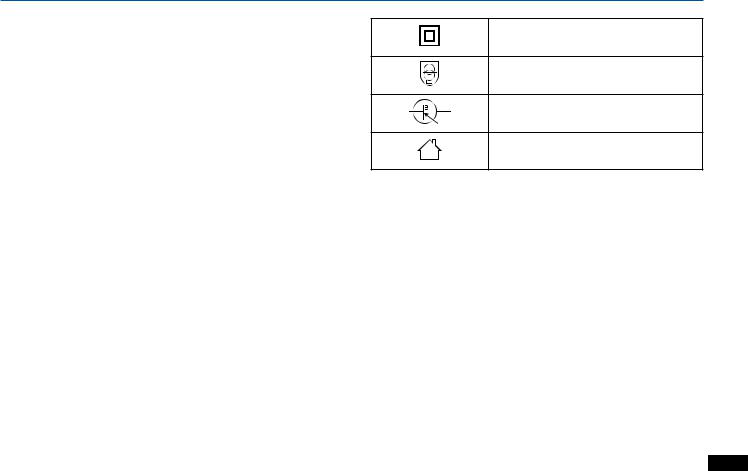
Class II
Short-circuit-proof safety isolating transformer
Switch mode power supply
For indoor use only
5 EN

1. Important Safety Instructions
Federal Communications Commission (FCC) Interference
Statement
This equipment has been tested and found to comply with the limits for a Class B digital device, pursuant to Part 15 of the FCC Rules.
These limits are designed to provide reasonable protection against harmful interference in a residential installation. This equipment generate, uses and can radiate radio frequency energy and, if not installed and used in accordance with the instructions, may cause harmful interference to radio communications.
However, there is no guarantee that interference will not occur in a particular installation. If this equipment does cause harmful interference to radio or television reception, which can be determined by turning the equipment off and on, the user is encouraged to try to correct the interference by one of the following measures:
-Reorient or relocate the receiving antenna.
-Increase the separation between the equipment and receiver.
-Connect the equipment into an outlet on a circuit different from that to which the receiver is connected.
-Consult the dealer or an experienced radio/TV technician for help.
This device complies with Part 15 of the FCC Rules. Operation is subject to the following two conditions:
(1) This device may not cause harmful interference, and (2) this device must accept any interference received, including interference that may cause undesired operation.
CAN ICES-3 (B)/NMB-3(B)
FCC Caution: Any changes or modifications not expressly approved by the party responsible for compliance could void the user’s authority to operate this equipment.
RF exposure warning
This equipment complies with FCC radiation exposure limits set forth for an uncontrolled environment.
This equipment must be installed and operated in accordance with provided instructions and the antenna(s) used for this transmitter must be installed to provide a separation distance of at least 20 cm from all persons and must not be collocated or operating in conjunction with any other antenna or transmitter.
EN 6

1. Important Safety Instructions
IC Radiation Exposure Statement for Canada
This device complies with Industry Canada licence-exempt RSS standard(s). Operation is subject to the following two conditions: (1) this device may not cause interference, and (2) this device must accept any interference, including interference that may cause undesired operation of the device.
Le présent appareil est conforme aux CNR d'Industrie Canada applicables aux appareils radio exempts de licence. L'exploitation est autorisée aux deux conditions suivantes : (1) l'appareil ne doit pas produire de brouillage, et (2) l'utilisateur de l'appareil doit accepter tout brouillage radioélectrique subi, même si le brouillage est susceptible d'en compromettre le fonctionnement.
Under Industry Canada regulations, this radio transmitter may only operate using an antenna of a type and maximum (or lesser) gain approved for the transmitter by Industry Canada. To reduce potential radio interference to other users, the antenna type and its gain should be so chosen that the equivalent is otropically radiated power (e.i.r.p.) is not more than that necessary for successful communication.
Conformément à la réglementation d'Industrie Canada, le présent émetteur radio peut
fonctionner avec une antenne d'un type et d'un gain maximal (ou inférieur) approuvé pour l'émetteur par Industrie Canada. Dans le but de réduire les risques de brouillage radioélectrique à l'intention des autres utilisateurs, il faut choisir le type d'antenne et son gain de sorte que la puissance isotrope rayonnée équivalente (p.i.r.e.) ne dépasse pas l'intensité nécessaire à l'établissement d'une communication satisfaisante.
User manuals for transmitters equipped with detachable antennas shall also contain the following notice in a conspicuous location: This radio transmitter (identify the device by certification number, or model number if
Category II) has been approved by Industry Canada to operate with the antenna types listed below with the maximum permissible gain and required antenna impedance for each antenna type indicated. Antenna types not included in this list, having a gain greater than the maximum gain indicated for that type, are strictly prohibited for use with this device.
Le présent émetteur radio (identifier le dispositif par son numéro de certification ou son numéro de modèle s'il fait partie du matériel de catégorie I) a été approuvé par Industrie Canada pour fonctionner avec les types d'antenne énumérés ci-dessous et ayant un gain admissible maximal et l'impédance requise pour chaque type d'antenne. Les types d'antenne non inclus dans cette liste,ou dont le gain est supérieur au gain maximal indiqué, sont strictement interdits pour l'exploitation de l'émetteur.
IMPORTANT NOTE:
Radiation Exposure Statement:
This equipment complies with “Industry Canada RSS-102 for radiation exposure limits set forth for an uncontrolled environment”.
This equipment should be installed and operated with minimum distance 20cm between the radiator and your body.
7 EN
2. Package Contents and Technical Specifications
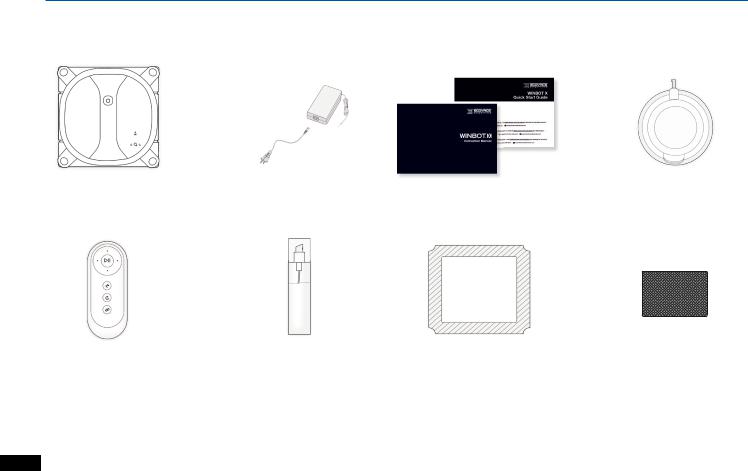
2.1 Package Contents
WINBOT |
Power Adapter |
Instruction Manual + Quick Start Guide |
Safety Pod with Batteries |
|
Pre-installed |
||||
|
|
|
Remote Control with |
WINBOT Cleaning |
Cleaning Pads x4 |
Finishing Cloth |
Batteries |
Solution |
|
|
Note: Figures and illustrations are for reference only and may differ from actual product appearance.
Product design and specifications are subject to change without notice.
EN 8
2. Package Contents and Technical Specifications
2.2 Specifications
Model |
|
WA30 |
|
|
|
|
|
|
|
Working voltage |
22.2V DC |
Rated power |
60W |
|
|
|
|
|
|
|
Remote Control |
|
||
|
|
|
||
Rated output voltage |
3V DC |
|
||
|
|
|
||
Power Adapter |
|
OH-1048A2701700U1-U |
||
|
|
|
|
|
Input |
100-240V AC, |
Output |
27V DC, 1.7A |
|
50/60Hz,1.5A |
||||
|
|
|
||
Note: Technical and design specifications may be changed in the course of continuous product improvement.
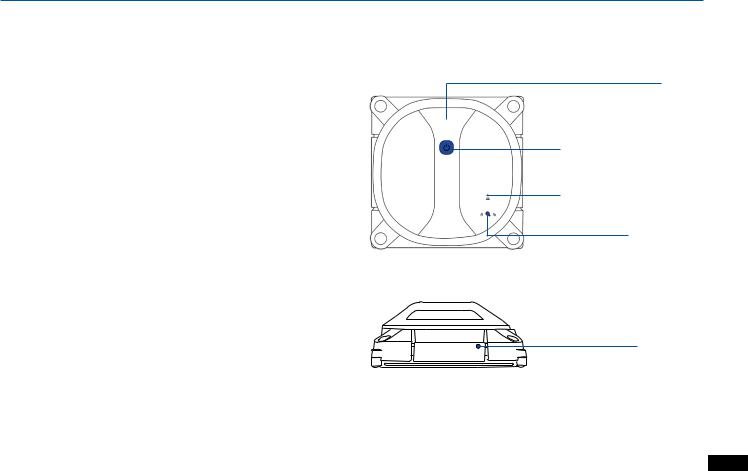
2.3 Product Diagram
WINBOT
Handle
WINBOT Status Indicator Light/
START/PAUSE Button
Safety Pod Status Indicator Light
Safety Pod Port
Charging Port
9 EN
2. Package Contents and Technical Specifications
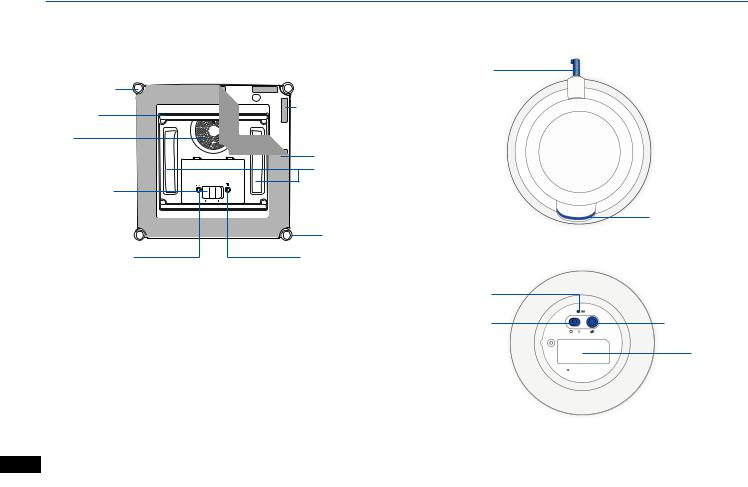
WINBOT
Edge Detection
Sensors
Squeegee
Fan
Power Switch
Bottom Safety Pod
Status Indicator Light
Safety Pod
Safety Pod Jack
Cleaning Pad Hook
and Loop Fastener
Cleaning Pad
Driving Treads
Side Rollers
Bottom WINBOT
Status Indicator Light
Battery Indicator
Light
Power Switch
Quick Release Handle
Safety Pod Pairing
Button
Battery Slot
Note: Safety Pod comes with batteries pre-installed.
EN 10
2. Package Contents and Technical Specifications
Remote Control
Direction Control |
|
|
|
START/PAUSE Button |
Buttons |
|
|
|
|
Deep Cleaning Mode
Button
RESET Button
Remote Control
Pairing Button
Button |
How to Use |
|
|
|
|
Direction Control Buttons |
Press to control the directions in which WINBOT |
|
travels. |
||
|
|
|
START/PAUSE Button |
Press to start/pause WINBOT. |
|
|
|
|
|
Used to clean windows in both N- and Z- patterns, |
|
Deep Cleaning Mode |
providing a better cleaning performance. If WINBOT |
|
Button |
is in AUTO Cleaning Mode, please pause it before |
|
|
using this function. |
|
|
|
|
|
1. Press the RESET Button to gain control of WINBOT |
|
|
if it is stuck; |
|
RESET Button |
2. Press RESET once, then press RESET again |
|
and hold it to enter Manual Override Mode and gain |
||
|
||
|
control of WINBOT (see Section 6. Troubleshooting |
|
|
for details). |
|
|
|
|
Remote Control Pairing |
Used to pair Remote Control with WINBOT (pairing |
|
Button |
has been set up by default). |
|
|
|
11 EN
3.Operating WINBOT
3.1Notes Before Cleaning
Please refer to the glass manufacturer's care and cleaning instructions before using WINBOT on glass with an uneven surface, such as frosted, textured, patterned, or coated glass. ECOVACS cannot be held liable or responsible for damage due to improper use on these surfaces.
Do not use WINBOT on a framed window with a frame narrower than |
WINBOT can clean framed or frameless glass larger than 50 cm x 50 cm |
5 mm(0.2’’). |
(19.7’’ x 19.7’’). |
If WINBOT’s Status Indicator Light flashes RED, please charge WINBOT.
EN 12
If the Safety Pod's Battery Indicator Light flashes RED, the battery power is low, and the Safety Pod cannot work. Please change the battery.
3. Operating WINBOT
If the window is covered with dirt, clean a small area of the glass before placing Safety Pod and WINBOT there.
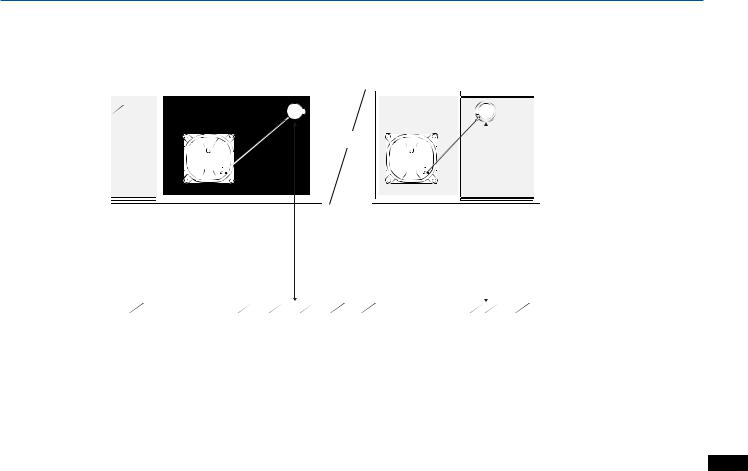
WINBOT can clean glass installed horizontally, but only when using the Direction Control Buttons on the Remote Control. Keep the Safety Pod firmly attached to the glass.
WINBOT can clean glass installed at an angle, but may not operate normally. In this case, a person should remain in the vicinity to assist
should there be a problem.
Do not use WINBOT upside down.
13 EN

3. Operating WINBOT
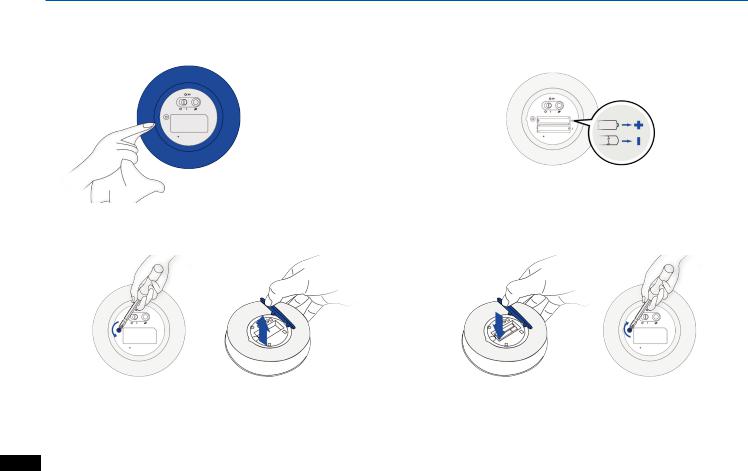
3.2 Using WINBOT
1 Assemble Power Adapter |
2 Power ON WINBOT |
Note: Keep objects away from WINBOT’s Fan to avoid blockage.
3 Charge WINBOT
2.5

Note: When WINBOT is charging, the WINBOT Status Indicator Light flashes BLUE. When WINBOT is fully charged, the WINBOT Status
Indicator Light glows a continuous BLUE and then goes out.
EN 14
3. Operating WINBOT
4 Attach the Cleaning Pad (Pre-installed)
Note: Make sure the white side of the Cleaning Pad attaches to the fastener.
The Cleaning Pad is not completely square, make sure it does not cover the Squeegees or Edge Detection Sensors.
5 Spray Cleaning Solution
It is recommended to use WINBOT with WINBOT Cleaning Solution from ECOVACS. Using tap water or other cleaners could have an adverse effect on cleaning performance. Using other cleaning solutions could potentially void the warranty.
1 |
2 |
Step |
Step |
Note: Do not over-spray Cleaning Solution as doing so may cause the driving treads to slip.
Note: After spraying, BE SURE to wipe the bottom of WINBOT with a dry cloth.
15 EN
3. Operating WINBOT
Warning: When using WINBOT to clean windows, the Safety Pod must be used to guarantee the safe operation of WINBOT.
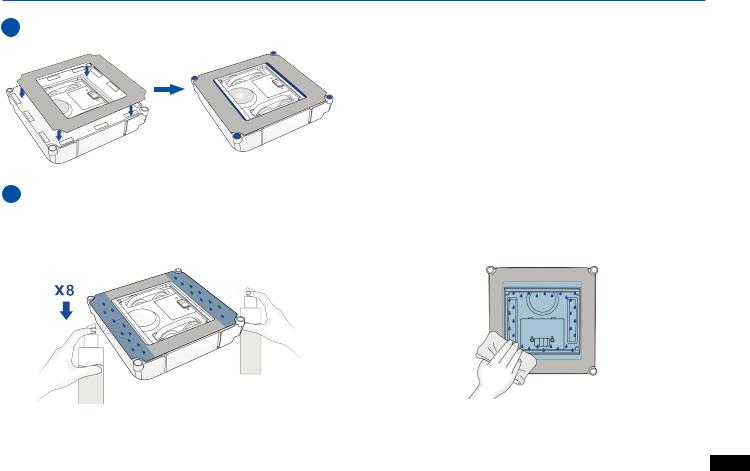
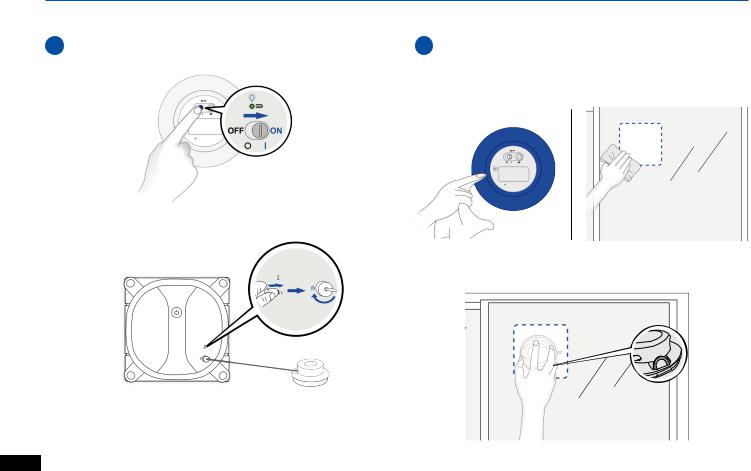
6 Prepare the Safety Pod
1Step
7 Start Cleaning
|
Make sure to use the Finishing Cloth to clean the Safety Pod bottom. |
Step |
Use a dry cloth to clean an area on the glass where the Safety Pod |
1 is to be attached. |
|
Step |
Press the Safety Pod firmly on the glass until the Safety Pod |
|
2 |
||
2 Status Indicator Light glows a continuous GREEN. |
||
Step |
Note: Turn the jack plug clockwise towards  until it locks.
EN 16
3. Operating WINBOT
INSTRUCTIONS PERTAINING TO A RISK OF INJURY TO PERSONS
3 |
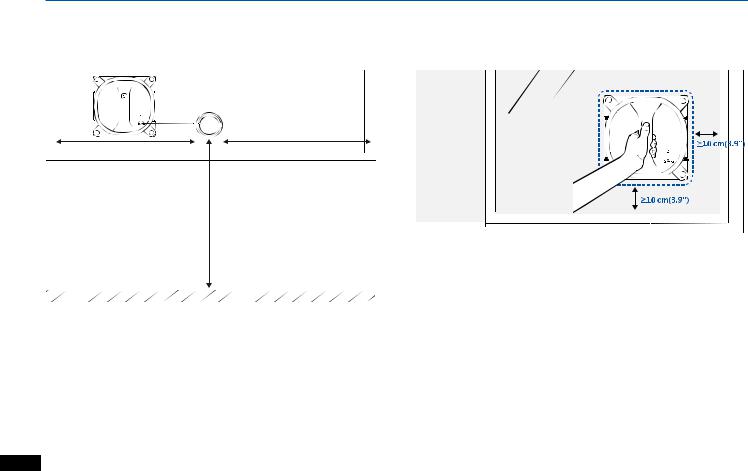
If the window is equal to or less than 1 m wide, place the Safety Pod at the top corner of the window or a nearby window. Make sure the Safety |
Pod is attached at least 1.6 m(5.2') above ground. |
|
Step |
|
OR
N |
N |
Note: The Fan does not start until Safety Pod is firmly pressed on the glass. Keep the fan away from hair or any debrisThe. length of the Safety Pod cable is 2.5 m(8.2').
Warning: Whether WINBOT is being used to clean the inside or the outside of a window, ALWAYS press the Safety Pod FIRMLY on the INSIDE of the window.
17 EN
3. Operating WINBOT
4If the window is wider than 1 m(3.3'), place the Safety Pod in the Step middle of the window. Make sure it is 1.6 m(5.2') above the ground.
5 WINBOT has successfully attached to the window when the Step WINBOT Status Indicator Light glows a continuous BLUE and
beeps.
N |
N |
N
Note: Please ensure there is a 15 cm(5.9”) clearance between the glass and any obstacles in the room like curtains or furniture.
EN 18

3. Operating WINBOT
6Step
AUTO Cleaning Mode
This is the most commonly used mode and is most suitable for regular cleaning.
Deep Cleaning Mode
This mode can be used for a better cleaning performance as WINBOT cleans in both N- and Z- patterns.
OR
8 Pause WINBOT
OR |
OR |
|
Note: WINBOT automatically chooses the suitable cleaning path in an |
Note: The Direction Control Buttons on the Remote Control cannot be |
|
N- or Z-pattern Cleaning Mode depending on the shape of the window. |
used until WINBOT is paused. |
|
|
19 |
|
|
EN |
3. Operating WINBOT
9 Stop (Finish Cleaning)
When WINBOT completes its cleaning cycle, it returns to the place where it started and plays a tune.
1Step
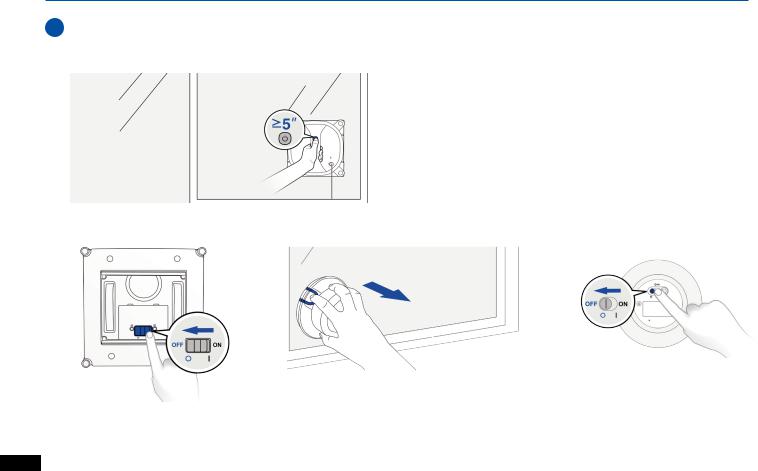
Note: Use a dry cloth to wipe away any marks the robot has left behind on the glass. If you want to stop the WINBOT during cleaning, first press the START/PAUSE Button once to pause WINBOT, and then hold WINBOT FIRMLY while pressing and holding this button for more than 5 seconds to remove WINBOT.
2 |
3 |
4 |
Step |
Step |
Step |
Note: If WINBOT has a problem and the WINBOT Status Indicator Light glows a continuous RED, it can be reset by pressing the RESET Button on the
Remote Control. See Section 6. Troubleshooting for details.
EN 20
4. Maintenance
Before performing cleaning and maintenance on WINBOT, POWER OFF WINBOT and disconnect it from the Power Adapter.
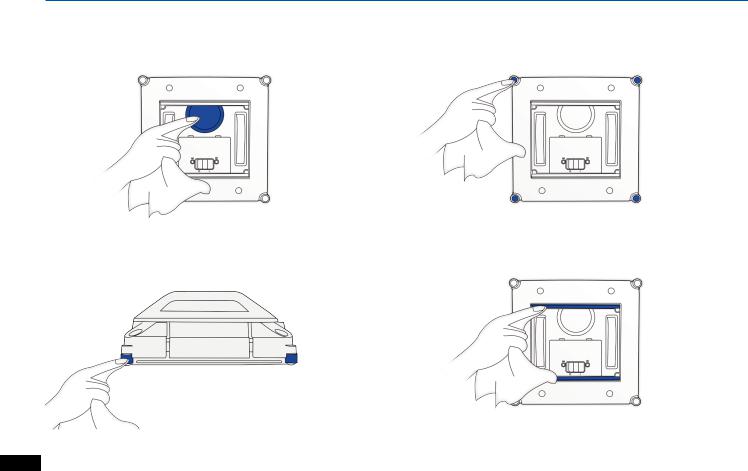
4.1 Cleaning Pad
Note:
Wash with mild detergent.
Do NOT use a wet Cleaning Pad on WINBOT or it may slip on the window. Washing the Cleaning Pad regularly can extend its service life.
If the Cleaning Pad becomes worn or no longer fits exactly within the fastener area, replace it with a new one to achieve optimal cleaning performance.
21 EN
4.Maintenance
4.2Fan, Side Rollers, Edge Detection Sensors and Squeegees
Fan |
Edge Detection Sensors |
Side Rollers |
Squeegees |
EN 22

4. Maintenance
4.3 Driving Treads
1 |
3 |
Step |
Step |
2 Inspect the Driving Treads by using the Direction Control Step Buttons on the Remote Control. Stop the Driving Treads if you
see dirt on them.
23 EN
4. Maintenance
4.4 Safety Pod
Clean Safety Pod |
2 |
|
Step |
Change batteries in Safety Pod (if necessary)
1 |
3 |
Step |
Step |
Note: Remove the Safety Pod’s battery if the robot will not be used for a long time. In case of battery leakage, please remove the battery and dispose of it in accordance with local laws and regulations.
EN 24

4. Maintenance
4.5 Regular Maintenance
To keep WINBOT running at peak performance, perform the maintenance and replacement in accordance with the following frequencies.
Robot Part |
Maintenance Frequency |
Replacement Frequency |
|
|
|
Cleaning Pad |
After each use |
Every 40 washings |
|
|
|
Fan |
|
|
|
|
|
Side Rollers |
|
|
|
|
|
Edge Detection Sensors |
After each use |
/ |
|
|
|
Squeegees |
|
|
Driving Treads
Note: ECOVACS manufactures various replacement parts and assemblies. Please contact Customer Service for more information on replacement parts.
25 EN

5. Status Indicator Light and Sounds
WINBOT emits beeps when encountering problems. When you hear the beeps, please check the Status Indicator Light list below to find the solutions.
|
Indicator |
Status |
Description |
|
|
|
|
|
|
|
|
|
1. WINBOT is charging. |
|
|
|
Flashing BLUE |
2. WINBOT has been paired with the Safety Pod already and is ready to |
|
|
|
|
be placed on the glass. |
|
|
WINBOT Status |
|
1. WINBOT has successfully adhered itself to the glass and is ready to |
|
|
Continuous BLUE |
clean. |
||
|
Indicator Light |
|||
|
|
2. The Safety Pod is in preparation. |
||
|
|
|
||
|
|
|
|
|
|
|
Flashing RED |
The robot’s battery is low. Charge WINBOT as described in Section 3.2. |
|
|
|
|
|
|
|
|
Continuous RED |
Please refer to Section 6. Troubleshooting for details. |
|
|
|
|
|
|
WINBOT |
|
|
The Safety Pod is not prepared to be pressed onto the glass: |
|
|
|
|
1.The Safety Pod Jack is not inserted into WINBOT. |
|
|
|
Flashing GREEN |
2.The Safety Pod is not paired with WINBOT. |
|
|
|
|
3.The Safety Pod is not attached to the glass safely and firmly. |
|
|
Safety Pod Status |
|
4.The Safety Pod is pairing with WINBOT. |
|
|
Continuous GREEN |
The Safety Pod is working normally. WINBOT can start working. |
||
|
Indicator Light |
|||
|
|
|
|
|
|
|
Flashing RED |
The Safety Pod’s battery is low. Replace the battery as described in |
|
|
|
Section 4.4. |
||
|
|
|
||
|
|
|
|
|
|
|
Continuous RED |
Please refer to Section 6. Troubleshooting, for details. |
|
|
|
|
|
|
|
|
Flashing RED |
The Safety Pod’s battery is low. Please replace the battery as described |
|
Safety Pod |
Battery Indicator |
in Section 4.4. |
||
|
||||
Light |
|
|
||
Continuous GREEN |
The Safety Pod’s battery is sufficient. |
|||
|
||||
|
|
|||
|
|
|
|
EN 26
 Loading...