


EN
DE
ES
FR
IT
Instruction Manual Benutzerhandbuch Manual de instrucciones Manuel d'instructions Manuale d'uso

EN
DE
ES
FR
IT
Instruction Manual .............................................................. |
2 |
Benutzerhandbuch............................................................ |
26 |
Manual de instrucciones |
|
.................................................. |
50 |
Manuel d'instructions....................................................... |
74 |
Manuale d'uso ................................................................... |
98 |
EU-Declaration of conformity............................................. |
122 |
Congratulations on the purchase of your ECOVACS ROBOTICS DEEBOT! We hope it brings you many years of satisfaction. We trust the purchase of your new robot will help keep your home clean and provide you more quality time to do other things.
Live Smart. Enjoy Life.
Should you encounter situations that have not been properly addressed in this Instruction Manual, please contact our Customer Service Center where a
For more information, please visit the ECOVACS ROBOTICS official website: www.ecovacs.com
The Company reserves the right to make technological and/or design changes to this product for continuous improvement.
Thank you for choosing DEEBOT!

Contents
1. |
Important Safety Instructions...................................................................... |
4 |
|
|
|
...................................... |
8 |
|
2.1 |
Package Contents .................................................................................... |
8 |
|
|
........................................................................................... |
8 |
|
2.3 |
Product Diagram....................................................................................... |
9 |
3. |
Operating and Programming..................................................................... |
11 |
|
|
3.1 |
Notes Before Cleaning ........................................................................... |
11 |
|
3.2 |
Quick Start.............................................................................................. |
12 |
|
3.3 |
Cleaning Mode Selection........................................................................ |
15 |
|
3.4 |
Programming the Robot ......................................................................... |
17 |
|
3.5 |
Indicator Light and Alarm Sounds........................................................... |
19 |
4. |
Maintenance................................................................................................ |
20 |
|
|
4.1 |
Dust Bin and Filters................................................................................ |
20 |
|
4.2 |
Main Brush and Side Brushes................................................................ |
21 |
|
4.3 |
Other Components ................................................................................. |
22 |
|
4.4 |
Regular Maintenance ............................................................................. |
23 |
5. |
Troubleshooting ......................................................................................... |
24 |
|
EN 3
1. Important Safety Instructions
When using an electrical appliance, basic precautions should always be followed, including the following:
READ ALL INSTRUCTIONS BEFORE USING THIS APPLIANCE.
SAVE THESE INSTRUCTIONS
1.This Appliance can be used by children aged from 8 years and above and persons with reduced physical, sensory or mental capabilities or lack of experience and knowledge if they have been given supervision or instruction concerning use of the Appliance in a safe way and understand the hazards involved. Children shall not play with the Appliance. Cleaning and user maintenance shall not be made by children without supervision.
2.Clear the area to be cleaned. Remove power cords and small objects under the rug base, and lift items such as curtains and tablecloths
3.If there is a drop off in the cleaning area due to a step or stairs, you should operate the Appliance to ensure that it can detect the step without falling over the edge. It may become necessary to place a physical barrier at the edge to keep the unit from falling. Make sure the physical barrier is not a trip hazard.
4.Only use as described in this manual. Only use attachments recommended or sold by the manufacturer.
5.Please make sure your power supply voltage matches the power voltage marked on the Charging Dock.
6.For INDOOR household use ONLY. Do not use the Appliance in outdoor, commercial or industrial environments.
7.Non-rechargeable batteries are prohibited.
8.
9.Do not operate the Appliance in an area where there are lit candles or fragile objects.
10. 
11.  any openings and moving parts.
4 EN
1.Important Safety Instructions
12.Do not operate the Appliance in a room where an infant or child is sleeping.
13.Do not use Appliance on wet surfaces or surfaces with standing water.
14.Do not allow the Appliance to pick up large objects like stones, large pieces of paper or any item that may clog the Appliance.
15.  such as gasoline, printer or copier toner, or use in areas where they may be present.
16.Do not use Appliance to pick up anything that is burning or smoking, such as cigarettes, matches, hot ashes, or anything that could cause
17.Do not put objects into the suction intake. Do not use if the suction intake is blocked. Keep the intake clear of dust, lint, hair, or anything
18.Take care not to damage the power cord. Do not pull on or carry the Appliance or Charging Dock by the power cord, use the power cord as a handle, close a door on the power cord, or pull power cord around sharp edges or corners. Do not run Appliance over the power cord. Keep power cord away from hot surfaces.
19.Ifthepowercord isdamaged,itmustbereplacedbythe manufacturer or its service agent in order to avoid a hazard.
20.Do not use the Charging Dock if it is damaged.
21.Do not use with a damaged power cord or receptacle. Do not use the Appliance or Charging Dock if it is not working properly, has been dropped, damaged, left outdoors, or come in contact with water. It must be repaired by the manufacturer or its service agent in order to avoid a hazard.
22.Turn OFF the power switch before cleaning or maintaining the Appliance.
23.The plug must be removed from the receptacle before cleaning or maintaining the Charging Dock.
24.Remove the Appliance from the Charging Dock, and turn OFF the power switch to the Appliance before removing the battery for disposal of the Appliance.
EN 5

1. Important Safety Instructions
25.The battery must be removed and discarded according to local laws and regulations before disposal of the Appliance.
26.Please dispose of used batteries according to local laws and regulations.
27.Do not incinerate the Appliance even if it is severely damaged. The
28.When not using the Charging Dock for a long period of time, please unplug it.
29.The Appliance must be used in accordance with the directions in this Instruction Manual. ECOVACS ROBOTICS cannot be held liable or responsible for any damages or injuries caused by improper use.
30.The robot contains batteries that are only replaceable by skilled persons. To replace or remove the battery, please contact Customer Service.
31.If the robot will not be used for a long time, fully charge the robot and power OFF for storage and unplug the Charging Dock.
32.WARNING: For the purposes of recharging the battery, only use the detachable supply unit DK18-190060H-V provided with this appliance.
33.The Remote Control pre-installs two non-rechargeable AAA batteries. To replace the battery of the Remote Control, please turn over the Remote Control, press and remove its Battery Cover. Remove the batteries, and insert the new batteries with the correct polarity. Reassemble the Battery Cover.
34.Non-rechargeable batteries are not to be recharged.
35.Different types of batteries or new and used batteries are not to be mixed.
36.Batteries of the Remote Control are to be inserted with the correct polarity.
37.Exhausted batteries are to be removed from the Appliance and safely disposed of.
38.If the Remote Control is to be stored unused for a long period, the batteries should be removed.
39.The supply terminals are not to be short-circuited.
6 EN
1. Important Safety Instructions
To disable Wi-Fi module on DEEBOT, power the robot ON.
Place the robot on the Docking Station making sure the Charging Contacts on DEEBOT and the Docking Station Pins make a connection.
Press and hold the AUTO Mode Button on the robot for 10 seconds until DEEBOT emits 3 beeps.
To enable Wi-Fi module on DEEBOT, power the robot OFF and then power ON. The Wi-Fi module is turned on when DEEBOT is restarted.
For EU Countries
Correct Disposal of this Product
This marking indicates that this product should not be disposed of with other household wastes throughout the EU. To prevent possible harm to the environment or human health from uncontrolled waste disposal, recycle it responsibly to promote the sustainable reuse of material resources. To recycle your used device, please use the return and collection systems or contact the retailer where the product was purchased. They can safely recycle this product.
EN 7
2.1 Package Contents
|
|
|
|
|
|
|
|
|
|
|
|
|
|
|
|
|
|
|
|
|
|
|
|
|
|
|
|
|
|
|
|
|
|
|
|
|
|
|
|
|
|
|
|
|
|
|
|
|
|
|
|
|
|
|
|
|
|
|
|
|
|
|
|
|
|
|
|
|
|
|
|
|
|
|
|
|
|
|
|
|
|
|
|
|
|
|
Robot |
|
Charging Dock with |
Remote Control |
|
Instruction Manual |
|||||||||
|
|
|
|
|
|
|
Power Adapter |
|
|
|
|
|
|
|||
|
|
|
|
|
|
|
|
|
|
|
|
|
|
|
|
|
|
|
|
|
|
|
|
|
|
|
|
|
|
|
|
|
|
|
|
|
|
|
|
|
|
|
|
|
|
|
|
|
|
|
|
|
|
|
|
|
|
|
|
|
|
|
|
|
|
|
|
|
|
|
|
|
|
|
|
|
|
|
|
|
|
|
|
|
|
|
|
|
|
|
|
|
|
|
|
|
|
|
|
|
|
|
|
|
|
|
|
|
|
|
|
|
|
|
|
|
|
|
|
|
|
|
|
|
|
|
|
|
|
|
|
|
|
|
|
Power Adapter
Model |
|
DN622.21 |
|
||
|
|
|
|
|
|
Working Voltage |
14.4V DC |
Rated Power |
|
25W |
|
|
|
|
|
|
|
|
|
Charging Dock |
|
||
|
|
|
|
|
|
Rated Input Voltage |
19V DC |
Rated output current |
|
0.6A |
|
|
|
|
|
|
|
Power Adapter Model |
|
DK18-190060H-V |
|
||
|
|
|
|
|
|
Rated Input Voltage |
100-240V AC |
Rated Input Current |
|
0.5A |
|
|
|
|
|
|
|
Rated output Voltage |
19V DC |
Rated output current |
|
0.6A |
|
|
|
|
|
|
|
Remote Control Model |
RC1507 |
Input Voltage |
|
3V DC |
|
|
|
|
|
|
|
Off/Standby Mode Power |
|
Less than 0.50 W |
|
||
|
|
|
|
|
|
Networked Standby Power |
|
Less than 2.00 W |
|
||
|
|
|
|||
Frequency Bands and |
Operating frequency: 2412MHz - 2472MHz |
||||
|
|
|
|
||
power |
|
Maximum transmitting power: 19 dBm. |
|
||
|
|
|
|||
|
|
|
|
|
|
*  * This equipment should be operated with a minimum distance of 20cm between the radiator and your body.
8 EN
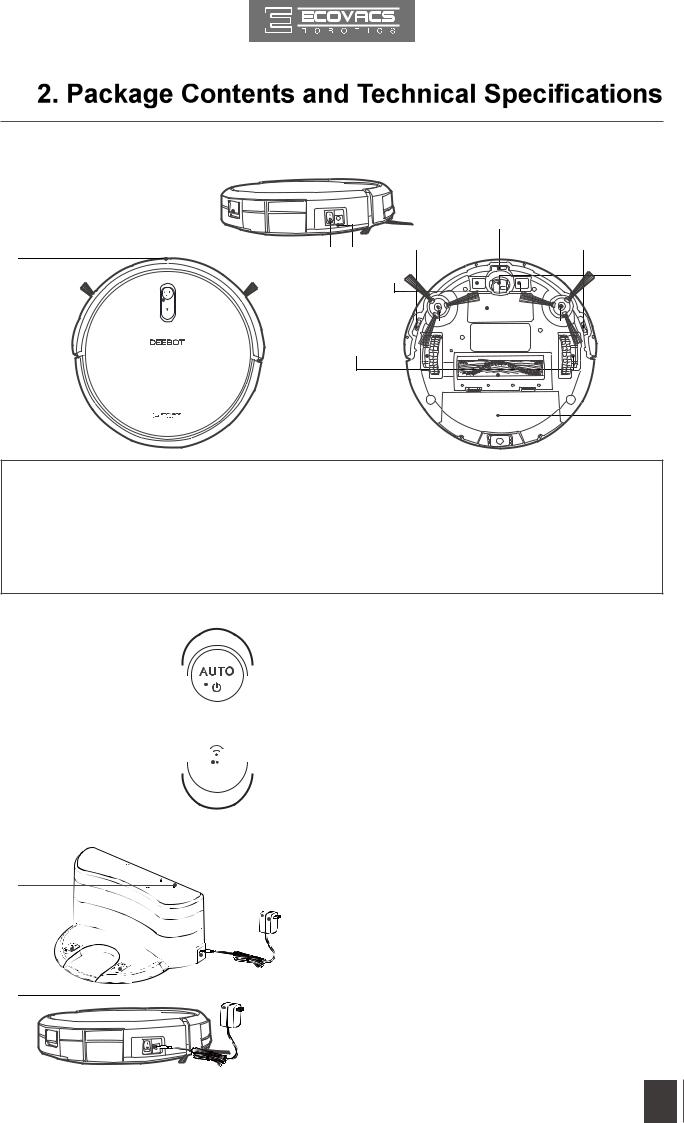
2.3 Product Diagram
Robot
3 |
9 |
|
1 |
|
|
8 |
7 |
10 |
|
|
|
4 |
|
|
2 |
|
|
|
|
|
|
|
5 |
|
11 |
|
|
|
|
|
||
|
|
|
|
|
|
|
|
|
6 |
|
12 |
|
|
|
|
|
|
|
|
|
|
|
13 |
1. Anti-Collision Sensors and Bumper |
6. |
Driving Wheels |
11. Side Brushes |
||
2. |
Control Panel |
7. |
Power Adapter Port |
12. Main Brush |
|
3. |
Dust Bin Release Button |
8. |
Power Switch |
13. Dust Bin |
|
4. |
Charging Contacts |
9. Anti-Drop Sensors |
|
||
5. |
Battery Cover |
10. Universal Wheel |
|
||
Control Panel
1 |
|
|
|
|
|
|
|
|
|
|
|
|
|
|
|
|
|
|
|
|
|
|
|
|
|
|
|
|
|
|
|
|
|
|
|
|
|
|
|
|
|
|
|
|
|
|
|
|
|
|
|
|
|
|
|
|
|
|
|
|
|
1. AUTO Mode Button |
|
|
|
|
|
|
|
|
|
|
|
|
|
|
|
2. |
Wi-Fi Indicator Light |
2 |
|
|
|
|
|
|
|
|
|
|
|
|
|
|
|
|
|
|
|
|
|
|
|
|
|
|
|
|
|
|
|
|
|
|
|
|
|
|
|
|
|
|
|
|
|
|
|
Charging Dock |
|
|
|
|
|
|
|
|
|
|
|
||||
1 |
|
|
|
|
|
|
|
|
|
|
|
|
|
|
|
2 |
|
|
|
|
|
|
|
|
|
|
|
||||
|
|
|
|
|
|
|
|
|
|
|
|
|
1. |
Power Indicator Light |
|
|
|
|
|
|
|
|
|
|
|
3 |
2. |
Power Adapter |
|||
|
|
|
|
|
|
|
|
|
|
|
|
|
|||
4 |
|
|
|
|
|
|
|
3. |
Power Adapter Port |
||||||
|
|
|
|
|
|
|
|
|
|
||||||
|
|
|
|
|
|
|
|
|
|
|
|
|
|||
|
|
|
|
|
|
|
|
|
|
4. |
Charging Dock Pins |
||||
|
|
|
|
|
|
|
|
|
|
|
|
||||
|
|
|
|
|
|
|
|
|
|
|
|
|
|
|
|
|
|
|
|
|
|
|
|
|
|
|
|
|
|
|
|
EN 9
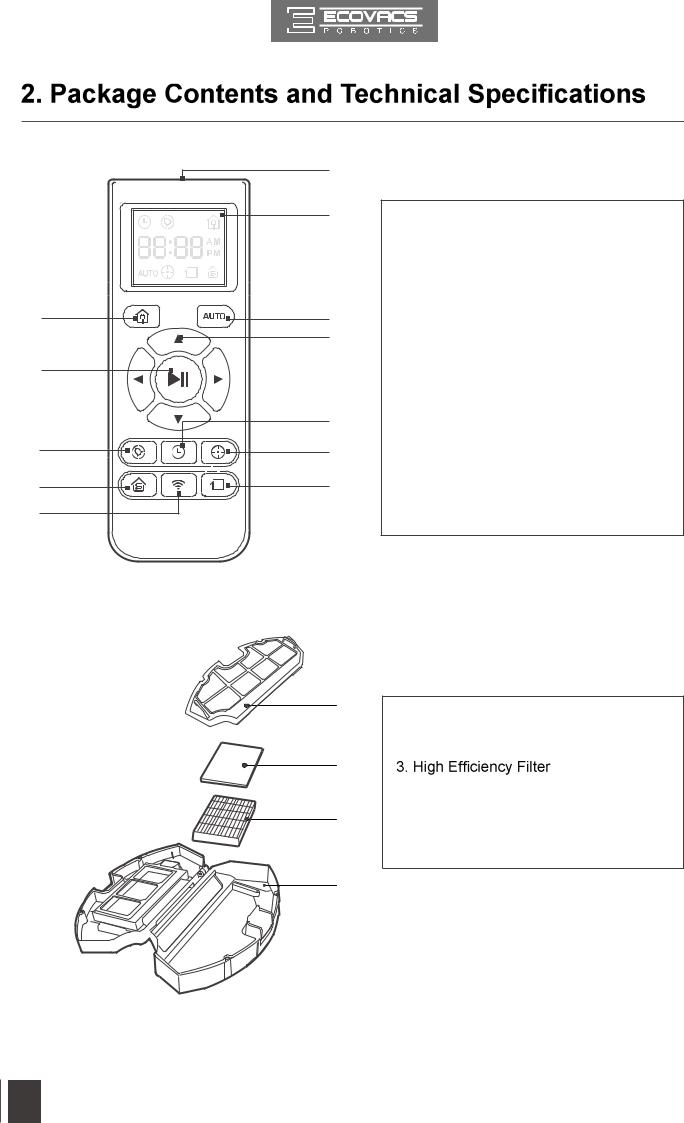
Remote Control
2 |
5 |
6 |
9 |
10 |
12 |
1 |
3 |
4 |
7 |
8 |
11 |
Dust Bin
1.LCD Screen
2.Return to Charger Mode Button
3.AUTO Mode Button
4.Direction Control Buttons
5.START/PAUSE Button
6.Time Scheduling Button
7.Set Current Time Button
8.Spot Cleaning Mode Button
9.Single Room Mode Button
10.Network Setup Button
11.Edge Cleaning Mode Button
12.Infrared Emitter
1
1. Filter Net
2. Sponge Filter
2
4. Dust Bin Cover
3 5. Dust Bin
6. Dust Bin Release Button
5


 6 4
6 4 


10 EN
3.Operating and Programming
3.1Notes Before Cleaning
Before operating DEEBOT, take a few moments to survey the area to be cleaned and remove any obstacles.
|
|
|
|
|
|
|
|
|
|
|
|
|
|
|
|
|
|
|
|
|
|
|
|
|
|
|
|
|
|
|
|
|
|
|
|
|
|
|
|
|
|
|
|
|
|
|
|
|
|
|
|
|
|
|
|
Remove power cords and small objects from |
The product is not suitable for use on long-pile |
||||||||||||
|
|
|
|
carpet. Before using the product near an area |
|||||||||
|
|
|
|
rug or on a short-pile area rug with tasseled |
|||||||||
|
|
|
|
edges, please fold area rug edges under |
|||||||||
|
|
|
|
themselves. |
|||||||||
|
|
|
|
|
|
|
|
|
|
|
|
|
|
|
|
|
|
|
|
|
|
|
|
|
|
|
|
|
|
|
|
|
|
|
|
|
|
|
|
|
|
|
|
|
|
|
|
|
|
|
|
|
|
|
|
|
|
|
|
|
|
|
|
|
|
|
|
|
|
|
|
|
|
|
|
|
|
|
|
|
|
|
|
Please be aware that the robot needs at furniture without complications.
If there is a step or stairs in the cleaning area, please operate DEEBOT to ensure its AntiDrop Sensors can detect the drop off. It may be necessary to place a physical barrier at the edge of the drop off to keep the unit from falling over the edge.
EN 11
3.Operating and Programming
3.2Quick Start
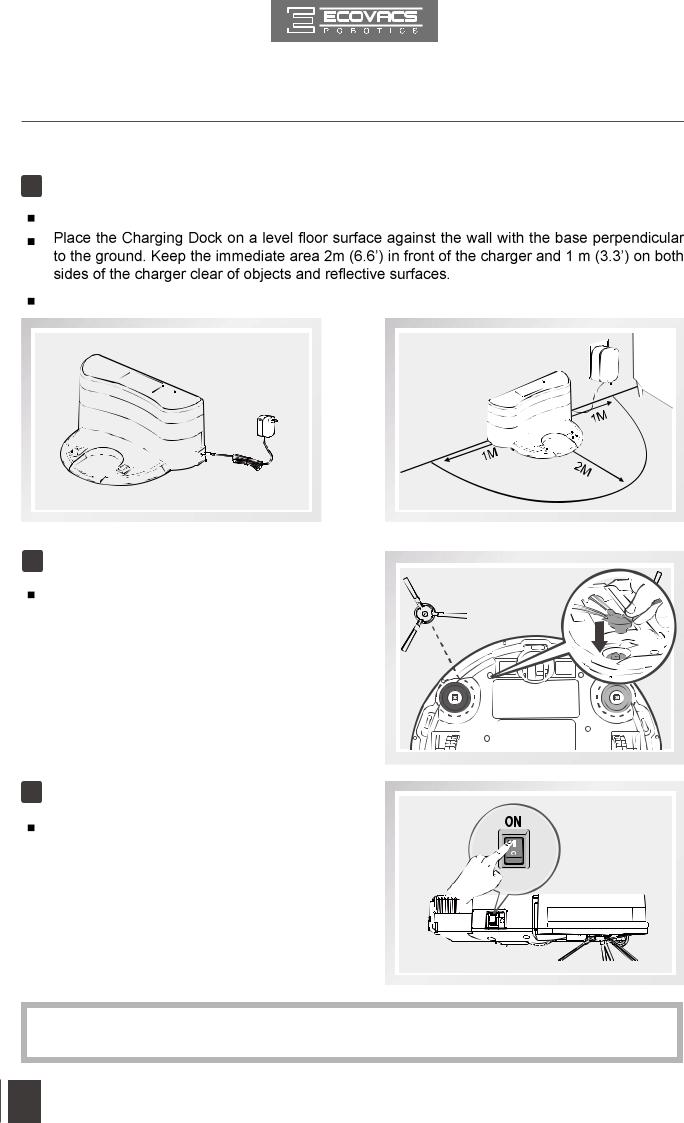
1 Charging Dock Placement
Connect the Power Adapter to the Charging Dock.
Plug the Charging Dock in. The Power Indicator Light on the Charging Dock glows.
2 Install Side Brushes
Attach Side Brushes to the bottom of DEEBOT by pressing a brush into each slot until it clicks.
3 Power ON
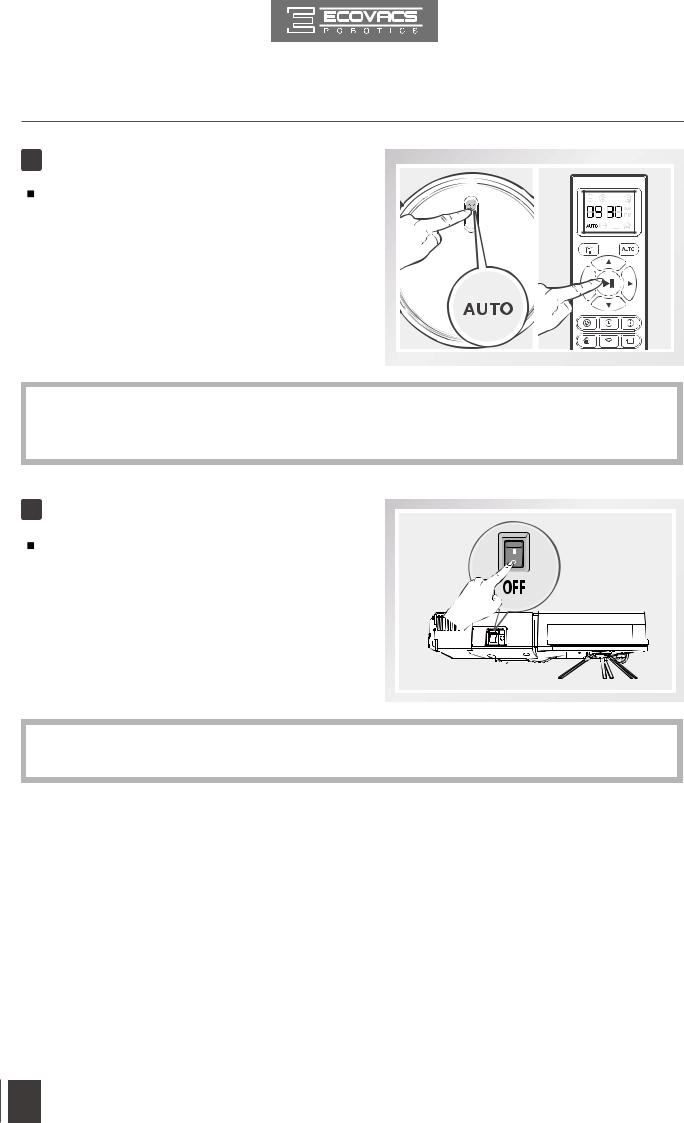
Turn the robot’s Side Power Switch to the ON position. “l” indicates ON and “O” indicates OFF. DEEBOT is powered ON when  button glows a continuous BLUE.
*When DEEBOT is not cleaning, it is suggested to keep it powered ON and charging instead of powered OFF.
12 EN
3. Operating and Programming
4 Charge DEEBOT
Place DEEBOT on the Charging Dock making sure the Charging Contacts on DEEBOT and the Charging Dock Pins make a connection.
Charge DEEBOT for at least 4 hours before
*Make sure to turn the robot’s Power Switch on before charging.
* button blinks when DEEBOT is charging.
  button stops glowing after DEEBOT is fully charged.
5 Start
Press the  button on DEEBOT or the AUTO Mode Button on the Remote Control. DEEBOT starts to work immediately in AUTO Cleaning Mode.
*To choose another Cleaning Mode, please refer to section 3.3 Cleaning Mode Selection for details.
*DEEBOT can be directed using the Direction Control Buttons on the Remote Control when it is paused.
EN 13
3. Operating and Programming
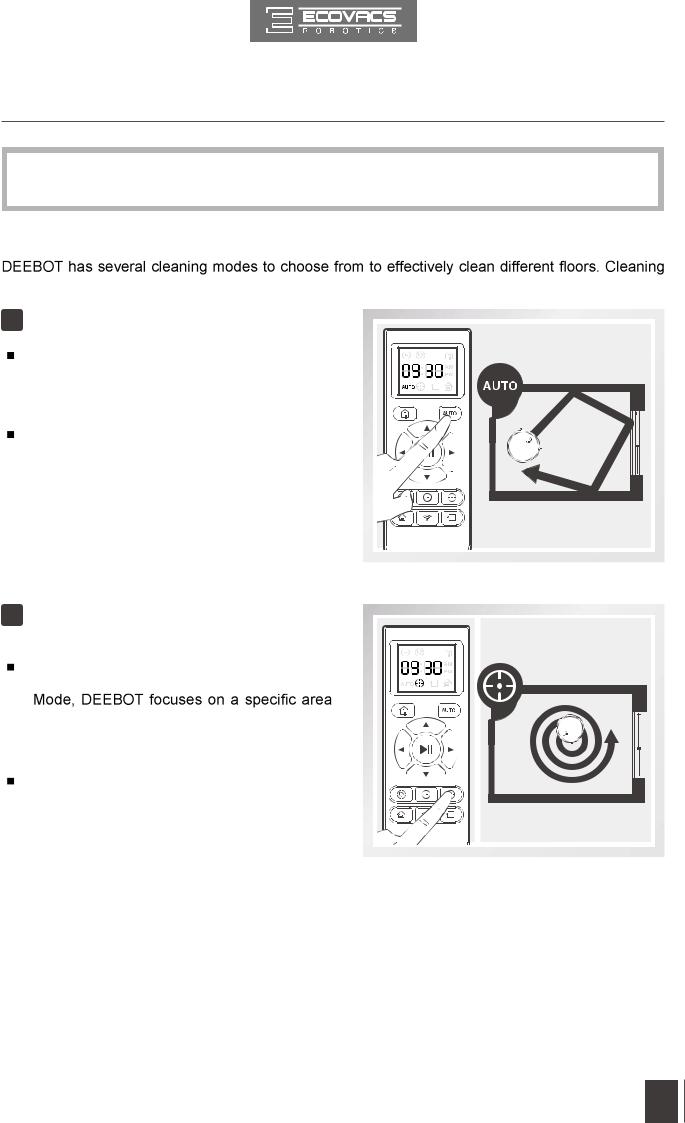
6 Pause
Pause DEEBOT by pressing the  button on DEEBOT or the START/ PAUSE Button on the Remote Control.
*The AUTO Mode Button on the robot's Control Panel stops glowing when the robot is paused for more than 10 minutes. Press AUTO Mode Button on the robot or press any button on the Remote Control to start the DEEBOT immediately.
7 Power OFF
Turn the robot’s Side Power Switch to the ON position. “l” indicates ON and “O” indicates OFF.
*When DEEBOT is not cleaning, it is suggested to keep it powered ON and charging instead of powered OFF.
14 EN
3.Operating and Programming
*For models with app-connectivity, various functions can be performed using the ECOVACS App.
3.3 Cleaning Mode Selection
modes are selected using the Remote Control.
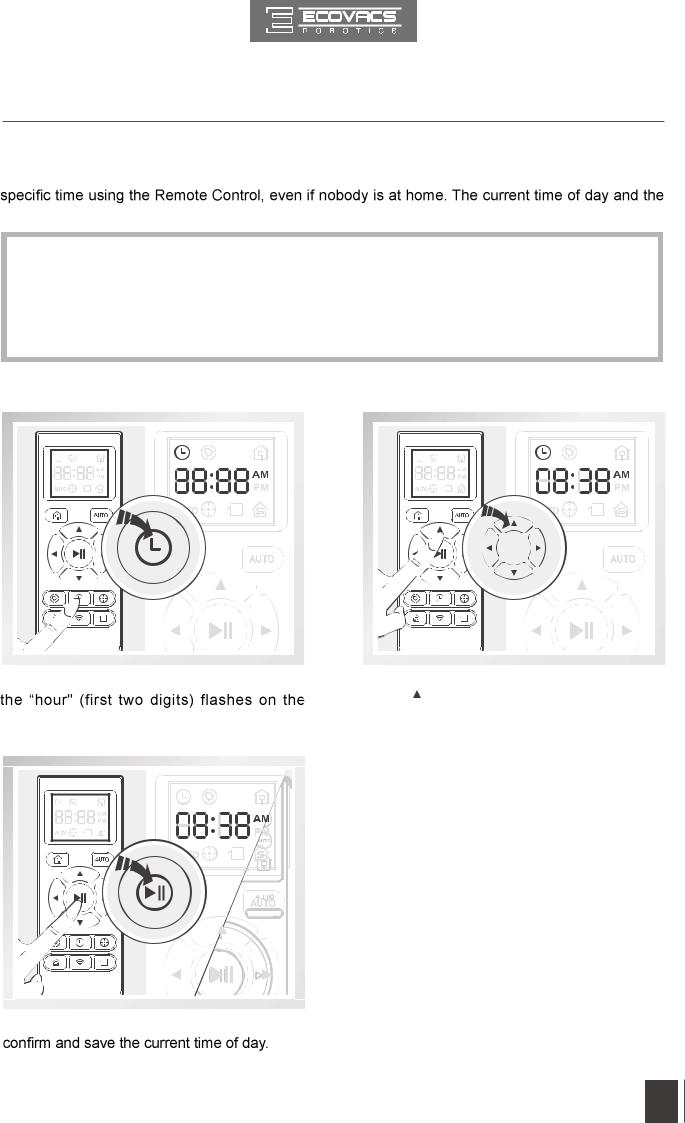
1 AUTO Cleaning Mode
This is the most commonly used mode. In AUTO Cleaning Mode, DEEBOT cleans in a straight line and changes direction when it meets an obstacle.
To start AUTO Cleaning Mode, Press the  button on DEEBOT or the AUTO Mode Button on the Remote Control.
2 Spot Cleaning Mode
( Less than 3 minutes)
This mode is applicable for an area of highly concentrated dirt or dust. In Spot Cleaning
to clean. DEEBOT cleans the area in a spiral pattern using MAX suction power and stops when it completes Spot Cleaning.
To start Spot Cleaning Mode, press Spot
Cleaning Mode Button on the Remote
Control.
EN 15

3. Operating and Programming
3 Edge Cleaning Mode
This mode is good for cleaning the edges and corners of a room. In Edge Cleaning Mode, DEEBOT cleans along a border using
To start Edge Cleaning Mode, press the
Edge Cleaning Mode Button on the Remote
Control.
4 Single Room Mode
This mode is used when DEEBOT only needs to clean a single room. To start Single Room Cleaning Mode, press the Single Room Mode Button on the Remote Control.
* The room must be contained for Single Room Mode to function properly. Close doors to the room entrance and exit to contain the room.
* Use the App to adjust the suction power of any Cleaning Mode already in process.
5 Return to Charger Mode
When battery power gets low, DEEBOT automatically switches to Return to Charger Mode and returns to the Charging Dock to recharge itself.
* DEEBOT can also be sent back to the Charging Dock at any time by pressing the Return to Charger Button on the Remote Control.
16 EN
3.Operating and Programming
3.4Programming the Robot
DEEBOT has a Time Scheduling function. DEEBOT can be programmed to automatically clean at a
cleaning times are scheduled using the Remote Control.
*All scheduled cleanings are performed in AUTO Cleaning Mode.
*The Remote Control uses a 12-hour clock with “AM” and “PM” indicators.
*DEEBOT loses the current time of day and schedule once it is powered OFF. Reset the current time of day and schedule the cleaning time when power on the DEEBOT again.
*It is suggested to keep it powered ON and charging instead of powered OFF.
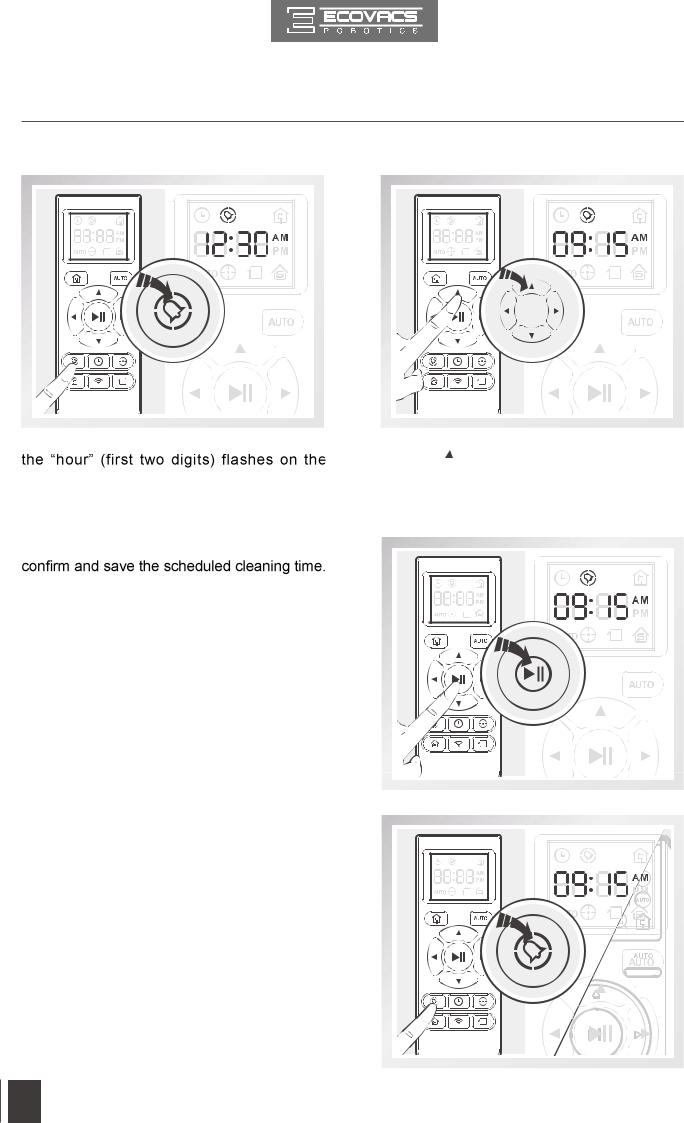
Set the Current Time of Day
Press  button on the Remote Control and Remote Control LCD Screen.
Press the up and down Direction Control Buttons  to adjust “hour” and “minute” number. Press the left and right Direction Control Buttons
  to switch between “hour” and “minute.”
Press 
 button on the Remote Control to
EN 17
3. Operating and Programming
Schedule the Cleaning Time using Remote Control
Press  button on the Remote Control and
Remote Control Screen.
Press 
 button on the Remote Control to
DEEBOT beeps. DEEBOT automatically cleans at the scheduled cleaning time every day.
Press the up and down Direction Control Buttons  to adjust “hour” and “minute” number. Press the left and right Direction Control Buttons
  to switch between “hour” and “minute.”
Cancel Scheduled Cleaning Time using Remote Control
To cancel the scheduled cleaning time, press and hold  button for 3 seconds until
  disappears from the Remote Control LED Screen and the robot beeps. The scheduled cleaning time is cancelled.
18 EN

3.Operating and Programming
3.5Indicator Light and Alarm Sounds
Indicator Light
AUTO Mode Button |
Status |
|
|
Flashes BLUE |
The robot is charging. |
|
|
Flashes RED or glows a continuous RED |
The robot has a problem. |
|
|
Glows a continuous RED |
The robot has low battery. |
|
|
Glows a continuous BLUE |
The robot is cleaning. |
|
|
Alarm Sounds
If DEEBOT detects a problem, it emits alarm beeps and the AUTO Mode Button flashes RED or glows RED.
Flashing RED:
Alarm Sound |
Problems |
Solution |
|
|
|
|
|
One Beep |
The robot is suspended or |
Place the robot on an even surface, or |
|
stuck. |
remove the obstacles, and restart the robot. |
||
|
|||
|
|
|
|
Two Beeps |
Anti-Collision Bumper |
Check the Anti-Collision Bumper for debris |
|
Malfunction |
and remove the debris. |
||
|
|||
|
|
|
|
Three Beeps |
Anti-Drop Sensors Malfunction |
Clean Anti-Drop Sensors as described in |
|
|
|
section 4 Maintenance. |
|
Four Beeps |
Low Battery |
Manually place the robot on the Charging |
|
Dock to charge. |
|||
|
|
||
|
|
|
|
Glowing a continuous RED: |
|
||
|
|
|
|
Alarm Sound |
Problems |
Solution |
|
|
|
|
|
|
|
Check Driving Wheel for tangled hair or |
|
One Beep |
Driving Wheel malfunction |
debris and clean as described in section 4 |
|
|
|
Maintenance. |
|
|
|
|
|
|
|
Check Side Brushes for tangled hair or |
|
Two Beeps |
Side Brush malfunction |
debris and clean as described in section 4 |
|
|
|
Maintenance. |
|
|
|
|
|
Three Beeps |
Dust Bin malfunction |
Empty the Dust Bin as described in section |
|
4 Maintenance. |
|||
|
|
||
|
|
|
|
|
|
Check Main Brush for tangled hair or debris |
|
Four Beeps |
Main Brush malfunction |
and clean as described in section 4 |
|
|
|
Maintenance. |
|
|
|
|
|
EN 19

4. Maintenance
Before performing cleaning and maintenance, power OFF DEEBOT and unplug the Charging Dock.
4.1 Dust Bin and Filters
Remove the Dust Bin. Open the Dust Bin Cover and empty the Dust Bin.
|
|
|
|
|
|
|
|
|
|
|
|
|
|
|
|
|
|
|
|
|
|
|
|
|
|
|
|
|
|
|
|
|
|
|
|
|
|
|
|
|
|
|
|
|
|
|
|
|
|
|
|
|
|
|
|
|
|
|
|
|
|
|
|
|
|
|
|
|
|
|
|
|
|
|
|
|
|
|
|
|
|
|
|
|
|
|
|
|
|
|
|
|
|
|
|
Rinse the Sponge Filter, Dust Bin and Filter Net |
Dry the Sponge Filter, Dust Bin and Filter Net |
||||||||||
under running water. |
completely before reinstalling. |
||||||||||
|
|
|
|
|
|
|
|
|
|
|
|
|
|
|
|
|
|
|
|
|
|
|
|
|
|
|
|
|
|
|
|
|
|
|
|
|
|
|
|
|
|
|
|
|
|
|
|
|
|
|
|
|
|
|
|
|
|
|
|
|
|
|
|
|
|
|
|
|
|
|
|
20 EN
4. Maintenance
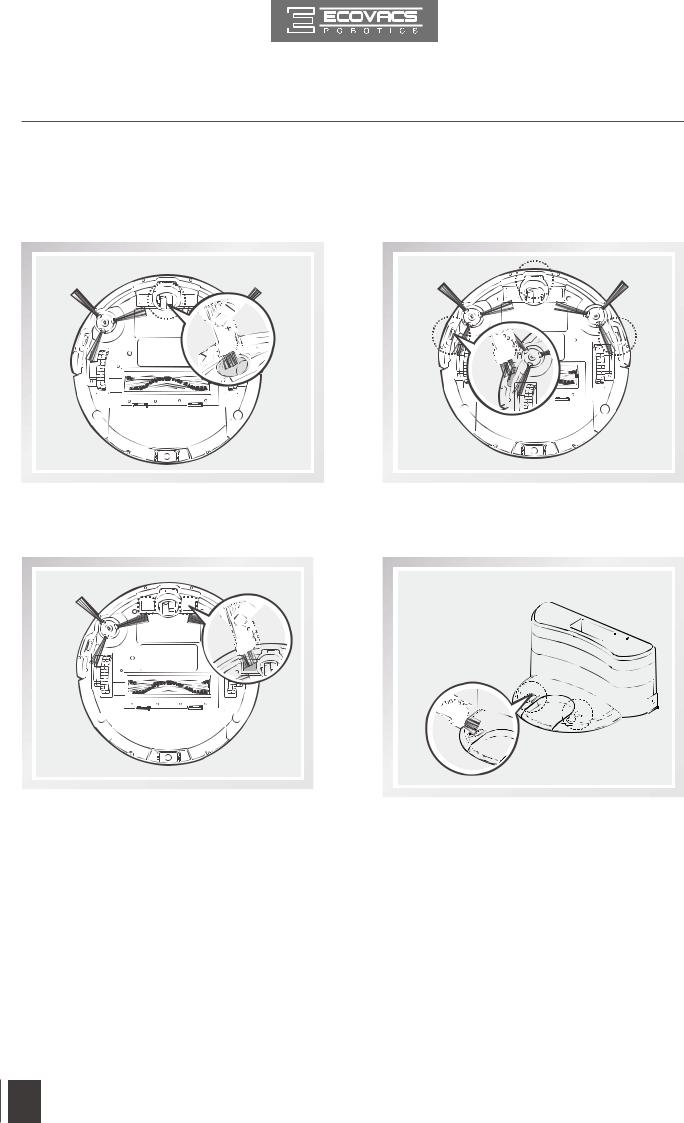
4.2 Main Brush and Side Brushes
*A Multi-Function Cleaning Tool is provided for easy maintenance. Handle with care, this cleaning tool has sharp edges.
Cleaning the Main Brush
Turn the robot over. Push both buttons on the Main Brush Cover and remove it.
Remove the Main Brush.
Use the Multi-Function Cleaning Tool to cut off and remove any hair tangled around the Main Brush.
Cleaning the Side Brushes
Remove the Side Brushes. Wipe the Side Brushes and their slots with a dry cloth.
EN 21
4. Maintenance
4.3 Other Components
Use the Multi-Function Cleaning Tool to cut off and remove any hair tangled around the Universal Wheel.
Wipe the Anti-Drop Sensors with the brush or the felt side of the Multi-Function Cleaning Tool to maintain their effectiveness.
Wipe the Charging Contacts and Charging Dock Pins with the brush of the Multi-Function Cleaning Tool or a dry clean cloth to maintain their effectiveness.
22 EN

4. Maintenance
4.4 Regular Maintenance
To keep DEEBOT running at peak performance, perform the maintenance and replacement according to the following frequency. A multi-Function Cleaning Tool is provided for easy maintenance. Handle with care, this cleaning tool has sharp edges.
Robot Part |
Maintenance Frequency |
Replacement Frequency |
|
|
|
|
|
Dust Bin |
After each use |
/ |
|
|
|
|
|
Side brush |
Once every 2 weeks |
Every 3-6 months |
|
|
|
|
|
Main Brush |
Once per week |
Every 6-12 months |
|
|
|
|
|
Sponge Filter/ High |
Once per week (twice per |
Every 4-6 months |
|
|
|
||
|
|
|
|
Universal Wheel |
|
|
|
Anti-Drop Sensors |
Once per week |
/ |
|
Charging Contacts |
|||
|
|
||
Charging Dock Pins |
|
|
|
|
|
|
Note: ECOVACS manufactures various replacement parts and assemblies. Please contact Customer Service for more information on replacement parts.
EN 23
5. Troubleshooting
Please use this chart to troubleshoot common problems using DEEBOT.
No. |
Malfunction |
Possible Causes |
Solutions |
|
|
|
|
|
|
|
|
DEEBOT is not powered |
Press and hold AUTO Mode Button on |
|
|
|
ON. |
DEEBOT to power ON. |
|
|
|
|
|
|
|
|
|
Be sure that DEEBOT’s Charging |
|
|
|
DEEBOT has not made a |
Contacts have made a connection with |
|
|
DEEBOT will not |
connection with the Charging |
the Charging Dock Pins. You may |
|
1 |
Dock. |
move the robot manually to make the |
||
charge. |
||||
|
|
connection if necessary. |
||
|
|
|
||
|
|
|
|
|
|
|
Charging Dock is unplugged |
Plug in the Charging Dock and ensure |
|
|
|
DEEBOT is powered ON. Keep |
||
|
|
while DEEBOT is powered |
||
|
|
DEEBOT on the Charging Dock to |
||
|
|
ON, which causes battery |
||
|
|
make sure it has a full battery to work |
||
|
|
consumption. |
||
|
|
at any time. |
||
|
|
|
||
|
|
|
|
|
|
|
DEEBOT is tangled with |
DEEBOT will try various ways to get |
|
|
|
|
itself out of trouble. If it is |
|
|
|
(electrical cords, drooping |
unsuccessful, manually remove the |
|
|
|
|
obstacles and restart. |
|
|
|
|
|
|
|
|
Side Brush is stuck or the |
Remove the debris tangled around the |
|
|
DEEBOT gets into |
Side Brush. If the Side Brush still |
||
2 |
rotation speed of the Side |
|||
trouble while working |
rotates slowly, contact Customer |
|||
|
and stops. |
Brush decreases. |
Service. |
|
|
|
|||
|
|
|
|
|
|
|
|
Remove the debris tangled around the |
|
|
|
Main Brush is stuck or the |
Main Brush with the provided Multi- |
|
|
|
rotation speed of the Main |
Function Cleaning Tool. If the Main |
|
|
|
Brush decreases. |
Brush still rotates slowly, contact |
|
|
|
|
Customer Service. |
|
|
|
|
|
|
|
|
When battery power gets |
|
|
|
|
low, DEEBOT automatically |
|
|
|
|
switches to Return to |
This is normal. No solution necessary. |
|
|
DEEBOT returns to |
Charger Mode and returns |
||
|
|
|||
|
to the Charging Dock to |
|
||
3 |
the Charging Dock |
|
||
recharge itself. |
|
|||
|
|
|||
|
cleaning. |
|
|
|
|
Working time varies |
|
||
|
|
|
||
|
|
room complexity and the |
This is normal. No solution necessary. |
|
|
|
|
||
|
|
selected Cleaning Mode. |
|
|
|
|
|
|
24 EN

|
|
|
|
|
5. Troubleshooting |
|
|
|
|
|
|
|
|
|
|
|
|
|
|
|
|
|
|
No. |
Malfunction |
Possible Causes |
|
Solutions |
|
|
|
|
|
||
|
|
Time Scheduling function is |
Set Time Scheduling function as |
||
|
|
cancelled. |
described in section 3.4. |
||
|
|
|
|
||
|
|
DEEBOT is powered OFF. |
Power ON DEEBOT. |
||
|
DEEBOT will not clean |
|
|
|
|
|
|
|
Keep DEEBOT powered ON and on |
||
4 |
automatically at |
|
|
||
|
scheduled time. |
The robot’s battery is low. |
the Charging Dock to make sure it has |
||
|
|
|
|
a full battery to work at any time. |
|
|
|
|
|
|
|
|
|
|
|
Power OFF DEEBOT, clean the Dust |
|
|
|
The robot’s components are |
Bin, and invert the robot. Clean Side |
||
|
|
tangled with debris. |
Brushes and the Main Brush as |
||
|
|
|
|
described in section 4. |
|
|
|
|
|
||
|
|
The batteries in the Remote |
Replace with new batteries making |
||
|
|
Control need to be replaced. |
sure they are installed correctly. |
||
|
|
|
|
||
|
|
DEEBOT is powered OFF or |
Make sure DEEBOT is powered ON |
||
|
|
DEEBOT’s battery is low. |
and fully charged. |
||
|
Remote Control failure |
|
|
|
|
|
The infrared signal cannot |
|
|
||
5 |
(effective control range |
be transmitted because the |
Use a dry cloth or the Multi-Function |
||
|
of Remote Control is |
Infrared Emitter on the |
Cleaning Tool to wipe the Infrared |
||
|
|
||||
|
|
Remote Control or |
Emitter on Remote Control and the |
||
|
|
DEEBOT’s Infrared Receiver |
Infrared Receiver on DEEBOT. |
||
|
|
on DEEBOT is dirty. |
|
|
|
|
|
|
|
||
|
|
There is other equipment |
Avoid using the Remote Control near |
||
|
|
interfering with the infrared |
other equipment using infrared |
||
|
|
signal to DEEBOT. |
signals. |
||
|
|
|
|
|
|
EN 25

Herzlichen Glückwunsch zum Kauf Ihres neuen DEEBOT von ECOVACS ROBOTICS!
Wir hoffen, dass er viele Jahre lang zu Ihrer vollen Zufriedenheit arbeiten wird. Wir sind sicher, dass er Ihnen dabei helfen wird, Ihr Zuhause sauber zu halten, während Sie Ihre wertvolle Zeit für die angenehmen Dinge im Leben nutzen.
Live Smart. Enjoy Life.
Sollten Sie mit einer Situation konfrontiert sein, die in dieser Bedienungsanleitung nicht ausreichend behandelt wird, wenden Sie sich an das Kundenservicecenter, damit sich ein Techniker mit Ihrem speziellen Problem bzw. Ihrer Frage befassen kann.
ROBOTICS: www.ecovacs.com
Technische und gestalterische Änderungen sind im Zuge der kontinuierlichen Produktverbesserung vorbehalten.
Vielen Dank, dass Sie sich für den DEEBOT entschieden
haben.
26 DE

Inhalt
1. |
Wichtige Sicherheitshinweise................................................................... |
28 |
|
2. |
Lieferumfang und technische Daten ........................................................ |
32 |
|
|
2.1 |
Lieferumfang........................................................................................... |
32 |
|
2.2 Technische Daten................................................................................... |
32 |
|
|
2.3 |
Produktzeichnung................................................................................... |
33 |
3. Bedienung und Programmierung ............................................................. |
35 |
||
|
3.1 |
Vor der Reinigung................................................................................... |
35 |
|
3.2 |
Kurzanleitung.......................................................................................... |
36 |
|
3.3 |
Wahl des Reinigungsmodus................................................................... |
39 |
|
3.4 |
Programmieren des Roboters ................................................................ |
41 |
|
3.5 |
Statusanzeige und Alarmtöne................................................................. |
43 |
4. |
Wartung....................................................................................................... |
44 |
|
|
4.1 |
Staubbehälter und Filter......................................................................... |
44 |
|
4.2 |
Hauptbürste und Seitenbürsten.............................................................. |
45 |
|
4.3 |
Sonstige Teile ......................................................................................... |
46 |
|
4.4 |
Regelmäßige Wartung............................................................................ |
47 |
5. |
Fehlerbehandlung ...................................................................................... |
48 |
|
DE 27
1. Wichtige Sicherheitshinweise
Beim Gebrauch eines elektrischen Gerätes sind einige grundlegende Sicherheitshinweise zu beachten. Dazu gehören auch die folgenden Hinweise:
LESEN SIE ALLE ANWEISUNGEN VOR GEBRAUCH DIESES GERÄTES.
BEWAHREN SIE DIESE ANWEISUNGEN AUF.
1.Dieses Gerät ist zur Verwendung durch Kinder ab 8 Jahren oder durch Personenmiteingeschränktenphysischen,sensorischenodergeistigen Fähigkeiten bzw. fehlenden Erfahrungen und Kenntnissen geeignet, sofern sie dabei beaufsichtigt oder bezüglich der sicheren Handhabung des Gerätes angeleitet werden und die damit verbundenen Gefahren verstandenhaben.KinderdürfennichtmitdemGerätspielen.Reinigung und anwenderseitige Wartung dürfen nicht durch unbeaufsichtigte Kinder erfolgen.
2.Räumen Sie den zu reinigenden Bereich frei. Entfernen Sie Netzkabel und kleine Gegenstände, in denen sich das Gerät verfangen könnte, vom Boden. Legen Sie Teppichfransen unter den Teppich und achten Sie darauf, dass Vorhänge, Tischdecken u. ä. nicht bis zum Boden herunterhängen.
3.Wenn sich im zu reinigenden BereichAbsätze in Form von Stufen oder
wird, ohne dass das Gerät über die Kante fällt. Es kann erforderlich sein, eine physische Barriere an der Kante anzubringen, um ein Herunterfallen des Gerätes zu verhindern. Stellen Sie sicher, dass die physische Barriere keine Stolperfalle darstellt.
4.Verwenden Sie das Gerät nur gemäß der Beschreibung in dieser Bedienungsanleitung. Verwenden Sie nur empfohlene bzw. vom Hersteller angebotene Zubehörteile.
5.Stellen Sie sicher,dassIhre NetzspannungmitderaufdemTypenschild der Ladestation angegebenen Netzspannung übereinstimmt.
6.Verwenden Sie das Gerät AUSSCHLIESSLICH für INNENRÄUME im Haushalt. Verwenden Sie das Gerät nicht im Freien oder für kommerzielle oder industrielle Anwendungen.
7.
8.Verwenden Sie das Gerät nicht ohne Staubbehälter bzw. Filter.
9.Verwenden Sie das Gerät nicht in Bereichen, in denen sich brennende
28 DE

1.Wichtige Sicherheitshinweise
10.Verwenden Sie das Gerät nicht bei extrem heißen bzw. kalten Umgebungstemperaturen (d. h. unterhalb von -5 °C bzw. oberhalb von
11.Halten Sie Haare, lose Kleidung, Finger und sonstige Körperteile von jeder Öffnung und sich bewegenden Teilen fern.
12.Verwenden Sie das Gerät nicht in Räumen, in denen Babys oder Kinder schlafen.
13.Verwenden Sie das Gerät nicht auf nassen Flächen oder auf Flächen, auf denen Wasser steht.
14.Achten Sie darauf, dass das Gerät keine größeren Gegenstände wie Steine, große Papierstückchen oder sonstige Gegenstände, die das Gerät verstopfen könnten, aufnimmt.
15.Verwenden Sie das Gerät nicht, um entzündliche oder brennbare Materialien wie Benzin, Druckeroder Kopierertoner aufzunehmen, und meiden Sie beim Gebrauch Bereiche, in denen diese Materialien anzutreffen sind.
16.Verwenden Sie das Gerät nicht, um Zigaretten, Streichhölzer, heiße Asche oder sonstige brennende, qualmende oder brandauslösende Gegenstände aufzunehmen.
17.SteckenSiediegenanntenGegenständenichtindieStaubeinsaugöffnung. Lassen Sie das Gerät nicht mit verstopfter Einsaugöffnung arbeiten. Halten Sie die Einsaugöffnung frei von Staub, Flusen, Haaren oder sonstigen den Luftstrom behindernden Materialien.
18.Achten Sie darauf, dass das Netzkabel nicht beschädigt wird. Ziehen oder tragen Sie das Gerät bzw. die Ladestation nicht am Stromkabel, verwendenSiedasStromkabelnichtalsHaltegriff,klemmenSieesnicht in einer geschlossenen Tür ein, und ziehen Sie es nicht über scharfe Kanten oder Ecken. Achten Sie darauf, dass das Gerät nicht über das Netzkabel fährt. Halten Sie das Netzkabel von heißen Flächen fern.
19.Wenn das Netzkabel beschädigt ist, muss es durch den Hersteller oder dessen Kundendienst ausgewechselt werden, damit keine Gefahren davon ausgehen.
20.Verwenden Sie die Ladestation nicht, wenn sie beschädigt ist.
21.Verwenden Sie das Gerät nicht, wenn das Netzkabel oder die Steckdose beschädigt sind. Verwenden Sie das Gerät nicht, wenn es nicht einwandfrei funktioniert, wenn es heruntergefallen, beschädigt worden, im Freien gelassen worden oder mit Wasser in Berührung
DE 29

1. Wichtige Sicherheitshinweise
gekommen ist. Wenn das Netzkabel beschädigt ist, muss es durch den Hersteller oder dessen Kundendienst ausgewechselt werden, damit keine Gefahr davon ausgeht.
22. Schalten Sie das Gerät vor dem Reinigen oder Warten aus
23.Vor dem Reinigen oder Warten der Ladestation muss der Stecker aus der Steckdose gezogen werden.
24.Entfernen Sie vor dem Entsorgen des Gerätes den Akku. Nehmen Sie hierzu das Gerät aus der Ladestation und schalten Sie es aus
25.Vor dem Entsorgen des Gerätes ist der Akku entsprechend den örtlichen Gesetzen und Vorschriften zu entfernen und zu entsorgen.
26.Gebrauchte Akkus sind entsprechend den örtlichen Gesetzen und Vorschriften zu entsorgen.
27.Verbrennen Sie das Gerät nicht, auch wenn es stark beschädigt ist. Die Akkus können im Feuer explodieren.
28.Wenn die Ladestation für längere Zeit nicht verwendet wird, ist sie vom Stromnetz zu trennen.
29.Verwenden Sie das Gerät immer gemäß den Anweisungen in dieser Bedienungsanleitung. ECOVACS ROBOTICS übernimmt keine Haftung für Verletzungen und Schäden, die durch unsachgemäße Nutzung entstehen.
30.Der Roboter enthält Akkus, die nur durch geschultes Personal ausgewechselt werden dürfen. Zum Auswechseln oder Entfernen des Akkus wenden Sie sich bitte an den Kundendienst.
31.Wenn der Roboter längere Zeit nicht benutzt wird, laden Sie ihn zur Aufbewahrung vollständig auf und schalten Sie ihn aus. Trennen Sie außerdem die Ladestation vom Netz.
32.WARNUNG: 
ausschließlich das mit dem Gerät mitgelieferte abnehmbare Netzteil DK18-190060H-V.
33.  Batteriengeliefert.UmdieBatterienderFernbedienungauszutauschen, drehen Sie die Fernbedienung um und drücken auf die Abdeckung des Batteriefachs, um diese zu entfernen. Nehmen Sie die Batterien heraus, und setzen Sie neue Batterien mit der richtigen Polzuordnung ein. Setzen Sie dann die Batteriefachabdeckung wieder auf.
30 DE
 Loading...