

Page 1

Page 2

Table of Contents
Table of Contents
Introduction ...................................................................................1
Product Overview .............................................................. 2
Package Contents ......................................................................... 2
System Requirements ................................................................. 2
Features ............................................................................................3
Hardware Overview ..................................................................... 5
Front Panel ..............................................................................5
Hardware Overview ..................................................................... 6
Front Panel ..............................................................................6
Rear Panel (Connections) ................................................... 7
Using the OLED .............................................................................8
Chapter 1 - Hardware ........................................................9
Hardware Setup - Installing Hard Drives ............................10
Hardware Setup - Removing Brackets ................................11
Hardware Setup - Attaching the Hard Drive to the Hard
Drive Tray .......................................................................................12
Getting Started ............................................................................22
Getting Started - Browser Setup ...........................................24
Using the Web UI ........................................................................26
Using the Web UI Part II ............................................................27
Understanding the Web UI .....................................................28
Understanding the WEB UI Part II .........................................29
Chapter 3 - Setup Wizard .........................................................30
Using the Setup Wizard for the First Time .........................31
Using the Setup Wizard for the First Time .........................32
Using the Setup Wizard for the First Time .........................33
Using the Setup Wizard for the First Time .........................34
Using the Setup Wizard for Static IP Addresses ...............35
Using the Setup Wizard for Static IP Addresses ...............36
Using the Setup Wizard for Host Names ............................37
Using the Setup Wizard for File Sharing .............................38
Using the Setup Wizard for RAID Levels .............................39
Encrypting your Drive ...............................................................40
Hardware Setup - Installing Hard Drives ............................13
Network Setup - Plugging in the Network Cables ..........14
Network Setup - Plugging in the Cables ............................15
Power Cable Setup - Plugging in the Cables ....................16
Powering on the Device ...........................................................17
Powering on the Device - Software .....................................18
Chapter 2 - Software Installation ...................................19
Software Setup - Default IP Address Location .................20
Software Setup - EZ Search Utility ........................................21
Setup Wizard Summary ............................................................41
Setup Wizard Summary Part II ...............................................42
Creating a Clean Volume..........................................................43
Formatting a Volume .................................................................44
Accessing the Drive for the First Time .................................45
Chapter 4 - Hardware - Installing more Drives ..............46
Hardware - Installing more Drives ........................................47
Hardware - Installing more Drives ........................................48
Hardware - Installing more Drives ........................................49
iD-Link ShareCenter Pro 1100-04 User Manual
Page 3

Table of Contents
Chapter 5 - Software - Creating Volumes & Formatting 50
Software - Installing more Drives .........................................51
Software - Conguring more than one drive ...................52
Software - Conguring more than one drive ...................53
Software - Creating RAID .........................................................54
Software - Encryption Settings ..............................................55
Software - Creating the Volume ............................................56
Software - Creating the RAID & Formatting ......................57
Software - Volume & RAID Created ......................................58
Chapter 6 - Software - Creating Users ............................59
Software - Creating Users ........................................................60
Software - Creating Users ........................................................61
Software - User Information ...................................................62
Software - Creating Groups ....................................................63
Software - Creating Share Folder Lists ................................64
Software - User Summary ........................................................65
Software - Importing Users - Checking the User List .....78
Software - Creating a Batch User List ..................................79
Software - Creating a Batch User List ..................................80
Software - Creating a Batch User List ..................................81
Software - Creating a Batch User List ..................................82
Software - Creating a Batch User List ..................................83
Software - Creating a Batch User List ..................................84
Chapter 7 - Software - Creating a Shared Folder ........... 85
Software - Creating a Shared Folder ....................................86
Create Share Folder ............................................................87
Create Share Folder - Volumes & Quotas ....................88
Create Share Folder - Volumes & Quotas ....................89
Create Share Folder - Volumes & Quotas ....................90
Create Share Folder - Volumes & Quotas ....................91
Create Share Folder - Volumes & Quotas ....................92
Create Share Folder - Volumes & Quotas ....................93
Software - User Information ...................................................66
Software - Creating more than One User ...........................67
Software - Creating more than One User ...........................68
Software - Creating more than One User ...........................69
Software - Creating more than One User ...........................70
Software - User Summary ........................................................71
Software - User Information ...................................................72
Software - Deleting a User ......................................................73
Software - Deleting a User ......................................................74
Software - Importing Users .....................................................75
Software - Importing Users .....................................................76
Software - Importing Users - Creating a User List ...........77
Create Share Folder - Select Service ............................94
Create Share Folder - Access Rights .............................95
Create Share Folder - Access Rights .............................96
Shared Folders .....................................................................97
Create Share Folder - Summary .....................................98
Chapter 8 - Software - Creating a Group ........................99
Software - Creating a Group ........................................ 100
Software - Creating a Group ........................................ 101
Software - Creating a Group ........................................ 102
Software - Adding Users to a Group ......................... 103
Software - Adding Users to a Group ......................... 104
My Favorites............................................................................... 105
iiD-Link ShareCenter Pro 1100-04 User Manual
Page 4

Table of Contents
Chapter 9 - Software - Admin Password ......................106
Software - Admin Password .................................................107
Software - Admin Password .................................................108
Software - Admin Password .................................................109
Chapter 10 - Software - System & Hard Drive Status ..110
Software - Status Management .......................................... 111
Software - System Status ...................................................... 112
Software - System Status ...................................................... 113
System Status ............................................................................ 114
Software - Hard Drive Status ............................................... 115
Software - Hard Drive Status ............................................... 116
Software - Hard Drive Status ............................................... 117
Software - Hard Drive Status ............................................... 118
Software - Resource Monitor ............................................... 119
Software - Resource Monitor ............................................... 120
Software - Resource Monitor ............................................... 121
Software - Resource Monitor ............................................... 122
Disk Management - Change the Encryption Settings 134
Disk Management - Change the Encryption Settings 135
Disk Management - Change the Encryption Settings 136
iSCSI Target......................................................................... 137
iSCSI Target - iSCSI Manager ........................................ 139
iSCSI Target - iSCSI Targets ............................................ 142
iSCSI Target - Editing iSCSI Targets ............................ 148
iSCSI Target - Deleting iSCSI Targets ......................... 151
iSCSI Target - Details of an iSCSI Targets .................. 153
iSCSI Target - iSCSI LUN .................................................. 154
Edit an iSCSI LUN .............................................................. 158
View details of an iSCSI LUN ........................................159
iSCSI Target - LUN ACL .................................................... 160
Editing the LUN ACL .......................................................163
Virtual Volume .................................................................. 166
Disk Diagnostic ................................................................. 168
Disk Management - Scheduling a Disk Diagnostics ... 172
Disk Management - Scan a Volume .................................. 173
Chapter 11 - Software - Disk Management..................124
Software - Disk Management .............................................. 125
Software - Disk Management .............................................. 126
Software - Disk Management - Volume ........................... 127
Software - Disk Management - Creat a Volume ............ 128
Software - Disk Management - Create a Volume ......... 129
Software - Disk Management - Create a Volume ......... 130
Software - Disk Management - Extend/Spare a Volume 131
Software - Disk Management - Migrate a Volume ....... 132
Software - Disk Management - Expand a Volume ....... 133
Disk Management - Format a Volume.............................. 174
Account Management ........................................................... 175
Admin Password ..............................................................176
Users ..................................................................................... 177
Groups ................................................................................. 191
Shared Folders .................................................................. 194
Shared Folders - Editing a Shared Folder ................ 206
Shared Folders - Management ....................................212
Accounts Management - Shared Folders ................ 229
ISO Mounts ......................................................................... 230
iiiD-Link ShareCenter Pro 1100-04 User Manual
Page 5

Table of Contents
ISO Mounts - Editing an ISO Mount .......................... 238
ISO Mounts - Deleting an ISO Mount .......................242
Chapter 12 - Software - System Management .............245
Software - System Management - Network Settings . 246
Software - System Management - Network Settings . 247
System Management - Network Settings - LAN 1 ....... 248
System Management - Network Settings - LAN 2 ....... 249
System Management - Network Settings - Global Settings
250
System Management - Network Settings - Route ....... 251
System Management - Network Settings - Route ....... 252
System Management - Time and Date Settings ........... 253
System Management - Time and Date Settings ........... 254
System Management - System Settings ..........................255
System Management - System Settings ..........................256
System Management - Power Management ................. 257
System Management - Power Management ................. 258
System Management - Schedule Settings .....................259
System Management - Power Management - UPS ..... 260
System Management - Email Alerts .................................. 268
System Management - Email Alerts .................................. 269
System Management - Firmware Upgrade .................... 270
System Management - Firmware Upgrade .................... 271
System Management - Logs ................................................ 272
System Management - Logs ................................................ 273
System Management - Logs ................................................ 274
System Management - Syslog Server ............................... 275
System Management - Syslog Server Rule ..................... 277
System Management - Edit a Syslog Server Rule . 285
System Management - Delete a Syslog Server
Rule ....................................................................................... 290
System Management - Enable/Disable a Syslog
Server Rule ......................................................................... 292
System Management - Clearing a Syslog Server
Log ........................................................................................ 293
Chapter 13 - Software - Network Services ...................295
Software - Network Services ........................................ 296
Software - Network Services - File Sharing ............. 297
Software - Network Services - File Sharing - FTP .. 298
Software - Network Services - File Sharing - CIFS 299
Software - Network Services - File Sharing - DFS . 300
Software - Network Services - File Sharing - DFS . 301
Software - Network Services - Dynamic DNS ........302
Software - Network Services - Dynamic DNS ........303
Software - Network Services - SNMP ........................ 304
Software - Network Services - SNMP ........................ 305
Software - Network Services - Network Discovery
Services ............................................................................... 306
Software - Network Services - Network Discovery
Services ............................................................................... 307
Chapter 14 - Software - Applications ...........................308
Software - Applications - Web File Manager .......... 309
Software - Applications - Web File Manager .......... 310
Software - Applications - Download Manager ...... 311
Software - Applications - Download Manager ...... 312
ivD-Link ShareCenter Pro 1100-04 User Manual
Page 6

Table of Contents
Software - Applications - Download Manager ...... 313
Software - Applications - Download Manager ...... 314
Chapter 15 - Software - Backup ....................................315
Software - Backup ............................................................ 316
Software - Backup - Volume Snapshot ..................... 317
Software - Backup - Volume Snapshot ..................... 318
Software - Backup - Volume Snapshot ..................... 319
Software - Backup - Volume Snapshot ..................... 320
Software - Backup - Volume Snapshot ..................... 321
Software - Backup - Local Backup .............................. 322
Software - Backup - Local Backup .............................. 323
Software - Backup - Local Backup .............................. 324
Software - Backup - Local Backup .............................. 325
Software - Backup - Local Backup .............................. 326
Software - Backup - Remote Backup Server ........... 327
Software - Backup - Remote Backup Job ................328
Chapter 19 - Appendix ..................................................347
Knowledge Base ............................................................348
What is RAID? ............................................................................ 348
Mapping a Drive ......................................................................350
USB Print Server ....................................................................... 353
iSCSI Drive Mapping ............................................................... 361
Hot-swap ........................................................................370
Storing non-English Character Files ............................371
Software - Backup - Remote Backup Job ................329
Software - Backup - Remote Backup Job ................330
Software - Backup - Remote Backup Job ................331
Software - Backup - Remote Backup Job ................332
Software - Backup - Remote Backup Job ................333
Software - Backup - External Backup ........................ 334
Software - Backup - External Backup ........................ 335
Software - Backup - External Backup ........................ 336
Amazon S3 ......................................................................... 337
Amazon S3 ......................................................................... 338
Chapter 18 - Software - Extension Pack .......................344
Extension Pack .......................................................................... 345
Extension Pack .................................................................. 346
vD-Link ShareCenter Pro 1100-04 User Manual
Page 7

Section 1 - Product Overview
Introduction
The D-Link ShareCenter Pro 1100 (DNS-1100-04) 4-Bay Network Attached Storage handles the ever-growing data storage
requirements for households/SOHO and SMB users. The need for data consolidation and data sharing makes the DNS-1100-04
an ideal storage solution. Its iSCSI capability delivers blistering transfer rates and provides an extra layer of stability.
The DNS-1100-04 CD contains the D-Link’s EZ Search Utility. This utility allows you to locate the ShareCenter Pro 1100
automatically and map drives to your computer on the y. The D-Link EZ Storage Utility allows you to congure the device
and set IP addresses.
Once setup and congured on your network, the DNS-1100-04, acts as a FTP, Web, Music, and Multimedia server. Windows™,
MAC, and Linux computers on the network can access any data o the server without adding new software locally and becaue
of its stable and powerful feature set sensitive data can be securely managed.
1D-Link ShareCenter Pro 1100-04 User Manual
Page 8

Section 1 - Product Overview
D-Link ShareCenter Pro 1100-04
CD-ROM with Manual and Software
Quick Installation Guide
Power Cord
Cat5E Ethernet Cable
Front Panel Lock Key
Note: Use the power supply that came with your device. Failure to do so might damage the unit and void the warranty.
Note: The ShareCenter Pro 1100-04 should only be maintained by authorized sta or an IT administrator. The front panel key locks the
device and keeps intruders from tampering with the device.
Product Overview
Package Contents
If any of the above items are missing, please contact your reseller.
System Requirements
For best results, the following minimum requirements are recommended on any system used to congure and access
the ShareCenter Pro:
Computer with: 1Ghz processor / 512 MB RAM / 200 MB available space / CD-ROM drive
Internet Explorer version 7.0, Mozilla Firefox 3.0, Apple Safari, Google Chrome 3, Opera 10
Windows
3.5” SATA Hard Drive(s)
®
XP (with Service Pack 2), Windows® Vista
™
Windows® 7
2D-Link ShareCenter Pro 1100-04 User Manual
Page 9

Section 1 - Product Overview
Features
The D-Link ShareCenter Pro 1100 is packed with a wide variety of features geared toward the small and medium business
environment. Some of these features are listed below:
Link Aggregation
Four 3.5-inch SATA Hard Drives with support for 3TB
and above
2 Gigabit Ethernet ports
2 USB 2.0 ports
UPS, printer, and external storage support
Concurrent NAS/iSCSI: Supports le sharing and
iSCSI block devices
Data Protection: Supports RAID 0/1/5/6/5+Spare/
JBOD and S.M.A.R.T. disk diagnostic.
Ease of Use: iSCSI targets appear as a local drive on
your client PC. Access NAS les via the easy-to-use
web le manager.
Accessibility: Share les across the network or over
the Internet via FTP or the web le manager.
Security: Create users, groups, and iSCSI targets with
password authentication.
Account management: Manage users/groups and
Read/Write permission
iSNS
Virtual Disks
Thin-provisioning
DDNS
Volume Snapshot
Up to 64 iSCSI Targets
SNMP (D-View 6.0 compatible)
CHAP
Fail-over/Fail-back
VLAN tag Support
DFS Support
AES Support
FTP w/ TLS/SSL
NFS
ADS support
Backup
Remote backup
Local backup
External backup
PC client to NAS backup
Web File Manager
Print server
Power management to conserve energy and extend
hard drive life.
� Schedule power on/o
� Hard disk hibernation
� SMART for hard disk health scan
� D-Link Green Ethernet
� Resource Monitor
� Multi-LUNs per Target
� Supports LUN Mapping & LUN Masking
� Supports MPIO
� Supports MC/S
3D-Link ShareCenter Pro 1100-04 User Manual
Page 10

Section 1 - Product Overview
� Supports Windows Server 2008 Hyper-V
� Network access by service
� AFP support
� Syslog server
� Network UPS
� ISO mount
� WebDAV
� Amazon S3
4D-Link ShareCenter Pro 1100-04 User Manual
Page 11
Section 1 - Product Overview
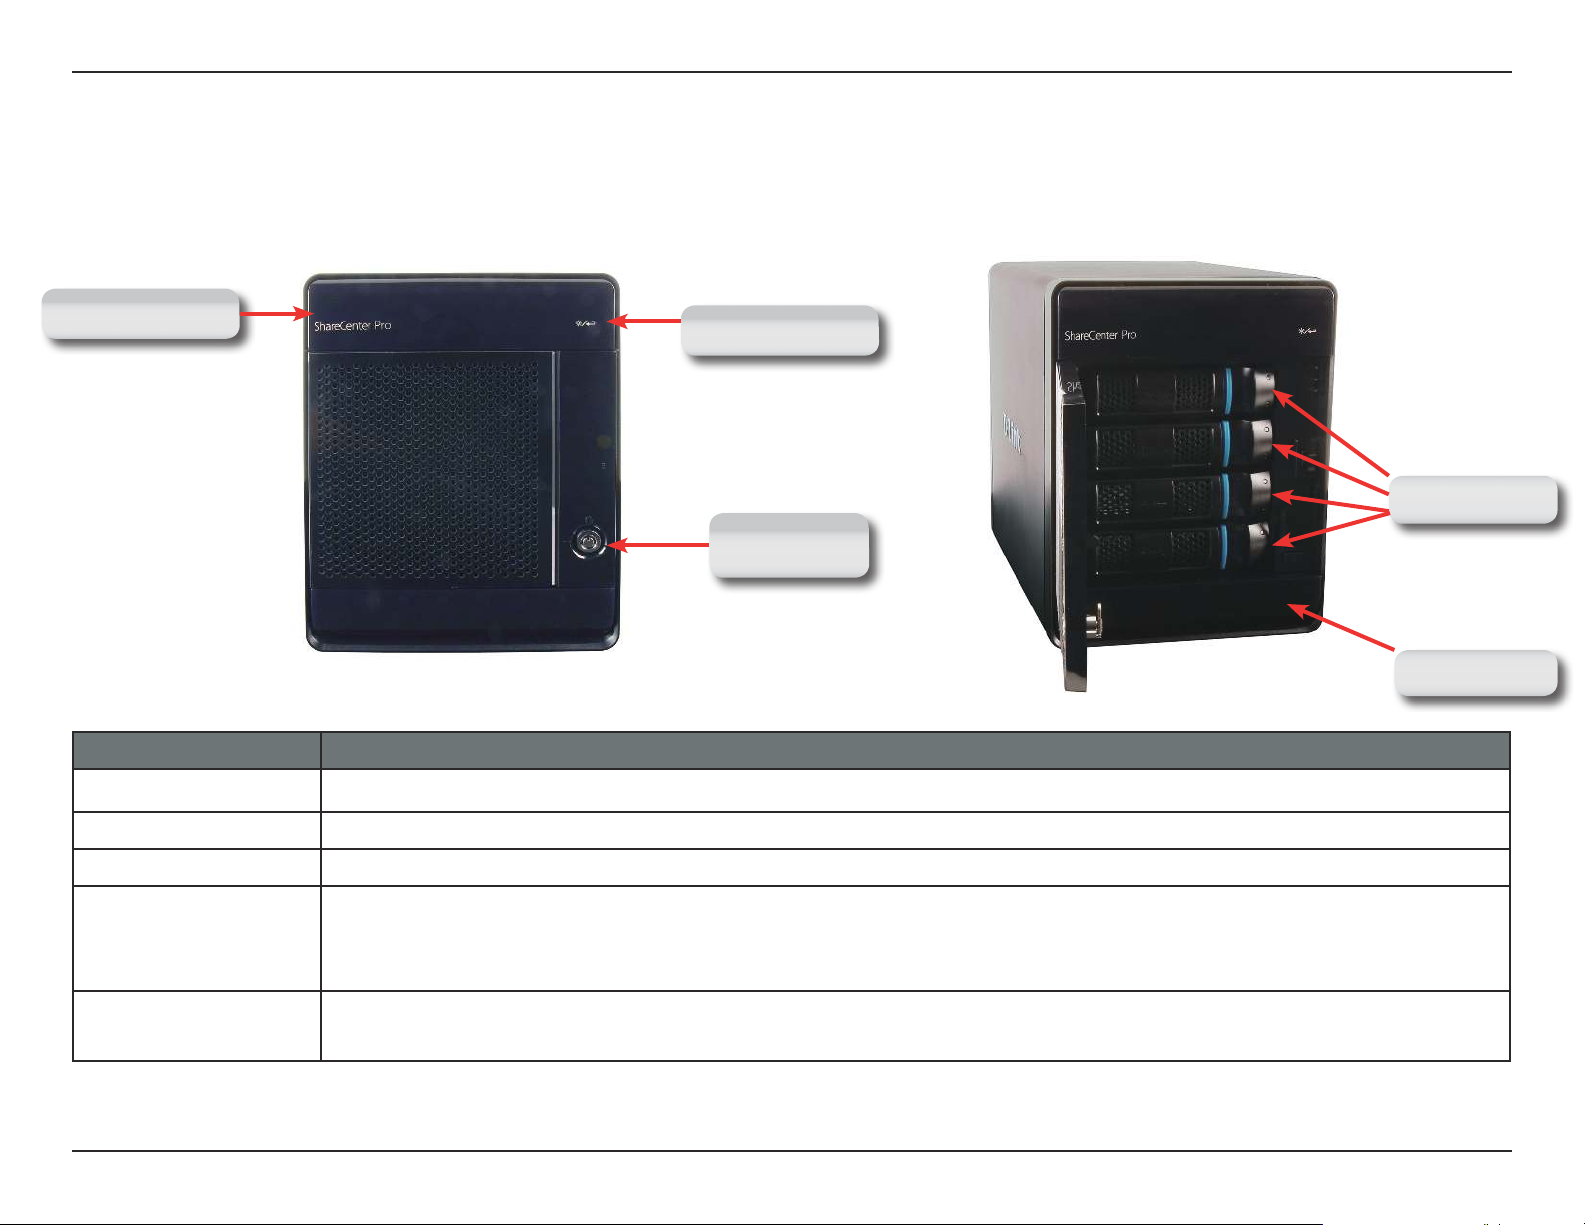
Hardware Overview
Front Panel
OLED Screen
COMPONENT DESCRIPTION
Front Panel Lock Turn the key to the up position to unlock. Turn key to left position to lock.
OLED Button This button switches the OLED screen to display System, HD Volume Information and Error Messages.
Drive Trays Unclip the bays to remove the cage and install the hard drives
OLED Button
Drive Trays
Front Panel
Lock
Power Button
Power Button Use this button to switch the device on or o.
To switch on the device press the button once.
To switch o the device hold the button down for 5 seconds.
OLED Screen This screen displays detailed information about the following:
System Information, HD Volume Information and Error Messages
5D-Link ShareCenter Pro 1100-04 User Manual
Page 12

Section 1 - Product Overview
Hardware Overview
Front Panel
Component Color Status Description
Static Disk Ready
4 Disk LED’s Green
Red Static Disk error. Cannot Read/ Write
Component Color Status Description
2 LAN LED’s Blue
Blinking Disk being accessed
O No internal disk
Static A network connection is available
Blinking The network is active
O The network is inactive
6D-Link ShareCenter Pro 1100-04 User Manual
Page 13

Section 1 - Product Overview
Cooling Fan
Reset Button
Rear Panel (Connections)
USB Connectors
Power Receptacle
Gigabit Ethernet Ports
COMPONENT DESCRIPTION
Gigabit Ethernet Port Two Gigabit Ethernet Ports to connect the ShareCenter Pro 1100-04 to the local network.
Power Receptacle Connect the supplied power cord to the receptacle.
USB Connector Two USB 2.0 (Type A) connectors. The USB Host ports are for Print Servers, USB memory disks or
USB UPS monitoring.
Reset Button Press this button for more than 5 seconds to reset the unit to factory defaults.
Cooling Fan The cooling fan is used to cool the hard drives and feature speed control.
7D-Link ShareCenter Pro 1100-04 User Manual
Page 14

Section 1 - Product Overview
Using the OLED
The ShareCenter Pro 1100-04 features an OLED that enables the administrator to easily view information about the ShareCenter
Pro. The OLED screen displays the system information, hard drive volume information and error messages. The OLED has three
dierent screens:
y System Information- This screen shows the following information:
{ The hostname of the ShareCenter Pro
{ The IP address of the ShareCenter Pro
{ The hard drive slots information
y Hard Drive Volume information- This screen shows the following information:
{ The percentage of used space on the hard drives.
y Error Messages- This screen shows error messages during system failures
Press the following button
once to alternate between the dierent Status screens.
8D-Link ShareCenter Pro 1100-04 User Manual
Page 15

Section 3 - Conguration
Chapter 1 - Hardware
The D-Link ShareCenter Pro 1100-04 is a solid NAS. It can hold four hot-swappable drives, provides auto encryption and has
dual Ethernet ports. Let’s take a closer look.
9D-Link ShareCenter Pro 1100-04 User Manual
Page 16

Section 2 - Installation
Hardware Setup - Installing Hard Drives
The D-Link ShareCenter Pro 1100 takes four 3.5” hard disk drives. The hard drives do not have to be the same size. However, to
create a RAID, it would be preferable to have all hard drives the same size. In this guide we show how to take the hard drive
cases apart, install the drives and turn on the device.
To install the Hard Drives, refer to the steps below:
tep 1:
emove the hard drive cages from the
enclosure.
10D-Link ShareCenter Pro 1100-04 User Manual
Page 17

Section 2 - Installation
Hardware Setup - Removing Brackets
tep 2:emove the plastic bracket inside the hard
drive cage.
11D-Link ShareCenter Pro 1100-04 User Manual
Page 18

Section 2 - Installation
Hardware Setup - Attaching the Hard Drive to the Hard
Drive Tray
tep 3:
tep 4:
lace a 3.5” SATA hard drive into the drive
tray, and screw it into place. There are four
holes on either side of the drive tray.
ive trays into the enclosure.
12D-Link ShareCenter Pro 1100-04 User Manual
Page 19

Section 2 - Installation
tep 5:
epress the blue clip in place to shut the
drive tray in the enclosure.
Hardware Setup - Installing Hard Drives
13D-Link ShareCenter Pro 1100-04 User Manual
Page 20

Section 2 - Installation
Network Setup - Plugging in the Network Cables
tep 1:
lug in one end of the CAT5E cable (provided
in the box) into one of the Gigabyte ports at
the back of the ShareCenter Pro.
14D-Link ShareCenter Pro 1100-04 User Manual
Page 21

Section 2 - Installation
tep 2:
lug the other end of the CAT5E cable into a
router or switch.
Network Setup - Plugging in the Cables
15D-Link ShareCenter Pro 1100-04 User Manual
Page 22

Section 2 - Installation
Power Cable Setup - Plugging in the Cables
tep 1:
tep 2:
lug the power cord into the back of the
ShareCenter Pro 1100-04.
lug the other end into the wall socket and
power up the device.
16D-Link ShareCenter Pro 1100-04 User Manual
Page 23

Section 2 - Installation
Powering on the Device
Before connecting to the ShareCenter Pro 1100-04, test to see if the device is powered on correctly.
tep 1:
tep 2:
o not slot any of the hard drive bays into the
ShareCenter Pro.
ress the “On” button in front of the
ShareCenter Pro and wait for the OLED
screen to display “Welcome to ShareCenter
Pro “1100”. There will also be a blinking blue
network LED that indicates the device is
connected to the network.
Power Button
OLED Screen
Network LED
17D-Link ShareCenter Pro 1100-04 User Manual
Page 24

Section 2 - Installation
Powering on the Device - Software
tep 3:
tep 4:
lace the accompanied CD-ROM into your
CD-ROM drive and browse to D-Link’s DNS1100-04 EZSearch. Double-click the icon to
activate the program.
his starts the EZSearch utility. The EZSearch
utility locates the ShareCenter Pro 1100-04
and it’s IP address.
18D-Link ShareCenter Pro 1100-04 User Manual
Page 25

Section 3 - Conguration
Chapter 2 - Software Installation
The D-Link ShareCenter Pro 1100-04 is a solid NAS. Installing, conguring, and creating shares on the y is the ShareCenter Pro’s strengths. Let’s
take a closer look.
19D-Link ShareCenter Pro 1100-04 User Manual
Page 26

Section 2 - Installation
Software Setup - Default IP Address Location
During the initial boot sequence, the ShareCenter Pro 1100-04 awaits to be assigned a DHCP IP address. If it does not receive
a DHCP assigned IP address, the ShareCenter Pro 1100 reverts to its Auto-IP address. The Auto-IP address will look similar to
(eg. 169.254.x.x). The Username and Password information is just below the IP address information.
Username
Password
It is recommended to use the D-Link EZ Search Utility when accessing and conguring the ShareCenter Pro for the rst time.
If you want to change the IP address before logging in or are unable to connect to the ShareCenter Pro’s IP address, you can
use the EZ Search Utility provided on the product CD to locate the device on your network and make any changes.
20D-Link ShareCenter Pro 1100-04 User Manual
Page 27

Section 2 - Installation
Software Setup - EZ Search Utility
Here is a closer look at the EZ Search Utility
work
Storage
The EZ Search Utility displays any D-Link NAS or ShareCenter Pro
device on the network here.
Device
efresh Click Refresh to refresh the device list.
onguration Click Conguration to access the Web based conguration of the
!
ShareCenter Pro.
AN Congure the LAN Settings for the ShareCenter Pro here.
pply Click Apply to save changes to the LAN Settings.
"#!#$ %
rive
Displays the available iSCSI targets on the ShareCenter Pro.
Mapping
onnect Click Connect to connect to the iSCSI target.
!
anagement Click Management to edit the information.
rive Mapping Volumes available for mapping are displayed here.
%
vailable
Drive Letters
Choose an available drive letter. Click Connect to map the selected
volume. Click Disconnect to disconnect the selected mapped
volume.
bout Click About to view the software version of the Easy Search Utility.
&"
Click Exit to close the utility.
21D-Link ShareCenter Pro 1100-04 User Manual
Page 28

Section 3 - Conguration
Getting Started
To run the EZ Search Utility, insert the ShareCenter Pro CD into your CD-ROM drive:
tep 1:
'
()*+, -./
EZ Search Utility link.
Click EZ Search Utility.
22D-Link ShareCenter Pro 1100-04 User Manual
Page 29

Section 3 - Conguration
tep 2:
0
Conguration to the right of the
12345
Network Storage Device.
The Conguration button launches your computer’s default
web browser and directs it to the IP address listed for the
device. Make sure your browser is not congured to use a
proxy server.
Note: The computer used to access the web-based
conguration manager must be on the same subnet as the
ShareCenter Pro. If your network is using a DHCP server and
the computer receives IP settings from the DHCP server, the
ShareCenter Pro will automatically be in the same subnet.
23D-Link ShareCenter Pro 1100-04 User Manual
Page 30

Section 2 - Installation
Getting Started - Browser Setup
Alternatively, open your default browser and type in the IP address of your ShareCenter Pro 1100-04.
24D-Link ShareCenter Pro 1100-04 User Manual
Page 31

Section 3 - Conguration
The Login screen will appear:
Select System Administrator and
leave the password eld blank.
Note:
The computer used to access the web-based
conguration manager must be on the same subnet as the
ShareCenter Pro. If your network is using a DHCP server and
the computer receives IP settings from the DHCP server, the
ShareCenter Pro will automatically be in the same subnet.
tep 3:
6
789:; <=> ?@<<
Administrator, leave the Password eld
blank and click Login.
on next to System
Click Login.
25D-Link ShareCenter Pro 1100-04 User Manual
Page 32

Section 3 - Conguration
Using the Web UI
The screen loads to the default page. If there are no drives, the browser loads to the Disk Management, Volumes page.
26D-Link ShareCenter Pro 1100-04 User Manual
Page 33

Section 3 - Conguration
Using the Web UI Part II
Load the hard drives into the bays. Once the bays are installed, the Create Volume window appears but this only occurs if no
RAID has been created. The ShareCenter Pro 1100-04 immediately recognizes the capacity of the drive(s) and prompts you
to select a RAID level. See Creating Your First Volume in the next section. You can also close this window and use the Setup
Wizard to congure the ShareCenter Pro 1100-04.
Note: If there is only one drive
installed into the system, the device
will act as a standalone drive as no
RAID can be created.
27D-Link ShareCenter Pro 1100-04 User Manual
Page 34

Section 3 - Conguration
Understanding the Web UI
Once a volume has been created, the Web UI defaults to the Homepage (
Pro 1100-04 are located in the folders at the left of the page. Click the icon to see the categories of each folder. The categories
available for conguration include: Homepage, Status, Disk Management, Account Management, System Management, Network
Services, Applications, Backup and Extension Pack.
). The main categories for conguring the ShareCenter
28D-Link ShareCenter Pro 1100-04 User Manual
Page 35

Section 3 - Conguration
Understanding the WEB UI Part II
The following is a short explanation of the Web UI:
y Homepage- Contains the System Wizard, Create User, Create Share Folder and My Favorites.
y Status- Contains the System Status, Hard Drive Status, and Resource Monitor.
y Disk Management- Allows the ShareCenter Pro administrator to create/congure a Volume, iSCSI Target, Virtual Volume,
and perform Disk Diagnostic.
y Account Management- Allows the ShareCenter Pro administrator to congure Admin Password, Users, Groups and Share
Folders
y System Management- Contains Network, Time and Date, System Settings, Power Management, Email Alerts, Firmware
Upgrade and Logs.
y Network Services- Contains File Sharing, Dynamic DNS, SNMP and Network Discovery Services.
y Applications- Contains Web File Manager and Download Management.
y Backup- Contains Volume Snapshot, Local Backup, Remote Backup and External Backup.
y Extension Pack- Allows the ShareCenter Pro administrator to add more applications to the device and supports several
Multi-language packs.
These pages and their conguration options will be discussed in detail in the following pages of this manual.
Note: After logging in to the ShareCenter Pro for the rst time it is recommended to add a password to the admin account.
29D-Link ShareCenter Pro 1100-04 User Manual
Page 36

Section 3 - Conguration
Chapter 3 - Setup Wizard
The ShareCenter Pro 1100-04 provides a Setup Wizard to easily congure the DNS-1100-04. This chapter shows you how to
create volumes and format drives.
30D-Link ShareCenter Pro 1100-04 User Manual
Page 37

Section 3 - Conguration
Using the Setup Wizard for the First Time
The Setup Wizard is the easiest and fastest way to setup your ShareCenter Pro 1100-04. Once you have entered your IP address
into the browser, follow these few steps to get started:
Create Volume (close)
tep 1:
A
BCDEF GHF B
reate Volume window.
31D-Link ShareCenter Pro 1100-04 User Manual
Page 38

Section 3 - Conguration
Using the Setup Wizard for the First Time
tep 2:
I
Home Icon
JKLMN OPQ
browser.
Home icon at the top right of the
32D-Link ShareCenter Pro 1100-04 User Manual
Page 39

Section 3 - Conguration
Using the Setup Wizard for the First Time
tep 3:
R
STUVW XYZ
Setup Wizard icon on the main
Homepage
System Wizard Icon
33D-Link ShareCenter Pro 1100-04 User Manual
Page 40

Section 3 - Conguration
Using the Setup Wizard for the First Time
tep 4:
[
he ShareCenter Pro 1100-04 System Wizard
\
starts. Read the instructions carefully and
click Next.
Next
34D-Link ShareCenter Pro 1100-04 User Manual
Page 41

Section 3 - Conguration
Using the Setup Wizard for Static IP Addresses
tep 5:^he ShareCenter Pro 1100-04 System
]
Wizard provides information on setting
up your local LAN, VLAN, and Port
Bonding.
Enter the Static IP address, Subnet
Mask, Jumbo Frame, and Gateway
details provided by your systems
administrator. Leave Jumbo Frame
Disabled if your Service Provider does
not support it.
Setup the VLAN settings according to
your virtual LAN.
Enable Port Bonding according to your
specied needs.
Click Next to continue.
Note: If your network environment
is setup with DHCP, select DHCP. If,
however, you are setting up your
network environment using your own
set of IP addresses, select Static IP.
35D-Link ShareCenter Pro 1100-04 User Manual
Page 42

Section 3 - Conguration
Using the Setup Wizard for Static IP Addresses
tep 6:
_
he ShareCenter Pro 1100-04 System
`
Wizard provides information on
setting up your second local LAN,
VLAN, and Port Bonding too.
Enter the Static IP address, Subnet
Mask, Jumbo Frame, and Gateway
details provided by your systems
administrator. Leave Jumbo Frame
Disabled if your Service Provider does
not support it.
Setup the VLAN settings according to
your virtual LAN.
Click Next to continue.
Note: If you are not conguring the
ShareCenter Pro to use the second
LAN port, click DHCP Client.
36D-Link ShareCenter Pro 1100-04 User Manual
Page 43

Section 3 - Conguration
Using the Setup Wizard for Host Names
tep 7:bhe ShareCenter Pro 1100-04 System
a
Wizard allows you to change the
hostname. Enter the Host Name,
Primary DNS and Secondary DNS, and
the Default Gateway for either LAN
card.
Click Next to continue.
37D-Link ShareCenter Pro 1100-04 User Manual
Page 44

Section 3 - Conguration
Using the Setup Wizard for File Sharing
tep 8:
c
he ShareCenter Pro 1100-04 System Wizard
d
allows you to select the le sharing protocols.
Click Enable or Disable to activate or
deactivate these share options.
CIFS: Common Internet File System, provides
shared access to les, printers, and serial ports.
FTP: File Transfer Protocol, provides is used to
copy a le from one host to another.
NFS: Network File System, allows a client
computer to access les over the network as if
the device is part of local storage.
DFS: Distributed File System, is a remote
le access protocol that provides faster
performance over slower networks.
Quota: Provides disk and network quotas
based on user’s setting.
AFP: Apple Filing Protocol, is a network
protocol that oers le services for Mac OS X
and previous Mac OS’s.
WebDAV: Web-based Distributed Authoring
and Versioning,is a set of methods based on
the Hypertext Transfer Protocol (HTTP).
Click Next to continue.
38D-Link ShareCenter Pro 1100-04 User Manual
Page 45

Section 3 - Conguration
Using the Setup Wizard for RAID Levels
tep 9:fhe ShareCenter Pro 1100-04 System
e
Wizard automatically detects the
amount of hard drives present and
creates a table to select which drives
you want.
In our example, we inserted one drive.
The RAID level is automatically selected
(standalone).
Select the Disk Array and click Next.
39D-Link ShareCenter Pro 1100-04 User Manual
Page 46

Section 3 - Conguration
Encrypting your Drive
tep 10:
g
hijkl
Create Volume, Settings choose to
encrypt your hard drive. Enter a Password
and re-enter to conrm your Password.
Select Auto Unlock to unlock the hard drive
on powering the NAS or select USB Key to
save the password on an external USB drive.
Click Apply.
Note: Select either Auto Unlock or USB Key.
You cannot select both.
Auto Unlock Checkbox
USB Key Checkbox
Password Field
40D-Link ShareCenter Pro 1100-04 User Manual
Page 47

Section 3 - Conguration
tep 11:nhe ShareCenter Pro 1100-04 now
m
provides a summary of all the stages
you completed.
LAN 1
LAN 2
Setup Wizard Summary
41D-Link ShareCenter Pro 1100-04 User Manual
Page 48

Section 3 - Conguration
Setup Wizard Summary Part II
tep 12:phe ShareCenter Pro 1100-04 now provides a
o
summary of all the stages you completed.
Global Settings
File Sharing
Create Volume
Click Apply to continue.
42D-Link ShareCenter Pro 1100-04 User Manual
Page 49

Section 3 - Conguration
Creating a Clean Volume
tep 13:
q
Yes to create a new Volume on the
rstuv
drive. All data on the selected disk will be
erased.
tep 14:whe ShareCenter Pro 1100-04 now creates a
q
volume for the hard drive.
43D-Link ShareCenter Pro 1100-04 User Manual
Page 50

Section 3 - Conguration
Formatting a Volume
tep15:
x
e the Volume is created, the ShareCenter
yz{
Pro 1100-04 will format the drive. (As shown
below)
44D-Link ShareCenter Pro 1100-04 User Manual
Page 51

Section 3 - Conguration
Accessing the Drive for the First Time
When the Setup Wizard is complete, use your Windows Explorer to access the drives on the ShareCenter Pro 1100-04.
45D-Link ShareCenter Pro 1100-04 User Manual
Page 52

Section 3 - Conguration
Chapter 4 - Hardware - Installing more Drives
The D-Link ShareCenter Pro 1100-04 can take up to four hard drives. All these hard drives can be individually congured and
grouped in an array for RAID. Let’s take a look further.
46D-Link ShareCenter Pro 1100-04 User Manual
Page 53

Section 3 - Conguration
Hardware - Installing more Drives
Installing new hard drives in the ShareCenter Pro 1100 is convenient and funtional. Let’s take a look at this in more detail.
tep1:hen you rst purchase the ShareCenter
|
Pro 1100, there are no drives in it. The Setup
Wizard will prompt you to install drives (as
seen below).
Click OK and install the drives.
47D-Link ShareCenter Pro 1100-04 User Manual
Page 54

Section 3 - Conguration
tep 2:
}
nstall the rst drive
~
Hardware - Installing more Drives
tep 3:
}
he top OLED indicates the position of
the drive on the ShareCenter Pro, while
the bottom OLED displays the active drive
number in green.
Top OLED
Bottom OLED
48D-Link ShareCenter Pro 1100-04 User Manual
Page 55

Section 3 - Conguration
tep 4:nstall the second drive
Hardware - Installing more Drives
Hard Drive Installation
tep 5:
s you install the second drive, the
ShareCenter Pro automatically recognizes
the drives and displays the information on
the OLED screens.
Top OLED showing
two drives
Bottom OLED showing
drive numbers
49D-Link ShareCenter Pro 1100-04 User Manual
Page 56

Section 3 - Conguration
Chapter 5 - Software - Creating Volumes & Formatting
The D-Link ShareCenter Pro 1100-04 handles each drive dierently. Once a new drive is installed the WEB UI creates a volume
and formats the drive according to the user’s requirements. Let’s take a closer look.
50D-Link ShareCenter Pro 1100-04 User Manual
Page 57

Section 3 - Conguration
Software - Installing more Drives
Once the hard drives are installed in the ShareCenter Pro 1100-04, the drives can be formatted and congured.
tep1:
our default browser and type in the
IP Address displayed on the OLED screen.
If you cannot see the top OLED screen click the
icon on the right side of the ShareCenter Pro.
Browser window
LED IP Address
Touch Display
51D-Link ShareCenter Pro 1100-04 User Manual
Page 58

Section 3 - Conguration
Software - Conguring more than one drive
tep 2:
The Login screen will appear:
Select System Administrator and
leave the password eld blank.
Note:
The computer used to access the web-based
conguration manager must be on the same subnet as
the ShareCenter Pro. If your network is using a DHCP
server and the computer receives IP settings from the
DHCP server, the ShareCenter Pro will automatically be
in the same subnet.
tep 3:
Administrator, leave the Password eld
blank and click Login.
on next to System
Click Login.
52D-Link ShareCenter Pro 1100-04 User Manual
Page 59

Section 3 - Conguration
Software - Conguring more than one drive
tep 4:
Disk Management, Disk Diagnostics
Disk Diagnostics shows all the drives placed
in the NAS (formatted or unformatted)
53D-Link ShareCenter Pro 1100-04 User Manual
Page 60

Section 3 - Conguration
Software - Creating RAID
tep 5:
¡¢£¤¥
Disk Management click
Volume. The Create Volume
window appears.
tep 6:
¡¢£¤¥
Create Volume, select the
RAID Level best suited for your
purpose. (See More About RAID
in other chapters)
tep 7:¦elect the Array you wish to use
and click Next.
54D-Link ShareCenter Pro 1100-04 User Manual
Page 61

Section 3 - Conguration
Software - Encryption Settings
The ShareCenter Pro 1100-04 oers bootup encryption and remote encryption via a USB stick drive. Select the method that
best suits your needs.
tep 8:¨elect Auto-rebuild to automatically unlock the
§
volume on startup.
Select Encryption to encrypt the device
Type a Password for encryption.
tep 9:
§
Click the Enable radio button to encrypt the
volumes. Enter a password in the Password and
Conrm Password elds.
Apply to continue.
©ª«¬
Select to enable or disable the auto-rebuild
function of RAID 1, RAID 5, or RAID 6
Tick the Auto Unlock check box to automatically
unlock the volume when the system starts.
Tick the USB Key check box to save the password
to a USB drive.
Click Apply to continue.
55D-Link ShareCenter Pro 1100-04 User Manual
Page 62

Section 3 - Conguration
Software - Creating the Volume
tep 10:
®
Yes to create the Volume.
¯°±²³
A warning message appears before starting to
create the volume.
Click Yes to continue.
The volume is being created. The status bar
displays the percentage of completion in real
time.
56D-Link ShareCenter Pro 1100-04 User Manual
Page 63

Section 3 - Conguration
Software - Creating the RAID & Formatting
tep 11:
´
e the Volume is created,
µ¶·
the ShareCenter Pro 1100-04
formats the drives and creates
the RAID.
Note: The ShareCenter Pro
1100-04 will automatically
create the Volume, a
Standalone Volume, if the
size of the hard drives are
dierent.
Once the volume is created, the Volume
page opens to show the information.
57D-Link ShareCenter Pro 1100-04 User Manual
Page 64

Section 3 - Conguration
Software - Volume & RAID Created
The ShareCenter Pro 1100-04 creates a Volume and congures the RAID. Windows Explorer can see the share but users on the
network cannot access it unless a shared folder is created.
58D-Link ShareCenter Pro 1100-04 User Manual
Page 65

Section 3 - Conguration
Chapter 6 - Software - Creating Users
The D-Link ShareCenter Pro 1100-04 allows you to create individual accounts or group accounts accordingly. Let’s take a look.
59D-Link ShareCenter Pro 1100-04 User Manual
Page 66

Section 3 - Conguration
Software - Creating Users
tep 1:
¸
e you have logged into
¹º»
the Web UI, click the Home
icon on the left side of the
browser.
Click the Create User icon.
Click Create User
60D-Link ShareCenter Pro 1100-04 User Manual
Page 67

Section 3 - Conguration
Software - Creating Users
tep 2:
¼
he “Create User” wizard
½
appears.
Click Next to proceed.
Click the Create User icon in the Homepage window
and the Create User window appears.
Click Next to continue.
61D-Link ShareCenter Pro 1100-04 User Manual
Page 68

Section 3 - Conguration
Software - User Information
tep 3:¿Àter the User Name and Password in
¾
the elds provided.
Conrm the Password entered.
tep 4:¿Àter a storage size in
¾
megabytes if you wish to limit
a user’s storage quota.
Click Next to continue
Enter a name in User Name, and a
password in Password and Confirm
Password.
If setting a specic storage quota for the user,
tick the Set Quota check box and enter the
storage quota in megabytes (MB).
If you use 0 in the Quota it represents
unlimited disk space.
Click Next to continue.
62D-Link ShareCenter Pro 1100-04 User Manual
Page 69

Section 3 - Conguration
Software - Creating Groups
tep 5:
Á
ÂÃÄÅÆ
Group List, view the groups you wish the user to
belong to.
Click Next to continue.
If there is no Group List just click Next and you can add
Groups at a later stage
Select a group from the list. If there is no entry in
the list, you can go to Account Management >>
User to update the information after a group has
been created.
Click Next to continue.
63D-Link ShareCenter Pro 1100-04 User Manual
Page 70

Section 3 - Conguration
Software - Creating Share Folder Lists
tep 6:
Ç
ÈÉÊËÌ
Share Folder List, view the shared folder you wish
the user to belong to.
Click Next to continue.
If there is no Share Folder List just click Next and you can
add the Folder at a later stage.
Select a share folder from the list. If there is no entry
in the list, you can go to Account Management >
User to update the information after a share folder
is created.
Click Next to continue.
64D-Link ShareCenter Pro 1100-04 User Manual
Page 71

Section 3 - Conguration
Software - User Summary
tep 7:
Í
ÎÏÐÑÒ
Summary, view details about the user
you have just created.
Click Apply to save the settings.
This window displays the information that has
been congured.
Click Apply to save the settings.
65D-Link ShareCenter Pro 1100-04 User Manual
Page 72

Section 3 - Conguration
Software - User Information
tep 8:
Ó
ÔÕÖ×Ø
Account
Management, Users.
There you will nd the
New User that you have
created.
Account Manager
Users
New User
66D-Link ShareCenter Pro 1100-04 User Manual
Page 73

Section 3 - Conguration
Software - Creating more than One User
tep 1:
Ù
e you have
ÚÛÜ
the Account
Management window
open, simply click
Create at the top of
the right window
pane.
Create
67D-Link ShareCenter Pro 1100-04 User Manual
Page 74

Section 3 - Conguration
Software - Creating more than One User
tep 2:Þßter the details of the new user and
Ý
click Next.
New User details
68D-Link ShareCenter Pro 1100-04 User Manual
Page 75

Section 3 - Conguration
Software - Creating more than One User
tep 3:
à
áâãäå
Group List, view the groups you wish the user
to belong to.
Click Next to continue.
If there is no Group List just click Next and you can
add Groups at a later stage
Select a group from the list. If there is no entry in
the list, you can go to Account Management >>
User to update the information after a group has
been created.
Click Next to continue.
69D-Link ShareCenter Pro 1100-04 User Manual
Page 76

Section 3 - Conguration
Software - Creating more than One User
tep 4:
æ
çèéêë
Share Folder List, view the shared folder
you wish the user to belong to.
Click Next to continue.
If there is no Share Folder List just click Next and
you can add the Folder at a later stage
Select a share folder from the list. If there is no entry
in the list, you can go to Account Management >
User to update the information after a share folder
is created.
Click Next to continue.
70D-Link ShareCenter Pro 1100-04 User Manual
Page 77

Section 3 - Conguration
Software - User Summary
tep 5:
ì
íîïðñ
Summary, view details about the
user you have just created.
Click Apply to save the settings.
This window displays the information that has
been congured.
Click Apply to save the settings.
71D-Link ShareCenter Pro 1100-04 User Manual
Page 78

Section 3 - Conguration
Software - User Information
tep 6:
ò
Account Management,
óôõö÷
Users.
There you will nd the New
User that you have created.
Account Manager
Users
Second User created
72D-Link ShareCenter Pro 1100-04 User Manual
Page 79

Section 3 - Conguration
Software - Deleting a User
tep 1:
ø
ùúûüý þÿ
check-box next to
the User’s name and click
Delete.
Check-box next to User
details.
73D-Link ShareCenter Pro 1100-04 User Manual
Page 80

Section 3 - Conguration
tep 2:onrm that you want to
delete the User from the User
List and click Yes.
Software - Deleting a User
tep 3:he User no longer exists in the User List.
74D-Link ShareCenter Pro 1100-04 User Manual
Page 81

Section 3 - Conguration
tep 1:
Import
Users button
at the top of
the Account
Management,
Users window.
Software - Importing Users
Click Import Users
75D-Link ShareCenter Pro 1100-04 User Manual
Page 82

Section 3 - Conguration
Software - Importing Users
tep 2:
he welcome window is displayed. Click
Next to continue.
Click Next to continue.
76D-Link ShareCenter Pro 1100-04 User Manual
Page 83

Section 3 - Conguration
Software - Importing Users - Creating a User List
tep 3:
tep 4:
ownload button to see an example .txt
le. The le looks similar to this:
#user name;user password;user groups;
shared folder(rw); shared folder(ro); shared
folder(deny);user quota
user001;11111;Group1,Group2;Volume_1,Volume
_50;B,Volume_51;;10240
Note: Consult a systems administrator or a
programmer to design the script for this le.
Note: The ShareCenter Pro only accepts “txt” les at
the moment.
x next to Overwrite duplicate
accounts to write over user accounts you already
have in the ShareCenter Pro.
tep 5:
Browse button to locate the le you
created and click Next.
Click Next to continue.
77D-Link ShareCenter Pro 1100-04 User Manual
Page 84

Section 3 - Conguration
Software - Importing Users - Checking the User List
tep 6:his window displays all the users in the le. If there
are any error warnings in the State eld, the user
will not be able to go to the next window.
Click Next to continue.
tep 7:he window displays the nal results of importing
users to the ShareCenter Pro.
Click Apply to save the settings.
78D-Link ShareCenter Pro 1100-04 User Manual
Page 85

Section 3 - Conguration
Software - Creating a Batch User List
tep 1:
!" #$%
Create Batch button at the top of the
Account Management, Users window.
Click Create Batch
79D-Link ShareCenter Pro 1100-04 User Manual
Page 86

Section 3 - Conguration
Software - Creating a Batch User List
tep 2:
&
he welcome window appears. Click Next to
'
continue.
Click Next to continue.
80D-Link ShareCenter Pro 1100-04 User Manual
Page 87

Section 3 - Conguration
Software - Creating a Batch User List
tep 3:
(
his window allows you to create multiple users.
,
User Name Prex Enter the prex of the users
(
tart Number Enter the start number of the users.
reate Number Enter the total number of the users.
)
assword Enter the password of the users
*
onrm
)
Retype the password
Password
verwrite
+
Tick the check box to replace duplicate accounts.
duplicate
Accounts
et Quota Tick the Set Quota check box to limit the storage
(
capacity (in megabyte) for the user. The value of
0 means an unlimited quota size.
Click Next to continue
Click Next to continue.
81D-Link ShareCenter Pro 1100-04 User Manual
Page 88

Section 3 - Conguration
Software - Creating a Batch User List
-
tep 4:
This window is used to add the users to groups. If there is no entry in the list, you can go to Account Management > Groups
to create groups.
-
earch
age Displays number of pages. You can enter a page
.
efresh
/
Enter the search keyword and click to search for
the group. Click to clear the search eld and all
groups’ information appears.
dd Tick the corresponding check box to add the users
to the groups.
number in the eld to jump to the specic page. Click
First Page (
), Previous Page ( ), Next Page ( ) or
Last page ( ) to search for the group.
Click
to update the group list.
Click Next to continue.
Click Next to continue.
82D-Link ShareCenter Pro 1100-04 User Manual
Page 89

Section 3 - Conguration
Software - Creating a Batch User List
0
tep 5:
This window is used to assign access rights to the users for the corresponding share folder(s) to the share folders. If there is no
entry in the list, you can go to Account Management > Share Folders to create share folders.
0
earch
ead Only Tick the check box for read only access right.
1
ead/Write Tick the check box for both read
1
23
age Displays number of pages. You can enter a page
4
Enter the search keyword and click to search for
the folder. Click to clear the search eld and all
folders appear.
and write access rights.
y Tick the check box for no access right.
number in the eld to jump to the specic page. Click
First Page (
), Previous Page ( ), Next Page ( ) or
Last page ( ) to search for the group.
efresh
1
Click
to update the folder list.
Click Next to continue.
Click Next to continue.
83D-Link ShareCenter Pro 1100-04 User Manual
Page 90

Section 3 - Conguration
Software - Creating a Batch User List
tep 6:
5
This window displays a summary of the congured information.
Click Previous to modify the settings.
Click Apply to save the settings. Depending on the amount
of users, the procedure may take a few hours.
Click Apply to save the settings.
84D-Link ShareCenter Pro 1100-04 User Manual
Page 91

Section 3 - Conguration
Chapter 7 - Software - Creating a Shared Folder
The D-Link ShareCenter Pro 1100-04 allows you to create shared folders for users to access. Let’s take a look.
85D-Link ShareCenter Pro 1100-04 User Manual
Page 92

Section 3 - Conguration
Software - Creating a Shared Folder
tep 1:
6
e you have logged into
78
the Web UI, click the Home
icon on the left side of the
browser.
Click the Create Share Folder
icon.
Click Create Share
Folder
86D-Link ShareCenter Pro 1100-04 User Manual
Page 93

Section 3 - Conguration
tep 2::he Create Share Folder introduction window
9
appears. Click Next to continue.
Click the Create Share Folder icon in the Homepage
window and the Create Share Folder window appears.
Create Share Folder
Click Next to continue.
87D-Link ShareCenter Pro 1100-04 User Manual
Page 94

Section 3 - Conguration
tep 3:
;
<=>?@
Volume Path, click
on the Select Path eld to
choose a folder.
Create Share Folder - Volumes & Quotas
tep 4:
;
?
ABCCD?EB
Volume you wish
to use by double-clicking or
click Create.
Click the
Select Path eld to choose the path of a folder.
Click Create
88D-Link ShareCenter Pro 1100-04 User Manual
Page 95

Section 3 - Conguration
Create Share Folder - Volumes & Quotas
tep 5:Gter a Share Folder name in the
F
eld provided and click OK.
89D-Link ShareCenter Pro 1100-04 User Manual
Page 96

Section 3 - Conguration
Create Share Folder - Volumes & Quotas
tep 6:
H
e the Share Folder name
IJK
is chosen, select one or all of
the Share Folder Options.
Click the radio buttons to congure the folder
options.
plocks are: guarantees made by a server for
L
a shared logical volume to its clients. These
guarantees inform the Client that a le’s
content will not be allowed to be changed
by the server, or if some change is imminent,
the client will be notied before the change is
allowed to proceed.
Select Enable or Disable according to your
choice.
90D-Link ShareCenter Pro 1100-04 User Manual
Page 97

Section 3 - Conguration
Create Share Folder - Volumes & Quotas
tep 6:ap Archive: means that backed up data is
M
kept in a le that lists what les were backed up
and on what dates. It compares le modication
dates and maps data to that archive.
Click the Set Quota box and enter a number in
Megabytes
91D-Link ShareCenter Pro 1100-04 User Manual
Page 98

Section 3 - Conguration
Create Share Folder - Volumes & Quotas
ecycle Bin is: means that any les within
tep 6:
N
Click the Set Quota box and enter a number in
Megabytes
O
the Share Folders can be deleted and
placed in the Recycle Bin. If this is disabled
then a user cannot delete an item into the
Recycled Bin.
92D-Link ShareCenter Pro 1100-04 User Manual
Page 99

Section 3 - Conguration
tep 7:
P
QRSTU VWX
Set Quota check box and type
the storage amount in megabytes.
Click Next to continue.
Create Share Folder - Volumes & Quotas
If setting a specic storage quota for the
share folder, tick the Set Quota check box
and enter the storage quota in megabyte
(MB).
Click Next to continue.
93D-Link ShareCenter Pro 1100-04 User Manual
Page 100

Section 3 - Conguration
tep 8:
Y
elect the Service you wish to enable.
Z
There are six services: CIFS, AFP, FTP, NFS,
Web File Manager, and WebDAV.
Create Share Folder - Select Service
Click Next to continue.
94D-Link ShareCenter Pro 1100-04 User Manual
 Loading...