

Page 1
Roq-it 10 GB
[DMP-HD610]
Portable MP3 Jukebox
User’s Guide
Page 2

Version 1.0
Page 3

Table of Contents
INTRODUCTION 1
WHAT IS THE ROQ-IT 10 GB? 1
SPECIFICATIONS 2
PACKAGE CONTENTS 3
SYSTEM REQUIREMENTS 4
ROQ-IT 10 GB FEATURES 5
FRONT PANEL 5
TOP AND BOTTOM 6
REMOTE CONTROL 7
HARDWARE INSTALLATION 8
H ARD DRIVE INSTALLATION 8
BATTERY INSTALLATION 8
CONNECTING TO YOUR COMPUTER 9
CONNECTING TO YOUR CAR 11
CONNECTING TO FAMILY STEREO , H OME THEATER 12
ROQ-IT 10 GB FUNCTIONS 14
PROGRAM (PLAY M ODES) 15
BROWSING AND PLAYING M USIC 16
EQUALIZER / SETTINGS 17
Adjusting Audio Settings 18
K EY PAD LOCK AND STAND BY 19
HANDLING INSTRUCTIONS 21
GLOSSARY 23
TROUBLESHOOTING 28
D-LINK OFFICES 30
LIMITED WARRANTY 31
TECHNICAL SUPPORT 37
Page 4

Page 5

INTRODUCTION
What is the Roq-it 10 GB?
The Roq-it 10 GB is a high performance portable MP3 solution. You can
use your Roq-it 10 GB as an external hard drive to store all your personal
data or store your entire music collection in MP3 format. Your road trips
will never be the same once you've used a portable MP3 player with
thousands of songs at your fingertips. It uses a 2.5” laptop hard drive to
store MP3 music files, and an internal MP3 decoder board to playback
your MP3 music. With this player you no longer have to worry about
bringing your CD catalogue along on a trip or worry about scratched CDs.
With the fast and simple USB interface, you can upload your MP3 songs
quickly and be on your way. When connected to your computer, the Roq-it
10 GB shows up just like a normal hard-drive on your computer. Simply
copy your favourite music onto the drive.
The Roq-it 10 GB supports the following features:
§ Can play thousands of MP3 format songs from a single hard drive,
only limited to the hard drives capacity.
§ The Roq-it 10 GB is not just a MP3 player, but also an external
USB drive that can act as a digital wallet to carry files of any type.
Carry all your games, movies, documents, presentations, etc.
§ When the Roq-it 10 GB is connected to a PC by the USB port, the
PC will see the Roq-it 10 GB as a regular external hard drive.
§ The unit can be connected to any “Line in” or “AUX in” audio
connection on stereos.
§ It is easy to connect to your car’s stereo by using a cassette
adapter, RF modulator or just connecting it to “Line in.”
- 1 -
Page 6
§ It has many play modes, equalizer, song / track ID info, volume,
playtime, and more. Supports M3U playlists.
§ It is easy to choose a song on the illuminated graphic LCD panel
and remote control.
Specifications
• Liquid Crystal Display (LCD) Screen
• 56X32 mm visual area
LCD DISPLAY
MEMORY
DIMENSIONS
INTERFACE
OPERATING
SYSTEMS
• Blue back light
• 64X128 graphic display
• Multi-Language ability (firmware upgradeable)
• Built-in 2 MB buffer
• 2.5 inch EIDE/Ultra DMA IDE Hard Drive
• Supports both FAT16 and FAT 32 formats
Outer case size:
• 142.5(W) X 120.8(H) X 27(D) mm
Weight (w/o battery and hard drive):
• 218g
PC:
• USB (Universal Serial BUS) Port (transfer rate
800KB/sec)
HDD:
• EIDE
Analog:
• Audio out (3.5 mm phone jack)
• Windows 95/98/ME/2000,
• Macintosh Computer Mac O/S 9 and above.
- 2 -
Page 7

Adapter AC:
• Input: 110/220V, 50/60Hz – DC Output: 5.0V 2A
POWER
SNR • 100 dB
Battery
• Lithium-Ion rechargeable battery (3.6V
1500mA/H)
D/A CONVERTER
THD • Better than 0.1%
FREQUENCY
RESPONSE
AUDIO OUTPUT
POWER
Data Capacity • 10G (Roq-it 10 GB)
• 18 bit
• 20Hz – 20 kHz
• 60 mW at 32ohm impedance
All specifications are subject to change without notice.
Package Contents
The Roq-it 10 GB package contains the following items:
• Roq-it 10 GB Portable MP3 Player
• User’s Guide (This Document)
• Quick Install Guide
• AC power adapter
• Headphones with 3.5 mm phone jack
• Lithium-Ion rechargeable battery
• USB cable
• IR remote control
• Leather carrying bag
• Driver/Software Installation Disk
• Shoulder Strap
- 3 -
Page 8

System Requirements
• Pentium Class 200MHz Processor or Better
• 1 available USB port
• 32MB RAM
• 50MB Hard Drive Space
• CD-ROM
Operating System:
• Windows 98
• Windows 98SE
• Windows ME
• Windows 2000
• Windows XP
• MAC OS 9 or higher
- 4 -
Page 9

ROQ-IT 10 GB FEATURES
The Roq-it 10 GB is a full feature MP3 playing subsystem, designed to
cater to the demand for large amounts of music storage. The following
sections describe the external features of the Roq-it 10 GB.
Front Panel
The front panel of the Roq-it 10 GB contains the Function Buttons and the
LCD Display.
- 5 -
Page 10

Power Switch
3.5 mm Headphone Jack
Top and Bottom
Line out:
To connect to any
stereo or amp.
USB(Universal Serial Bus)
DC 5V Power Input
- 6 -
Page 11
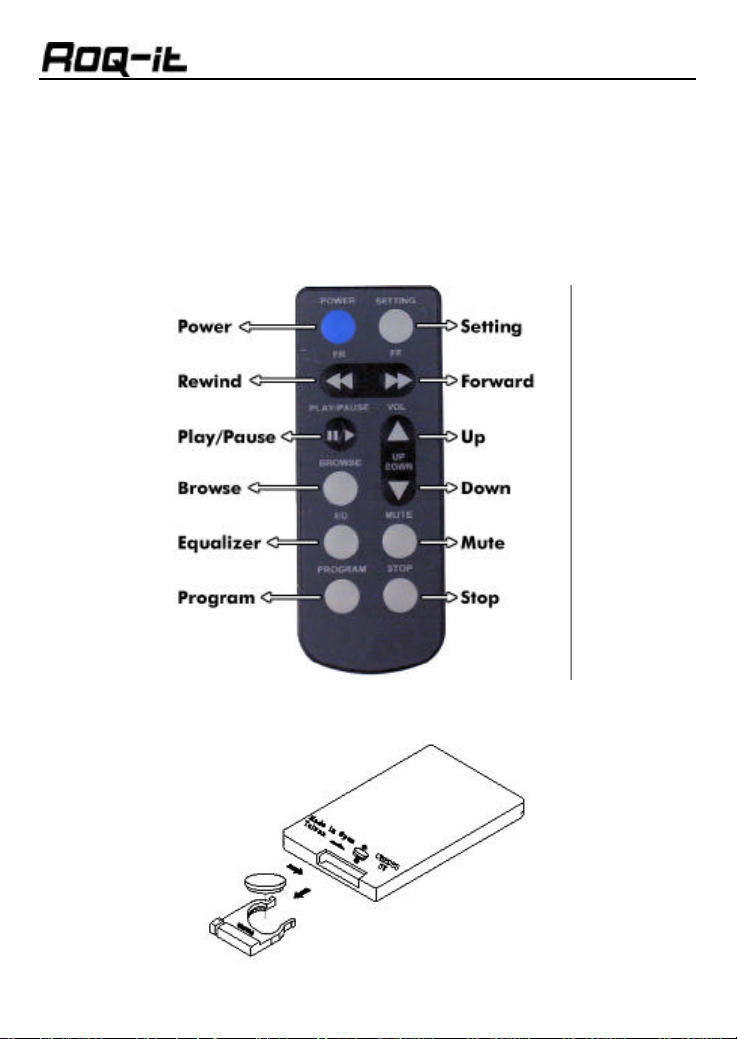
Remote Control
The Roq-it 10 GB includes an IR remote control so that you can control the
Roq-it 10 GB from a distance.
Note: Please remove the plastic ta b before use.
Function Buttons
Changing the Batteries
- 7 -
Page 12

HARDWARE INSTALLATION
Hard Drive Installation
Note: The hard drive is already pre -installed inside the Roq-it 10 GB.
Do not remove the hard drive. Doing so will void your warranty!
Battery Installation
1 Install the battery as shown in the diagrams below.
Connect the AC power adapter to the Jukebox. The Battery
2
Recharge Indicator LED should light up. It is recommended that
you recharge the Jukebox for approximately 8 hours prior to fi rst
use as a portable unit.
- 8 -
Page 13
Caution
Do not connect the Roq-it 10 GB to your system until after the USB
software driver has been installed. Your computer will not recognize the
Roq-it 10 GB until the driver has been installed. Continue to the next
section for USB driver installation instructions.
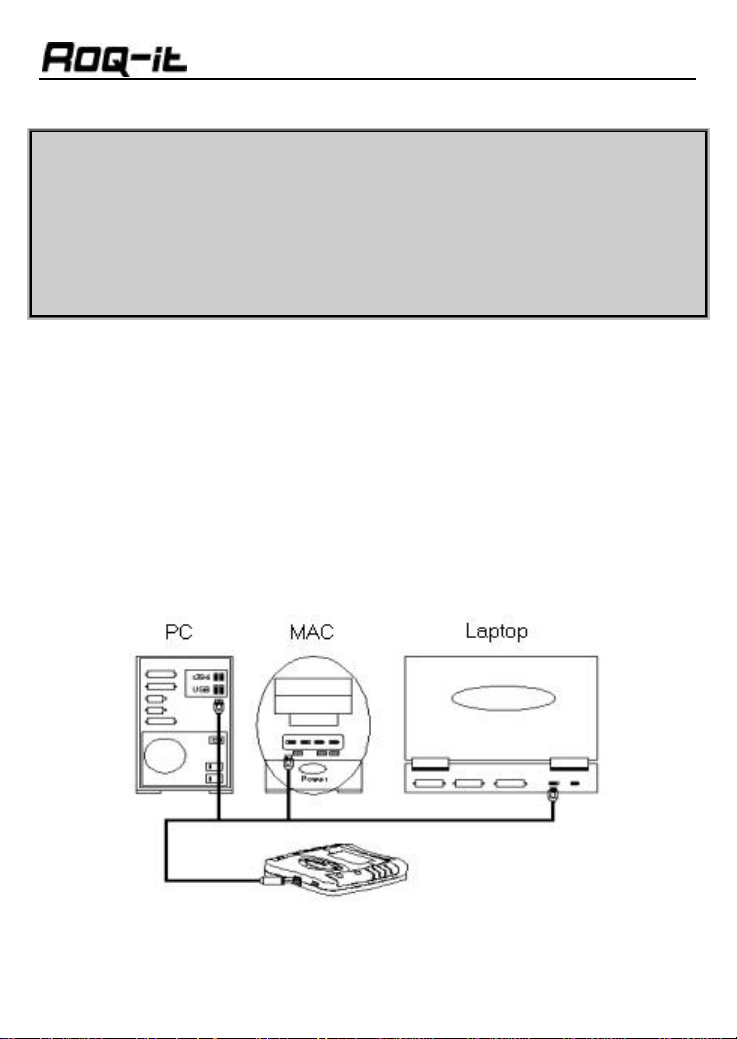
Connecting to your Computer
After the USB driver has been installed, you may connect the Roq-it 10 GB
to the USB port. Make sure the Jukebox is ON before connecting to
your system.
The Roq-it 10 GB easily connects to the USB Port on your PC, MAC or
Laptop.
- 9 -
Page 14

If the driver is installed correctly, your system should automatically
recognize the Roq-it 10 GB once it is connected to the USB port. A new
drive letter for the Roq-it 10 GB should appear in “My Computer.”
- 10 -
Page 15
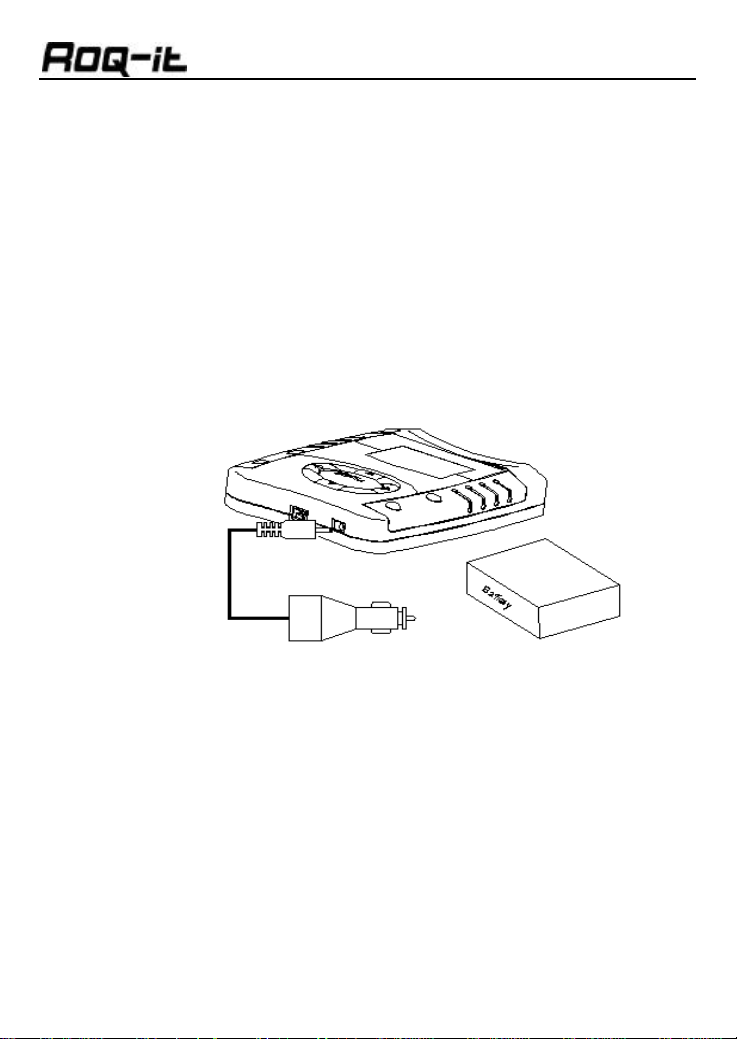
Connecting to your Car
Installing The Roq-it 10 GB in your car will be similar to installing a portable
CD, MD, or tape player in your Car.
Connect the Roq-it 10 GB’s “Line Out” to your car’s stereo “Line In”. If your
car stereo does not have a “Line In” you can use a cassette adapter or
amplifier. You will need a cigarette lighter plug to power the Roq-it 10 GB.
Firmly secure the Roq-it 10 GB in the car for best results and to avoid
damage.
- 11 -
Page 16
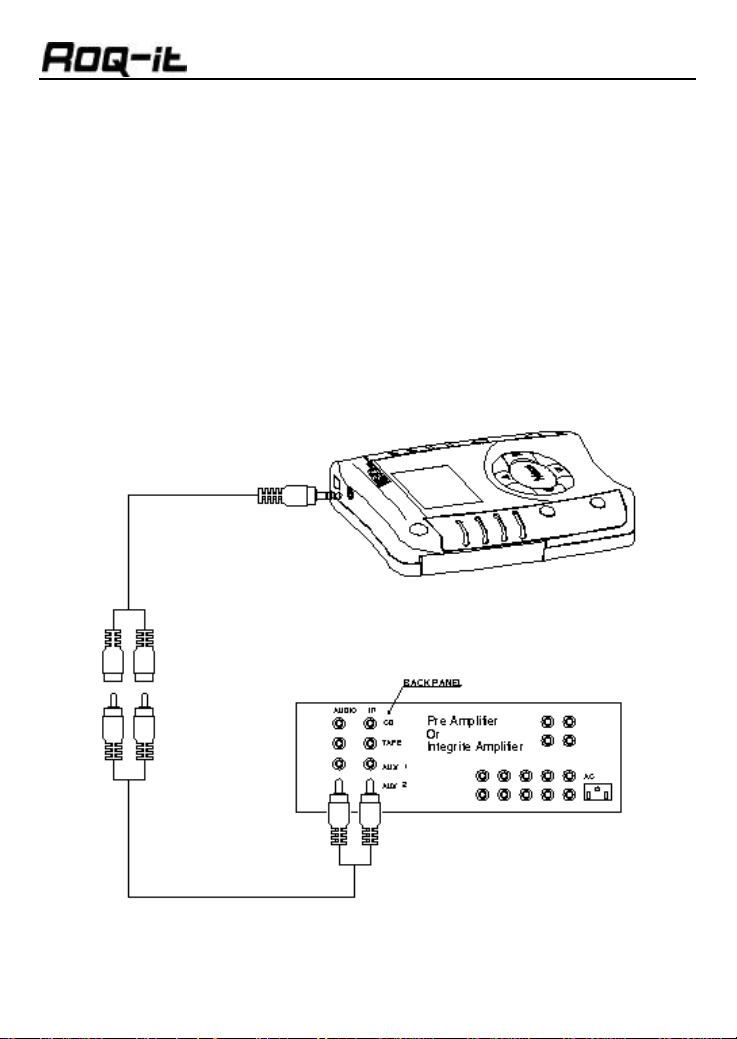
Connecting to Family Stereo, Home
Theater
Connecting the Roq-it 10 GB to your Home Stereo is similar to connecting
the Roq-it 10 GB to your car.
Connect the players “Line out” directly to your stereo’s “Line in” or to
“AUX.”
Use the included power adapter to power and charge the Roq-it 10 GB.
(Note: Adapter cables are not included with the Roq-it 10 GB)
- 12 -
Page 17

Copyright Information
Please note that The Roq-it 10 GB is to be used as a personal music
player. Copying, downloading and transferring music or any other
files without permission from the artist or copyright holder is
forbidden.
D-Link and its resellers will not be liable for unlawful use of this
product.
- 13 -
Page 18

ROQ-IT 10 GB FUNCTIONS
Program
Browse
EQ/Settings
Stand By/Stop
Press to select “Repeat”, “Repeat All”,
“Random”, “Random All” or “Directory Only”.
Press to view list of songs or song directories.
Press to adjust Balance, Bass, Treble, or
Equalizer (User, Rock, Pop, Jazz, Classic)
Press to stop playing a song, or hold two
seconds to put juke box in/out of Stand By
Mode.
- 14 -
Page 19

Program (Play Modes)
The Roq-it 10 GB supports various play modes, such as repeat, repeat all,
random, random all, directory only and continuous. As the “Program”
button is pressed, the play modes seen below cycle on the LCD.
Press [Program] one time and the screen
“Repeat”
“Repeat All”
“Random”
“Random All”
“Directory Only”
“Continuous ”
Playing Mode
shows ” Repeat”. The Roq-it 10 GB will
repeat the current song until another
program is selected.
Press [Program] two times and the screen
shows ” RepAll.” The Roq-it 10 GB will
repeat all the songs in the directory.
Press [Program] three times and the
screen shows ” Random.” The Roq-it 10
GB will play songs randomly from the
current directory.
Press [Program] four times and the
screen shows ” RanAll.” The Roq-it 10 GB
will play songs randomly from the entire
hard drive.
Press [Program] five times and the
screen shows ” DirOnly.” The Roq-it 10
GB will play all the songs in the current
directory until the last song of the
directory. Then the jukebox will then stop
playing.
Press [Program] six times or by not
pressing ” Program” as default the screen
shows nothing. The Roq-it 10 GB will play
all the songs one by one until the last one
on the hard drive is reached.
- 15 -
Page 20

Browsing and Playing Music
Press the “Browse” button to view your selections of MP3 files or folders.
Use the Control Panel buttons to navigate through the files and folders.
Navigating is simple: move the controller right [FF] to go deeper into the
sub folders (or left [RW]) to go up) then scroll up and down to see the
songs in the directory.
Folders or Directories are indicated with a “down arrow.” Use the Up and
Down keys to select the folders. Press the “FF” button to view the contents
of the selected folder.
- 16 -
Page 21

Songs are indicated by a “musical note.” Use the Up and Down arrow keys
to select the songs. Press “Play” to begin playing the selected song.
Press Event
PLAY
PLAY (Pause)
STOP
FF
Hold [FF]
RW
Hold [RW]
UP
DOWN
Play the song in current directory.
Press [Play] during a song to pause the song.
Stop the currently playing song.
Play the next song.
Hold two seconds to fast forward within the current
Play the previous song.
Hold two seconds to rewind within the current song.
Increase volume
Decrease volume
Equalizer / Settings
The Roq-it 10 GB has a built-in equalizer to provide users with a high-end
entertainment environment. The Roq-it 10 GB provides basic functions to
change the equalizer settings, enabling users to enjoy their music in a
personalized way.
- 17 -
Page 22

Press the “EQ/Settings” button until the blinking “EQ:” is displayed on the
screen. Use the arrow keys on the keypad to select the desire setting
(Rock, Pop, Jazz, Classic, or Us er).
Rock
Pop
Jazz
Classic
User
Tap [EQ] one time and you will find the screen
shows “EQ: Rock”
Tap [EQ] again and you will find the screen shows
“EQ: Pop”
Tap [EQ] again and you will find the screen shows
“EQ: Jazz”
Tap [EQ] again and you will find the screen shows
“EQ: Classic”
This setting allows you to manually adjust your
audio settings.
Adjusting Audio Settings
Make sure the Equalizer is set to “EQ: User.” Press the “EQ/Settings”
button to select the setting you want to adjust. Use the left and right arrow
keys to adjust each setting.
User
Balance
Bass
Users can define the equalizer manually under this
mode.
Press [LEFT] and [RIGHT] to adjust the balance of
left and right speaker.
Press [LEFT] and [RIGHT] to adjust bass.
- 18 -
Page 23

Treble
LCD Lvl
Volume
1. Use of headphones while operating an automobile or
moving vehicle is not recommended and is unlawful in some
countries and areas.
2. Do not operate the unit while driving.
3. Please turn off the car stereo before turning on the player to avoid
the initial noise of the player’s hard drive spinning.
4. Using playlists is a good way to listen to songs without operating
or looking at the unit while driving.
Press [LEFT] and [RIGHT] to adjust treble
Press [LEFT] and [RIGHT] to adjust the LCD
contrast level
Press [UP] and [DOWN] to adjust the volume
Caution While Driving Cars
Key pad lock and Stand by
The Roq-it 10 GB’s keys can be locked to avoid accidental depression of
buttons.
1. Press and hold the “Program” key for two seconds.
2. The LCD screen will display “Hold On.” Only the volume
keys will operate.
3. To resume normal operation, press and hold the “Program”
key a second time until “Hold Off” appears on the LCD.
4. To put the Roq-it 10 GB in sleep mode, hold the “Stand by”
key for more than two seconds.
- 19 -
Page 24

5. To resume normal operation, press the “Stand by” key for
over two seconds again.
- 20 -
Page 25

HANDLING INSTRUCTIONS
Please read all the instructions carefully before handling your Roq-it 10 GB.
BE CAREFUL WHEN STORING THE ROQ-IT 10 GB
Avoid places with high humidity, strong magnetic fields, or extreme
temperatures when you store your Roq-it 10 GB or hard drive.
DO NOT SUBJECT The ROQ-IT 10 GB TO SEVERE IMPACT OR
JARRING
Vibration experienced during normal driving or moving will not affect the
normal operation of the Roq-it 10 GB. However, dropping the player or
some off-road driving may result in damage to the player.
KEEP THE ROQ-IT 10 GB AWAY FROM WATER
If water enters the Roq-it 10 GB, damage may result. If the Roq-it 10 GB
comes into contact with water, wipe immediately with a dry cloth.
- 21 -
Page 26

vehicles or outside for extended periods of time.
This equipment may be reset by unintentional
electrostatic discharge during operation.
Warning
Caution
Exposure to direct sunlight or extreme heat (such as
inside a parked car for more than 2 hours) may cause
damage or malfunction.
For safety, please do not leave the Jukebox in
- 22 -
Page 27

GLOSSARY
Item Definition
MP3 is an audio file format. Audio files can be quite large,
MP3 (MPEG Layer
3)
Recorder
Ripping
Encoding
Encoder
Decoder
Encryption
which is why it hasn't been practical to store music on PCs.
An MP3 file is an audio file that has been compressed
(anywhere from one fifth to one seventeenth of its original
size) with little or no loss in sound quality, resulting in a great
sounding MP3 file small enough to be downloaded and/or
stored on your computer.
One of the main components of MUSICMATCH Jukebox is the
Recorder. This is where you record (also known as ripping
and encoding) your audio CDs to MP3.
Technically, ripping is the process of extracting the digital
audio files from a CD. This process is commonly referred to
as ripping CDs and this, in conjunction with the encoding
process, is known as recording within MUSICMATCH
Jukebox.
For our purposes, encoding is the process of compressing a
ripped audio file into MP3, AIFF or other audio formats. The
ripping and encoding processes happen in one easy step
within MUSICMATCH Jukebox and are collectively referred to
as Recording.
An encoder is a device that modifies information into a
required transmission format. For our purposes, an MP3
encoder is the technology used to compress ripped audio files
into the much smaller MP3 format. Within MUSICMATCH
Jukebox, the ripping and encoding processes are combined in
one easy step and are referred to as Recording.
MUSICMATCH Jukebox currently features the next- generation
encoder from Fraunhofer, the co- inventors of the MP3
format.
A decoder is a device necessary to play back information,
which has been modified (or encoded) to a specific
transmission format. For our purposes, MUSICMATCH
Jukebox features an MP3 decoder, more commonly referred
to as an MP3 player. We also decode, or play, MP2.
Encryption refers to the application of a specific algorithm to
- 23 -
Page 28

Bit Rate
Near CD Quality
CD Quality
MUSICMATCH
Jukebox
(Standard
Version)
MUSICMATCH
Jukebox Plus
Update
Constant Bit Rate
(CBR)
data so as to alter the appearance of the data making it
incomprehensible to those who are not authorized to see the
information. Whether or not files will be encrypted depends on
what format files are in. If recording MP3 files, they will not be
encrypted.
Bit rate refers to the speed at which bits (of information) are
transmitted, usually expressed in bits per second.
MP3 files compressed at 96kbps are more commonly referred
to as near CD Quality recordings. The next step up in
recording quality is 128kbps, more commonly referred to as
CD Quality recording. Generally speaking, the higher the bit
rate, the better the sound quality of the resulting file. A track
recorded at near CD quality will take up less hard drive space
than the same track recorded at CD quality. Unfortunately,
sound quality must be sacrificed to save disk space, so the
choice usually is to record tracks at CD quality.
MP3 files compressed at 128 kbps are considered CD quality
recordings. MUSICMATCH offers the ability to record MP3s up
to 320 kbps.
Throughout the MUSICMATCH website and related materials,
you will see references to the standard version of
MUSICMATCH Jukebox. This is the standard (free) version of
the program that allows you to record an unlimited number of
CD Quality recordings, unlimited use of the library and more.
Upgrade the standard version to the enhanced MUSICMATCH
Jukebox Plus for $19.99, which includes many power
features including the ability to encode up to 12 times faster
than the standard version of the jukebox.
Throughout the MUSICMATCH web site and related materials,
you will see references to 'updating the software'. Update
refers to updating your version of MUSICMATCH Jukebox to a
new, or more recent software release. There is no cost to
update the program and you can check for software updates
anytime by choosing Update Software from the Register menu
within the player.
Constant Bit Rate encoding is a method that ensures a
consistent bit rate throughout an encoded file, potentially at
the expense of audio quality and/or Encoder efficiency.
Use CBR encoding when you need to limit the size of the MP3
file or produce consistent file sizes. Choose a CBR setting
from 16kbps to 320kbps from the Record Settings screen to
- 24 -
Page 29

Variable Bit Rate
(VBR)
Music Library
Add
Overwrite
ID3 Tags
customize recording. Constant Bit Rate encoded files will be
smaller than Variable Bit Rate encoded files of a comparable
encoding speed. For example, a song recorded in CBR at
128kbps will usually be smaller than the same song recorded
in VBR at 50.
Variable Bit Rate encoding is an encoding method that
ensures consistently high audio quality throughout an
encoded file by making intelligent bit- allocation decisions
during the encoding process. Use VBR encoding when
consistent audio quality is the top priority and predictable
encoded MP3 file size is not critical. Choose a VBR setting
from one to 100 from the Record Settings screen, to
customize the recording. As a general guideline, a setting of
25 is approximately 80 kbps, a setting of 50 is approximately
128 kbps and a setting of 75 is approximately 160 kbps.
Variable Bit Rate encoded files will be larger than Constant Bit
Rate encoded files, of a comparable encoding bit rate. For
example, a song recorded in VBR at 50 will be larger than the
same song recorded in CBR at 128kbps. Not all mp3 players
support Variable Bit Rate encoding; however the
MUSICMATCH Jukebox player does support this technology.
One of the main components of MUSICMATCH Jukebox is the
Music Library. This is where you organize the database of
MP3 files for easy creation of Playlists.
Click the Add button in the Music Library screen to browse
the hard drive and add existing MP3s to the Music Library.
Overwrite generally refers to replacing a file. If you have a
saved file, and try to save another song with the same name,
you can choose to overwrite it, or choose a different name
for the file.
ID3v2 tags are accepted informally as the standard for
tagging MP3 files. These tags offer a flexible and unobtrusive
way to add textual information to audio files such as song
title, artist name, album title, etc. MUSICMATCH supports ID3
tags so if you download a track that has ID3 tags already
associated with it, you will not have to add that information,
though you do have access to modify and add information
through the MUSICMATCH tagging feature.
- 25 -
Page 30

Tagging Music
Player
Playlist
Art View
Track Info
AutoDJ
Gracenote
Tagging music refers to adding ID3v2 tags to user's MP3 files.
ID3 tags can contain a lot of valuable and personalized
information including song title, artist name, song lyrics and
even album cover art to the song for display while that song
is playing. You can create names for your own custom
genres. When tagging the file, simply enter the name of a
genre if it's not already listed in the drop- down box.
Remember the tag information cannot be saved to the song if
it is playing. MUSICMATCH Jukebox offers a very intuitive and
easy to use tagging feature and all tagging
can be completed simply, in a single screen.
One of the main components of MUSICMATCH Jukebox is the
Player screen. It is the MP3 player portion of the software and
is used primarily in conjunction with the Playlists created.
However, the Player also has an integrated CD Player.
One of the main components of MUSICMATCH Jukebox is the
Playlist screen. This screen is where you create Playlists for
playback. You can also save Playlists for future sessions,
and all saved Playlists will be listed in this screen as well.
Saved Playlists will have a file extension of '.mmpl.'
Tag tracks with album art and view the cover art while the
track is playing.
One of the main components of MUSICMATCH Jukebox is the
Track Info screen. The Track Info screen allows you to view
song lyrics, artist bios, etc. while your tracks are playing. The
Track Info screen is interactive in terms of adding information
to song files, via the tagging feature.
AutoDJ is a Playlist- compiling feature unique to MUSICMATCH.
The AutoDJ feature works in conjunction with the tagging
feature and creates automatic Playlists based on your sorting
preferences. Simply define the length of the desired music
program and determine the type of music you want from the
pre- tagged Music Library.
Gracenote (formerly CDDB) is a database comprised of
thousands of artists, album and track titles. Insert an audio CD
into the CD ROM drive and open the recorder screen. If
connected to the Internet, the program will make a connection
with this site and match the serial number of the user's CD
with your records and import all title, artist, and track data into
the Recorder screen. This information will cross over to the
Music Library, as ID3 tags, upon recording completion.
- 26 -
Page 31

Skins
Default
Auto-Arrange
Components
Skins change the overall look, and sometimes the layout, of
MUSICMATCH Jukebox, by applying a new GUI to the
program. This is a great way to personalize the program and
keep it dynamic. Different skins are available within the
MUSICMATCH program by choosing Options/Change Skin.
In most cases, default refers to the preset value that the
program assumes unless changed by the user. Change the
default skin by choosing Options/Change Skin, change the
default record settings by choosing
Options/Settings/Recorder, and so on.
An Auto- Arrange Component option is available by selecting
View/Auto Arrange Components from within MUSICMATCH
Jukebox. This will arrange all components in the Player, Music
Library, Recorder and Track Info.
- 27 -
Page 32

TROUBLESHOOTING
Problem Solution
Battery life is very
short or the Roq-it 10
GB is not working at
all.
Ensure the battery is fully charged. The red LED
on the front of the unit will turn on when the unit
is charging, and off after the battery is fully
charged.
If the problem still persists please contact Tech
Support.
When the Roq-it 10
GB is plugged into
the Computer via the
USB no new hard
drive appears.
IR remote control is
not working
1. Check the connection between the unit and
the computer. Ensure the USB cable is fully
inserted into both the player and your
computer.
2. Right click with your mouse on the “My
Computer” icon and choose: “Properties,”
then go to the “Device Manager.” Go to the
“Universal Serial Bus controller” and remove
all the drivers in the USB controllers by
clicking the remove button.
Restart your computer without the Jukebox
plugged in.
After the computer has loaded all the USB
drivers reinstall the Roq-it 10 GB’s USB
drivers and reboot your computer.
Plug the Jukebox USB cable into the computer.
You should now see the hard drive appear
under “My Computer.”
3. If the problem still persists try connecting
the Roq-it 10 GB to a different computer and
see if the problem has been fixed.
If it is your first time using the remote, make
sure to remove the plastic tab from the battery
slot. If the remote worked in the past, check the
- 28 -
Page 33

battery, as it may be dead.
Problem Solution
Hard Drive is making
strange clicking
noises and unit is not
working
The USB controller or
the USB root hub is
not listed or has a
yellow exclamation
point in the Device
Manager.
This problem happens when the hard drive has
received a severe shock. Contact Tech Support
immediately for further assistance.
The USB port is not installed correctly. Remove
all the USB components under the Universal
Serial Bus Controller category in Device
Manager. From the Device Manager, click on
“Refresh” to reinstall the USB components. You
may be prompted to insert your Windows 98
CD.
Why do I not have a
Universal Serial Bus
Controller in the
Device Manager?
Can I play WAV or
MIDI files with the
Roq-it 10 GB?
Where do I find
information about
updates for my Roq-it
10 GB?
Tip: If you are not using the Roq-it 10 GB for a long period of time
remove the battery from the unit.
You must enable your USB port in the BIOS.
Consult your Computer Users guide, or contact
your motherboard manufacturer.
Although you can store any type of data file on
the Roq-it 10 GB, the player will only recognize
and play MP3 or MP2 files.
For the latest information about driver, software
or firmware for your Roq-it 10 GB, please visit
www.dlink.com on the web.
- 29 -
Page 34

D-LINK OFFICES
AUSTRALIA D-LINK AUSTRALIA
Unit 16, 390 Eastern Valley Way, Roseville, NSW 2069, Australia
TEL: 61-2-9417-7100 FAX: 61-2-9417-1077
TOLL FREE: 1800-177-100 (Australia), 0800-900900 (New Zealand)
E-MAIL: support@dlink.com.au, info@dlink.com.au URL: www.dlink.com.au
BENELUX D-LINK BENELUX
CANADA D-LINK CANADA
#2180 Winston Park Drive, Oakville, Ontario, L6H 5W1 Canada
TEL: 1-905-829-5033 FAX: 1-905-829-5095 FREE CALL: 1-800-354-6522
E-MAIL: techsup@dlink.ca URL: www.dlink.ca FTP: ftp.dlinknet.com
CHILE D-LINK SOUTH AMERICA
Isidora Goyeechea 2934 of 702, Las Condes, Santiago – Chile S.A.
TEL: 56-2-232-3185 FAX: 56-2-232-0923
E-MAIL: ccasassu@dlink.cl, tsilva@dlink.cl URL: www.dlink.cl
CHINA D-LINK CHINA
2F., Sigma Building, 49 Zhichun Road, Haidian District, 100080 Beijing, China
TEL: 86-10-88097777 FAX: 86-10-88096789
DENMARK D-LINK DENMARK
Naverland 2, DK-2600 Glostrup, Copenhagen, Denmark
TEL:45-43-969040 FAX:45-43-424347
E-MAIL: info@dlink.dk URL: www.dlink.dk
EGYPT D-LINK MIDDLE EAST
7 Assem Ebn Sabet Street, Heliopolis Cairo, Egypt
TEL: 202-2456176 FAX: 202-2456192
E-MAIL: support@dlink-me.com URL: www.dlink-me.com
FINLAND D-Link FINLAND
FRANCE D-LINK FRANCE
Le Florilege #2, Allee de la Fresnerie, 78330 Fontenay le Fleury France
TEL: 33-1-302-38688 FAX: 33-1-3023-8689
E-MAIL: info@dlink-france.fr URL: www.dlink-france.fr
GERMANY D-LINK Central Europe/D-Link Deutschland GmbH
Schwalbacher Strasse 74, D-65760 Eschborn, Germany
TEL: 49-6196-77990 FAX: 49-6196-7799300
INFO LINE: 00800-7250-0000 (toll free) HELP LINE: 00800-7250-4000 (toll free)
REPAIR LINE: 00800-7250-8000
E-MAIL: info@dlink.de URL: www.dlink.de
IBERIA D-LINK IBERIA
INDIA D-LINK INDIA
Plot No.5, Kurla-Bandra Complex Road, Off Cst Road, Santacruz (E), Bombay - 400 098 Ind ia
TEL: 91-22-652-6696 FAX: 91-22-652-8914
E-MAIL: service@dlink.india.com URL: www.dlink-india.com
ITALY D-LINK ITALIA
Via Nino Bonnet No. 6/b, 20154 Milano, Italy
TEL: 39-02-2900-0676 FAX: 39-02-2900-1723
E-MAIL: info@dlink.it URL: www.dlink.it
JAPAN D-LINK JAPAN
10F, 8-8-15 Nishi -Gotanda, Shinagawa-ku, Tokyo 141, Japan
TEL: 81-3-5434-9678 FAX: 81-3-5434-9868
E-MAIL: kida@d-link.co.jp URL: www.d-link.co.jp
NORWAY D-LINK NORWAY
RUSSIA D-LINK RUSSIA
Michurinski Prospekt 49, 117607 Moscow, Russia
TEL: 7-095-737-3389, 7-095-737-3492 FAX: 7-095-737-3390
E-MAIL: vl@dlink.ru URL: www.dlink.ru
SINGAPORE D-LINK INTERNATIONAL
1 International Business Park, #03-12 The Synergy, Singapore 609917
TEL: 65-774-6233 FAX: 65-774-6322
E-MAIL: info@dlink.com.sg URL: www.dlink-intl.com
S. AFRICA D-LINK SOUTH AFRICA
102-106 Witchhazel Avenue, Einetein Park 2, Block B, Highveld Technopark Centurion, South Africa
TEL: 27(0)126652165 FAX: 27(0)126652186
E-MAIL: attie@d-link.co.za URL: www.d-link.co.za
SWEDEN D-LINK SWEDEN
P.O. Box 15036, S-167 15 Bromma Sweden
TEL: 46-(0)8564-61900 FAX: 46-(0)8564-61901
E-MAIL: info@dlink.se URL: www.dlink.se
TAIWAN D-LINK TAIWAN
2F, No. 119 Pao-Chung Road, Hsin-Tien, Taipei, Taiwan,
TEL: 886-2-2910-2626 FAX: 886-2-2910-1515
E-MAIL: dssqa@tsc.dlinktw.com.tw URL: www.dlinktw.com.tw
U.K. D-LINK EUROPE
4th Floor, Merit House, Edgware Road, Colindale, London, NW9 5AB, U.K.
TEL: 44-20-8731-5555 FAX: 44-20-8731-5511
E-MAIL: info@dlink.co.uk URL: www.dlink.co.uk
U.S.A. D-LINK U.S.A.
53 Discovery Drive, Irvi ne, CA 92618 USA
TEL: 1-949-788-0805 FAX: 1-949-753-7033 INFO LINE: 1-800-326-1688
BBS: 1-949-455-1779, 1-949-455-9616
E-MAIL: tech@dlink.com, support@dlink.com URL: www.dlink.com
Fellenoord 130, 5611 ZB Eindhoven, The Netherlands
TEL: 31-40-2668713 FAX: 31-40-2668666
E-MAIL:info@dlink-benelux.nl, info@dlink-benelux.be URL: www.dlink-benelux.nl/, www.dlink-benelux.be/
Thlli-ja Pakkahuone Katajanokanlaituri 5, FIN-00160 Helsinki, Finland
TEL: 358-9-622-91660 FAX: 358-9-622-91661
E-MAIL: info@dlink-fi.com URL: www.dlink-fi.com
Gran Via de Carlos III, 84, 3° Edificio Trade, 08028 BARCELONA
TEL. 34 93 4090770 FAX 34 93 4910795
E-MAIL: info@dlinkiberia.es URL: www.dlinkiberia.es
Waldemar Thranesgt. 77, 0175 Oslo, Norway
TEL: 47-22-991890 FAX: 47-22-207039
- 30 -
Page 35

LIMITED WARRANTY
D-Link Systems, Inc. (“D-Link”) provides this lim ited warranty for its product
only to the person or entity who originally purchased the product from;
• D-Link or its authorized reseller or distributor.
• Products purchased and delivered with the fifty United States, the
District of Columbia, US Possessions or Protectorates, US Military
Installations, addresses with an APO or FPO.
Limited Hardware Warranty: D-Link warrants that the hardware portion of the
D-Link products described below (“Hardware”) will be free from material defects
in workmanship and materials from the date of original retail purchase of the
Hardware, for the period set forth below applicable to the product type
(“Warranty Period”) if the Hardware is used and serviced in accordance with
applicable documentation; provided that a completed Registration Card is
returned to an Authorized D-Link Service Office within ninety (90) days after the
date of original retail purchase of the Hardware. If a completed Registration Card
is not received by an authorized D-Link Service Office within such ni nety (90) day
period, then the Warranty Period shall be ninety (90) days from the date of
purchase.
Product Type Warranty Period
• Product (excluding power supplies and fans) purchased and delivered
within One (1) Year of purchase.
• Power Supplies and Fans One (1) Year.
• Spare parts and spare kits Ninety (90) days.
D-Link’s sole obligation shall be to repair or replace the defective Hardware at no
charge to the original owner. Such repair or replacement will be rendered by DLink at an Authorized D-Link Service Office. The replacement Hardware need not
be new or of an identical make, model or part; D-Link may in its discretion replace
the defective Hardware (or any part thereof) with any reconditioned product that
D-Link reasonably determines is substantially equivalent (or superior) in all
- 31 -
Page 36

material respects to the defective Hardware. The Warranty Period shall extend for
an additional ninety (90) days after any repaired or replaced Hardware is delivered.
If a material defect is incapable of correction, or if D-Link determines in its sole
discretion that it is not practical to repair or replace the defective Hardware, the
price paid by the original purchaser for the defective Hardware will be refunded
by D-Link upon return to D-Link of the defective Hardware. Al l Hardware (or part
thereof) that is replaced by D-Link, or for which the purchase price is refunded,
shall become the property of D-Link upon replacement or refund.
Limited Software Warranty: D-Link warrants that the software portion of the
product (“Sof tware”) will substantially conform to D-Link’s then current
functional specifications for the Software, as set forth in the applicable
documentation, from the date of original delivery of the Software for a period of
ninety (90) days (“Warranty Period”), if the Software is properly installed on
approved hardware and operated as contemplated in its documentation. D-Link
further warrants that, during the Warranty Period, the magnetic media on which
D-Link delivers the Software will be free of physical defects. D-Link’s sole
obligation shall be to replace the non-conforming Software (or defective media)
with software that substantially conforms to D-Link’s functional specifications
for the Software. Except as otherwise agreed by D-Link in writing, the replacement
Software is provided only to the original licensee, and is subject to the terms and
conditions of the license granted by D-Link for the Software. The Warranty
Period shall extend for an additional ninety (90) days after any replacement
Software is delivered. If a material non-conformance is incapable of correction, or
if D-Link determines in its sole discretion that it is not practical to replace the
non-conforming Software, the price paid by the original licensee for the nonconforming Software will be refunded by D-Link; provided that the nonconforming Software (and all copies thereof) is first returned to D-Link. The
license granted respecting any Software for which a refund is given automatically
terminates.
What You Must Do For Warranty Service:
Registration Card. The Registration Card provided at the back of this manual
must be completed and returned to an Authorized D-Link Service Office for each
D-Link product within ninety (90) days after the product is purchased and/or
- 32 -
Page 37

licensed. The addresses/ telephone/fax list of the nearest Authorized D-Link
Service Office is provided in the back of this manual.
FAILURE TO PROPERLY COMPLETE AND TIMELY RETURN THE
REGISTRATION CARD MAY AFFECT THE WARRANTY FOR THIS PRODUCT.
Submitting A Claim . Any claim under this limited warranty must be submitted in
writing before the end of the Warranty Period to an Authorized D-Link Service
Office.
• The customer must submit as part of the claim a written description of
the Hardware defect or Software nonconformance in sufficient detail to
allow D-Link to confirm the same.
• The original product owner must obtain a Return Material Authorization
(RMA) number from the Authorized D-Link Service Office and, if
requested, provide written proof of purchase of the product (such as a
copy of the dated purchase invoice for the product) before the warranty
service is provided.
• After an RMA number is issued, the defective product must be
packaged securely in the original or other suitable shipping package to
ensure that it will not be damaged in transit, and the RMA number must
be prominently marked on the outside of the package.
• The customer is responsible for all shipping charges to and from D-Link
(No CODs allowed). Products sent COD will become the property of DLink Systems, Inc. Products should be fully insured by the customer and
shipped to D-Link Systems Inc., 53 Discovery Drive, Irvine CA 92618.
D-Link may reject or return any product that is not packaged and shipped in strict
compliance with the foregoing requirements, or for which an RMA number is not
visible from the outside of the package. The product owner agrees to pay DLink’s reasonable handling and return shipping charges for any product that is
not packaged and shipped in accordance with the foregoing requirements, or that
is determined by D-Link not to be defective or non-conforming.
What Is Not Covered:
- 33 -
Page 38

This limited warranty provided by D-Link does not cover: Products that have
been subjected to abuse, accident, alteration, modification, tampering, negligence,
misuse, faulty installation, lack of reasonable care, repair or service in any way
that is not contemplated in the documentation for the product, or if the model or
serial number has been altered, tampered with, defaced or removed; Initial
installation, installation and removal of the product for repair, and shipping costs;
Operational adjustments covered in the operating manual for the product, and
normal maintenance; Damage that occurs in shipment, due to act of God, failures
due to power surge, and cosmetic damage; and Any hardware, software, firmware
or other products or services provided by anyone other than D-Link.
Disclaimer of Other Warranties: EXCEPT FOR THE LIMITED WARRANTY
SPECIFIED HEREIN, THE PRODUCT IS PROVIDED “AS -IS” WITHOUT ANY
WARRANTY OF ANY KIND INCLUDING, WITHOUT LIMITATION, ANY
WARRANTY OF MERCHANTABILITY, FITNESS FOR A PARTICULAR
PURPOSE AND NON-INFRINGEMENT. IF ANY IMPLIED WARRANTY
CANNOT BE DISCLAIMED IN ANY TERRITORY WHERE A PRODUCT IS
SOLD, THE DURATION OF SUCH IMPLIED WARRANTY SHALL BE LIMITED
TO NINETY (90) DAYS. EXCEPT AS EXPRESSLY COVERED UNDER THE
LIMITED WARRANTY PROVIDED HEREIN, THE ENTIRE RISK AS TO THE
QUALITY, SELECTION AND PERFORMANCE OF THE PRODUCT IS WITH
THE PURCHASER OF THE PRODUCT.
Limitation of Liability: TO THE MAXIMU M EXTENT PERMITTED BY LAW,
D-LINK IS NOT LIABLE UNDER ANY CONTRACT, NEGLIGENCE, STRICT
LIABILITY OR OTHER LEGAL OR EQUITABLE THEORY FOR ANY LOSS OF
USE OF THE PRODUCT, INCONVENIENCE OR DAMAGES OF ANY
CHARACTER, WHETHER DIRECT, SPECIAL, INCIDENTAL OR
CONSEQUENTIAL (INCLUDING, BUT NOT LIMITED TO, DAMAGES FOR
LOSS OF GOODWILL, WORK STOPPAGE, COMPUTER FAILURE OR
MALFUNCTION, LOSS OF INFORMATION OR DATA CONTAINED IN,
STORED ON, OR INTEGRATED WITH ANY PRODUCT RETURNED TO D-LINK
FOR WARRANTY SERVICE) RESULTING FROM THE USE OF THE PRODUCT,
RELATING TO WARRANTY SERVICE, OR ARISING OUT OF ANY BREACH
OF THIS LIMITED WARRANTY, EVEN IF D-LINK HAS BEEN ADVISED OF
THE POSSIBILITY OF SUCH DAMAGES. THE SOLE REMEDY FOR A BREACH
- 34 -
Page 39

OF THE FOREGOING LIMITED WARRANTY IS REPAIR, REPLACEMENT OR
REFUND OF THE DEFECTIVE OR NON-CONFORMING PRODUCT.
GOVERNING LAW: This Limited Warranty shall be governed by the laws of the
state of California. Some states do not allow exclusion or limitation of incidental
or consequential damages, or limitations on how long an implied warranty lasts,
so the foregoing limitations and exclusions may not apply. This limited warranty
provides specific legal rights and the product owner may also have other rights
which vary from state to state.
Trademarks
Copyright 1999 D-Link Corporation. Contents subject to change without prior
notice. D-Link is a registered trademark of D-Link Corporation/D -Link Systems,
Inc. All other trademarks belong to their
respective proprietors.
Copyright Statement
No part of this publication may be reproduced in any form or by any means or
used to make any derivative such as translation, transformation, or adaptation
without permission from D-Link Corporation/D -Link Systems Inc., as stipulated
by the United States Copyright Act of 1976.
FCC Certifications
This equipment has been tested and found to comply with the limits for a Class B
digital device, pursuant to Part 15 of the FCC Rules. These limits are designed to
provide reasonable protection against harmful interference in a residential
installation. This equipment generates, uses and can radiate radio frequency
energy and, if not installed and used in accordance with the instructions, may
cause harmful interference to radio communications. However, there is no
guarantee that interference will not occur in a particular installation. If this
equipment does cause harmful interference to radio or television reception, which
can be determined by turning the equipment off and on, the user is encouraged to
try to correct the interference by one or more of the following measures:
§ Reorient or relocate the receiving antenna.
§ Increase the separation between the equipment and receiver.
- 35 -
Page 40

§ Connect the equipment into an outlet on a circuit different from that to
which the receiver is connected.
§ Consult the dealer or an experienced radio/TV technician for help.
Shielded interface cables must be used in order to comply with emission limits.
You are cautioned that changes or modifications not expressly approved by the
party responsible for compliance could void your authority to operate the
equipment.
This device complies with Part 15 of the FCC rules. Operation is subject to the
following two conditions:
(1) This device may not cause harmful interference, and (2) This device must
accept any interference received, including interference that may cause undesired
operation.
CE Mark Warning
This is a Class B product. In a domestic environment, this product may cause
radio interference, in which case the user may be required to take adequate
measures
D-Link will not be liable or responsible for any damage caused to your hard
drive due to misuse, shock damage or any other problem with your hard drive
Hard Drive Warranty
due to the use of this product.
- 36 -
Page 41

TECHNICAL SUPPORT
D-Link provides free technical support for customers within the United
States during the warranty period. U.S. customers can contact D-Link
Technical Support through our web site, e-mail or by phone.
D-Link Technical Support over Tel ephone:
(949) 790-5290
6 a.m. to 6 p.m. PST, Monday thru Friday
D-Link Technical Support over the Internet:
Support@dlink.com
http://support.dlink.com
Register online at
http://support.dlink.com/register/
If you are a customer residing outside of the United States, please refer to
the list of D-Link locations that is included in the User’s Manual.
- 37 -
 Loading...