

Page 1

MP3 Music Player
DMP-90
USER'S GUIDE
Please read all instructions in this User's Guide before using the
product and keep it in a safe place for future reference.
Page 2
Copyright Statement
Product Type Warranty Period
Product (excluding power supplies and fans), if
purchased and delivered in the fifty (50) United
States, or the District of Columbia (“USA”)
As long as the original pur chaser still
owns the product
Product purchased or d elivered outside the
USA
One (1) Year
Power Supplies and Fans One (1) Year
Spare parts and spare kit s Ninety (90) days
No part of this publication may be reproduced in any form or by any means or used to make
any derivative such as translation, transformation, or adaptation without permission from DLink Corporation / D-Link Systems Inc., as stipulated by the United States Copyright Act of
1976.
FCC Certifications
This equipment has been tested and found to comply with the limits for a Class B digital
device, pursuant to Part 15 of the FCC Rules. These limits are designed to provide
reasonable protection against harmful interference in a residential installation. This
equipment generates, uses and can radiate radio frequency energy and, if not installed and
used in accordance with the instructions, may cause harmful interference to radio
communications. However, there is no guarantee that interference will not occur in a
particular installation. If this equipment does cause harmful interference to radio or television
reception, which can be determined by turning the equipment off and on, the user is
encouraged to try to correct the interference by one or more of the following measures:
Reorient or relocate the receiving antenna.
Increase the separation between the equipment and receiver.
Connect the equipment into an outlet on a circuit different from that to which the receiver is
connected.Consult the dealer or an experienced radio/TV technician for help. Shielded
interface cables must be used in order to comply withemission limits. You are cautioned that
changes or modifications not expressly approved by the party responsible for compliance
could void your authority to operate the equipment.
This device complies with Part 15 of the FCC rules. Operation is subject to the following two
conditions: (1) This device may not cause harmful interference, and (2) This device must
accept any interference received, including interference that may cause undesired operation.
LIMITED WARRANTY
D-Link Systems, Inc. ("D-Link") provides this limited warranty for its product only to the person
or entity who originally purchased the product from D-Link or its authorized reseller or
distributor.
Limited Hardware Warranty: D-Link warrants that the hardware portion of the D-Link products
described below ("Hardware") will be free from material defects in workmanship and materials
from the date of original retail purchase of the Hardware, for the period set forth below
applicable to the product type ("Warranty Period") if the Hardware is used and serviced in
accordance with applicable documentation; provided that a completed Registration Card is
returned to an Authorized D-Link Service Office within ninety (90) days after the date of
original retail purchase of the Hardware. If a completed Registration Card is not received by
an authorized D-Link Service Office within such ninety (90) period, then the Warranty Period
shall be ninety (90) days from the date of purchase.
D-Link's sole obligation shall be to repair or replace the defective Hardware at no charge to
the original owner. Such repair or replacement will be rendered by D-Link at an Authorized DLink Service Office. The replacement Hardware need not be new or of an identical make,
model or part; D-Link may in its discretion may replace the defective Hardware (or any part
thereof) with any reconditioned product that D-Link reasonably determines is substantially
equivalent (or superior) in all material respects to the defective Hardware. The Warranty
Period shall extend for an additional ninety (90) days after any repaired or replaced Hardware
is delivered. If a material defect is incapable of correction, or if D-Link determines in its sole
discretion that it is not practical to repair or replace the defective Hardware, the price paid by
the original purchaser for the defective Hardware will be refunded by D-Link upon return to DLink of the defective Hardware. All Hardware (or part thereof) that is replaced by D-Link, or
for which the purchase price is refunded, shall become the property of D-Link upon
Page 3

replacement or refund.
Limited Software Warranty: D-Link warrants that the software portion of the product
("Software") will substantially conform to D-Link's then current functional specifications for
the Software, as set forth in the applicable documentation, from the date of original delivery
of the Software for a period of ninety (90) days ("Warranty Period"), if the Software is
properly installed on approved hardware and operated as contemplated in its
documentation. D-Link further warrants that, during the Warranty Period, the magnetic
media on which D-Link delivers the Software will be free of physical defects. D-Link's sole
obligation shall be to replace the non-conforming Software (or defective media) with
software that substantially conforms to D-Link's functional specifications for the Software.
Except as otherwise agreed by D-Link in writing, the replacement Software is provided only
to the original licensee, and is subject to the terms and conditions of the license granted by
D-Link for the Software. The Warranty Period shall extend for an additional ninety (90)
days after any replacement Software is delivered. If a material non-conformance is
incapable of correction, or if D-Link determines in its sole discretion that it is not practical to
replace the non-conforming Software, the price paid by the original licensee for the nonconforming Software will be refunded by D-Link; provided that the non-conforming
Software (and all copies thereof) is first returned to D-Link. The license granted respecting
any Software for which a refund is given automatically terminates.
What You Must Do For Warranty Service:
1.Registration Card. The Registration Card provided at the back of this manual must be
completed and returned to an Authorized D-Link Service Office for each D-Link product
within ninety (90) days after the product is purchased and/or licensed. The
addresses/telephone/fax list of the nearest Authorized D-Link Service Office is provided in
the back of this manual. FAILURE TO PROPERLY COMPLETE AND TIMELY RETURN
THE REGISTRATION CARD MAY AFFECT THE WARRANTY FOR THIS PRODUCT.
2.Submitting A Claim. Any claim under this limited warranty must be submitted in writing
before the end of the Warranty Period to an Authorized D-Link Service Office. The claim
must include a written description of the Hardware defect or Software nonconformance in
sufficient detail to allow D-Link to confirm the same. The original product owner must
obtain a Return Material Authorization (RMA) number from the Authorized D-Link Service
Office and, if requested, provide written proof of purchase of the product (such as a copy of
the dated purchase invoice for the product) before the warranty service is provided. After
an RMA number is issued, the defective product must be packaged securely in the original
or other suitable shipping package to ensure that it will not be damaged in transit, and the
RMA number must be prominently marked on the outside of the package. The packaged
product shall be insured and shipped to D-Link, 53 Discovery Drive, Irvine CA 92618, with
all shipping costs prepaid. D-Link may reject or return any product that is not packaged and
shipped in strict compliance with the foregoing requirements, or for which an RMA number
is not visible from the outside of the package. The product owner agrees to pay D-Link's
reasonable handling and return shipping charges for any product that is not packaged and
shipped in accordance with the foregoing requirements, or that is determined by D-Link not
to be defective or non-conforming.
This limited warranty provided by D-Link does not cover:
1.Products that have been subjected to abuse, accident, alteration, modification,
tampering, negligence, misuse, faulty installation, lack of reasonable care, repair or
service in any way that is not contemplated in the documentation for the product, or if the
model or serial number has been altered, tampered with, defaced or removed;
2.Initial installation, installation and removal of the product for repair, and shipping costs;
3.Operational adjustments covered in the operating manual for the product, and normal
maintenance;
4.Damage that occurs in shipment, due to act of God, failures due to power surge, and
cosmetic damage; and
5.Any hardware, software, firmware or other products or services provided by anyone other
than D-Link.
What Is Not Covered:
Page 4

Disclaimer of Other Warranties: EXCEPT FOR THE LIMITED WARRANTY SPECIFIED
HEREIN, THE PRODUCT IS PROVIDED "AS-IS" WITHOUT ANY WARRANTY OF ANY KIND
INCLUDING, WITHOUT LIMITATION, ANY WARRANTY OF MERCHANTABILITY, FITNESS
FOR A PARTICULAR PURPOSE AND NON-INFRINGEMENT. IF ANY IMPLIED WARRANTY
CANNOT BE DISCLAIMED IN ANY TERRITORY WHERE A PRODUCT IS SOLD, THE
DURATION OF SUCH IMPLIED WARRANTY SHALL BE LIMITED TO NINETY (90) DAYS.
EXCEPT AS EXPRESSLY COVERED UNDER THE LIMITED WARRANTY PROVIDED
HEREIN, THE ENTIRE RISK AS TO THE QUALITY, SELECTION AND PERFORMANCE OF
THE PRODUCT IS WITH THE PURCHASER OF THE PRODUCT.
Limitation of Liability: TO THE MAXIMUM EXTENT PERMITTED BY LAW, D-LINK IS NOT
LIABLE UNDER ANY CONTRACT, NEGLIGENCE, STRICT LIABILITY OR OTHER LEGAL OR
EQUITABLE THEORY FOR ANY LOSS OF USE OF THE PRODUCT, INCONVENIENCE OR
DAMAGES OF ANY CHARACTER, WHETHER DIRECT, SPECIAL, INCIDENTAL OR
CONSEQUENTIAL (INCLUDING, BUT NOT LIMITED TO, DAMAGES FOR LOSS OF
GOODWILL, WORK STOPPAGE, COMPUTER FAILURE OR MALFUNCTION, LOSS OF
INFORMATION OR DATA CONTAINED IN, STORED ON, OR INTEGRATED WITH ANY
PRODUCT RETURNED TO D-LINK FOR WARRANTY SERVICE) RESULTING FROM THE
USE OF THE PRODUCT, RELATING TO WARRANTY SERVICE, OR ARISING OUT OF ANY
BREACH OF THIS LIMITED WARRANTY, EVEN IF D-LINK HAS BEEN ADVISED OF THE
POSSIBILITY OF SUCH DAMAGES. THE SOLE REMEDY FOR A BREACH OF THE
FOREGOING LIMITED WARRANTY IS REPAIR, REPLACEMENT OR REFUND OF THE
DEFECTIVE OR NON-CONFORMING PRODUCT.
GOVERNING LAW: This Limited Warranty shall be governed by the laws of the state of
California. Some states do not allow exclusion or limitation of incidental or consequential
damages, or limitations on how long an implied warranty lasts, so the foregoing limitations
and exclusions may not apply. This limited warranty provides specific legal rights and the
product owner may also have other right.
Page 5
CONTENTS
What is MP3? 1
What is the DMP-90? 1
General System Requirements 1
Installing DMP-90.exe file 2
DMP-90 Accessories 2
DMP-90 Player Controls 3
The DMP-90 Smart Media card 4
Connecting DMP-90 Player to PC 5
Initializing Internal Memory Smar t Media card 6
Downloading Files from PC to DMP-90 7
Power On/Off 8
Key Lock 8
Playing MP3 files 9
Selecting the desired MP3 file 10
Starting Playback from the Middle of MP3 file 10
Repeat 11
Random 11
Equalizer mode 11
Selecting Internal Memory/Exter nal Memory 12
Volume 12
Troubleshooting 13
Warning 14
Warranty 15
Specifications 16
Appendix
Page 6
WHAT IS MP3?
MP3 (MPEG1 layer 3) is a standard audio file format, which
compresses a sound sequence into approximately one-twelfth
the size of the original file. MP3 files are relatively small while
retaining the sound quality of the original file.
You must be aware that distributing copies of MP3 file without
permission is against copyright law. You should use the MP3
!
encoding software included in the DMP-90 package only for personal
purposes.
What is the DMP-90?
The DMP-90 is a portable digital audio player. The DMP-90 is userfriendly with easy to follow downloading and operating procedures. Music
can be downloaded from your PC to the DMP-90. The DMP-90 stores all
your music files in flash memory. The DMP-90 stores up to 1/4 hour of MP3
music compressed at 128 Kbps for your listening pleasure. Also, skipping is
eliminated due to the DMP-90's’solid state components and design.
The DMP-90 comes with 16MB of built-in flash memory and a slot for a
removable Smart Media Card that extends the memory by up to 32 MB.
SYSTEM REQUIREMENTS
Windows 95/98
CD-Rom driver
16MB RAM or above
One free parallel port that supports ECP mode.
How to set parallel port to ECP mode, please refer to Appendix.
1
Page 7
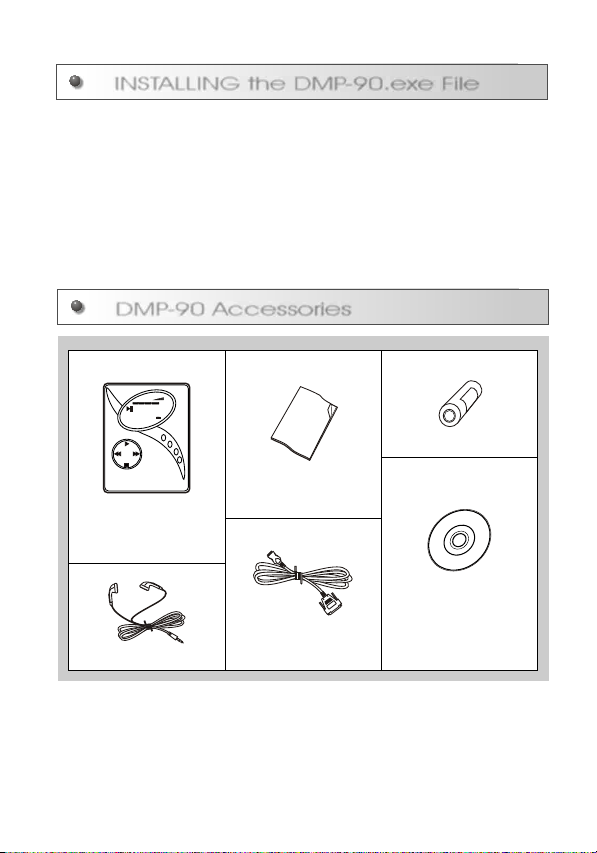
INSTALLING the DMP-90.exe File
1. Turn on your PC.
2. Insert the installation CD.
3. Open setup.exe in the CD-Rom driver.
4. The welcome screen pops up. Click "Next".
5. Read the License Agreement. Click "Yes" to agree to it.
6. You may select a destination folder. Then click "Next".
7. The installation is finished.
DMP-90 Accessories
2
VOL
REPEAT
RECORD
MEMO
A-B
RANDOM
0 1.45:28
INT EXT FULL
MEMONY
REMAIN
BATTERY
NORMAL
SECONDS
CLASSIC
MBYTES
HOLD
JAZZ
INTRO
ROCK
REPEAT
RANDOM
EQ
MENU
DMP-90
DMP-90 Player
Headphone
USER'S GUIDE
User's guide
PC connecting cable
AA 1.5V Battery
Install CD Rom x1
Page 8
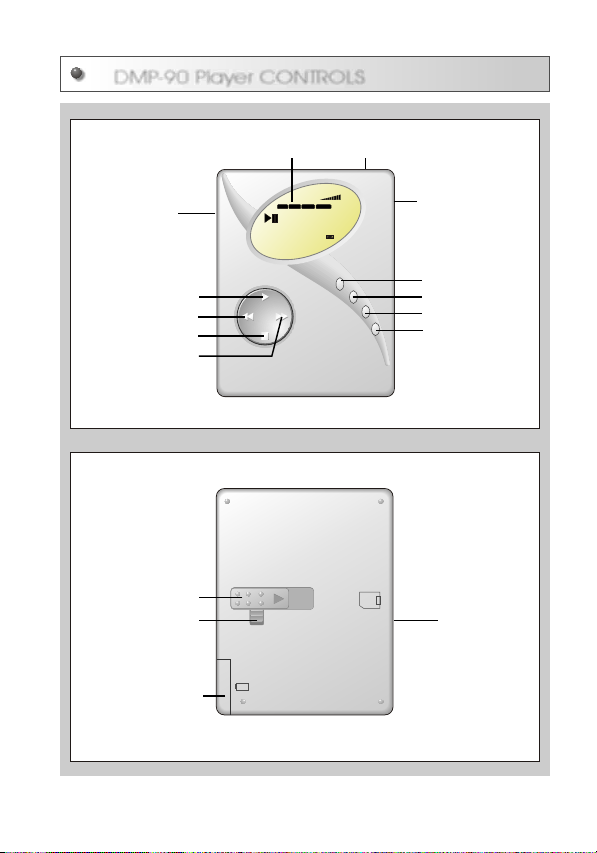
DMP-90 Player CONTROLS
Earphone Jack
LCD
PCMCIA port
Play/Pause/Power on
PR/Last Track
Stop/Power off
FF/Next Track
Eject
(Smart Media
Card eject)
Eject lock switch
Battery Cell
REPEAT
MEMO
0 1.45:28
INT EXT FULL
MEMONY
SECONDS
MBYTES
HOLD
INTRO
DMP-90
CARD EJECT
NORMAL
CLASSIC
JAZZ
ROCK
VOL
RECORD
REMAIN
REPEAT
BATTERY
A-B
RANDOM
RANDOM
Volume Control
Repeat 1/ALL
Random on/off
EQ
MENU
EQ
Menu
Smart Media
Card slot
3
Page 9

THE DMP-90 Smart Media Card
The expansion card, purchased separately, enables you to store more
MP3 files and extend the DMP-90’s playing time. Note: external memory
is not included in your DMP-90. The card that comes installed in the
device is only a place holder for a Smart Media card.
INSERTING
Power off the DMP-90. Check the orientation of the
1
'99 Best Music
Smart Media Card and insert it into the card slot.
VOL
MEMO
MP3 RECORD
8 8.88:88
FULL
MEMORY
EXT
REMAIN
2
INT
NORMAL CLASSIC
SECONDS
RANDOM
MBYTES
JAZZ
REPEAT 1 ALL
ROCK
INTRO
EJECT
3
4
EJECT
The DMP-90 is a proprietary device. The DMP-90 uses a different file
format than other MP3 players. The DMP-90 is not recommended for
use with other PC cameras or other digital cameras. Once the expansion
card is formatted for the DMP-90 it cannot be reformatted for use with
other MP3 systems.
Turn on the power of the player.
Press the "MENU" button once, then press
HOLD
"PLAY" once to switch to external memory.
"EXT MEMORY" appears on the LCD.
EJECTING
Unlock the lock switch.
Power the DMP-90 off. Push eject switch to eject
the Smart Media Card.
4
Page 10

CONNECTING the DMP-90 to a PC
1. Power off the DMP-90 before connecting it to a PC.
2. To download MP3 files from your PC to the DMP-90, the player must
be connected to your PC. The DMP-90 connects to your PC through
the parallel port. Disconnect the printer cable, if necessary, before attaching
the cable for the DMP-90.
Connect the PC-connecting cable to
the parallel port on your PC.
1
Connect the other end of the connecting
cable to the PCMCIA port.
MEMORY
EXT
INT
SECONDS
MBYTES
2
3
ROCK
REPEAT 1 ALL
VOL
MEMO
MP3 RECORD
HOLD
FULL
MEMORY
EXT
REMAIN
INT
NORMAL CLASSIC
SECONDS
RANDOM
MBYTES
JAZZ
REPEAT 1 ALL
ROCK
INTRO
" " appears on the LCD
To remove the plug
from the DMP-90
player, push the grips
of the plug, and then
pull out the plug.
5
Page 11
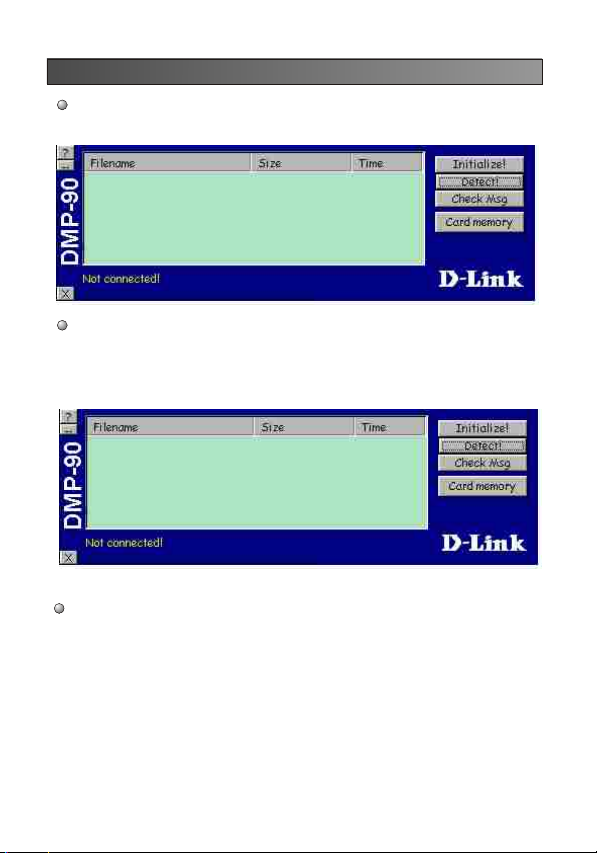
INITIALIZING INTERNAL MEMORY OR SMART MEDIA CARD
Open the DMP-90.exe file in the PC. You must initialize the memory before
attempting to download files.
To copy files from your PC to the DMP-90, select the desired memory
(Built-in flash Memory or Smart Media Card) by clicking on the icon of
[card memory].
Click on the icon of initialize, then click "Yes" (Built-in flash Memory or Smart
Media Card must be initialized before downloading files to flash memory or
Smart Media card).
* Warning: After initialization, all information will be erased.
6
Page 12

DOWNLOADING FILES FROM PC TO DMP-90
1. Go to the location which contains the MP3 files.
2. Select the desired MP3 files and drag the MP3 files to the download
file window by holding the left mouse button.
Display shows the file copying status on the DMP-90.exe file.
CHECK MP3 FILES
Click the "Detect or "Check song " button once to check the download Mp3 files.
DELETE MP3 FILES IN THE DMP-90 PLAYER
1. Connect the DMP-90 player and the PC with the connecting cable.
2. Open the DMP-90.exe file.
3. Select the desired MP3 file.
4. Press the "Delete" button on the keyboard and click "Yes" to confirm.
5. Check the remaining MP3 files(see: CHECK MP3 FILES)for next delete.
7
Page 13

POWER ON/OFF
Power on the player by pressing
and holding the PLAY button
1
1
( ).
Press the STOP ( ) twice to
turn off the player.
2
2
KEY LOCK
Press "Menu" button and then
press STOP ( ) to lock
1
keys. To free the keys,
1
press " MENU" button and then
press STOP ( ) again.
REPEAT
REPEAT
REPEAT
RANDOM
RANDOM
RANDOM
VOL
MEMO
MP3 RECORD
HOLD
0 1.02: 30
EQ
MENU
EQ
MENU
EQ
MENU
8 8.88:88
FULL
MEMORY
EXT
INT
NORMAL CLASSIC
SECONDS
RANDOM
MBYTES
REPEAT 1 ALL
INTRO
MEMO
MP3 RECORD
0 1.02: 30
8 8.88:88
FULL
MEMORY
EXT
INT
NORMAL CLASSIC
SECONDS
RANDOM
MBYTES
REPEAT 1 ALL
INTRO
MEMO
MP3 RECORD
0 1.02: 30
8 8.88:88
FULL
MEMORY
EXT
INT
NORMAL CLASSIC
SECONDS
RANDOM
MBYTES
REPEAT 1 ALL
INTRO
REMAIN
JAZZ
ROCK
VOL
HOLD
REMAIN
JAZZ
ROCK
VOL
HOLD
REMAIN
JAZZ
ROCK
8
Page 14

Playing Music on your DMP-90
You must load the music you want to play into the DMP-90
To play the MP3 files stored in the built-in memory select "INT
MEMORY". To play the MP3 files stored in the Smart Media card, select
"EXT MEMORY".
LCD Display MP3 Menu
MP3
Time Counter
MP3 File Track NO.
MEMO
MP3 RECORD
88.88:88
FULL
MEMORY
EXT
INT
NORMAL CLASSIC
SECONDS
RANDOM
MBYTES
REPEAT 1 ALL
INTRO
VOL
HOLD
REMAIN
JAZZ
ROCK
Press and hold the"PLAY" button
( )to turn on the player.
1
1
Press the "PLAY"button( )once
to playback.
Press the "PLAY" button( )
again to pause.
2
2
Press the "STOP" button( ) to
stop the playback.
3
3
Press the "STOP" button( )
again to turn off power.
REPEAT
REPEAT
REPEAT
RANDOM
RANDOM
RANDOM
VOL
MEMO
MP3 RECORD
HOLD
0 1.02: 30
EQ
MENU
EQ
MENU
EQ
MENU
8 8.88:88
FULL
MEMORY
EXT
INT
NORMAL CLASSIC
SECONDS
RANDOM
MBYTES
REPEAT 1 ALL
INTRO
MEMO
MP3 RECORD
0 1.02: 30
8 8.88:88
FULL
MEMORY
EXT
INT
NORMAL CLASSIC
SECONDS
RANDOM
MBYTES
REPEAT 1 ALL
INTRO
MEMO
MP3 RECORD
0 1.02: 30
8 8.88:88
FULL
MEMORY
EXT
INT
NORMAL CLASSIC
SECONDS
RANDOM
MBYTES
REPEAT 1 ALL
INTRO
REMAIN
JAZZ
ROCK
VOL
HOLD
REMAIN
JAZZ
ROCK
VOL
HOLD
REMAIN
JAZZ
ROCK
9
Page 15
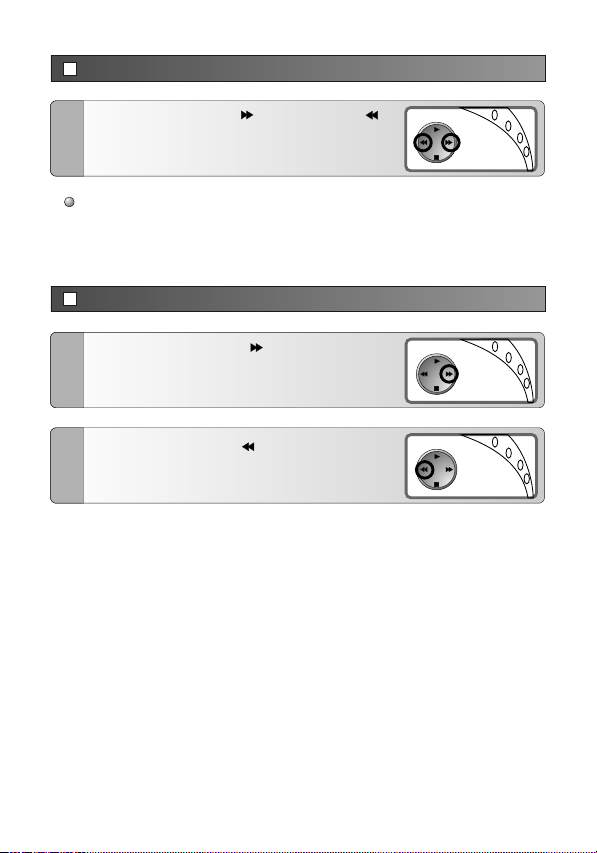
SELECTING THE DESIRED MP3 FILE
Use the "FORWARD"( )or "REVERSE"( )
button to select the desired track.
1
1
The MP3 files stored in the built-in memory will be played before
those in the Smart Media card.
STARTING PLAYBACK FROM THE MIDDLE OF MP3 FILE
Press the "FORWARD"( ) button and hold
for searching track.
1
1
Press the "REVERSE"( ) button and hold
for searching track.
2
2
REPEAT
REPEAT
REPEAT
RANDOM
RANDOM
RANDOM
EQ
MENU
EQ
MENU
EQ
MENU
10
Page 16

REPEAT
Press the "REPEAT" button and select either
" REPEAT 1", "REPEAT All" or playing.
1
1
To repeat the current track, select "Repeat one".
To repeat all the tracks, select "All".
RANDOM
Press the "RANDOM" button once to play tracks
randomly. Press the "RANDOM" button again to
cancel the random mode.
1
1
EQUALIZER MODE
Press the "EQ" button and select either
normal or " "JAZZ" or "ROCK", CLASSIC"
effects.
1
1
MEMO
MP3 RECORD
0
8 8.88:88
FULL
MEMORY
EXT
INT
NORMAL CLASSIC
SECONDS
RANDOM
MBYTES
REPEAT 1 ALL
INTRO
REPEAT
MEMO
MP3 RECORD
8 8.88:88
0 1.02: 30
FULL
MEMORY
EXT
INT
NORMAL CLASSIC
SECONDS
RANDOM
MBYTES
REPEAT 1 ALL
INTRO
MEMO
MP3 RECORD
8 8.88:88
0 1.02: 30
FULL
MEMORY
EXT
INT
NORMAL CLASSIC
SECONDS
RANDOM
MBYTES
REPEAT 1 ALL
INTRO
REPEAT
RANDOM
VOL
HOLD
1.02: 30
REMAIN
JAZZ
ROCK
RANDOM
EQ
MENU
VOL
HOLD
REMAIN
JAZZ
ROCK
REPEAT
RANDOM
VOL
HOLD
REMAIN
JAZZ
ROCK
EQ
MENU
EQ
MENU
11
Page 17
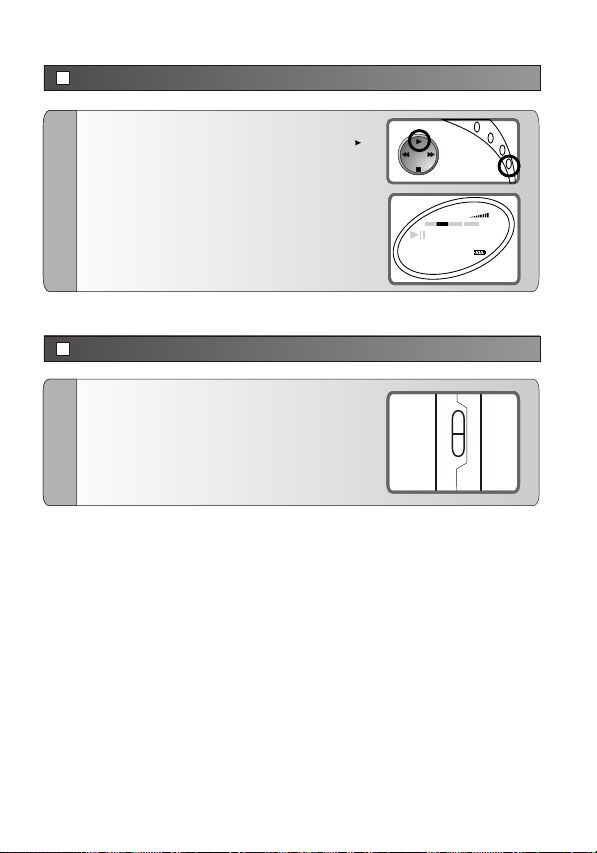
SELECTING INTERNAL OR EXTERNAL MEMORY
When the player is in stop mode, press MENU
button once and then press PLAY button( )
once to select internal memory or external
memory.
1
1
VOLUME
Increase and decrease volume.
Press (+) or (-) to increase/decrease volume.
1
1
MEMO
MP3 RECORD
0 1.02: 30
8 8.88:88
FULL
MEMORY
EXT
INT
NORMAL CLASSIC
SECONDS
RANDOM
MBYTES
REPEAT 1 ALL
INTRO
REPEAT
RANDOM
EQ
MENU
VOL
HOLD
REMAIN
JAZZ
ROCK
+
VOLUME
-
12
Page 18
TROUBLESHOOTING
If the DMP-90 does not work, check the following before calling for service
DMP-90 does not work or nothing is displayed on the LCD:
1
1
2
2
3
3
4
4
5
5
Check the capacity of the batteries, one 1.5V AA-size battery is
required.
Make sure the battery is inserted into correct polarity (+) and (-).
The buttons of the DMP-90 player do not work:
Check if "HOLD" is displayed on the LCD. While the "HOLD" status
is on, all the buttons do not work. (Press the "MEMU" and the "STOP"
button to unlock the buttons).
No sound after the "PLAY" button is pressed:
Make sure MP3 files are stored in the built in memory
or Smart Media card.
Cannot download the Mp3 files:
Make sure the DMP-90 player is connected to your PC.
The Smart Media card cannot be inserted:
There are two types of Smart Media cards, one works at 3.3V
and the other at 5V. (Refer to the diagram). The 5V
Smart Media card cannot be used in the DMP-90 player.
The files on the built-in memory or the Smart Media card are not recognized:
DMP-90 player cannot recognize the Smart Media Cards that
6
6
have been used by other MP3 players and digital cameras.
Use the DMP-90.exe file to format the built-in memory and the
Smart Media Card.
13
Page 19

WARNING
Read all instructions below before using the DMP-90 player.
Do not drop the DMP-90.
1
1
2
2
3
3
Vibration during walking or exercising should not affect the
DMP-90. However, dropping or placing heavy objects on it
may cause it to malfunction.
Do not get the DMP-90 wet.
Wipe the DMP-90 immediately with a dry cloth it any water gets
on it.
Storing the DMP-90 player.
Do not store the DMP-90 in an area with high humidity, strong
magnetic fields or high heat. Avoid storing the DMP-90 in direct
sunlight.
This equipment may be reset by unintentional
electrostatic discharge during operation.
!
14
Page 20

WARRANTY
The DMP-90 player comes with a one year-limited warranty
D-Link Systems Inc., guarantees that the DMP-90 player and all
related accessories will be repaired or replaced within one year from
the date of purchase. This warranty applies against defects in
materials or workmanship during assembly or shipping. This warranty
1
1
applies only to the original purchaser of the DMP-90 player.
This warranty does not cover problems associated with misuse and
or failure to be compatible with any other product.
TRADEMARK
DMP-90 and DMP-90 explorer are the trademarks of D-Link Systems
Inc. All other trade names referenced in this user's guide are
1
1
trademarks of their respective manufacturers.
INFORMATION
INFORMATION
To obtain further information, please refer to following web site
http://dlink.com.
1
1
Smart Media Card
The Smart media Card is a smart media Flash Memory Card with
the DMP-90 MP3 player's physical format. User(s) can purchase
1
1
a standard Smart Media card and format it for the by DMP-90 Mp3
to increase the memory.
15
Page 21
SPECIFICATIONS
Memory : 16MB Built-In, Expandable with Smart Media
S/N ratio : >90dB
Harmonic distortion : <0.1%
Max. Output : 15mW (16 ohm)
Frequency Range : 20Hz-20 kHz
Power : AA 1.5V x 1
Display : LCD
Slot : 1 slot for Smart Media Card
Transmission Rate : 400kbps
Interface : 15pins PCMCIA Port
Dimensions : 64x82x18mm
Weight : 70g
16
Page 22

APPENDIX
If the DMP-90 can't be detected by DMP-90.exe while it's still turned on, it
is likely that your computer is using a non-compliant Parallel Port setting.
The DMP-90 requires that you have an ECP-compliant Parallel port.
Parallel ports are typically used for the connection of a printer. As a result
the computer industry has a number of communication methods that have
changed over the years for the Parallel port. SPP, EPP, and ECP are a
number of Parallel port modes. The current ECP is required to ensure that
the DMP-90 can communicate with your computer. To check if your
Parallel port is set to ECP, please go to
Parallel port is set to ECP?
(1) How can I determine if my Parallel port is set to ECP?
To check if you computer's Parallel port is currently configured to ECP
please follow these steps:
A)Click Start->Setting->Control Panel
(1) How can I determine if my
17
Page 23

B) Double Click the System Icon in the Control Panel
C) Select the "Device Manager" Tab at the top of the System
Properties Window, Click the (+) next to the line that reads "Ports
(COM & LPT)
D) At this point a line should read "ECP Printer Port (LPT1)". If it
does and the unit still does not function, please contact D-Link
Technical Support at (949)788-0805 or ustech@dlink.com. If it does
not read ECP, please go to (2) How can I set my Parallel port to ECP?
18
Page 24

(2) How do I set my Parallel Port to ECP?
The DMP-90 requires your Parallel port to be set to ECP to function
properly. Most computers will allow you to change this setting in the BIOS.
Please note that most users are not comfortable with changing BIOS
settings and D-Link does not recommend that you change your BIOS
settings as it may cause your computer to stop functioning. D-Link
recommends that you contact the maker of your motherboard or computer
for detailed instructions on how to set your Parallel port to ECP mode.
If you are an advanced user and are comfortable with making the change,
most BIOS' will have a specific line item pertaining to Parallel Port Mode.
Find this line and follow the directions in your BIOS, or provided by your
computer/motherboard manufacturer, to change this setting to ECP. It is
normally a simple matter of toggling the Parallel Port Modes using the
PgUp/PgDn keys to find the right setting. Once you have made the
change, Save and Quit your BIOS set up program to reboot your computer.
Please note that once your computer reboots, Windows 95, 98, and 98SE
will find the new ECP Parallel port and attempt to install the drivers. You
will need to provide your Windows installation CD if prompted. Once you
have completed this change, follow the directions in (1) How can I
determine if my Parallel port is set to ECP? to double check your Parallel
port settings.
19
 Loading...