

Page 1
Quick Installation Guide
5 Megapixel Day & Night Outdoor Network Camera
This document will guide you through the
basic installation process for your new
D-Link Network Camera.
DCS-7517
Quick Installation Guide
Краткое руководство по установке
Guía de Instalación Rápida
Guia de Instalação Rápida
快速安裝指南
Petunjuk Pemasangan Cepat
Documentation also available on CD
and via the D-Link Website
Page 2

Quick Install Guide
This installation guide provides basic instructions for installing the Network Camera on
your network. For additional information about how to use the camera, please see the
User’s Manual which is available on the CD included in this package or from the D-Link
ENGLISH
support website.
Installation Steps
1. Verify the package contents against the list below.
2. Hardware Overview
3. Hardware Installation
4. Conguration with Wizard
5. SD Card Installation
6. Mounting Instructions
Package Contents
DCS-7517 5 Megapixel Day & Night Outdoor Network Camera
Manual and Software on CD-ROM
Quick Install Guide
Power Adapter
Cable Bundle
RJ-45 Extension Connector
Mounting Bracket and Screws
Alignment Sticker
Waterproof Cable Cover
If any of the above items are missing, please contact your reseller.
Safety Notice:
Installation and servicing should be done by certied technicians so as to conform to all
local codes and prevent voiding your warranty.
Note: Users are advised to ensure that the weatherproof seals are secured rmly in
place.
2
D-Link DCS-7517 Quick Install Guide
Page 3
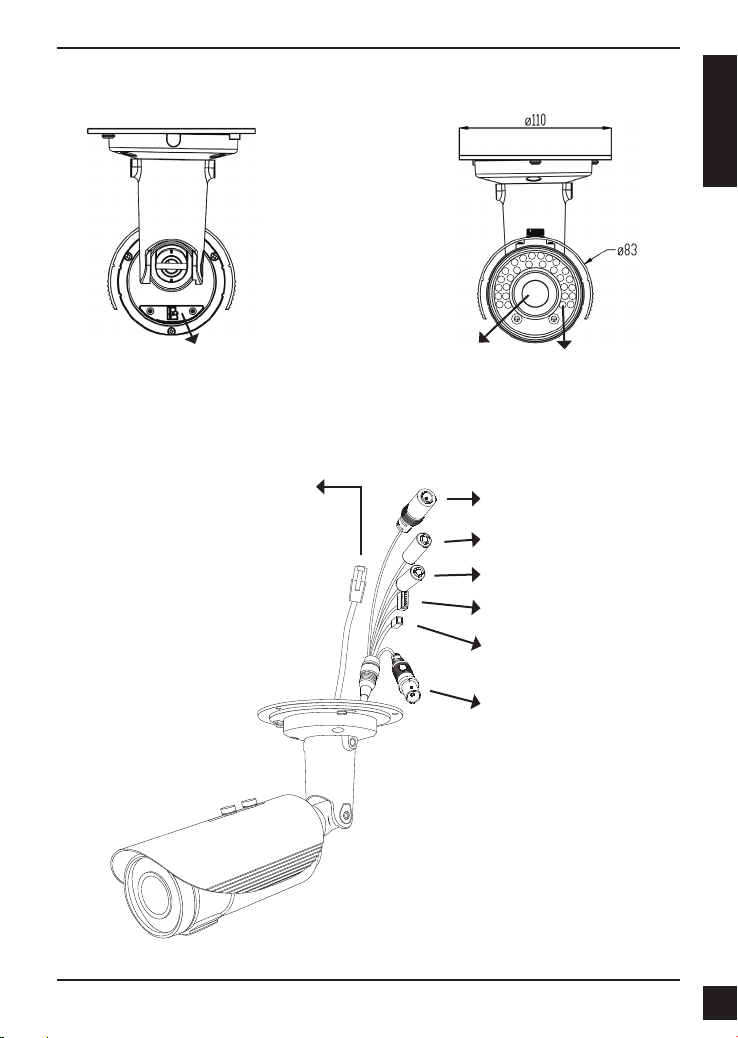
Hardware Overview
ENGLISH
microSD Card Cover
Remove cover to insert/
remove the microSD card
RJ-45 connector for Ethernet
which can also be used to power
the camera using Power over
Ethernet Jack
Ethernet (PoE)
Camera Lens
IR LEDs
Provide illumination for
low-light environments
Power Connector
Connects to 12 V DC power
Audio Out
Connects to speakers
Audio In
Connects to a microphone
DI/DO Wiring
I/O connectors for external devices
Reset Button
Resets camera to factory
default settings
BNC
Analog video output
D-Link DCS-7517 Quick Install Guide
3
Page 4
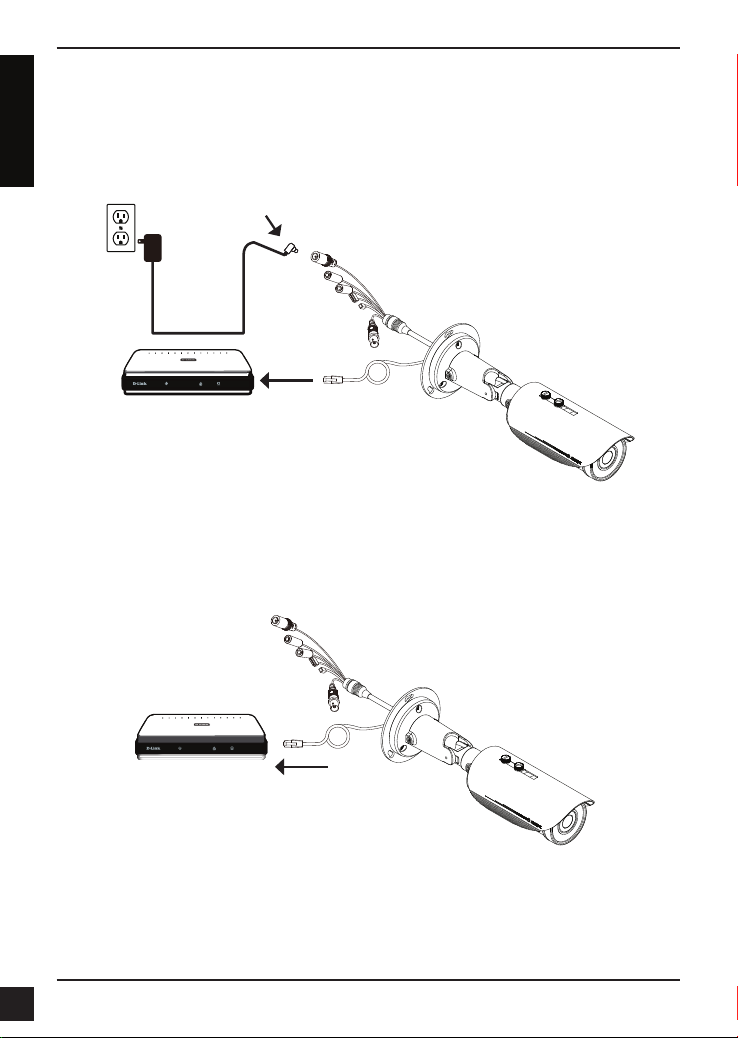
Hardware Installation
General Connection Using 12 V DC Power Adapter
1. Connect the network camera to a hub via an Ethernet cable.
2. Connect the supplied power cable from the camera to a power outlet.
ENGLISH
Connection with a PoE Hub
If you are using a PoE hub, connect the IP camera to the hub via an Ethernet cable,
which will provide transmission of both power and data over a single cable.
4
D-Link DCS-7517 Quick Install Guide
Page 5

Conguration with Wizard
Insert the DCS-7517 CD into your computer's CD-ROM drive to begin the installation. If
the Autorun function on your computer is disabled, or if the D-Link Launcher fails to start
automatically, click Start > Run. Type D:\autorun.exe, where D: represents the drive
letter of your CD-ROM drive.
The following window will open.
Click Next to continue.
Click Yes to accept the License Agreement.
ENGLISH
To start the installation process, click Next.
Note: The installation may take several minutes to
nish.
Click Finish to complete the installation.
D-Link DCS-7517 Quick Install Guide
5
Page 6

Click on the D-Link Setup Wizard SE icon that was
created in your Windows Start menu.
Start > D-Link > Setup Wizard SE
ENGLISH
The Setup Wizard will appear and display the MAC
address and IP address of your camera(s). If you have
a DHCP server on your network, a valid IP Address
will be displayed. If your network does not use a
DHCP server, the network camera's default static IP
(192.168.0.66) will be displayed.
Select your camera, then
click the Wizard button to continue.
Enter the Admin ID and password. When logging in for
the rst time, the default Admin ID is admin with the
password left blank.
Click Next, to proceed to the next page.
Select DHCP if your camera obtains an IP address
automatically when it boots up. Select static IP if the
camera will use the same IP address each time it is
started.
Click Next, to proceed to the next page.
Take a moment to conrm your settings and click Restart.
6
D-Link DCS-7517 Quick Install Guide
Page 7

Viewing Your Camera via a Web Browser
Click on the D-Link Setup Wizard SE icon that was
created in your Windows Start menu (Start > D-Link >
Setup Wizard SE).
Select the camera and click the button labeled "Link"
to access the web conguration.
The Setup Wizard will automatically open your web
browser to the IP address of the camera.
Enter admin as the default username and leave the
password blank.
Click OK to continue.
ENGLISH
This section shows your camera’s live video. You
can select your video prole and view or operate
the camera. For additional information about web
conguration, please refer to the user manual included
on the CD-ROM or the D-Link website.
D-Link DCS-7517 Quick Install Guide
7
Page 8

microSD Card Installation
Open the microSD Card Cover
Unscrew the microSD card cover and pull it down to open it.
ENGLISH
Install the microSD Card
Push the microSD card into the camera with the gold contacts oriented towards the base
of the camera. To eject the microSD card, push the microSD card into the slot.
Note: Users are advised to ensure that the weatherproof seals are secured rmly
in place.
8
D-Link DCS-7517 Quick Install Guide
Page 9

Mounting Instructions
It is highly recommended that you congure and test your camera before mounting it.
Place the alignment sticker where you want to position the camera. Make sure the camera
base will be positioned so that the cable channel is on the bottom.
Use a 6 mm drill bit to make the required holes approximately 25 mm deep, then insert
the wall anchors into the holes.
If you are running the camera cables through the wall, drill a hole in the center and pull
the cables through the hole.
ENGLISH
Use the screws provided to mount the camera to the wall.
If you are running the camera cables out the side of the
camera, guide the camera cables through the cable
channel on the base.
Connect the power and Ethernet cables, or just the
Ethernet cable if you are using a PoE connection.
If the cable bundle is not required, it can be detached from the camera, and the socket
sealed with a weatherproof cable cover.
Alignment
sticker
D-Link DCS-7517 Quick Install Guide
9
Page 10

To adjust the camera's angle, turn the adjustment ring counterclockwise to loosen it,
then move the camera to the desired position and angle. When you are nished, turn the
adjustment right clockwise to tighten it.
ENGLISH
Additional Information
Additional help is available through our ofces listed at the back of the User’s Guide or
online. To know more about D-Link products or marketing information, please visit the
website http://www.
dlink.com.
Warranty Information
Please visit http://warranty.dlink.com/ for warranty information for your region.
10
D-Link DCS-7517 Quick Install Guide
Page 11

Notes
ENGLISH
D-Link DCS-7517 Quick Install Guide
11
Page 12

Ver.1.00(WW)_130x183
2015/05/19
 Loading...