

MT-908
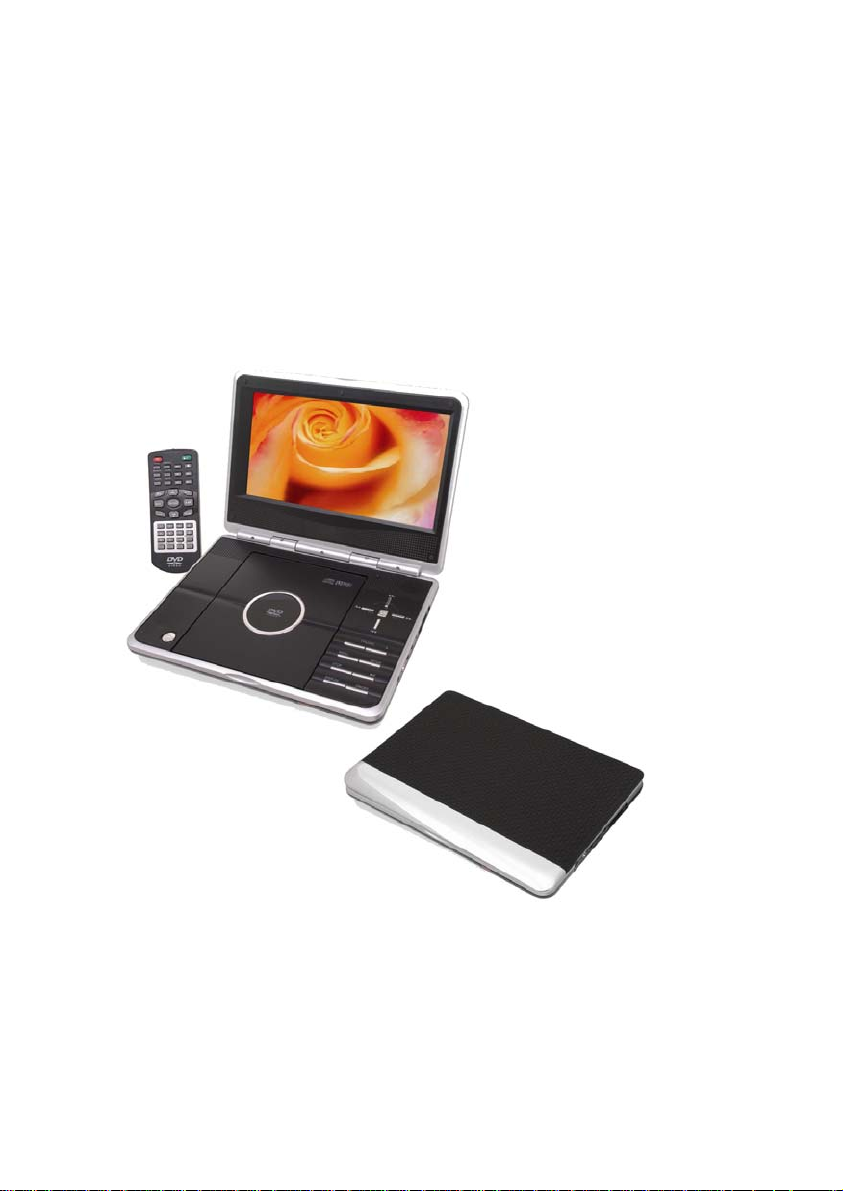
Portable DVD Player
INSTRUCTION MANUAL

Table of connect
Important Safety Instructions..........................................................................................4
Precautions.................................................................................................................. 5-6
Quick Guide
Getting to Know Your Portable DVD Player
Unpacking....................................................................................................... ......7
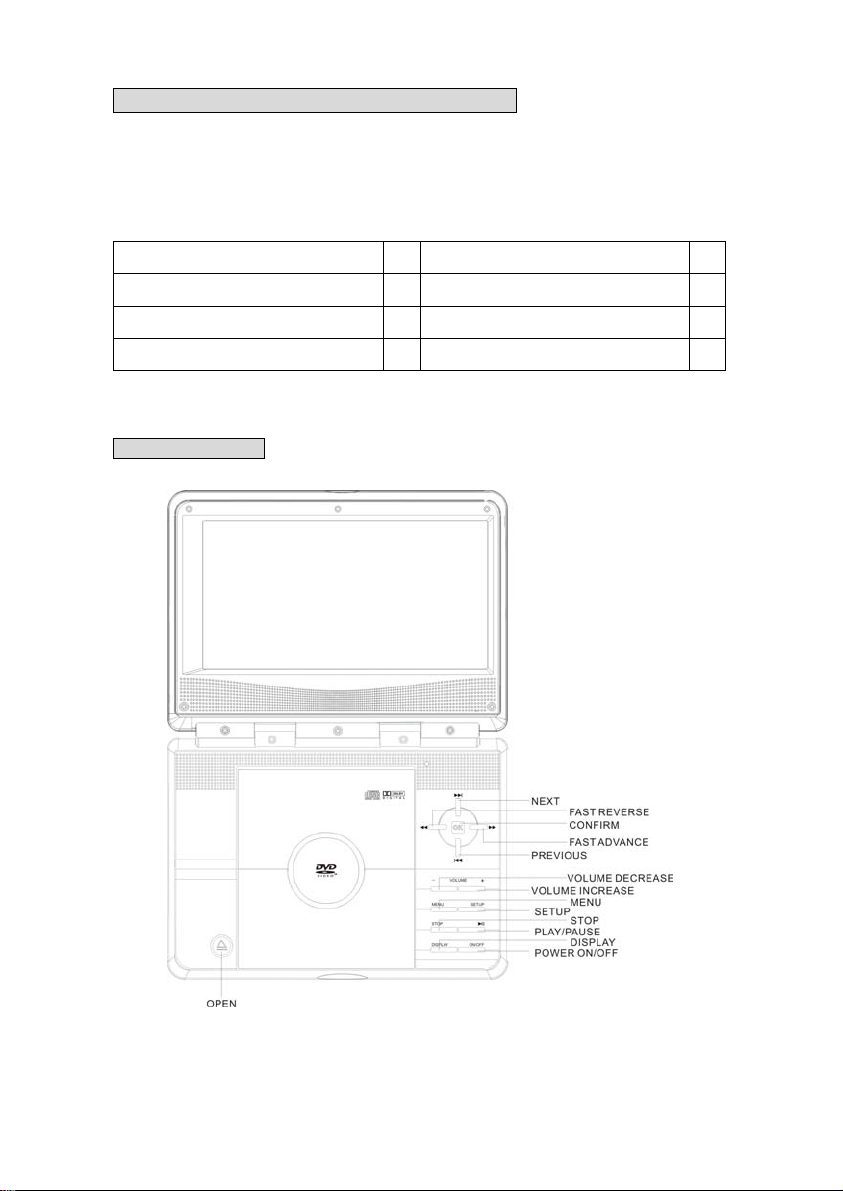
Front View Diagram…………………………………………………………………….7
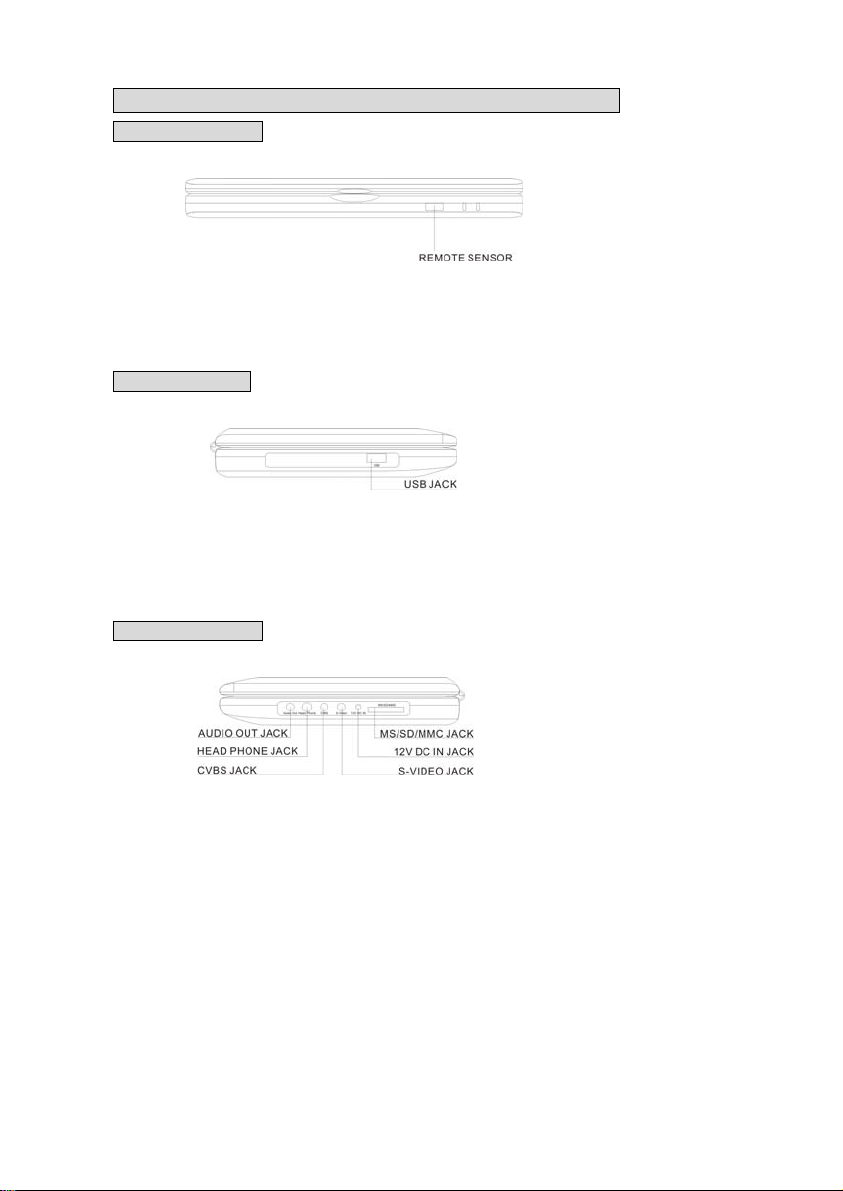
Left Side Diagram..................................................................................................8
Front Side Diagram............................................................................................... 8
Right Side Diagram............................................................................................... 8
Remote Control Diagram……………………………………………………………..9
Battery Installation for the Remote Control…………………………………………9
Remote Control Operation Range…………………………………………………...10
Quick Operation Guide
Quick Operation……………………………………………………………………11-12
Chapter 1. DVD
1-1 DVD Playback
Basic Playback………………………………………………………………………...13
Stopping Playback and Returning to the Menu Screen …………………….13
Stopping Playback………………………….………………..…………………….….14
Rapid Advance / Rapid Reverse………….………………..…………………….….14
Slow Playback…………………………………………………………………………14
Skipping Ahead or Back to Chapters…….………………..…………………….….14
Still Picture (PAUSE) …….……………..……………………………………….….14
Volume Adjusting …….………………..……………………………………….….….15
Mute playback…..…….………………..……………………………………….….….15
Repeat Viewing…….………………..……………………………………….…….….15
A-B Repeat Viewing………………..……………………………………….…….….15
Displaying the Information of the Scene ……………………………..….…….….15
Playing in a favorite order.…..……………..…….……………………….…….…....16
Zooming a Picture…….………………..………………………………….…….….16
Switch between DVD and Card…………..……………………………….…….….16
2

1-2 Convenient function
Changing Audio Soundtrack Language..………………………………..…….…....17
Changing Substitute Language……………………………….………………..…....17
Viewing Form Another Angle…………….………………….………………..…....18
Using the Title Function……….………………………….…...………………..…....18
Using the Menu Function…………….………………….….....………………..…....18
Selecting Scenes by Title / Chapter Number………….….....………………..…....19
Selecting Scenes by Time………….………………….….....………………..…......19
Chapter 2. Setup
2-1 Language Setup
Language Setting….………………………….……………...…….………….…......20
2-2 Video Setup
Aspect Ratio………………………………….……………...…….………….….......21
View Mode….……………………………….……………...…….………….….......21
TV System….……………………………….……………...…….………….….......21
Picture…………………………………………………………………………………..22
2-3 Rating Setup
Parental Control Setting [DVD] ……………….……………...…….………….........23
Password Setting [DVD] ……………………….……………...…….…………........24
2-4 Misc Setup
Use Default Settings…..……………………….……………...…….………….........25
MPEG4 Registration…………………………………………………………………25
What is MPEG4.…….………………………….……………...……………….…......25
Screen Saver…………………………………………………………………………25
Chapter 3. For Your Reference
Troubleshooting Guide..……………………….……………...………..………........26
Disc Handling and Maintenance……………….……………...………..…..…........27
Definition of Terms..…………………………….……………...………..………........28
Specifications..…………………………….……………...………..……………........29
3

Safety Precautions
Y
Y
WARNING: TO REDUCE THE RISK OF FIRE OR ELECTRIC SHOCK, DO NOT
EXPOSE THIS PRODUCT TO RAIN OR MOISTURE.
CAUTION: THIS DVD EMPLOYS A LASER SYSTEM.
TO ENSURE PROPER USE OF THIS PRODUCT, PLEASE READ
THIS OWNER’S MANUAL CAREFULLY AND RETAIN FOR FUTURE
REFERENCE. SHOULD THE UNIT REQUIRE MAINTENANCE,
CONTACT AUTHORIZED SERVICE LOCATION-SEE SERVICE
PROCEDURE.
USE OF CONTROLS, ADJUSTMENTS OR THE PERFORMANCE OF
PROCEDURES OTHER THAN THOSE SPECIFIED MAY RESULT IN
HAZARDOUS RADIATION EXPOSURE.
TO PREVENT DIRECT EXPOSURE TO LASER BEAM, DO NOT TR
TO OPEN THE ENCLOSURE.
VISIBLE LASER RADIATION WHEN THE ENCLOSURE IS OPENED.
DO NOT STARE INTO BEAM.
THE APPARATUS SHOULD NOT BE EXPOSED TO DRIPPING OR
SPLASHING AND NO OBJECTS FILLED WITH LIQUIDS, SUCH AS
VASES, SHOULD BE PLACED ON THE APPARATUS.
WARNING: CHANGES OR MODIFICATIONS NOT EXPRESSLY APPROVED B
THE PARTY RESPONSIBLE FOR COMPLIANCE COULD VOID THE
USER’S AUTHORITY TO OPERATE THE EQUIPMENT.
Since it is usual for DVD movies to be released at different times in different regions of
the world, all players have region codes and discs can have an optional region code. If
you load a disc of a different region code to your player, you will see the region code
notice on the screen. This player displays region 2 discs only.
4

Precautions
Note on handling
● When shipping the DVD player, always use the original shipping carton and
packing materials.
● For maximum protection, repack the unit as it was originally packed at the factory.
● Do not use volatile liquids, such as insect spray, near the DVD player. Do not
leaver rubber or plastic products in contact with the DVD player for a long time.
They will leave marks on the finish.
● The top and rear panels of the DVD player may become warm after a long period
of use. This is normal and not a malfunction.
● When the DVD player is not in use, be sure to remove the disc and turn off the
power.
● If you do not use the DVD player for a long period, the unit ma y not function
properly in the future. Turn on and use the DVD player occasionally.
Note on Locating
● When you place near a TV, Radio, or VCR, the playback picture may become poor
and the sound may be distorted. In this case, move the DVD player away form the
TV, Radio, or VCR.
Note on Cleaning
Use a soft, dry cloth for cleaning.
● For stubborn dirt, soak the cloth in a weak detergent solution, wring well and wipe.
Use a dry cloth to wipe it dry. Do not use any type of solvent, such as thinner and
benzene, as they may damage the surface of DVD player.
● If you use a chemical saturated cloth to clean the unit, follow that product’s
instructions.
Warning: Cleaning and adjustment of lenses and /or other components of playback
mechanism should be performed by a qualified service technician.
5

Precautions
To Obtain a Clear Picture
● The DVD player is a high technology, precision device. If the optical pick up lens
and disc drive parts are dirty or worn down, the picture quality becomes poor. To
obtain a clear picture, we recommend regular inspection and maintenance
(cleaning or parts replacement) every 1,000 hours of use depending on the
operating environment. For details, contact your nearest dealer.
Note on Moisture Condensation
Moisture condensation damages the DVD player. Please read the following
carefully.
Moisture condensation occurs, for example, when you pour a cold drink into a glass on
a warm day. Drops of water form on the outside of the glass, in the same way, moisture
may condense on the optical pick-up lens inside this unit, one of the most crucial
internal parts of the DVD player.
Moisture condensation occurs during the following cases.
● When you bring the DVD player directly from a cold place to a warm place.
● When you use the DVD player in a room where you have just turned on the heater,
or a place where the cold wind from the air conditioner directly hits the unit.
● In summer, when you use the DVD player in a hot and humid place just after you
have moved the unit from an air conditioned room.
● When you use the DVD player in a humid place.
Do not use the DVD player when moisture condensation may occur.
If you use the DVD player in such a situation, it may damage discs and internal parts.
Remove the disc, connect the power cord of the DVD player to the wall outlet, turn on
the DVD player and leave it “ON” for two or three hours. After two or three hours, the
DVD player will have warmed up and evaporated any moisture. Keep the DVD player
connected to the wall outlet and moisture condensation will seldom occur.
6
Getting to Know Your Portable DVD Player
Quick Guide will instruct you to install your Portable DVD Player in a quick and easy
way. Please carefully follow the instructions to set up your Portable DVD Player.
Unpacking
First inventory the contents of your Portable DVD player package.
Portable DVD Player 1 Battery Pack 1
Audio Cable (white, red) 1 External Power Adapter 1
Video / Coaxial Cable 1 Cigarette Lighter Adapter 1
Remote Control 1 User Manual 1
Front View Diagram
7
Getting to Know Your Portable DVD Player-continued
Front Side Diagram
Left Side Diagram
Right Side Diagram
8
Getting to Know Your Portable DVD Player-continued
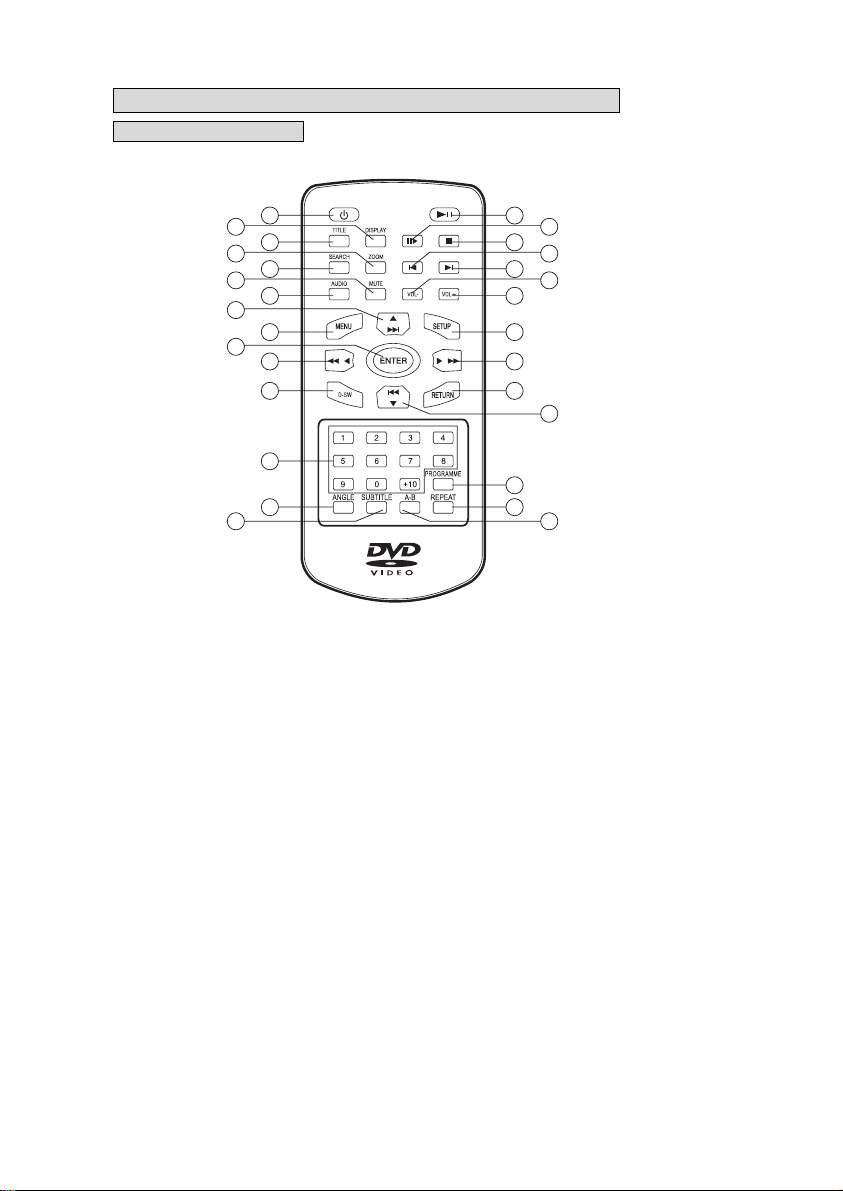
Remote Control Diagram
10
15
1. Power
2. Display
3. Title
4. Zoom
5. Search
6. Mute
7. Audio
8. Up choice and
Next
9. Menu
10. Enter
1
2
3
4
5
6
7
8
9
11
12
13
14
11. Left choice and
Rapid Reverse
12. D-SW
13. Numeric buttons
14. Angle
15. Subtitle
16. Play/Pause
17. Pause/Step
18. Stop
19. Previous
20. Next
16
17
18
19
20
21
22
23
24
25
26
27
28
29
21. Volume decrease
22. Volume increase
23. Setup
24. Right choice and
Rapid Advance
25. Return
26. Down choice and
Previous
27. Programme
28. Repeat
29. Repeat A-B
9

Getting to Know Your Portable DVD Player-continued
Battery Installation for the Remote Control
Insert the battery and match the (+) and (-) on battery to the marks inside the battery
compartment.
First-time use:
Remember to remove the insulating Mylar Tape from the battery compartment.
Service life of battery
1. The battery normally lasts for about one year although this
depends on how often and for what operations the remote
control is used.
2. If the remote control unit fails to work even when it is
operated near the player, replace the battery.
3. Use a 3V lithium battery, CR2025 available from a local retailer.
Remote Control Operation Range
Point the remote control unit no more than about 12 feet from the remote control sensor
and within about 30˚ of the front of the unit
The operating distance may vary according to the brightness in the room.
Note:
1. Do not point bright lights at the remote control signal sensor.
2. Do not place objects between the remote controll unit and the remote control
signal sensor.
3. Do not use this remote control unit while simultaneously operating the remote
control unit of any other equipment.
PROGRAMME
10

Quick Operation Guide
Quick Operation
STEP 1. Connect it to Power
Please connect the applied adaptor to the DC IN jack on the Right side of this Portable
DVD Player.
STEP 2. Connect it with headphones or connect it to external equipment.
If you want to enjoy higher listening and viewing quality, you can connect this Portable
DVD player to external equipment, such as a TV or an amplifier.
Note:
Before connecting, make sure to turn off the power of this Portable DVD Player
and external equipment.
11

STEP 3. Press ON/OFF button for a few seconds to turn o n the Portable DVD
Player.
STEP 4. Press OPEN button to open the disc cover.
STEP 5. Gently hold the edge of the disc, then place and press down firmly
near center spindle with printed side up.
Note: Make sure the printed side of the disc is facing up.
STEP 6. Close the disc cover.
STEP 7. Press PLAY to play the disc.
Note: Make sure the external equipment
1. Left audio jack of TV or amplifier.
2. Right audio jack of TV or amplifier.
3. Video jack on TV
4. S-video jack of digital amplifier
To playback, select your input source based on your
connections.
supports the audio/video input feature.
12

DVD Playback
Preparation
Connect the portable DVD player with the AC adaptor and / or battery pack, and
playback through headphones, speakers, or home theater system.
To connect to home theater or stereo system:
● Turn on the TV set, and select “Video” as the TV input.
● Turn on the home theater / stereo s ystem and select the input source which you
connected to the portable DVD player.
Basic Playback
1. Press ON/OFF button for a few seconds to power on the unit.
2. Press OPEN button to open the disc cover.
3. Place disc in the tray with the printed side up.
Hold the disc without touching the playable surface, position it with the printed title side
facing up, align it with the guides, and press the disc firmly onto the center spindle.
4. Close the disc cover.
Close the disc cover, the portable DVD player will start playback automatically.
If the disc contains one or more titles, a menu screen will appear on the screen.
<< NOTE: Proceed with steps 5 and 6 when a menu is available on the disc >>
5. Press UP/ DOWN/ LEFT/ RIGHT button to choose the preferred selection.
6. Press ENTER or PLAY.
The Player will start playback of the selected item.
Stopping Playback and Returning to The Menu Screen
(If a Menu is available on the Disc)
Press <MENU>.
The portable DVD player stops playback, and then displays the menu screen.
After operation
When the portable DVD player is not in use, remove the disc and press ON/OFF button
to turn off the player. Then close the display panel.
<< NOTE >>
● The disc continues to spin while the menu is displayed even after the player has
finished playing a particular disc. When no further selections are to be played, be
sure to press the <STOP> button to clear the menu screen.
● If the disc is placed in upside down (and it is a single sided disc), the player’s
display will appear “BAD DISC”.
For your reference:
● When appears while a button is being operated, it means that the
corresponding operation is prohibited by the player.
13

DVD Playback-continued
Stopping Playback
Press <STOP>, the play will temporarily stop.
When play is temporarily stopped, the unit records the point where STOP was pressed.
Press <PLAY> and play will resume from this point.
When play is temporarily stopped, press <STOP> again, the player will stopped fully.
Press <PLAY> and play will start from the beginning of the disc.
Rapid Advance / Rapid Reverse
Press < > or < > during playback.
The speed of advance ( x2, x4, x8, x16) or reverse ( x2, x4, x8,
x16) changes for each press of the or button
Normal playback is resumed when you press <PLAY>
Slow Playback
Press < > or < > button during playback.
The speed of advance ( 1/2, 1/4, 1/6, 1/8) or reverse ( 1/2, 1/4,
1/6, 1/8) changes for each press of the or button
Normal playback is resumed when you press <PLAY>
Skipping Ahead or Back to Chapters
You can skip a specific chapter or track during playback.
Skipping Ahead
Press < > during playback.
Skips next chapter each time you press the button.
Skipping Back
Press < > during playback.
Skips previous chapter each time you press the button.
Still Picture (PAUSE / STEP)
Press < > on the remote control once during playback.
The screen image is paused.
Press < > button several times, the screen image will playback frame by frame.
Press <PLAY> to return to normal playback.
14
DVD Playback-continued
Vo lum e A d justin g
Press <VOL - > button to decrease volume
Press <VOL +> button to increase volume
Mute Playback
Press <MUTE > button to turn off volume, press this button again to turn volume on.
Repeat Viewing
Press <REPEAT> during playback.
Each time you press, the disc will repeat a chapter or title.
REPEAT CHAPTER Repeats the same chapter.
REPEAT TITLE
REPEAT OFF
<<NOTE>>
Repeat playback works only with the discs for which the elapsed playing time appears
on the player’s display during playback.
Repeat playback may not work correctly with some DVDs.
A-B Repeat Viewing
This DVD player allows you to playback a specific segment repeatedly.
Press <A-B> during playback.
Rep A
Rep A -B
Rep Off
Display the information of the Scene
Press <DISPLAY> to display the title number, chapter number, and other information on
screen.
Press <DISPLAY> again to disappear the information.
Repeats the same title.
Resumes normal playback.
Set point A
Set point B
Resumes normal playback.
15

DVD Playback-continued
Playing in a favourite Order
Press <PROGRAM> during playback.
Program menu displays on the screen
Use <UP>, <DOWN>, <LEFT>, <RIGHT> to select the desired Title/Chapter, then
press <ENTER> to confirm.
Use the <RIGHT> button to select “Play”, then press <ENTER> to start.
Clearing the program
Select “Clear” and press <ENTER> to clear the programmed chapters one by one
Select “Clear All” and press <ENTER> to clear all the programmed chapters
(The programs are also cleared when the power is turned off or the disc is removed.)
Zooming a Picture
This DVD player allows you to zoom into a picture as well as shift the zoom point.
Press <ZOOM> several times during normal playback.
The play magnifies in the center of the picture.
If you press <UP>, <DOWN>, <RIGHT> buttons during playback, the zoom point shifts.
To cancel the zoom function, press <ZOOM> until zoom off.
Switch between DVD and Card
During Stop Mode, press <D-SW> button to transform the input signal between DVD
and Card.
1
2
3 Off
16

Convenient functions
Changing Audio Soundtrack Language
1. Press <AUDIO> during playback.
2. Press it until the preferred language is selected.
For your reference:
● If the preferred language is not selected even after pressing the button several
times, it may indicate that language is not available on the disc.
● You can also change the audio language during initial setup to a different
language, if available. (This functions only on discs with multiple languages.)
● When you turn on or remove the disc, the portable DVD player will playback the
language which is selected at the initial setting. If you select a language which is
not recorded on the disc, the portable DVD player will playback a prior language
programmed on the disc.
Changing Subtitle Language
If a disc provides subtitles, you may choose to hide or display them. (This operation
works with discs that provide subtitles.)
Press <SUBTITLE> during playback to display subtitles or hide them. When you press
<SUBTITLE> twice, the first subtitle recorded on the disc will display. The rest of the
subtitles recorded will display in sequence as you press the button repeatedly.
You may switch to another language using this key, or you can turn off the subtitle by
pressing this key until “SUBTITLE OFF” appears on the screen.
You may change the subtitle language, if available.
1. Press <SUBTITLE> during playback
When no subtitles are recorded “ “ will display instead of the language number
selected.
2. Press <SUBTITLE> until the preferred language is selected.
<< NOTE: In some cases, the subtitle language may not change immediately to the
selected one >>
For your reference:
● When the preferred subtitle language is not selected even after pressing the
button several times, it may indicate that the language is not available on the disc.
● When you turn on or remove the disc, the portable DVD player will playback the
subtitle language selected during initial setup. If you select a subtitle language
which is not recorded on the disc, the portable DVD player will playback a prior
subtitle language programmed on the disc.
17

Convenient functions-continued
Viewing from another Angle
Some special featured DVD discs may contain scenes which have been shot
simultaneously from a number of different angles. For these discs, the same scenes
can be viewed from different angles using the <ANGLE> button. (The recorded angles
vary depending on the disc programming.)
1. Press <ANGLE> during playback.
2. Press it until the preferred viewing angle is selected.
Press <ANGLE> button to change the viewing angle.
<< NOTE >>
● ANGLE will only function on discs where different angles have been recorded.
● The viewing angles are shown on the player’s display and you can select one from
them for viewing.
Using the TITLE Function
Certain DVD discs have unique menu structures called DVD menus. For example,
DVDs programmed with complex content provide guide menus, and those recorded
with various languages provide menus for audio and subtitle language. Although the
DVD menu’s contents and operation vary from disc to disc, the following explains basic
operation when this feature is used.
1. Press <TITLE>
The DVD menu available on the disc will appear.
2 Press <UP>, <DOWN>, <LEFT>, <RIGHT> buttons to select the preferred item.
3 Press <ENTER>.
To enter the selected item.
Using the MENU Function
1. Press <MENU>.
A DVD chapter menu with a still image will appear. You may view the introduction of
each chapter and then decide with which chapter to select.
2. Press <UP>, <DOWN>, <LEFT>, <RIGHT> buttons or number button(s) to select
the preferred item.
<< Note: The menu details vary depending on discs recorded. >>
3. Press <ENTER>.
To enter the selected item.
18

Convenient functions-continued
Selecting Scenes by Title/Chapter Number
Allows you to locate specific titles/chapters of scenes to playback.
1. Press <SEARCH> during playback.
2. Press <DOWN> button, <LE FT> button and <RI GHT> butt on to highlight the titl e
or chapter item.
3. Press the number buttons to specify the desired title or chapter.
4. Press <ENTER>
The portable DVD player will start playback from selected title/chapter numbers.
Selecting Scenes by Time
1. Press < SEARCH > during playback.
2. Press <DOWN> button, <LEFT> button and <RIGHT> button to highlight the time
item.
3. Press the number buttons to specify the scene time desired.
Example: To locate “01 hr. 50 min. 00 sec.”, press “1”, “5”, “0”, “0” and “0”.
4. Press <ENTER>.
The portable DVD player will start playback from the specified position.
<<NOTE>>
● These operations work only with discs for which the elapsed playing time appears
on the portable DVD play’s display during playback.
● For some discs, playback may start from a different place, even when the steps
above have been performed correctly.
For your reference:
● When “ ” appears while you are pressing a button, it may indicate that the
corresponding operation is prohibited by the portable DVD player.
19

Language Setup
Allows you to set various languages for the on screen display (OSD).
You can select a preferred DVD menu, subtitle, MPEG4 subtitle, audio language or
DVD menu among various languages that have been recorded on certain DVD discs.
1. Press <SETUP> then press <RIGHT>.
2. Press <UP> or <DOWN> button to select desired items, and then press
<ENTER>.
3. Press <UP> button/ <DOWN> direction button to select the desired language.
4. Press <ENTER> to confirm.
To complete the setup operation, press <SETUP> to exit.
20

Video Setup
You can also adjust the Brightness and the Sharpness.
1. Press <SETUP>
2. Press <DOWN> button to select “VIDEO”, and then press <RIGHT>.
3. Press <UP> / <DOWN> button to select the desired items, then press <ENTER>
4. Press <UP> button/ <DOWN> direction button to select the desired item.
5. Press <ENTER> to confirm.
To finish the setup operation, press <SETUP> to exit setup menu screen.
Aspect Ratio Settings
4:3
Select 4:3 for a conventional size TV set. Black bands appear at top and bottom of
screen, but allow for the true aspect ratio of the widescreen programming.
16:9
Select 16:9 for a wide-screen TV set.
View Mode
Allow you to select the view modes among: Fill, Original, Auto Fit or Pan Scan.
TV System
According to the system of TV to be connected, set the type of the TV System to match
the TV .
21

Picture
Allow you to select the picture modes among: Standard, Bright, Soft or Dynamic.
If you select “Dynamic”, the screen will display another menu:
You can press <UP> and <DOWN> button to select preferred items, then press
<LEFT> and <RIGHT> button to adjust.
22

Rating Setup
Parental Control Setting [DVD]
A built-in viewer rating setting enables you to lockout video programming that you do
not want children to view. For example, if you set it to PG-13, then the portable DVD
player will not play any videos rated R, NC-17 or Adult unless the correct password is
entered.
1. Press <SETUP>.
2. Press <DOWN> button to select “Rating”, then press <RIGHT> to highlight the
“Parental Control”, press <ENTER>
NOTE:
● If you want to modify the item s in the parental control, you must i nput
a 4-digit password to unlock it.
● The default password is “8888”
3. Input a 4-digit password to unlock it.
4. Press <UP> and <DOWN> button to select desired item.
5. Press <ENTER> to confirm
To complete the setup operation, press <SETUP> to exit setup menu screen.
For your reference:
● You can use the parental control lock ONLY with DVD discs featured with the
parental lock function.
● Some discs may not be encoded with specific rating level information though its
disc jacket says that it is for “adults”. For those discs, RATINGS lock will not
function.
23

Password Setting [DVD]
You can change the password setting of the portable DVD player by selections.
In the Rating Setup menu, press <UP> and <DOWN> to highlight the Set Password
item, then press <ENTER>. The screen will display a menu allow you input a 4-digit
password.
Input the 4-digit password and press <ENTER> to confirm.
Then the screen will lighten out “Correct Password”. After the Set Password been
highlighted again, press <ENTER>. The screen will display a menu allow you input a
new 4-digit password.
Input a new 4-digit password and press <ENTER> to confirm.
24

Misc Setup
1. Press <SETUP>.
2. Press <DOWN> button to select “Misc”, and then press <RIGHT>.
3. Press <UP> or <DOWN> button to select desired items, then press <ENTER>
To complete the setup operation, press <SETUP> to exit setup menu screen.
Use Default Settings
If you select “YES” and press <ENTER> to confirm.
The unit will restore all menu selections to the factory default setting (except for the
password and Parental Control).
MPEG4 Registration
You can know registration code in this item.
What is MPEG4?
MPEG4 video technology, often called the “MP3 of video”, enables you to take large
video files and reduce them to a fraction of their original size with no significant loss in
quality. Thanks to MPEG4 technology’s superior compression, hours of quaity video
can ba saved. Manage a personal video librar and share with family and friends. You
can also download the latest Hollywood trailers or share among the 2 billion existing
MPEG4 videos and play them on your DVD player.
The MPEG4 codec (short for compress-decompression) is based on the MPEG-4
compression standard. This codec is ao advanced that it ca reduce an MPEG-2 video
(the same format used for DVD) to 10% of its original size. Video on regular VHS tapes
can be reduced to about 1/30
Screen saver
Allow you to select screen saver ON or OFF in this item.
th
of their original size.
25

Troubleshooting Guide
Before requesting service for this portable DVD player, check the chart below for a possible
cause of the problem you are experiencing. Some simple checkups or a minor adjustment on
your part may eliminate the problem and restore problem and restore proper operation.
SYMPTOM(COMMON) REMEDY
No power • Insert the power plug securely into the power outlet.
The player does not start
playback when PLAY is
pressed
The player starts playback
but stops immediately.
No picture • Ensure that the equipment is connected properly.
No sound • Ensure that the equipment is connected properly and firmly into jacks.
Distorted sound • Ensure that the input settings for the TV and stereo system are proper.
Distorted picture • Check the disc for fingerprints and clean it with a soft cloth, wiping it
No rapid advance/reverse • Some discs may have sections which prohibit rapid advance/reverse.
No 4:3 (16:9) picture • Choose the correct setup “Aspect Ratio ” item which matches the TV
No operations perform with
the remote control
No key operation (by the
DVD player power and/or the
remote control) is effective
PLAY does not start
playback even when title is
selected
Audio soundtrack and/or
subtitle language is not the
one selected at the initial
settings
No subtitles • Subtitles appear only with discs that contain them.
Angle cannot change • This function depends on software availability. Even if a disc has a
I forgot my password for
parental control
• Check if no power at the AC outlet by plugging in another appliance for
a test.
• Recharge the battery.
• Condensation has formed: wait about 1 to 2 hours to allow the player to
dry out.
• Check if the disc is defective by trying another disc.
• Check the region (local) code.
• Disc may have been placed in the tray upside down.
• The disc may be dirty and may require cleaning.
• Ensure that the disc is installed with the label side up.
• Ensure that the input setting for the TV is “Video”.
• Check if external equipment is on.
• Select the same channel and source on the TV as on the player.
• If using a HiFi amplifier, try another sound source.
• Check the Volume Adjustment.
from center to edge.
• Sometimes a small amount of picture distortion may appear. This is not
a malfunction
set used.
• Check the batteries are installed with the correct polarity (+ and –).
• The batteries are depleted: replace them with new ones.
• Point the remote control unit at the remote control signal sensor and
operate.
• Operate the remote control unit at a distance but no more than 6
meters from the remote control signal sensor.
• Remove the obstacles between the rem ote control unit and remote
control signal
• Turn the unit off and then back to on. Alternatively, turn off the unit,
disconnect the AC cord and then re-connect it. (The player may not be
operating properly due to lightning, static electricity or some other
external factor.)
• T his may be a result of the parental lock function that has been set.
Confirm the “PARENTAL” setup.
• If the audio soundtrack and/or subtitle language does n ot exist on the
disc, the language selected at the initial settings will not be seen/
heard.
• Subtitles are hidden from the TV screen. Press SUBTITLE to display
the subtitles.
number of angles recorded, these angles may be recorded for specific
scenes only.
• Enter overriding password: 8888
26
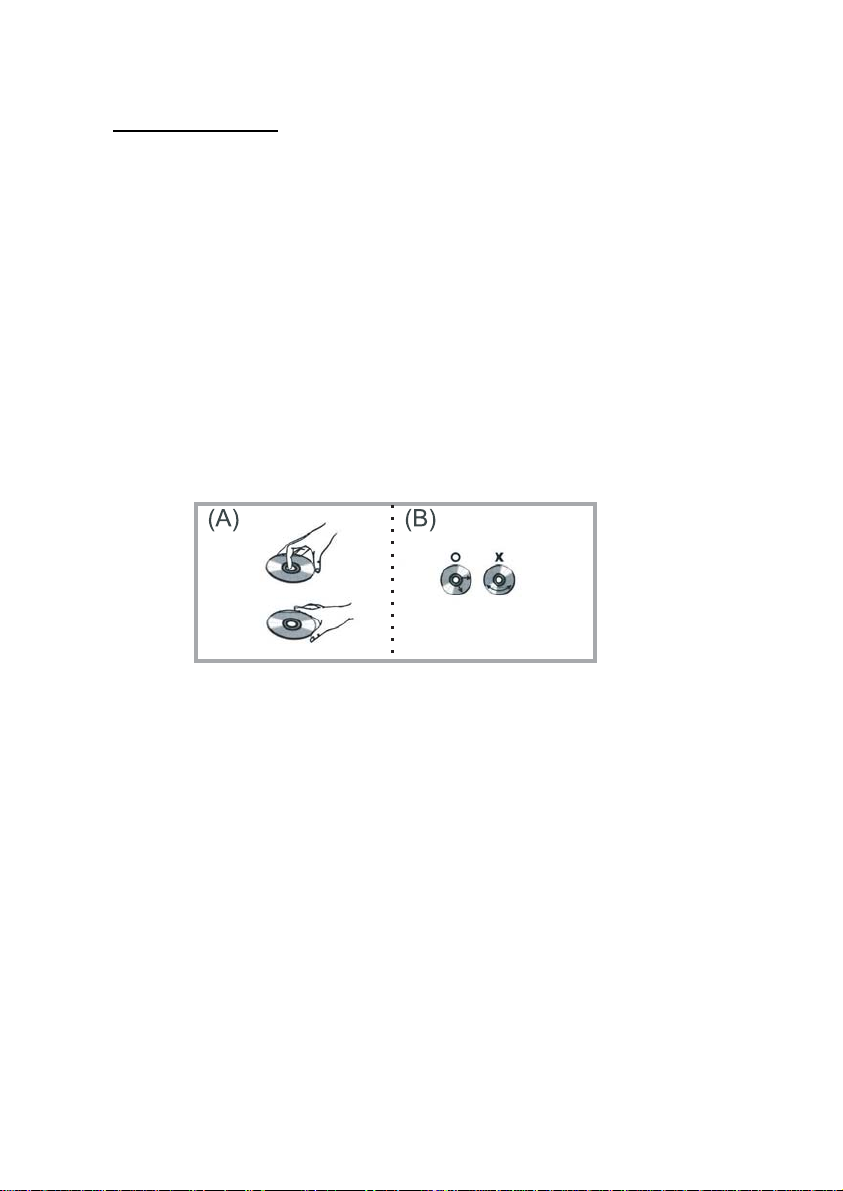
Disc Handling and Maintenance
Handling Precautions
• Hold the disc by the edges to avoid fingerprints. (A)
• Fingerprints, dirt and scratches can cause skipping and distortion.
• Do not write on the label side with a ball-point pen or other writing utensils.
• Do not use record cleaning sprays, benzine, thinner, static electricity prevention
liquids or any other sol-vent.
• Be careful not to drop or bend the disc.
• Do not install more than 1 disc on the disc tray.
• Do not try to close the disc cover on an improperly installed DVD.
• Be sure to store the disc in its exclusive case when not in use.
If the surface is soiled (B)
Wipe gently with a soft, damp (water only) cloth.
When wiping discs, always move the cloth from the center hole toward the outer edge.
(If you wipe the discs using a circular motion, circular scratches are likely to occur,
which will cause noise.)
If the disc is brought from a cold to a warm environment, moisture may form on the disc.
Wipe this moisture off with a soft, dry, lint-free cloth before using the disc.
Improper disc storage
You can damage discs if you store them in the following places:
• Areas exposed to direct sunlight
• Humid or dusty areas
• Areas directly exposed to a heat outlet or heating appliance
Maintenance
• Be sure to turn the unit off and disconnect the AC power cord.
• Wipe this unit with a dry soft cloth. If the surfaces are extremely dirty, wipe clean with
a cloth which has been dipped in a weak soap-and-water solution and wrung out
thoroughly, and then wipe again with a dry cloth.
• Never use alcohol, benzine, thinner, cleaning fluid or other chemicals. And do not
use compressed air to remove dust.
27

Definition of Terms
Angle
Recorded onto certain special edition DVD discs are scenes that have been
simultaneously shot from a number of different angles (the same scene is shot from the
front, from the left side, from the right side, etc.). With such discs, the ANGLE button
can be used to view the scene from different angles.
Chapter Number
These numbers are recorded on DVD discs. A title is subdivided into many sections,
each of which is numbered, and specific parts of video presentations can be searched
quickly using these numbers.
DVD
Refers to a high-density optical disc on which high-quality pictures and sound have
been recorded by means of digital signals. Incorporating a new video compression
technology (MPEG II) and high-density recording technology, DVD enables
aesthetically pleasing full-motion video to be recorded over long periods of time (for
instance, a whole movie can be recorded).
DVD has a structure consisting of two 0.6 mm thin discs which are adhered to each
other. Since the thinner the disc, the higher the density at which the information can be
recorded, a DVD disc has a greater capacity than a single 1.2 mm thick disc. Since the
two thin discs are adhered to each other, there is the potential to achieve double-sided
play sometime in the future for even longer duration play.
Subtitles
These are the printed lines appearing at the bottom of the screen which translate or
transcribe the dialogue. They are recorded on DVD discs.
Time Digit
This indicates the play time which has elapsed from the start of a disc or a title. It can be
used to find a specific scene quickly. (It may not work with some discs.)
Title Number
These numbers are recorded on DVD discs. When a disc contains two or more movies,
these movies are numbered as title 1, title 2, etc.
Track Number
These numbers are assigned to the tracks which are recorded on audio CDs. They
enable specific tracks to be located quickly.
28

Specifications
Portable DVD Video Player
Power Supply ~120V-240V. 60Hz
Power Consumption 10W
Mass 1.0kg
External Dimensions 240(W)x175(D)x33.5(H) (mm)
Laser Semiconductor Laser, wavelength 655nm
Outputs
CVBS Output 1.0V(p-p), 75ohms, negative sync
Audio Output (analog audio) 2.0V(rms), 10Komhs
Inputs
Input Formats MS/ SD/ MMC card
USB Port 2.0
This product incorporates copyright protection technology that is protected by U.S.
patents and other intellectual property rights. Use of this copyright protection
technology must be authorized by Macrovision, and is intended for home and other
limited viewing uses only unless otherwise authorized by Macrovision. Reverse
engineering or disassembly is prohibited.
* Designs and specifications are subject to change without notice.
* Weight and dimensions are approximate.
29
 Loading...