

Page 1
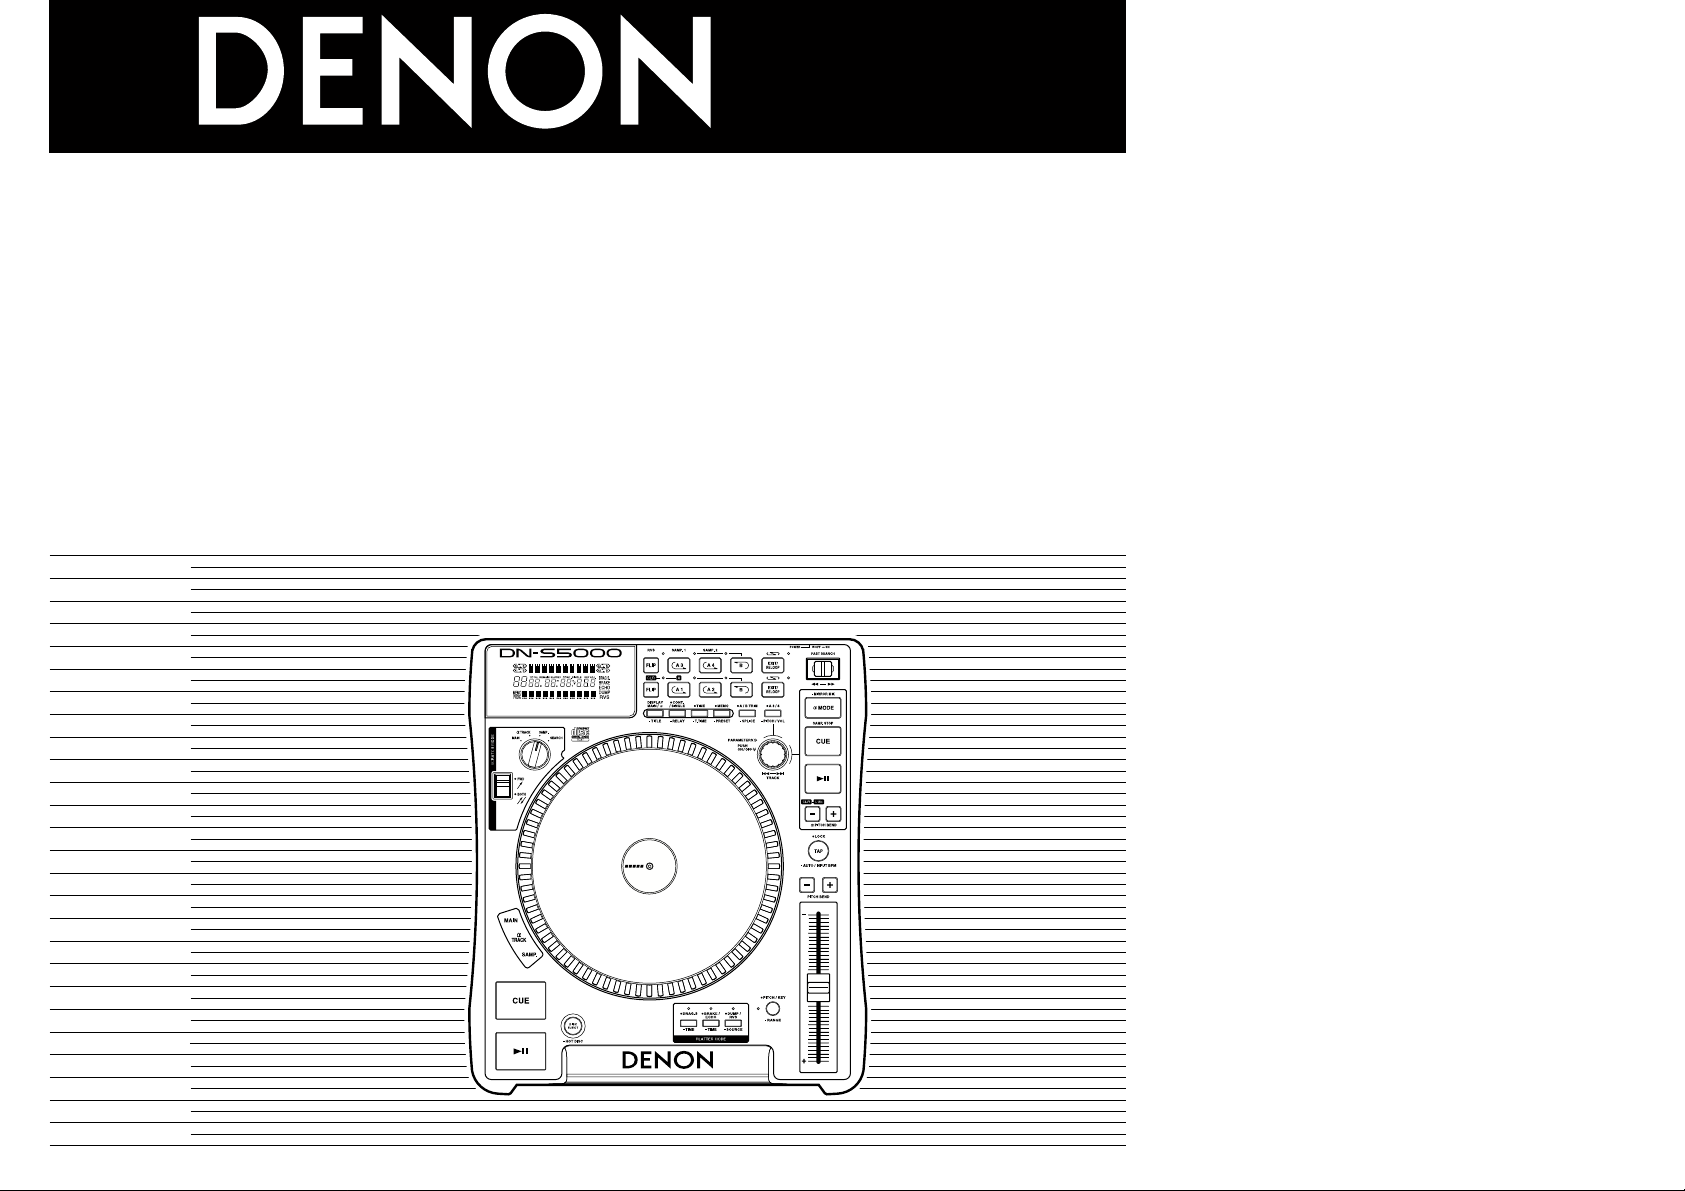
TABLE TOP SINGLE CD PLAYER
DN-S5000
OPERATING INSTRUCTIONS
INSTRUCCIONES DE OPERACION
FOR ENGLISH READERS PAGE 6 ~ PAGE 26
PARA LECTORES DE ESPAOL PAGINA 27~ PAGINA 47
Page 2
CAUTION:
,
CLASS 1
LASER
PRODUCT
,
,,
FIGURE A
EXAMPLE OF ANTENNA GROUNDING
AS PER NATIONAL
ELECTR CAL CODE
ANTENNA
LEAD N
WIRE
GROUND
CLAMP
ELECTRIC
SERVICE
EQUIPMENT
ANTENNA
DISCHARGE UN T
(NEC SECTION 810 20)
GROUND NG CONDUCTORS
(NEC SECTION 810 21)
GROUND CLAMPS
POWER SERV CE GROUNDING
ELECTRODE SYSTEM
(NEC ART 250 PART H)
NEC NATIONAL ELECTRICAL CODE
WARNING:
CAUTION:
1. Handle the power supply cord carefully
Do not damage or deform the power supply cord. If it is
damaged or deformed, it may cause electric shock or
malfunction when used. When removing from wall outlet,
be sure to remove by holding the plug attachment and not
by pulling the cord.
2. Do not open the top cover
In order to prevent electric shock, do not open the top cover.
If problems occur, contact your DENON dealer.
3. Do not place anything inside
Do not place metal objects or spill liquid inside the CD player.
Electric shock or malfunction may result.
Please, record and retain the Model name and serial number of
your set shown on the rating label.
Model No. DN-S5000 Serial No.
NOTE:
This CD player uses the semiconductor laser. To allow you to
enjoy music at a stable operation, it is recommended to use this
in a room of 5 °C (41 °F) –35 °C (95 °F).
CLASS 1 LASER PRODUCT
LUOKAN 1 LASERLAITE
KLASS 1 LASERAPPARAT
ADVARSEL: USYNLIG LASERSTRÅLING VED ÅBNING, NÅR
VAROITUS! LAITTEEN KÄYTTÄMINEN MUULLA KUIN TÄSSÄ
VARNING– OM APPARATEN ANVÄNDS PÅ ANNAT SÄTT ÄN I DENNA
CAUTION
RISK OF ELECTRIC SHOCK
DO NOT OPEN
TO REDUCE THE RISK OF ELECTRIC SHOCK, DO NOT REMOVE COVER
(OR BACK). NO USER SERVICEABLE PARTS INSIDE. REFER SERVICING
TO QUALIFIED SERVICE PERSONNEL.
The lightning flash with arrowhead symbol, within an equilateral triangle, is intended to
alert the user to the presence of uninsulated “dangerous voltage” within the product’s
enclosure that may be of sufficient magnitude to constitute a risk of electric shock to
persons.
The exclamation point within an equilateral triangle is intended to alert the user to the
presence of important operating and maintenance (servicing) instructions in the literature
accompanying the appliance.
TO PREVENT FIRE OR SHOCK HAZARD, DO NOT EXPOSE THIS
APPLIANCE TO RAIN OR MOISTURE.
LABELS (for U.S.A. model only)
CERTIFICATION
CAUTION:
USE OF CONTROLS OR ADJUSTMENTS OR
PERFORMANCE OF PROCEDURES OTHER THAN THOSE
SPECIFIED HEREIN MAY RESULT IN HAZARDOUS
RADIATION EXPOSURE.
THE COMPACT DISC PLAYER SHOULD NOT BE ADJUSTED
OR REPAIRED BY ANYONE EXCEPT PROPERLY QUALIFIED
SERVICE PERSONNEL.
SIKKERHEDSAFBRYDERE ER UDE AF FUNKTION.
UNDGÅ UDSAETTELSE FOR STRÅLING.
KÄYTTÖOHJEESSA MAINITULLA TAVALLA SAATTAA
ALTISTAA KÄYTTÄJÄN TURVALLISUUSLUOKAN 1
YLITTÄVÄLLE NÄKYMÄMTTÖMÄLLE LASERSÄTEILYLLE.
BRUKSANVISNING SPECIFICERATS, KAN ANVÄNDAREN
UTSÄTTAS FÖR OSYNLIG LASERSTRÅLNING SOM
ÖVERSKRIDER GRÄNSEN FÖR LASERKLASS 1.
THIS PRODUCT COMPLIES WITH DHHS RULES 21 CFR
SUBCHAPTER J APPLICABLE AT DATE OF MANUFACTURE.
This device complies with Part 15 of the FCC Rules.
Operation is subject to the following two conditions : (1)
This device may not cause harmful interference, and (2) this
device must accept any interference received, including
interference that may cause undesired operation.
This Class B digital apparatus meets all requirements of the
Canadian Interference-Causing Equipment Regulations.
Cet appareil numérique de la classe B respecte toutes les
exigences du Règlement sur le matériel brouilleur du Canada.
SAFETY INSTRUCTIONS
1. Read Instructions – All the safety and operating instructions
should be read before the product is operated.
2. Retain Instructions – The safety and operating instructions
should be retained for future reference.
3. Heed Warnings – All warnings on the product and in the
operating instructions should be adhered to.
4. Follow Instructions – All operating and use instructions
should be followed.
5. Cleaning – Unplug this product from the wall outlet before
cleaning. Do not use liquid cleaners or aerosol cleaners.
6. Attachments – Do not use attachments not recommended
by the product manufacturer as they may cause hazards.
7. Water and Moisture – Do not use this product near water –
for example, near a bath tub, wash bowl, kitchen sink, or
laundry tub; in a wet basement; or near a swimming pool;
and the like.
8. Accessories – Do not place this product on an unstable cart,
stand, tripod, bracket, or table. The product may fall,
causing serious injury to a child or adult, and serious
damage to the product. Use only with a cart, stand, tripod,
bracket, or table recommended by the manufacturer, or
sold with the product. Any mounting of the product should
follow the manufacturer’s instructions, and should use a
mounting accessory
recommended by the
manufacturer.
9. A product and cart
combination should be
moved with care. Quick
stops, excessive force,
and uneven surfaces may
cause the product and cart
combination to overturn.
10. Ventilation – Slots and openings in the cabinet are provided
for ventilation and to ensure reliable operation of the
product and to protect it from overheating, and these
openings must not be blocked or covered. The openings
should never be blocked by placing the product on a bed,
sofa, rug, or other similar surface. This product should not
be placed in a built-in installation such as a bookcase or rack
unless proper ventilation is provided or the manufacturer’s
instructions have been adhered to.
11. Power Sources – This product should be operated only
from the type of power source indicated on the marking
label. If you are not sure of the type of power supply to
your home, consult your product dealer or local power
company. For products intended to operate from battery
power, or other sources, refer to the operating instructions.
12. Grounding or Polarization – This product may be equipped
with a polarized alternating-current line plug (a plug having
one blade wider than the other). This plug will fit into the
power outlet only one way. This is a safety feature. If you
are unable to insert the plug fully into the outlet, try
reversing the plug. If the plug should still fail to fit, contact
your electrician to replace your obsolete outlet. Do not
defeat the safety purpose of the polarized plug.
13. Power-Cord Protection – Power-supply cords should be
routed so that they are not likely to be walked on or pinched
by items placed upon or against them, paying particular
attention to cords at plugs, convenience receptacles, and
the point where they exit from the product.
15. Outdoor Antenna Grounding – If an outside antenna or
cable system is connected to the product, be sure the
antenna or cable system is grounded so as to provide some
protection against voltage surges and built-up static
charges. Article 810 of the National Electrical Code,
ANSI/NFPA 70, provides information with regard to proper
grounding of the mast and supporting structure, grounding
of the lead-in wire to an antenna discharge unit, size of
grounding conductors, location of antenna-discharge unit,
connection to grounding electrodes, and requirements for
the grounding electrode. See Figure A.
16. Lightning – For added protection for this product during a
lightning storm, or when it is left unattended and unused
for long periods of time, unplug it from the wall outlet and
disconnect the antenna or cable system. This will prevent
damage to the product due to lightning and power-line
surges.
17. Power Lines – An outside antenna system should not be
located in the vicinity of overhead power lines or other
electric light or power circuits, or where it can fall into such
power lines or circuits. When installing an outside antenna
system, extreme care should be taken to keep from
touching such power lines or circuits as contact with them
might be fatal.
18. Overloading – Do not overload wall outlets, extension
cords, or integral convenience receptacles as this can result
in a risk of fire or electric shock.
19. Object and Liquid Entry – Never push objects of any kind
into this product through openings as they may touch
dangerous voltage points or short-out parts that could
result in a fire or electric shock. Never spill liquid of any
kind on the product.
20. Servicing – Do not attempt to service this product yourself
as opening or removing covers may expose you to
dangerous voltage or other hazards. Refer all servicing to
qualified service personnel.
21. Damage Requiring Service – Unplug this product from the
wall outlet and refer servicing to qualified service personnel
under the following conditions:
a) When the power-supply cord or plug is damaged,
b) If liquid has been spilled, or objects have fallen into the
product,
c) If the product has been exposed to rain or water,
d) If the product does not operate normally by following
the operating instructions. Adjust only those controls
that are covered by the operating instructions as an
improper adjustment of other controls may result in
damage and will often require extensive work by a
qualified technician to restore the product to its normal
operation,
e) If the product has been dropped or damaged in any way,
and
f) When the product exhibits a distinct change in
performance – this indicates a need for service.
22. Replacement Parts – When replacement parts are required,
be sure the service technician has used replacement parts
specified by the manufacturer or have the same
characteristics as the original part. Unauthorized
substitutions may result in fire, electric shock, or other
hazards.
23. Safety Check – Upon completion of any service or repairs
to this product, ask the service technician to perform safety
checks to determine that the product is in proper operating
condition.
24. Wall or Ceiling Mounting – The product should be mounted
to a wall or ceiling only as recommended by the
manufacturer.
25. Heat – The product should be situated away from heat
sources such as radiators, heat registers, stoves, or other
products (including amplifiers) that produce heat.
2
Page 3
o
!1
!3
!4
#1
#2
#3
#4
#5
$1
#7
#8
#6
$0
#9
!7!5
!9!8@0@1@2
$2$4 $3$5
@5@3
@4 @6!6
!2
!0
#0@9@8@7
ENGLISH DEUTSCH FRANÇAIS ESPAÑOL SVENSKANEDERLANDS
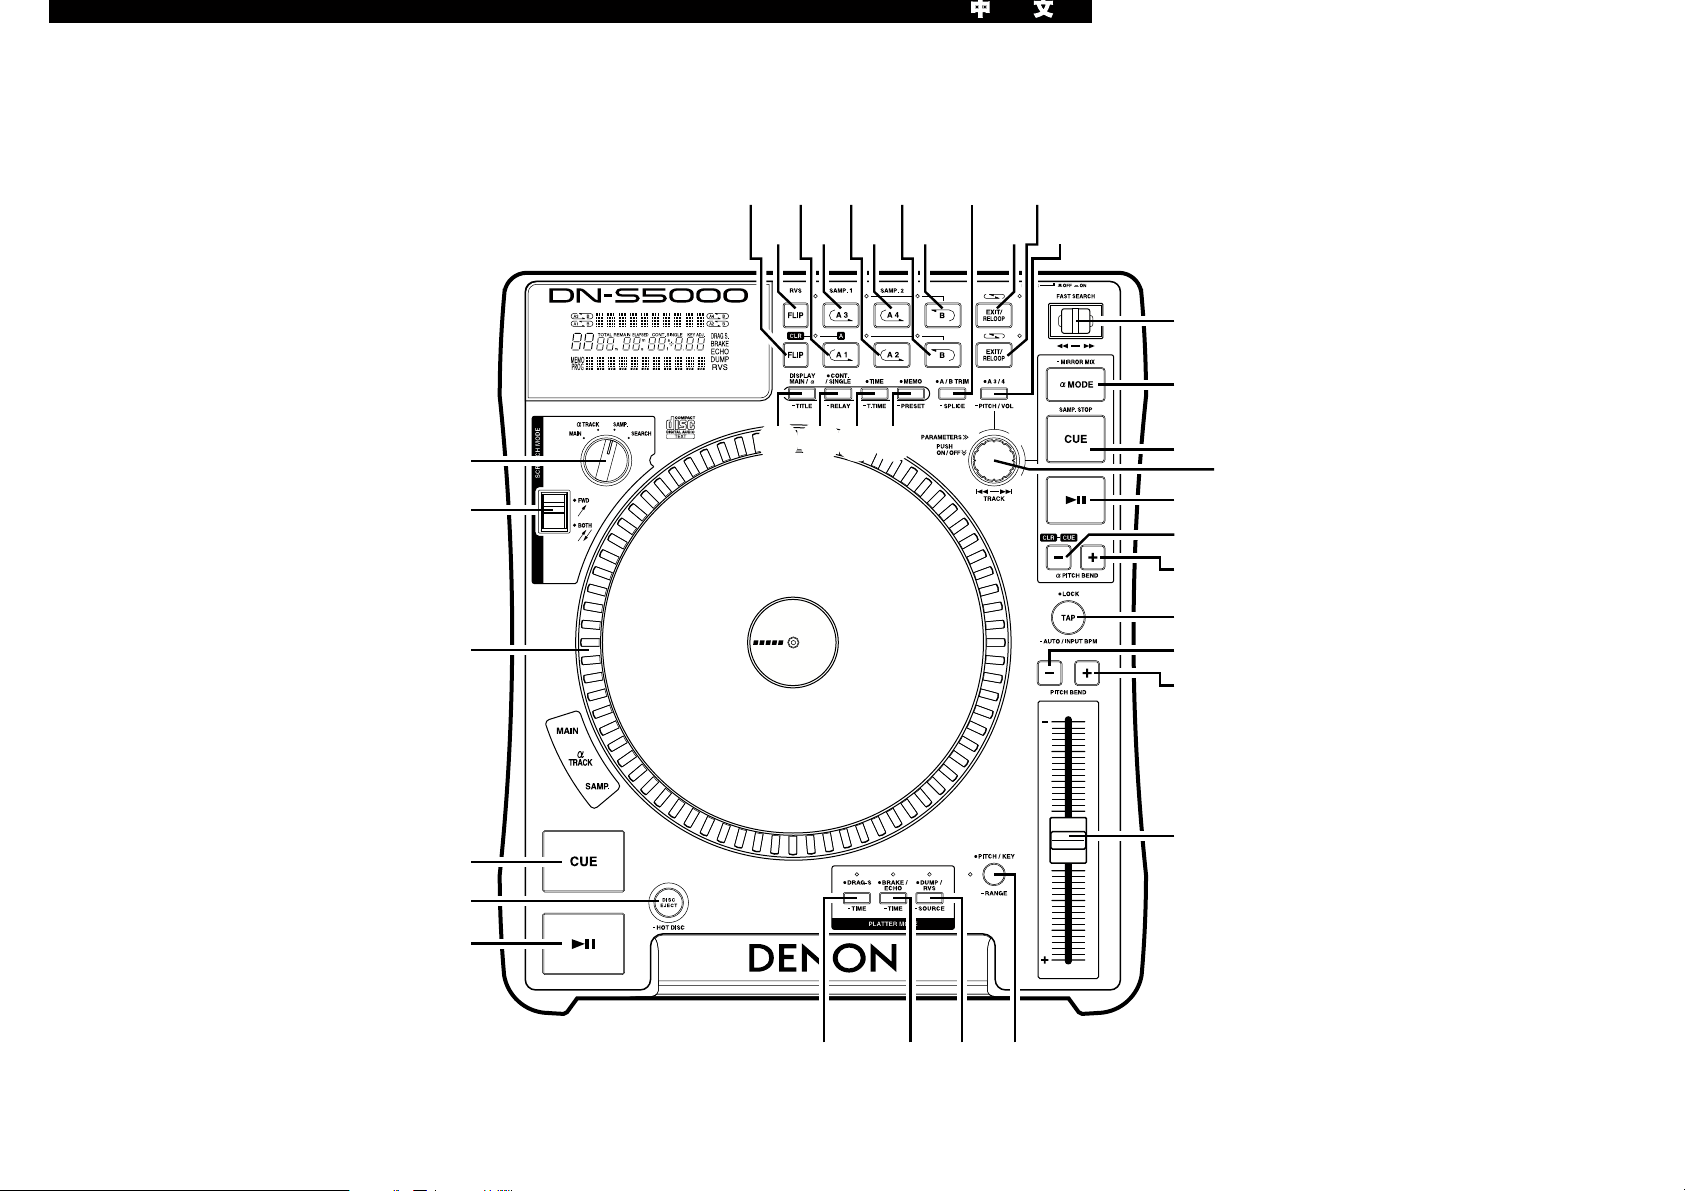
TOP PANEL DIAGRAM / OBERES BEDIENFELD-SCHEMA / SCHEMA DU PANNEAU SUPERIEUR / DIAGRAMA DEL PANEL SUPERIOR /
OVERZICHT VAN BOVENPANEEL / BILD ÖVER ÖVERSTA PANELEN
3
Page 4
wq
FRONT PANEL DIAGRAM / VORDERES BEDIENFELD-SCHEMA /
POWER
ON OFF
DIGITAL OUT
X-EFFECT
ALPHA
IN
OUT
MA N
LL
L NE OUT
RR
FADER
MAIN
ALPHA
e irty u
SCHEMA DU PANNEAU AVANT / DIAGRAMA DEL PANEL FRONTAL / OVERZICHT VAN
VOORPANEEL / FRONTPANELEN
NOTE ON USE / HINWEISE ZUM GEBRAUCH /
OBSERVATIONS RELATIVES A L’UTILISATION / NOTAS SOBRE EL USO /
ALVORENS TE GEBRUIKEN / OBSERVERA
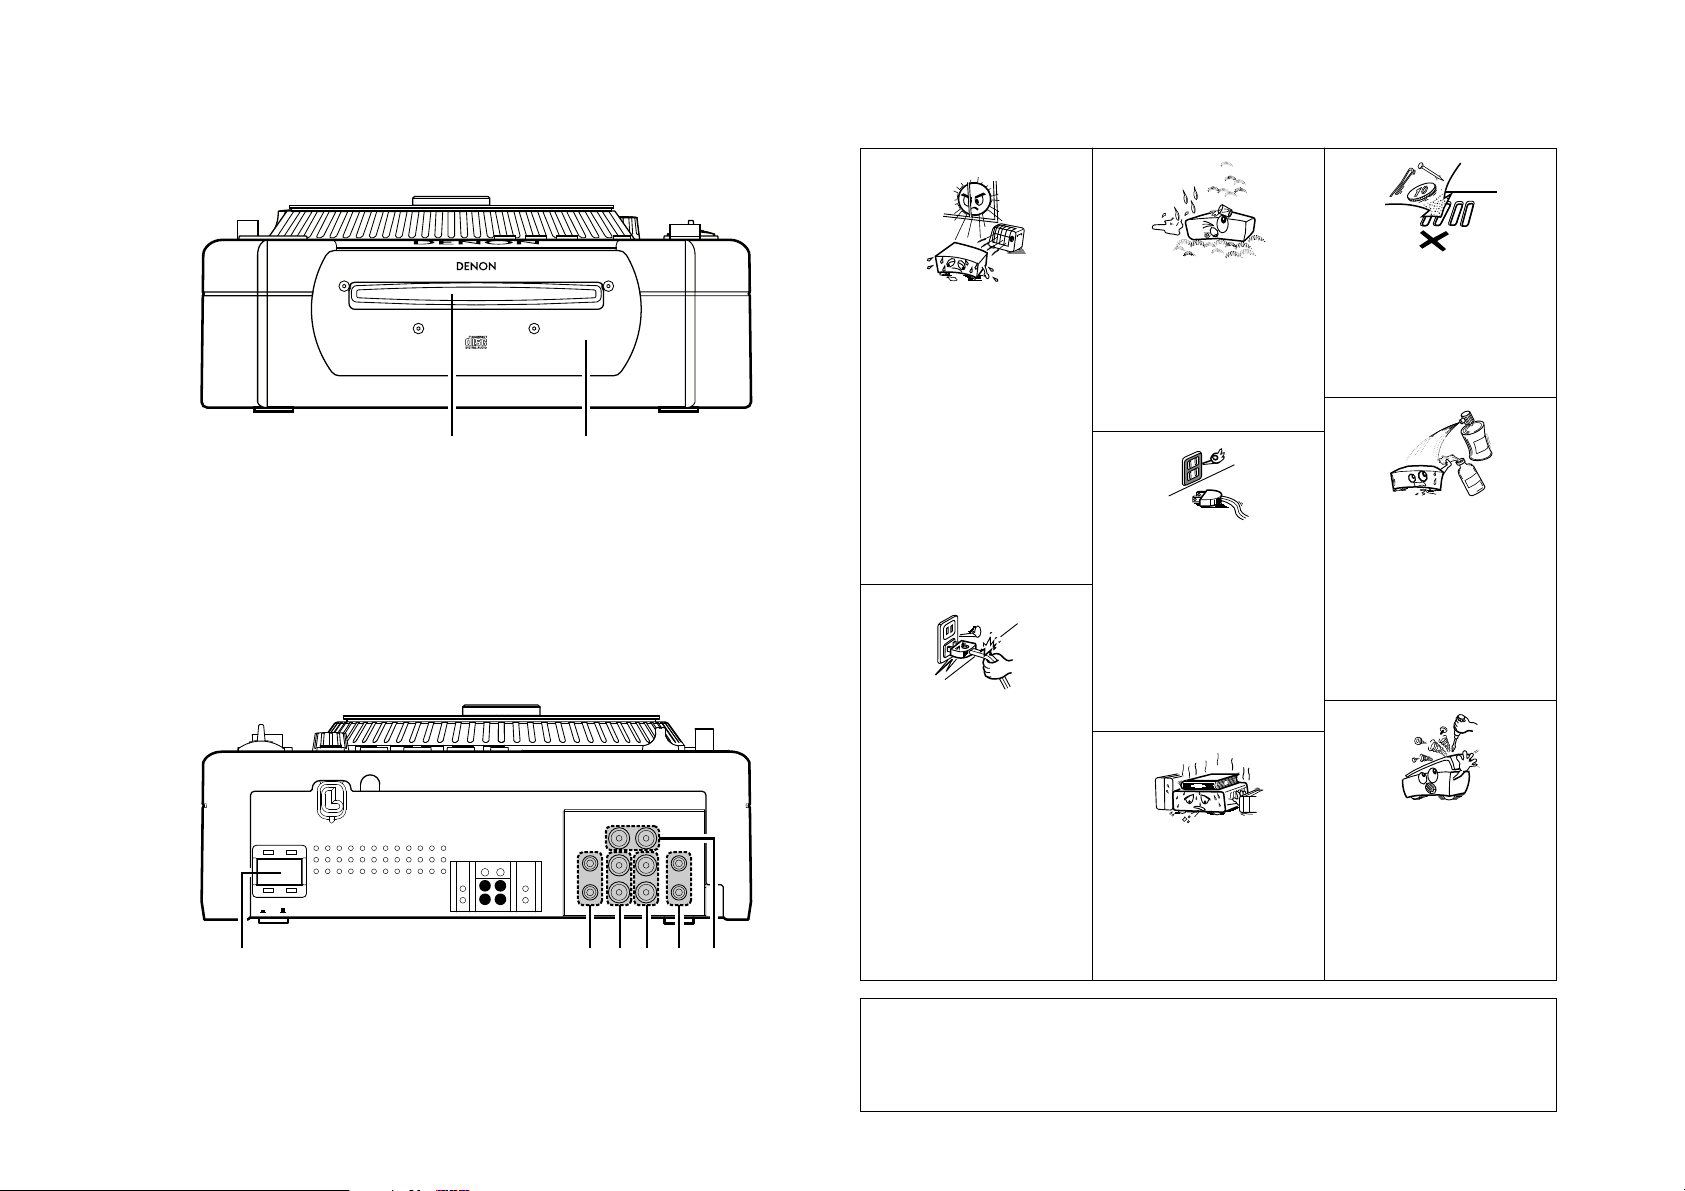
REAR PANEL DIAGRAM / HINTERES ANSCHLUSSFELD-SCHEMA /
SCHEMA DU PANNEAU ARRIERE / DIAGRAMA DEL PANEL POSTERIOR / OVERZICHT VAN
ACHTERPANEEL / BAKPANELEN
• Avoid high temperatures.
Allow for sufficient heat dispersion when
installed on a rack.
• Vermeiden Sie hohe Temperaturen.
Beachten Sie, daß eine ausreichend
Luftzirkulation gewährleistet wird, wenn das
Gerät auf ein Regal gestellt wird.
• Eviter des températures élevées
Tenir compte d’une dispersion de chaleur
suffisante lors de l’installation sur une
étagère.
• Evite altas temperaturas
Permite la suficiente dispersión del calor
cuando está instalado en la consola.
• Vermijd hoge temperaturen.
Zorg voor een degelijk hitteafvoer indien het
apparaat op een rek wordt geplaatst.
• Undvik höga temperaturer.
Se till att det finns möjlighet till god
värmeavledning vid montering i ett rack.
• Handle the power cord carefully.
Hold the plug when unplugging the cord.
• Gehen Sie vorsichtig mit dem Netzkabel um.
Halten Sie das Kabel am Stecker, wenn Sie
den Stecker herausziehen.
• Manipuler le cordon d’alimentation avec
précaution.
Tenir la prise lors du débranchement du
cordon.
• Maneje el cordón de energía con cuidado.
Sostenga el enchufe cuando desconecte el
cordón de energía.
• Hanteer het netsnoer voorzichtig.
Houd het snoer bij de stekker vast wanneer
deze moet worden aan- of losgekoppeld.
• Hantera nätkabeln varsamt.
Håll i kabeln när den kopplas från el-uttaget.
• Keep the set free from moisture, water, and
dust.
• Halten Sie das Gerät von Feuchtigkeit,
Wasser und Staub fern.
• Protéger l’appareil contre l’humidité, l’eau et
lapoussière.
• Mantenga el equipo libre de humedad, agua
y polvo.
• Laat geen vochtigheid, water of stof in het
apparaat binnendringen.
• Utsätt inte apparaten för fukt, vatten och
damm.
• Unplug the power cord when not using the
set for long periods of time.
• Wenn das Gerät eine längere Zeit nicht
verwendet werden soll, trennen Sie das
Netzkabel vom Netzstecker.
• Débrancher le cordon d’alimentation lorsque
l’appareil n’est pas utilisé pendant de
longues périodes.
• Desconecte el cordón de energía cuando no
utilice el equipo por mucho tiempo.
• Neem altijd het netsnoer uit het stopkontakt
wanneer het apparaat gedurende een lange
periode niet wordt gebruikt.
• Koppla ur nätkabeln om apparaten inte
kommer att användas i lång tid.
✽ (For sets with ventilation holes)
• Do not obstruct the ventilation holes.
• Die Belüftungsöffnungen dürfen nicht
verdeckt werden.
• Ne pas obstruer les trous d’aération.
• No obstruya los orificios de ventilación.
• De ventilatieopeningen mogen niet worden
beblokkeerd.
• Täpp inte till ventilationsöppningarna.
• Do not let foreign objects in the set.
• Keine fremden Gegenstände in das Gerät
kommen lassen.
• Ne pas laisser des objets étrangers dans
l’appareil.
• No deje objetos extraños dentro del equipo.
• Laat geen vreemde voorwerpen in dit
apparaat vallen.
• Se till att främmande föremål inte tränger in i
apparaten.
• Do not let insecticides, benzene, and thinner
come in contact with the set.
• Lassen Sie das Gerät nicht mit Insektiziden,
Benzin oder Verdünnungsmitteln in
Berührung kommen.
• Ne pas mettre en contact des insecticides,
du benzène et un diluant avec l’appareil.
• No permita el contacto de insecticidas,
gasolina y diluyentes con el equipo.
• Laat geen insektenverdelgende middelen,
benzine of verfverdunner met dit apparaat in
kontakt komen.
• Se till att inte insektsmedel på spraybruk,
bensen och thinner kommer i kontakt med
apparatens hölje.
• Never disassemble or modify the set in any
way.
• Versuchen Sie niemals das Gerät
auseinander zu nehmen oder auf jegliche Art
zu verändern.
• Ne jamais démonter ou modifier l’appareil
d’une manière ou d’une autre.
• Nunca desarme o modifique el equipo de
ninguna manera.
• Nooit dit apparaat demonteren of op andere
wijze modifiëren.
• Ta inte isär apparaten och försök inte bygga
om den.
4
CAUTION
• The ventilation should not be impeded by covering the ventilation openings with items, such as newspapers, table-cloths,
curtains, etc.
• No naked flame sources, such as lighted candles, should be placed on the apparatus.
• Please be care the environmental aspects of battery disposal.
• The apparatus shall not be exposed to dripping or splashing for use.
• No objects filled with liquids, such as vases, shall be placed on the apparatus.
Page 5
• DECLARATION OF CONFORMITY
We declare under our sole responsibility that this product,
to which this declaration relates, is in conformity with the
following standards:
EN60065, EN55013, EN55020, EN61000-3-2 and EN610003-3.
Following the provisions of 73/23/EEC, 89/336/EEC and
93/68/EEC Directive.
• BEREINSTIMMUNGSERKL RUNG
Wir erkl ren unter unserer Verantwortung, da dieses
Produkt, auf das sich diese Erkl rung bezieht, den
folgenden Standards entspricht:
EN60065, EN55013, EN55020, EN61000-3-2 und EN610003-3.
Entspricht den Verordnungen der Direktive 73/23/EEC,
89/336/EEC und 93/68/EEC.
• DECLARATION DE CONFORMITE
Nous d clarons sous notre seule responsabilit que
l’appareil, auquel se r f re cette d claration, est conforme
aux standards suivants:
EN60065, EN55013, EN55020, EN61000-3-2 et EN610003-3.
D’apr s les dispositions de la Directive 73/23/EEC,
89/336/EEC et 93/68/EEC.
• Use compact discs that include the mark.
CD’s with special shapes (heart-shaped CD’s, octagonal CD’s etc.) cannot be played on this set.
Attempting to do so may damage the set. Do not use such CD’s.
• Benutzen Sie Compact Discs, die das Zeichen tragen.
Speziell geformte CD’s (herzf rmige CDs, achteckige CDs, usw.) k nnen auf dieser Anlage nicht abgespielt
werden.
Der Versuch derartige CDs abzuspielen kann die Anlage besch digen. Verzichten Sie auf die Benutzung
solcher CDs.
• Utiliser des disques compacts portant le logo .
Des CD avec des formes sp ciales (CD en forme de coeur, des CD octogonaux, etc.) ne peuvent pas tre
lus sur cet appareil.
Le fait de l’essayer, risque d’endommager le lecteur. Ne pas utiliser de tels CD.
• Use discos compactos con la marca .
En este equipo no es posible reproducir CDs con formas especiales (CDs con forma de coraz n, CDs
octagonales, etc.).
Si intenta hacerlo, el equipo podr resultar da ado. No use este tipo de CDs.
• Gebruik compact discs voorzien van het logo .
CD’s met speciale vormen (bijv. CD’s in de vorm van een hart, achthoekige CD’s, enz.) kunnen met dit
toestel niet worden afgespeeld.
Wanneer u dit toch probeert, zal u het toestel beschadigen. Speel dergelijke CD’s dus niet af.
• Anv nd CD-skivor med -m rket.
Specialformade CD-skivor (hj rtformade, ttkantiga, m m) g r inte att spela p den h r apparaten.
Utrustningen kan skadas om du f rs ker g ra detta. Anv nd inte CD-skivor av denna typ.
• DECLARACI N DE CONFORMIDAD
Declaramos bajo nuestra exclusiva responsabilidad que
este producto al que hace referencia esta declaraci n,
est conforme con los siguientes est ndares:
EN60065, EN55013, EN55020, EN61000-3-2 y EN610003-3.
Siguiendo las provisiones de las Directivas 73/23/EEC,
89/336/EEC y 93/68/EEC.
• EENVORMIGHEIDSVERKLARING
Wij verklaren uitsluitend op onze verantwoordelijkheid dat
dit produkt, waarop deze verklaring betrekking heeft, in
overeenstemming is met de volgende normen:
EN60065, EN55013, EN55020, EN61000-3-2 en
EN61000-3-3.
Volgens de bepalingen van de Richtlijnen 73/23/EEC,
89/336/EEC en 93/68/EEC.
• VERENSST MMELSESINTYG
H rmed intygas helt p eget ansvar att denna produkt,
vilken detta intyg avser, uppfyller f ljande standarder:
EN60065, EN55013, EN55020, EN61000-3-2 och
EN61000-3-3.
Enligt stadgarna i direktiv 73/23/EEC, 89/336/EEC och
93/68/EEC.
Residue
R ckstand
R sidu
Residuos
Oneffenheid
Plastrester
Disc
• The disc may not play normally if there is residue along the edges of the center hole.
• When using new discs in particular, use a pen, etc., to remove the residue.
• Die Disk kann nicht normal abgespielt werden, wenn sich ein R ckstand entlang der Mittellochenden befindet.
• Insbesondere, wenn Sie neue Disks benutzen, dann entfernen Sie mit einem Stift, etc. den R ckstand.
• Le disque peut ne pas tre lu normalements s’il y a un r sidu le long des bord du trou central.
• Lors de l’utilisation de nouveaux disques en particulier, utiliser un stylo bille, etc., pour enlever le r sidu.
• El disco no puede ser reproducido normalmente debido a la terminaci n deficiente de los bordes del agujero
central.
• Para quitar estos residuos de material, especialmente cuando vaya a re-producir discos nuevos, utilice un
bol grafo, o algo similar.
• Het is mogelijk dat de disc niet normaal wordt weergegeven als de randen van het middengat van de schijf
oneffenheden vertonen.
• Verwijder vooral bij gebruik van nieuwe discs de oneffenheden met een pen of iets dergelijks.
• Det kan uppst fel vid CD-avspelningen om det finns plastrester kvar i mitth let.
• T nk p att bort dessa med en penna, e d, s rskilt om CD-skivan r ny.
• FOR CANADA MODEL ONLY • POUR LES MODELE CANADIENS
UNIQUEMENT
CAUTION ATTENTION
TO PREVENT ELECTRIC SHOCK, MATCH WIDE BLADE
OF PLUG TO WIDE SLOT, FULLY INSERT.
CAUTION:
DO NOT USE THE DENON AMC-22 CD PICK-UP LENS CLEANER FOR THIS PRODUCT.
THIS MIGHT DAMAGE THE LASER PICK-UP OF THIS PRODUCT.
ACHTUNG:
VERWENDEN SIE NICHT DEN CD-ABTAST-LINSENREINIGER DENON AMC-22 F R DIESES PRODUKT.
SOLLTEN SIE DIES NICHT BEACHTEN, K NNTE DER LASERABTASTKOPF DIESES PRODUKTES
BESCH DIGT WERDEN.
ATTENTION :
N’UTILISEZ PAS LE NETTOYEUR DE CAPTEUR D’OBJECTIF CD DENON AMC-22 POUR CE PRODUIT.
CECI POURRAIT ENDOMMAGER LE CAPTEUR LASER DE CD DE CE PRODUIT.
PRECAUCI N:
NO UTILICE EL LIMPIADOR DE OBJETIVO DEL DETECTOR DE CD DEL DENON AMC-22 PARA ESTE
PRODUCTO.
ESTO PUEDE DA AR EL DETECTOR LASER DE ESTE PRODUCTO.
OPGELET:
GEBRUIK DE PICK-UPLENSREINIGER VAN DE DENON AMC-22 NIET VOOR DIT PRODUCT.
DIT KAN DE LASER PICK-UP VAN DIT PRODUCT BESCHADIGEN.
F RSIKTIGT:
ANV ND INTE LINSAVPUTSAREN F R DENON AMC-22:NS CD-PICKUP F R DENNA PRODUKT.
DET KAN SKADA PRODUKTENS LASERPICKUP.
POUR VITER LES CHOCS LECTRIQUES,
INTERODUIRE LA LAME LA PLUS LARGE DE LA FICHE
DANS LA BORNE CORRESPONDANTE DE LA PRISE ET
POUSSER JUSQU’ AU FOND.
5
Page 6

ENGLISH
– TABLE OF CONTENTS –
Main features .....................................................6
z
Connections/Installation .....................................7
x
Part names and functions..........................7 ~ 10
c
Compact discs ..................................................10
v
Basic operation .................................................11
b
Scratch..............................................................12
n
Playing the alpha track
m
(Real time Sampler) ....................................13, 14
Alpha mode (Alpha-Track monitor)...................15
,
Seamless loop/Hot start/
.
Stutter and Splice .......................................16, 17
A/B trim ............................................................18
⁄0
A3/A4 for Sampler, 4 Hot Start,
⁄1
Alpha-track Hot Start..................................19, 20
Platter effect.....................................................21
⁄2
Memo (Custom setting memory).....................22
⁄3
Preset...............................................................23
⁄4
Program/Random/Relay play/
⁄5
Power on play.............................................24, 25
Specifications ...................................................26
⁄6
Replacing the belt.............................................26
⁄7
• ACCESSORIES
Check that the following parts are included in addition to the main unit:
q Operating instructions .....................................1
w Connection cords for signal output (RCA) .......2
MAIN FEATURES
1
Congratulations on your new purchase of the DNS5000. The DN-S5000 table top single CD player is
equipped with a variety of advanced features,
functions and rich performance for unlimited
creativeness and showmanship.
Professional Structure and parts
1. Active Motor Platter (New)
When playback is started, the Platter turns in the
same way as with an analog turntable.
The active motor Platter consists of the Motordriven Platter, Slip Mat and Scratch Disc, so the
beginnings of tracks can be found, the beat can
be matched and scratching can be performed
with the same feeling as an analog turntable.
2. Slot loading and Removable drive (New)
Our newly designed replaceable drive (Slot-in
type) structure is geared for professionals who
require virtually “ zero down time” . The heavyduty drives are built with optimum parts to assure
longevity.
3. Visible Displays
Visibility is greatly thanks to the large FL tube
displays, backlit buttons and disc opening
illumination, which comes in handy during low
light environments.
4. Improved Controller Interface
Good feeling and operation thanks to a large
190mm Platter, SCRATCH Direction Select knob,
SCRATCH Source Select knob, FAST SEARCH
knob, TRACK/PARAMETERS knob, 100mm pitch
slider and soft rubber buttons.
e Belt...................................................................1
r Hexagon wrench..............................................1
Features and Functions
The implementation of powerful DSP’s and large
memory capacity allows for many new controlling
features such as:
1. SCRATCH (Improved)
Thanks to the active motor Platter, the Scratch
sound is as good as with analog turntables.
Furthermore, the Main Track, a-Track and
Samples can be selected as the Scratch sound
source at the touch of a knob. The Scratch
direction (both/forward) can also be switched at
the touch of a knob, allowing for a variety of
Scratch operations not possible with analog
turntables.
2. HOT DISC (New)
Discs can be replaced while the sound is still
playing (for up to 35 seconds). If the disc is
replaced during the Seamless Loop mode
(maximum 35 seconds between points A and B),
the disc can be replaced without worrying about
the time.
Thanks to the Alpha-Track and Hot Disc
functions, sound can be played with the same
feel as a dual CD player, even when using a
single DN-S5000.
3. MIRROR MIX (New)
The Alpha-Track can be played with a delay of the
specified beat or time after the Main Track.
Mirror Mixing is also possible in the RVS, dump
and Scratch play modes, so a variety of sound
effects can be achieved.
4. ALPHA-TRACK PLAY
This powerful function succeeded from our DND9000 dual CD player allows independent and
simultaneous playback of another track from the
same disc, we call this the “ Alpha-Track” . The
playing pitch and output level for the Alpha-Track
can be independently adjusted.
5. ALPHA-MODE
The Alpha-Track output can be monitored through
the ALPHA OUT RCA jacks separately, so you
can play up to two tracks simultaneously through
a mixer. This lets you switch smoothly from a
“ Live” playing track to the next track on the
same disc in a single unit with no break in sound.
6. HOT START and STUTTER
The Hot Start function lets you start playback
immediately from a set point decided by you. Up
to four points can be set in the 4 Hot Start mode.
The loaded Hot Starts can also be used to
“ Stutter” those points. When in Stutter mode,
momentary audio is triggered according to the
length of time of which these buttons are held
down and released.
7. SEAMLESS LOOP (Improved)
With this function, any section on a disc can be
played repeatedly between A & B points with no
break in sound or limit in length. The DN-S5000
supports a total of four Seamless Loops in a
single unit. The DN-S5000 also has a variety of
looping functions.
8. SPLICE
This function removes unwanted sections of a
track seamlessly such as; long vocal breaks
found in dance mixes or explicit lyrics.
9. SAMPLER
Two on-board digital Samplers can record up to
15 seconds CD quality sound at 44.1kHz
sampling frequency. You can seamlessly loop
these samples or play them backwards
(REVERSE). The pitch and output level of each
sample can be adjusted independently.
The B point can be easily set or changed exactly
the same way as you would with the A-B
Seamless Loop function.
10. A/B TRIM and MOVE
The A and B points for the Seamless Loop,
Sampler loop and Splice points can easily be
adjusted using the Scratch Disc.
Trim and Move modes are available.
A-B TRIM: For adjusting the points while
playing the live loop.
A/B MOVE: For moving the points using the
manual search.
11. PLATTER MODE (Improved)
Analog turntable-like playback can be simulated
using five Platter effects.
DRAG START: Simulates the dragging sound
of a turntable’s slow starting up from
a stop mode. (Start-up time can be
adjusted.)
BRAKE: Simulates a winding-down sound of a
turntable coming to a full stop slowly.
(Slowing-down time can be
adjusted.)
TAIL ECHO: Adds an echo sound when
playback is paused.
DUMP: Plays the sound backwards while
continuing in a forward motion
without losing “ elapse time” when
you return back to normal play.
RVS: (Reverse) Plays the sound backwards
until you return to normal play.
12. AUTO BPM COUNTER, BPM LOCK, MANUAL
TAP, and MANUAL BPM INPUT (New)
In addition to an Auto BPM counter and Manual
Tap function, the DN-S5000 is also equipped with
a Lock function for temporarily locking the Auto
BPM counter and a Manual BPM Input function
for inputting the BPM value directly by a Rotary
knob, so the BPM setting can be made easily.
13. MEMO
Various settings such as Cue Points, Hot Starts,
A-B Loops, A-B Splice, Pitch and Key Adjust can
be saved to the internal non-volatile memory for
later recall. Up to 5000 points are available (1
memory per track).
The memory function can also be used in the
Alpha Mode and memory contents can be
exchanged with another DN-S5000, DN-D9000 or
DN-2600F.
14. PITCH/KEY ADJUST
PITCH: Playback speed is adjusted with
PITCH slider. Adjustable pitch
ranges are +/- 4, 10, 16, 24,
100% (selectable).
KEY ADJUST: Keeps the original key even if the
pitch playing speed is changed
with the PITCH slider.
15. DIGITAL OUT (Improved)
The digital output for Main and Alpha-Track
provides a true 100% digital signal without any
restrictions or limitations regardless of pitch
change or mode setting.
16. FADER START / X-EFFECT IN/OUT (New)
The DN-S5000 FADER START and X-EFFECT
controls are compatible with our DN-X800 mixer.
Only Fader Start is compatible with the DN-X400
mixer. When two DN-S5000s are connected by
X-EFFECT, it is possible to compare their memos.
17. SHOCKPROOF MEMORY
16 seconds of shock-proof memory guards
against audible interruptions due to external
mechanical shocks such as bumps or other hard
vibrations, which is especially helpful for the
mobile DJ as well as for nightclub-installed
applications.
18. PROGRAM/RANDOM/RELAY PLAY
You can playback tracks in various modes with
PROGRAM Play, RANDOM Play and RELAY Play
modes.
19. PRESETS
It is possible to customise the machine to your
preference by saving your favourite setting to
internal memory. For items found in the presets,
please see page 23.
20. CD TEXT (New)
6
Page 7
ENGLISH
CH1 CH2 CH3 CH4
FADE
Rch3
FADE
Rch4
X'EFFECT
DN-X800
MAIN ALPHA
FADER
MAIN
FADER
ALPHA
DN-S5000
X'EFFECTINX'EFFECT
OUT
CH1 CH2 CH3 CH4
FADE
Rch3
FADE
Rch4
X'EFFECT
DN-X800
MAIN ALPHA
FADER
MAIN
FADER
ALPHA
DN-S5000
CD1
X'EFFECTINX'EFFECT
OUT
MAIN ALPHA
FADER
MAIN
FADER
ALPHA
DN-S5000
CD2
X'EFFECTINX'EFFECT
OUT
CONNECTIONS/INSTALLATION
2
1. Turn off the POWER switch.
2. Connect the RCA pin cords between the DN-S5000 outputs and inputs of your mixer. Be sure MAIN OUTs are
Main outputs and ALPHA OUTs are outputs of Alpha-Track sound.
3. If your mixer has Fader Start function such as our DENON DN-X800 or DN-X400, connect FADER 1, 2 jacks to
the mixer using 3.5 mm stereo mini cord.
4. If you have a DENON DN-X800 mixer, you can use the X-Effect function to control the Hot Starts, Samplers
and Brake from the crossfader to get wide variety of operation. You may also trigger the Alpha Track by
connecting Fader Start 1, 2 to the DN-X800 mixer using the 3.5 mm stereo mini cords.
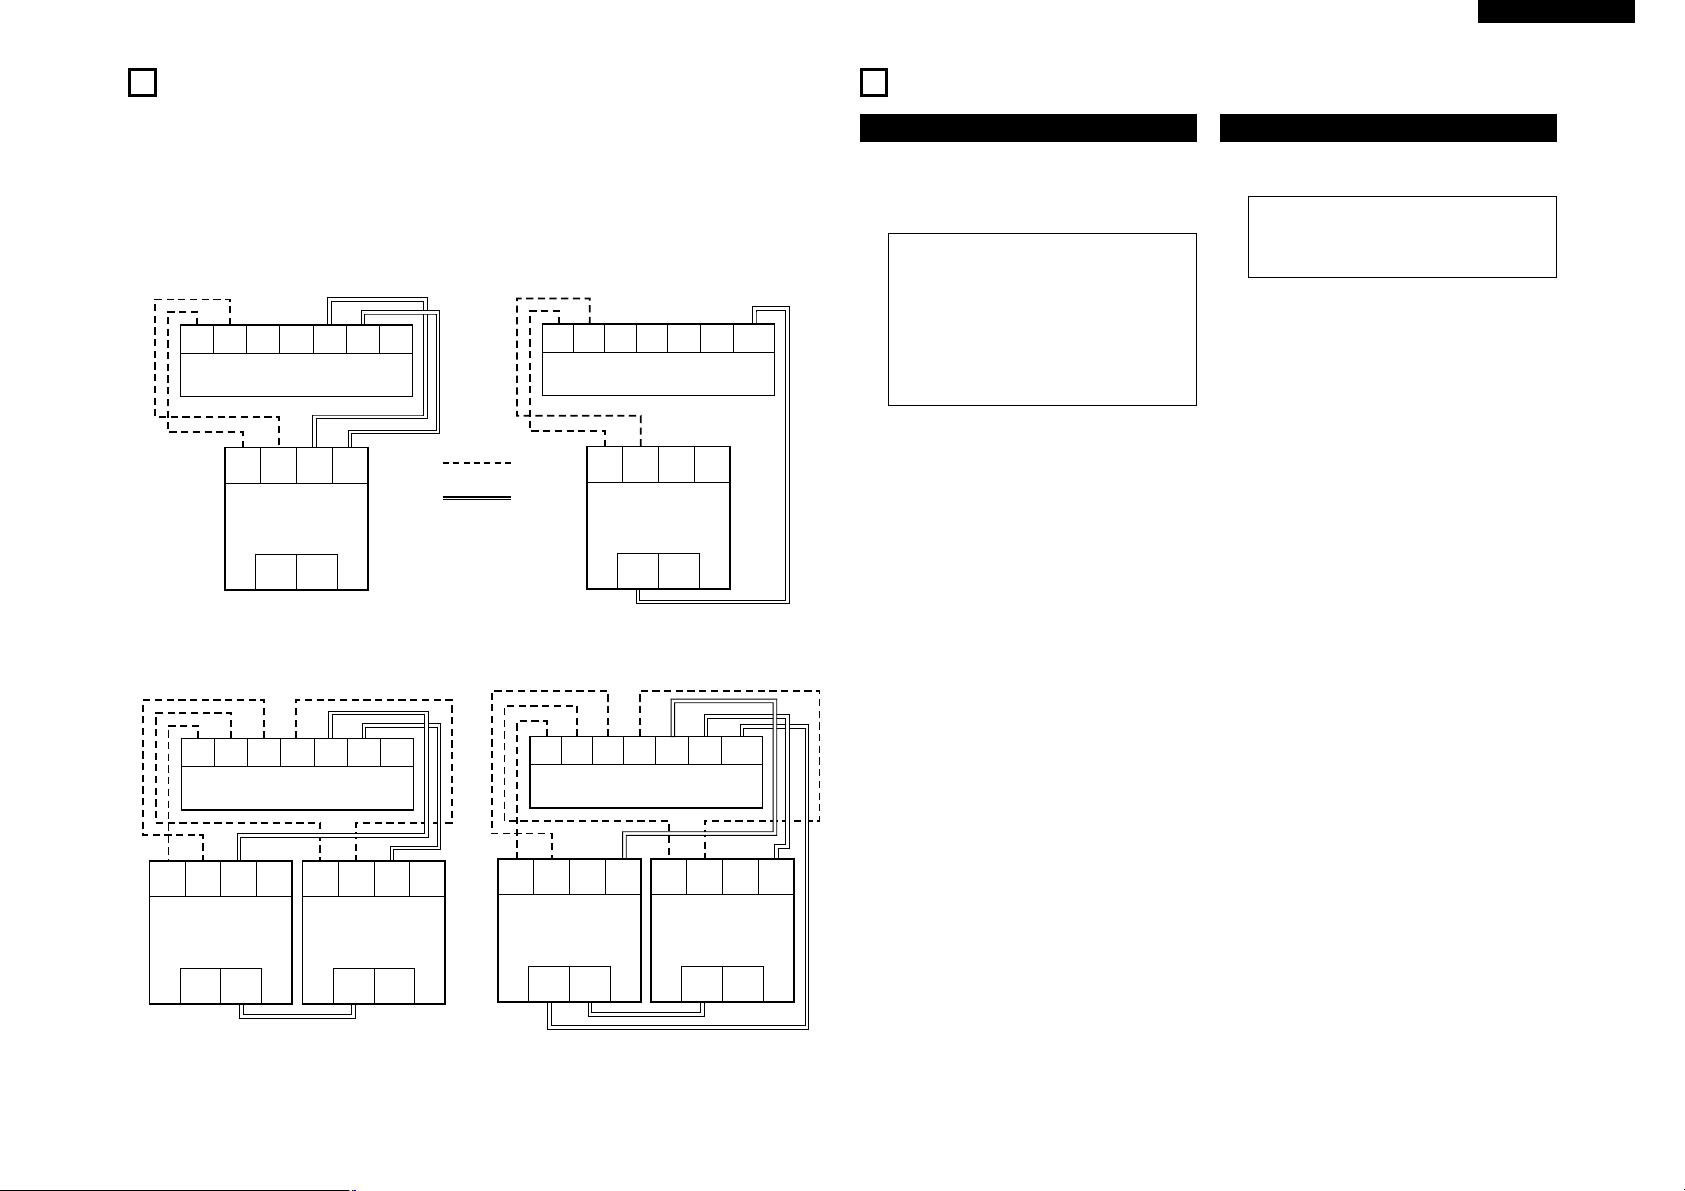
Fig. 1 : Fader start connections example 1 Fig. 2 : X-Effect connections example 1
FADE
FADER
MAIN
OUT
Rch1
FADE
Rch1
FADER
ALPHA
FADE
Rch2
FADE
Rch2
RCA cord
3.5 mm stereo mini cord
• X-EFFECT playback is possible with the Main and
Alpha-Tracks.
X-Effect connections example 2
CH1 CH2 CH3 CH4
DN-X400
MAIN ALPHA
DN-S5000
X'EFFECTINX'EFFECT
• Fader start playback is possible with the Main and
Alpha-Tracks.
Fader start connections example 2
CH1 CH2 CH3 CH4
DN-X400
PART NAMES AND FUNCTIONS
3
(1) Front panel
Disc loading slot
q
• Load the CD. Load the disc slowly, and release
it once the DN-S5000 starts drawing the disc
in.
CAUTIONS:
• Do not load discs when the power is turned
off.
• Do not try to forcibly remove a disc once
the DN-S5000 has started to draw it in.
• Do not load more than once disc at a time
or insert anything other than discs.
Otherwise loading mechanism may be
damaged.
CD drive
w
• This Drive is field replaceable by you.
• Optional spare drive is sold separately.
(2) Rear panel
POWER button (¢ON £OFF)
e
• Push this button to turn power on and off.
CAUTION:
• Do not turn off the power while a disc is
loading or being ejected. Otherwise loading
mechanism may be damaged.
X-EFFECT jacks
r
(X-EFFECT IN/OUT)
• Connect this jack to the DENON mixer DNX800 and DN-S5000 with 3.5 mm stereo mini
cord.
Alpha analog output jacks
t
(LINE OUT ALPHA)
• These are unbalanced RCA output jacks.
• Alpha-Track audio signals are output.
Main analog output jacks
y
(LINE OUT MAIN)
• These are unbalanced RCA output jacks.
• Main audio signals outputs.
Fader start jacks
u
(FADER MAIN, ALPHA)
• Use these when your mixer has Fader Start
function with 3.5 mm stereo mini cord.
Digital output jacks
i
(DIGITAL OUT MAIN, ALPHA)
• Main/Alpha Digital data is output from these
jacks.
• Use 75 Ω/ohms pin cord for connections.
• We recommend you use braided wire type
shielded cables.
FADER
MAIN ALPHA
DN-S5000
X'EFFECTINX'EFFECT
• Fader start playback is possible with the CD 1 Main
• The memos of CD1 and CD2 can be compared
Track and CD 2 Main Track.
when the CD players are connected by X-EFFECT.
• Relay play
FADER
MAIN
ALPHA
CD1
OUT
MAIN ALPHA
FADER
MAIN
DN-S5000
CD2
X'EFFECTINX'EFFECT
OUT
FADER
ALPHA
• X-EFFECT playback is possible with the CD 1 Main
Track and CD 2 Main Track.
• The memos of CD1 and CD2 can be compared
when the CD players are connected by X-EFFECT.
• Fader start playback is possible with the AlphaTracks of CD1 and CD2.
• Relay play
7
Page 8

ENGLISH
a
(3) Top panel
CAUTION:
• Note that there are many buttons working two
different function selected by short time
pushing or long pushing (1second or more). The
mark indicates short time push function and
mark indicates long time push function.
Play/Pause button (13)
o
• This button will start or pause playback.
• Push once to start playback, once again to
pause playback, and once more to resume
playback.
DISC EJECT, HOT DISC button
!0
• DISC EJECT:
Eject disc with this button while button
illumination light. Note that if illumination is off,
you cannot eject disc.(Eject lock function)
• HOT DISC:
When the button is pressed and held in for
more than 1 second during playback, the disc
can be ejected.
CUE button
!1
• Pushing this button in play mode will force the
track back to the position which playback
started. While in search mode, it makes new
Cue point. (Cue)
• In Cue mode, by pushing the CUE button
makes a Stutter sound from the Cue point. This
is called Stutter play. (Stutter)
Platter/Scratch Disc
!2
Use this for the manual search, Pitch Bend and
Scratch operations.
• Platter:
The Platter turns when playback of the source
selected in the Scratch mode (Main or AlphaTrack) starts.
• Scratch Disc:
When Scratch Disc is turned, Scratch playback
of the source selected in the Scratch mode
(Main, Alpha-Track or Sampler) starts.
NOTE: The Platter does not turn when the
Scratch mode is set to the SAMPLER
or the SEARCH mode. If “ PLATTER
off” is selected with the presettings,
the Platter never turns, regardless of
the Scratch mode.
8
CAUTIONS:
• Do not forcibly try to stop the Platter when
it is turning. Otherwise Platter moving
mechanism may be damaged.
• If a problem with Platter rotation arises
when the Platter is turning, the Platter
stops turning and the pause mode is set.
SCRATCH direction select knob
!3
Select the Scratch play direction.
• BOTH:
When Scratch Disc is turned, Scratch sound is
output in both directions.
• FWD:
When Scratch Disc is turned, Scratch sound is
output in the forward direction only.
SCRATCH source select knob
!4
Select the source for Scratch playback and the
manual search/bend mode.
• MAIN:
Scratch Main Track sound
•
TRACK:
Scratch Alpha-Track sound
• SAMP.:
Scratch Sampler Track sound
• SEARCH:
When Scratch Disc is turned during playback,
works as the pitch bend function.
When Scratch Disc is turned in the pause or
standby mode, works as the manual search
function. Manual search works and you can
move point by one frame (1/75 second) with
sound.
FLIP/CLR button
!5
• FLIP:
Use this to select operating mode of A1 and
A2 buttons, from Hot Start mode and Stutter
mode. FLIP LED lights up in Hot Start mode.
• A1, A2 CLR:
If the A1 or A2 button is pushed while pushing
the FLIP button, you can clear the selected A
point.
By holding down just the FLIP button for more
than 1 sec, you can clear A1 and A2 points all
at once.
(SAMP) RVS/FLIP/CLR button
!6
• (SAMP)RVS:
Use this to select the sample play direction
forward and reverse. When select reverse
RVS LED lights up.
• FLIP:
If in 4 Hot Start mode or Alpha-Track Hot Start
mode, this button works as FLIP button for A3,
A4. You can select Hot Start or Stutter mode.
When Hot start mode is selected FLIP LED
lights up.
• A3, A4 CLR:
If the A3 or A4 button is pushed while pushing
the FLIP button, you can clear the selected A
point.
By holding down just the FLIP button for more
than 1 sec, you can clear A3 and A4 points all
at once.
A1 button
!7
A2 button
!8
• Using these buttons you can create starting
points for Hot Start, Seamless Loop, Stutter
and Splice playback.
• The button illumination changes its colour to
inform different modes.
Orange ..Hot Start mode
Green ....Alpha-Track Hot Start mode
Yellow ....Splice mode
SAMP1/A3 button
!9
SAMP2/A4 button
@0
• SAMP1/SAMP2:
In the Sampler mode, push these buttons to
record or play sound of Sampler 1 or 2.
• A3, A4:
When in the 4 Hot Start or Alpha-Track Hot
Start modes, these act as A3 or A4 button. Y ou
can use these buttons for Hot Start, Seamless
Loop and Stutter playback.
• These 2 buttons illumination colour changes in
the different modes.
Orange
..4 Hot Start mode
Green ....Alpha-Track Hot Start or Sampler
mode
B button
@1
• Use this to set the B point for A1 and A2
Seamless Loop and splice playback end.
• The B LED indicates conditions about B point.
B LED lit:
Already B point was set.
B LED flashing:
In Splice point setting mode
(SAMP) B, B button
@2
• (SAMP)B:
In the Sampler mode, use this to set the
Sampler loop B point.
• B:
In the 4 Hot Start or Alpha-Track Hot Start
modes, use this to set the B point for A3 or A4
button Seamless Looping.
A/B TRIM, SPLICE button
@3
• A/B TRIM:
With a short push of this button, the A
and B point trim mode changes on and
off while in PLAY or CUE mode.
•
SPLICE:
When pushed for more than 1 sec ,
Splice point setting mode for A1 and A2
starts.
(SAMP) EXIT/RELOOP,
@4
EXIT/RELOOP button
• (SAMP)EXIT/RELOOP:
Use this to turn the Sampler Loop mode on
and off. Also acts as EXIT/RELOOP button for
Sampler Loop to exit or back again.
• EXIT/RELOOP:
In the 4 Hot Start or Alpha-Track Hot Start
modes, use this to exit or back again Seamless
Loop for A3 and A4.
• EXIT/RELOOP LED indicates conditions of
loop.
EXIT/RELOOP LED lit:
Seamless Loop on or playing.
EXIT/RELOOP LED flashing:
Playback after exit loop.
EXIT/RELOOP button
@5
• Use this to exit, back again to Seamless Loop
playback for A1 and A2 with keeping all loop
settings. You can add variety looping with this
function.
• The LED indicates what’s going on about
looping.
EXIT/RELOOP LED lit:
Seamless Loop on or playing.
EXIT/RELOOP LED flashing:
Playback after exit loop.
• This button also switches repeat play modes
on and off in Program, Random mode.
A3/4, PITCH/VOL button
@6
• A3/4:
After a short push, A3, A4 button operating
mode can be selected with the PARAMETERS
knob from Sampler, 4 Hot Start, Alpha-Track
Hot Start.
• PITCH/VOL:
After pushing for more than 1 sec, pitch and
output level of Sampler, Alpha-Track playback
can be adjusted with the PARAMETERS knob.
Page 9

ENGLISH
a
a
a
a
a
a
DISPLAY MAIN/a(Alpha), TITLE
@7
button
• DISPLAY MAIN/a(Alpha):
A quick push will display changes between
MAIN display and a TRACK display.
• TITLE:
When there is CD text data, the CD text data
is displayed when the button is pressed for
more than 1 second.
The display returns to normal after the CD text
data is displayed.
CONT./SINGLE, RELAY button
@8
• CONT./SINGLE:
Short pushing play ending mode between
CONT (continue: play more tracks) and
SINGLE (stop playing at current track played).
• RELAY:
You can turn on and off RELAY PLAY mode.
Relay playback is possible when two DNS5000s are connected by X-EFFECT.
TIME, T.TIME button
@9
• TIME:
A quick push will display mode changes
between ELAPSED TIME and REMAIN TIME.
• T.TIME:
A long push, will display mode changes
between TRACK TIME and DISC TIME.
• So, you can select display mode from four
modes, TRACK ELAPSED, TRACK REMAIN,
DISC ELAPSED and DISC REMAIN.
MEMO, PRESET
#0
(/ PROGRAM/RANDOM) button
• MEMO:
The memo mode starts when this button is
pushed once in the Cue mode.
• PRESET:
When this button is pushed for more than 1
sec, the PRESET mode starts.
• PROGRAM:
When the Preset mode is selected, with a
short push, you can make list of program play
and turn on/off Program play mode using
PARAMETERS knob.
• RANDOM:
When the Program mode is selected, with a
short push, Random play mode can be turned
on/off with PARAMETERS knob.
FAST SEARCH knob (6 7)
#1
• Fast-forward playback is selected when
moved to the
is selected when moved to the
7 side, fast-reverse playback
6 side.
(Alpha) MODE, MIRROR MIX
#2
button
•a(Alpha) MODE:
Use this to turn the Alpha-Mode on and off.
The Alpha-Mode playback sound is outputted
from the ALPHA OUT jacks in the AlphaMode.
• MIRROR MIX:
The Mirror Mix mode is selected when this
button is pressed and held in for more than 1
second.When the button is pressed and held
in for more than 1 second, the Mirror Mix
mode is turned off.
In the Mirror Mix mode, the Alpha-Track is
played with a delay of the specified beat or
time after the Main Track.
(Alpha) CUE/SAMP. STOP button
#3
•a(Alpha) CUE:
Use this as CUE and STUTTER button in
Alpha-Track.
This button lights up when the Alpha-CUE
point is set.
• SAMP. STOP:
Push while Sampler playback, Sampler
playback stops.
TRACK/PARAMETERS knob
#4
• TRACK:
When PARAMETERS LED is on, turn this knob
to select tracks.
By pushing this knob down while turning, the
tracks will change 10 at a time.
• PARAMETERS:
When the PARAMETER LED is flashing, turn
this knob to select and change the parameter
for items found in the Platter effects, Program,
Memo, and Preset data, etc.
(Alpha) track Play/Pause button
#5
(13)
• When this button is pushed while in the Cue
or Pause mode, the Alpha-Track playback
starts. By pushing it once again will Pause the
Alpha-Track.
• It is necessary to make Cue point for the
Alpha-Track before starting Alpha-Track
playback.
(Alpha) PITCH BEND – button
#6
(Alpha) PITCH BEND + button
#7
• Pushing these buttons will change Alpha-Track
playing speed temporary.
• While pushing a (Alpha) PITCH BEND + button
playing speed increases and speed decreases
while pushing a (Alpha) PITCH BEND – button.
• When release button, playing speed returns to
the previous speed.
•
(Alpha) CUE-CLR:
If the a (Alpha) CUE button is pushed while
pushing the a (Alpha) PITCH BEND – button,
the Alpha-Cue point is cleared.
TAP, LOCK, AUTO/INPUT BPM
#8
button
• TAP:
When you push this button repeatedly, the
Auto mode turns off and starts measuring your
Beats Per Minute (BPM) by tapping.
• LOCK:
When this button is pressed once while the
auto BPM counter is operating, the data
measured by the auto BPM counter is locked.
• AUTO:
When pushing the TAP button for 1 second,
activates AUTO BPM mode.
The measured BPM is displayed in the
character section of the display.
• INPUT BPM :
When the TAP button is pressed and held in for
more than 2 seconds, the BPM input mode is
set and the BPM value can be input directly
with the PARAMETERS knob. When the button
is pressed again, the BPM input mode is turned
off.
NOTE:
If you select a new track, AUTO BPM mode turns
on automatically.
PITCH BEND – button
#9
PITCH BEND + button
$0
• Pushing these buttons will change main
playing speed temporary.
• While pushing PITCH BEND + button playing
speed increases and speed decreases while
pushing PITCH BEND – button.
• When release button, playing speed returns to
the previous speed.
Pitch Slider
$1
• Use this slider to adjust playing speed.
• The playing speed decreases when slide
upwards and increases downwards.
PITCH/KEY, RANGE button
$2
• With this button you can select PITCH and
KEY ADJUST mode. Mode changes Pitch on,
Key Adjust on and both off cyclically. PITCH
LED indicates in Pitch mode and KEY ADJUST
indicator lights up in Key Adjust mode.
• RANGE:
Push this button for more than 1 sec to select
the pitch range.
DUMP/RVS, SOURCE button
$3
• DUMP/RVS:
Push this button a short time to select the
effect function from RVS and DUMP.
• SOURCE:
When this button is pressed and held in for
more than 1 second, the source for which the
Platter effect function is to be used (Main,
Alpha-Track or Main and Alpha-Track) can be
selected with the PARAMETERS knob.
BRAKE/ECHO, TIME button
$4
• BRAKE/ECHO:
Push this button a short time to select the
effect function from BRAKE and ECHO.
• TIME:
If pushed for more than 1 sec, you can select
time for BRAKE or ECHO with PARAMETERS.
DRAG-S, TIME button
$5
• DRAG-S:
Push this button a short time to set the DRAGS.
• TIME:
If pushed for more than 1 sec, you can select
time for DRAG-S with PARAMETERS.
9
Page 10
ENGLISH
BA1
BA1
BA1
BA1
BA1
sm
CONT.fSINGLE
B
B
A4
A2
REMAIN
s
m
TOTAL
BA3
BA1
ELAPSED
DRAG S.
DUMP
BRAKE
RVS
ECHO
KEY ADJ.
PROG
MEMO
ww uye trq
!0 !2!1toi
10
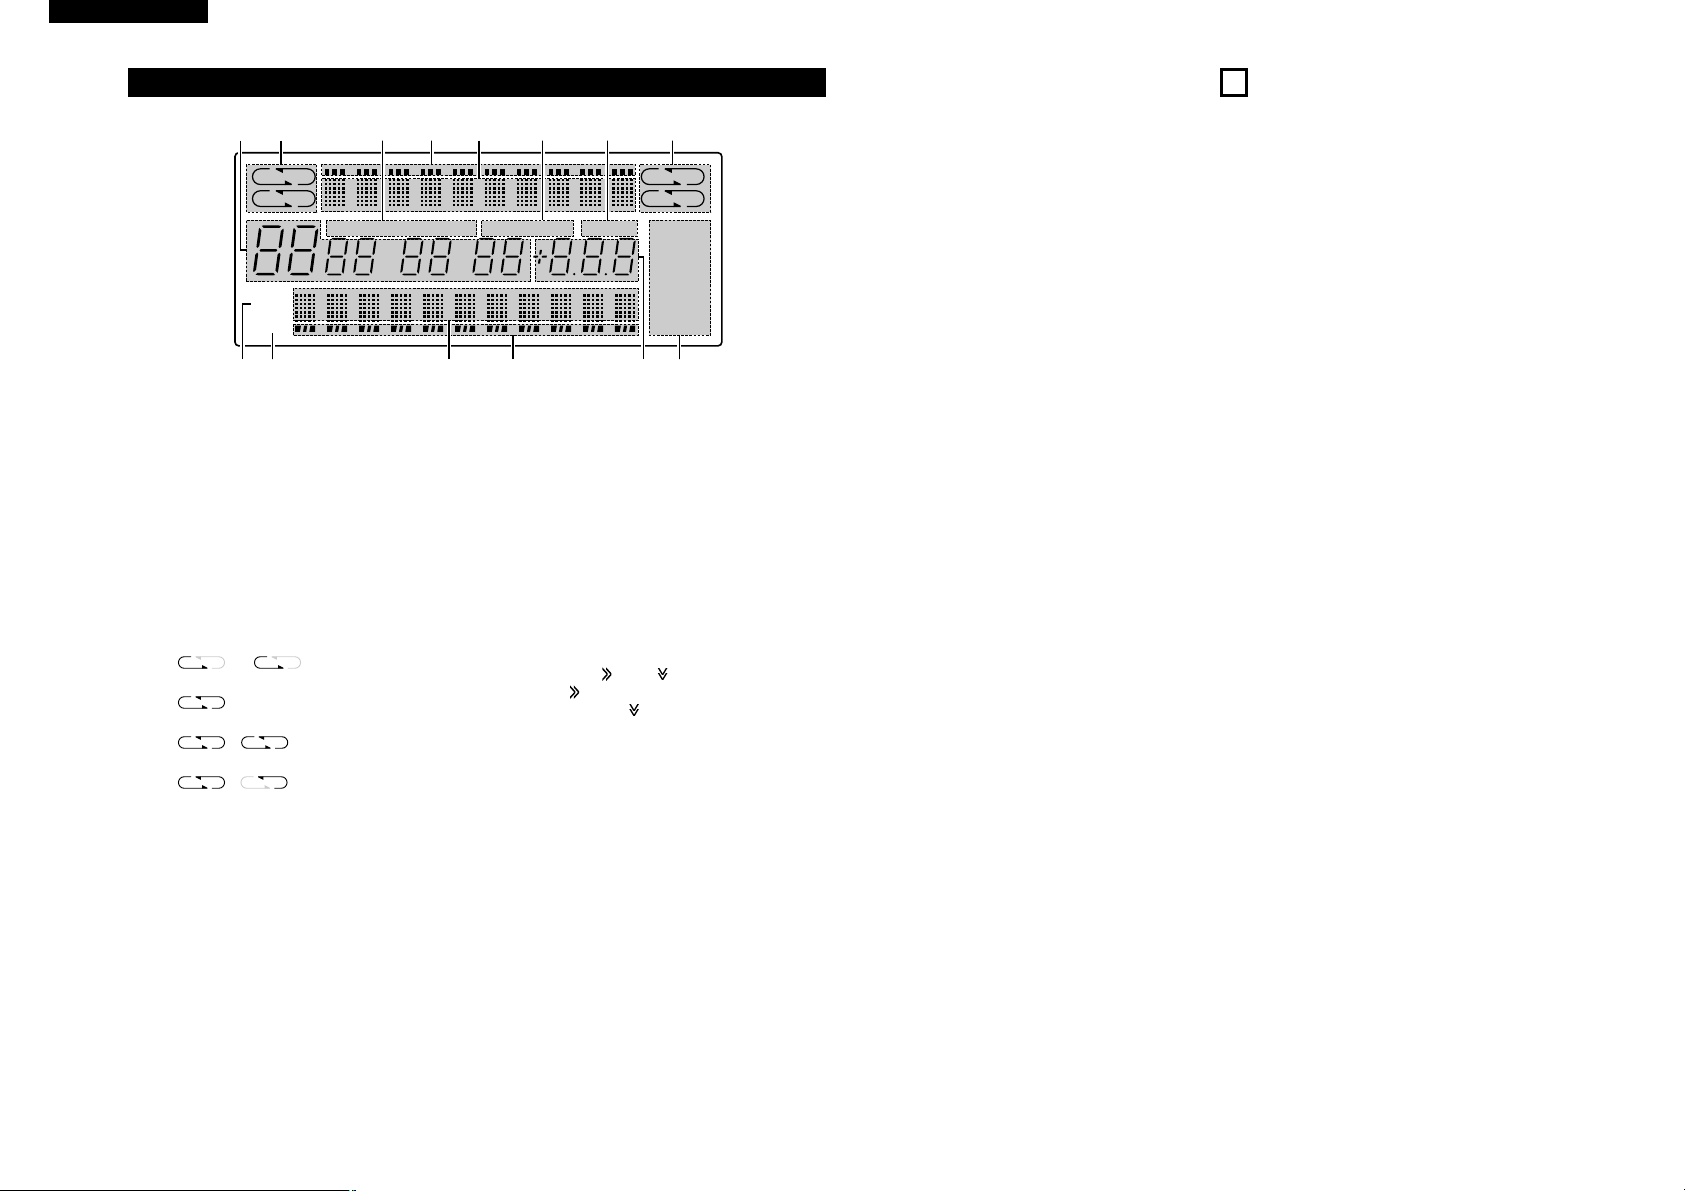
(4) Display
Track, minute, second and frame
q
displays
• These displays indicate current position
information.
Loop mode indicators
w
• DN-S5000 has Loop mode indicators consist of
four sets of A (A1, A2, A3, A4), B and two
arrows. A and B marks indicate A and B points
are exist.
• Two arrows indicate loop setting mode as
follow.
Example: A1 B
or Left arrow only on:
Hot Start mode
Both arrows on:
Seamless Loop mode
, Both arrows flashing:
Seamless Loop Playing
,
Exit play from Seamless Loop
Time mode indicators
e
• When the TIME/T.TIME button is pushed, the
Time mode indicator switches as follows:
ELAPSED:
Track’s elapsed time is displayed.
REMAIN:
Track’s remaining time is displayed.
TOTAL + ELAPSED:
The total elapsed time of disc or
programmed track is displayed.
TOTAL + REMAIN:
The total remaining time of disc or
programmed track is displayed.
Left arrow on, right flashing:
PROG indicator
o
• This indicator lights up when program data has
been set and when program data is stored in
the memory.
Play Position indicators
!0
(Play position indicator lower 33)
• Play position indicator:
The 33 white dots indicate where is playing
visually in a track in the normal play. The 11
Orange dots indicate play position in the
reverse play mode.
• End of Message:
When the time remaining to the end of the
track is less than the specified time, the EOM
(End Of Message) play position indicator
flashes along with the remaining time,
notifying of the track end.
Parameter indicators
r
(upper 30 dots)
• Upper 30 dots on display indicate parameter,
data setting for Effector visually.
Character display
t
• You can select mode or function using
PARAMETERS knob following the short
message which is displayed on the character
display part.
• The character display indicates the operation,
mode name, data, etc., and displays such
guide messages as “ Yes/Push_PM” means if
“ YES” , push PARAMETERS knob. The display
indicates and marks sometime, note
that mark says you to turn PARAMETERS
knob and marks says to push
PARAMETERS knob.
• The PARAMETERS LED flashes when you can
use PARAMETER knob, otherwise this knob
used for Track Selection.
Play mode indicators
y
• When SINGLE indicator lights up, playback will
finish at end of current track.
• When CONT. indicator lights up, playback
continues.
KEY ADJ. indicator
u
• KEY ADJ. sign appears in display when in the
Key Adjust mode.
MEMO indicator
i
• MEMO sign appears in display when there is a
memory setting for the currently playing track
or the track at which the standby mode is
currently set.
✽ The EOM time can be set with the presets.
Pitch display
!1
• This numeric indicator display the playback
speed (pitch).
PLATTER MODE indicators
!2
• There are signs of Platter Effects DRAG S.,
BRAKE, ECHO, DUMP, RVS. These signs light
up when mode is on.
4
COMPACT DISCS
1. Precautions on handling compact discs
• Do not allow fingerprints, oil or dust to get on the
surface of the disc.
If the disc is dirty, wipe it off with a soft dry cloth.
• Do not use benzene, thinner, water , record spray,
electrostatic-proof chemicals, or silicone-treated
cloths to clean discs.
• Always handle discs carefully to prevent
damaging the surface; in particular when
removing a disc from its case or returning it.
• Do not bend the disc.
• Do not apply heat.
• Do not enlarge the hole in the center of the disc.
• Do not write on the label (printed side) with a
hard-tipped implement such as a pencil or ball
point pen.
• Condensation will form if a disc is brought into a
warm area from a colder one, such as outdoors
in winter. Do not attempt to dry the disc with a
hair dryer, etc.
2. Precautions on storage
• After playing a disc, always unload it from the
player.
• Always store the disc in the jewel case to protect
from dirt or damage.
• Do not place discs in the following areas:
(1) Areas exposed to direct sunlight for a
considerable time.
(2) Areas subject to accumulation of dust or high
humidity.
(3) Areas affected by heat from indoor heaters,
etc.
Page 11
ENGLISH
RAN
PITCH / KEY
RA
PITCH / KEY
PIT ND
SEARCHMAIN
SAMP.
TRACK
5
BASIC OPERATION
Play and pause
• Each push of the o PLAY/PAUSE (13) button
switches between playback and pause.
PLAY/PAUSE (
during playback and flashed in pause.
• When the o PLAY/PAUSE (
during play, the DN-S5000 pauses playback at that
point. Push PLAY/PAUSE (
and playback resumes.
• When the Scratch mode is set to MAIN, the Platter
turns when the Main Track is played. When the
rotation of Scratch Disc is stopped by pressing with
the finger, the pause mode is set, and when the
finger is released playback resumes.
13) button illuminates solid green
13) button is pushed
13) button once again
Play and Cue
• When the !1 CUE button is pushed during playback,
the track stops and returns to the position that
current playback started (Cue point) and prepares
for next playback. This function is called Back-Cue.
With Back-Cue function, you can start from exactly
same position. The CUE button illuminates solid red
when DN-S5000 is ready to start playback.
• You can set and change Cue point as follows.
• When you started playback.
• Track select finished.
• manual search.
Select the track
• Turn the #4 TRACK knob.
• By pushing #4 TRACK knob down while turning, the
tracks will change 10 at a time.
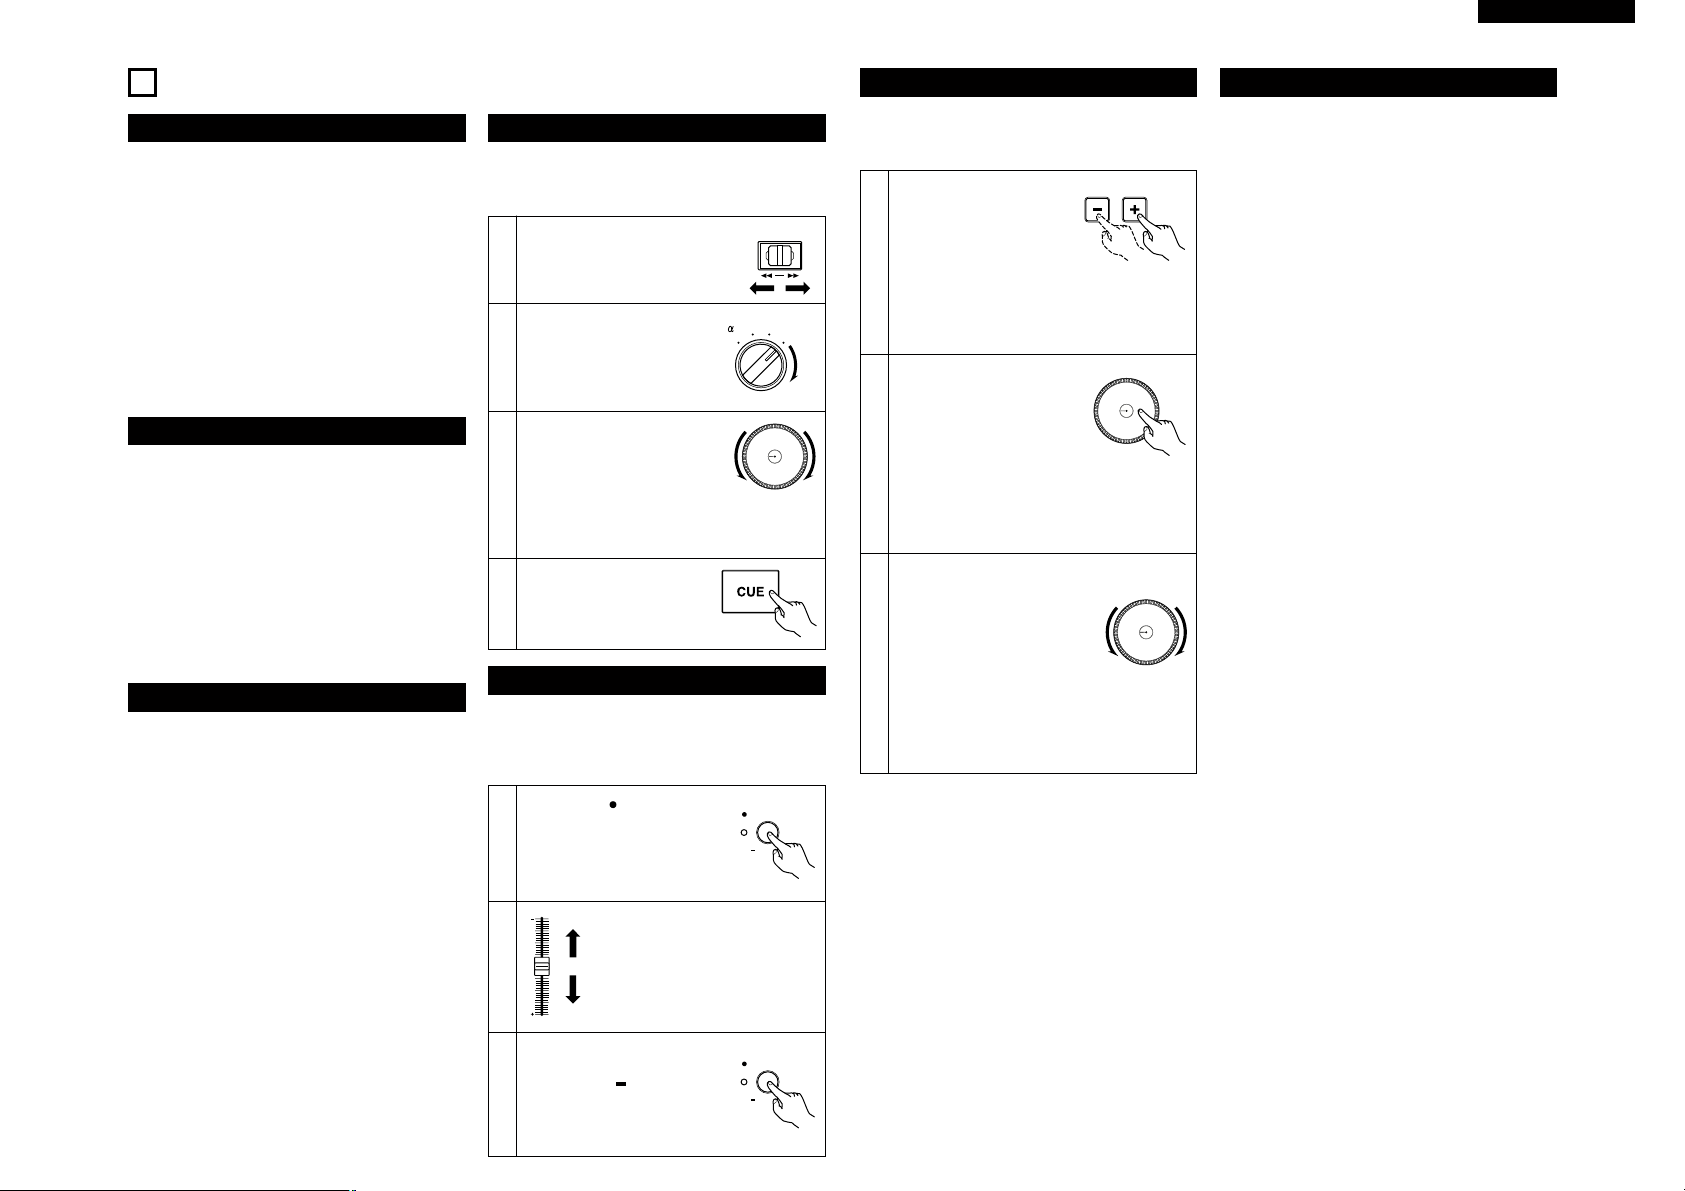
Move the Cue point
• If you would not like to start playback from
beginning of the track, you need to move Cue Point
using fast Search and manual search function.
You can move to the approximate
playback start position by fast-
1
forwarding and fast-reversing
using the #1 FAST SEARCH knob.
Turn the !4 SCRATCH source
select knob to select Scratch
Disc to search mode. The all
2
Scratch mode LEDs will turn
off.
Turn the !2 Scratch Disc to
change Cue point. You can hear
the short sound of the current
Cue point.
3
When Scratch Disc is turned in the pause,
standby or frame repeat mode, works as the
manual search function.
After you found your
preferred Cue point, push
4
the !1 CUE button then new
Cue point is set.
FAST SEARCH
Adjusting the pitch
• With Pitch slider you can adjust the playback speed
(Pitch).
• If you would not change key of sound, use the Key
Adjust function.
Pitch Bend
• With PITCH BEND function you can change pitch
temporary. DN-S5000 has three ways for this
function PITCH BEND buttons and Scratch Disc.
[PITCH BEND +/– buttons]
• Push the #9 PITCH BEND
– or $0 + button for
momentary change of
1
pitch.
While holding these buttons down, the pitch
continues to change up to the limitation.
• After releasing the PITCH BEND buttons,
playback pitch returns to slider setting.
When the Scratch source is
set to MAIN and the Platter is
turning, playback of the Main
source can be slowed
temporarily by lightly pressing
2
!2 Scratch Disc or PLATTER.
In addition, playback can be quickened
temporarily by pushing Scratch Disc or
PLATTER in the direction in which the Platter
is turning.
[Scratch Disc]
• When the Scratch mode is
set to SEARCH, the playback
speed can be changed by
turning !2 Scratch Disc
3
during playback.
• The pitch increases gradually when the
Scratch Disc is turned clockwise and
decreases when turned counterclockwise.
• When you stop turning the Scratch Disc, the
playing speed returns to the previous pitch.
BPM
• Normally the BPM for the currently playing track is
measured and displayed on the auto BPM counter.
NOTE:
For some tracks the BPM cannot be measured
properly.
BPM LOCK:
When this button is pressed once while the auto
BPM counter is operating, the data measured by
the auto BPM counter is locked.
TAP:
When you push this button repeatedly, the Auto
mode turns off and starts measuring your Beats Per
Minute (BPM) by tapping.
INPUT BPM:
When the TAP button is pressed and held in for
more than 2 seconds, the BPM input mode is set
and the BPM value can be input directly with the
PARAMETERS knob. When the button is pressed
again, the BPM input mode is turned off.
NOTE:
If you select a new track, AUTO BPM mode turns
on automatically.
Push the $2 PITCH/KEY
button to PITCH LED lights up.
1
• PITCH → KEY (key adjust) → OFF
Pitch decreases
Move the $1 Pitch slider to adjust
2
DN-S5000 has five pitch ranges,
4%, 10%, 16%, 24% and 100%.
When the $2 RANGE button
3
is pushed for more than 1 sec,
the pitch range can be selected
with the PARAMETERS knob.
the pitch. The current pitch setting
is displayed on the display.
Pitch increases
11
Page 12
ENGLISH
w eq
HOT D
MIRROR MIX
PI END
SAMP. STOP
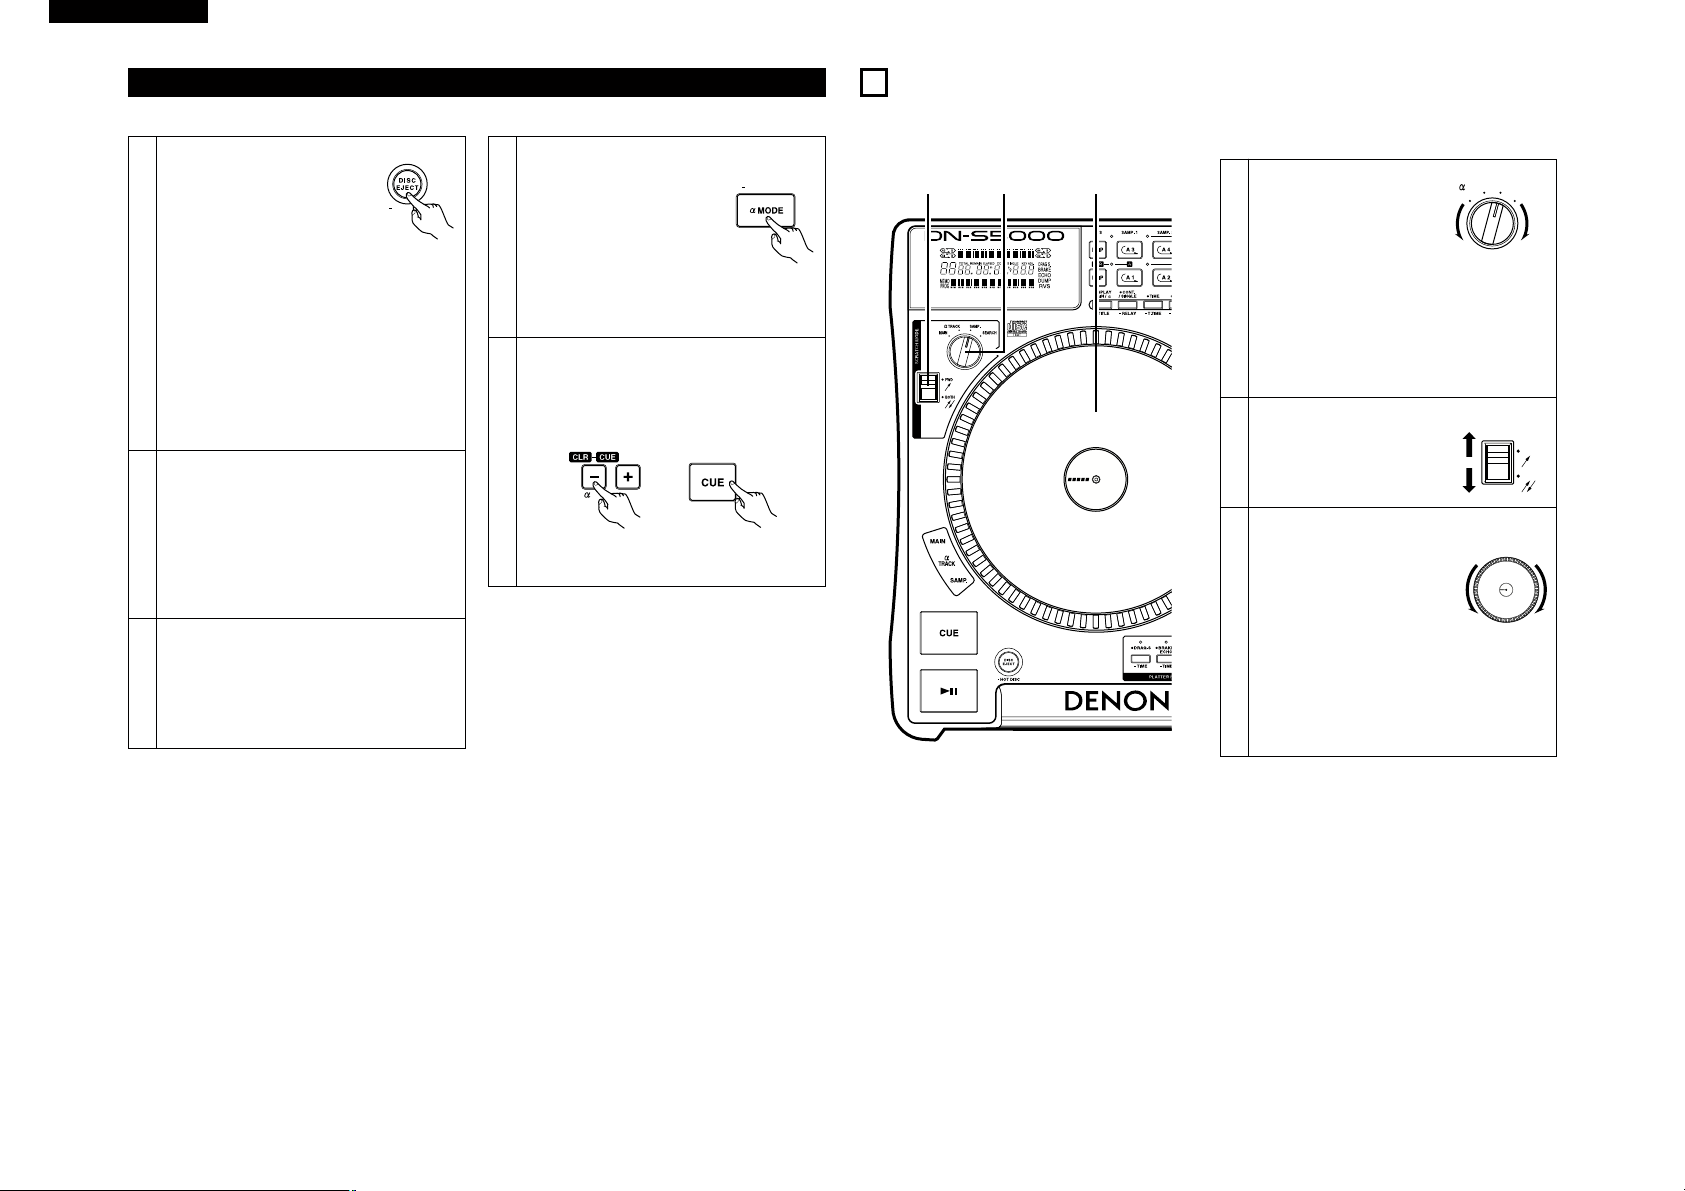
• The disc can be ejected while still Main Track playing.
Main Hot Disc
Data loading
When the !0 DISC EJECT button
is pressed for more than 1
second and held in while the
Main Track is playing, up to 35
seconds of subsequent data can
be read. (at 0% pitch)
• If a Seamless Loop of within 35 seconds is
1
playing, loop playback continues.
NOTE:The Hot Disc function cannot be used
when both the Main Track and AlphaTrack are playing.
When the Hot Disc function is started,
the Sampler data and points A and B
aside from the points for the currently
playing loop are cleared.
Eject
• Once data loading is completed, the disc is
ejected.
• The operating buttons switch to the Alpha-
2
Track controls.
13 → a 13, CUE → a CUE,
(
A1 → A3, A2 → A4,
and Loop control buttons.)
Disc loading and Cue search
• Load a new disc.
• Operate as usual, and cue to the beginning
3
of a track or match the beat.
At this time, the disc’s playback signals are
output from the ALPHA OUTPUT terminals.
Change output
Once cueing is completed, stop
playback, and when the #2 a
MODE button is pressed output
4
of the disc’s playback signals
switches from the ALPHA OUT
to the MAIN OUT terminals.
• Start playback from the disc and stop Hot
Disc playback.
Hot Disc clear
When the #3 a CUE button is pressed while
pressing the #6 a PITCH BEND – button, the
Hot Disc mode is turned off and the player is
set back to the normal mode.
5
NOTE:The a MODE button does not function
before the Hot Disc data is cleared.
6
SCRATCH
You can Scratch in CD or Sampler mode. Also you can select the Scratch sound direction to (turn direction of
Scratch Disc), both and forward. These selections give you variety of Scratch effects.
Select Scratch source
q Select the source to be
scratched using the
SCRATCH source select
knob.
• If scratching is possible, the LED for the
1
2
3
selected source flashes.
• If scratching is not possible immediately,
because for example the Sampler or
Alpha-Track settings have not been
made, the LED for the selected source
lights without flashing.
Select Scratch direction
w Select the direction for
scratching using the
SCRATCH direction select
knob.
[Scratch Disc]
e When MAIN is selected as
the Scratch mode and
Scratch Disc is turned by
hand, the Main Track is
scratched.
When Alpha-Track is selected as the
Scratch mode and Scratch Disc is turned by
hand, the Alpha-Track is scratched.
When SAMPLER is selected as the Scratch
mode and Scratch Disc is turned by hand,
the sample is scratched.
TRACK
SAMP.
SEARCHMA N
FWD
BOTH
12
Page 13

ENGLISH
w, e
y
t
i
q, r,
u, i
★
★
★
a
PI ND
SAMP. STOP
SAMP. STOP
SAMP. STOP
PI H BEND
SAMP. STOP
7
PLAYING THE ALPHA TRACK (Real Time Sampler)
• The Alpha-Track function lets you play one more track (the Alpha-Track) while playing the Main Track.
• The Alpha-Track’s pitch and sound level can be adjusted.
• You can switch output channel of Alpha-Track sounds from MAIN OUT (default) or ALPHA OUT with the
presets.
• You can use this function like a Sampler from Alpha-Cue point (Real time Sampler). When the ALPHA OUT is
selected, DN-S5000 can playback up to two songs simultaneously.
• When playing the Alpha-Track, scratching, Hot Starting, Seamless Looping (Alpha-Track and Hot Start modes)
and Hot Disc are possible in the same way as with the Main Track.
NOTE: The Sampler and Alpha-Track functions cannot be used simultaneously.
Enter Alpha-Track mode
q When Main Track is in the
standby or playing, push
the a CUE button to set
the Alpha-Cue point. The
a CUE button lights up
red.
• When Alpha-Cue is set during standby at
1
2
3
the Main Track, playback of the Main
Track starts.
• The display can be switched between
the Main Track and Alpha-Track using the
@7 DISPLAY button.
When “ Alpha-Track display” is selected,
“ PARAMETERS” is set to the alphatrack pitch input mode.
Start Alpha-Track playback
w Push the a
start Alpha-Track playback.
When playback starts, the
a
green.
• When the scratch mode is set for the
Pause Alpha-Track playback
e During Alpha-Track
playback, push the a
button to pause playback.
When the pause mode is set, the a
button starts flashing.
13 button to
13 button lights up
Alpha-Track, the Platter turns when the
Alpha-Track is played.
The pause mode is set when the rotation
of Scratch Disc is stopped by pressing
with the finger while the Platter is
turning, and playback resumes when the
finger is released.
13
13
Back Cue Alpha-Track playback
r In the Alpha-Track
playback or pause mode,
push the a CUE button to
Back-Cue. The a CUE
4
button lights up red.
NOTE:That the Alpha-Cue point is not
changed automatically with start
playback.
Alpha-Track pitch bend 1
[
(Alpha) PITCH BEND +/– buttons]
t Push the a PITCH
BEND – or + button
for momentary change
of pitch.
5-1
While holding these buttons down, the
pitch continues to change up to the
limitation.
• After releasing the a PITCH BEND
buttons, playback pitch returns to slider
setting.
Alpha-Track pitch bend 2
[Scratch Disc]
y When the Scratch source
is set to Alpha-Track and
the Platter is turning, playback of the
5-2
Alpha-Track can be slowed temporarily by
lightly pressing Scratch Disc or Platter.
In addition, playback can be quickened
temporarily by pushing Scratch Disc or
Platter in the direction in which the Platter
is turning.
Stutter play the Alpha-Track
u In the Alpha-Track standby
6
mode, push the a CUE
button to start stuttering.
Clear Alpha-Track
i While pushing the a PITCH BEND – button,
push the a CUE button to clear the AlphaCue point.
7
Adjust sound level and pitch
The Alpha-Track and Sampler playback sound
level and pitch can be adjustable.
★ (1) Push the PITCH/VOL button for more
than 1 sec, the pitch input mode is
selected, PARAMETERS LED flashes
and the current settings are displayed
on the character display.
(2) Push the PITCH/VOL button again to
selected the sound level output mode.
(3) Start Alpha-Track or Sampler playback.
8
(4) Turning the PARAMETERS knob can
change the sound level or pitch.
✽ When pushing down and turning the
PARAMETERS knob, you can change
the pitch range 10 times faster.
(5) Push the PITCH/VOL button again to
turn the playing parameter mode off.
Unless you adjust Alpha-Track pitch separately,
the Alpha-Track’s pitch will be the same as your
Main Track. In this case, pitch of both Main
Track and Alpha-Track changes together when
you move the main Pitch Slider
13
Page 14
ENGLISH
MIRROR MIX
MIRROR MIX
HOT
PI H BEND
SAMP. STOP
MIRROR MIX
r, t
w, e, y
q
AUTO / INP M
LOCK
MIRROR MIX
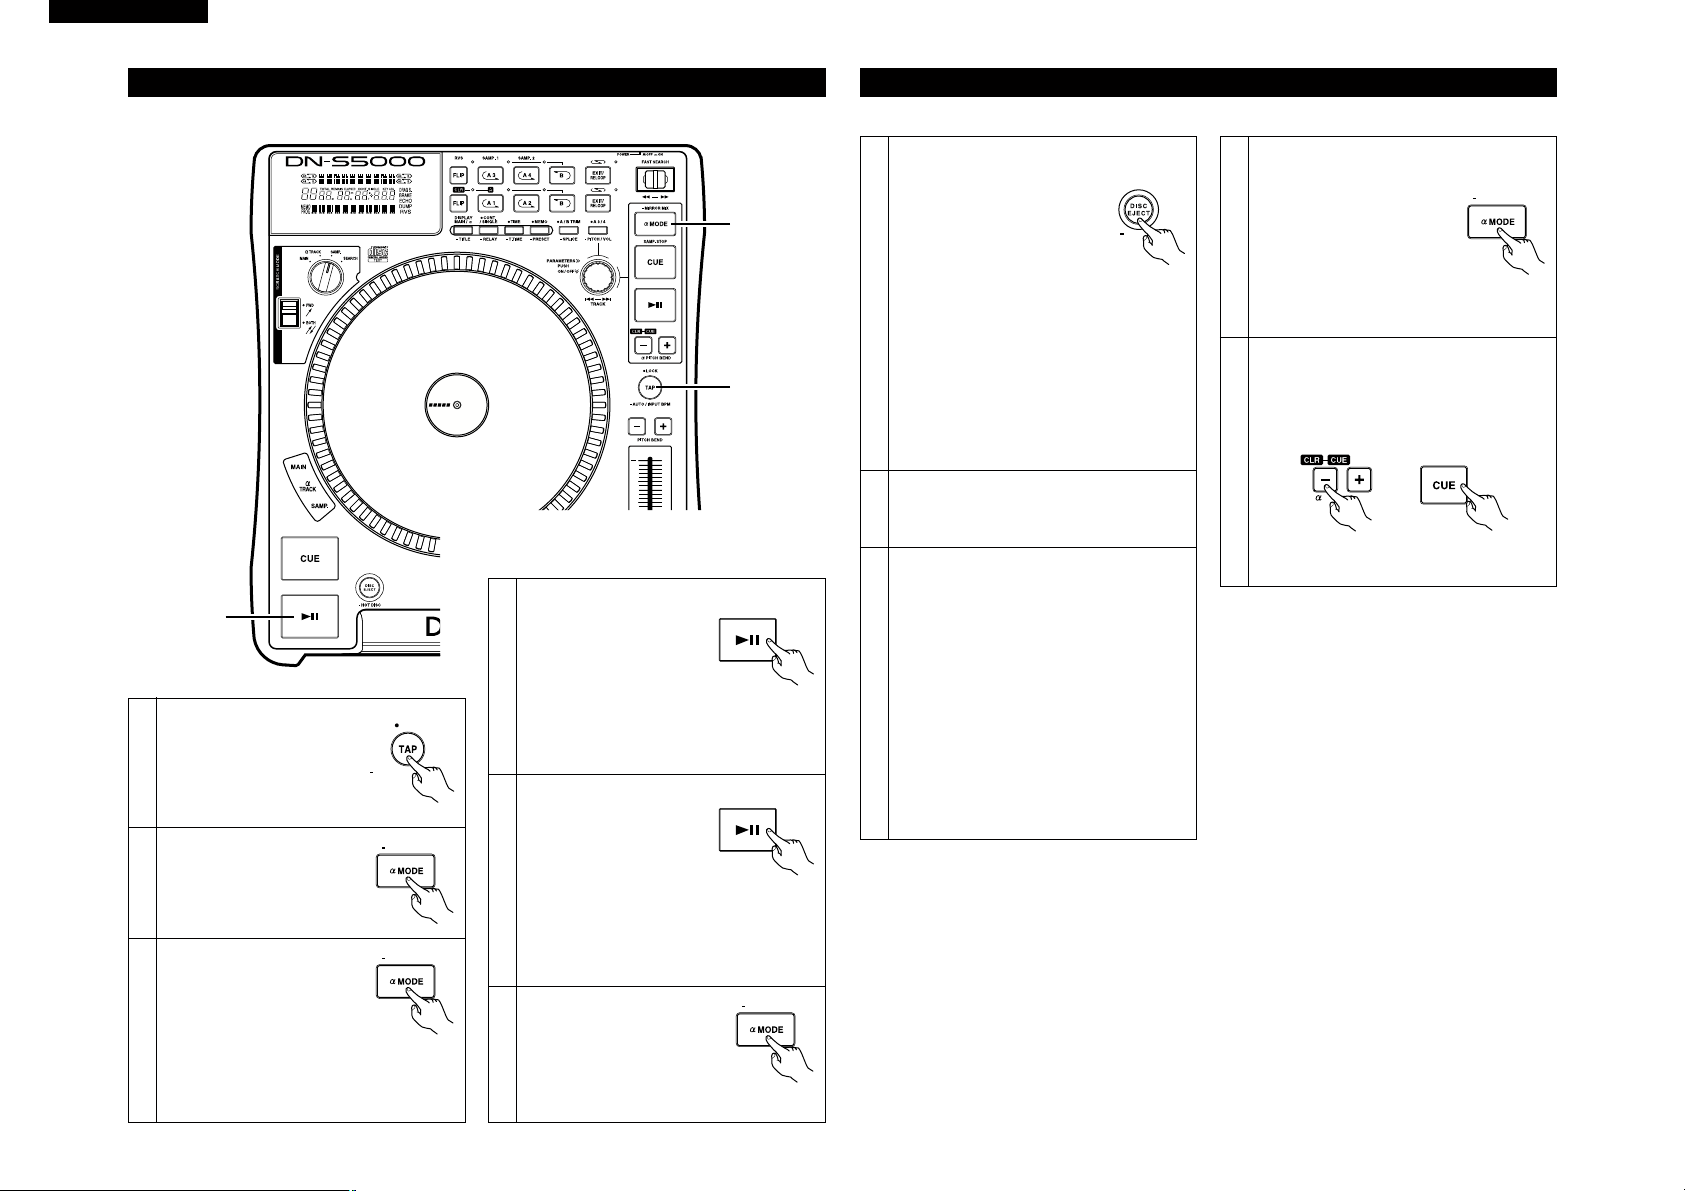
Mirror Mix
• The Alpha-Track can be played with a delay of the specified beat or time after the Main Track.
Start Mirror Mix playback
r When the 13 button is
pressed while the Main
Track is paused or in the
standby mode, Mirror
4
Set BPM
q The BPM for Main Track
playback can be set with
1
either the AUTO BPM
counter, TAP button or
BPM INPUT button.
Enter Mirror Mix mode
w The Mirror Mix mode is set
2
when the MIRROR MIX
button is pressed and held
in for more than 1 second.
Set the Mirror Mix parameter
e When the MIRROR MIX
button is pressed again
(short press), the delay beat
3
time can be set with the
PARAMETERS knob.
• When the Mirror Mix mode is set during
playback, Alpha-Track playback is
paused.
Mixing starts.
• When the a
the Main Track is playing, Mirror Mixing
resumes.
Pause Mirror Mix playback
t When the
pressed during Mirror
Mixing, Mirror Mixing
pauses.
5
• The
When the a 13 button is pressed during
Mirror Mixing, playback of the Alpha-Track
only pauses.
• The a
Cancel Mirror Mix mode
y The Mirror Mixing mode is
turned off when the
6
MIRROR MIX button is
pressed and held in for
more than 1 second.
13 button is pressed while
13 button is
13 button flashes.
13 button flashes.
14
Alpha Track Hot Disc
• The disc can be ejected while still Alpha-Track playing.
Data loading
When the !0 DISC EJECT button
is pressed and held in for more
than 1 second while the AlphaTrack is playing, playback
continues and the subsequent
data is read for a maximum of 35
seconds. (at 0% pitch)
• If a Seamless Loop of within 35 seconds is
1
playing, loop playback continues.
NOTE:The Hot Disc function cannot be used
when both the Main Track and AlphaTrack are playing.
When the Hot Disc function is started,
the Sampler data and points A and B
aside from the points for the currently
playing loop are cleared.
Eject
2
Once data loading is completed, the disc is
ejected.
Disc loading and Cue search
Load a new disc.
• Operate as usual, and cue to the beginning
of a track or match the beat.
• When at this time the Alpha-Track signals
are being output from the MAIN OUT
terminals, the disc’s playback signals are
3
output from the ALPHA OUT terminals, and
when the Alpha-Track signals are being
output from the ALPHA OUT terminals, the
disc’s playback signals are output from the
MAIN OUT terminals.
• The a MODE button flashes when the disc’s
playback signals are being output from the
ALPHA OUT terminals.
Change output
Once cueing is completed, stop
playback, and when the #2 a
MODE button is pressed while
it is flashing, output of the
4
disc’s playback signals switches
from the MONITOR OUT to the
MAIN OUT terminals.
• Start playback from the disc and stop Hot
Disc playback.
Hot Disc clear
When the #3 a CUE button is pressed while
pressing the #6 a PITCH BEND – button, the
Hot Disc mode is turned off and the player is
set back to the normal mode.
5
NOTE:The a MODE button does not function
before the Hot Disc data is cleared.
Page 15
ENGLISH
MIRROR MIX
e
r
q, t
w
MIRROR MIX
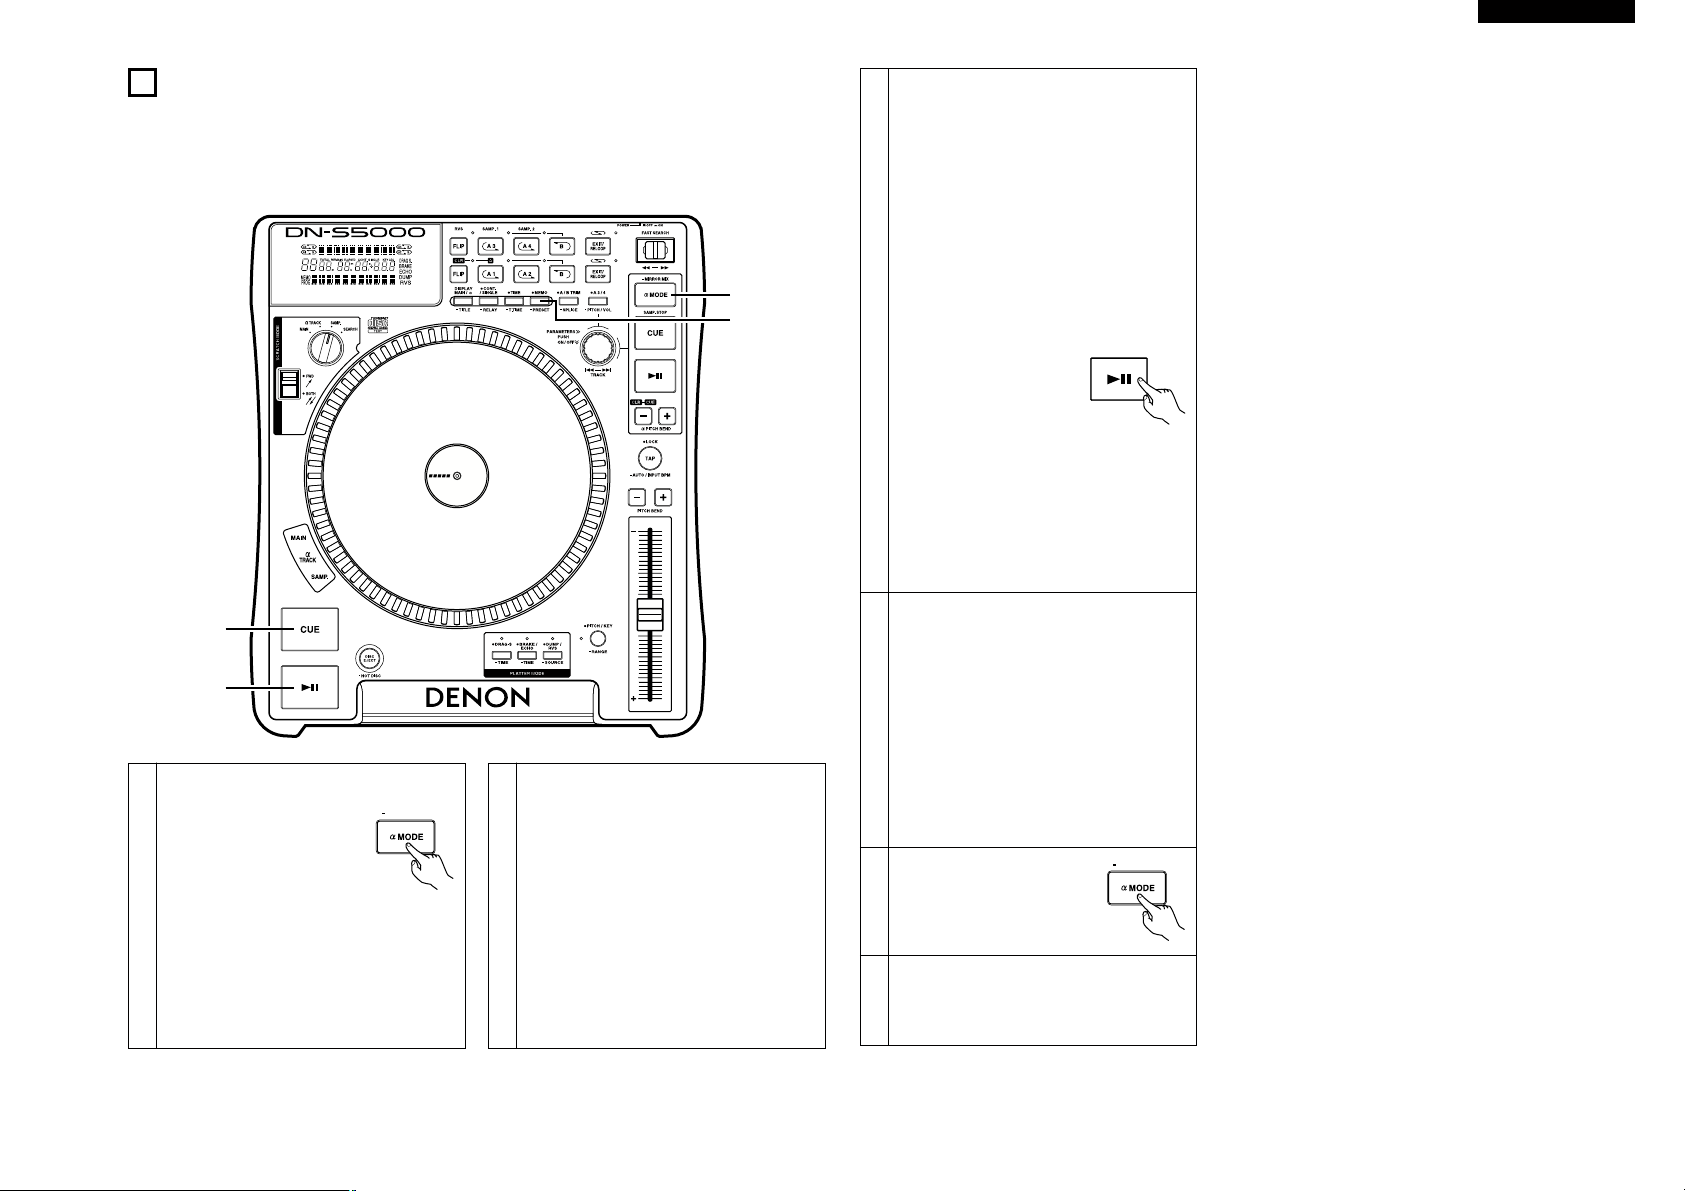
8
ALPHA MODE (Alpha-Track Monitor)
This function lets you play the Alpha-Track from ALPHA OUT while playing the Main Track. Using this function,
you can prepare the next song on same CD before the end of your first track. While in Alpha-Mode, Alpha-T rack’s
output can be monitored through your mixers headphone.
Therefore, you can switch between the Alpha-Track and Main Track at any time, so two tracks on the same disc
can be played continuously with no break in the sound.
Enter Alpha-Mode
q Push the a MODE button to
enter Alpha Mode.
• When alpha-cue is not
set, alpha-cue is set at
the beginning of the
1
Main Track.
NOTE:
Before entering the Alpha-Mode, Samplers
1 and 2 (A3, A4 buttons) must be in the
STOP mode otherwise the DN-S5000 will
not accept the ALPHA-MODE command.
✽ In the Alpha-Mode, illumination of a
MODE button flashes.
Monitor the Alpha-Track
• You can execute many functions almost
same as for the Main Track except, Program,
Random. Without these functions you can
prepare preferred sound and mixing point.
• In Alpha-Track mode, the display information
is dominated by Alpha-Track.
2
✽ Memo Call
w If the Hot Start, Seamless Loop and other
data for the track to be used next is stored
in the memory, the settings for the track
to be played can be made easily using the
memo call function.
Switching Alpha-Track and Main Track
• After you prepared your Alpha-Track, you
can switch the sound between Alpha-Track
and Main Track.
e When your Main Track is Cued in Alpha-
Mode, CUE button illumination flashes
rapidly. At this time you can switch
between Alpha-Cue point and main Cue
point, then CUE button stops flashing and
waits for your next command.
r When Main Track is playing and then Alpha-
Mode + Alpha-Track is selected, the main
13 button illumination flashes rapidly.
3
At this time you can
switch (slam-mix) to
force the “ MAIN OUT”
to stop and the AlphaTrack to start by simply
pushing the main
button.
The sound from Alpha-Cue point is routed
to MAIN OUT, then
flashing.
✽ After Alpha-Track changed to Main Track,
Alpha-Mode ends automatically and a
MODE button illumination turns off. You
can repeat the cycle again.
Pitch after switching
• Pitch of Alpha-Track can be changed
separately from the Main Track. This causes
the playback pitch to be different from the
Pitch Slider setting after switching to AlphaTrack because the Pitch Slider was set
originally for your Main Track.
4
• In this case, PITCH LED flashes to warn that
the Pitch Slider setting is different. Only until
the position of the Pitch Slider matches its
correct pitch of your Alpha-Track will the
PITCH LED stop flashing and start changing
with the Pitch Slider.
Exit from Alpha-Mode
t You can exit from Alpha-
5
Mode with push a MODE
button.
Hot Start, Sampler
• Hot Start and Sampler setting with A1, A2,
6
A3, A4 are available as Hot Start in AlphaMode.
13
13 button stops
15
Page 16

ENGLISH
ret, y q, w, y
9
SEAMLESS LOOP/HOT START/STUTTER AND SPLICE
Seamless Loop/Hot Start/Stutter (A1, A2 buttons)
Operation display (refer to the
section describing the display)
Setting the A point (loading the Hot Start
data)
q Push the A1 or A2 button to
set the A point and Hot Start
data loading starts.
• A1 and A2 buttons can be
1
2
3-1
used separately for each
Hot Start.
• When an A point is set, the
corresponding A button and FLIP LED
light and that button is set to the Hot
Start mode.
• The BPM is set independently for each
Hot Start.
Starts Hot Start
w When A1 or A2 button is
pushed, Hot Start playback
starts from the
corresponding A point.
Setting the B point for Seamless Loop
e When the B button is
pushed after setting the A
point or after starting Hot
start playback, the B point is
set and Seamless Loop
playback starts from the A
point.
• The B button works with respect to the
A point operated before the B button
was pushed.
• If the B button is pushed during
Seamless Loop playback or after EXIT
3-2
4
5
playback, the B point moves to the point
at which the button was pushed.
• When the B point is set, the B and LOOP
LEDs light.
Playing Seamless Loops
• When the B point for A1 is detected after
playback started from A1 point, playback
returns to A1 point with seamless. While A1
to B looping, B point for A2 ignored.
• When the B point for A2 is detected after
playback started from A2 point, playback
returns to A2 point with seamless. While A2
to B looping, B point for A1 ignored.
Exit/Reloop
r In Seamless Loop playback,
you can force exit from or
return in the loop.
EXIT:
While the Seamless Loop playback, push
the EXIT/RELOOP button to exit from
loop. DN-S5000 continues playback after
the B point.
RELOOP:
When the EXIT/RELOOP button is pushed
after exit the loop, Seamless Loop
playback resumes from the A point.
Stutter
• A1 and A2 points can be also used for
Stutter playback.
t To enable stutter playback,
push FLIP button for A1/A2
6
buttons, then FLIP LED turns
off.
Press the FLIP button to switch between
the Hot Start/Seamless Loop and Stutter
modes.
Clear the A1/A2 point
y While pressing the FLIP/(CLR) button, push
the A1 or A2 button to clear the
corresponding A and B points.
Or push the FLIP button for more than 1
7
sec to clear both A1 and A2 points at once.
16
Page 17

ENGLISH
A / B TRIM
SPLICE
Splice
• Use this function to skip a section between A and B points. The A point is the point from which jumping starts,
the B point the point at which jumping ends.
• The A1 and A2 Hot Starts and Stutter functions cannot be used if both Splice points are set in the Splice mode.
qt e w, r, t
Splice point setting mode
q Push the SPLICE button
for more than 1 sec to
enable setting Splice point
using A1, A2 and B
1
buttons.
• The A button illumination flashes when
the Splice mode is set.
• The Splice point setting cannot be set for
the A point at which Hot Start data is
already loaded.
Set splice start point A
w After starting playback, push
the A1 or A2 button. The
2
corresponding A button
lights up and that point is set
as splice start point A, and B
LED start flashing.
Set splice end point B
e After setting splice start
point A, push the B button.
3
The B LED lights up and that
point is set as splice end
point B.
Start splice playback
Start playback from any point before point A.
When point A is reached, the section from
4
point A to point B is jumped seamlessly and
playback continues.
Temporarily turning off the splice playback
r When the corresponding A
button is pushed after
setting splice points A and B,
the A button illumination
5
turns off and the Splice play
mode is temporarily turned
off.
• Push the corresponding A button again
to resume splice playback.
Clearing the splice points
t While pressing the FLIP/(CLR) button, push
the corresponding A button to clear splice
points A and B.
6
• When the splice points are cleared, the
A button is set back to the Hot Start
mode.
17
Page 18

ENGLISH
q, !3r, u, !1
e, t,
o, !2
y, i,
!0, !2
w
PARAMETERS
ON / OF
PUSH
A / B TRIM
SPLICE
A / B TRIM
SPLICE
10
A/B TRIM
• The Seamless Loop, Sampler loop and splice A and B points can be fine-adjusted using Scratch Disc.
• There are two ways for doing this.
A-B Trim: Trim the points during loop playback as a rehearsal.
A/B Move: Move the points using the fast search or manual search. A/B Move can not be used with
Sampler loop.
A/B Trim
Select A-B trim mode
First select whether to adjust the A and B
points using the A-B trim mode or the A/B
move mode.
q Push the A/B TRIM button
to set the A and B point
1
position adjustment mode.
w Now turn the
PARAMETERS knob to
select the A-B Trim or
the A/B Move.
Select A point (in A-B Trim)
e Select the A-B Trim and push
the corresponding A button
for the loop to be trimmed.
The A button illumination
2
flashes and loop playback
starts.
• In the splice trim mode, total 6 seconds
of spliced section (started from 2
seconds before A point to 4 seconds
after the B point) is played.
Trim A point
r Turn the Scratch Disc to
move the A point 1 frame at
a time.
• Range for trimming A point is limited as
follows.
A point for Loop:
±30 frames from the original A point.
3
4
(However, when the A point was
loaded from the standby mode, the A
point cannot be moved backwards.
So, use A/B Move function)
A point for Splice:
Between the beginning of the disc and
5 frames before B point.
A point for Sampler:
Between the original A point and 5
frames before B point.
Save the A point
t Push the A button again to
save new A point, and the
unit automatically exit from
the A-B Trim mode.
Select B point (in A-B Trim)
y Select the A-B Trim mode
and to select the B point,
5
push the B button after
selecting the A point.
Then push the B button. The B LED flashes
and the B point trim become enable.
Trim B point
u Turn Scratch Disc to move
the B point 1 frame at a
time.
• Range for trimming B point is limited as
follows.
B point for Loop:
6
7
Between 5 frames after A point and
disc end.
B point for Splice:
±30 frames from the original B point.
(However, when the B point was loaded
from the standby mode, the B point
cannot be moved backwards. So, use
A/B Move function)
B point for Sampler:
Between 5 frames after A point and
Sampler end.
Save the B point
i Push the B button again to
save new B point, and the
unit automatically exit from
finish the A-B Trim mode.
A/B move
Select A and B points
o Select or the A/B Move and
push the A button for the A
point you want to move. The
standby mode is set at the A
point and the A button
illumination flashes.
8
!0 To select the B point, push
the B button after selecting
the A point.
• The B LED flashes. The Selected B point
is used for the A1 or A2 point that was
first selected.
Move A or B points
!1 Turn the Scratch Disc to
move the selected point
using the manual search
function.
• Range for moving A point is limited as
follows.
A point for Loop:
Between the beginning of the disc and
9
10
11
5 frames before B point.
A point for Splice:
Between the beginning of the disc and
5 frames before B point
• Range for moving B point is limited as
follows.
B point for Loop:
Between 5 frames after A point and
disc end
B point for Splice:
Between 5 frames after A point and
disc end
Save the A or B points
!2 Push the A1/A2 or B button
again. The LED stops
flashing and the A1/A2 or B
point is saved, and the unit
automatically exit from the
A/B Move mode.
Cancel the A-B Trim or A/B Move
!3 Push the A/B TRIM button
to cancel the mode.
18
Page 19

ENGLISH
q
w
PARAMETERS
ON / OFF
PUSH
A 3 / 4
PITCH / VO
PARAMETERS
ON / OF
PUSH
A3/A4 FOR SAMPLER, 4 HOT START, ALPHA-TRACK HOT
11
START
The buttons of A3, A4 and corresponding FLIP, B and EXIT/RELOOP are used for Sampler, 4 Hot Start and AlphaTrack Hot Start functions.
A3/A4 mode
Sampler mode:
The A3 and A4 buttons lights up in green.
Select A3/A4 Mode
The A3 and A4 buttons can be used for one of
the three modes described below.
• Sampler mode
• 4 Hot Start mode (A1, A2, A3 and A4)
• Alpha-Track Hot Start mode
q When the A 3/4
button is pushed, the
operating mode can be
selected with the
PARAMETERS knob.
1-1
The PARAMETERS LED flashes and the
A3/A4 mode is displayed on the character
display.
w T urn the PARAMETERS knob and select the
A3/A4 button mode, then push the
PARAMETERS knob to set.
• In Sampler mode, A3 button used for
Sampler1 and A4 buttons are used for
Sampler2.
• The sampled data is stored in the
memory, even when the mode is
changed.
4 Hot Start mode:
The A3 and A4 buttons light up in orange.
• Like the A1 and A2 buttons, the A3 and
A4 buttons are also used for Hot Start,
Stutter and Seamless loop playback.
1-2
Then total 4 Hot Start points can be set,
one each at buttons A1, A2, A3 and A4.
• The A3 and A4 points set in the 4 Hot
Start mode can be used in Alpha-Track
Hot Start mode as well.
Alpha-Track Hot Start mode:
The A3 and A4 buttons light in green.
• Like the A1 and A2 buttons, the A3 and
A4 buttons are also used for Hot Start,
Stutter and Seamless loop playback.
However, A3 and A4 Hot Start is played
for the Alpha-Track.
• The A3 and A4 points set in the AlphaTrack Hot Start mode can be used in the
4 Hot Start mode as well.
19
Page 20

ENGLISH
★★ ★★
SAMP. STOP
SAMP. STOP
Sampler
DN-S5000 has two Samplers of 15 seconds length. These Samplers are also used in looping playback.
y, ui, !0 w, oq, r, !0
e, t
Record in Sampler
q When the SAMP button
(SAMP1 (A3) or SAMP2 (A4))
is pushed in the standby or
playing, the sound from A3
or A4 point is recorded to
1
Sampler memory up to 15
seconds.
• The SAMP1 or SAMP2 button is flashing
while recording. When the recording is
completed, the button turns off and the
corresponding SAMP B LED lights up.
Setting B point
w When the B button is
pushed during Sampler
recording, the Sampler Loop
B point is set and the loop
mode turns on.
2
• Recording continues for approximately
15 seconds without stopping after set B
point.
• If the B point is not set, recording end
point set as B point automatically. Also
EXIT/RELOOP LED light to indicates
Sampler Loop mode is set automatically.
Stop recording
e To stop recording before
recording finish
automatically with
3
memory full, push the
STOP (a CUE) button.
• The EXIT/RELOOP LED light to indicates
Sampler Loop mode is set automatically.
Play Sampler sound
r Playback of the Sampler
sound starts when the
SAMP button is pushed after
recording has stopped.
• Sampler playback continues in looping.
With setting B point, playback loop
4
5
between A and B point. Without B point
setting Sampler loops whole recorded
length (about 15 seconds).
NOTE: It is not possible to play Sampler1
and Sampler2 at the same time.
t To stop the Sampler
sound push STOP (a CUE)
button.
Select Sampler Loop mode
You can select loop mode for Sampler when
Sampler playback stop.
Loop (default):
Sampler playback continues with
looping.
(EXIT/RELOOP LED stays lit)
Exit: Sampler playback continues over B
point up to recording length.
(EXIT/RELOOP LED flashes)
Single: Sampler playback stops at B point.
(EXIT/RELOOP LED turned off)
y To select loop mode, push
EXIT/RELOOP button after
recording and before playing.
Exit and Reloop
u The EXIT/RELOOP button
6
can be used same as
Seamless Loop function.
Reverse Play
i You can play Sampler sound in
reverse with push RVS (FLIP)
button. In reverse play mode
7
RVS LED lights up.
• Reverse playback will start with next
playback starting after reverse mode
turned on.
Moving Sampler B point
o When the B button is
pushed during Sampler
8
playback, the B point moves
to the point at which the
button was pushed, and loop
playback from point A starts.
Setting the Sampler volume and pitch
• The sound level (volume) and pitch can be
9
set individually for Sampler1 and 2.
• See m - step 8 “ Adjust sound level and
pitch” .
Clearing the Sampler data
!0 While pressing the (RVS)/FLIP/(CLR)
button, push the SAMP button (SAMP1 or
SAMP2) to clear the Sampler.
10
• By pushing the (RVS)/FLIP/(CLR) button
for approx. 1 sec, you can clear both
Samplers 1 and 2.
Hot start mode
Like with buttons A1 and A2, operation is performed
using the (RVS)/FLIP/(CLR), A3, A4 and EXIT/RELOOP
buttons. Operation is same as Hot Start with A1, A2
buttons. See page 16 for details.
Alpha-Track Hot Start mode
Like with buttons A1 and A2, operation is performed
using the (RVS)/FLIP/(CLR), A3, A4 and EXIT/RELOOP
buttons. (Refer to page 16.)
20
Page 21

ENGLISH
a
a
DUMP /
RVS
SOURCE
DUMP /
RVS
SOURCE
DRAG-S
TIME
DRAG-S
TIME
PARAMETERS
ON / OFF
PUSH
DRAG-S
TIME
BRAKE /
ECHO
TIME
PARAMETERS
ON / OFF
PUSH
w, e q, !3 t, y,
i, !0
q
r
u
o
!0
!1
!2
★1
★2
★3
★4
★5
PARAMETERS
ON / OFF
PUSH
12
PLATTER EFFECT
This function is available for the Main Track and Alpha-Track.
Select the Platter Effect Source
q When the SOURCE button is pressed and
held in for more than 1 second, the source
for which the Platter effect function is to be
used can be selected with the
PARAMETERS knob.
MAIN:
1
The Platter effect function only affects the
Main Track.
TRACK:
The Platter effect function only affects the
Alpha-Track.
MAIN/
T:
The Platter effect function affects both the
Main and Alpha-Track.
NOTE: The echo function cannot be used for
the Main and Alpha-Tracks
simultaneously.
DRAG-S (DRAG START):
Simulates the dragging sound of a belt drive
turntable starting up from a stop mode.
w The DRAG-S function can
2-1
be turned on and off by
pressing the DRAG-S
button.
DRAG-S TIME:
When the DRAG-S turn on, the PARAMETERS
LED flashes and parameter are displayed.
If you use with default settings, there is a 4
second time out of inactivity for the DRAG-S
button once selected and PARAMETERS knob
if adjusted. After 4 seconds, and exits out of
2-2
the DRAG-S menu.
e Or when the TIME
(DRAG-S) button is
pressed and held in for
more than 1 second, the
DRAG-S time selection
mode is set.
r The DRAG-S time can
be selected with the
PARAMETERS knob.
• When the PARAMETERS knob is
2-2
pressed, the time is entered and the
DRAG-S time selection mode is
cancelled.
★1 The DRAG-S is activated when playback is
started with the
13 button.
BRAKE/ECHO
BRAKE:
Simulates a winding-down sound of a vinyl
turntable coming to a full stop slowly.
ECHO (TAIL ECHO):
3-1
Adds a echo sound when playback stops.
t The mode switches in the
following order each time
the DRAG-S button is
pressed: BRAKE → ECHO
→ off.
BRAKE TIME, ECHO TIME
When the BRAKE or ECHO turn on, the
PARAMETERS LED flashes and the BRAKE or
ECHO parameter are displayed.
If you use these 2 functions with default
settings, there is a 4 second time out of
inactivity for the BRAKE/ECHO button once
selected and PARAMETERS knob if adjusted.
After 4 seconds, and exits out of the BRAKE or
ECHO menu.
BRAKE TIME:
y Or when the TIME
(BRAKE/ECHO) button is
pressed and held in for
3-2
more than 1 second while
BRAKE is selected, the
BRAKE time selection
mode is set.
u The BRAKE time can
be selected with the
PARAMETERS knob.
• When the PARAMETERS knob is
pressed, the time is entered and the
BRAKE time selection mode is
cancelled.
★2 The BRAKE is activated when the
button is pushed during playback.
13
ECHO TIME:
i Or when the TIME (BRAKE/ECHO) button
is pressed and held in for more than 1
second while ECHO is selected, the mode
for selecting the number of echo feedback
times is set.
o The time of ECHO can be selected with
the PARAMETERS knob.
!0 When the TIME (BRAKE/ECHO) button is
pressed again (short press), the echo delay
3-2
time can be selected with the
PARAMETERS knob.
!1 The delay time of ECHO can be selected
with the PARAMETERS knob.
!2 When the PARAMETERS knob is pressed,
the data is entered and the echo time
setting mode is cancelled.
★3 The ECHO is activated when the
button is pushed during playback.
DUMP/RVS
!3 The mode switches in the
following order each time
4-1
the DUMP/RVS button is
pressed: DUMP → RVS →
off.
DUMP:
Reverse playback is performed for the
specified time. Plays the sound backwards
while continuing in a forward motion without
losing “ elapsed time” when you return back to
4-2
normal (forward) play.
★4 Each pushing the
between DUMP playback and normal
playback.
• The reverse play turns off when the Hot
Start or stutter is started.
RVS (REVERSE):
★5 Each pushing the
4-3
between reverse playback and normal
playback.
• The reverse play turns off when the Hot
Start or stutter is started.
PLATTER MODE MEMO
The DRAG-S on/off setting and time data, the
BRAKE/ECHO on/off setting and time data and
the source for which the Platter effect function
is to be used can be stored in the preset mode.
5
• After making the desired settings, enter the
preset mode and stores the settings at
“ PRESET (5)” .
Once the settings are stored, they are
automatically set each time the power is
turned on. (See “ PRESET” on page 23.)
13 button switches
13 button switches
13
21
Page 22

ENGLISH
POWER
ON OFF
DI TAL OU
XEFFECT
P
IN
OUT
MAN
LL
LNE OUT
RR
MAN
MO I OR
POWER
ON OFF
DI TAL U
XEFFECT
P
IN
OUT
MAN
LL
LNE OUT
RR
FADER
MAN
MON OR
13
MEMO (Custom Setting Memory)
CD setting information can be stored in the non-volatile memory. The stored information can be called out of the
memory later, making it easy to prepare for your mixing.
1. About MEMO
• Up to 5000 memo points can be stored to internal memory for later recall.
The number of tracks on a particular CD only limits the amount of memo points available per that disc.
Example: If your CD has 22 tracks, you can only save up to 22 memos. (1 memo group per track.)
CAUTION:
5000 is the maximum possible number of tracks that can be stored to memory.
However, to simplify the MEMO operations, the memory system manages each 1250 MEMO data
package as a minimum unit (the total 5000 memory capacity divided into 4 package units). When you want
to clear just one MEMO data in the 1 MEMO CLEAR mode (see page 21), the unit will erase the memo
information but not the internal memo allocation number. Accordingly, depending on conditions, the
number of tracks that can be stored in the memory may be fewer than 5000.
Once you reached 5000 stored points, you will see a message that says “ MEMO FULL!” . At this time
you will need to “ delete” old data to make room for new memo points. Therefore the oldest 1250 memo
points will be deleted and become clear.
• Some data can be set and recalled from the memory in the Alpha-mode as well.
• The MEMO indicator on the display lights up when a track for which data is stored in the memory is
selected.
2. MEMO ITEMS
The following items are max to be stored under 1 memory bank:
q Cue and Alpha-Cue point
w A1-B1 and A2-B2 points
e A3-B3, A4-B4 points and A3/4 mode (not stored in the Sampler mode)
r Playing pitch, pitch on/off, Key Adjust on/off setting
3. MEMO MODE SELECT
q Push the MEMO button in Cue mode to enter MEMO mode.
w Turn the PARAMETERS knob to select the various MEMO modes from as follows.
Memo Set, MemoCall, Memo Clr
Depending on conditions, some modes cannot be selected.
e Push the MEMO button again to exit MEMO mode.
(1) Storing data in the memory [Memo Set]
• After make the settings to be stored in the memory, then push CUE button.
• When MEMO indicator on the display is off in Cue mode, push MEMO button to enable Memo set
function.
• If MEMO indicator lights up, it is necessary to clear existing Memo before store new Memo.
• At last push PARAMETERS knob to fix. You can see “ COMPLETE” message and MEMO indicator
lights up.
MEMO FULL
• If the memory is full and no more data can be stored, “ Memo Full!” and “ Del 1250?” message
appears.
• In this case, you need to clear memory of First 1250s Memo (number 1 to 1250) at a time to make
space for new memos.
• To make space, push PARAMETERS knob while “ Del 1250?” message is displayed.
• “ Delete OK?” message appears then push PARAMETERS knob again to execute clearing.
• After the first 1250s Memo (number 1 to 1250) are cleared, number after 1251 Memo are renumbered
as new 1, 2, 3… (now you have new 1250 empty space.).
(2) MEMO Call [Memo Call]
• When the CD includes tracks that DN-S5000 has Memo is inserted, MEMO indicator flashes 5
seconds.
• To call out the Memo data, select the track that you made MEMO. Then MEMO indicator lights up.
• Push the MEMO button to enable Memo call function.
• When the PARAMETERS knob is pushed in the Memo call mode, all the data stored in the memory is
loaded. DN-S5000 goes to standby mode at the called Cue point.
22
• When the playing pitch is loaded from the Memo with PITCH LED flashes, playing Pitch is locked until
Pitch Slider comes same Pitch. While playing Pitch is locked, PITCH LED keeps flashing.
Memo Call in Alpha-Mode
• In the Alpha-Mode, Memo call function can be used when Main Track is not Cue. And Memo call
function can be used without changing the Main Track operations.
(3) 1 MEMO CLEAR [Memo Clr]
• To clear one Memo data, select the track that you made MEMO. Then MEMO indicator lights up.
• Push the MEMO button to enable Memo clear function.
• When the PARAMETERS knob is pushed in MEMO CLEAR mode, the Memo data is cleared and the
MEMO indicator on the display turns off.
ALL MEMO CLEAR
• All memory data can be cleared.
• For instructions, see “ ⁄4 PRESET (15) MEMO ALL CLEAR” .
4. Copying all MEMO
• The MEMO data can be copied between DN-S5000s or DN-S5000 and DN-D9000.
• Also DN-2600F MEMO data can be copied onto the DN-S5000.
• For instructions, see “ ⁄4 PRESET (16) MEMO ALL COPY” .
5. X-EFFECT
• The MEMO datas of two DN-S5000 can be compared when the DN-S5000s are connected by X-EFFECT.
DN-S5000-1 DN-S5000-2
X-EFFECT OUT jack
X-EFFECT IN jack
3.5 mm stereo mini cord
NOTE:
The MEMO data of the two DN-S5000 units is checked when the disc is loaded.
Page 23

ENGLISH
POWER
ON OFF
DIGTAL OU
XEFFECT
P
IN
OUT
MAN
LL
LNE OUT
RR
MAN
MO I OR
POWER
ON OFF
DIGTAL OU
XEFFECT
P
IN
OUT
MAN
LL
LNE OUT
RR
FADER
MAN
MON OR
14
PRESET
1. Preset mode
q The preset mode is available when PRESET button is pushed for more than 1 sec while DN-S5000 is in
Cue, pause or no disc mode.
w Turn the PARAMETERS knob to select the preset item.
e After selecting an item, push the PARAMETERS knob to select the preset data.
r To change other Preset items, repeat these steps.
t Push the PRESET, CUE or PLAY/PAUSE (
13) button to exit from the Preset mode.
2. Preset items and data
The “ *” mark next to the data indicates the default value.
(1) AUTO CUE : Auto Cue level search on/off. (ON* / OFF)
(2) PITCH RANGE : Select the playing pitch range when the power is turned on. (±4 / ±10* / ±16 / ±24%)
(3) ALPHA-TRACK OUTPUT : Alpha-Track playback output destination. (Main out* / Alpha out)
(4) PLATTER : Select whether or not the Platter is to rotate during playback. (Turn round* / Turn stop)
(5) PLATTER MODE MEMO :
When the Platter mode (DRAG-S, BRAKE and ECHO) parameters, the source and the on/off setting
are stored, the stored data is set each time the power is turned on.
q To set the effect data, push the PARAMETERS knob and select “ YES“ .
• “ Set OK?” flashes on the character display.
w Push the PARAMETERS knob again and select “OK” to execute setting the data.
e Once setting is completed, “ Complete!” is displayed.
(6) AUTO LOAD : Time for automatically loading disc. (OFF / 10 / 30 / 60* seconds)
(7) EOM : Track end message start time. (OFF / 10* / 15 / 20 / 30 / 60 / 90 seconds)
(8) DIGITAL OUT OUTPUT LEVEL : Select the digital out output level. (Normal* / –6 dB Down)
NOTE: Use – 6dB if the playback output is clipped when the Main and Alpha-Tracks are played
simultaneously at the same position.
(9) FADER START MODE: Select 2-line type (Cue and Play) or 1 line type (Play and Pause).
(Play /Cue* / Play/Pause)
(10) POWER ON PLAY : Playback starts when the power is turned on if a disc is loaded. (On / Off*)
(11) A3/4 MODE : Select the A3 and A4 button operating modes when the power is turned on.
(Sampler* / 4H/S / Alpha-Track H/S)
(12) SINGLE/CONTINUOUS : Select the play mode when the power is turned on. (Single* / Continuous)
(13) ELAPSED/REMAIN: Select the time mode when the power is turned on.
(Elapsed* / Remain)
(14) PROGRAM ALL CLEAR : Clear all program play data in the non-volatile memory.
q To clear the program, push the PARAMETERS knob and select “ YES“ .
• “ Clear OK?” flashes on the character display.
w Push the PARAMETERS knob again and select “OK” to execute clearing the program.
“ Prog. Clear” is displayed on the character display while data clearing.
e Once clearing is completed, “ Complete!” is displayed.
(15) MEMO ALL CLEAR : Clear all MEMO data in the non-volatile memory.
q To clear all MEMO data, push the PARAMETERS knob and select “ YES” .
• “ Clear OK?” flashes on the character display.
w Push the PARAMETERS knob again and select “OK” to execute clearing all MEMO data.
• “ Memo Clear” is displayed on the character display while clearing.
e Once clearing is completed, “ Complete!” is displayed.
(16) MEMO ALL COPY :
Copy all MEMO data from the master unit of DN-S5000 (or DN-D9000, DN-2600F) to the slave unit
of DN-S5000 (or DN-D9000) when both unit are connected by the normal straight Cable. (See
diagram for the cable.)
NOTE: Be sure CD player have no discs inside.
A straight cable used:
X'EFFECT OUT
DN-S5000
DN-S5000 (X'EFFECT IN)
DN-D9000 (X'EFFECT)
DN-2600F (X'EFFECT)
• Using the straight cable, connect the X-EFFECT terminals between two DN-S5000 units or
between one DN-2600F and one DN-S5000 unit or between one DN-D9000 and one DN-S5000
unit.
• If a DN-2600F is the master unit, take the procedures below in the Preset mode of the DN-2600F
beforehand. (For details, refer to the DN-2600F’s operating instructions.)
✽ Set the “ Copy Master” for the Preset item (14).
Then, step to the q below on the slave unit of DN-S5000.
• Copying can be performed using the DN-S5000 and DN-D9000 in the same way as when using
two units of the DN-S5000.
DN-S5000-1 DN-S5000-2
X-EFFECT OUT jack
3.5 mm stereo mini cord
• Perform the copying operation as below on the slave unit of DN-S5000.
q To start copying, push the PARAMETERS knob and select “ YES” . Now “Copy OK?”
messages flashes on the character display.
w Push the PARAMETERS knob again to confirm. Now “Start OK?” is displayed.
NOTE: If a DN-2600F is the master unit, take the procedures below in the Preset mode of
the DN-2600F here.
In the Preset item (15), first start copying on the DN-2600F. Then, step to e below
on the slave unit of DN-S5000.
e Push the PARAMETERS knob once again, and the unit starts copying when the MEMO data
are received from the master unit. Now “ Copying” is displayed.
• If the master unit and the slave unit are not connected properly or the DN-2600F is not
prepared to start sending data, “ Not Connect” is displayed on the character display.
r When copying is completed correctly, “Complete!” is displayed.
• “ Copy Error” is displayed on the character display if copying was not completed correctly.
In this case, try the above procedure again.
• The copied MEMO data are added to the highest number area of the slave DN-S5000 unit.
(17) The DN-S5000’s software version is displayed. (SYSTEM / DSP / CD DRIVE)
(18) PRESET CLEAR : Set all the preset data back to the factory defaults.
q To clear the PRESET data, push the PARAMETERS.
“ Initial OK?” flashes on the character display.
w Push the PARAMETERS knob again and select “OK” to start clear the preset data.
“ Preset Int” is displayed on the character display while data clearing.
e Once clearing is completed, “ Complete!” is displayed.
X-EFFECT IN jack
23
Page 24

ENGLISH
q, e ★3
w, r,
t, y
★1
★2
PARAMETERS
ON / OF
PUSH
PARAMETERS
ON / OFF
PUSH
PARAMETERS
ON / OFF
PUSH
PARAMETERS
ON / OF
PUSH
MEMO
PRESET
MEMO
PRESET
15
• Up to 25 tracks from one disc can be programmed.
• Programs for up to six discs (one program per disc) can be stored in the non-volatile memory for later recall.
NOTE: Such functions as Hot Start, Sampler, Mirror Mix, and Platter Effect do not operate during programmed
PROGRAM/RANDOM/RELAY PLAY/POWER ON PLAY
Program play
playback.
Program mode select
q In the Cue or pause
mode, push the PRESET
button for more than 1
sec to select preset
mode.
When the PRESET button is pressed at this
time, the program mode is selected.
✽ The mode switches in the following
order each time the PRESET button is
pressed (short press): preset mode →
program mode → random mode → off.
w Turn the
1
PARAMETERS knob to
select the various
program setting
modes as follows.
Prog.In, Prog.On, Prog.Off,
MemoSet, MemoCall,
Memo Clr
Depending on conditions, some modes
cannot be selected.
e Push the PRESET button
again to exit program
mode.
★2 Clear Tracks from Program
• You can clear tracks from the previously
2-2
programmed tracks.
• One track can be cleared at a time using
the PITCH BEND – button.
y Push the
PARAMETERS knob
again to return step
1 – r.
2-
3
• Repeat these steps to input whole
program.
• Push the PRESET button to end the
program input mode, then proceed to
Start Program Play (Prog.On).
Start Program Play (Prog.On)
• When “ Prog.On” is selected, DN-S5000 will
cue up at the first track in the program.
• Program playback starts when the
4
button is pushed.
★3 You can use program repeat play function
with push EXIT/RELOOP button.
Cancel Program mode (Prog.Off)
• When “ Prog.Off” is selected, the program
5
play mode turns off and returns to normal
play mode.
Store Program (MemoSet)
• When “ Memo Set” is selected, the program
6
that has been set is stored in the non-volatile
memory.
13
24
Input Program (Prog.In)
Input the program for program playback.
r Turn the
PARAMETERS knob to
select the track.
t Push the
PARAMETERS knob
2-1
to input the selected
track to the program.
★1 Insert Tracks to Program
• You can insert tracks to the previously
programmed tracks.
• One track can be inserted at a time using
the PITCH BEND + button and return r.
Call Program (MemoCall)
• When “ MemoCall” is selected, the program
7
stored in the non-volatile memory is loaded
and the program play mode is set.
Clear Program (Memo Clr)
• When “ Memo Clr” is selected, the program
for the loaded disc is cleared.
8
• To clear all Program Memo use Preset
function.
Page 25

ENGLISH
MEMO
PRESET
PARAMETERS
ON / OFF
PUSH
/ SINGLE
CONT.
RELAY
q, w
MEMO
PRESET
PARAMETERS
ON / OFF
PUSH
rq, t
w, y
e
/ SINGLE
CONT.
RELAY
Random playback
• With the random play function, tracks are selected at random and played from the disc.
NOTE: Such functions as Hot Start, Sampler, Mirror Mix and Platter Effect do not operate during random
playback.
Start Random Play
Random Play mode (Random On)
q In the Cue or pause
mode, push the PRESET
button for more than 1
sec to select preset
mode.
“ Random On?” is selected when the
PRESET button is pressed twice at this
1
time.
w Push PARAMETERS
knob to set the
random play mode.
The unit will standby
at a track selected at
random.
e Push the
2
r You can use random repeat
Cancel Random Play (RandomOff)
t “ Random Off” can be
3
y Push PARAMETERS
13 button on
the player that is in the
standby mode to start
random playback.
play function by pushing the
EXIT/RELOOP button.
selected when the
PRESET button is pushed
during random playback.
knob to cancel
Random play. The
unit will return to the
normal play mode.
Relay playback
• Relay Play function is a playback mode to continue play tracks of CDs in two DN-S5000s.
• Connect the X-EFFECT IN/OUT terminals between two DN-S5000s.
Start Relay Play
q Push the RELAY button
for more than 1 sec to
enable Relay play mode.
You can set Relay mode
as below.
• In the single play mode, when the one
player’s playback reaches end of track,
1
another DN-S5000 starts playing.
• In the continuous play mode, when the
whole tracks on one side are finished,
another DN-S5000 starts.
Stop Relay Play
w When the RELAY button
is pushed for more than 1
2
sec while in the relay play
mode, the relay play
mode is turned off.
• The discs in two DN-S5000s can be
played alternately by setting both DNS5000 to the relay play mode.
• Relay play can be set in the program and
random play modes.
Power on play
• When “ POWER ON PLAY” is set to “ ON” at “ ⁄4 PRESET (10)” , playback starts from the first track on the
disc when the power is turned on.
25
Page 26

A
B
B
∗
ENGLISH
B
16
SPECIFICATIONS
GENERAL
Type: Compact disc player
Disc type: Standard compact discs (12 cm discs), CD-TEXT
Dimensions: Player unit: 285 (W) x 111.5 (H) x 327 (D) mm (without feet)
Installation: Table top type
Mass: Player unit: 5.7 kg (12 lbs 9 oz)
Power supply: U.S.A., Canada and Taiwan R.O.C. models: 120 V AC ±10%, 60 Hz
Power consumption: 18 W
Environmental conditions: Operational temperature: 5 to 35°C (41 to 95°F)
AUDIO SECTION
Main out, Monitor out
Quantization: 24-bit linear per channel
Sampling frequency: 44.1 kHz at normal pitch
Oversampling rate: 8 times
Total harmonic distortion: 0.01% or less
Signal to noise ratio: 90 dB or more
Channel separation: 85 dB or more
Frequency response: 20 to 20,000 Hz
Analog output
Output level: 2.0 V r.m.s.
Load impedance: 10 kΩ/kohms or more
Digital output
Signal format: SPDIF
Output level: 0.5 Vp-p 75 Ω/ohms
FUNCTIONS
Instant start: Within 20 msec.
Variable pitch: ±4% (0.05% pitch), ±10% (0.1% pitch), ±16% (0.1% pitch)
Pitch bend: Pitch range ±32%
Sampler
Sampling: 44.1 kHz
Length: 15 sec.
Output level: 2.0 V r.m.s. (Variable / -14 ~ +6 dB)
Variable pitch: ±24% (0.1% pitch)
Search precision: 1/75 sec. (1 subcode frame)
Max. scan speed: Over 20 times normal speed
Max. MEMO memory steps: 5000 steps
✽ Specifications and design are subject to change without notice for purpose of improvement.
CD-R, CD-RW discs
NOTE: Finalized CD-R or CD-RW discs can be played back in this unit.
However, according to recording quality, some CD-R/RW discs
cannot be played.
11-7/32” (W) x 4-25/64” (H) x 12-7/8” (D)
European models: 230 V AC ±10%, 50 Hz
Operational humidity: 25 to 85% (no condensation)
Storage temperature: – 20 to 60°C (4 to 140°F)
±24% (0.1% pitch), ±100% (1.0% pitch)
Pitch range ±100%: ±99%
17
REPLACING THE BELT
• On the DN-S5000, the platter is driven by a belt.
In the unlikely case of trouble, use the procedure described below to replace the belt.
1. Remove a screw (Hexagon socket head) and
pull out Scratch Disc and Slip Mat.
2. Remove Belt from Motor Pully.
3. Remove 3 screws (< head) and pull out
Platter.
4. Remove Belt from Platter.
5. Mount in the order 4 → 1.
CAUTIONS:
• Unplug the power cord before replacing the
belt.
• Do not touch the sensor or scale(∗) when
removing the Platter.
• Do not apply oil or grease to the belt when
replacing it.
A
(Hexagon socket head)
Belt
Motor Pully
(< head)
Platter
Belt
Stabilizer
Scratch Disc
Slip Mat
Slip Sheet
(< head)
Platter
26
Page 27

ESPA OL
– INDICE –
Caracter sticas principales ................................69
z
Conexiones/Instalaci n.....................................70
x
Nombres de los componentes y
c
funciones .................................................70 ~ 73
Los discos compactos......................................73
v
Operaciones b sicas.........................................74
b
Scratch..............................................................75
n
Reproducci n de Alpha-Track
m
(Sampler en timpo real)..............................76, 77
Alpha-Mode (Monitor Alpha-Track)...................78
,
Seamless loop/Hot Start/
.
Stutter y Splice ...........................................79, 80
A/B Trim............................................................81
⁄0
A3/A4 para Sampler, 4 Hot Start,
⁄1
Alpha-Track Hot Start..................................82, 83
Platter Effect.....................................................84
⁄2
Memo (Memoria de ajuste personalizado).......85
⁄3
Preset...............................................................86
⁄4
Program/Random/Relay Play/Power On Play
⁄5
....................................................................87, 88
Especificationes................................................89
⁄6
⁄7 Sustituci n de la correa
• ACCESORIOS
Compruebe que la unidad principal va acompa ada de las piezas siguientes:
q Manual de instrucciones.....................................1
w
Cables de conexi n para salida de se ales (RCA)
CARACTER STICAS PRINCIPALES
1
Enhorabuena por haber comprado el DN-S5000. El
reproductor de CD de mesa DN-S5000 est equipado
con una gran variedad de opciones y funciones
avanzadas, y est preparado para ofrecer un
rendimiento ptimo para aquellos que pretendan
desarrollar una creatividad y una capacidad art stica sin
l mites.
Estructura profesional y piezas
1. Platter de motor activo (Nuevo)
Cuando se inicia la reproducci n, el Platter gira en
el mismo sentido en el que lo har a un platter
anal gico. El Platter de motor activo consta del
platter, una alfombrilla de deslizamiento y un
Scratch Disc, igual que en un plato anal gico, de
modo que puedan encontrarse los inicios de cada
una de las pistas, se puedan acoplar los ritmos y
se pueda realizar el scratching de la misma
manera que en un plato anal gico. o de modo.
2. Carga r pida y unidad desmontable (Nuevo)
Nuestra estructura de dispositivos sustituibles de
nuevo dise o est pensada para aquellos
profesionales que requieren un “ tiempo de
inactividad” pr cticamente nulo. Los dispositivos
que han de soportar una mayor carga de trabajo
est n construidos con piezas de alta calidad para
asegurar una m xima duraci n.
3. Visualizadores visibles
La visibilidad ha mejorado enormemente gracias a
los visualizadores de tubo FL, a los botones
iluminados y a la iluminaci n del recept culo de
los discos, que resulta muy til en entornos con
poca visibilidad.
4. Interfaz de control mejorada
Se obtienen unas buenas sensaciones y un buen
funcionamiento de la unidad gracias a un plato
m s grande, al bot n de selecci n de direcci n
SCRATCH, al bot n de selecci n de fuente de
SCRATCH, al bot n FAST SEARCH, al bot n
TRACK/PARAMETERS, a un bot n de
desplazamiento de tono de 100 mm y a los
botones de goma suave.
e Correa .................................................................1
......2
r Llave hexagonal ..................................................1
Caracter sticas y Funciones
La incorporaci n del potente DSP y una gran
capacidad de memoria permite la presencia de
nuevas opciones de control como:
1. SCRATCH (Mejorada)
Gracias al Platter de motor activo, el sonido
Scratch es tan bueno como el logrado con los
platter anal gicos.
Es m s, las opciones Main Track, Alpha-Track y
Samples pueden seleccionarse como fuente del
sonido Scratch con s lo pulsar un bot n,
permitiendo una gran cantidad de operaciones de
Scratch, que no son posibles con los platter
anal gicos.
2. HOT DISC (Nueva)
Los discos pueden cambiarse mientras el sonido
se est reproduciendo (hasta 35 segundos). Si el
disco se sustituye durante el modo Seamless
Loop (m ximo 35 segundos entre los puntos A y
B), el disco puede sustituirse sin tener que
preocuparse por el tiempo.
Gracias a las funciones Alpha-Track y Hot Disc, el
sonido puede reproducirse de la misma forma
que en un reproductor de CD doble, incluso si se
utiliza s lo una unidad DN-S5000.
3. MIRROR MIX (Nueva)
El modo Alpha Track puede reproducirse con un
retardo del ritmo o tiempo especificados despu s
del modo Main Track.
Mirror Mixing tambi n es posible en los modos
de reproducci n RVS, dump (volcado) y Scratch,
de modo que puede obtenerse una gran variedad
de efectos de sonido.
4. REPRODUCCION ALPHA-TRACK
Esta nueva y potente funci n permite una
reproducci n simult nea e independiente de otra
pista del mismo disco, nosotros llamamos a este
sistema “ Alpha-Track”. Los niveles de pitch y de
salida de la reproducci n para Alpha-Track
pueden ajustarse.
....................................89
5. ALPHA-MODE
La salida Alpha-Track puede o rse a trav s de las
clavijas ALPHA OUT RCA de forma separada, de
modo que usted pueda reproducir hasta cuatro
pistas de forma simult nea a trav s de un
mezclador de 4 canales. Esto le permitir realizar
una transici n suave desde la pista actualmente
en reproducci n a la siguiente pista del mismo
CD, sin ning n salto de sonido.
6. HOT START y STUTTER
La funci n Hot Start le permite comenzar la
reproducci n de forma inmediata desde un punto
fijo establecido por usted. Pueden establecerse
hasta cuatro puntos para cada unidad durante la
configuraci n del modo 4 Hot Start.
Las Hot Starts cargadas pueden utilizarse
tambi n para “ Stutter” esos mismo puntos. En
modo Stutter, el audio moment neo se oye
seg n el tiempo durante el cual se mantienen
pulsados y liberados estos botones.
7. SEAMLESS LOOP
Con esta funci n, cualquier secci n de una pista
puede reproducirse de forma repetida sin que se
produzca ning n corte en el sonido o limitaci n
en su longitud. El DN-S5000 soporta un total de
ocho Seamless Loops para ambas unidades. El
DN-S5000 tambi n posee una amplia variedad de
funciones de looping.
8. SPLICE
Esta funci n elimina a la perfecci n las secciones
no deseadas de una pista, como por ejemplo,
grandes interrupciones vocales en mezclas de
baile o letras expl citas en m sica pop.
9. SAMPLER
Cada uno de los cuatro samplers digitales
integrados en la placa pueden grabar hasta 15
segundos de sonido con calidad de CD, con una
frecuencia de muestreo de 44,1 kHz. Usted
podr repetir estas muestras en un bucle o
reproducirlas en sentido inverso (reverse).
El nivel de pitch y de salida de cada muestra
puede ajustarse de forma independiente.
El punto B puede fijarse o cambiarse f cilmente
del mismo modo que lo har a con la funci n A-B
seamless loop.
10. A/B TRIM y MOVE
Los puntos A y B para los modos Seamless Loop
(bucle perfecto), Sampler loop (bucle de muestra)
y los puntos de uni n pueden ajustarse
f cilmente utilizando la funci n Scratch Disc.
Hay dos modos disponibles para el ajuste de A/B.
A-B TRIM: para el ajuste de los puntos
A/B MOVE: para mover los puntos utilizando
11. PLATTER MODE (Mejorada)
La reproducci n estilo platos anal gicos puede
simularse utilizando cinco Platter efects.
DRAG START: Simula el sonido de arrastre de
BRAKE: Simula el sonido que hace un plato
TAIL ECHO: A ade un sonido de eco cuando
mientras se reproduce el loop en
vivo.
la b squeda manual.
un plato impulsado mediante correa
arrancando desde el modo de parada.
de vinilo cuando se detiene por
completo lentamente.
se realiza una pausa en la
reproducci n.
DUMP: Reproduce el sonido en sentido
inverso al mismo tiempo que sigue
movi ndose hacia delante, siempre
sin perder el “ tiempo transcurrido”
cuando se regresa al modo de
reproducci n normal.
RVS: (Reverse) Reproduce el sonido en
sentido inverso hasta que se regresa
12. AUTO BPM COUNTER, AUTO BPM COUNTER
LOCK, MANUAL TAP, y MANUAL BPM INPUT
(Nueva)
Adem s de un contador autom tico BMP y un
funci n de golpeteo manual, la unidad DN-S5000
tambi n est equipada con una funci n de
bloqueo para bloquear de forma provisional el
contador autom tico BMP y con una funci n de
entrada manual BMP para introducir
directamente el valor BMP, de modo que pueda
ajustarse el BMP f cilmente.
13. MEMO
Algunos ajustes, como Hot Starts, A-B Loops, AB Splice o Pitch and Key Adjust pueden
guardarse de forma interna en memoria no vol til
para su posterior utilizaci n. Hay hasta 5.000
puntos disponibles (1 memoria por pista).
La funci n de memoria puede utilizarse en Alpha
Mode. Los contenidos de la memoria pueden
intercambiarse.
14. PITCH/KEY ADJUST
PITCH: La velocidad de la reproducci n
KEY ADJUST: Mantiene la key original incluso si
15. DIGITAL OUT (Improved)
La salida digital para Main y Alpha-Tracks
proporcionan una se al digital 100% aut ntica,
sin ninguna restricci n o limitaci n sea cual sea el
ajuste de cambio de tono o de modo.
16. FADER START / X-EFFECT IN/OUT (Nueva)
Los controles DN-S5000 FADER START e XEFFECT son compatibles con nuestro DN-X800
mixer. S lo Fader Start es compatible con el DNX400 mixer. Cuando se contactan dos unidades
DN-S5000 mediante los terminales X-EFFECT, es
posible comparar sus memorias.
17. SHOCKPROOF MEMORY
16 segundos de memoria a prueba de golpes
evitan cualquier interrupci n audible debida a
impactos mec nicos externos, como golpes y
vibraciones fuertes, lo cual es especialmente til
para el DJ m vil, as como para aplicaciones de
instalaci n en clubs nocturnos.
18. PROGRAM/RANDOM/RELAY PLAY
Podr reproducir pistas de varias formas con los
modos de reproducci n PROGRAM (programa),
RANDOM (aleatorio) y RELAY (relevos).
19. PRESETS
Es posible personalizar la m quina a sus
preferencias guardando sus ajustes favoritos en la
memoria interna. Para conocer los elementos que
se encuentran en las presets, consulte la p gina 86.
20. CD TEXT (texto del CD) (Nuevo)
al modo de reproducci n normal.
se ajusta con el bot n de control
de PITCH. Los valores l mites
ajustables de pitch son +/– 4, 10,
16, 24, 100% (seleccionable).
la velocidad de reproducci n de
pitch se cambia con el bot n de
control de PITCH.
27
Page 28

ESPA OL
CH1 CH2 CH3 CH4
FADE
Rch3
FADE
Rch4
X'EFFECT
DN-X800
MAIN ALPHA
FADER
MAIN
FADER
ALPHA
DN-S5000
X'EFFECTINX'EFFECT
OUT
CH1 CH2 CH3 CH4
FADE
Rch3
FADE
Rch4
X'EFFECT
DN-X800
MAIN ALPHA
FADER
MAIN
FADER
ALPHA
DN-S5000
CD1
X'EFFECTINX'EFFECT
OUT
MAIN ALPHA
FADER
MAIN
FADER
ALPHA
DN-S5000
CD2
X'EFFECTINX'EFFECT
OUT
2
1. Desconecte el interruptor POWER.
2. Conecte el haz de cables RCA entre las salidas del DN-S5000 y las entradas de su mixer. Aseg rese de que
las MAIN OUTs son salidas principales y que las ALPHA OUTs son salidas de sonido Alpha-Track.
3. Si su mixer posee la funci n Fader Start, como nuestros modelos DENON DN-X800 o DN-X400, conecte las
clavijas de FADER 1 y 2 al mixer utilizando un minicable est reo de 3,5mm.
4.
Si tiene un DENON DN-X800 mixer, puede utilizar la funci n X-Effect para controlar los Hot Starts, Samplers y
Brakes desde el crossfader para conseguir una gran variedad de modos de funcionamiento. Tambi n puede activar
el Alpha Track conectando el Fader Start 1, 2 al DN-X800 mixer, utilizando los minicables est reo de 3,5 mm.
Fig.1: Conexiones Fader Start ejemplo 1 Fig.2: Conexiones X-Effect ejemplo 1
• La reproducci n de inicio atenuado es posible con
los modos Main y Alpha Track.
Conexiones Fader Start ejemplo 2
MAIN ALPHA
CONEXIONES/INSTALACI N
FADE
CH1 CH2 CH3 CH4
DN-X400
MAIN ALPHA
DN-S5000
X'EFFECTINX'EFFECT
CH1 CH2 CH3 CH4
DN-X400
FADER
FADER
MAIN
ALPHA
CD1
OUT
DN-S5000
X'EFFECTINX'EFFECT
Rch1
FADER
FADER
MAIN
ALPHA
OUT
FADE
Rch1
MAIN ALPHA
X'EFFECTINX'EFFECT
FADE
Rch2
minicable est reo de 3,5 mm
FADE
Rch2
FADER
FADER
MAIN
ALPHA
DN-S5000
CD2
OUT
Cable RCA
• La reproducci n X-EFFECT es posible con los modos
Main y Alpha Tracks.
Conexiones X-Effect ejemplo 2
NOMBRES DE LOS COMPONENTES Y FUNCIONES
3
(1) Panel frontal
Ranura para la carga de discos
q
• Cargar el CD. Cargue el disco lentamente y
su ltele una vez que la unidad DN-S5000 inicie
el arrastre del disco.
PRECAUCIONES:
• No cargue discos con la alimentaci n
desactivada.
• No intente forzar la salida de un disco una
(2) Panel trasero
Bot n POWER (¢ON £OFF)
e
• Pulse este bot n para encender y apagar su
equipo.
PRECAUCI N:
• No desconecte la alimentaci n mientras se
est cargando o expulsando un disco. Si no
lo hace as , el mecanismo de carga puede
verse da ado.
vez que la unidad DN-S5000 ha iniciado el
proceso de arrastre.
• No cargue m s de un disco ni inserte nada
que no sea un disco.
Si no lo hace as , el mecanismo de carga
puede verse da ado.
Unidad de CD
w
• Puede sustituir esta unidad cuando lo desee.
• Se vende por separado la unidad de recambio
opcional.
Terminales X-EFFECT
r
(X-EFFECT IN/OUT)
• Conecte este cable al DENON mixer DN-X800
y DN-S5000 con miniclable est reo de 3,5 mm.
Terminales de salida anal gica
t
alpha
(LINE OUT ALPHA)
• Se trata de clavijas de salida desequilibrada.
• Las se ales de audio Alpha-Track son de salida.
Terminales de salida anal gica
y
principal
(LINE OUT MAIN)
• Se trata de clavijas de salida desequilibrada.
• Salidas de se ales de audio principal.
Clavijas de segumiento de salida
u
anal gica
(FADER MAIN, ALPHA)
• Util celas si su mixer tiene la funci n Fader
Start con minicable est reo de 3,5 mm.
Terminales de salida digital
i
(DIGITAL OUT MAIN, ALPHA)
• Los datos digitales salen por estas clavijas.
• Utilice cable de 75 Ω/ohms para las
conexiones.
• Recomendamos el uso de cables blindados
tipo cableado trenzado.
• La reproducci n de inicio atenuado es posible con
los modos CD 1 Main Track y CD 2 Main Track.
• Las memorias de CD1 y CD2 pueden compararse
cuando los reproductores de CD est n conectados
mediante los terminales X-EFFECT.
• Reproducci n por turnos.
28
• La reproducci n X-EFFECT es posible con los
modos CD 1 Main Track (pista principal CD 1) y CD
2 Main Track (pista principal CD 2).
• Las memorias de CD1 y CD2 pueden compararse
cuando los reproductores de CD est n conectados
mediante los terminales X-EFFECT.
• La reproducci n de inicio atenuado es posible con
el modo de Alpha Track (pista alpha) de CD1 y CD2.
• Reproducci n por turnos.
Page 29

ESPA OL
a
(3) Panel superior
PRECAUCI N:
• Tenga en cuenta que hay mucho botones con
dos funciones diferentes dependiendo de si
pulsan durante m s o menos tiempo (1 segundo
o m s). La marca indica una funci n de
tiempo corto, mientras que la marca indica
una funci n de pulsado de tiempo largo.
Bot n PLAY/PAUSE (13)
o
• Este bot n iniciar o detendr la reproducci n.
• Pulse una vez para iniciar la reproducci n, y
puse de nuevo para hacer una pausa en la
reproducci n. Si vuelve a pulsar una vez m s, la
reproducci n continuar .
Bot n DISC EJECT, HOT DISC
!0
• DISC EJECT:
Expulse el disco con este bot n mientras ste
se encuentre iluminado. Tenga en cuenta que
si no est iluminado, no podr expulsar el
disco. (Eject lock function)
• HOT DISC:
Cuando este bot n se mantiene pulsado
durante m s de 1 segundo durante la
reproducci n, el disco puede ser expulsado.
Bot n CUE
!1
• Si se pulsa este bot n en modo Reproducci n
forzar a la pista a volver a la posici n en la que
comenz la reproducci n. Si se pulsa durante
una en modo de b squeda, crear un nuevo
punto Cue.
• En modo Cue, al pulsar el bot n CUE, se crear
un sonido Stutter desde el punto Cue. Esto es
lo que se llama la STTUTER PLAY.
Platter/Scratch Disc
!2
Utilice esto para realizar una b squeda manual y
operaciones de curva de tono y scratch.
• Plato:
El plato gira cuando se inicia la reproducci n de
la fuente seleccionada en el modo Scratch
(pistas principal o alpha).
• Disco de scratch:
Cuando est activada la opci n Scratch Disc
(disco scratch), se inicia la reproducci n
Scratch de la fuente seleccionada en el modo
Scratch (pistas principal o alpha, o muestra).
NOTA: El plato no gira cuando el modo
Scratch est ajustado como SAMPLER
(muestra), o en modo SEARCH
(b squeda). Si se ha seleccionado la
opci n “ PLATTER off” (plato
desactivado) en las preselecciones, el
plato nunca gira, sea cual sea el modo
Scratch.
PRECAUCI N:
• No fuerce la detenci n del plato cuando
ste est girando. Si no lo hace as , el
mecanismo de movimiento del plato puede
resultar da ado.
• Si aparece un problema de giro del plato
mientras ste est girando, el plato dejar
de girar y se establecer el modo de pausa.
Bot n de selecci n de direcci n
!3
SCRATCH
Seleccione la direcci n de reproducci n Scratch.
• BOTH:
Cuando est activada la opci n Scratch Disc, el
sonido Scratch sale en ambas direcciones.
• FWD:
Cuando est activada la opci n Scratch Disc el
sonido Scratch sale s lo en la direcci n hacia
delante.
Bot n de selecci n de fuente
!4
SCRATCH
Seleccione la fuente para la reproducci n Scratch
y el modo de b squeda/curva manual.
• MAIN:
Sonido Scratch Main Track
•
TRACK:
Sonido Scratch Alpha-Track
• SAMP.:
Sonido Scratch Sampler Track.
• SEARCH:
Cuando la funci n Scratch Disc est activada
durante la reproducci n, trabaja como funci n
de curva de tono.
Cuando la funci n Scratch Disc est en modo
pausa o de parada, trabaja como funci n de
b squeda manual. La b squeda manual
trabaja y usted puede mover un punto en un
nico cuadro (1/75 de segundo) con sonido.
Bot n FLIP/CLR
!5
• FLIP:
Util celo para seleccionar el modo de
funcionamiento de los botones A1 y A2, desde
los modos Hot Start y Sttuter. El LED FLIP se
encender en el modo Hot Start.
• A1, A2 CLR:
Si el bot n FLIP se pulse al mismo tiempo que
el bot n FLIP, podr borrar el punto A
seleccionado.
Si se mantiene pulsado el bot n FLIP durante
m s de un segundo, podr borrar todos los
puntos A1 y A2 al instante.
Bot n (SAMP) RVS/FLIP/CLR
!6
• (SAMP)RVS:
Utilice este bot n para seleccionar el sentido
de reproducci n de la muestra. Cuanto tenga
seleccionado una inversi n, el LED RVS se
ilumina.
• FLIP:
Si se encuentra en el modo 4 Hot Start o
Alpha-Track Hot Start, este bot n funcionar
como el bot n FLIP para A3, A4. Puede
seleccionar el modo Hot Start o Stutter.
Cuando haya seleccionado el modo Hot Start,
el LED FLIP se iluminar .
• A3, A4 CLR:
Si el bot n A3 o A4 est n pulsados mientras
se pulsa en bot n FLIP (voltear), puede borrar
el punto ha seleccionado.
Si se mantiene pulsado el bot n FLIP durante
m s de un segundo, podr borrar todos los
puntos A3 y A4 al instante.
Bot n A1
!7
Bot n A2
!8
• Utilizando estos botones, usted puede crear
puntos de inicio para la reproducci n Hot Start,
Seamless Loop, Stutter y Splice.
• La iluminaci n del bot n cambia de color para
informar de los diferentes modos.
Naranja.....Modo Hot Start
Verde........Modo Alpha-Track Hot Start
Amarillo....Modo Splice
Bot n SAMP1/A3
!9
Bot n SAMP2/A4
@0
• SAMP1/SAMP2:
En el modo sampler, pulse estos botones para
grabar o reproducir sonido de Sampler 1 o 2.
• A3, A4:
En los modos 4 Hot Start o Alpha-Track Hot
Start, funcionan como un boton A3 o A4.
Puede utilizar estos botones para la
reproducci n Hot Start, Seamless Loop y
Stutter.
• El color de la iluminaci n de estos 2 botones
cambia para cada modo.
Naranja
..Modo 4 Hot Start
Verde ....Modo Alpha-Track Hot Start o
Sampler
Bot n B
@1
• Utilice este bot n para ajustar el punto B para
A1 y A2 seamless loop y el fin de la
reproducci n splice.
• El LED B indica las condiciones del punto B.
LED B encendido:
El punto B ya est fijado.
LED B parpadeado:
En modo de ajuste del punto Splice.
Bot n (SAMP) B, B
@2
• (SAMP)B:
En el modo Sampler, util ce este bot n para
ajustar el punto sampler loop B.
• B:
En los modos 4 Hot Start o Alpha-Track Hot
Start, util celo para ajustar el punto B para A3
o el bot n A4 para seamless looping.
Bot n A/B TRIM, SPLICE
@3
• A/B TRIM:
Al pulsar este bot n durante un corto
espacio de tiempo, el modo de recorte
de los puntos A y B se activa y desactiva
en modo PLAY y CUE.
• SPLICE:
Si se pulsa durante m s de 1 segundo,
se iniciar el modo de ajuste del punto
del punto Splice para A1 y A2.
Bot n (SAMP) EXIT/RELOOP,
@4
EXIT/RELOOP
• (SAMP)EXIT/RELOOP:
Utilice este bot n para activar y desactivar el
modo Sampler Loop. Tambi n act a como un
bot n EXIT/RELOOP para Sampler Loop para
salir o volver de nuevo.
• EXIT/RELOOP:
En los modos 4 Hot Start or Alpha-Track Hot
Start, util celo para salir o volver a Seamless
Loop para A3 y A4.
• El LED EXIT/RELOOP indica las condiciones
del loop (bucle).
LED EXIT/RELOOP encendido:
Seamless Loop activo o en
reproducci n.
LED EXIT/RELOOP parpadeando:
Reproducci n despu s de salir del
loop.
Bot n EXIT/RELOOP
@5
• Utilice este bot n para salir, regresa a la
reproducci n Seamless Loop para A1 y A2
manteniendo toda la configuraci n del ciclo.
Puede adicionar una variedad de ciclos con
esta funci n.
• El LED indica cu l es el estado del looping
(bucles).
LED EXIT/RELOOP encendido:
Seamless Loop activo o en
reproducci n.
LED EXIT/RELOOP parpadeando:
Reproducci n despu s de salir del loop.
• Este bot n cambia activa y desactiva los
modos de reproducci n repetida en los modos
Program y Random.
Bot n A3/4, PITCH/VOL
@6
• A3/4:
Despu s de pulsar durante un breve espacio
de tiempo, el modo de funcionamiento del
bot n A3, A4 puede seleccionarse con el
bot n PARAMETERS desde Sampler, 4 Hot
Start Alpha-Track Hot Start.
29
Page 30

ESPA OL
a
• PITCH/VOL:
Despu s de pulsar durante m s de un
segundo, el nivel de pitch y salida del Sampler
y de la reproducci n Alpha-Track pueden
ajustarse con el bot n PARAMETERS.
Bot n DISPLAY MAIN/a(Alpha),
@7
TITLE
• DISPLAY MAIN/a(Alpha):
Si pulsa de forma r pida, aparecer n los
cambios entre la visualizaci n MAIN (principal)
y la visualizaci n a TRACK.
• TITLE:
Cuando hay datos de CD text, stos se
muestran cuando el bot n se pulsa durante
m s de un segundo.
La visualizaci n vuelve a su estado normal una
vez se han mostrado los datos de CD text.
Bot n CONT./SINGLE, RELAY
@8
• CONT./SINGLE:
Pulsar durante un tiempo corto activa el modo
de finalizaci n entre CONT (continuar:
reproducir m s pistas) y SINGLE ( detener la
reproducci n cuando acabe la pista actual).
• RELAY:
Usted puede activar y desactivar el modo
RELAY PLAY.
La reproducci n por turnos es posible cuando
se conectan dos unidades DN-S5000
mediante los terminales X-EFFECT.
Bot n TIME, T.TIME
@9
• TIME:
Pulsar durante un corto espacio de tiempo
muestra los cambios de modo entre ELAPSED
TIME y REMAIN TIME.
• T.TIME:
Pulsar durante un largo espacio de tiempo
muestra los cambios de modo entre TRACK
TIME y DISC TIME.
• De este modo, usted puede seleccionar el
modo de visualizaci n de cuatro posibles,
TRACK ELAPSED, TRACK REMAIN, DISC
ELAPSED y DISC REMAIN.
Bot n MEMO, PRESET
#0
(/ PROGRAM/RANDOM)
• MEMO:
El modo memo se activa cuando se pulsa este
bot n mientras se esta en modo Cue.
• PRESET:
Cuando se pulsa este bot n durante m s de
un segundo, se activa el modo PRESET.
• PROGRAM:
Cuando el modo Preset est seleccionado,
pulsando de forma r pida, puede obtener una
lista de reproducci n de programa y
activar/desactivar el modo de reproducci n
Program utilizando el bot n PARAMETERS.
30
• RANDOM:
Una vez seleccionado el modo Program,
pulsando de forma r pida, puede
activar/desactivar el modo de reproducci n
Random (aleatorio) con el bot n
PARAMETERS.
Bot n FAST SEARCH (6 7)
#1
• La reproducci n r pida hacia delante se
selecciona cuando se mueve hacia el lado
7, la reproducci n r pida hacia atr s se
selecciona cuando se mueve hacia el lado
6.
Bot na(Alpha) MODE,
#2
MIRROR MIX
•a(Alpha) MODE:
Utilice este bot n para activar y desactivar el
Alpha-Mode. Los sonidos de reproducci n
Alpha-Mode salen desde las clavijas ALPHA
OUT del Alpha-Mode.
• MIRROR MIX:
El modo Mirror Mix se selecciona cuando se
mantiene pulsado este bot n durante m s de
1 segundo. Si se mantiene pulsado el bot n
durante m s de 1 segundo, se desactivar el
modo Mirror Mix.
En el modo Mirror Mix, el modo Alpha-Track
se reproduce con un retardo del ritmo o de los
tiempos especificados despu s de Main Track.
Bot na(Alpha) CUE/SAMP. STOP
#3
•a(Alpha) CUE:
Util celo como el bot n CUE y STUTTER en
Alpha-Track.
Este bot n se ilumina cuando se ajusta el unto
Alpha-CUE.
• SAMP. STOP:
Pulse durante la reproducci n del Sampler y
sta se detendr .
Bot n TRACK/PARAMETERS
#4
• TRACK:
Con el LED PARAMETERS iluminado, gire este
bot n para seleccionar las pistas.
Si pulsa este bot n mientras lo gira, las pistas
cambiar n de 10 en 10.
• PARAMETERS:
Con el PARAMETER LED parpadeando, gire
este bot n para seleccionar y cambiar el
par metro para elementos encontrados en las
opciones Platter effects, Program, Memo,
Preset data, etc.
Bot na(Alpha) track Play/Pause
#5
(13)
• Cuando se pulsa est bot n en modo Cue o
Pause, se inicia la reproducci n Alpha-Track. Si
se pulsa de nuevo, el modo Alpha-Track
realizar una pausa.
• Es necesario crear un punto Cue para el AlphaTrack antes de comenzar la reproducci n
Alpha-Track.
Bot na(Alpha) PITCH BEND –
#6
Bot na(Alpha) PITCH BEND +
#7
• Si pulsa estos botones, cambiar
temporalmente la velocidad de reproducci n
de Alpha-Track.
• Mientras pulse el bot n a (Alpha) PITCH BEND
+, la velocidad de reproducci n aumentar , y
disminuir cuando se pulse el bot n a (Alpha)
PITCH BEND -.
• Cuando libere el bot n, la velocidad de
reproducci n volver a la velocidad previa.
•
(Alpha) CUE-CLR:
Si se pulsa el bot n a (Alpha) CUE mientras se
pulsa tambi n el bot n (Alpha) PITCH BEND,
se borra el punto Alpha-Cue.
Bot n TAP, LOCK,
#8
AUTO/INPUT BPM
• TAP:
Si pulsa este bot n de forma repetida, de
desactivar el modo Auto y comenzar la
medici n de los Beats por minuto (BPM)
mediante tapping.
• LOCK:
Cuando se pulsa este bot n mientras est
funcionando el contador autom tico BPM, los
datos medidos por el contador autom tico
BPM quedan bloqueados.
• AUTO:
Cuando se pulsa el bot n TAP durante 1
segundo, se activa el modo AUTO BPM.
El BPM medido se visualiza en la secci n de
caracter de la pantalla.
• INPUT BPM :
Cuando el bot n TAP se mantiene pulsado
durante m s de 2 segundos, el modo de
entrada BPM se establece y el valor BPM
puede introducirse directamente con el bot n
PARAMETERS. Cuando se vuelve a pulsar este
bot n, se desactiva el modo de entrada BPM.
NOTA:
Si selecciona una pista nueva, el modo AUTO
BMP se activar de forma autom tica.
Bot n PITCH BEND –
#9
Bot n PITCH BEND +
$0
• Si pulsa estos botones, cambiar
temporalmente la velocidad de reproducci n
de la pista principal.
• Mientras pulse el bot n a (Alpha) PITCH BEND
+, la velocidad de reproducci n aumentar , y
disminuir cuando se pulse el bot n a (Alpha)
PITCH BEND -.
• Cuando libere el bot n, la velocidad de
reproducci n volver a la velocidad previa.
Barra de Pitch (Pitch Slider)
$1
• Utilice esta barra para ajustar la velocidad de
reproducci n.
• La velocidad de reproducci n disminuye
cuando se sube la barra y aumenta cuando se
baja.
Bot n PITCH/KEY, RANGE
$2
• Con este bot n puede seleccionar los modos
de PITCH y KEY ADJUST. El modo cambiar a
entre activado y desactivado para Pitch y Key
Adjust de forma c clica. El LED PITCH indica
que nos encontramos en modo Pitch y las
luces indicadoras de KEY ADJUST que
estamos en modo Key Adjust.
• RANGE:
Pulse este bot n durante m s de 1 segundo
para seleccionar la variaci n de pitch.
Bot n DUMP/RVS, SOURCE
$3
• DUMP/RVS:
Pulse este bot n durante poco tiempo para
seleccionar la funci n de efectos de RVS y
DUMP.
• SOURCE:
Cuando se mantiene pulsado este bot n
durante m s de 1 segundo, la fuente para se
utilizar la funci n de efectos de plato (Main,
Alpha-Track, o Main y Alpha-Track) pueden
seleccionarse con el bot n PARAMETERS.
Bot n BRAKE/ECHO, TIME
$4
• BRAKE/ECHO:
Pulse este bot n de forma r pida para
seleccionar la funci n de efecto desde BRAKE
y ECHO.
• TIME:
Si se pulsa durante m s de 1 segundo, puede
seleccionar la duraci n para BRAKE y ECHO
con el bot n PARAMETERS.
Bot n DRAG-S, TIME
$5
• DRAG-S:
Pulse este bot n durante un espacio de
tiempo corto para ajustar el modo DRAG-S.
• TIME:
Si se pulsa durante m s de 1 segundo, puede
seleccionar la duraci n de DRAG-S con el
bot n PARAMETERS.
Page 31

ESPA OL
BA1
BA1
BA1
BA1
BA1
sm
CONT.fSINGLE
B
B
A4
A2
REMAIN
s
m
TOTAL
BA3
BA1
ELAPSED
DRAG S.
DUMP
BRAKE
RVS
ECHO
KEY ADJ.
PROG
MEMO
ww uye trq
!0 !2!1toi
Indicador KEY ADJ.
(4) Display
Visualizadores de pista, minuto,
q
segundo y cuadro (frames)
• Estos visualizadores indican la informaci n de
posici n actual.
Indicadores de modo Loop
w
• DN-S5000 tiene indicadores de modo Loop
consistentes en cuatro grupos de A (A1, A2,
A3, A4), B y dos flechas. Las marcas A y B
indican la presencia de puntos A y B.
• Dos flechas indican el modo de ajuste de bucle
tal y como sigue.
Ejemplo: A1 B
o S lo flecha izquierda
activa:
Modo Hot Start
Ambas flechas activas:
Modo Seamless Loop
, Ambas flechas
parpadeando:
Reproducci n Seamless Loop
,
derecha parpadeando:
Salir de reproducci n de Seamless Loop
Indicadores de modo Time
e
• Si el bot n TIME/T.TIME est pulsado, el
indicador de modo Time cambiar tal y como
sigue:
ELAPSED:
Se muestra el tiempo transcurrido de la
pista.
REMAIN:
Se muestra el tiempo restante de la pista.
TOTAL + ELAPSED:
Se muestra el tiempo transcurrido del disco
o pistas programadas.
Flecha izquierda activa,
TOTAL + REMAIN:
Se muestra el tiempo restante del disco o
pistas programadas.
Indicadores de par metros
r
(los 30 puntos de la parte superior)
• Los 30 puntos de la parte superior del
visualizador indican de forma visual los
par metros y configuraci n de datos de
Effector.
Visualizador de caracteres
t
• Usted puede seleccionar el modo o la funci n
utilizando el bot n PARAMETERS despu s de
que aparezca el mensaje corto en la zona de
visualizaci n de caracteres.
• El visualizador indica la operaci n, el nombre
del modo, los datos, etc., y muestra mensajes
de gu a como: “ Yes/Push_PM” , que significa
“ YES” (“ S ” ), pulse el bot n PARAMETERS
(par metros)” . En ocasiones, muestra y
marcas , esta marca indica que ha
girado el bot n PARAMETERS y las marcas
indican que ha pulsado el bot n
PARAMETERS.
• El LED PARAMETERS parpadea cuando utiliza
el bot n PARAMETER, a no ser que este
bot n se est utilizando para la selecci n de
pistas.
Indicadores de modo Reproducci n
y
• Cuando se ilumina el indicador SINGLE, la
reproducci n finalizar al final de la pista
actual.
• Si se ilumina el indicador CONT., la
reproducci n contin a.
u
• El s mbolo de KEY ADJ. aparece en el
visualizador si la unidad se encuentra en el
modo Key Adjust.
Indicador MEMO
i
• El s mbolo MEMO aparece en el visualizador
cuando hay alguna configuraci n de memoria
para la pista en reproducci n en esos
instantes, o para la pista en la que se ha
establecido el modo pausa.
Indicador PROG
o
• Este indicador se ilumina cuando los datos de
programa han sido establecidos y cuando se
han almacenado en la memoria.
Indicadores de posici n de
!0
reproducci n
(Indicador de posici n de
reproducci n inferior a 33)
• Indicador de posici n de reproducci n:
Los 33 puntos blancos indican visualmente
d nde se encuentra el punto de reproducci n
en una pista en reproducci n norma. Los 11
puntos naranja indican una posici n de
reproducci n en el modo de reproducci n
inversa.
• Fin de Mensaje:
Cuando el tiempo restante hasta el final de la
pista es menor que el tiempo especificado, el
indicador de posici n de reproducci n EOM
(Fin de Mensaje) parpadear junto al tiempo
restante, notificando la llegada al final de la
pista.
✽ El tiempo EOM puede ajustarse con las
preselecciones.
Visualizador de Pitch
!1
• Este visualizador num rico muestra la
velocidad de la reproducci n (pitch).
Indicadores PLATTER MODE
!2
• Hay s mbolos para Platter Effects DRAG S.,
BRAKE, ECHO, DUMP, RVS. Estos s mbolos
se iluminan cuando el modo en cuesti n se
encuentra activo.
4
LOS DISCOS COMPACTOS
1. Cuidados a tener durante la manipulaci n de los
discos compactos
• No deje huellas digitales en los discos ni permita
que se ensucien con polvo o aceite.
Si el disco est sucio, l mpielo con un pa o suave
y seco.
• No use bencina, diluyente, agua, pulverizadores
para discos, productos qu micos antiest tica ni
pa os tratados con silicona para limpiar los
discos.
• Trate siempre los discos con cuidado para evitar
da ar su superficie; especialmente al extraer o
introducir un disco en su caja protectora.
• No doble los discos.
• No aplique calor a los discos.
• No agrande el orificio central del disco.
• No escriba en la etiqueta (lado impreso) con un
implemento puntiagudo, como ser un l piz o un
bol grafo.
• Al trasladar un disco desde un ambiente fr o (por
ejemplo, desde el exterior en invierno) a uno
c lido, se producir la condensaci n de agua en
su superficie. Cuando se produzca
condensaci n, no intente secar el disco con un
secador de pelo, etc.
2. Precauciones relativas al almacenamiento de los
discos
• Despu s de reproducir un disco, extr igalo
siempre del reproductor.
• Para evitar que los discos se ensucien o da en,
gu rdelos siempre en sus cajas protectoras.
• No deje los discos en los siguientes lugares:
(1) Lugares que queden expuestos a la luz
directa del sol por per odos prolongados de
tiempo.
(2) Lugares donde se acumule polvo o que
tengan altos niveles de humedad.
(3) Lugares afectados por el calor generado por
calefactores interiores, etc.
31
Page 32

ESPA OL
RAN
PITCH / KEY
RAN
PITCH / KEY
PIT ND
FAST SEARCH
5
OPERACIONES B SICAS
Reproducci n y Pausa
• Cada vez que pulse el bot n o PLAY/PAUSE (13)
se cambia entre modo de reproducci n y de pausa.
El bot n PLAY/PAUSE (
verde durante la reproducci n y parpadea durante la
pausa.
• Cuando pulse el bot n o PLAY/PAUSE (
durante la reproducci n, el DN-S5000 realizar una
pausa en la reproducci n en ese punto. Pulse de
nueve el bot n PLAY/PAUSE (
reproducci n.
• Cuando el modo Scratch est ajustado como MAIN,
el platter gira cuando se reproduce Main Track.
Cuando el giro de Scratch Disc se detiene
presionando con el dedo, se activa el modo pausa y
cuando se quita el dedo, se reinicia la reproducci n.
13) se ilumina en color
13) y se reiniciar la
Reproducci n y Cue
• Cuando pulse el bot n !1 CUE durante la
reproducci n, la pista se detendr y volver a la
posici n en la que se inici la reproducci n actual
(punto Cue) y se preparar para la siguiente
reproducci n. Esta funci n se llama Back- Cue Con
la funci n Back-Cue podr iniciar la reproducci n
desde exactamente el mismo punto. El bot n CUE
se ilumina en rojo s lido cuando el DN-S5000 est
listo para la reproducci n.
• Podr establecer y cambiar el punto Cue de la
siguiente manera.
• Cuando se inici la reproducci n.
• Selecci n de pista finalizada.
• Manual Search.
Seleccionar la pista
• Gire el bot n TRACK #4 .
• Pulsando el bot n TRACK #4 mientras gira, las
pistas cambiar n 10 de una sola vez.
32
Mover el punto Cue
• Si no desea iniciar la reproducci n desde el inicio de
la pista, necesita mover el punto Cue utilizando la
funci n Search r pida y de b squeda manual.
Puede desplazarse hasta la
posici n aproximada de inicio de
1
la reproducci n utilizando el
13)
bot n FAST SEARCH #1.
Gire el bot n de selecci n de
fuente SCRATCH !4 para
seleccionar el Scratch Disc en
2
el que se realizar la
b squeda. Se apagar n todos
los LEDs de modo Scratch.
Gire la !2 Scratch Disc para
cambiar a punto Cue Podr
escuchar el sonido corto del
punto actual Cue.
3
Cuando el Scratch Disc pasa a modo pausa,
parada o repetici n de cuadro, trabaja como
funci n de b squeda manual.
Al encontrar en punto Cue
deseado, pulse el bot n
4
!1 CUE y entonces el nuevo
punto Cue est puesto.
Ajuste del Pitch
• Con el bot n de control de Pitch podr ajustar la
velocidad de reproducci n (Pitch).
• Si no desea cambiar la clave de sonido, utilice la
funci n Key Adjust.
Pulse el bot n $2 PITCH/KEY
para encender el PITCH LED.
1
• PITCH → KEY (Ajuste clave) → OFF
La tonalidad disminuye
Mueve el bot n de $1 control de
2
DN-S5000 tiene cinco rangos de
pitch, 4%, 10%, 16%, 24% y
100% Cuando se pulsa el bot n
$2 durante m s de 1
3
segundo, el rango de pitch se
podr seleccionar con el bot n
PARAMETERS.
Pitch para ajustar el pitch. La
configuraci n actual del pitch
aparece en la visualizador.
La tonalidad aumenta
TRACK
SAMP.
Pitch Bend
• Con la funci n PITCH BEND podr cambiar el pitch
de forma temporal. La unidad DN-S5000 tiene tres
v as para los botones de la funci n PITCH BEND y
para el bot n Scratch Disc.
[Botones PITCH BEND +/-]
• Pulse el bot n #9 PITCH
BEND – o $0 + para un
SEARCHMAIN
cambio moment neo de
pitch.
1
Mientras se mantienen apretados estos
botones, el pitch continua subiendo hasta
su l mite.
• Una vez liberados los botones PITCH BEND,
el pitch de reproducci n vuelve al ajuste de
la barra.
Cuando la fuente Scratch se
establece como MAIN y el
plato est girando, la
reproducci n en la fuente
principal puede ralentizarse
temporalmente presionando
2
ligeramente !2 Scratch Disc o
PLATTER.
Adem s, la reproducci n puede acelerarse
temporalmente pulsando Scratch Disc o
PLATTER en el sentido en el que gira el plato.
[Scratch Disc]
• Cuando el modo Scratch
est ajustado como
SEARCH, la velocidad de la
reproducci n puede
cambiarse girando !2 Scratch
Disc durante la reproducci n.
3
• El pitch aumenta gradualmente cuando se
gira la Scratch Disc en el sentido de las
agujas del reloj y disminuye cuando se gira
en sentido contrario.
• Cuando pare de girar la Scratch Disc, la
velocidad de reproducci n vuelve al pitch
anterior.
BPM
• Normalmente el BPM de la pista de reproducci n
actual se mide y visualiza en el contador
autom tico de BPM.
NOTA:
El BPM no puede medirse correctamente para algunas
pistas.
BPM LOCK:
Cuando se pulsa este bot n mientras est
funcionando el contador autom tico BPM, los datos
medidos por el contador autom tico BPM quedan
bloqueados.
TAP:
Si pulsa este bot n de forma repetida, de
desactivar el modo Auto y comenzar la medici n
de los Beats por minuto (BPM) mediante tapping.
INPUT BPM :
Cuando el bot n TAP se mantiene pulsado durante
m s de 2 segundos, el modo de entrada BPM se
establece y el valor BPM puede introducirse
directamente con el bot n PARAMETERS. Cuando
se vuelve a pulsar este bot n, se desactiva el modo
de entrada BPM.
NOTA:
Si selecciona una pista nueva, el modo AUTO BMP
se activar de forma autom tica.
Page 33

ESPA OL
w eq
SEARCHMAIN
SAMP.
TRACK
HOT D
MIRROR MIX
PI BEND
SAMP. STOP
• El disco puedo expulsarse mientras se reproduce en modo Main Track.
Main Hot Disc
Carga de datos
Cuando se mantiene pulsado el
bot n !0 DISC EJECT (expulsi n
del disco) durante m s de 1
segundo mientras se est
reproduciendo Main Track,
pueden leerse hasta 35 segundos
de los datos posteriores.(a 0%
pitch)
• Si se reproduce un Seamless loop durante
1
esos 35 segundos, la reproducci n del bucle
continuar .
NOTA:La funci n Hot Disc no puede utilizarse
cuando se est n reproduciendo las
pistas Main y Alpha-Tracks.
Cuando se inicia la funci n Hot Disc, se
borran los datos de la Sampler y los
puntos A y B que aparecen junto a los
puntos del bucle de reproducci n
actual.
Expulsar
• Una ver ha finalizado la carga, el disco se
expulsa
• Los botones de operaciones cambian a los
2
controles del modo Alpha-Track.
13 → a 13,
(
CUE (entrada) → a CUE (entrada alfa),
A1 → A3, A2 → A4,
y los botones de control de bucle)
Carga de discos y b squeda de entrada
• Cargue un disco nuevo
• Opere de la manera habitual y busque la
entrada en el inicio de una pista o iguale el
3
ritmo.
En este momento, las se ales de
reproducci n salen desde los terminales
ALPHA OUTPUT.
Cambiar salida
Una vez finalizada la operaci n
de entrada, detenga la
reproducci n y cuando se pulse
el bot n #2 a MODE, la salida
4
de las se ales de reproducci n
del disco cambiar n de los
terminales ALPHA OUT a los
terminales MAIN OUT.
• Inicie la reproducci n del disco y detenga la
reproducci n Hot Disc.
Borrar Hot Disc (disco r pido)
Cuando se pulsa el bot n #3 a CUE mientras se
pulsa tambi n el bot n #6 a PITCH BEND
(curva de tono alpha), el modo Hot Disc se
desactiva y el reproductor vuelve al modo
normal.
5
NOTA:El bot n a MODE no funciona hasta
que se borren los datos de Hot Disc.
6
SCRATCH
Podr hacer scractch en modo CD o sampler. Adem s, puede seleccionar la direcci n del sonido Scratch (cambiar
la direcci n del disco Scratch) a ambos lados o hacia delante. Estas selecciones le dar n una variedad de efectos
de scratch.
Seleccionar la fuente Scratch
q Seleccione la fuente para
realizar el scratch
utilizando el bot n de
selecci n de la fuente
SCRATCH.
• Si es posible realizar el scratch, el LED
1
2
3
de la fuente seleccionada parpadear .
• Si no es posible realizar el scratch, ya
que, por ejemplo, los ajustes de los
modos. Sampler (muestra) o Alpha-Track
no han sido realizados, el LED de la
fuente seleccionada se iluminar sin
parpadear.
Seleccionar la direcci n del scratch
w Seleccione la direcci n del
scratch utilizando el bot n
de selecci n de direcci n
SCRATCH.
[Scratch Disc]
e Cuando est seleccionada la
opci n MAIN como modo
de Scratch y el disco de
Scratch se gira a mano, la
pista en la que se realiza el
scratch es MAIN Track.
Cuando se selecciona la opci n Alpha-Track
(pista alpha) como modo de Scratch y el
Scratch Disc se gira a mano, la pista en la
que se realiza el scratch es Alpha-Track.
Cuando est seleccionada la opci n
SAMPLER como modo de Scratch y el
Scratch Disc se gira a mano, la pista en la
que se realiza el scratch es la de muestra.
FWD
BOTH
33
Page 34

ESPA OL
w, e
y
t
i
q, r,
u, i
★
★
★
a
PI ND
SAMP. STOP
SAMP. STOP
SAMP. STOP
PI END
SAMP. STOP
7
REPRODUCCI N DE ALPHA-TRACK (Sampler en tiempo real)
• La funci n Alpha-Track le permitir reproducir una pista m s (el Alpha-Track) mientras est reproduciendo la
pista principal.
• El nivel de sonido del Alpha-Track pitch se puede ajustar.
• Podr cambiar el canal de salida de los sonidos Alpha-Track desde MAIN OUT (predeterminado) o ALPHA OUT
con las preselecciones.
• Podr utilizar esta funci n como un Sampler desde el punto Alpha-Cue (Sampler en tiempo real) Cuando est
seleccionado el ALPHA OUT, el DN-S5000 puede reproducir dos canciones simult neamente.
• Cuando reproduzca Alpha-Track, es posible realizar las operaciones de scratching, Hot Starting, Seamless
Looping (en los modos Alpha-Track y Hot Start) y Hot Disc, igual que con Main Track.
NOTA: Las funciones sampler y Alpha-Track no se pueden usar simult neamente.
Entrar en modo Alpha-Track
q Cuando la pista principal
est en espera o en
reproducci n pulse el
bot n a CUE para activar
el punto Alpha-Cue. El
bot n a CUE se ilumina
de color rojo.
• Cuando la opci n Alpha-Cue est
1
2
activada durante el modo de parada de
Main Track, se inicia la reproducci n de
Main Track.
• El visualizador puede cambiar entre los
modos Main Track y Alpha-Track
utilizando el bot n @7 DISPLAY.
Cuando se selecciona “ Alpha-Track
display” , “ PARAMETERS” se ajusta al
modo de entrada de tono Alpha-Track.
Inicio de reproducci n de Alpha-Track
w Pulse el bot n a
iniciar la reproducci n
Alpha-Track.
Cuando se inicia la
reproducci n el bot n a
13 se ilumina en verde.
• Cuando el modo scratch est activado
para Alpha-Track, el platter gira cuando
se reproduce la Alpha-Track.
El modo de pausa se activa cuando se
detiene el giro del Scratch Disc al
presionar con el dedo mientras el patter
est girando, y se reinicia la
reproducci n cuando se quita el dedo.
13 para
Pausa en la reproducci n de Alpha-Track
e Pulse el bot n a 13 para
parar la reproducci n
Alpha-Track. Cuando se
3
est en modo pausa, el
13 empieza a
bot n a
parpadear.
Reproducci n Back Cue Alpha-Track
r En el modo de
reproducci n o pausa
Alpha Track, pulse el
bot n ALPHA CUE para
Back-Cue. El bot n
4
ALPHA-CUE se ilumina de
color rojo.
NOTA:Tenga en cuenta que el punto Alpha-
Cue no cambia de forma autom tica
al inicio de la reproducci n.
Alpha-Track pitch bend 1
[
(Alpha) Botones PITCH BEND +/-]
t Pulse el bot n a
PITCH BEND – o +
para un cambio
moment neo de pitch.
5-1
Mientras se mantienen apretados estos
botones, el pitch continua subiendo hasta
su l mite.
• Una vez liberados los botones a PITCH
BEND, el pitch de reproducci n vuelve al
ajuste de la barra.
Alpha-Track pitch bend 2
[Scratch Disc]
y Cuando la fuente de
scratch se activa para
Alpha-Track y el platter
est girando, la
reproducci n de Alpha-
5-2
Track puede ralentizarse
temporalmente
presionando ligeramente
Scratch Disc o Platter.
Adem s, la reproducci n puede acelerarse
temporalmente presionando Scratch Disc
o Platter en la direcci n en la que gira el
platter.
Reproducci n en modo Stutter del AlphaTrack
u En el modo de pausa
6
Alpha Track, pulse el
bot n ALPHA CUE para
iniciar el modo stutter.
Borrar Alpha-Track
i Pulse al mismo tiempo el bot n ALPHA-
CUEy el bot n a PITCH BEND – para borrar
el punto Alpha-Cue.
7
Ajuste de nivel de sonido y de Pitch
El nivel de sonido del Alpha-Track y del
reproductor de sampler y del pitch se puede
ajustar.
★ (1) Mantenga pulsado el bot n
PITCH/VOL durante m s de un
segundo para seleccionar el modo
entrada de pitch. El LED
PARAMETERS parpadea y las
configuraciones actuales aparecen en
el visualizador de caracteres.
(2) Pulse de nuevo el bot n PITCH/VOL
para seleccionar el modo de salida del
nivel de sonido.
(3) Inicio de reproducci n Alpha-Track o
8
sampler.
(4) Si gira el bot n PARAMETERS puede
cambiar en nivel de sonido o de pitch.
✽ Si pulsa y gira el bot n
PARAMETERS, podr cambiar el
rango de pitch 10 veces m s r pido.
(5) Pulse de nuevo el bot n PITCH/VOL
para desactivar el modo par metro de
reproducci n.
A menos que ajuste el Alpha-Track pitch por
separado, el pitch del Alpha Track ser el
mismo que el de la pista principal. En este
caso, tanto el pitch de la pista principal como el
del Alpha-Track cambian simult neamente al
variar la posici n del Slider del Pitch principal.
34
Page 35

ESPA OL
MIRROR MIX
MIRROR MIX
HOT
PI H BEND
SAMP. STOP
MIRROR MIX
r, t
w, e, y
q
AUTO / INP M
LOCK
MIRROR MIX
Mirror Mix
• Alpha-Track puede reproducirse con un retardo del ritmo o de la duraci n especificados despu s de Main
Track.
Inicio de la reproducci n Mirror Mix
r Cuando se pulsa el bot n
13 mientras Main Track
est en modo pausa o en
modo de parada, se inicia
4
Ajuste BPM
q Pueden ajustarse las BPM
para la reproducci n de
Main Track con el contador
1
autom tico BMP, con el
bot n TAP o con el bot n
BMP INPUT.
Introducir el modo Mirror Mix
El modo Mirror Mix se activa
w
cuando se mantiene pulsado
2
el bot n MIRROR MIX
durante m s de 1 segundo.
Ajuste de los par metros del modo Mirror
Mix
e Cuando se vuelve a pulsar
el bot n MIRROR MIX
(mezcla invertida), se puede
ajustar la duraci n del ritmo
3
de retardo con el bot n
PARAMETERS.
• Cuando el modo Mirror Mix se activa
durante la reproducci n, la reproducci n
de Alpha-Track queda en modo pausa.
el modo Mirror Mixing.
• Cuando se pulsa el bot n a
mientras la pista principal est en modo
de reproducci n, el modo Mirror Mixing
se reinicia.
Efectuar una pausa en la reproducci n
Mirror Mix
t Cuando se pulsa el bot n
5
Cancelar el modo Mirror Mix
y El modo Mirror Mixing se
6
13 durante el modo
Mirror Mixing, ste
efectuar una pausa.
• El bot n
Cuando se pulsa el bot n
modo Mirror Mixing, la reproducci n de la
Alpha-Track s lo efect a una pausa.
• El bot n
desactiva cuando se
mantiene pulsado el bot n
MIRROR MIX durante m s
de 1 segundo.
13 parpadear .
13 durante el
13 parpadear .
13
Alpha Track Hot Disc
• El disco puede expulsarse mientras se reproduce Alpha Track.
Carga de datos
Cuando se mantiene pulsado el
bot n !0 DISC EJECT durante
m s de 1 segundo mientras se
est reproduciendo Alpha-Track,
pueden leerse hasta 35 segundos
de los datos posteriores.(a 0%
pitch)
• Si se reproduce Seamless loop durante esos
35 segundos, la reproducci n del bucle
1
continuar .
NOTA:La funci n Hot Disc (Disco r pido) no
puede utilizarse cuando se est n
reproduciendo Main y Alpha-Track.
Cuando se inicia la funci n Hot Disc,
se borran los datos de la muestra y los
puntos A y B que aparecen junto a los
puntos del bucle de reproducci n
actual.
Expulsar
2
Una ver ha finalizado la carga, el disco se
expulsa
Carga de discos y b squeda de entrada
Cargue un disco nuevo
• Opere de la manera habitual y busque la
entrada en el inicio de una pista o iguale el
ritmo.
• Cuando en ese momento las se ales AlphaTrack salgan por los terminales MAIN OUT,
las se ales de reproducci n del disco
3
saldr n por los terminales ALPHA OUT, y
cuando las se ales Alpha-Track salgan de los
terminales ALPHA OUT, las se ales de
reproducci n del disco saldran de los
terminales MAIN OUT.
• El bot n a MODE parpadear cuando las
se ales de reproducci n del disco salgan de
los terminales ALPHA OUT.
4
5
Cambiar salida
Una vez finalizada la operaci n
de entrada, detenga la
reproducci n y cuando se pulse
el bot n #2 a MODE, la salida
de las se ales de reproducci n
del disco cambiar n de los
terminales MONITOR OUT a
los terminales MAIN OUT.
• Inicie la reproducci n del disco y detenga la
reproducci n Hot Disc.
Borrar Hot Disc
Cuando se pulsa el bot n #3 a CUE mientras se
pulsa tambi n el bot n #6 a PITCH BEND
(curva de tono alpha), el modo Hot Disc se
desactiva y el reproductor vuelve al modo
normal.
NOTA:El bot n a MODE no funciona hasta
que se borren los datos de Hot Disc.
35
Page 36

ESPA OL
MIRROR MIX
e
r
q, t
w
MIRROR MIX
8
ALPHA-MODE (Monitor Alpha-Track)
Esta funci n permite reproducir el Alpha-Track desde ALPHA OUT mientras se est reproduciendo la pista
principal. Mediante esta funci n, se podr preparar la siguiente canci n en el mismo CD antes de que finalice la
primera pista. Mientras se est en Alpha-Mode, la salida del Alpha-Track se puede controlar a traves de los
auriculares mixers.
Por lo tanto, podr cambiar entre el Alpha-Track y la pista principal en cualquier momento, de manera que se
puedan reproducir dos pistas del mismo disco continuamente sin interrumpir el sonido.
Alternar entre la Alpha-Track y la pista
principal
• Tras fijar su Alpha-Track, puede alternar el
sonido entre la Alpha-Track y la pista
principal.
e Cuando la pista principal este Cued en
Alpha-Mode, la iluminaci n del bot n CUE
parpadea r pidamente. En este momento
puede alternar entre el punto Alpha-Cue y
el principal punto Cue. Entonces el bot n
CUE deja de parpadear y espera que le d
otra orden.
r Cuando se est reproduciendo la pista
principal y se selecciona Alpha-Mode +
Alpha-Track, la iluminaci n del bot n
3
parpadea r pidamente.
En este momento puede
cambiar (cerrrar mezcla)
para detener la “ MAIN
OUT” y hacer que la
Alpha-Track se inicie
pulsando simplemente el
bot n principal
El sonido del punto Alpha-Cue es enviado a
MAIN OUT y, entonces, el bot n
de parpadear.
✽ Despu s de que la Alpha-Track haya
cambiado a la pista principal, el Alpha-Mode
finaliza autom ticamente, y la iluminaci n
del bot n ALPHA-MODE desaparece.
Puede repetir el proceso de nuevo.
13.
13
13 deja
Salir del Alpha-Mode
t Puede salir del Alpha-Mode
5
pulsando el bot n ALPHAMODE.
Hot Start, Sampler
• La configuraci n Hot Start y Sampler con
6
A1, A2, A3, A4 est n disponibles como Hot
Start en Alpha-Mode.
Activar Alpha-Mode
q Pulse el bot n ALPHA-
MODE para activar el Alpha
Mode.
• Cuando la Alpha-Cue no
1
NOTA:
Antes de activar el Alpha-Mode, los
Samplers 1 y 2 (botones A3 y A4) debe
estar en modo STOP, de lo contrario el
DN-S5000 no aceptar el comando
ALPHA-MODE.
✽ En el Alpha-Mode, la luz del bot n
36
est establecida, sta se
puede establecer al inicio
de la Main Track.
ALPHA-MODE parapadea.
Control del Alpha-Track
• Puede ejecutar muchas funciones casi de la
misma manera que para la opci n Main
Track, excepto Program, Random. Sin estas
funciones, puede establecer un punto de
mezcla y sonido preferido.
• En el modo Alpha-Track, la informaci n del
visualizador corresponde a la Alpha-Track.
2
✽ Memo Call (Llamada Memo)
Si los modos Hot Start, Seamless Loop y
w
otros datos para la pista que se usar a
continuaci n se almacenan en la memoria,
los ajustes para la pista que se desee
reproducir pueden realizarse f cilmente
utilizando funci n memo call.
Pitch tras el cambio
• El Pitch de la Alpha-Track puede cambiarse
independientemente de la pista principal.
Esto hace que el pitch sea distinto al valor de
la barra de Pitch tras cambiar a Alpha-Track,
porque la barra de Pitch se configur
originalmente para la pista principal.
4
• En este caso, el LED del PITCH parpadea
para advertirle que la barra de Pitch es
diferente. S lo cuando la posici n de la barra
de Pitch alcance el pitch correcto de su
Alpha-Track, el LED del PITCH dejar de
parpadear y empezar a variar seg n el
movimiento de la barra de Pitch.
Page 37

ESPA OL
ret, y q, w, y
9
SEAMLESS LOOP/HOT START/STUTTER Y SPLICE
Seamless Loop/Hot Start/Stutter (botones A1, A2 )
Visualizaci n del funcionamiento
(rem tase a la secci n de descripci n de
la visualizaci n)
Establecer el punto A (cargando los datos
de Hot Start)
q Pulse el bot n A1 o A2 para
establecer el punto A y
comenzar la carga de los
datos Hot Start.
• Los botones A1 y A2 pueden usarse
1
2
3-1
independientemente para cada Hot
Start.
• Cuando se establece un punto A, el
bot n A correspondiente y el led del
FLIP se iluminan, y ese bot n cambia al
modo Hot Start.
• El BPM se fija independientemente
para cada hot start.
Inicia Hot Start
w Cuando se pulsa un bot n A1
o A2, la reproducci n Hot
Start comienza desde el
punto A correspondiente.
Establecer el punto B para Seamless Loop
e Cuando se pulsa el bot n B
despu s de establecer el
punto A o tras iniciar la
reproducci n Hot Start, se
activa el punto B y la
reproducci n Seamless Loop
empieza desde el punto A.
• El bot n B funciona en relaci n con el
punto A, activado antes de que se
pulsara el bot n B.
• Si el bot n B se pulsa durante la
reproducci n del seamless loop o tras
FINALIZAR la reproducci n, el punto B
3-2
4
5
se desplaza hasta el punto en el que se
haya pulsado el bot n.
• Cuando se activa el punto B, los LEDs
del LOOP y de B se iluminan.
Reproducci n de seamless loops
• Cuando se detecta el punto B para A1 tras
empezar la reproducci n desde el punto
A1, la reproducci n vuelve al punto A1 sin
cambios. Mientras se ejecuta la funci n de
looping de A1 a B, se ignora el punto B
para A2.
• Cuando se detecta el punto B para A1 tras
empezar la reproducci n desde el punto
A2, la reproducci n vuelve al punto A2 sin
cambios. Mientras se ejecuta la funci n de
looping de A2 a B, se ignora el punto B
para A1.
Exit/Reloop
r En la reproducci n Seamless
Loop, siempre se puede salir o
volver a la funci n loop.
EXIT:
Durante la reproducci n Seamless Loop,
pulse el bot n EXIT/RELOOP para salir de
la funci n loop. DN-S5000 continua la
reproducci n despu s del punto B.
RELOOP:
Cuando se pulsa el bot n EXIT/RELOOP
tras salir de la funci n del loop, Seamless
Loop la reproducci n retoma desde el
punto A.
Stutter
• Loa puntos A1 y A2 tambi n pueden usarse
para la reproducci n Stutter.
t Para habilitar la reproducci n
6
stutter, pulse el bot n FLIP
para los botones A1/A2;
entonces el LED del FLIP se
apaga.
Pulse el bot n FLIP para alternar entre los
modos Hot Start/Seamless Loop y Stutter.
Borrar el punto A1/A2
y Pulse el botones A1 o A2 al mismo tiempo
que pulsa los bot n FLIP/(CLR) para borrar
los puntos A y B correspientes.
O pulse el bot n Flip durante m s de un
segundo para borrar tanto el punto A1
7
como el A2 de una vez.
37
Page 38

ESPA OL
A / B TRIM
SPLICE
Splice
• Use esta funci n para saltar una secci n entre los puntos A y B. El punto A es el punto desde el cual empieza
el salto, el punto B es el punto en el que finaliza el salto.
• Las funciones Hot Starts A1 y A2, y Stutter no pueden utilizarse si ambos puntos Splice se encuentran en
modo Splice.
qt e w, r, t
Modo de ajuste de los puntos Splice
q Pulse el bot n SPLICE durante
m s de un segundo para
habilitar el ajuste del punto
Splice utilizando los botones
A1, A2 y B.
1
• La iluminaci n del bot n A parpadear
cuando el modo Splice se encuentre
activo.
• El ajuste del punto Splice no puede
realizarse para el punto A, en el cual ya
se han cargado los datos Hot Start.
Activar el punto A splice de inicio
w Tras iniciar la reproducci n,
pulse el bot n A1 o A2. El
bot n A correspondiente se
2
iluminar y el LED B
comenzar a parpadear, y ese punto
quedar fijado como punto A splice de
inicio.
Activar el punto B splice de finalizaci n
e Tras activar el punto A splice
de inicio, pulse el bot n B. El
LED B se iluminar , y ese
3
punto quedar fijado como
punto B splice de finalizaci n.
Iniciar la reproducci n splice
Inicie la reproducci n desde cualquier punto
anterior al punto A. Cuando se alcance el punto
4
A, la secci n que va del punto A al B se salta
sin cambios y la reproducci n continua.
Realizar una pausa en la reproducci n splice
r Cuando se pulsa el bot n A
correspondiente despu s de
activar los puntos A y B splice,
la iluminaci n del bot n A se
apagar y el modo de
5
reproducci n Splice realizar
una pausa.
• Pulse de nuevo el bot n A
correspondiente para reiniciar la
reproducci n splice.
Borrar los puntos splice
t Pulse el bot n A al mismo tiempo que pulsa
el bot n FLIP/(CLR) correspondiente para
borrar los puntos A y B splice.
6
• Cuando haya borrado los puntos splice,
el bot n volver al modo hot start.
38
Page 39

ESPA OL
A / B TRIM
SPLICE
q, !3r, u, !1
e, t,
o, !2
y, i,
!0, !2
w
A / B TRIM
SPLICE
PARAMETERS
ON / OF
PUSH
10
A/B TRIM
• Los modos Seamless Loop, Sampler loop y los puntos de uni n A y B pueden ajustarse con m s pr ecisi n
utilizando el bot n Scratch Disc.
• Hay dos modos de hacer esto.
A-B Trim: Recorte los puntos durante la reproducci n del bucle.
A/B Move: Mueve los puntos utilizando la b squeda r pida o la b squeda manual. A/B Move no puede
utilizarse con Sampler loop.
A/B Trim
Seleccione el modo A-B trim
En primer lugar, seleccione si desea ajustar los
puntos A y B utilizando el modo A-B trim o el
modo A/B move.
q Pulse el bot n A/B TRIM
para establecer el modo de
1
ajuste de posici n de los
puntos A y B.
w Ahora gire el bot n
PARAMETERS para
seleccionar el modo A-B
Trim o A/B Move.
Seleccione el punto A (A-B Trim)
e Seleccione A-B Trim y pulse el
bot n A correspondiente para
recortar el bucle. La
iluminaci n del bot n A
parpadear y se iniciar la
2
reproducci n del bucle.
• En el modo de recorte de empalme, se
reproducen un total de 6 segundos de la
secci n empalmada (comenzando desde
2 segundos antes del punto A a 4
segundos despu s del punto B ).
Recorte del punto A
r Gire la Jog Wheel para
mover el punto A un
cuadro (frame) cada vez.
• El alcance para el punto A de recorte
est limitado de la siguiente manera.
Punto A para ciclo:
±30 cuadros desde el punto original A.
3
4
(Sin embargo, cuando el punto A fue
cargado desde el modo de espera, el
punto A no se puede mover hacia
atr s. Por tal motivo, utilice la funci n
A/B Move)
Punto A para Splice:
Entre el comienzo del disco y 5
cuadros antes del punto B.
Punto A para Sampler:
Entre el punto original A y 5 cuadros
antes del punto B.
Guarde el punto A
t lse el bot n A de nuevo
para guardar los nuevos
puntos A y finalizar el
modo A-B Trim.
Seleccione el punto B (in A-B Trim)
y Seleccione el modo A-B Trim y
para seleccionar el punto B,
pulse el bot n B despu s de
5
seleccionar el punto A.
Despu s, pulse el bot n B. El LED B
parpadear y el recorte del punto B
quedar activado.
Recorte del punto B
u Gire el bot n Scratch Disc
para desplazar un cuadro 1
del punto B cada vez.
• El alcance para el punto B de recorte est
limitado de la siguiente manera.
Punto B para ciclo:
Entre 5 cuadros despu s del punto A y
6
7
el final del disco.
Punto B para Splice:
±30 cuadros desde el punto original B.
(Sin embargo, cuando el punto B fue
cargado desde el modo de espera,.el
punto B no se puede mover hacia atr s.
Por tal motivo, utilice la funci n A/B
Move)
Punto B para Sampler:
Entre 5 cuadros despu s del punto A y
el final de sampler.
Guarde el punto B
i Pulse el bot n B de nuevo
para guardar los nuevos
puntos B y finalizar el modo
A/B Trim. El LED B se
iluminar .
A/B Move
Seleccione los puntos A o B
o Seleccione el A/B Move y
pulse el bot n A para el punto
A que desee mover. El modo
de pausa est establecido en
el punto A y la iluminaci n del
punto A parpadea.
8
!0 Para seleccionar el punto
B, pulse el bot n B
despu s de seleccionar el
punto A.
• El LED B parpadear . El punto B
seleccionado ser utilizado por el punto
A1 o A2 seleccionado en primer lugar.
Puntos Move A o B
!1 Gire el bot n Scratch Disc
para desplazar el punto
seleccionado utilizando la
funci n de b squeda
manual.
• El alcance para el movimiento del punto
A est limitado de la siguiente manera.
Punto A para ciclo:
Entre el comienzo del disco y 5
9
10
11
cuadros antes del punto B.
Punto A para Splice:
Entre el comienzo del disco y 5
cuadros antes del punto B.
• Alcance para el movimiento del punto B
est limitado de la siguiente manera.
Punto B para ciclo:
Entre 5 cuadros despu s del punto A y
el final del disco.
Punto B para Splice:
Entre 5 cuadros despu s del punto A
y el final del disco.
Guarde los puntos A o B
!2 Pulse el bot n A1/A2 o B de
nuevo. El LED dejar de
parpadear y el punto A1/A2 o
B se renovar n, as finalizar el
modo A/B Move.
Cancelar el A-B Trim o A/B Move
!3 Pulse el bot n A/B TRIM
para finalizar el modo de
ajuste de los puntos A y B.
39
Page 40

ESPA OL
q
w
PARAMETERS
ON / OFF
PUSH
PARAMETERS
ON / OFF
PUSH
A 3 / 4
PITCH / VO
A3/A4 PARA SAMPLER, 4 HOT START, ALPHA-TRACK
11
HOT START
Los botones de A3, A4 y los correspondientes FLIP, B y EXIT/RELOOP se utilizan para las funciones Sampler, 4
Hot Start y Alpha-Track Hot Start.
Modo A3/A4
Seleccione el modo A3/A4
Los botones A3 y A4 puede utilizarse para uno
de los tres modos descritos a continuaci n.
• Modo Sampler
• Modo 4 Hot Start (A1, A2, A3 y A4)
• Modo Alpha-Track Hot Start
q Cuando se pulsa el bot n
A 3/4, el modo de
funcionamiento puede
seleccionarse con el bot n
PARAMETERS
El LED PARAMETERS parpadear y el
modo de bot n A3/A4 se mostrar en el
visualizador de caractres.
w Gire el bot n PARAMETERS y seleccione el
modo de bot n A3/A4, despu s pulse el
1-1
bot n PARAMETERS para entrar en el
modo.
Modo Sampler:
Los botones A3 y A4 tendr n una
iluminaci n verde.
• En modo Sampler, el bot n A3 se utiliza
para Samper1 y los botones A4 para
Sampler2.
• Los datos muestreados se almacenan en
la memoria, incluso cuando se cambia el
modo.
Modo 4 Hot Start:
Los botones A3 y A4 tendr n una
iluminaci n naranja.
• Como los botones A1 y A2, los botones
A3 y A4 tambi n se utilizan para Hot
Start, Stutter y reproducci n Seamless
Loop. Los puntos 4 Hot Start pueden
establecerse, uno para cada uno en los
botones A1, A2, A3 y A4.
• Los puntos A3 y A4 establecidos en el
modo 4 Hot Start pueden utilizarse
tambi n en el modo Alpha-Track Hot
Start.
1-2
Modo Alpha-Track Hot Start:
Los botones A3 y A4 estar n iluminados
en verde.
• Los botones A3 y A4 estar n
iluminados en verde * Como los
botones A1 y A2, los botones A3 y A4
se utilizan tambi n para Hot Start,
Stutter y reproducci n Seamless Loop.
Sin embargo, Hot Start A3 y A4 se
utiliza para el Alpha-Track.
• Los puntos A3 y A4 establecidos en el
modo Alpha-Track Hot Start pueden
utilizarse tambi n en el modo 4 Hot
Start.
40
Page 41

ESPA OL
★★ ★★
y, ui, !0 w, oq, r, !0
e, t
SAMP. STOP
SAMP. STOP
Sampler
La unidad DN-S5000 dispone de dos samplers de 15 segundos de duraci n. Estas muestras se utilizan tambi n
para la reproducci n de bucles.
Grabar en Sampler
q Cuando se pulsa el bot n
SAMP (SAMP1 (A3) o SAMP2
(A4)) en modo de pausa o de
reproducci n, el sonido del
punto A3 o A4 se graba en la
memoria del Sampler hasta 15
1
segundos.
• El bot n SAMP1 o SAMP2 parpadear
mientras dure la grabaci n. Cuando
finalice la grabaci n, el bot n se apagar
y el LED del SAMP B correspondiente se
iluminiar .
Establecer punto B
w Cuando se pulsa el bot n B
durante la grabaci n del
Sampler, se establece el punto
B del Sampler Loop y se activa
el modo de bucle.
• La grabaci n contin a durante
2
aproximadamente 15 segundos sin
pausa despu s de establecer el punto B.
• Si el punto B no esta establecido, el
punto final de grabaci n quedar fijado
de forma autom tica en el punto B. El
LED EXIT/RELOOP se iluminar tambi n
para indicar que el modo Sampler Loop
se ha establecido autom ticamente.
Detener la grabaci n
e Para detener la grabaci n
antes de que sta finalice
autom ticamente con la
memoria llena, pulse el bot n
3
STOP (ALPHA-CUE).
• El LED EXIT/RELOOP se iluminar
tambi n para indicar que el modo
Sampler Loop se ha establecido
autom ticamente.
Reproducir sonido de Sampler
r La reproducci n de un sonido
de Sampler se iniciar cuando
se pulse el bot n SAMP una
vez haya concluido la
grabaci n.
• La reproducci n del Sampler contin a en
modo bucle. Con el punto B establecido,
se reproducir el bucle entre los puntos
4
A y B. Sin el punto B establecido, se
reproducir todo el Sampler loops (unos
15 segundos).
NOTA: No es posible reproducir el
t Para detener el sonido del
Sampler, pulse el bot n STOP
(ALPHA-CUE).
Sampler1 y el Sampler2 al mismo
tiempo.
Selecci n del modo Sampler Loop
Puede seleccionar el modo lo bucle para
Sampler cuando se detenga la reproducci n del
sampler.
Loop (predeterminado):
La reproducci n del Sampler
contin a en modo bucle.
(El LED EXIT/RELOOP permanece
encendido)
Exit: La reproducci n del sampler
5
y Para seleccionar el modo de
Salir y Bucle repetido
u El bot n EXIT/RELOOP puede
6
Reproducci n inversa
i Puede reproducir el sonido
7
Mover el punto del Sampler B
o Cuando pulse el bot n B
8
Establecer el volumen y el pitch del sampler
• El nivel de sonido (volumen) y la velocidad
9
• Consulte el apartado m - paso 8 “ Ajuste de
contin a sobre el punto B hasta
alcanzar la longitud de grabaci n.
(El LED EXIT/RELOOP parpadea)
Single: La reproducci n del sampler se
detiene en el punto B.
(El LED EXIT/RELOOP se apaga)
bucle, pulse el bot n
EXIT/RELOOP despu s de la
grabaci n y antes de la
reproducci n.
utilizarse igual que la funci n
Seamless Loop.
del Sampler en modo
invertido pulsando el bot n
RVS (FLIP). En modo de
reproducci n inversa, el LED
de RVS se encender .
• La reproducci n inversa se iniciar con el
inicio de la siguiente reproducci n
despu s de activar el modo de inversi n.
durante la reproducci n del
sampler, el punto B se
mover hasta el punto en el
cual se pulso el bot n y
reproducir el bucle desde el
punto A.
de reproducci n pueden ajustarse de forma
individual para los sampler1 y 2.
nivel de sonido y de Pitch” .
Borrar los datos del Sampler
!0 Pulse el bot n SAMP (SAMP1 o SAMP2)
mientras pulsa tambi n el bot n
(RVS)/FLIP/(CLR) para borrar el sampler.
10
•
Al pulsar el bot n (RVS)/FLIP/(CLR) durante
aproximadamente 1 segundo, puede borrar
tanto el sampler 1, como el 2.
Modo Hot Start
Como sucede con los botones A1 y A2, el funcionamiento se
realiza utilizando los botones the (RVS)/FLIP/(CLR), A3, A4 y
EXIT/RELOOP. El funcionamiento es el mismo que el de Hot
Start con los botones A1 y A2. Consulte la p gina 79 para
obtener una informaci n m s detallada.
Modo Alpha-Track Hot Start
Como sucede con los botones A1 y A2, el funcionamiento se
realiza utilizando los botones the (RVS)/FLIP/(CLR), A3, A4 y
EXIT/RELOOP. (Consulte la p gina 79.)
41
Page 42

ESPA OL
a
a
DUMP /
RVS
SOURCE
DUMP /
RVS
SOURCE
DRAG-S
TIME
DRAG-S
TIME
PARAMETERS
ON / OF
PUSH
PARAMETERS
ON / OFF
PUSH
DRAG-S
TIME
BRAKE /
ECHO
TIME
PARAMETERS
ON / OFF
PUSH
w, e q, !3 t, y,
i, !0
q
r
u
o
!0
!1
!2
★1
★2
★3
★4
★5
12
PLATTER EFFECT
Esta funci n est disponible para las opciones Main Track y Alpha-Track.
Seleccione la fuente de Platter Effect
q Cuando se mantiene pulsado el bot n
SOURCE durante m s de un segundo, la
fuente de la funci n Platter Effect que se
desea utilizar puede seleccionarse con el
bot n PARAMETERS.
MAIN:
1
La funci n de Platter Effect s lo afecta a la
Main Track.
TRACK:
La funci n de Platter Effect s lo afecta a la
Alpha-Track.
MAIN/
T:
La funci n de Platter Effect afecta tanto a la
Main Track , como a la Alpha Track.
NOTA: La funci n de eco no puede utilizarse
de forma simult nea la para Main y
Alpha-Track.
42
DRAG-S (DRAG START):
Simula el sonido de arrastre de un plato
impulsado mediante correa arrancando desde
el modo de parada.
2-1
w La funci n DRAG-S puede
activarse y desactivarse
pulsando el bot n
DRAG-S.
DRAG-S TIME:
Cuando se activa DRAG-S, PARAMETERS LED
parpadea y se visualizan los par metros.
Si utiliza con ajustes por defecto, hay 4
segundos de inactividad para el bot n DRAG-S
una vez seleccionado y se ajusta el bot n
PARAMETERS. Despu s de 4 segundos, sale
del men DRAG-S.
e O cuando se mantiene
2-2
r La duraci n del modo
pulsado el bot n TIME
(DRAG-S) durante m s de
1 segundo, se inicia el
modo de selecci n de
duraci n de DRAG-S.
DRAG-S puede
seleccionarse con el
bot n PARAMETERS.
La duraci n del modo DRAG-S puede
seleccionarse con el bot n PARAMETERS.
• Cuando se pulsa el bot n
PARAMETERS, se introduce la hora y se
2-2
cancela el modo de selecci n de
duraci n de DRAG-S.
★1 El DRAG-S se activa cuando la
reproducci n se inicia con el bot n
BRAKE/ECHO
BRAKE:
Simula el sonido que hace un plato de vinilo
cuando se detiene por completo lentamente.
ECHO (TAIL ECHO):
3-1
A ade un sonido de eco cuando se detiene la
reproducci n.
t El modo cambia en el
siguiente orden cada vez
que se pulsa el bot n:
BRAKE → ECHO → off.
BRAKE TIME, ECHO TIME
Cuando se activa BRAKE o ECHO ,
PARAMETERS LED parpadea y se visualizan
los par metros BRAKE o ECHO.
Si utiliza usted 2 funciones con ajustes por
defecto, hay 4 segundos de inactividad para el
bot n BRAKE/ECHO una vez seleccionado y
se ajusta el bot n PARAMETERS. Despu s de
4 segundos, sale del men BRAKE o ECHO.
BRAKE TIME:
y O cuando se mantiene
pulsado el bot n TIME
(BRAKE/ECHO) durante
m s de 1 segundo
mientras est
seleccionada la opci n
BRAKE, se activa el modo
de selecci n de duraci n
de BRAKE.
3-2
u El tiempo de duraci n
del BRAKE se
selecciona mediante el
bot n PARAMETERS.
• Cuando se pulsa el bot n
PARAMETERS, se introduce la duraci n
y se cancela el modo de selecci n de
duraci n para la opci n BRAKE.
★2 El BRAKE se activa cuando se pulsa el
bot n
13 durante la reproducci n.
ECHO TIME:
i O cuando se mantiene pulsado el bot n
TIME (BRAKE/ECHO) durante m s de 1
segundo mientras est seleccionada la
opci n ECHO, se inicia el modo de
selecci n del n mero de veces que se
produce la respuesta del eco.
o Las veces de ECHO pueden seleccionarse
con el bot n PARAMETERS.
13.
!0 Cuando se pulsa de nuevo (presi n corta) el
bot n TIME (BRAKE/ECHO), puede
seleccionarse el tiempo de retardo del eco
con el bot n PARAMETERS.
!1 El tiempo de retardo de ECHO puede
seleccionarse con el bot n PARAMETERS.
3-2
!2 Cuando se pulsa el bot n PARAMETERS,
se introducen los datos y se cancela el
modo de selecci n del tiempo de eco.
★3 El ECHO se activa cuando se pulsa el
13 durante la reproducci n.
bot n
DUMP/RVS
!3 El modo cambia en el
siguiente orden cada vez
4-1
que se pulsa el bot n
DUMP/RVS:
DUMP → RVS → off.
DUMP:
La reproducci n inversa se lleva a cabo durante
un espacio de tiempo especificado. Reproduce
el sonido hacia atr s mientras continua en un
movimiento hacia adelante sin perder el
“ tiempo transcurrido” cuando regrese a la
4-2
reproducci n normal (hacia adelante).
★4 Cada vez que pulse el bot n
cambia entre reproducci n DUMP y
normal.
• La reproducci n inversa se desactiva cuando
se inician los modos Hot Start y Stutter.
RVS (REVERSE):
★5 Cada vez que pulse el bot n
cambia entre reproducci n inversa y
4-3
normal.
• La reproducci n inversa se desactiva
cuando se inician los modos Hot Start y
Stutter.
PLATTER MODE MEMO
El ajuste on/off (activado/desactivado) y los
datos de duraci n de DRAG-S, los ajustes
on/off (activado/desactivado) y los datos de
duraci n de BRAKE/ECHO y la fuente de
Platter Effect del platter que se deseen utilizar
pueden almacenarse en el modo de
preselecci n.
5
• Tras realizar los ajustes deseados,
introduzca el modo de preselecci n y
almacene los ajustes en “ PRESET (5)” .
Una vez almacenados los ajustes, se
activar n autom ticamente cada vez que se
encienda el aparato (v ase la secci n
“ PRESET” , en la p gina 86).
13, se
13, se
Page 43

ESPA OL
POWER
ON OFF
DIGTAL OU
XEFFECT
P
IN
OUT
MAN
LL
LNE OUT
RR
MAN
MO I OR
POWER
ON OFF
DIGTAL OU
XEFFECT
P
IN
OUT
MAN
LL
LNE OUT
RR
FADER
MAN
MON OR
13
MEMO
(Memoria de ajuste personalizado)
La informaci n de configuraci n del CD puede almacenarse en memoria no vol til. Esta informaci n almacenada
puede invocarse desde la memoria m s tarde, haciendo que sea m s sencilla de preparar para la mezcla.
1. Sobre MEMO
• Un m ximo de 5000 puntos de notas recordatorias se pueden almacenar en la memoria interna para
recordarlas despu s.
El n mero de pistas en un CD en particular solo limita la cantidad de puntos de notas recordatorias
disponibles para ese disco.
Ejemplo: Si su CD tiene 22 pistas, solo puede guardar 22 notas recordatorias. (1 nota recordatoria por
pista)
PRECAUCI N:
El n mero m ximo posible de pistas que se pueden almacenar en la memoria es 5000.
Sin embargo para simplificar las operaciones de MEMO , el sistema de memoria maneja cada paquete de
datos de 1250 MEMO como una unidad m nima (la capacidad de memoria total de 5000 dividido en 4
unidades de paquete).Cuando desee borrar solo un dato de MEMO en el modo 1 MEMO CLEAR (vea la
p gina 84), la unidad borrar la informaci n de nota recordatoria pero no el n mero de asignaci n
interno.Respectivamente, dependiendo de las condiciones, el n mero de pistas que se puede almacenar
en la memoria puede ser inferior a 5000.
Una vez que tenga 5000 puntos almacenados, visualizar un mensaje que dice “ MEMO FULL!” . En este
momento necesitar “ borrar” datos antiguos para conseguir espacio para los nuevos puntos de notas
recordatorias. Por consiguiente los 1250 puntos de notas recordatorias antiguos ser n borrados y habr
espacio libre.
• Algunos datos tambi n pueden activarse y ser invocados desde la memoria en el Alpha-mode.
• El indicador MEMO del visualizador se ilumina al seleccionar una pista cuyos datos est n almacenados en
la memoria.
2. Elementos MEMO
Los siguientes elementos se pueden almacenar como m ximo en un banco de memoria:
q Cue y punto Alpha-Cue
w Puntos A1-B1 y A1-B2
e Puntos A3-B3, A4-B4 y modo A3/4 (no almacenado en el modo sampler)
r Ajuste de la configuraci n de pitch, pitch activar/desactivar, Key Adjust activar/desactivar
3. Selecci n mode MEMO
q Pulse el bot n MEMO en modo Cue para activar el modo MEMO.
w Gire el bot n PARAMETERS para seleccionar entre los distintos modos de MEMO de la siguiente manera:
Memo Set, MemoCall, Memo Clr
Seg n las circunstancias, algunos modos no podr n ser seleccionados.
e Pulse de nuevo el bot n MEMO para salir del modo MEMO.
(1) Almacenar datos en la memoria [Memo Set]
• Tras hacer los ajustes que desea guardar en la memoria, pulse el bot n CUE.
• Cuando el indicador MEMO del visualizador est desactivado en el modo Cue, pulse el bot n MEMO
para habilitar la funci n Memo set.
• Si se ilumina el indicador de MEMO, ser necesario borrar el Memo existente antes de almacenar un
Memo nuevo.
• Por ltimo, pulse el bot n PARAMETERS para fijar. Le aparecer el mensaje “ COMPLETE” y se
iluminar el indicador de MEMO.
MEMO completa (MEMO FULL)
• Si la memoria est completa y no puede almacenar m s datos, “ Memo Full!” y “ Del 1250?” Le
aparece el mensaje.
• En este caso, necesita borrar la memoria de los primeros 1250 Memo (n mero 1 al 1250) en ese
momento para conseguir espacio para los nuevos memo.
• Para liberar espacio, pulse el bot n PARAMETERS mientras tenga el mensaje “ Del 1250?” en el
visualizador.
• Aparecer el mensaje “ Delete OK? Entonces, pulse de nuevo el bot n PARAMETERS para empezar a
borrar.
• Despu s de que se han borrado los primeros 1250 Memo (n mero 1 al 1250), los n meros despu s
del Memo 1251 son numerados nuevamente como los nuevos 1, 2, 3… (ahora tendr 1250 nuevos
espacios vacios).
(2) MEMO Call [Memo Call]
• Cuando el CD incluya pistas en las que DN-S5000 haya insertado un Memo, el indicador de MEMO
parpadear durante 5 segundos.
• Para invocar los datos de un Memo, seleccione la pista que convirti en un MEMO. Entonces se
iluminar el indicador de MEMO.
• Pulse el bot n MEMO para habilitar la funci n Memo call.
• Si pulsa el bot n PARAMETERS en el modo Memo call, se cargaran todos los datos almacenados en
la memoria. DN-S5000 pasa a modo pausa en el punto Cue cancelado.
• Cuando el pitch actual se carga de un Memo con el LED del PITCH parpadeando, el Pitch actual se
bloquea hasta que la barra del Pitch alcanza el mismo Pitch. Mientras el Pitch actual est bloqueado,
el LED del PITCH continua parpadeando.
Memo Call en Alpha-Mode
• En el Alpha-Mode, se puede usar la funci n Memo Call siempre que la pista principal no sea Cue. Y la
funci n Memo call puede usarse sin variar las operaciones de la pista principal.
(3) 1 MEMO CLEAR [Memo Clr]
• Para borrar los datos de un Memo, seleccione la pista que convirti en un MEMO. Entonces se
iluminar el indicador de MEMO.
• Pulse el bot n MEMO para habilitar la funci n Memo clear.
• Si pulsa el bot n PARAMETERS en el modo MEMO CLEAR, se borra la memoria y se apaga el
indicador de MEMO del visualizador.
Borrar todos los MEMO (ALL MEMO CLEAR)
• Se pueden borrar todos los datos de la memoria.
• Para obtener m s instrucciones, v ase “ ⁄4 PRESET (15) MEMO ALL CLEAR” .
4. Copiar todo el MEMO
• La informaci n del MEMO puede copiarse entre ou DN-S5000 y DN-D9000.
• As mismo, los datos DN-2600F MEMO pueden copiarse en el DN-S5000.
• Consulte las instrucciones en “ ⁄4 PRESET (16) MEMO ALL COPY” .
5. X-EFFECT
• Los datos MEMO de dos unidades DN-S5000 pueden compararse entre s cuando las dos unidades est n
conectadas mediante los terminales X-EFFECT.
DN-S5000-1 DN-S5000-2
Terminales X-EFFECT OUT
minicable est reo de 3,5 mm
Terminales
X-EFFECT IN
NOTA:
Los datos MEMO de las dos unidades DN-S5000 se verifican cuando se carga el disco.
43
Page 44

ESPA OL
POWER
ON OFF
DIGTAL OU
XEFFECT
P
IN
OUT
MAN
LL
LNE OUT
RR
MAN
MO I OR
POWER
ON OFF
DIGTAL OU
XEFFECT
P
IN
OUT
MAN
LL
LNE OUT
RR
FADER
MAN
MON OR
14
PRESET
1. Modo Preset
q El modo preset est disponible cuando se pulsa el bot n PRESET durante m s de 1 segundo si DN-S5000
est en modo Cue, pausa o sin disco.
w Gire el bot n PARAMETERS para seleccionar el elemento preestablecido.
e Despu s de seleccionar el elemento, pulse el bot n PARAMETERS para seleccionar los datos preset.
r Para cambiar los datos Preset, repita los siguientes pasos.
t Pulse el bot n PRESET, CUE, PLAY/PAUSE (
13) para cancelar el modo preset.
2. Elementos preset y datos
El s mbolo “ *” junto a los datos indica el valor por defecto.
(1) AUTO CUE : ON/OFF de la B squeda del nivel de Auto Cue. (ON* / OFF)
(2) PITCH RANGE : Seleccione la variaci n de pitch actual cuando encienda el equipo.
(±4 / ±10* / ±16 / ±24%)
(3) ALPHA-TRACK OUTPUT : Destino de salida de reproducci n Alpha-Track. (Main out* / Alpha out)
(4) PLATTER : Seleccione si el plato va a girar durante la reproducci n
(Turn round *(girar) / Turn stop (detener giro))
(5) PLATTER MODE MEMO :
Cuando los par metros del modo de plato (DRAG-S, BRAKE y ECHO ), la fuente y el ajuste on/off
(activado/desactivado) se almacenan, los datos almacenados se activan cada vez que se enciende el
aparato.
q Para establecer los datos de efectos, pulse el bot n PARAMETERS y seleccione “ YES” .
• El mensaje “ Set OK?” (“ ajuste correcto” ) parpadea en el visualizador.
w Pulse el bot n PARAMETERS de nuevo y selecci n “ OK” para ejecutar el establecimiento de los
datos.
e Una vez establecidos, aparecer el mensaje “ Completed!” (finalizado).
(6) AUTO LOAD : Tiempo para carga autom tica de disco. (OFF / 10 / 30 / 60* seconds)
(7) EOM : Tiempo de inicio del mensaje de final de pista. (OFF / 10* / 15 / 20 / 30 / 60 / 90 seconds)
(8) DIGITAL OUT OUTPUT LEVEL : Seleccione el nivel de salida digital. (Normal* / –6 dB Down)
NOTA: Utilice el valor – 6dB si la salida de reproducci n se corta cuando las pistas Main y Alpha-
Tracks se reproducen simult neamente en la misma posici n.
(9) FADER START MODE : Seleccione un tipo 2 l neas (Cue y Play) o un tipo 1 l nea (Play y Pause).
(Play /Cue* / Play/Pause)
(10) POWER ON PLAY :
La reproducci n comienza cuando la alimentaci n es activada y si se carga un disco.
(On / Off*)
(11) A3/4 MODE : Seleccione los modos operativo del bot n A3 y A4 cuando encienda el equipo.
(Sampler* / 4H/S / Alpha-Track H/S)
(12) SINGLE/CONTINUOUS : Seleccione el modo de reproducci n cuando encienda el equipo.
(Single* / Continuous)
(13) ELAPSED/REMAIN : Seleccione el modo tiempo cuando encienda el equipo.
(Elapsed* / Remain)
(14) PROGRAM ALL CLEAR : Borre todos los datos de reproducci n del programa que haya en la memoria
no vol til.
q Para borrar el programa, pulse el bot n PARAMETERS y seleccione “ YES” .
• “ Clear OK?” parpadea en el visualizador de caracteres.
w Pulse de nuevo el bot n PARAMETERS y seleccione “ OK” para borrar el programa.
El mensaje “ Prog. Clear” aparece en el visualizador de caracteres mientras borra datos.
e Una vez ha terminado de borrar, aparece el mensaje “Complete!”
(15) MEMO ALL CLEAR : Borre todos los datos de MEMO que haya en la memoria no vol til.
q Para borrar los datos de un MEMO, pulse el bot n PARAMETERS y seleccione “ YES” .
• “ Clear OK?” parpadea en el visualizador de caracteres.
w Pulse de nuevo el bot n PARAMETERS y seleccione “ OK” para empezar a borrar los datos que
haya en la memoria.
• El mensaje “ Clear” aparece en el visualizador de caracteres mientras borra datos.
44
e Una vez ha terminado de borrar, aparece el mensaje “Complete!”
(16) MEMO ALL COPY :
Copie todos los datos MEMO de la unidad maestra del DN-S5000 (ou del DN-D9000,DN-2600F) a
la unidad esclava del DN-S5000 (ou DN-D9000) cuando ambas unidades est n conectadas mediante
el cable sin cruzar normal. (Vea el diagrama para el cable).
NOTA: Aseg rese de que el reproductor de CD no tiene discos en su interior.
Se utiliza un cable sin cruzar normal:
X'EFFECT OUT
DN-S5000
DN-S5000 (X'EFFECT IN)
DN-D9000 (X'EFFECT)
DN-2600F (X'EFFECT)
• Utilizando un cable no cruzado, conecte los terminales X-EFFECT entre dos unidades DN-S500,
o entre una unidad DN-2600F y una unidad DN-S6000, o entre una unidad DN-D9000 y otra DNS5000.
• Si un DN-2600F es la unidad maestra, realice de antemano el procedimiento de abajo en el modo
Preset del DN-2600F. (Para m s detalles, rem tase a las instrucciones de funcionamiento del DN-
2600).
✽ Ajuste el “ Copy Master” para el tem (14) Preset.
Luego, pase al punto q abajo en la unidad escalva del DN-S5000.
• La copia puede realizarse utilizando la unidad DN-S5000 y la unidad DN-D9000 de la misma
manera que cuando se utilizan dos unidades DN-S5000.
DN-S5000-1 DN-S5000-2
X-EFFECT OUT jack
3.5 mm stereo mini cord
X-EFFECT IN jack
• Realizar la operaci n de copiar en el esclavo DN-S5000.
q Para empezar a copiar, pulse el bot n PARAMETERS y seleccione “ YES” . “ Copy OK?”
parpadea en el visualizador de caracteres.
w Pulse de nuevo el bot n PARAMETERS. El mensaje “ Start OK?” aparece en el visualizador
de caracteres.
NOTA: ISi un DN-2600F es la unidad master, siga el procedimiento de abajo en el modo
Preset del DN-2600F aqu .
IEn el tem (15) Preset, primero comience copiando en el DN-2600F. Luego, pase al
punto e abajo en la unidad esclava del DN-S5000.
e Pulse de nuevo el bot n PARAMETERS y el proceso de copia empezar cuando el maestro
env e los datos copiados. El mensaje “ Copying?” aparece en el visualizador de caracteres.
• Si el maestro y el esclavo no est n conectados o no est n preparados para copiar, se
mostrar el mensaje “ Not Connect” en el visualizador de caracteres.
r Una vez ha terminado la copia, aparece el mensaje “ Complete!”
• El mensaje “ Copy Error” aparece en el visualizador de caracteres si la copia no se ha
completado. En este caso, intente nuevamente el procedimiento anterior.
• Los datos copiados MEMO son adicionados al rea de n mero mayor de la unidad esclava
del DN-S5000.
(17) Se muestra la versi n del software de la unidad DN-S5000. (SYSTEM / DSP / CD DRIVE)
(18) PRESET CLEAR : Restablecer todos los datos preestablecidos a la configuraci n de f brica.
q Para borrar los datos PRESET, pulse los PARAMETERS.
“ Initial OK?” parpadea en el visualizador de caracteres.
w Pulse de nuevo el bot n PARAMETERS y seleccione “ OK” para empezar a borrar los datos
preestablecidos.
El mensaje “ Preset Int” aparece en el visualizador de caracteres mientras se borran los datos.
e Una vez ha terminado de borrar, aparece el mensaje “Complete!”
Page 45

ESPA OL
PROGRAM/RANDOM/RELAY PLAY/POWER ON PLAY
q, e ★3
w, r,
t, y
★1
★2
PARAMETERS
ON / OFF
PUSH
PARAMETERS
ON / OFF
PUSH
PARAMETERS
ON / OF
PUSH
MEMO
PRESET
MEMO
PRESET
PARAMETERS
ON / OFF
PUSH
15
Reproducci n del programa (Program Play)
• Se puede programar hasta 25 pistas por disco.
• En la memoria no vol til se pueden almacenar programas para seis discos (un programa por disco).
NOTA: Algunas funciones, como Hot Start, Sampler, Mirror Mix, y Platter Effect no funcionan durante la
reproducci n programada.
Selecci n del modo de programa
q En el modo Cue o pause
(pausa), pulse el bot n
PRESET durante m s de 1
segundo para seleccionar
el modo de preselecci n.
Cuando se pulsa el bot n
PRESET en este
momento, se selecciona
el modo de programa.
✽ El modo cambia en el siguiente orden
cada vez que se pulsa (presi n corta) el
bot n PRESET :
preset mode (preselecci n) → program
mode (programa) → random mode
1
(aleatorio) → off (desactivado).
w Gire el bot n
PARAMETERS para
seleccionar los
distintos modos de
programa de la
siguiente manera:
Prog.In, Prog.On, Prog.Off,
MemoSet, MemoCall,
Memo Clr
Seg n las circunstancias, algunos modos
no podr n ser seleccionados.
e Pulse de nuevo el bot n
PRESET para salir del
modo programa.
Introducir Programa (Prog.In)
Introducci n del programa para reproducci n.
r Gire el bot n
PARAMETERS para
seleccionar la pista que
desee introducir.
t Pulse el bot n
PARAMETERS para
introducir la pista
seleccionada.
2
★1 Inserte las pistas al programa
• Se pueden insertar pistas a las pistas
previamente programadas.
• Solo se puede insertar una pista a la vez
utilizando el bot n PITCH BEND+ y
regrese al paso r.
★2 Borrado de pistas desde programa
• Se pueden borrar pistas de aquellas que
se hab an programado previamente.
• Solo se puede borrar una pista a la vez
utilizando el bot n PITCH BEND -.
y Pulse el bot n
PARAMETERS de
nuevo para volver al
paso 1- r.
3
• Repita estos pasos para
introducir un programa
completo.
• Pulse el bot n PRESET para finalizar el
modo de entrada de un programa, luego
inicie la reproducci n del programa
(Prog.On).
Inicio de la reproducci n del programa
(Prog.On)
• Cuando seleccione “ Prog.On” , el DN-S5000
establecer una Cue en la primera pista del
programa.
4
• La reproducci n del programa se inicia
cuando se pulsa el bot n
13.
★3 Puede utilizar la funci n de reproducci n
repetida del programa pulsando el bot n
EXIT/RELOOP.
Modo de cancelaci n del programa
(Prog.Off)
• Cuando se selecciona “ Prog.Off” , el modo
5
de reproducci n del programa se desactiva y
vuelve al modo de reproducci n normal.
Almacenar programa (MemoSet)
• Cuando se selecciona la opci n “ Memo
6
Set” , el programa creado se almacena en la
memoria no vol til.
Invocar programa (MemoCall)
• Cuando se selecciona la opci n
“ MemoCall” , el programa almacenado en la
7
memoria no vol til se carga y se activa el
modo de reproducci n de programa.
Borrar programa (Memo Clr)
• Cuando se selecciona la funci n “ Memo
Clr” , el programa del disco cargado se borra.
8
• Para borrar todos los programas en
memoria, utilice la funci n Preset.
45
Page 46

ESPA OL
MEMO
PRESET
PARAMETERS
ON / OFF
PUSH
/ SINGLE
CONT.
RELAY
q, w
MEMO
PRESET
PARAMETERS
ON / OFF
PUSH
rq, t
w, y
e
/ SINGLE
CONT.
RELAY
Reproducci n aleatoria (Random Playback)
• Con la funci n de reproducci n aleatoria, las pistas del disco se seleccionan y reproducen de forma aleatoria.
NOTA: Algunas funciones, como Hot Start, Sampler, Mirror Mix, y Platter Effect no funcionan durante la
reproducci n aleatoria.
SIniciar la reproducci n aleatoria
e Pulse el bot n
13 en el
reproductor que est en
modo pausa para iniciar
la reproducci n aleatoria.
2
Modo de reproducci n aleatoria (Random On)
q En el modo Cue o pausa,
pulse el bot n PRESET el
tiempo suficiente para
seleccionar mode de
preselecci n.
La opci n “ Random On?” (activar aleatorio)
se selecciona en este momento pulsando
dos veces el bot n PRESET.
1
w Pulse la ruedecilla
PARAMETERS para
ajustar el modo de
reproducci n
aleatorio. La unidad
permanecer en
espera en una pista
seleccionada
aleatoriamente.
r Puede utilizar la funci n de
reproducci n repetida
aleatoria pulsando el bot n
EXIT/RELOOP.
Cancelar la reproducci n aleatoria
(RandomOff)
t “ RandomOFF” queda
seleccionado cuando se
pulsa el bot n PRESET
durante una reproducci n
aleatoria.
3
y Pulse la ruedecilla
PARAMETERS para
cancelar la reproducci n
aleatoria. La unidad
regresar al modo de
reproducci n normal.
46
Reproducci n por turnos (Relay Playback)
• La funci n de reproducci n por turnos es modo de reproducci n en el que se reproducen de forma continua
las pistas de los CDs en dos unidades DN-S5000.
• Conecte los terminales X-EFFECT IN/OUT entre las dos unidades DN-S5000.
SIniciar la reproducci n por turnos
q Pulse el bot n RELAY
durante m s de 1
segundo para habilitar el
modo de reproducci n de
transmisi n. Se puede
ajustar el modo de
transmisi n como se
indica abajo.
• En el modo de reproducci n nico,
cuando la reproducci n de una de las
1
unidades alcanza el final de una pista, el
otro DN-S5000 comienza a funcionar.
Detener la reproducci n por turnos
w Cuando se pulsa el bot n
RELAY durante el tiempo
2
suficiente en el modo de
reproducci n por turnos,
se desactiva este modo.
• En el modo de reproducci n continua,
cuando todas las pistas en un lado han
finalizado, otro DN-S5000 comienza a
funcionar.
• Los discos de dos unidades DN-S5000
pueden reproducirse por turnos si se
configuran ambas unidades DN-S5000
con el modo de reproducci n por turnos.
• La reproducci n de retransmisi n y los
modos de reproducci n aleatorios se
pueden ajustar en el programa.
Reproducci n de encendido (Power On Play)
• Cuando la opci n “ POWER ON PLAY” se activa (“ ON” ) en “ ⁄4 PRESET (10)” , se inicia la reproducci n en la
primera pista del disco cuando se enciende la unidad.
Page 47

ESPA OL
A
B
B
∗
B
16
ESPECIFICACIONES
GENERALIDADES
Tipo: Reproductor de disco compacto.
Tipo de discos: Disco compacto est ndar (12 cm),CD-TEXT.
Dimensiones: Reproductor: 285 (ancho) x 111,5 (alto)
Instalaci n: Tipo mesa superior.
Peso: Reproductor: 5,7 kg
Alimentaci n: Modelos para R.O.C. de U.S.A., Canad y Taiw n:
Consumo: 18 W
Condiciones ambientales: Temperatura de operaci n:5 a 35°C
SECCION DE AUDIO
Main out, Monitor out
Cuantificaci n: Lineal de 24 bits por canal
Frecuencia de muestreo: 44,1 kHz a velocidad normal
Relaci n de sobremuestreo: 8 veces
Distorsi n de arm nicos total
Se al a ratio de ruido: 90 dB o superior
Separaci n de canales: 85 dB o superior
Frequency respons: 20 a 20,000 Hz
Salida anal gica
Nivel de salida: 2,0 V r.m.s.
Impedancia de carga: 10 kΩ/kohmios o mayor
Salida digital
Formato de se al: SPDIF
Nivel de salida: 0,5 Vp-p 75 Ω/ohmios
Discos CD-R y CD-RW
NOTA: Los discos CD-R o CD-RW finalizados puede reproducirse en esta
unidad. Sin embargo, dependiendo de la calidad de la grabaci n,
algunos discos CD-R/RW pueden no reproducirse.
x 327 (prof.) mm (sin patas)
Modelos para Europa: 230 V CA ±10%, 50 Hz
Humedad de operaci n: 25 a 85% (sin llegar al punto de condensaci n)
Temperatura de almacenamiento: –20 a 60° C
: 0,01 % o menor
120 V CA ±10%, 60 Hz
17
SUSTITUCI N DE LA CORREA
• En las DN-S5000, el Platter es conducido por una correa.
Utilice el procedimiento que se describe a continuacin para reemplazar la correa por la correa incluida.
1. Quite un tornillo (cabeza hexagonal) y extraiga
el Scratch Disc y la alfombrilla de deslizamiento.
2. Quite la correa de la polea del motor.
3. Quite 3 tornillos (< cabeza) y retire el Platter.
4. Quite la correa del Platter.
A
Polea del motor
(Cabeza hexagonal)
Correa
Platter
(< Cabeza)
Estabilizador
Scratch Disc
Alfombrilla de
deslizamiento
Hoja deslizante
(< Cabeza)
Platter
FUNCIONES
Comienzo instant neo: Dentro de 20 mseg.
Velocidad de pitch: ±4% (0,05% pitch), ±10% (0,1% pitch), ±16% (0,1% pitch)
Curva de pitch: Variaci n de pitch: ±32%
Sampler
Muestreo: 44,1 kHz
Longitud: 15 segundos
Nivel de salida: 2,0 V r.m.s. (Variable / -14 ~ +6 dB)
Velocidad de pitch: ±24% (0,1% pitch)
Precisi n de b squeda: 1/75 seg. (1 cuadro de subc digo)
Velocidad m x. de exploraci n
Pasos m ximos de
memoria MEMO: 5000 pasos
✽ Con el prop sito de introducir mejoras, las especificaciones y el dise o del producto est n sujetos a cambios
sin previo aviso.
±24% (0,1% pitch), ±100% (1,0% pitch)
Variaci n de pitch ±100%: ±99%
: M s de 20 veces la velocidad normal
Correa
5. Monte en orden inverso 4 → 1.
PRECAUCIONES:
• Desenchufe el cable de alimentaci n antes de
sustituir la correa.
• No toque el sensor de escala (*) al quitar el
Platter.
• No aplique aceite ni grasa en la correa al
sustituirla.
47
 Loading...