

Page 1

FR GUIDE D'UTILISATION
EN USER GUIDE
Four
Oven
Page 2

2
FR
02
DE
47
EN
62
ES
77
IT
92
NL
107
PT
122
DA
32
CS
17
Chère Cliente, Cher Client,
Vous venez d'acquérir un four
DDEE DDIIEETTRRIICCHH
et nous vous en remer-
cions.
Nos équipes de recherche ont conçu pour vous cette nouvelle génération d’appareils, qui par leur qualité, leur esthétique, leurs fonctions
et leurs évolutions technologiques en font des produits d’exception,
révélateurs de notre savoir-faire.
Votre nouveau four
DDEE DDIIEETTRRIICCHH
s’intégrera harmonieusement dans
votre cuisine et alliera parfaitement les performances de cuisson, et la
facilité d’utilisation. Nous avons voulu vous offrir un produit d’excellence.
Vous trouverez également dans la gamme des produits
DDEE DDIIEETTRRIICCHH
,
un vaste choix de cuisinières, de tables de cuisson, de hottes aspirantes, de lave-vaisselle, et de réfrigérateurs intégrables, que vous
pourrez coordonner à votre nouveau four
DDEE DDIIEETTRRIICCHH
.
Bien entendu, dans un souci permanent de satisfaire le mieux possible
vos exigences vis-à-vis de nos produits, notre service consommateurs
est à votre disposition et à votre écoute pour répondre à toutes vos
questions ou suggestions (coordonnées à la fin de ce livret).
Et connectez-vous aussi sur notre site:
wwwwww..ddeeddiieettrriicchh--eelleeccttrroommeennaag
geerr..ccoomm
sur lequel vous trouverez nos
dernières innovations ainsi que des informations utiles et complémentaires.
DDEE DDIIEETTRRIICCHH
LLeess nnoouuvveeaauuxx oobbjjeettss ddee vvaalleeuurr
Dans le souci d'une amélioration constante de nos produits, nous nous réservons le droit d'apporter à leurs caractéristiques techniques, fonctionnelles ou esthétiques toutes modifications
liées à leur évolution.
Important :
Avant de mettre votre appareil en marche, veuillez lire attentivement ce guide d'installa-
tion et d'utilisation afin de vous familiariser plus rapidement avec son fonctionnement.
Page 3

3
FR
SOMMAIRE
1 / DESCRIPTION DE VOTRE APPAREIL
••
Présentation de votre four
___________________________________ 4
••
Accessoires
_______________________________________________ 4
••
Présentation du programmateur ______________________________ 5
••
Présentation du Four supérieur_______________________________ 6
2 / UTILISATION DE VOTRE APPAREIL
••
Utilisation du programmateur
º
Comment régler l’heure _________________________________ 7
º
Cuisson immédiate _____________________________________ 8
••
Cuisson programmée
º
Départ immédiat _______________________________________ 9
º
Départ différé _________________________________________ 10
••
Utilisation de la fonction minuterie ____________________________ 11
••
Personnalisation de la température préconisée__________________ 12
••
Verrouillage des commandes ________________________________ 12
••
Comment utiliser votre four superieurºDépart immédiat __________ 13
º
Cuisson au gril ________________________________________ 13
3 / MODES DE CUISSON DU FOUR_________________________________ 14
4 / ENTRETIEN ET NETTOYAGE DE VOTRE FOUR ____________________ 16
5 / SERVICE APRES-VENTE
••
Interventions
______________________________________________ 18
••
Relations consommateurs
___________________________________ 18
Page 4
4
FR
1 / DESCRIPTION DE VOTRE APPAREIL
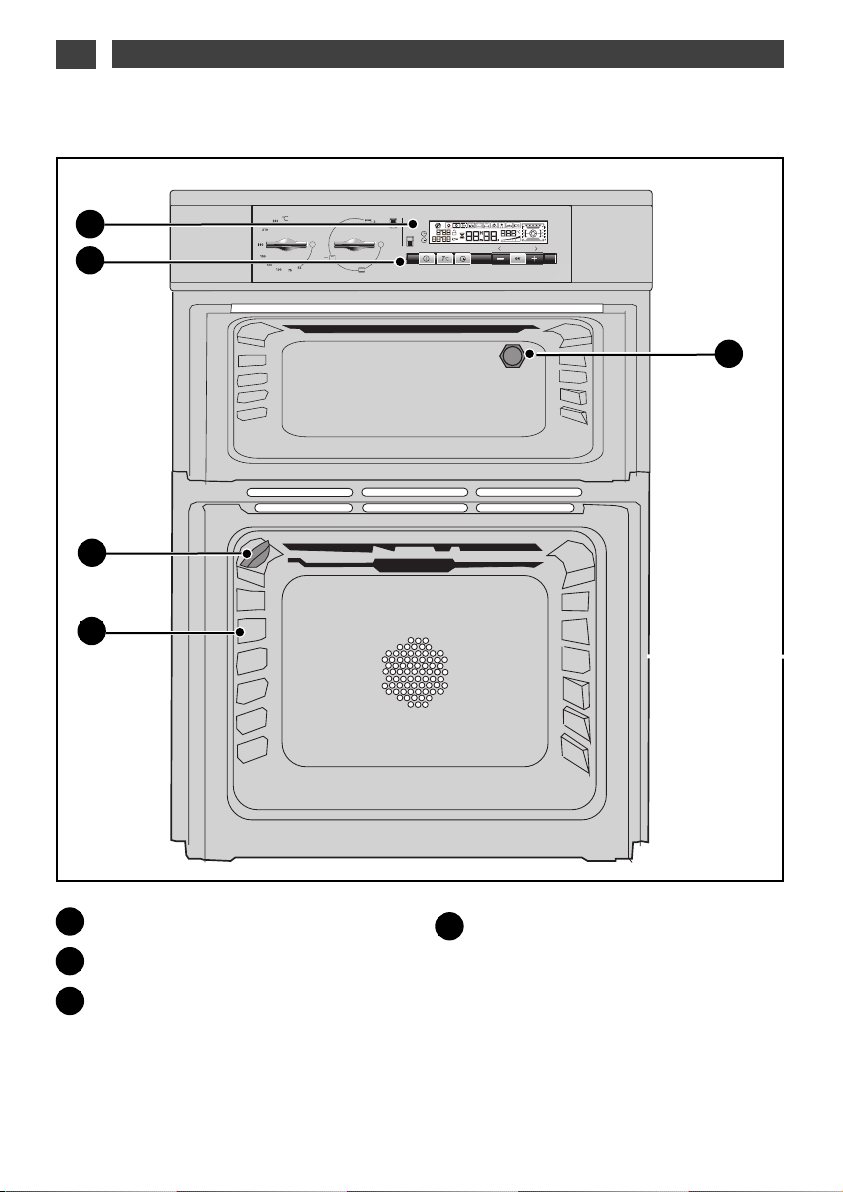
PRESENTATION DE VOTRE FOUR
••
A
B
Programmateur
Barette de commandes
Lampe
C
D
Gradins fil
D
C
B
A
•Accessoires
Votre appareil est équipé de deux grilles sécurité avec poignée, d’une grille avec poignées pour
plat 45 mm, d’un plat pâtisserie Lissium et d’un plat 45 mm.
c
5
3
1
Page 5

5
FR
1 / DESCRIPTION DE VOTRE APPAREIL
••
PRESENTATION DU PROGRAMMATEUR
A
P
A
B
Affichage des modes de cuisson
Affichage de la température du four
Indicateur de gradins et du mode
de cuisson choisis
Indicateur de montée en température
Touches de réglages
Touches de validation des réglages
Affichage de l’horloge ou de la minuterie
Réglage des durées/fin de cuisson et
mise à l’heure
Indicateur de minuterie
C
D
E
Indicateur de verrouillage clavier (sécurité enfant)
Réglage de température
Start/Stop
Affichage fin de cuisson
Indicateur fin de cuisson
Indicateur durée de cuisson
Affichage durée de cuisson
Indicateur de nettoyage
Verrouillage pyrolyse (modèle DOP740*)
F
G
H
I
C
D
F
E
H
K
L
O
N
Q
J
I
G
B
M
J
K
L
M
N
O
P
Q
R
R
Page 6

6
FR
1 / DESCRIPTION DE VOTRE APPAREIL
••
PRESENTATION DU FOUR SUPERIEUR
A B
A
B
Sélecteur de température.
Sélecteur de fonctions.
Page 7
FR2 / UTILISATION DE VOTRE APPAREIL
•
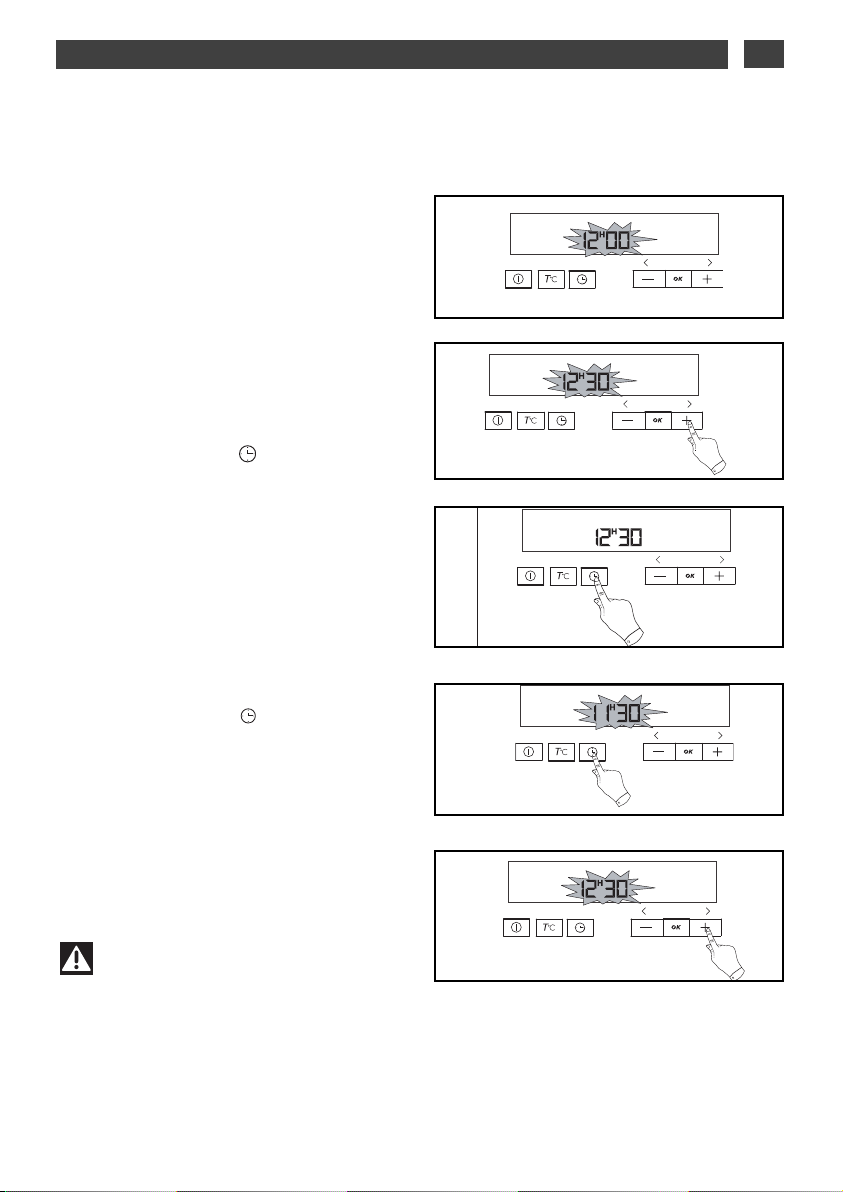
Comment régler l’heure
--
A la mise sous tension
L’afficheur clignote à 12H00 (fig.1)
Réglez l’heure en appuyant sur les touches +
et - (le maintien de la touche permet d’obtenir
un défilement rapide) (fig.2).
Exemple : 12H30.
Appuyez sur la touche pour valider.
L’affichage ne clignote plus (fig.3).
fig.1
fig.2
fig.2
fig.3
fig.1
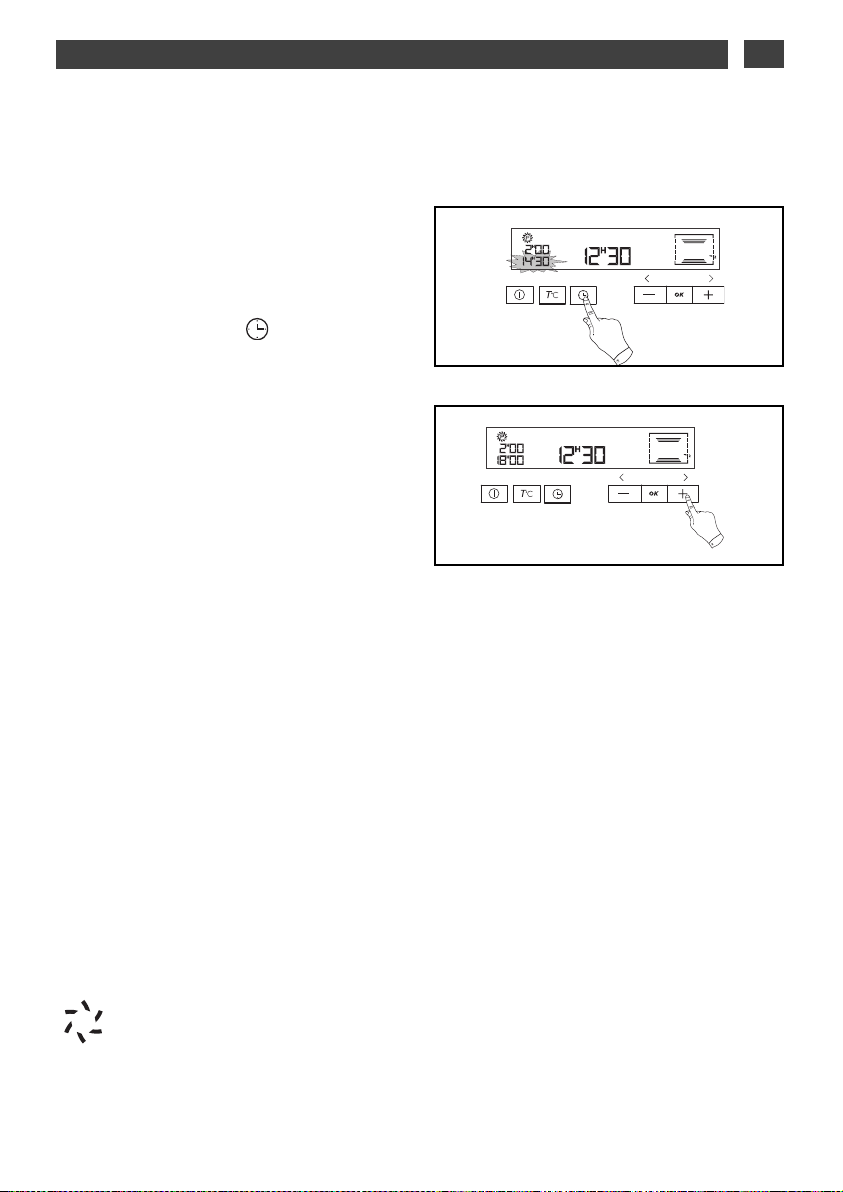
- Pour remettre à l’heure l’horloge
Appuyez sur la touche pendant quelques
secondes jusqu’à faire clignoter l’afficheur
(fig.1), puis relâchez.
Des bips sonores indiquent que le réglage
est alors possible.
Ajustez le réglage de l’heure avec les
touches + et - (fig.2).
Appuyez sur la touche
OOKK
pour valider.
Attention
S’il n’y a pas de validation par la
touche OK, l’enregistrement est automatique au bout de quelques secondes.
7
Page 8
8
FR
2 / UTILISATION DE VOTRE APPAREIL
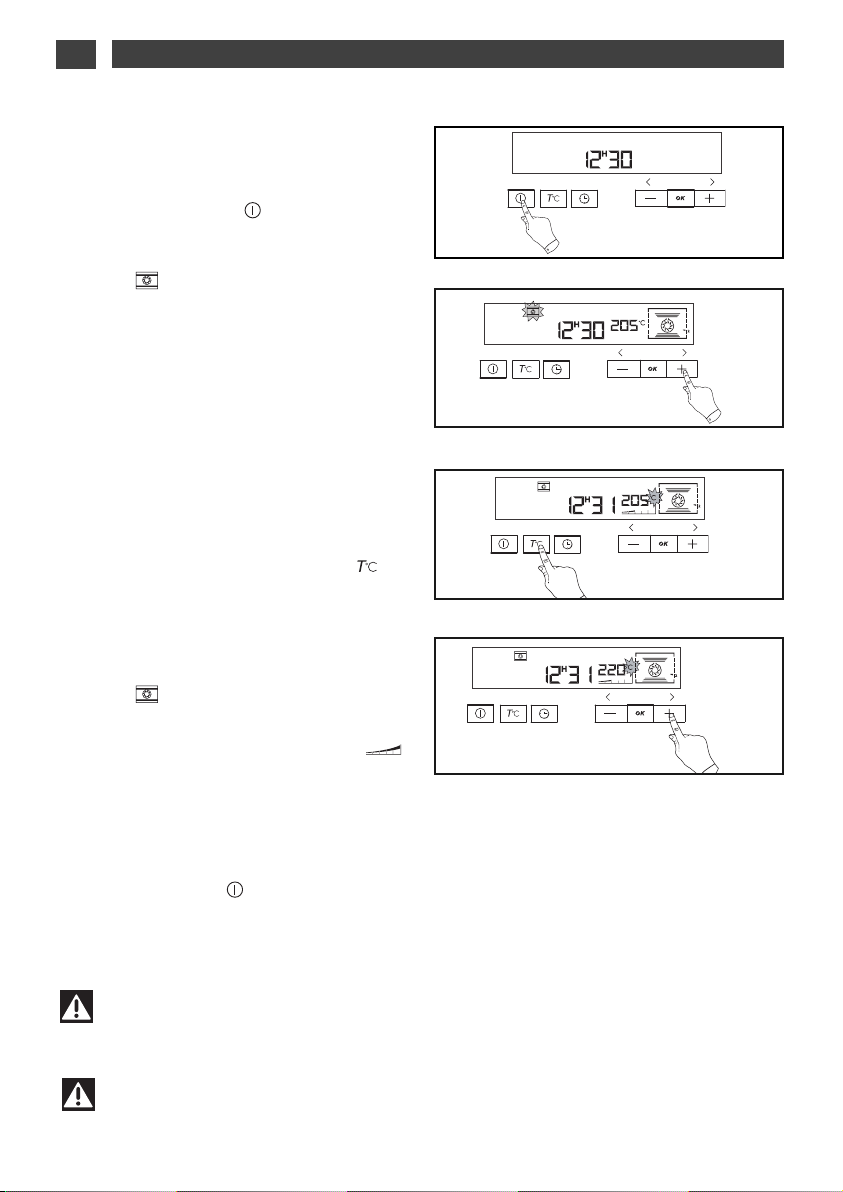
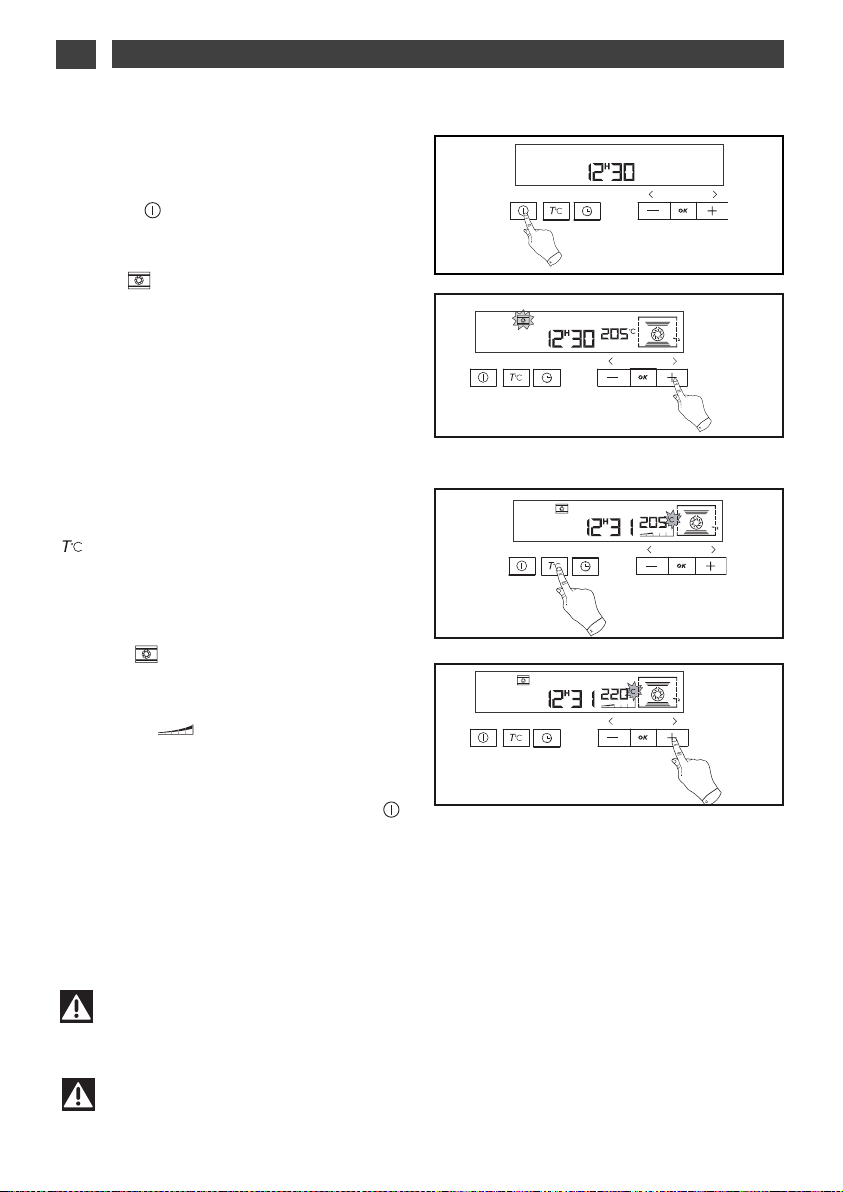
•Cuisson immédiate
— Le programmateur ne doit afficher que
l’heure. Celle-ci ne doit pas clignoter.
Appuyez sur la touche (fig.1) puis sélectionnez avec les touches + ou - la cuisson
choisie (fig.2).
Exemple: --> gradin 2 conseillé.
— Validez avec la touche OK.
L’indicateur de cuisson se fige. L’indicateur de
gradins et les éléments en fonctionnement
apparaissent.
Le four se met en marche.
Placez votre plat dans le four selon la préconnisation indiquée dans l’afficheur.
Votre four vous propose la température optimale pour ce type de cuisson.
Il vous est cependant possible d’ajuster la
température en appuyant sur la touche située sous l’afficheur (fig.3).
Le “°C” clignote dans l’afficheur et indique
que vous pouvez ajuster la température en
appuyant sur les touches + ou - (fig.4).
Exemple: --> ajustée à 220°C.
— Validez avec la touche OK.
L’indicateur de montée en température
signale la progression de la température à
l’intérieur du four.
Une série de bips sonores retentit lorsque le
four atteint la température choisie.
Pour arrêter la cuisson, appuyez quelques secondes sur la touche .
fig.2
Attention
Toutes les cuissons se font porte fermée.
Attention
Après un cycle de cuisson, la turbine de refroidissement continue de fonctionner pendant un certain temps, afin de garantir une bonne fiabilité du four.
fig.1
fig.3
fig.4
Page 9

9
FR2 / UTILISATION DE VOTRE APPAREIL
--
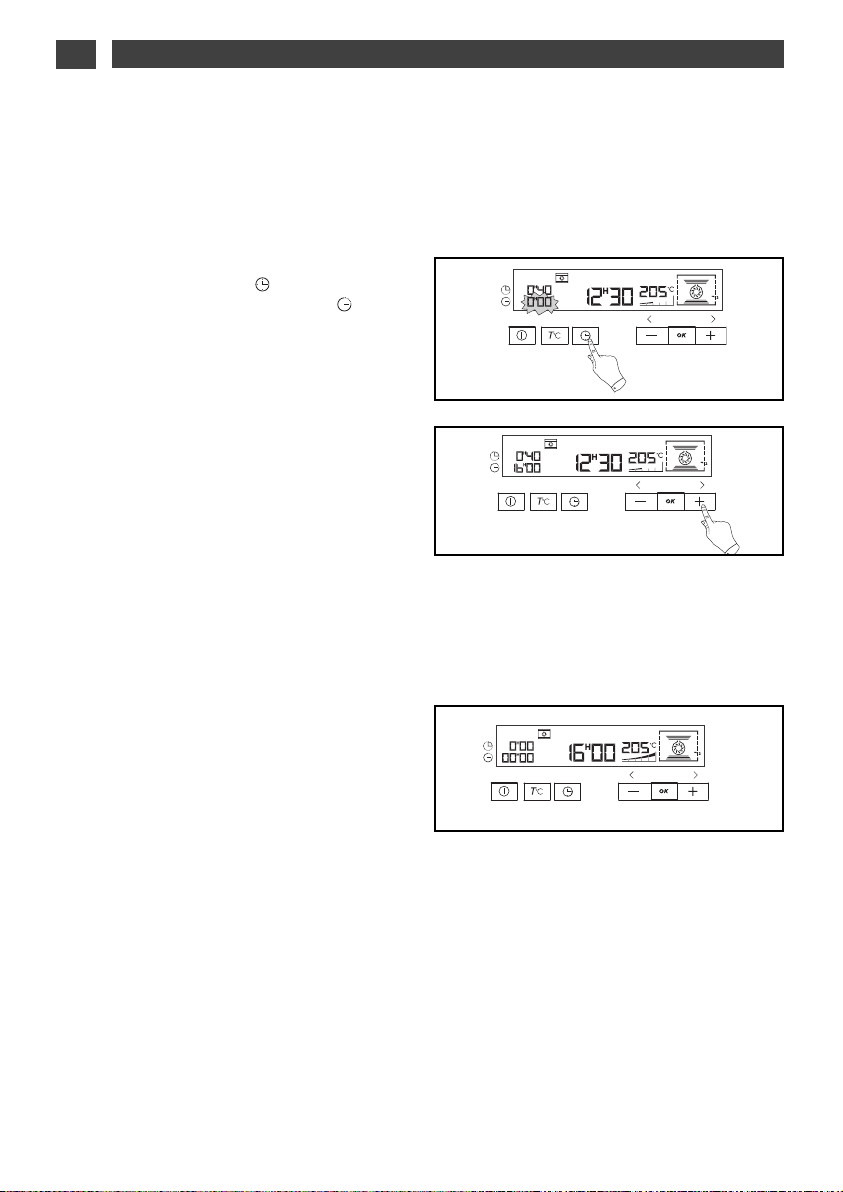
Cuisson avec départ immédiat et
durée programmée
- Choisissez le mode de cuisson souhaité et
ajustez la température (voir paragraphe: cuisson immédiate).
- Appuyez sur la touche jusqu’à faire clignoter l’indicateur de durée de cuisson .
“
L’affichage clignote à 0h00 pour indiquer que
le réglage est alors possible (fig.
1).
- Appuyez sur la touche ++ou --pour régler le
temps souhaité.
Exemple : 30 min de cuisson (fig.
2).
— Validez avec la touche OK.
L’enregistrement du temps de cuisson est automatique au bout de quelques secondes.
L’affichage de la durée ne clignote plus.
Le décompte de la durée se fait immédiatement après le réglage.
AApprrèèss cceess 33 aaccttiioonnss,, llee ffoouurr cchhaauuffffee ::
Une série de bips sonores retentit lorsque le
four atteint la température choisie.
En fin de cuisson (fin du temps programmé),
- le four s’arrête,
- l’indicateur de durée de cuisson et 0:00 clignotent (fig.
3),
- une série de bips sonores est émise durant
quelques minutes. L’arrêt définitif de ces bips
se fait en appuyant sur n’importe quelle
touche.
fig.2
CUISSON PROGRAMMEE
••
fig.1
fig.3
Page 10
10
FR
2 / UTILISATION DE VOTRE APPAREIL
--
Cuisson avec départ différé et heure de
fin choisie
PPrrooccééddeezz ccoommmmee uunnee ccuuiissssoonn pprrooggrraammmmééee..
- Appuyez sur la touche jusqu’à faire clignoter l’indicateur de fin de cuisson .
“
L’affichage clignote pour indiquer que le réglage est alors possible (fig.
1).
- Appuyez sur la touche ++ou --pour régler
l’heure de fin de cuisson souhaitée.
Exemple : fin de cuisson à 16h (fig.
2).
— Validez avec la touche OK.
L’enregistrement de la fin de cuisson est automatique au bout de quelques secondes.
L’affichage de la fin de cuisson ne clignote
plus.
AApprrèèss cceess 33 aaccttiioonnss,, llee ddééppaarrtt ddee llaa cchhaauuffffee
eesstt ddiifffféérréé ppoouurr qquuee llaa ccuuiissssoonn ssooiitt ffiinniiee àà 1166hh..
En fin de cuisson (fin du temps programmé),
- le four s’arrête,
- l’indicateur de durée de cuisson et 0:00 clignotent (fig.
3),
- une série de bips sonores est émise durant
quelques minutes. L’arrêt définitif de ces bips
se fait en appuyant sur n’importe quelle
touche.
L’affichage repasse à l’heure du jour.
La cavité est éclairée à partir du démarrage
de la cuisson et s’éteint en fin de cuisson.
fig.1
fig.2
fig.3
CUISSON PROGRAMMEE
••
Page 11

11
FR2 / UTILISATION DE VOTRE APPAREIL
-- LLee pprrooggrraammmmaatteeuurr ddee vvoottrree ffoouurr ppeeuutt êêttrree uuttii--
lliisséé ccoommmmee mmiinnuutteerriiee iinnddééppeennddaannttee ppeerrmmeett--
ttaanntt ddee ddééc
coommpptteerr uunn tteemmppss ssaannss ffoonnccttiioonnnnee--
mmeenntt dduu ffoouurr..
Dans ce cas, l’affichage de la minuterie est
prioritaire sur l’afficheur de l’heure du jour.
- Appuyez 3 fois sur la touche (fig.1).
Le symbole minuterie et 0m00s clignotent.
- Ajustez le temps choisi en appuyant sur les
touches ++ou
--
(fig.2).
- Appuyez sur la touche
OOKK
pour valider ou at-
tendre quelques secondes.
Attention
Il est possible de modifier ou d’annuler à n’importe quel moment la programmation de
la minuterie.
fig.1
fig.2
UTILISATION DE LA FONCTION MINUTERIE
••
L’afficheur s’arrête de clignoter au bout de quelques secondes et la minuterie se met en marche
et décompte le temps de secondes en secondes.
Une fois la durée écoulée, la minuterie émet une série de bips sonores pour vous avertir.
L’arrêt de ces bips se fait en appuyant sur n’importe quelle touche.
Page 12

12
FR
2 / UTILISATION DE VOTRE APPAREIL
PERSONNALISATION DE LA TEMPERATURE PRECONISEE
Sélectionnez la fonction de cuisson :
- Appuyez sur la touche
OOKK..
Si vous souhaitez personnaliser la température préconisée :
- Appuyez sur la touche jusqu’à faire clignoter la température.
- Appuyez sur la touche + ou - jusqu’à la température désirée.
- Appuyez sur
OOKK
pour valider.
••
VERROUILLAGE DES COMMANDES (SÉCURITE ENFANTS)
FOUR A L’ARRET
Vous avez la possibilité d’interdire l’accès aux
commandes du four en procédant de la façon
suivante :
le four étant à l’arrêt, appuyez sur la touche
OOKK
pendant quelques secondes, une “clé”
vient alors s’afficher dans l’écran -> l’accès
aux commandes de votre four est bloqué
(fig.1).
Pour le débloquer, appuyez pendant
quelques secondes sur la touche
OOKK
.
Les commandes de votre four sont à nouveau
accessibles.
••
Attention
Vous ne pouvez pas verrouiller le four si vous avez programmé une cuisson.
fig.1
Page 13

13
2 / UTILISATION DE VOTRE APPAREIL
FR
--CCoommmmeenntt ffaaiirree uunnee ccuuiissssoonn aauu ggrriill??
-Tournez le sélecteur de fonctions sur la sequence “gril”.
-Tournez la manette du thermostat de la position - à+ pour faire varier la température du gril.
-Arrêtez la cuisson en ramenant le sélecteur
de fonctions en position zéro.
COMMENT UTILISER VOTRE FOUR SUPERIEUR
--CCoommmmeenntt ffaaiirree uunnee ccuuiissssoonn iimmmmééddiiaattee??
-Le progrmmateur ne doit afficher que l’heure; celle-ci ne doit pas clignoter.
-Tournez le sélecteur de fonctions sur la position de votre choix.
-Tournez le thermostat sur la température recommandée pour votre cuisson.
Après ces actions, le four chauffe.
••
r
g
i
l
u
d
e
c
n
a
s
s
i
u
p
a
l
e
d
n
o
i
t
a
t
n
e
m
g
u
A
Page 14

14
FR
3 / MODES DE CUISSON DU FOUR
*
Séquences(s) utilisée(s) pour l’annonce écrite sur l’étiquette énergétique conformément à la norme
européenne EN 50304 et selon la directive Européenne 2002/40/CE.
CCHHAALLEEUURR TTOOUURRNNAANNTTEE
(température préconisée
118800°°CC
mini 35°C maxi 235°C)
•
La cuisson s’effectue par l’élément chauffant situé au fond du four et par l’hélice de
brassage d’air.
•
Montée rapide en température : Certains plats peuvent être enfournés four froid.
•
Recommandé pour garder le mœlleux des viandes blanches, poissons, légumes.
Pour les cuissons multiples jusqu’à 3 niveaux.
CCHHAALLEEUURR CCOOMMBBIINNEEEE
(température préconisée
220055°°CC
mini 35°C maxi 275°C)
•
La cuisson s’effectue par les éléments inférieur et supérieur et par l’hélice de brassa-
ge d’air.
•
Trois sources de chaleur associées : beaucoup de chaleur en bas, un peu de chaleur
tournante et un soupcon de gril pour dorer.
•
Recommandé pour les quiches, tourtes, tarte aux fruits juteux, posés dans un plat en
terre de préference.
EECCOO
(température préconisée
220000°°CC
mini 35°C maxi 275°C)
•
La cuisson s'effectue par les éléments inférieur et supérieur.
•
Cette position permet de faire un gain d’énergie tout en conservant les qualités de
cuisson.
•
La position ECO est utilisée pour l’étiquetage énergétique.
•
Toutes les cuissons se font
ssaannss pprréécchhaauuffffaaggee..
GGRRIILL PPUULLSSEE ++ TTOOUURRNNEEBBRROOCCHHEE
(température préconisée
220000°°CC
mini 180°C maxi 230°C)
•
La cuisson s'effectue , alternativement, par l’élément supérieur et par l’hélice de
brassage d’air.
•
Préchauffage inutile. Volailles et rôtis juteux et croustillants sur toutes les faces.
•
Le tournebroche continue de fonctionner jusqu’à l’ouverture de la porte.
•
Glissez la léchefrite au gradin du bas.
•
Recommandé pour toutes les volailles ou rôtis au tourne broche, pour saisir et cuire
à cœur gigot, côtes de bœuf. Pour garder leur fondant aux pavés de poissons.
GGRRIILLSS VVAARRIIAABBLLEESS MMOOYYEENN eett FFOORRTT ++ TTOOUURRNNEEBBRROOCCHHEE
(positions préconisées
22 oouu 44
- mini 1 - maxi 4)
•
La cuisson s'effectue par l’élément supérieur.
•
Le gril fort couvre toute la surface de la grille. Le gril moyen, montre une même effi-
cacité que le gril fort, pour de plus petites quantités.
•
Ils sont recommandés pour griller les côtelettes, saucisses, tranches de pain, gambas
posées sur la grille.
*
*
Page 15

15
FR
3 / MODES DE CUISSON DU FOUR
MMAAIINNTTIIEENN AAUU CCHHAAUUDD
(température préconisée
8800°°CC
mini 35°C maxi 100°C)
•
Cette position permet un maintien au chaud de vos aliments par un dosage de l’élé-
ment situé au fond du four associé au brassage d’air.
•
Recommandé pour faire lever les pâtes à pain, à brioche, kouglof… en ne dépassant
pas 40°C (chauffe-assiettes, décongélation).
PPAAIINN
(température préconisée
220055°°CC
mini 35°C maxi 275°C)
•
Séquence de cuisson préconisée pour la cuisson du pain.
•
Après un préchauffage, posez la boule de pain sur le plat pâtisserie - 2ème gradin.
•
N’oubliez pas de déposer un ramequin d’eau sur la sole pour obtenir une croûte
croustillante et dorée.
Page 16

16
FR
4 / ENTRETIEN ET NETTOYAGE DE VOTRE FOUR
--
Vérifiez que le programmateur affiche l’heu-
re du jour et que celle-ci ne clignote pas.
Vous avez la possibilité de choisir 3 durées de
cycle pyrolyse :
durée de pyrolyse de 1 heure 30.
durée de pyrolyse de 1 heure 45.
durée de pyrolyse de 2 heures.
Appuyez sur la touche (fig.1).
Puis appuyez une fois sur la touche - pour obtenir le symbole “
PP””
clignotant dans l’afficheur
(fig.2).
Validez en appuyant sur la touche OK.
La durée du cycle de pyrolyse affiche 2h00,
mais vous avez la possibilité de modifier cette
durée .
Exemple: cycle de pyrolyse de1h45.
Appuyez sur la touche + ou - pour obtenir la
durée souhaitée (fig.3).
Validez en appuyant sur la touche OK.
La pyrolyse démarre et le symbole devient
fixe. Le décompte de la durée se fait immédiatement après le réglage.
Au cours de la pyrolyse, le symbole s’affiche dans le programmateur vous indiquant
que la porte est verrouillée (fig.4).
En fin de pyrolyse, 0:00 clignote ainsi que le
symbole .
--
Lorsque le four est froid, utilisez un chiffon humide
pour enlever la cendre blanche.
Le four est propre et à nouveau utilisable pour effectuer une cuisson de votre choix.
FAIRE UNE PYROLYSE (MODELE PYROLYSE: DOP740*)
•Pyrolyse immédiate
••
fig.1
fig.2
fig.3
Attention
Retirez la casserolerie du four et
enlevez les débordements importants qui
auraient pu se produire.
fig.4
Page 17
17
FR
4 / ENTRETIEN ET NETTOYAGE DE VOTRE FOUR
fig.1
•Pyrolyse différée
--
Suivre les instructions décrites dans le para-
graphe “Pyrolyse immédiate”
Après avoir validez le cycle de pyrolyse avec
la touche OK :
- Appuyez sur la touche .
Le symbole fin de cuisson clignote pour indiquer que le réglage est alors possible (fig.1).
- Appuyez sur la touche + ou - pour régler
l’heure de fin souhaitée (fig.2).
Exemple: fin de cuisson à 18 heures.
Validez en appuyant sur la touche OK.
--
Après ces actions, le départ de la pyrolyse est
différé pour qu’elle se termine à 18 heures.
FAIRE UNE PYROLYSE (MODELE PYROLYSE: DOP740*)
••
fig.2
FOUR A EMAIL CATALYTIQUE
(
autodégraissant)
(MODELE CATALYSE: DOC740*)
••
- Ce four est constitué d’une enceinte équipée de parois amovibles recouvertes d’un émail spécial microporeux (émail catalytique) qui lui confère ses qualités autodégraissantes. Dès leur apparition, les souillures s’étalent et se diffusent largement dans les microporosités. Elles se trouvent oxydées sur les deux faces et disparaissent progressivement. L’émail autodégraissant est
surtout adapté aux corps gras, mais pas au sucre. C’est pourquoi le revêtement de la sole, plus
sujet aux débordements de sucre, n’est pas revêtu de cet émail.
NNoouuss vvoouuss rreeccoommmmaannddoonnss ffoorrtteemmeenntt ::
- De ne pas gratter ces parois catalytiques avec une brosse métallique, des instruments pointus
ou tranchants.
- De ne pas essayer de les nettoyer avec des produits à recurer du commerce.
- Lors de la cuisson des grillades, la température des parois n’est pas toujours suffisante pour
éliminer les projections grasses importantes.
NNEETTTTOOYYAAGGEE
•
Après cuisson, sélectionnez la séquence de nettoyage.
S’il reste des traces, elles s’atténueront lors des cuissons suivantes.
Page 18

18
FR
5 / SERVICE APRES-VENTE
Les éventuelles interventions sur votre appareil doivent être effectuées par un professionnel qualifié dépositaire de la marque. Lors de
votre appel, mentionnez la référence complète
de votre appareil (modèle, type, numéro de série). Ces renseignements figurent sur la plaque
signalétique
(fig.1).
PIÈCES D’ORIGINE
Lors d’une intervention d’entretien, deman-
dez l'utilisation exclusive de
pièces déta-
chées certifiées d’origine.
•INTERVENTIONS
•RELATIONS CONSOMMATEURS
**
Service fourni par Brandt Customer Services, société par actions simplifiée au capital de 2.5000.000 euros,
5/7 avenue des Béthunes, 95310 Saint Ouen l’Aumône - RCS Pontoise 440 303 303
BBrraannddtt AApppplliiaanncceess
- société par actions simplifiée au capital de 10.000.000 euros RCS Nanterre 440 302 347.
BRANDT APPLIANCES SAS
7 rue Henri Becquerel
92500 RUEIL MALMAISON
230V ~ 50 Hz
MADE IN FRANCE
fig.1
•Pour en savoir plus sur tous les produits de
la marque :
informations, conseils, les points de vente, les
spécialistes après-vente.
•Pour communiquer :
nous sommes à l'écoute de toutes vos remarques, suggestions, propositions auxquelles nous vous répondrons personnellement.
> Vous pouvez nous écrire :
Service Consommateurs
DE DIETRICH
BP 9526
95069 CERGY PONTOISE CEDEX
> ou nous téléphoner au :
Page 19

19FR20
Page 20

FR
02
EN
20
Dear Customer,
You have just acquired a
DDEE DDIIEETTRRIICCHH
oven and we would like to
thank you.
Our research teams have created this new generation of appliances
for you. Their quality, appearance, functions and technological
advances make them exceptional products, showcases of our unique
know-how.
Your new
DDEE DDIIEETTRRIICCHH
oven will blend harmoniously into your
kitchen and perfectly combine cooking performance and ease of use.
We wanted to offer you a product of excellence.
In the line of
DDEE DDIIEETTRRIICCHH
products, you will also find a wide range of
cookers, hobs, ventilation hoods, dishwashers, and refrigerators, all of
which can be built in and coordinated with your new
DDEE DDIIEETTRRIICCHH
oven.
Of course, in an ongoing effort to better satisfy your demands with
regard to our products, our after-sales service department is at your
disposal and ready to listen in order to respond to all of your questions
and suggestions (contact information at the end of this booklet).
You can also log onto our site:
wwwwww..ddeeddiieettrriicchh--eelleeccttrroommeennaaggeerr..ccoomm
where you will find our latest
new ideas and useful additional information.
DDEE DDIIEETTRRIICCHH
SSeettttiinngg NNeeww VVaalluueess
As part of our commitment to constantly improving our products, we reserve the right to make
changes to them based on advances to their technical, functional and/or aesthetic properties.
Important:
Before installing and using your appliance, please read this Installation and Usage
Guide carefully, as it will allow you to quickly familiarise yourself with its operation.
Page 21

21
EN
21
TABLE OF CONTENTS
1 / DESCRIPTION OF YOUR APPLIANCE
••
Introduction to your oven
____________________________________
22
••
Accessories
_______________________________________________
22
••
Introduction to the programmer
______________________________
23
••
Introduction to your top oven
________________________________
24
2 / USING YOUR APPLIANCE
••
Using the programmer
º
How to set the time
_____________________________________
25
º
Immediate cooking
_____________________________________
26
••
Programmed cooking
º
Immediate start
________________________________________
27
º
Delayed start
__________________________________________
28
••
Using the timer function
_____________________________________
29
••
Customising the recommended temperature
___________________
30
••
Locking the controls
________________________________________
30
••
Using your top oven
º
Immediate start ________________________________________ 31
º
Using the grillt _________________________________________ 31
3 / OVEN COOKING MODES
_______________________________________
32
4 / CARING FOR AND CLEANING YOUR OVEN
_______________________
34
5 / AFTER-SALES SERVICE
••
Service calls
______________________________________________
36
Page 22

22
EN
1 / DESCRIPTION OF YOUR APPLIANCE
INTRODUCTION TO YOUR OVEN
••
A
B
Programmer
Controls
Lamp
C
D
Wire shelf supports
D
C
B
A
•Accessories
Your appliance has two safety grids with handles, one with handles for a 45 mm dish, a Lissium
pastry dish and a 45 mm dish.
c
5
3
1
Page 23

23
EN
1 / DESCRIPTION OF YOUR APPLIANCE
INTRODUCTION TO THE PROGRAMMER
••
A
P
A
B
Cooking modes display
Oven temperature display
Shelf support indicator and
selected cooking mode indicator.
Temperature rise indicator
Adjustment buttons
Buttons for confirming settings
Clock and timer display
Setting cooking time / cooking end
time and clock
Timer display
C
D
E
Control panel lock indicator (child safety device).
Setting the temperature
Start/Stop
Cooking end time display
Cooking end time indicator
Cooking time indicator
Cooking time display
Cleaning indicator
F
G
H
I
C
D
F
E
H
K
L
O
N
Q
J
I
G
B
M
J
K
L
M
N
O
P
Q
R
R
Page 24

24
EN 1 / DESCRIPTION OF YOUR APPLIANCE
INTRODUCTION TO YOUR TOP OVEN
••
A B
A
B
Selector of temperature.
Selecteur of functions.
Page 25

25
EN2 / USING YOUR APPLIANCE
USING THE PROGRAMMER
•
How to set the time
--
When plugged in
The displays flashes 12:00 (fig.1).
Set the time by pressing the + or - buttons
(holding your finger on the button allows you
to scroll through the numbers rapidly) (fig.2).
Example: 12:30
Press the button to confirm.
The display stops flashing (fig.3).
fig.1
fig.2
fig.2
fig.3
fig.1
- To set the time on the clock
Press and hold the button for a few
seconds until the display starts flashing
(fig.2), then release.
Audible beeps indicate that it is now possible
to set the time.
Adjust the clock setting with the + and buttons (fig.2).
Press the button
OOKK
to confirm.
Warning
If the OK button is not pressed, the
adjustment will be automatically recorded
after a few seconds.
••
Page 26
26
EN
2 / USING YOUR APPLIANCE
•Immediate cooking
— The programmer should display only the
time. It should not be flashing.
Press the button (fig.1) then select your
cooking program using the + or - buttons
(fig.2).
Example: —> shelf support two recommended.
— Confirm using the OK button.
Cooking indicator self-selects. The shelf
support indicator and functions appear.
The oven begins heating.
Place your dish in the oven based on the
recommendation shown in the display.
Your oven recommends the optimal
temperature for the chosen cooking mode.
You can still adjust the temperature using the
button under the display (fig.3).
“C” flashes in the display and indicates that
you can adjust the temperature by pressing
the + or - buttons (fig.4).
Example: —> set to 220°C.
— Confirm using the OK button.
The temperature rise indicator displays the
temperature rise in the oven.
A series of beeps will sound when the oven
reaches the selected temperature.
To stop cooking, press and hold the
button for a few seconds.
fig.2
Warning
All types of cooking are done with the door closed.
Warning
After a cooking cycle, the cooling fan continues to operate for a period of time in order
to guarantee optimal oven reliability.
fig.1
fig.3
fig.4
Page 27

27
EN2 / USING YOUR APPLIANCE
--
Cooking with immediate start and
programmed duration
- Select the desired cooking mode and adjust
the temperature (see paragraph: immediate
cooking).
- Press the button until the cooking time
indicator starts to flash .
“
The display flashes 0:00 to indicate that you
can now adjust the setting (fig.
1).
- Press the ++or --buttons to set the desired
time.
Example: 30 mins cooking time (fig.
2).
— Confirm using the OK button.
The cooking time is automatically recorded
after a few seconds.
The cooking time display stops flashing.
The countdown of the cooking time begins
immediately after it has been set.
AAfftteerr tthheessee tthhrreeee sstteeppss,, tthhee oovveenn hheeaattss uupp::
A series of beeps will sound when the oven
reaches the selected temperature.
At the end of cooking (end of programmed
time),
- the oven turns off,
- the cooking time indicator and 00:00 both
flash (fig.
3),
- a series of beeps sounds for a few minutes.
Press any button to stop the beeping.
fig.2
PROGRAMMED COOKING
••
fig.1
fig.3
Page 28

28
EN
2 / USING YOUR APPLIANCE
--
Cooking with delayed start and chosen
cooking end time
PPrroocceeeedd aass wwiitthh pprrooggrraammmmeedd ccooookkiinngg..
- Press the button until the cooking end
indicator starts to flash .
“
The display flashes to indicate that you can
now adjust the setting (fig.
1).
- Press the ++or --button to set the desired
cooking end time.
Example: end of cooking at 16:00 (fig.
2).
— Confirm using the OK button.
The cooking end time is automatically
recorded after a few seconds.
The cooking end time display stops flashing.
AAfftteerr tthheessee 33 sstteeppss,, tthhee oovveenn hheeaattiinngg iiss
ddeellaayyeedd ssoo tthhaatt ccooookkiinngg eennddss aatt 1166::0000..
At the end of cooking (end of programmed
time),
- the oven turns off,
- the cooking time indicator and 0:00 both
flash (fig.
3),
- a series of beeps sounds for a few minutes.
Press any button to stop the beeping.
Displays returns to the clock.
The light inside the oven turns on when
cooking starts and goes out when cooking
stops.
fig.1
fig.2
fig.3
PROGRAMMED COOKING
••
Page 29

29
EN2 / USING YOUR APPLIANCE
-- YYoouurr oovveenn’’ss pprrooggrraammmmeerr ccaann bbee uusseedd aass aann
iinnddeeppeennddeenntt ttiimmeerr tthhaatt aalllloowwss yyoouu ttoo ccoouunntt
ddoowwnn aa ttiimmee wwiit
thhoouutt ooppeerraattiinngg tthhee oovveenn..
In this case, the timer display has priority over
the clock display.
- Press the button 3 times (fig.1)
The timer symbol and 0m00s start flashing.
- Adjust the chosen time by pressing the
buttons ++or
--
(fig.2).
- Press the button
OOKK
to confirm or wait a few
seconds.
Warning
It is possible to change or cancel the timer at any time.
fig.1
fig.2
USING THE TIMER FUNCTION
••
The display stops flashing after a few seconds and the timer starts working, counting down the
time in seconds.
Once the time has expired, the timer emits a series of beeps to notify you.
Press any button to stop the beeping.
Page 30

30
EN
2 / USING YOUR APPLIANCE
CUSTOMISING THE RECOMMENDED TEMPERATURE
Select the cooking function:
- Press the button
OOKK..
If you wish to customise the recommended temperature:
- Press the button until the temperature starts flashing.
- Press the + or - button until the desired temperature appears.
- Press
OOKK
to confirm.
••
LOCKING THE CONTROLS (CHILD SAFETY)
OVEN OFF
You have the option of preventing access to
the oven controls by taking the following
steps:
when the oven is off, hold down the button
OOKK
for a few seconds; a “key” will then be
displayed on the screen -> access to the oven
controls is now blocked (fig.1).
To unlock access, hold down the
OOKK
button
for a few seconds.
The oven controls are once again accessible.
••
Warning
You cannot lock the oven if you have programmed a cooking cycle.
fig.1
Page 31

31
EN
2 / USING YOUR APPLIANCE
--HHooww ddoo yyoouu ccooookk uussiinngg tthhee ggrriillll??
--TTuurrnn tthhee ffuunnccttiioonn sseelleeccttoorr ttoo tthhee ““ggrriillll”” ssee--
qquueennccee..
--TTuurrnn tthhee t
thheerrmmoossttaatt kknnoobb ffrroomm tthhee -- ttoo ++ ppoossii--
ttiioonn ttoo vvaarryy tthhee ggrriillll tteemmppeerraattuurree..
--SSttoopp tthhee ccooookkiinngg bbyy rreettuurrn
niinngg tthhee ffuunnccttiioonn ssee--
lleeccttoorr ttoo zzeerroo..
USING YOUR TOP OVEN
--HHooww ddoo yyoouu pprrooggrraamm ffoorr iinnssttaanntt ccooookkiinngg??
-The programmer should only display the time; it must not be flashing.
- Turn the function selector to the position of
your choice.
-Turn the thermostat to the temperature recommended for the cooking.
After these steps, the oven heats up.
••
r
g
i
l
u
d
e
c
n
a
s
s
i
u
p
a
l
e
d
n
o
i
t
a
t
n
e
m
g
u
A
Page 32

32
EN
3 / OVEN COOKING MODES
*
Program(s) used to obtain the results indicated on the energy label in accordance with European
standard EN 50304 and European Directive 2002/40/CE.
CCIIRRCCUULLAATTIINNGG HHEEAATT
(recommended temperature
118800°°CC
min 35°C max 235°C)
•
Cooking is by a heating element at the bottom of the oven and the oven fan.
•
Rapid temperature increase: Some dishes can be placed in the oven while it is still
cold.
•
Recommended to retain moisture in white meat, fish, vegetables.
For cooking multiple items on up to 3 levels.
CCOOMMBBIINNEEDD HHEEAATT
(recommended temperature
220055°°CC
min 35°C max 275°C)
•
Cooking controlled by the upper and lower heating elements and by the fans.
•
Three combined sources of heat: a lot of heat from the bottom, a little circulating heat
and a bit from the grill.
•
Recommended for quiches, tarts, wet fruit tarts, placed preferebly in a terracotta
dish.
EECCOO
(recommended temperature
220000°°CC
min 35°C max 275°C)
•
Cooking controlled by the upper and lower heating elements.
•
This position allows for energy savings while preserving the quality of the cooking.
•
The ECO position is used for energy label performance.
•
All cooking is done
wwiitthhoouutt pprreehheeaattiinngg..
FFAANN GGRRIILLLL ++ RROOTTIISSSSEERRIIEE
(recommended temperature
220000°°CC
min 180°C max 230°C)
•
Cooking controlled, alternately, by the upper element and by oven fan.
•
Preheating is unnecessary. Roasts and poultry are juicy and crispy all over.
•
The spit keeps turning until the door is opened.
•
Slide the drip tray onto the bottom shelf support.
•
Recommended for all poultry and spit roasts, to thoroughly cook legs and large cuts
of beef. To keep fish steaks moist.
VVAARRIIAABBLLEE GGRRIILLLL,, MMEEDDIIUUMM AANNDD HHIIGGHH ++ RROOTTIISSSSEERRIIEE
(recommended positions
22 oorr 44
- min 1 - max 4)
•
Cooking done by the upper element.
•
The grill on high setting covers the entire grid surface. The medium grill setting is as
effective as the high setting, for smaller quantities.
•
Recommended for grilling chops, sausages, toast or prawns, placed on the grid.
*
*
Page 33

33
EN
3 / OVEN COOKING MODES
KKEEEEPPIINNGG TTHHIINNGGSS WWAARRMM
(recommended temperature
8800°°CC
min 35°C max 100°C)
•
This position allows food to be kept warm by heat from the bottom of the oven along
with the fan.
•
Recommended for letting dough rise for bread, brioche, kugelhopf, etc, without
exceeding 40°C (plate warming, defrosting).
BBRREEAADD
(recommended temperature
220055°°CC
min 35°C max 275°C)
•
Cooking sequence recommended for baking bread.
•
After preheating, place the dough on the pastry dish - 2nd shelf support.
•
Place a bowl of water at the botom of the oven to get a crusty and shiny crust.
Page 34

34
EN
4 / CARING FOR AND CLEANING YOUR OVEN
--
Check that the programmer is displaying the
time of day and that it is not flashing.
You can choose 3 durations of pyrolysis:
pyrolysis lasting 1 hour 30 minutes.
pyrolysis lasting 1 hour 45 minutes.
pyrolysis lasting 2 hours.
Press the touch button (fig.1).
Then press once on the button - to get the
symbol “PP” flashing in the display (fig.2).
Confirm by pressing the button OK.
The pyrolysis cycle display shows a duration
of 2:00 hours, but you can change this
duration.
Example: pyrolysis cycle 1h45.
Press the + or - button to get the desired
duration (fig.3).
Confirm by pressing the button OK.
Pyrolysis starts and the symbol stops
flashing, becomes steady. The countdown of
the cooking time begins immediately after it
has been set.
During the pyrolysis, the symbol displays
in the programmer indicating that the door is
locked (fig.4).
At the end of pyrolysis, 0:00 starts flashing as
well as the symbol .
--
When the oven is cool, use a damp cloth to
remove the white ashes.
The oven is clean and once again ready for
the cooking cycle of your choice.
PERFORM A PYROLYSIS (PYROLYSIS MODEL: DOP740*)
•Immediate pyrolysis
••
fig.1
fig.2
fig.3
Warning
Remove the grids and trays from the
oven and clean any major spill residue.
fig.4
Page 35

35
EN
4 / CARING FOR AND CLEANING YOUR OVEN
fig.1
•Delayed pyrolysis
--
Follow the instructions described in the
section “Immediate pyrolysis”
After validating the pyrolysis cycle by pressing
the button OK:
- Press the button.
The end of cooking symbol flashes to indicate
that it is now possible to set it (fig.1).
- Press the + or - button to set the desired end
time (fig.2).
Example: end of cooking at 18:00.
Confirm by pressing the button OK.
- After these steps, the beginning of pyrolysis is
delayed so that it finishes at 18:00.
PERFORM A PYROLYSIS (PYROLYSIS MODEL: DOP740*)
••
fig.2
SELF-DEGREASING CATALYTIC
(
enamelled oven)
(CATALYTIC MODEL: DOC740*)
••
- This oven is composed of an enclosure fitted with detachable walls covered with a special
microporous enamel (catalytic enamel), which provides its self-degreasing properties. As soon
as dirt appears, it spreads out and is dispersed into the microporous holes. It is oxidised on
both sides and gradually disappears. The self-degreasing enamel is mainly suited for fatty, rather
than sugary substances. This is why the oven floor, which is more subject to sugary overflow, is
not covered with this enamel.
WWee ssttrroonnggllyy rreeccoommmmeenndd::
- That you do not scrub these catalytic walls with metallic brushes, pointed or sharp instruments.
- That you do not try to clean them with commercial scouring products.
- When grilling food, the temperature of the walls is not always sufficient to eliminate major
spattering of fat.
CCLLEEAANNIINNGG
•
After cooking, select the cleaning sequence.
If traces of spatter remain, they will be reduced during subsequent cooking operations.
Page 36

36
EN
5 / AFTER-SALES SERVICE
Any repairs that are made to your appliance
must be handled by a qualified professional
authorised to work on the brand. When you
call, mention your appliance’s complete
reference (model, type, serial number). This
information appears on the manufacturer’s
nameplate
(fig.1).
GENUINE REPLACEMENT PARTS
During maintenance work, request that only
certified genuine replacement parts are
used.
•SERVICE CALLS
**
Service provided by Brandt Customer Services, simplified shareholder company with capital of 25,000,000 Euros,
5/7 avenue des Béthunes, 95310 Saint Ouen l’Aumône - RCS Pontoise 440 303 303
BBrraannddtt AApppplliiaanncceess
- simplified shareholder company with capital of 10,000,000 Euros RCS Nanterre 440,302,347.
BRANDT APPLIANCES SAS
7 rue Henri Becquerel
92500 RUEIL MALMAISON
230V ~ 50 Hz
MADE IN FRANCE
fig.1
99643991 08/07
 Loading...