

Page 1

User Manual for Your Oven
Model : DOD428*
99634122_GB.qxd 20/01/05 13:45 Page 1
Page 2

Throughout the manual,
indicates safety recommendations,
indicates advice and tips
Introduction P.3
LOWER OVEN
What does your oven look like?
Description of the appliance P.4
Accessories P.5
Safety recommendations P.7
How do you install your oven?
Electrical connection P.8
Changing the power cable P.8
Useful dimensions for installing your oven P.9
How does your oven work?
Close-up view of your programmer P.10
How do you set the clock on the oven? P.11
How do you program for immediate cooking? P.12
How do you set a cooking programme? P.12-14
Cooking using the grill P.15
How does the timer work? P.15
Oven cooking functions P.16-17
How do you care for your oven? P.18
How do you change the lamp? P.19
What to do in case of operating malfunctions? P.19
UPPER OVEN
How do you program for immediate cooking? P.20
How does the grill work? P.20
Oven cooking functions P.21
How do you change the lamp? P.22
2
Table of Contents
99634122_GB.qxd 20/01/05 13:45 Page 2
Page 3

3
Introduction
Dear Customer,
You have just acquired a DE DIETRICH oven and we would like to thank you.
Our research teams have created a new generation of appliances for you. Their
quality, design and technological advances make them exceptional products
and reveal our unique know-how.
With modern, refined lines, your new DE DIETRICH oven blends harmoniously
into your kitchen and perfectly combines technological expertise, cooking performance and aesthetic luxury.
In the line of DE DIETRICH products, you will also find a wide range of hobs,
ventilation hoods, dishwashers, microwave ovens and refrigerators, all of which
can be built in and all of which can be coordinated with your new DE DIETRICH
oven.
Thanks to these "New Items of Value" that serve as guideposts in our everyday lives, DE DIETRICH, the reference of excellence, is truly an invitation to a
new art of living.
The DE DIETRICH brand.
99634122_GB.qxd 20/01/05 13:45 Page 3
Page 4
4
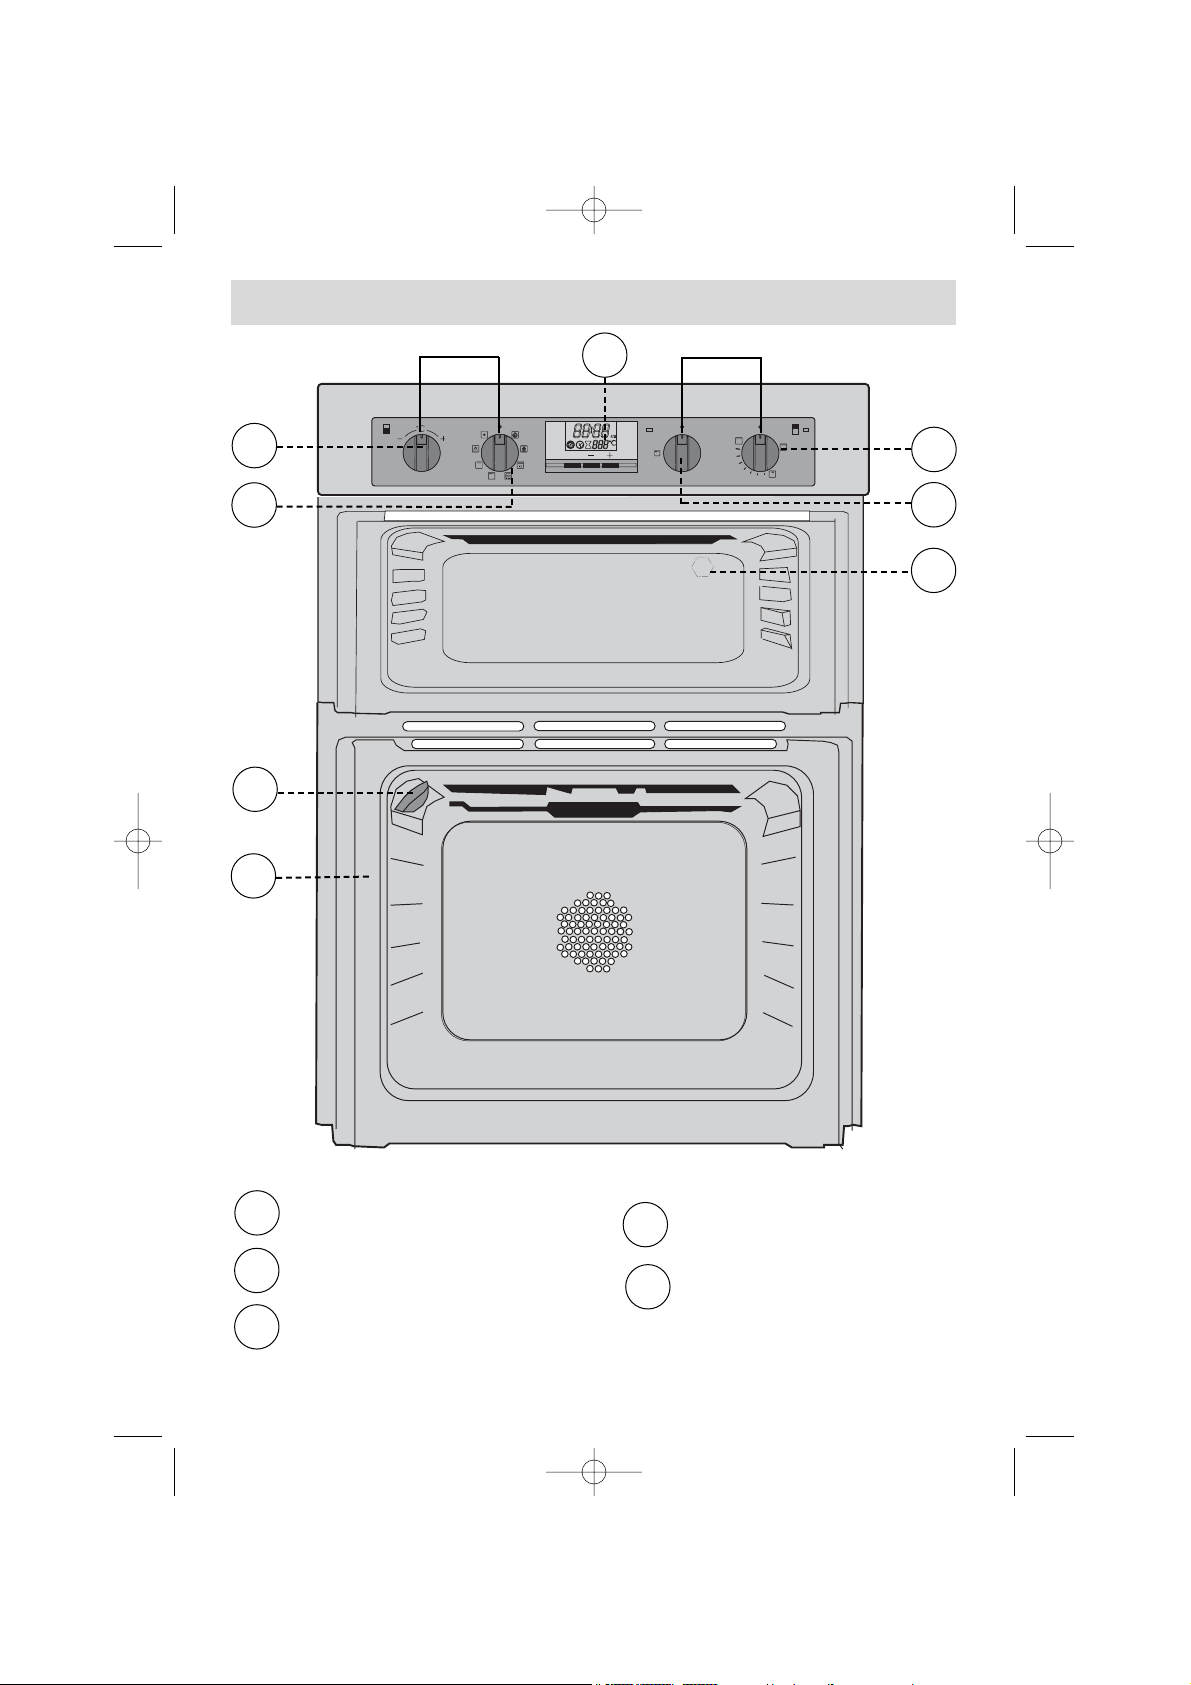
What does your oven look like?
1
3
5
55
75
100
125
150
180
210
240
SET
3
1
2
3
4
Temperature setting
Function selector
Lower oven programmer
Lamp
Shelf support indicator
DESCRIPTION OF THE APPLIANCE
Lower oven
Upper oven
2
1
4
5
1
4
5
2
99634122_GB.qxd 20/01/05 13:45 Page 4
Page 5
5
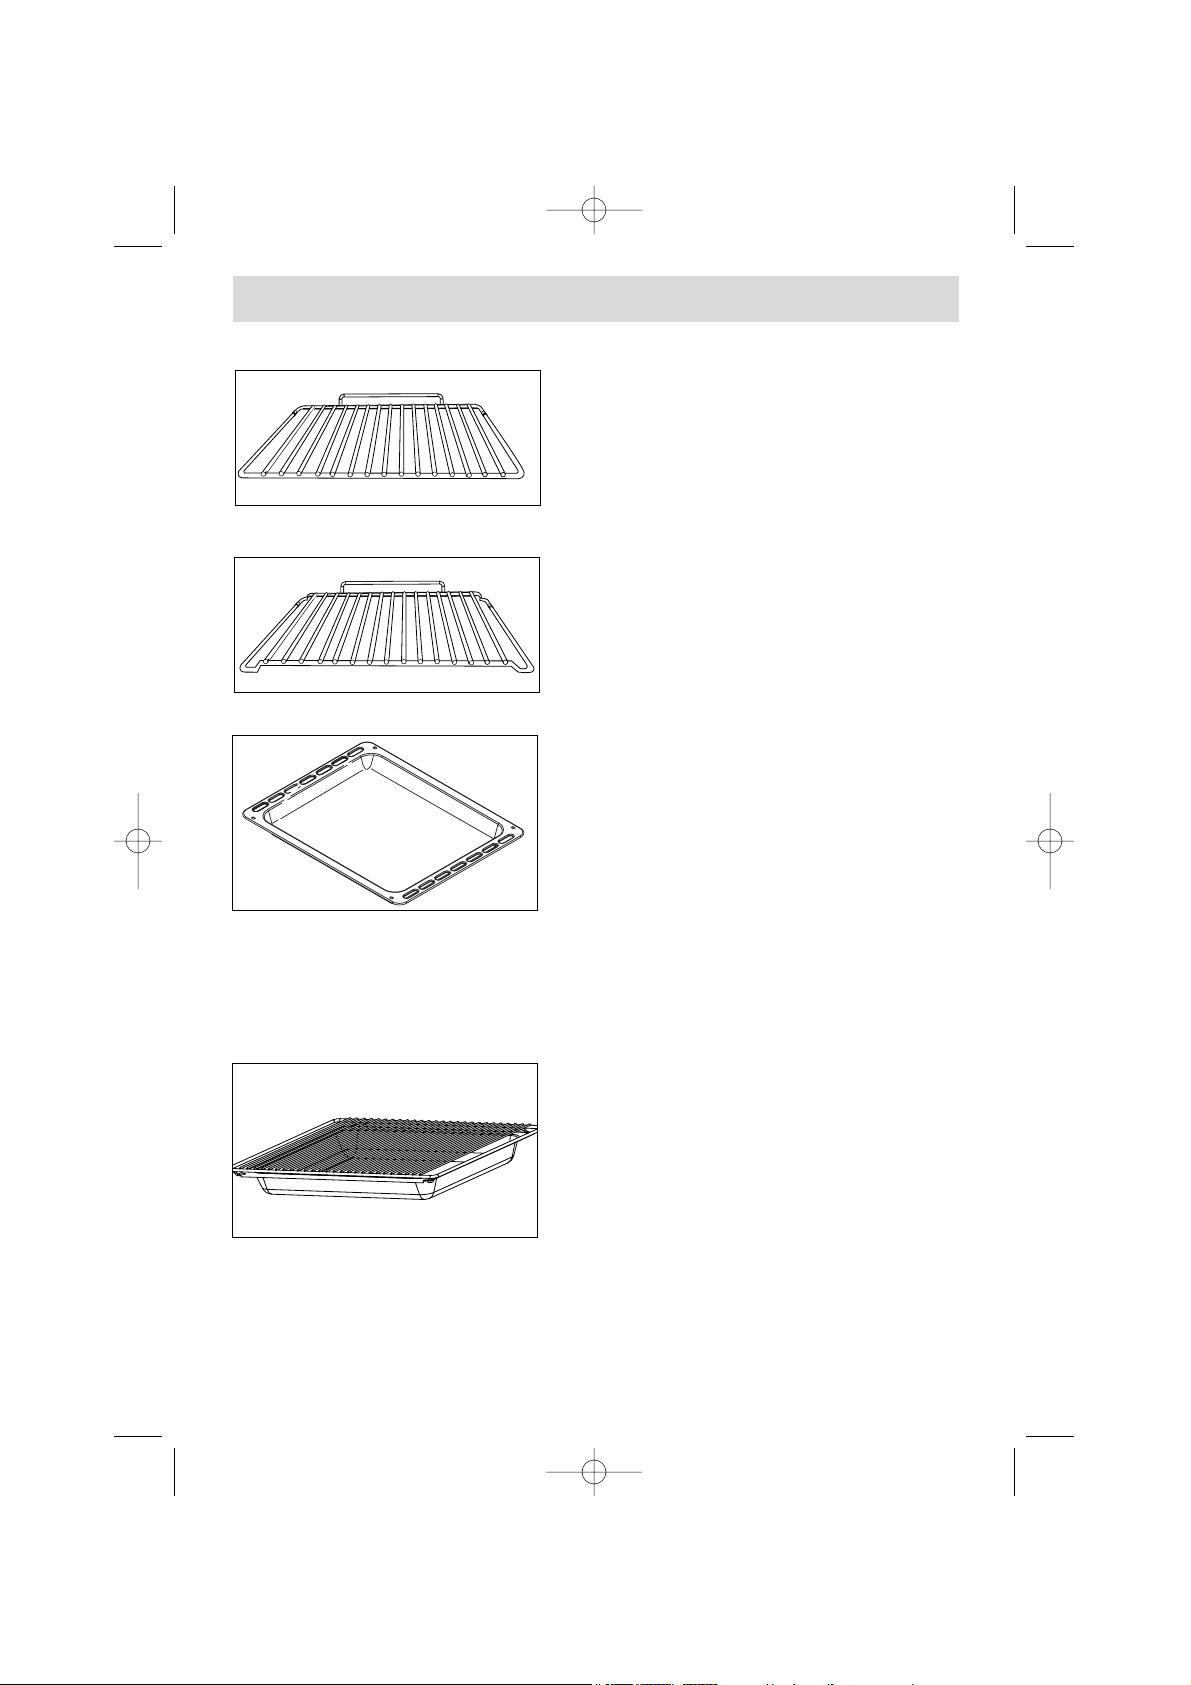
Accessories
BACK
FRONT
The arched anti-drop safety
shelf
This is used in the same way as the flat shelf.
Its shape has been carefully designed to enable
you to position your dish between two runner
levels.
(to be used in the lower oven cavity)
Inserted in the runners under the shelf, this pan catches cooking juices and fat
from grilled food. It can also be used half filled with water as a double boiler.
Joints should not be cooked in this tray uncovered because fat could spit all over
the oven sides.
Multi-purpose baking tray
(
cake tray or dripping pan)
This tray has a raised edge and can be used
for baking pastries (choux buns, meringues,
small cakes, flaky pasties, etc).
Hollow dish + shelf
(
dripping pan)
Inserted under the shelf, this pan catches
cooking juices and fat from grilled food. It can
also be used half filled with water as a double
boiler. Joints should not be cooked in this tray
uncovered because fat could spit all over the
oven sides.
Anti-tip safety shelf
Food can either be placed on the shelf in a
dish or cake tin for cooking or browning.
BACK
FRONT
99634122_GB.qxd 20/01/05 13:45 Page 5
Page 6

6
99634122_GB.qxd 20/01/05 13:45 Page 6
Page 7
7
Safety recommendations
Please become familiar with these recommendations before installing
and using your oven. This oven was designed for household use only. It is
intended solely for cooking foodstuffs. This oven does not contain any asbestosbased components.
FIRST USE:
Before using your oven for the first time, heat it up while empty with the door
closed for approximately 15 minutes using the maximum setting in order to “cure”
the appliance. The rock wool that surrounds the oven cavity may initially release
a particular odour caused by its composition. Similarly, you may notice the release
of some smoke. All of this is normal.
SUBSEQUENT USES:
- Ensure that the door of your oven is completely closed so that the seal
can properly do its job.
- Do not let anyone lean against or sit on the oven door when it is open.
- When using the grill with the door semi-open, exposed parts
and surfaces may become hot. Keep small children away.
- When in use, the appliance becomes hot. Be careful not to touch the heat-
ing elements located inside the oven.
- After cooking, do not use bare hands to touch the dishes or accessories
(grid, rotisserie, drip tray, rotisserie support, etc.); use a potholder or heat-resistant material.
- Do not line your oven with sheets of aluminium. Otherwise, the result
could be an accumulation of heat that could have an undesirable effect on cooking and roasting results and could damage the enamel.
- Never use a spray or a high-pressure washer to clean the oven.
The oven must be turned off for all attempts to clean the cavity.
You absolutely must return the function selector to 0 to reuse
your oven.
99634122_GB.qxd 20/01/05 13:45 Page 7
Page 8
8
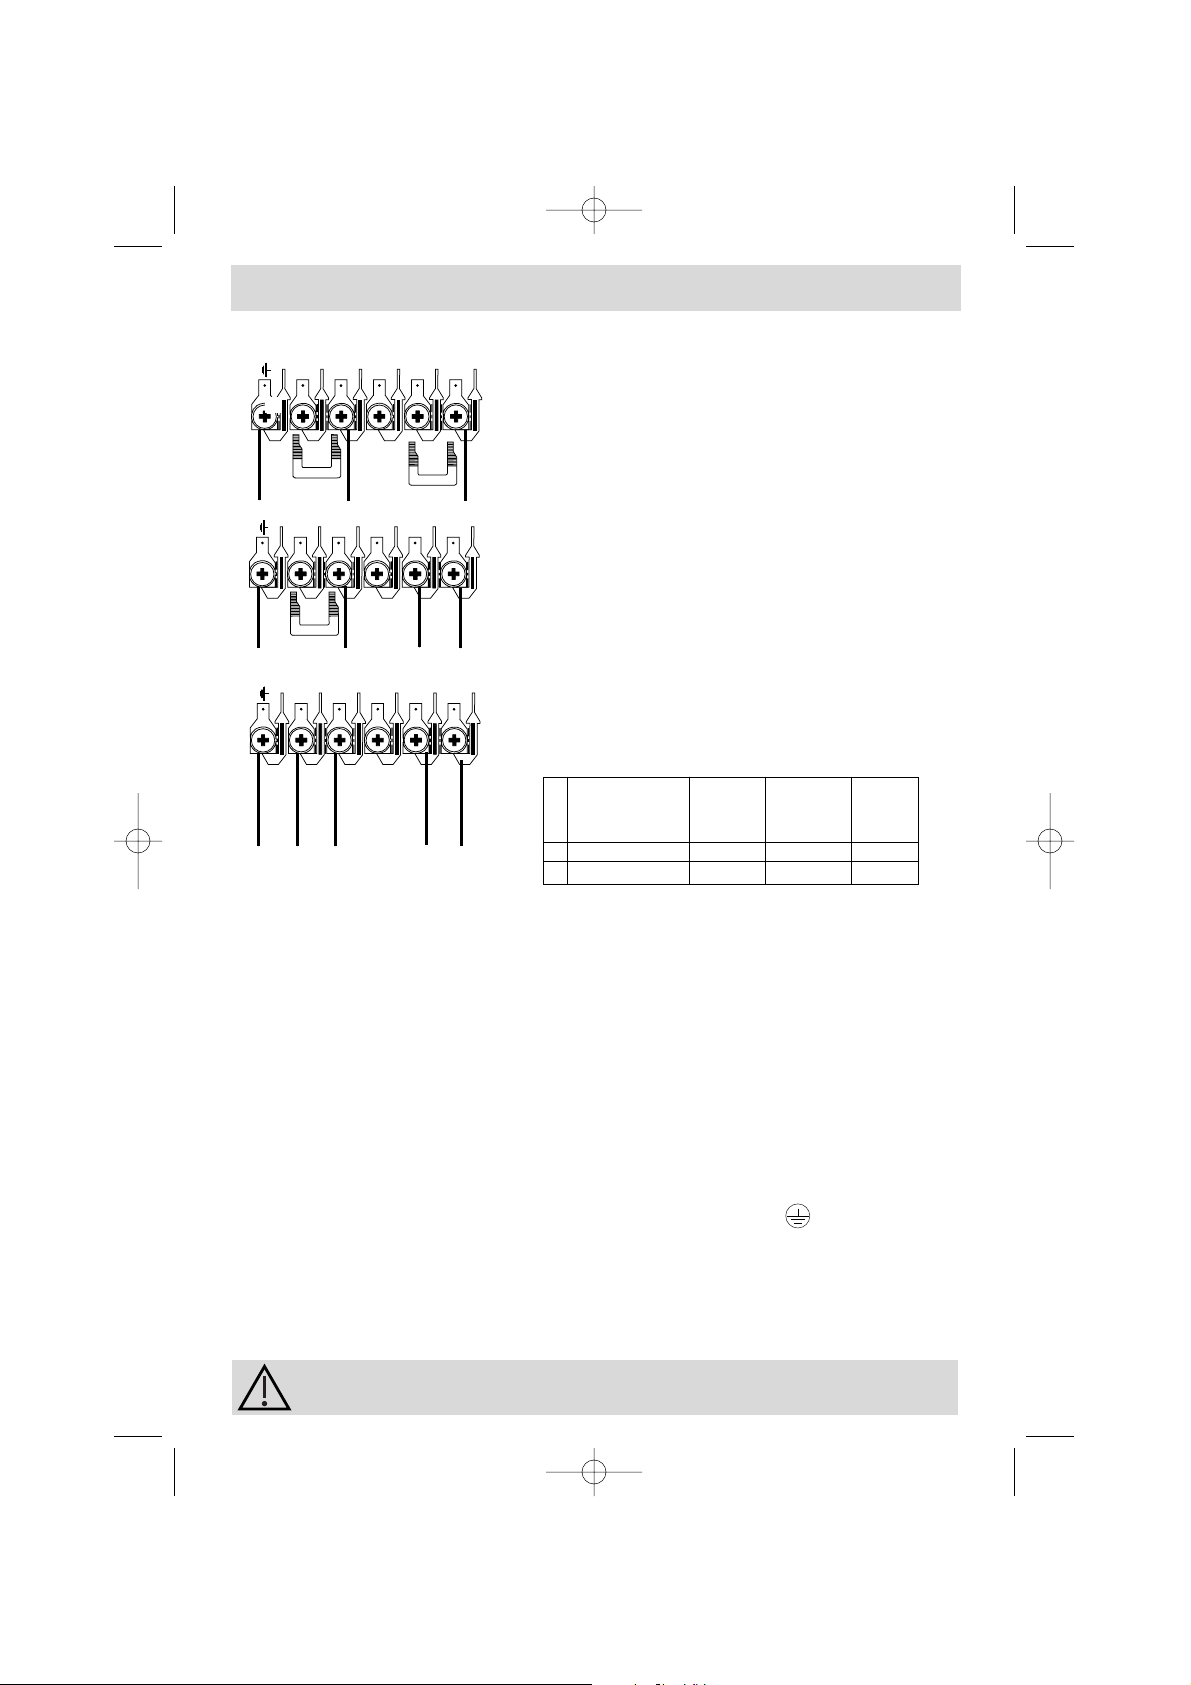
• The supply cable (H05 RR-F, H05 RN-F or H05 W-F) must be long enough to allow
the oven to rest on the floor in front of its housing.
With the oven sitting on the floor and disconnected:
• Open the trapdoor at the bottom right hand side at the back of the oven by
removing the 2 screws and swinging the door away.
• Remove the sheath from each wire in the new cable up to 12 mm.
• Twist the ends carefully together.
• Unscrew the terminal screws and remove the wires that need changing.
• Pass the new cable through the wire clamp to the right of the terminals.
• Connect the wires up in accordance with the markings on the terminals.
• Make sure all wires are trapped under the screws.
• The brown wire (live) going to terminal marked L.
• The green and yellow wire (earth) going to the one marked .
• The blue wire (neutral) going to the terminal marked N.
• Tighten the screws and check, by tugging on each wire, that they are firmly
connected.
• Tighten the clamp to hold the cable.
• Close the trapdoor using the two screws.
Changing the power cable
We cannot be held responsible for any accident resulting from
an inexistent, defective or incorrect ground lead.
The electrical connections are made before the oven
is installed in its housing.
• Before connecting your oven, make sure you are
using the correct size cable. The cross-section should
be the same as the cable connected to the oven. The
fuse for your installation must conform to the table
shown opposite.
• Where the oven is connected using a separate plug
and socket this must be accessible after the oven has
been installed.
• Where the appliance is not connected to the mains
electricity supply by a plug, an omnipolar cutout
device (with a contacts gap of at least 3 mm) must be
fitted on the supply side of the connection to meet µ
requirements.
• The oven must be connected using a standard
power cable for which the number of conductors is
dependent upon the type of connection required and
in conformity with the table shown below.
How do you install your oven?
➀
➁
③
T
N
L
E
E
N
L 1
L 2
E
N2
L 1
L 2
N1
Electrical connection
min.
network voltage connection diameter fuse
of cable
➀ 230V- 50Hz 1 L + N 4 mm² 32 A
➁ 400V 2N-50Hz 2 L + N 1,5 mm² 16 A
④ 230V 2N-50Hz 2 L + N 1,5 mm² 16 A
99634122_GB.qxd 20/01/05 13:45 Page 8
5
4
5
4
2
3
3
1
2
1
5
4
2
3
1
Page 9

9
How do you install your oven?
To be certain that you have a proper installation, do not hesitate
to call on a household appliance specialist.
Useful dimensions for installing your oven
Your oven works at its best and produces excellent results when cooking and
cleaning itself, if its air circulation is not compromised:
• The oven must be centred in the unit so that there is a minimum distance of
5 mm between it and the surrounding unit.
• The housing unit or its outer surface must be capable of withstanding heat.
• To ensure the oven rests firmly in the housing, screw it to the housing unit using
the holes on the side uprights provided (see diagram).
To do this:
1) Remove the rubber stoppers masking the fixing holes.
2) To prevent the housing unit splintering, drill two holes 3 mm in diameter in the wall of the
housing unit opposite the fixing holes.
3) Attach the oven using the two screws.
4) Conceal the hole using the rubber stoppers. (These also help to cushion the
closing of the oven door).
(*) If the housing unit is open at the back, the gap must not be more
than 70 mm.
875 mini
5
5
888
875
875
870
595
545
20
50
50
20
99634122_GB.qxd 20/01/05 13:45 Page 9
Page 10

10
How does your oven work?
1.
Close-up of your analog programmer
1
6
5
2
4
3
7
8
9
1
3
4
2
Time and duration display
ECO cooking indicator
Digital Temperature Display
Timer indicator
Cooking time indicator
End of cooking indicator
Touch control for accessing
various time setting programmes
Touch controls for setting time
DESCRIPTION OF THE DEVICE
7
9
8
6
5
99634122_GB.qxd 20/01/05 13:45 Page 10
SET
Page 11

11
How does your oven work?
a) When supplied with electricity
• The displays flashes 12:00.
• Set the time by pressing the + or – touch controls
(holding your finger on the touch control allows for
rapid number advancement)
Example: 12:30.
The set time is recorded automatically after a few
seconds.
-> The display is no longer flashing.
b) Resetting the clock
• Simultaneously press the + and – touch control for a
few seconds until the display is flashing.
The time display flashes, indicating that it is now
possible to adjust the time.
To set the time, press the + or – touch controls to
advance or turn back the displayed time.
• Press the SET touch control to enter.
2. How do you set the clock on the oven?
If the SET touch control is not pressed, the adjustment will be
automatically recorded after a few seconds.
99634122_GB.qxd 20/01/05 13:45 Page 11
SET
SET
SET
SET
SET
SET
Page 12

12
The analog programmer should display only the time; it should not be flashing.
• Choose the cooking mode:
Turn the function selector to the position of your
choice.
Example: " " position -> the oven turns on.
Your oven recommends the most commonly used temperature.
Place your dish in the oven based on the recommendations provided by the cookbook.
It is, however, possible to adjust the temperature by turning the “
°C” knob toward + or –.
Example " " set to 210°.
After these steps, the oven heats up and the temperature display (210°C) flashes.
A series of beeps will be emitted when the oven reaches the selected temperature.
The temperature stops flashing.
After a cooking cycle, the circulating fan continues to function for a
short period in order to cool the oven.
3. How do you program for immediate cooking?
How does your oven work?
99634122_GB.qxd 20/01/05 13:45 Page 12
ECO
SET
Page 13

13
How does your oven work?
4. How do you set a cooking programme?
a) With immediate start
1. Set the desired cooking mode and adjust the temperature if necessary.
Example: " " position
Temperature 200°C.
2. Press the "SET" touch control until the symbol “ ”
(cooking time) begins flashing.
The display flashes 0:00 to indicate that you can now
adjust the setting.
3. Press the + or – touch controls to set the desired
time.
Example: 30 min cooking time.
The set time is recorded automatically after a few seconds -> the display is no longer flashing.
The countdown of the length of time begins immediately after it has been set.
After these three steps, the oven heats up:
A series of beeps will be emitted when the oven reaches the selected temperature.
At the end of cooking (end of programmed time),
- The oven stops
- The cooking time indicator turns off
- 0:00 is displayed
- A series of beeps is emitted for a few minutes.
The beeps are definitively deactivated by pushing on any touch control, when the
display also returns to the time of day.
b) With delayed start (choose end time)
Proceed as with programmed cooking.
After setting the cooking time,
Press the "SET" touch control until the “ ” symbol
(cooking time) begins flashing).
99634122_GB.qxd 20/01/05 13:46 Page 13
ECO
SET
SET
SET
SET
Page 14

14
The display flashes 0:00 to indicate that you can now adjust the setting.
Press the + or – touch control to set the desired end time.
Example: End of cooking at 13:00.
After these steps, the oven heating is delayed so that
cooking ends at 13:00.
At the end of cooking (end of programmed time),
- The oven stops
- The cooking time indicator turns off
- 0:00 is displayed
- A series of beeps is emitted for a few minutes.
The beeps are definitively deactivated by pushing on any
touch control, when the display also returns to the time of day.
In the two previous cases, your oven begins to heat up. To stop this heating, return
the function selector to 0.
In the case of pre-programmed cooking the oven cavity is lit until cooking begins
and once cooking is finished.
In the case of pre-programmed, fan-assisted cooking, if the function selector is not
reset to 0, the fan continues to operate in order to even out the temperature in the
oven.
How does your oven work?
5.
How does the timer work?
Your oven is equipped with an electronic timer that is
independent of the oven functions, making it possible
to measure times.
In this case, the timer display takes priority over the time of
day display.
Press the "SET" touch control until the symbol (Timer)
flashes -> the display is a small, flashing hourglass.
Press on the (+ or –) touch control until the desired length
of time is displayed (60 minute maximum).
The display stops flashing after a few seconds and the timer
starts working, counting down the time in seconds.
Once the time has expired, the timer emits a series of beeps
to notify you.
It is possible to change or cancel the timer programme at any
time.
99634122_GB.qxd 20/01/05 13:46 Page 14
SET
SET
SET
SET
Page 15

15
6.
How do you program for energy-saving cooking?*
The analog programmer should display only the time; it should not be flashing.
• Place your dish in the oven based on the recommendation indicated in the display.
• Turn the function selector to the " " position.
The "ECO" indicator appears in the display.
Example: " " position -> Shelf support 1 or
2 recommended.
• Your oven recommends the optimal temperature
for the chosen cooking mode: 200°C.
It is, however, possible to adjust the temperature by
turning the "
°C" knob toward + or –.
Example: " " position adjusted to 190°C.
After these three steps, the oven heats up.
Three beeps will indicate to you that the set temperature has been reached.
To optimise the ECO cooking mode, do not pre-heat and do not open the door.
*This position makes it possible to save up to 20% energy while still
offering identical cooking results.
The ECO position is used for the energy label performance.
99634122_GB.qxd 20/01/05 13:46 Page 15
ECO
ECO
ECO
ECO
SET
Page 16

16
Turbo grill
Cooking controlled, alternately,
by the upper element and by
the fan.
No need for preheating.
Roasts and poultry that are juicy
and crispy all the way around.
Stabilisation at low temperatures.
Symbol
Name of
cooking mode
Description of
cooking mode
O ven cook
* Programme(s) used for the notice written on the energy label in compliance with Euro
Circular heating
Cooking controlled by the heating element located at the back
of the oven and by the fan.
Quick temperature increase.
Some dishes can be placed in the
oven while it is still cold.
Combined cooking
Cooking controlled by the upper
and lower heating elements and
the fan.
Three combined heat sources:
high heat from the bottom, a little
circulating heat and a hint of the
grill for browning.
This position allows for energy
savings while preserving the quality of the cooking.
The ECO position is used for the
energy label performance.
T
raditional ECO
Cooking controlled by the
upper and lower heating
elements with no fan.
Double grill
Cooking controlled by the
upper element
Simple grill
Cooking controlled by the
upper element.
The double grill covers the entire
grid surface.
As for the simple grill, it is equally effective for smaller quantities.
*
Hold warm function
Heat dosages from the element at the back of the
oven combined with fan.
*
99634122_GB.qxd 20/01/05 13:46 Page 16
ECO
Page 17

17
Recommended for all poultry or roasts.
To seal and thoroughly cook leg of lamb,
rib roasts.
To preserve the texture of fish steaks that
melt in your mouth.
Recommended for letting dough rise for
bread, buns, cakes... without exceeding
40° C (plate warming, defrosting).
Recommendations
Recommended for preserving tenderness
in white meats, fish, vegetables.
For cooking multiple items on up to three
levels.
Recommended for quiches, potpies,
juicy fruit tarts, preferably baked in
terra cotta dishes.
Note: All cooking is done without
preheating.
Recommended for grilling chops,
sausages, toast, prawns placed on the
grid.
Recomm. Temp.
min.
recomm.
max.
35°
180°
235°
min.
recomm.
max.
70°
205°
275°
min.
recomm.
max.
180°
200°
230°
min.
recomm.
max.
35°
200°
275°
min.
recomm.
max.
1
4
4
min.
recomm.
max.
1
2
4
min.
recomm.
max.
35°
80°
100°
99634122_GB.qxd 20/01/05 13:46 Page 17
Page 18

Before disassembling the appliance, let it cool off and check that the cooking selector is at the OFF position.
Side panels
(1)
Unhook the wire shelf support (2) in front by lifting it
(diagram A)
. Pull the entire shelf support toward you, lift
it in order to unhook the rear fastener
(diagram B)
.
Remove it from the two holes (3) in the catalytic panels
and from the oven cavity. Then remove the catalytic
panel (1). Position the
new items (panels and/or
cavity) by reversing these
steps.
Back panels
(4)
Completely unscrew the
screw (5) located at the
top of the back panel. Tilt the panel toward the front
to remove it from the oven cavity. Position the new
panel by reversing these steps.
H
ow do I care for the oven?
H
ow do you change the catalytic panels? (depending on model)
C
leaning the cavity
The continuous cleaning oven (depending on the model) is comprised of a cavity
equipped with removable panels covered with a special micro porous enamel (catalytic surface) that gives it self-degreasing properties. As soon as they appear, soil
marks spread out and are widely distributed throughout the micro pores. They
become oxidized on both sides and gradually disappear. The self-degreasing enamel is first and foremost adapted to fats, but not to sugars. This is why the bottom
heating element, which is more subject to sugar spills, is not coated with this enamel.
We strongly recommend that:
- You do not scrub with a metallic brush or sharp or cutting instruments.
- You do not try to clean with commercial scouring products.
- When cooking barbecues, major grease splatters will be projected onto the walls,
whose temperature is not always sufficient for them to be completely eliminated
during cooking.
In this case, after cooking, continue to heat the oven for 20 to 30 minutes at the
maximum temperature setting under the
“”
cleaning programme.
If there are still spots, they will be eliminated during subsequent cooking programmes.
1
3
4
2
5
The oven must be turned off for all attempts to clean the cavity.
99634122_GB.qxd 20/01/05 13:46 Page 18
B
A
Page 19

19
How to use your lower oven
What do you do in case of operating malfunctions?
You observe that...
Possible causes
What should you do?
The oven is not heating.
The oven lamp is not working.
• The lamp is out of order.
• The oven is not connected or the
fuse is not working.
- Replace the lamp.
- Connect the oven or replace the
fuse.
The cooling fan continues to operate after the oven stops.
• The fan should work for a maximum of one hour after cooking, or
when the oven temperature is
greater than 125°C.
• If it does not stop after one hour.
- Open the oven door to accelerate cooling of the oven.
- Call the Post-Sales Service
Department.
• The oven is not connected.
• The fuse in your electrical set-up is
not working.
• The selected temperature is too
low.
- Connect the oven.
- Replace the fuse in your electrical
set-up and check its capacity (16A).
- Increase the selected temperature.
• The lamp is located on the ceiling of your oven's cavity.
a) Unscrew the view port (see adjacent
diagram).
b) Pull on the lamp.
Lamp specifications:
- 25 W
- 220-240 V
- 300°C
-G9
c) Replace the bulb then reposition the
view port and reconnect your oven.
Disconnect your oven before performing any task on the lamp to
avoid the risk of electric shock and, if necessary, let the appliance
cool down.
How do you change the lamp?
Lamp
Unscrew
View port
If you have a doubt about the functioning of your oven, this does not necessarily mean that there is a malfunction.
In any event, check the following
items:
Drop-down grill
- To facilitate cleaning of the top of your oven's cavity, the grill can be dropped down.
- Pull gently toward you to unhook the two clips (on the left and right)
- Lower the grill
After cleaning, return the grill to its position, ensuring that the two clips are fitted
into the notches.
99634122_GB.qxd 20/01/05 13:46 Page 19
Page 20

How to use your upper oven
The timer display only shows the time of day. It should not
be blinking.
• Choose the cooking method:
Turn the dial until it is indicating your choice.
Example: position " ".
• Choose the cooking temperature
Turn the dial to the temperature recommended for
the food you are cooking.
Example: 210 temperature mark.
When you have done both these the oven heats up and
the temperature light glows.
1. How do you program for immediate cooking?
2.
How do you use the grill?
• Turn the function selector and set it to one of the “grill” set-
tings (double grill, single grill).
• Turn the thermostat knob to the position.
• You can switch off the cooking cycle by turning the function
selector back to the “0” position.
Grilling should only be carried out with the door closed.
The walls of the upper oven are covered with normal enamel, the oven is best
used :
- Position " " thermostat setting of 55 to 240 for dishes which cause
little or no spitting or soiling, such as small and large cakes, etc.
- Position " " for grilling dishes that don't make any grease splashes
(toasted sandwiches, etc.).
- For browning dishes (pasta, caramel creams, etc.).
20
99634122_GB.qxd 20/01/05 13:46 Page 20
55
75
240
210
180
100
125
150
55
75
240
210
180
100
125
150
Page 21

How to use your upper oven
21
Symbol Feature
Description
Recommendations
3. Upper oven cooking modes
C
onventional oven
The food is cooked by
top and bottom
elements.
Pre-heating is
sometimes
necessary to reach
the required
temperature.
Recommended to keep
white meat, fish
and vegetables
juicy and succulent.
The double grill
covers the full
surface of the oven
shelf.
The single grill is
equally efficient, but
covers a smaller
area.
Adjustable
grill
Cooking is
carried out by
the upper
element.
Recommended for
grilling cutlets,
sausages, slices
of bread and
Mediterranean
prawns placed on
the oven shelf.
99634122_GB.qxd 20/01/05 13:46 Page 21
Page 22

How to use your upper oven
• The lamp is located on the ceiling of your oven's cavity.
a) Unscrew the protective shade (see
diagram).
b) Unscrew the lamp in the same
direction.
Lamp specifications:
- 15 W
- 220-240 V
- 300°C
- E 14 screw-fitting bulb
c) Replace the bulb then reposition
the view port and reconnect your
oven.
How do you change the lamp?
bulb fitting
unscrew
cover
It is easier to unscrew the shade and bulb if you wear a rubber
glove.
Disconnect your oven before performing any task on the lamp to
avoid the risk of electric shock and, if necessary, let the appliance
cool down.
22
99634122_GB.qxd 20/01/05 13:46 Page 22
Page 23

23
99634122_GB.qxd 20/01/05 13:46 Page 23
Page 24

99634122 01/05
24
99634122_GB.qxd 20/01/05 13:46 Page 24
 Loading...