

Page 1
MINI BICYCLE PUMP
MINI BICYCLE PUMP
Instructions for use
MINI POMPKA
Instrukcja obsługi
MINI PUMPA
Használati útmutató
MINI ZRAČNA TLAČILKA
Navodila za uporabo
MINIPUMPIČKA
Návod k použití
HUSTILKA
Návod na použitie
MINI-LUFTPUMPE
Gebrauchsanweisung
IAN 94826
Page 2
A
B
C
2
Page 3
D
E
F
3
Page 4

Contents/Spis treści/Tartalomjegyzék/
Kazalo/Obsah
Scope of delivery / Part names ............................... 6
Technical data ............................................................ 6
Correct use ................................................................. 6
Safety notes .......................................................... 6 - 7
Mounting to the bike frame ...................................... 7
Use .............................................................................. 7
Maintenance and storage ........................................ 7
Notes on disposal ..................................................... 8
3 Years Warranty ...................................................... 8
Zakres dostawy / opis części ................................... 9
Dane techniczne ........................................................ 9
Zastosowanie zgodne z przeznaczeniem .............. 9
Wskazówki dotyczące bezpieczeństwa ......... 9 - 10
Montaż na ramie roweru ........................................ 10
Zastosowanie ................................................... 10 - 11
Pielęgnacja i przechowywanie .............................. 11
Wskazówki dotyczące utylizacji ........................... 11
3 lata gwarancji ...................................................... 11
A csomag tartalma / alkatrészek megnevezése .. 12
Műszaki adatok ....................................................... 12
Rendeltetésszerű használat .................................... 12
Biztonsági utasítások ....................................... 12 - 13
Felszerelés a kerékpár vázára ............................... 13
Alkalmazása .................................................... 13 - 14
Kezelés és tárolás .................................................... 14
Ártalmatlanítási szempontok .................................. 14
3 év garancia .......................................................... 14
Obseg dobave / Opis delov ................................. 15
Tehnični podatki ....................................................... 15
Namenska uporaba ................................................ 15
Varnostna opozorila ........................................ 15 - 16
Montaža na ogrodje kolesa ................................... 16
Uporaba ................................................................... 16
Nega in shranjevanje .............................................. 17
Napotki za odstranjevanje med odpadke ............ 17
3 leta garancije ............................................... 17 - 18
Rozsah dodávky / označení dílů ........................... 19
Technická data ......................................................... 19
Použití v souladu s určením ..................................... 19
Bezpečnostní pokyny ...................................... 19 - 20
Montáž na rám kola ................................................ 20
Používání .................................................................. 20
Péče a skladování .................................................... 21
Pokyny pro likvidaci do odpadu ............................ 21
3 roky záruky ........................................................... 21
4
Page 5

Obsah/Inhaltsverzeichnis
Obsah balenia/označenie častí ............................ 22
Technické údaje ....................................................... 22
Použitie podľa určenia ............................................ 22
Bezpečnostné pokyny ..................................... 22 - 23
Montáž na rám bicykla ........................................... 23
Použitie ...................................................................... 23
Čistenie a skladovanie ............................................ 23
Pokyny na likvidáciu ................................................ 24
3 roky záruka ........................................................... 24
Lieferumfang / Teilebezeichnung .......................... 25
Technische Daten ..................................................... 25
Bestimmungsgemäße Verwendung ........................ 25
Sicherheitshinweise .......................................... 25 - 26
Montage am Fahrradrahmen ................................. 26
Verwendung ..................................................... 26 - 27
Pflege und Lagerung ............................................... 27
Hinweise zur Entsorgung ........................................ 27
3 Jahre Garantie ............................................. 27 - 28
5
Page 6

Congratulations!
With your purchase you have decided on a highquality product. Get to know the product before you
start to use it. Carefully read the following instructions for use. Use the product only as described and
only for the given areas of application. Keep these
instructions safe.
When passing the product on to a third party, always make sure that the documentation is included.
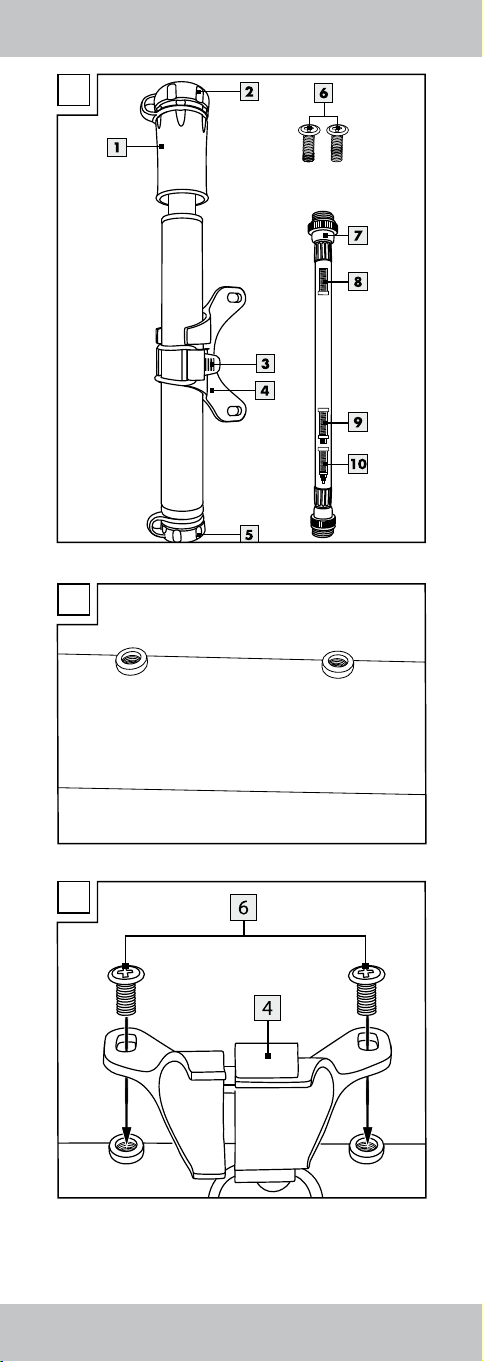
Scope of delivery /
Part names (fig. A)
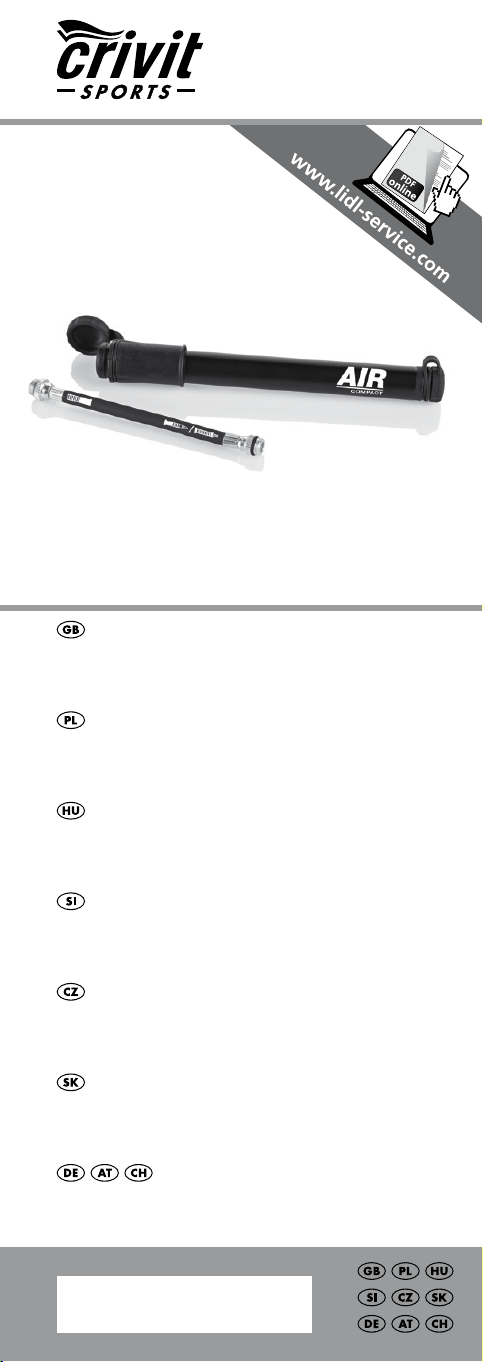
1 x Mini bicycle pump (1)
1 x Top cap (2)
1 x Rubber ring (3)
1 x Bike mount (4)
1 x Bottom cap (5)
2 x Screws (6)
1 x Hose (7)
1 x Schrader valve (8)
1 x Dunlop valve (9)
1 x Sclaverand valve (10)
1 x Instructions for use
Technical data
Dimensions: length approx. 190mm
Nominal pressure: approx. 120 PSI/8.3 bar
Correct use
This article was developed for private use to pump
all standard bike tyres with Schrader, Dunlop, or
Sclaverand valves. The bike mount is only suitable
for bike frames that have holes for a mount (fig. B).
Not suitable for pumping up car tyres!
Safety notes
• This article is not suitable for use by children or by
adults with physical and/or mental limitations
because of the high operating forces and the
associated risks.
• Risk of burns! The friction in the mini air pump
piston and mini air pump cylinder means that they
warm up after longer periods of use. Only hold
the article by the handle after use.
• Inspect the article in particular the bike mount and
the correct connection between the valve and the
mini air pump for damage or wear before each
use.
• Defective articles must not be used and must be
discarded as a defective article cannot be re paired.
• Only pump up the article to the maximum pressure
stated by the manufacturer. This is usually printed
on the sidewall of the bike tyre.
6 GB
Page 7

• There is a risk of explosion with over-inflated tyres!
• The pressure must be controlled using a calibrated
measurement device.
Mounting to the bike frame
• Remove the screws from the frame designed for
attaching a drinking bottle (fig. B).
• Attach the bike mount (4) to the frame with the
included screws (6) or the screws from the drin king bottle mount (fig. C).
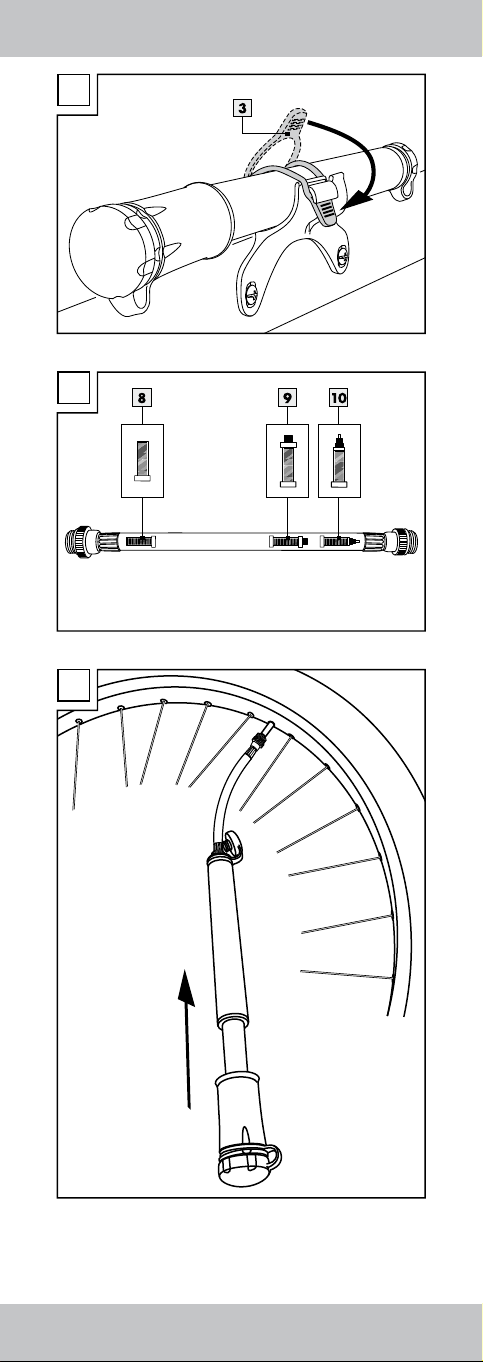
• Secure the pump by placing the rubber ring (3)
around the pump (fig. D).
• If the included screws are too large or
too small, please purchase the correct
screws from a specialist retailer.
Always ensure the article is attached
securely and tightly! The bike mount
must stay secure even on unpaved sur faces and it must not wobble.
Otherwise there is a risk of losing the
bike mount with the mini air pump.
Use
• Open the top cap (2) and remove the hose (7).
• Open the bottom cap (5). Depending on whether
you have a Schrader valve (8), Dunlop valve (9),
or Sclaverand valve (10), screw the correct end of
the hose to the other end of the mini air pump
(see label on the hose: Schrader/Dunlop, Sclaver and) (fig. E).
• Open the cap on the tyre valve.
• Screw the correct end of the hose to the OPEN
valve and then pump (fig. F).
Special note when pumping bike tyres using the
Sclaverand valve (10):
1. Remove the knurled nut (on the bike valve casing)
of the bike valve.
2. Place the Sclaverand valve vertically on the bike
valve, then pump.
3. Now tighten the knurled nut on the bike valve
again after pumping.
• Caution! The hose on the mini air pump
must not be bent!
• Pump the mini air pump in a regular motion and
do not pump too fast.
When the article is not in use, please always store
the hose inside the mini air pump.
Close the caps securely, and always put the mini air
pump in the mount with the handle of the air pump
pointing upward.
Maintenance and storage
Never submerge the pump in water as this will damage the article. Always store the article in a clean,
dry, temperature-controlled room. Important!
Only clean with a damp cloth and then wipe dry.
7GB
Page 8

Notes on disposal
Please dispose of the article and all associated
components through an authorised waste disposal
company or through your local authority facilities.
Please observe all valid regulations. If in doubt,
please ask at your waste disposal facility regarding
environmentally compatible disposal.
3 Years Warranty
The product was produced with great care and
under constant supervision. You receive a three-year
warranty for this product from the date of purchase.
Please retain your receipt.
The warranty applies only to material and workmanship and does not apply to misuse or improper
handling. Your statutory rights, especially the warranty rights, are not affected by this warranty.
With regard to complaints, please contact the following service hotline or contact us by e-mail.
Our service employees will advise as to the subsequent procedure as quickly as possible. We will be
personally available to discuss the situation with you.
Any repairs under the warranty, statutory
guarantees or through goodwill do not extend the
warranty period. This also applies to re-placed and
repaired parts. Repairs after the warranty are subject
to a charge.
IAN: 94826
Service Great Britain
Tel.: 0871 5000 720
(£ 0.10/Min.)
E-Mail: deltasport@lidl.co.uk
You can also find spare parts for your product at:
www.delta-sport.com, category Service - Lidl Spare Parts Service
8
GB
Page 9
Gratulujemy! Przez Państwa zakup wybraliście produkt o wysokiej jakości. Przed pierwszym
użyciem zapoznajcie się z produktem. W tym celu
przeczytajcie następującą instrukcję obsługi.
Z produktu należy korzystać jedynie jak to zostało
opisane i w podanych zakresach zastosowania.
Zachować niniejszą instrukcję. W razie przekazania
produktu osobom trzecim dołączyć do niego wszystkie dokumenty.
Zakres dostawy /
opis części (rys. A)
1 x Mini pompka (1)
1 x Zatyczka górna (2)
1 x Pierścień gumowy (3)
1 x Uchwyt rowerowy (4)
1 x Zatyczka dolna (5)
2 x Śruba (6)
1 x Wąż (7)
1 x Wentyl Schradera (8)
1 x Wentyl Dunlop (9)
1 x Wentyl Sclaverand (10)
1 x Instrukcja obsługi
Dane techniczne
Wymiary: Długość około 190 mm
Ciśnienie nominalne: około 120 PSI/8,3 bar
Zastosowanie zgodne z
przeznaczeniem
Niniejszy artykuł zaprojektowano do pompowania wszystkich powszechnie stosowanych opon
rowerowych z wentylami, jak Schrader, Dunlop i
Sclaverand. Uchwyt rowerowy przeznaczony jest
tylko do ram rowerowych, w których przewidziano
otwory pod mocowania (rys. B).
Pompka nie jest przeznaczona do pompowania
opon samochodowych!
Wskazówki dotyczące
bezpieczeństwa
• Ze względu na duże siły potrzebne do przesunię cia tłoka i związane z tym zagrożenie artykuł nie
jest przeznaczony do użycia przez dzieci i osoby
z ograniczeniem fizycznym i/lub umysłowym.
• Niebezpieczeństwo poparzenia! Ze wzglę du na tarcie wywołane przez mini tłoki i mini cylin dry pompki rowerowej oraz w przypadku dłuższe go pompowania może dojść do ich rozgrzania.
Po użyciu artykuł można chwytać tylko za odpo wiedni uchwyt.
• Artykuł, a w szczególności uchwyt rowerowy oraz
poprawne połączenie pomiędzy wentylem a mini
pompką rowerową, należy sprawdzić przed każ dym użyciem pod względem uszkodzeń lub zużycia.
PL
9
Page 10

• Uszkodzonych artykułów nie wolno dalej
stosować i należy poddać je utylizacji, ponieważ
uszkodzonego artykułu nie można naprawić.
• Artykuł można pompować tylko do wskazanego
przez producenta ciśnienia maksymalnego.
W przypadku opon rowerowych podane jest ono
najczęściej na ściance bocznej opony.
• W przypadku nadciśnienia istnieje niebezpiec zeństwo eksplozji!
• Kontrolę ciśnienia należy wykonać przy pomocy
skalibrowanego przyrządu mierniczego.
Montaż na ramie roweru
• Odkręcić śruby z ramy przewidziane do mocowa nia uchwytu bidonu (rys. B).
• Zamocować teraz do ramy uchwyt rowerowy (4)
przy pomocy dołączonych śrub (6) lub przy
pomocy śrub od uchwytu bidonu (rys. C).
• Zabezpieczyć pompkę nakładając gumowy
pierścień (3) wokół pompki (rys. D).
• Jeśli załączone śruby są za duże lub
za małe, należy nabyć pasujące śruby
w odpowiednim sklepie specjalistycz nym. Zwracać zawsze uwagę na be
zpieczeństwo i stabilność mocowania!
Również na terenie nieutwardzonym
uchwyt rowerowy powinien być solidnie
zamocowany i nie może się ruszać.
W przeciwnym wypadku istnieje niebe
zpieczeństwo zgubienia uchwytu rowe rowego wraz z mini pompką rowerową.
Zastosowanie
• Otworzyć zatyczkę u góry (2) i wyjąć wąż (7).
• Wyjąć zatyczkę na dole (5). W zależności, czy
mamy wentyl Schradera (8), wentyl Dunlop (9)
czy wentyl Sclaverand (10), należy dokręcić
odpowiednią końcówkę węża do końcówki mini
pompki rowerowej (patrz oznakowanie na wężu:
Schrader/Dunlop, Sclaverand) (rys. E).
• Otworzyć zamknięcie wentyla opony.
• Odpowiednią końcówkę węża wkręcić na OT WARTY wentyl, a następnie pompować (rys. F).
Specyfika w przypadku pompowania opon rowerowych z wentylem Sclaverand (10):
1. Odkręcić nakrętkę radełkową wentyla rowerowe go (na obudowie wentyla rowerowego).
2. Nałożyć wentyl Sclaverand pionowo na wentyl
rowerowy, a następnie pompować.
3. Po napompowaniu dokręcić ponownie nakrętkę
radełkową zaworu rowerowego.
• Uwaga! Wąż mini pompki rowerowej nie
może być zgięty!
• Mini pompką rowerową należy pompować rów nomiernie i nie za szybko.
10 PL
Page 11

Jeśli artykuł nie jest używany, wąż powinien znajdować się zawsze we wnętrzu pompki.
Zamknąć dobrze zatyczki i zamocować mini
pompkę rowerową w uchwycie zwracając uwagę,
aby uchwyt mini pompki rowerowej skierowany był
ku górze.
Pielęgnacja i przechowywanie
Nie zanurzać artykułu w wodzie. W przeciwnym
razie ulegnie uszkodzeniu. Artykuł przechowywać
zawsze w suchym i czystym pomieszczeniu o temperaturze pokojowej.
Ważne! Czyścić tylko wilgotną ściereczką, a następnie wytrzeć do sucha.
Wskazówki dotyczące utylizacji
Oddaj artykuł oraz wszystkie przynależne części
składowe do utylizacji w autoryzowanym zakładzie
oczyszczania i przetwarzania odpadów lub do
odpowiedniej jednostki na terenie gminy. Należy
przestrzegać aktualnie obowiązujących przepisów.
W razie wątpliwości zasięgnij informacji w swojej
jednostce oczyszczania i przetwarzania odpadów
odnośnie utylizacji przyjaznej dla środowiska.
3 lata gwarancji
Produkt został wyprodukowany bardzo starannie i
podczas stałej kontroli. Państwo otrzymują na ten
produkt trzy lata gwarancji od daty zakupu.
Prosimy o zachowanie paragonu.
Gwarancja obejmuje tylko błędy materiałowe lub fabryczne i traci ważność podczas używania produktu
nie właściwie i nie zgodnie z jego przeznaczeniem.
Państwa prawa, w szczególności zasady odpowiedzialności z tytułu rękojmi, nie zostaną ograniczone
tą gwarancję.
W razie ewentualnych reklamacji należy skontaktować się pod niżej podanym numerem infolinii lub poprzez pocztę elektroniczną. Nasi współpracownicy
omówią z Państwem jak najszybciej dalszy przebieg
sprawy. Z naszej strony gwarantujemy doradztwo.
Czas gwarancji nie zostanie przedłużony przez
ewentualnie podjęte naprawy na podstawie
gwarancji, prawnej odpowiedzialności z tytułu rękojmi czy dokonania bezpłatnej naprawy.
Dotyczy to również wymienionych i naprawionych
części. Po upłynięciu czasu gwarancji powstałe
naprawy są płatne.
IAN: 94826
Serwis Polska
Tel.: 22 397 4996
E-Mail: deltasport@lidl.pl
Części zamienne do Waszego produktu znajdziecie także pod
adresem: www.delta-sport.com, Rubryka serwisu - Serwis części
zamiennych Lidl
11
PL
Page 12

Gratulálunk!
Vásárlásával egy kiváló minőségű termék mellett
döntött. Az első használatba vételt megelőzően
ismerkedjen meg a termékkel. Ehhez figyelmesen
olvassa el a következő használati útmutatót.
Csak a leírásnak és csak a megadott felhasználási
területeknek megfelelően használja a terméket.
Ezt a útmutatót jól őrizze meg.
Amennyiben a terméket harmadik személynek továbbadja, adja át neki a teljes dokumentációt is.
A csomag tartalma /
alkatrészek megnevezése
(A ábra)
1 x Mini pumpa (1)
1 x Felső fedél (2)
1 x Gumigyűrű (3)
1 x Pumparögzítő (4)
1 x Alsó fedél (5)
2 x Csavar (6)
1 x Tömlő (7)
1 x Schrader-szelep (8)
1 x Dunlop-szelep (9)
1 x Sclaverand-szelep (10)
1 x Használati útmutató
Műszaki adatok
Méretek: Hosszúság: kb. 190 mm
Névleges nyomás: kb. 120 PSI/8,3 bar
Rendeltetésszerű használat
Ez a termék privát használatra készült és valamennyi Schrader-, Dunlop- vagy Sclaverand-szeleppel
felszerelt biciklikerék felpumpálására alkalmas.
A pumparögzítő kizárólag olyan kerékpárvázakhoz
használható, amelyeken lyukakat alakítottak ki a
pumparögzítő számára (B ábra).
A termék nem alkalmas gépkocsiabroncsok
felpumpálására!
Biztonsági utasítások
• Mivel a termék működtetése nagy erőt igényel és
kockázatokat hordoz magában, gyermekek és te sti és/vagy szellemi fogyatékossággal élő személ yek nem használhatják.
• Égési sérülés veszélye! A mini biciklipumpa
dugattyúi és cilinderei a súrlódás miatt a hosszan
tartó pumpálás során felmelegedhetnek.
Használat után a terméket kizárólag a nyelénél
szabad megfogni.
• Használat előtt minden alkalommal ellenőrizze,
hogy vannak-e sérülés vagy kopás jelei a ter méken, különösen a pumparögzítőn illetve a
szelep és a mini biciklipumpa közötti részen.
HU
12
Page 13

• A hibás termékeket nem szabad tovább használni,
illetve ártalmatlanítani kell, ugyanis a hibás termék
nem javítható.
• A terméket csak a gyártó által megadott
maximális nyomás eléréséig szabad felpumpálni.
Kerékpárabroncsok esetén ez az adat általában
az abroncs oldalán található.
• Túlnyomás esetén robbanásveszély áll fenn!
• A nyomás ellenőrzését egy kalibrált mérőeszköz zel kell elvégezni.
Felszerelés a kerékpár vázára
• Lazítsa ki a vizesüveg rögzítésére való vázon lévő
csavarokat (B ábra).
• Majd rögzítse a pumparögzítőt (4) a csomag ban található csavarokkal (6) vagy a vizesüveg
rögzítésére való csavarokkal a vázra (C ábra).
• Rögzítse a pumpát azáltal, hogy a gumigyűrűt (3)
a pumpa köré helyezi (D ábra).
• Amennyiben a csomagban lévő csavarok
túl kicsik vagy túl nagyok, vásároljon
szaküzletben megfelelő méretű csavaro kat. Mindig ügyeljen arra, hogy a csa varok biztonságosan tartsanak, és szo rosan be legyenek csavarva! A pumparö gzítőnek nem aszfaltozott utakon
történő használat közben is stabilan kell
állnia, ilyenkor sem mozoghat.
Különben fennáll a veszély, hogy a pum parögzítőt a mini biciklipumpával együtt
elveszíti.
Alkalmazása
• Nyissa fel a felső fedelet (2) és vegye ki a tömlőt
(7).
• Nyissa ki az alsó fedelet (5). Attól függően, hogy
Schrader- (8), Dunlop- (9) vagy Sclaverand-sze lepet (10) használ, csavarozza a tömlő megfelelő
oldalát a mini biciklipumpa másik végéhez (lásd a
tömlőn lévő jelölést: Schrader/Dunlop, Sclaver and) (E ábra).
• Nyissa ki a tömlőszelepen lévő zárat.
• Csavarozza a tömlő megfelelő végét a NYITOTT
szelepre, majd kezdjen pumpálni (F ábra).
Sclaverand-szeleppel (10) rendelkező kerékpárabroncsok felpumpálásakor:
1. Lazítsa meg a kerékpárszelep (tokján lévő) recé zett anyacsavart.
2. Helyezze a Sclaverand-szelepet merőlegesen a
kerékpárszelepre, majd kezdjen el pumpálni.
3. A pumpálás befejeztével ismét húzza szorosra a
kerékpárszelep recézett anyacsavarját.
• Figyelem! A mini biciklipumpa tömlőjét
nem szabad megtörni!
• Egyenletesen és ne túl gyorsan pumpáljon a mini
biciklipumpával.
13HU
Page 14

A tömlőt tartsa a mini kerékpártömlő belsejében, ha
éppen nem használja.
Jól zárja le a fedeleket, és mindig úgy rögzítse a
mini biciklipumpát a tartóra, hogy a nyele felfelé
nézzen.
Kezelés és tárolás
Ne merítse a terméket vízbe! Megsérülhet.
A terméket mindig szárazon és tisztán, fűtött
helyiségben kell tárolni.
Fontos! Tisztítását nedves ronggyal kell végezni,
majd szárazra kell törölni.
Ártalmatlanítási szempontok
A termék és valamennyi hozzá tartozó komponens
ártalmatlanítását bízza egy arra engedéllyel rendelkező hulladékfeldolgozó létesítményre vagy a helyi
hulladékfeldolgozó üzemre. Vegye figyelembe a
mindenkor érvényes előírásokat.
Amennyiben kétségei vannak, érdeklődjön a hulladékfeldolgozó létesítményben a környezetbarát
ártalmatlanítás felől.
3 év garancia
Ezen termék gyártása nagy gondossággal és
folyamatos ellenőrzés mellett történt. Ön a termékre
három év garanciát kap a vásárlás időpontjától.
Kérjük őrizze meg a pénztárblokkot.
A garancia csak anyag- és gyártási hibákra érvényes, visszaélésszerű vagy szakszerűtlen kezelés
esetén teljesen megszűnik. Az Ön törvényes jogait,
kiváltképpen a szavatosságra vonatkozó jogait, ez a
garancia nem korlátozza.
Esetleges reklamáció esetén, kérjük, hívja fel a
szerviz alábbi közvetlen telefonvonalát, vagy lépjen
kapcsolatba velünk e-mailben. Szerviz szakembereink a további tennivalókat a lehető leggyorsabban
egyeztetik Önnel. Minden esetben személyesen
adunk tanácsot Önnek.
A garanciális időt garancia, törvényes szavatosság
vagy kulantéria alapján történő esetleges javítások
nem hosszabbítják meg. Ez a pótolt vagy megjavított
alkatrészekre is érvényes.
A garancia lejárta után felmerülő javítások költségeit
Önnek kell fedezni.
IAN: 94826
Szerviz Magyarország
Tel.: 0640 102785
E-Mail: deltasport@lidl.hu
Termékéhez pótalkatrészek itt is találhatók:
www.delta-sport.com, Szerviz rubrika - Pótalkatrész-ellátás Lidl
14
HU
Page 15

Prisrčne čestitke!
Z Vašim nakupom ste se odločili za kakovosten
izdelek. Pred prvo praktično uporabo se seznanite z
izdelkom. Zato skrbno preberite naslednja navodila
za uporabo. Izdelek uporabljajte samo v skladu z
navodili in v predviden namen.
Ta navodila dobro shranite. Ob predaji naprave
tretjim osebam jim izročite tudi vso dokumentacijo.
Obseg dobave / Opis delov
(sl. A)
1 x Mini zračna tlačilka (1)
1 x Pokrovček zgoraj (2)
1 x Gumijast obroček (3)
1 x Nosilec za kolo (4)
1 x Pokrovček spodaj (5)
2 x Vijak (6)
1 x Gibka cev (7)
1 x Ventil Schrader (8)
1 x Ventil Dunlop (9)
1 x Ventil Sclaverand (10)
1 x Navodila za uporabo
Tehnični podatki
Mere: dolžina pribl. 190 mm
Nazivni tlak: pribl. 120 PSI/8,3 bari
Namenska uporaba
Ta izdelek je bil razvit za zasebno uporabo za
napihovanje vseh običajnih kolesarskih pnevmatik z
ventili Schrader, Dunlop ali Sclaverand.
Nosilec za kolo je primeren le za ogrodje kolesa, ki
ima predvidene luknje za nosilce (sl. B).
Ni primerna za napihovanje avtomobilskih pnevmatik!
Varnostna opozorila
• Zaradi visokih prožilnih sil in s tem povezanih
tveganj izdelek ni primeren za to, da ga upo rabljajo otroci in osebe s telesnimi in/ali duševnimi
motnjami.
• Nevarnost opeklin! Ob daljšem napihovanju
se lahko bat in cilinder mini zračne tlačilke zaradi
trenja segrejeta. Po uporabi prijemajte izdelek le
še za ročaj.
• Pred vsako uporabo preverite izdelek in še pose bej nosilec za kolo ter pravilen spoj med ventilom
in mini zračno tlačilko glede poškodb ali obrabe.
• Okvarjenih izdelkov ni dovoljeno več uporabljati
in jih je treba zavreči med odpadke, ker okvarje nega izdelka ni mogoče popraviti.
SI
15
Page 16

• Z izdelkom napihujte le do največjega dovoljene ga tlaka, ki ga navede proizvajalec. Pri koles arskih pnevmatikah je ta tlak običajno naveden na
strani pnevmatike.
• V primeru prevelikega tlaka obstaja nevarnost
eksplozije!
• Tlak je treba nadzirati preko umerjene merilne
naprave.
Montaža na ogrodje kolesa
• Iz ogrodja odvijte vijaka, ki sta namenjena za
pritrditev nosilca za steklenico (sl. B).
• Nosilec za kolo (4) pritrdite na ogrodje s prilože nima vijakoma (6) ali vijakoma nosilca za stekleni co (sl. C).
• Tlačilko zavarujte tako, da pod njo položite gumi jast obroček (3) (sl. D).
• Če sta priložena vijaka prevelika ali
premajhna, kupite v ustrezni specializira ni trgovini ustrezna vijaka. Vedno pazite
na varen in trden oprijem! Tudi na neu trjenih površinah mora nosilec za kolo
trdno sedeti in se ne sme majati.
Sicer tvegate, da izgubite nosilec za kolo
skupaj z mini zračno tlačilko.
Uporaba
• Odprite pokrovček zgoraj (2) in izvlecite gibko
cev (7).
• Odprite pokrovček spodaj (5). Glede na to, ali je
na tlačilki ventil Schrader (8), ventil Dunlop (9) ali
ventil Sclaverand (10), privijte ustrezno stran
gibke cevi na drugi konec mini zračne tlačilke,
(glejte oznako na gibki cevi: Schrader/Dunlop,
Sclaverand) (sl. E).
• Odprite pokrovček ventila pnevmatike.
• Ustrezni konec gibke cevi privijte na ODPRT ventil,
nato napihnite (sl. F).
Posebnost pri napihovanju kolesarskih pnevmatik z
ventilom Sclaverand (10):
1. Odvijte narebričeno matico (na ohišju ventila
kolesa) ventila kolesa.
2. Ventil Sclaverand postavite navpično na ventil
kolesa, nato napihnite.
3. Po napihovanju ponovno trdno privijte narebriče no matico ventila kolesa.
• Pozor! Gibka cev mini zračne tlačilke se
ne sme prepogniti!
• Z mini zračno tlačilko upravljajte enakomerno in
ne prehitro.
Če izdelka ne uporabljate, gibko cev vedno pospravite v notranjost mini zračne tlačilke.
Dobro zaprite pokrovčka in mini zračno tlačilko
pritrdite na nosilec mini zračne tlačilke, vedno z
ročajem navzgor.
16 SI
Page 17

Nega in shranjevanje
Izdelka ne potapljajte v vodo, sicer se poškoduje.
Izdelek vedno hranite suh in čist v ogrevanem
prostoru.
Pomembno! Čistite le z vlažno krpo in nato do
suhega obrišite.
Napotki za odstranjevanje med
odpadke
Izdelek in vse pripadajoče komponente zavrzite
preko pooblaščenega komunalnega podjetja ali preko vaše komunalne ustanove. Upoštevajte trenutno
veljavne predpise. V primeru dvoma se pozanimajte
pri vaši komunalni ustanovi o okolju primernem
odstranjevanju.
3 leta garancije
Izdelek je bil izdelan skrbno in pod stalnim nadzorom. Garancija izdelka velja 3 leta od datuma
nakupa. Prosimo shranite račun.
Garancija velja le za napake v materialu in proizvodnji ter ugasne ob zlorabi ali neustrezni uporabi
izdelka. Vaše pravne koristi, posebno pravica do
garancije, s to garancijo niso omejene.
V primeru pritožb se prosimo obrnite na spodaj
navedeno telefonsko številko servisa ali nam pošljite
elektronsko pošto. Naši sodelavci na servisu se bodo
tako hitro kot je le mogoče dogovorili z Vami glede
nadaljnjih ukrepov. Vsekakor bomo osebno stopili v
stik z Vami.
Čas garancije se zaradi morebitnih popravil na
podlagi garancije, pravnih koristi ali kulantnosti
ne podaljša. To velja tudi za nadomeščene ali
popravljene dele. Po poteku garancije so popravila
plačljiva.
IAN: 94826
Servis Slovenija
Tel.: 080080917
E-Mail: deltasport@lidl.si
Nadomestne dele za Vaš izdelek najdete na:
www.delta-sport.com, rubrika servis - servis z rezervnimi deli Lidl
17
SI
Page 18

Garancijski list
1. S tem garancijskim listom jamčimo
DELTA-SPORT HANDELSKONTOR GMBH, da
bo izdelek v garancijskem roku ob normalni in
pravilni uporabi brezhibno deloval in se zavezu jemo, da bomo ob izpolnjenih spodaj navedenih
pogojih odpravili morebitne pomanjkljivosti in
okvare zaradi napak v materialu ali iz delavi oz.
po svoji presoji izdelek zamenjali ali vrnili kupni no.
2. Garancija je veljavna na ozemlju Republike
Slovenije.
3. Garancijski rok za proizvod je 3 lega od dneva
izročitve balga. Dan izročitve blaga je enak dne vom prodaje, ki je razviden iz računa.
4. Kupec je dolžan okvaro javiti pooblaščenemu
servisu oz. se informirati o nadaljnjih postopkih
na zgoraj nave deni telefonski številki. Svetujemo
vam, da pred tem natančno preberete navodila o
sestavi in uporabi izdelka.
5. Kupec je dolžan pooblaščenemu servisu pred ložiti garancijski list in račun, kot potrdilo in doka zilo o nakupu.
6. V primeru, da proizvod popravlja nepooblaščeni
servis ali oseba, kupec ne more uveljavljati
zahtevkov iz te garancije.
7. Vzroki za okvaro oz. nedelovanje izdelka morajo
biti lastnosti stvari same, in ne vzroki, ki so zunaj
proizvajalčeve oz. prodajalčeve sfere.
Kupec ne more uveljavljati zahtevkov iz te garan cije, če se ni držal priloženih na vodil za sestavo
in uporabo izdelka ali, če je izdelek kakorkoli
spremenjen ali nepravilno vzdrževan.
8. Jamčimo servisiranje in rezervne dele za minimal no dobo, ki je zahtevana s strani zakonodaje.
9. Obrabni deli oz. potrošni material so izvzeti iz
garancije.
10. Vsi potrebni podatki za uveljavljanje garancije se
nahaja jo na dveh ločenih dokumentih (garancij ski list, račun).
11. Ta garancija proizvajalca ne izključuje pravic
potrošnika, ki izhajajo iz odgovornosti prodajal ca za napake na blagu.
Prodajalec:
Lidl d.o.o.k.d., Pod lipami 1, SI-1218 Komenda
18 SI
Page 19

Srdečně blahopřejeme!
Vaší koupí jste se rozhodli pro jakostní produkt.
Před uvedením do provozu se nejdříve seznamte s
celým produktem. Přečtěte si pozorně následující
navod k použiti. Používejte produkt jen tak, jak je
popsáno a jen v doporučených oblastech.
Uschovejte si tento návod. Při předávání produktu
třetí osobě předávejte i všechny příslušné podklady.
Rozsah dodávky /
označení dílů (obr. A)
1 x Minipumpička (1)
1 x Horní krycí víčko (2)
1 x Gumový prstenec (3)
1 x Držák na kolo (4)
1 x Dolní krycí víčko (5)
2 x Šroub (6)
1 x Hadička (7)
1 x Schraderův ventilek (8)
1 x Dunlop ventilek (9)
1 x Sclaverand ventilek (10)
1 x Návod k použití
Technická data
Rozměry: délka cca 190 mm
Jmenovitý tlak: cca 120 PSI / 8,3 bar
Použití v souladu s určením
Tento výrobek byl vyvinut pro privátní použití pro
pumpování všech obvyklých plášťů na kolo s ventilky
Schrader, Dunlop nebo Sclaverand. Držák na kolo
se hodí pouze na rámy kol, které mají pro držák
otvory (obr. B).
Nehodí se pro pumpování automobilových pneumatik!
Bezpečnostní pokyny
• Vzhledem k velkým silám potřebným pro ovládání,
a s tím spojených rizik, není vhodné, aby výrobek
používaly děti a osoby s tělesným a/nebo
duševním omezením.
• Nebezpečí spálení! Na základě tření pístu a
válce minipumpičky se tyto části při delším pumpo vání zahřívají. Po použití uchopte výrobek pouze
za držadlo.
• Před každým použitím překontrolujte výrobek
a zejména držák na kolo a správné spojení mezi
ventilkem a minipumpičkou, zda nejsou poškozeny
nebo opotřebeny.
• Vadné výrobky nesmí být dále používány a musí
být zlikvidovány do odpadu, neboť vadný výro bek již nelze opravovat.
CZ
19
Page 20

• Výrobek pumpujte pouze do maximálního tlaku
udávaného výrobcem. U plášťů na kolo tento údaj
najdete většinou na jejich boční straně.
• Při přetlaku vzniká nebezpečí exploze pláště!
• Kontrolu tlaku je nutné provádět pomocí kalibrova ného měřicího přístroje.
Montáž na rám kola
• Na rámu uvolněte šrouby, které byly provedeny k
upevnění držáku na láhev s nápojem (obr. B).
• Tam upevněte držák na kolo (4) pomocí přiba lených šroubů (6) nebo šroubů od nápojové láhve
k rámu kola (obr. C).
• Pumpičku zajistěte tím, že okolo ní připnete gumo vý prstenec (3) (obr. D).
• Pokud by přibalené šrouby byly příliš
velké nebo příliš malé, opatřete si prosím
v odpovídající prodejně vhodné šrouby.
Vždy dbejte na bezpečné a pevné držení!
Držák musí na jízdním kole pevně držet
i na nezpevněném terénu a nesmí se
nijak viklat. Jinak Vám hrozí, že ztratíte
držák na kolo včetně pumpičky.
Používání
• Otevřete horní krycí víčko (2) a vyjměte hadičku
(7).
• Otevřete dolní krycí víčko (5). Podle toho, zda
máte ventilek Schrader (8), Dunlop (9) anebo
Sclaverand (10), našroubujte odpovídající stranu
hadičky na druhý konec minipumpičky, (viz
značení na hadičce: Schrader/Dunlop, Sclaver and) (obr. E).
• Otevřete uzávěr ventilku pláště.
• Našroubujte odpovídající konec hadičky na
OTEVŘENÝ ventilek, pak pumpujte (obr. F).
Zvláštnost při pumpování pláště kola s ventilkem
Sclaverand (10):
1. Uvolněte rýhovanou matici (na pouzdru jízdního
kola) ventilku kola.
2. Nasaďte ventilek Sclaverand kolmo na ventilek
kola, pak pumpujte.
3. Po napumpování znovu dotáhněte matku se záře zem ventilku kola.
• Pozor! Hadička minipumpičky nesmí být
přehnutá!
• S minipumpičkou pumpujte rovnoměrně a nepříliš
rychle.
Pokud výrobek nepoužíváte, vždy uložte hadičku do
vnitřku minipumpičky.
Krycí víčka dobře uzavírejte a minipumpičku nasazujte do držáku vždy rukovětí pumpičky směrem
nahoru.
20
CZ
Page 21

Péče a skladování
Výrobek nenořte do vody. Jinak dojde k jeho poškození. Ukládejte ho vždy suchý a čistý v temperovaném prostoru.
Důležité upozornění! Čistění provádějte pouze
vlhkým hadříkem a následně utřete do sucha.
Pokyny pro likvidaci do odpadu
Výrobek a všechny jeho součásti likvidujte do odpadu přes registrovanou firmu pro likvidaci odpadu
nebo přes Vaše komunální zařízení odpadového
hospodářství. Dodržujte aktuálně platné předpisy.
V případě pochybností se informujte u Vašeho zařízení pro likvidaci odpadu o ekologické likvidaci.
3 roky záruky
Produkt byl vyrobený s velkou pečlivostí a byl
průběžně kontrolovaný ve výrobní procesu.
Na tento produkt obdržíte tříroční záruku ode dne
zakoupení. Uschovejte si pokladní stvrzenku.
Záruka se vztahuje jen na vady materiálu a chyby
z výroby, nevztahuje se na závady způsobené
neodborným zacházením nebo použitím k jinému
účelu. Tato záruka neomezuje Vaše zákonná ani
záruční práva.
Při případných reklamacích se obraťte na dole
uvedenou servisní horkou linku nebo nám zašlete
email. Náš servisní pracovník s Vámi co nejrychleji
upřesní další postup. V každém případě Vám osobně
poradíme.
Záruční doba se neprodlužuje po případných
opravách v době záruky ani v případě zákonného
ručení nebo kulance. Toto platí také pro náhradní
a opravené díly. Opravy prováděné po vypršení
záruční lhůty se platí.
IAN: 94826
Servis Česko
Tel.: 800143873
E-Mail: deltasport@lidl.cz
Náhradní díly pro Váš výrobek najdete také na webové stránce:
www.delta-sport.com, Rubrika Servis - Servis pro náhradní díly Lidl
21CZ
Page 22

Srdečne Vám blahoželáme!
Vašou kúpou ste sa rozhodli pre vysokokvalitný produkt. Skôr než začnete produkt používať, dôkladne
sa s ním oboznámte. K tomu si prečítajte tento návod
na použitie. Produkt používajte v súlade s pokynmi
uvedenými v návode a na účely, na ktoré je produkt
určený. Tento návod si odložte. Ak produkt odovzdáte tretej osobe, priložte jej tiež všetky podklady.
Obsah balenia/
označenie častí (obr. A)
1 x Hustilka (1)
1 x Snímateľný kryt hore (2)
1 x Gumový krúžok (3)
1 x Držiak na bicykli (4)
1 x Snímateľný kryt dole (5)
2 x Skrutka (6)
1 x Hadička (7)
1 x Ventil Schrader (8)
1 x Ventil Dunlop (9)
1 x Ventil Sclaverand (10)
1 x Návod na použitie
Technické údaje
Rozmery: dĺžka cca 190 mm
Menovitý tlak: cca 120 PSI/8,3 bar
Použitie podľa určenia
Tento výrobok bol vyrobený pre súkromné použitie
na nahustenie všetkých bežných bicyklových pneumatík s ventilmi Schrader, Dunlop alebo Sclaverand.
Držiak na bicykli je vhodný len pre rámy bicyklov,
na ktorých sú otvory pre držiaky (obr. B).
Výrobok nie je vhodný pre nahustenie automobilových pneumatík.
Bezpečnostné pokyny
• Kvôli vysokým ovládacím silám a rizikám, ktoré
sú s tým spojené, nie je výrobok vhodný na to,
aby ho používali deti alebo osoby s telesnými a/
alebo duševnými obmedzeniami.
• Nebezpečenstvo popálenia! Kvôli treniu
piestov a valcov minihustilky sa tieto pri dlhšom
hustení môžu zohriať. Po použití chytajte výrobok
len za držadlo.
• Pred každým použitím skontrolujte, či výrobok a
hlavne držadlo na bicykli a správne spojenie
medzi ventilom a minihustilkou nie sú poškodené
alebo opotrebené.
• Poškodené výrobky sa viac nesmú používať a
musia sa zlikvidovať, pretože poškodený výrobok
sa nedá opraviť.
• Výrobok hustite len po maximálny tlak, ktorý uvád za výrobca. Na bicyklových pneumatikách možno
tento tlak väčšinou nájsť na boku pneumatiky.
22
SK
Page 23

• Pri pretlaku hrozí nebezpečenstvo explózie!
• Tlak sa musí kontrolovať kalibrovaným meracím
prístrojom.
Montáž na rám bicykla
• Z rámu uvoľnite skrutky, ktoré sú určené na
pripevnenie držadla na fľaše (obr. B).
• Pomocou dodaných skrutiek (6) alebo skrutiek
držadla na fľaše teraz pripevnite na rám držadlo
na bicykel (4) (obr. C).
• Hustilku zaistite tak, že gumový krúžok (3)
nasadíte okolo hustilky (obr. D).
• Ak by dodané skrutky boli príliš veľké
alebo príliš malé, kúpte vhodné skrutky
v príslušnom špecializovanom obchode.
Dávajte vždy pozor, aby bezpečne a
pevne sedeli! Držadlo bicykla musí pevne
držať aj na nespevnenom teréne a nes mie sa kývať. Inak riskujete, že držadlo
bicykla spolu s minihustilkou stratíte.
Použitie
• Otvorte horný snímateľný kryt (2) a vyberte
hadičku (7).
• Otvorte dolný snímateľný kryt (5). Podľa toho,
či máte ventil Schrader (8), Dunlop (9) alebo
ventil Sclaverand (10), naskrutkujte odpovedajúcu
stranu hadičky na druhý koniec minihustilky (viď
označenie na hadičke: Schrader/Dunlop,
Sclaverand) (obr. E).
• Otvorte uzáver ventilu pneumatiky.
• Odpovedajúci koniec hadičky naskrutkujte na
OTVORENÝ ventil, potom hustite (obr. F).
Osobitosť pri hustení pneumatík bicykla s ventilom
Sclaverand (10):
1. Uvoľnite ryhovanú maticu (na telese ventilu
bicykla) ventilu bicykla.
2. Nasaďte ventil Sclaverand kolmo na ventil bicy kla, potom hustite.
3. Po nahustení znovu pevne nasaďte ryhovanú
maticu ventilu bicykla.
• Pozor! Hadica minihustilky sa nesmie
zlomiť!
• S minihustilkou pracujte rovnomerne a nie príliš
rýchlo.
Keď výrobok nepoužívate, vždy uložte hadičku do
vnútra minihustilky. Dobre zatvorte snímateľné kryty
a pripevnite minihustilku na určené držadlo tak, aby
rukoväť minihustilky smerovala nahor.
Čistenie a skladovanie
Výrobok nikdy neponárajte do vody. Inak by sa
poškodil. Výrobok vždy skladujte suchý a čistý v
temperovanej miestnosti.
Dôležité! Výrobok čistite vlhkou len vlhkou handrou
a utrite dosucha.
SK
23
Page 24

Pokyny na likvidáciu
Výrobok a k nemu patriace komponenty zlikvidujte
prostredníctvom povolenej likvidačnej prevádzky
alebo prostredníctvom Vašej komunálnej obecnej
správy. Dodržiavajte aktuálne platné predpisy.
V prípade pochybností sa o vhodnej likvidácii informujte v príslušnej likvidačnej prevádzke.
3 roky záruka
Produkt bol vyrobený s maximálnou zodpovednosťou a v priebehu výroby bol neustále kontrolovaný. Na tento produkt máte tri roky záruku od dátumu
kúpy produktu. Pokladničný lístok si odložte.
Záruka sa vzťahuje len na chyby materiálu a výrobné chyby a zaniká pri neodbornej manipulácii s produktom. Záruka nemá vplyv na Vaše zákonné práva,
predovšetkým na práva vyplývajúce zo záruky.
V prípade reklamácie sa obráťte na nižšie uvedenú
servisnú linku, alebo nám napíšte e-mail.
Naši servisní zamestnanci sa s Vami dohodnú
na ďalšom postupe a urýchlene vykonajú všetky
potrebné kroky. V každom prípade Vám poradíme
osobne.
Záručná lehota sa nepredlžuje v dôsledku eventuálnych opráv na základe záruky, zákonného plnenia
záruky alebo v dôsledku prejavu ochoty. To platí tiež
pre vymenené alebo opravené diely. Opravy vykonané po uplynutí záručnej lehoty sú spoplatnené.
IAN: 94826
Servis Slovensko
Tel.: 0850 232001
E-Mail: deltasport@lidl.sk
Náhradné diely na Váš produkt nájdete aj na:
www.delta-sport.com, servisná rubrika – servis náhradných dielov
Lidl
24
SK
Page 25

Herzlichen Glückwunsch!
Mit Ihrem Kauf haben Sie sich für ein hochwertiges
Produkt entschieden. Machen Sie sich vor der ersten
Verwendung mit dem Produkt vertraut.
Lesen Sie hierzu aufmerksam die nachfolgende
Gebrauchsanweisung. Benutzen Sie das Produkt nur
wie beschrieben und für die angegebenen Einsatzbereiche. Bewahren Sie diese Anleitung gut auf.
Händigen Sie alle Unterlagen bei Weitergabe des
Produkts an Dritte ebenfalls mit aus.
Lieferumfang /
Teilebezeichnung (Abb. A)
1 x Mini-Luftpumpe (1)
1 x Abdeckkappe oben (2)
1 x Gummiring (3)
1 x Fahrradhalterung (4)
1 x Abdeckkappe unten (5)
2 x Schraube (6)
1 x Schlauch (7)
1 x Schrader-Ventil (8)
1 x Dunlop-Ventil (9)
1 x Sclaverand-Ventil (10)
1 x Gebrauchsanweisung
Technische Daten
Maße: Länge ca. 190 mm
Nenndruck: ca. 120 PSI/8,3 bar
Bestimmungsgemäße
Verwendung
Dieser Artikel ist für den privaten Gebrauch zum Aufpumpen aller gängigen Fahrradreifen mit Schrader-,
Dunlop- oder Sclaverand-Ventilen entwickelt worden.
Die Fahrradhalterung ist nur für Fahrradrahmen
geeignet, die Löcher für Halterungen vorgesehen
haben (Abb. B).
Nicht geeignet für das Aufpumpen von Autoreifen!
Sicherheitshinweise
• Aufgrund der hohen Betätigungskräfte und der
damit verbundenen Risiken ist der Artikel
nicht geeignet, um von Kindern und Personen mit
körperlichen und/oder geistigen Einschränkungen
verwendet zu werden.
• Verbrennungsgefahr! Aufgrund der Reibung
von Mini-Luftpumpenkolben und Mini-Luftpumpen zylinder können sich diese bei längerem Pumpen
erwärmen. Fassen Sie den Artikel nach dem
Verwenden nur noch am Griff an.
• Prüfen Sie den Artikel und besonders die Fahrrad halterung und die korrekte Verbindung zwischen
Ventil und Mini-Luftpumpe vor jedem Gebrauch
auf Beschädigungen oder Abnutzungen.
25DE/AT/CH
Page 26

• Defekte Artikel dürfen nicht weiter verwendet
werden und müssen entsorgt werden, da ein
defekter Artikel nicht repariert werden kann.
• Pumpen Sie den Artikel nur bis zum angegebenen
maximalen Druck des Herstellers auf.
Bei Fahrradreifen ist dieser meist auf der
Reifenflanke zu finden.
• Bei Überdruck besteht die Gefahr von Explosion!
• Die Kontrolle des Drucks muss über ein kalibriertes
Messgerät erfolgen.
Montage am Fahrradrahmen
• Lösen Sie die Schrauben aus dem Rahmen, die
zur Befestigung des Trinkflaschenhalters gedacht
sind (Abb. B).
• Befestigen Sie nun die Fahrradhalterung (4) mit
den mitgelieferten Schrauben (6) oder den
Schrauben des Trinkflschenhalters am Rahmen
(Abb. C).
• Sichern Sie die Pumpe, indem Sie den
Gummiring (3) um die Pumpe legen (Abb. D).
• Sollten die mitgelieferten Schrauben zu
groß oder zu klein sein, erwerben Sie
bitte im entsprechenden Fachhandel
passende Schrauben. Achten Sie immer
auf einen sichereren und festen Halt!
Auch auf unbefestigtem Gelände muss
die Fahrradhalterung fest sitzen und darf
nicht wackeln. Ansonsten laufen Sie Ge fahr, die Fahrradhalterung samt Mini Luftpumpe zu verlieren.
Verwendung
• Öffnen Sie die Abdeckkappe oben (2) und
entnehmen Sie den Schlauch (7).
• Öffnen Sie die Abdeckkappe unten (5).
Je nachdem, ob Sie ein Schrader-Ventil (8),
Dunlop-Ventil (9) oder Sclaverand-Ventil (10)
haben, schrauben Sie die entsprechende Seite
des Schlauches an das andere Ende der Mini-Luft pumpe, (siehe Kennzeichnung auf dem Schlauch:
Schrader/Dunlop, Sclaverand) (Abb. E).
• Öffnen Sie den Verschluss des Reifenventils.
• Das entsprechende Ende des Schlauches auf das
OFFENE Ventil schrauben, dann pumpen (Abb. F).
Besonderheit beim Aufpumpen von Fahrradreifen mit
Sclaverand-Ventil (10):
1. Lösen Sie die Rändelmutter (auf dem Fahrrad ventilgehäuse) des Fahrradventils.
2. Setzen Sie das Sclaverand-Ventil senkrecht auf
das Fahrradventil, dann pumpen.
3. Drehen Sie nach dem Pumpen die Rändelmutter
des Fahrradventils wieder fest.
26 DE/AT/CH
Page 27

• Achtung! Der Mini-Luftpumpenschlauch
darf nicht geknickt werden!
• Betätigen Sie die Mini-Luftpumpe gleichmäßig und
nicht zu schnell.
Wenn Sie den Artikel nicht verwenden, lagern Sie
den Schlauch immer im Mini-Luftpumpeninneren.
Verschließen Sie die Abdeckkappen gut und befestigen Sie die Mini-Luftpumpe am Mini-Luftpumpenhalter stets mit dem Mini-Luftpumpengriff nach oben.
Pflege und Lagerung
Tauchen Sie den Artikel nicht in Wasser. Er wird
ansonsten beschädigt. Den Artikel immer trocken und
sauber in einem temperierten Raum lagern.
Wichtig! Nur mit einem feuchten Reinigungstuch
reinigen und anschließend trocken wischen.
Hinweise zur Entsorgung
Entsorgen Sie den Artikel und alle dazugehörigen
Komponenten über einen zugelassenen Entsorgungsbetrieb oder über Ihre kommunale Entsorgungseinrichtung. Beachten Sie die aktuell geltenden
Vorschriften. Erkundigen Sie sich im Zweifelsfall bei
Ihrer Entsorgungseinrichtung über eine umweltgerechte Entsorgung.
3 Jahre Garantie
Das Produkt wurde mit großer Sorgfalt und unter
ständiger Kontrolle produziert. Sie erhalten auf dieses Produkt drei Jahre Garantie ab Kaufdatum.
Bitte bewahren Sie den Kassenbon auf.
Die Garantie gilt nur für Material- und Fabrikationsfehler und entfällt bei missbräuchlicher oder unsachgemäßer Behandlung. Ihre gesetzlichen Rechte,
insbesondere die Gewährleistungsrechte, werden
durch diese Garantie nicht eingeschränkt.
Bei etwaigen Beanstandungen wenden Sie sich bitte
an die unten stehende Service-Hotline oder setzen
Sie sich per E-Mail mit uns in Verbindung.
Unsere Servicemitarbeiter werden das weitere Vorgehen schnellstmöglich mit Ihnen abstimmen.
Wir werden Sie in jedem Fall persönlich beraten.
Die Garantiezeit wird durch etwaige Reparaturen
aufgrund der Garantie, gesetzlicher Gewährleistung
oder Kulanz nicht verlängert. Dies gilt auch für
ersetzte und reparierte Teile.
Nach Ablauf der Garantie anfallende Reparaturen
sind kostenpflichtig.
27DE/AT/CH
Page 28

IAN: 94826
Service Deutschland
Tel.: 0800-5435111
E-Mail: deltasport@lidl.de
Service Österreich
Tel.: 0820 201 222
(0,15 EUR/Min.)
E-Mail: deltasport@lidl.at
Service Schweiz
Tel.: 0842 665566
(0,08 CHF/Min.,
Mobilfunk max. 0,40 CHF/Min.)
E-Mail: deltasport@lidl.ch
Ersatzteile zu Ihrem Produkt finden Sie auch unter:
www.delta-sport.com, Rubrik Service - Ersatzteilservice Lidl
28
DE/AT/CH
Page 29

293031
Page 30

Page 31

Page 32

DELTA-SPORT HANDELSKONTOR GMBH
Wragekamp 6 • D-22397 Hamburg
Version: 02/2014
Delta-Sport-Nr.: MP-1781
IAN 94826
 Loading...