

Page 1
MINI BICYCLE PUMP
MINI BICYCLE PUMP
Instructions for use
MINIPUMPPU
Käyttöohje
MINILUFTPUMP
Bruksanvisning
MINI LUFTPUMPE
Brugsvejledning
MINI-POMPE À AIR
Notice d‘utilisation
MINI LUCHTPOMP
Gebruiksaanwijzing
MINI-LUFTPUMPE
Gebrauchsanweisung
IAN 94826
Page 2
A
B
C
2
Page 3
D
E
F
3
Page 4

Contents/Sisällysluettelo/Innehållsförteckning/
Indholdsfortegnelse/Table des matieres
Scope of delivery / Part names ............................... 6
Technical data ............................................................ 6
Correct use ................................................................. 6
Safety notes .......................................................... 6 - 7
Mounting to the bike frame ...................................... 7
Use .............................................................................. 7
Maintenance and storage ........................................ 7
Notes on disposal ..................................................... 8
3 Years Warranty ...................................................... 8
Toimituksen sisältö/osat ............................................ 9
Tekniset tiedot ............................................................. 9
Määräystenmukainen käyttö .................................... 9
Turvallisuusohjeet ....................................................... 9
Asennus polkupyörän runkoon ............................... 10
Käyttö ........................................................................ 10
Hoito ja säilytys ....................................................... 10
Hävittämistä koskevat ohjeet .................................. 11
3 vuoden takuu ........................................................ 11
Leveransomfång/delbeteckning ............................. 12
Teknisk information .................................................. 12
Avsedd användning.................................................. 12
Säkerhetsföreskrifter ........................................ 12 - 13
Montering på cykelramen ...................................... 13
Användning .............................................................. 13
Skötsel och förvaring ............................................... 14
Avfallshantering ....................................................... 14
3 års garanti ............................................................. 14
Leveringsomfang / betegnelser på dele ............... 15
Tekniske data ........................................................... 15
Tilsigtet brug ............................................................. 15
Sikkerhedsoplysninger .................................... 15 - 16
Montering på cykelstellet ....................................... 16
Brug .......................................................................... 16
Pleje og opbevaring ................................................ 17
Oplysninger om bortskaffelse ................................. 17
3 års garanti ............................................................. 17
Contenu de la livraison / Désignation des pièces 18
Données techniques ................................................ 18
Utilisation conforme ................................................. 18
Consignes de sécurité ..................................... 18 - 19
Montage sur le cadre du vélo ................................ 19
Utilisation .................................................................. 19
Entretien et rangement ............................................ 20
Consignes de mise au rebut ................................... 20
3 ans de garantie .................................................... 20
4
Page 5

Inhoudsopgave/Inhaltsverzeichnis
In het leveringspakket inbegrepen /
benaming van de onderdelen ................................ 21
Technische gegevens ............................................... 21
Voorgeschreven gebruik ......................................... 21
Veiligheidsinstructies ........................................ 21 - 22
Montage aan het fietsframe ................................... 22
Gebruik ............................................................. 22 - 23
Onderhoud en opslag ............................................ 23
Aanwijzingen voor de afvalverwijdering .............. 23
3 jaar garantie ......................................................... 23
Lieferumfang / Teilebezeichnung .......................... 24
Technische Daten ..................................................... 24
Bestimmungsgemäße Verwendung ........................ 24
Sicherheitshinweise .......................................... 24 - 25
Montage am Fahrradrahmen ................................. 25
Verwendung ..................................................... 25 - 26
Pflege und Lagerung ............................................... 26
Hinweise zur Entsorgung ........................................ 26
3 Jahre Garantie ............................................. 26 - 27
5
Page 6

Congratulations!
With your purchase you have decided on a highquality product. Get to know the product before you
start to use it. Carefully read the following instructions for use. Use the product only as described and
only for the given areas of application. Keep these
instructions safe.
When passing the product on to a third party, always make sure that the documentation is included.
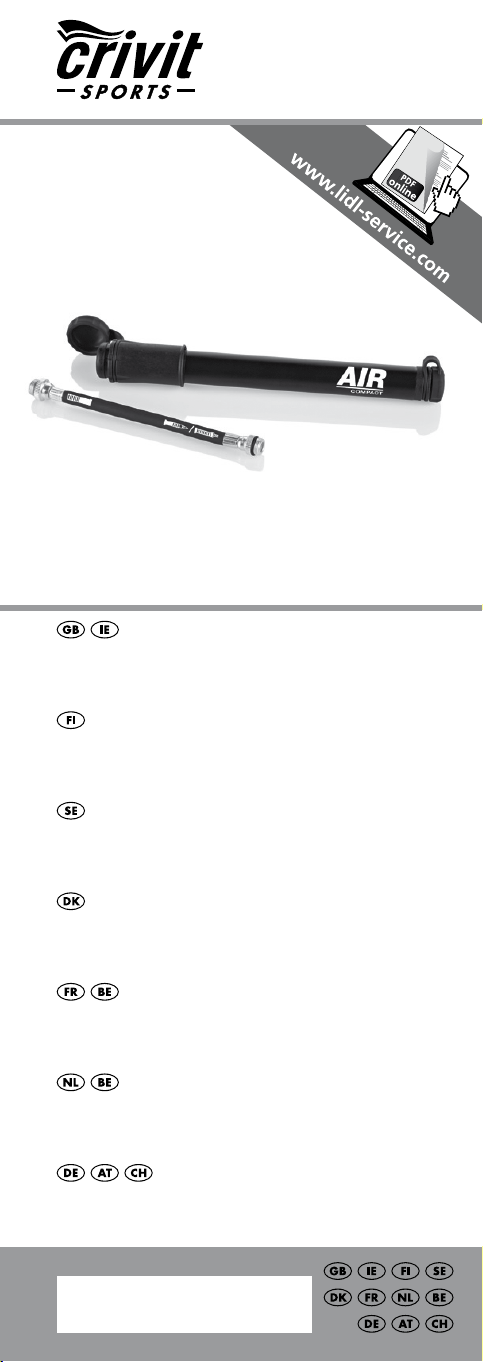
Scope of delivery /
Part names (fig. A)
1 x Mini bicycle pump (1)
1 x Top cap (2)
1 x Rubber ring (3)
1 x Bike mount (4)
1 x Bottom cap (5)
2 x Screws (6)
1 x Hose (7)
1 x Schrader valve (8)
1 x Dunlop valve (9)
1 x Sclaverand valve (10)
1 x Instructions for use
Technical data
Dimensions: length approx. 190mm
Nominal pressure: approx. 120 PSI/8.3 bar
Correct use
This article was developed for private use to pump
all standard bike tyres with Schrader, Dunlop, or
Sclaverand valves. The bike mount is only suitable
for bike frames that have holes for a mount (fig. B).
Not suitable for pumping up car tyres!
Safety notes
• This article is not suitable for use by children or by
adults with physical and/or mental limitations
because of the high operating forces and the
associated risks.
• Risk of burns! The friction in the mini air pump
piston and mini air pump cylinder means that they
warm up after longer periods of use. Only hold
the article by the handle after use.
• Inspect the article in particular the bike mount and
the correct connection between the valve and the
mini air pump for damage or wear before each
use.
• Defective articles must not be used and must be
discarded as a defective article cannot be re paired.
• Only pump up the article to the maximum pressure
stated by the manufacturer. This is usually printed
on the sidewall of the bike tyre.
6 GB/IE
Page 7

• There is a risk of explosion with over-inflated tyres!
• The pressure must be controlled using a calibrated
measurement device.
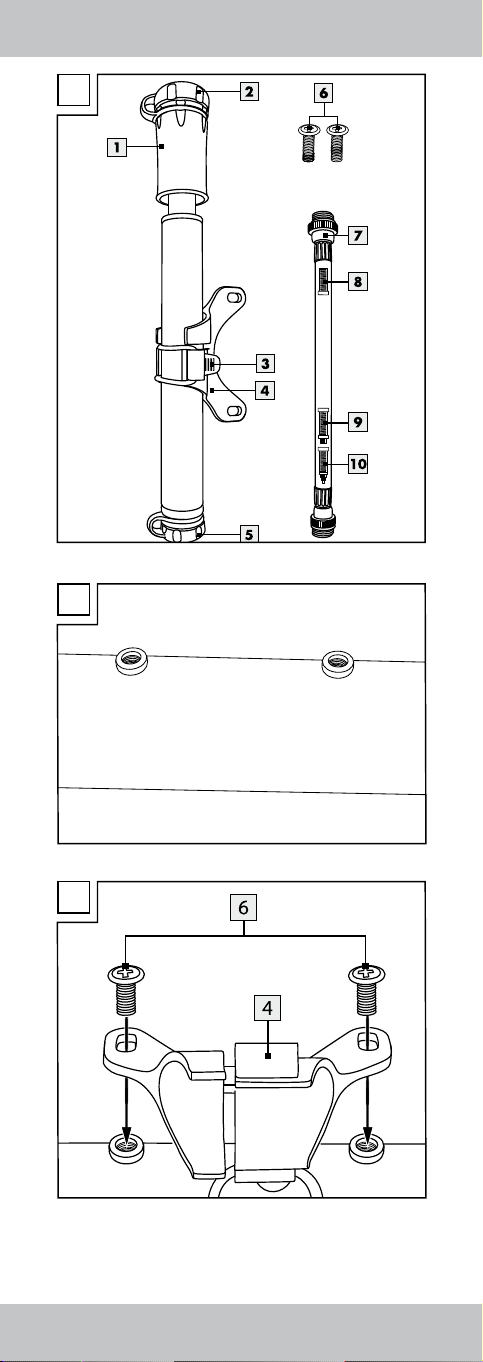
Mounting to the bike frame
• Remove the screws from the frame designed for
attaching a drinking bottle (fig. B).
• Attach the bike mount (4) to the frame with the
included screws (6) or the screws from the drin king bottle mount (fig. C).
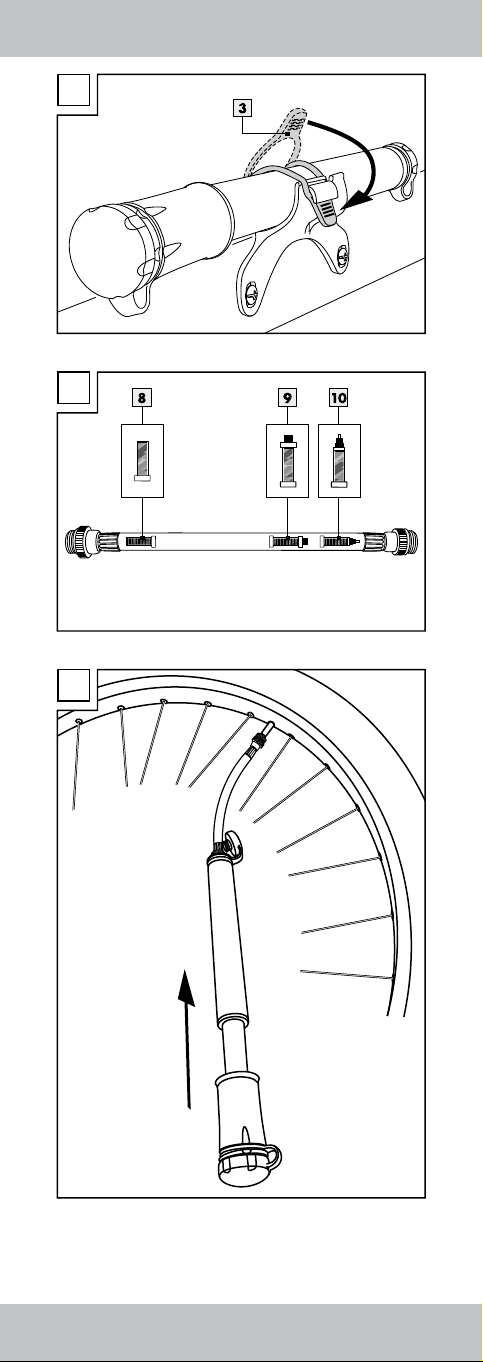
• Secure the pump by placing the rubber ring (3)
around the pump (fig. D).
• If the included screws are too large or
too small, please purchase the correct
screws from a specialist retailer.
Always ensure the article is attached
securely and tightly! The bike mount
must stay secure even on unpaved sur faces and it must not wobble.
Otherwise there is a risk of losing the
bike mount with the mini air pump.
Use
• Open the top cap (2) and remove the hose (7).
• Open the bottom cap (5). Depending on whether
you have a Schrader valve (8), Dunlop valve (9),
or Sclaverand valve (10), screw the correct end of
the hose to the other end of the mini air pump
(see label on the hose: Schrader/Dunlop, Sclaver and) (fig. E).
• Open the cap on the tyre valve.
• Screw the correct end of the hose to the OPEN
valve and then pump (fig. F).
Special note when pumping bike tyres using the
Sclaverand valve (10):
1. Remove the knurled nut (on the bike valve casing)
of the bike valve.
2. Place the Sclaverand valve vertically on the bike
valve, then pump.
3. Now tighten the knurled nut on the bike valve
again after pumping.
• Caution! The hose on the mini air pump
must not be bent!
• Pump the mini air pump in a regular motion and
do not pump too fast.
When the article is not in use, please always store
the hose inside the mini air pump.
Close the caps securely, and always put the mini air
pump in the mount with the handle of the air pump
pointing upward.
Maintenance and storage
Never submerge the pump in water as this will damage the article. Always store the article in a clean,
dry, temperature-controlled room. Important!
Only clean with a damp cloth and then wipe dry.
7GB/IE
Page 8

Notes on disposal
Please dispose of the article and all associated
components through an authorised waste disposal
company or through your local authority facilities.
Please observe all valid regulations. If in doubt,
please ask at your waste disposal facility regarding
environmentally compatible disposal.
3 Years Warranty
The product was produced with great care and
under constant supervision. You receive a three-year
warranty for this product from the date of purchase.
Please retain your receipt.
The warranty applies only to material and workmanship and does not apply to misuse or improper
handling. Your statutory rights, especially the warranty rights, are not affected by this warranty.
With regard to complaints, please contact the following service hotline or contact us by e-mail.
Our service employees will advise as to the subsequent procedure as quickly as possible. We will be
personally available to discuss the situation with you.
Any repairs under the warranty, statutory
guarantees or through goodwill do not extend the
warranty period. This also applies to re-placed and
repaired parts. Repairs after the warranty are subject
to a charge.
IAN: 94826
Service Great Britain
Tel.: 0871 5000 720
(£ 0.10/Min.)
E-Mail: deltasport@lidl.co.uk
Service Ireland
Tel.: 1890 930 034
(0,08 EUR/Min., (peak))
(0,06 EUR/Min., (off peak))
E-Mail: deltasport@lidl.ie
You can also find spare parts for your product at:
www.delta-sport.com, category Service - Lidl Spare Parts Service
8
GB/IE
Page 9

Onnittelumme!
Olet hankkinut itsellesi korkealaatuisen tuotteen.
Tutustu tuotteeseen ennen ensimmäistä käyttöä.
Lue käyttöohje huolellisesti läpi. Käytä tuotetta vain
ohjeissa kuvatulla tavalla ja mainitussa tarkoituksessa. Säilytä käyttöohje myöhempää tarvetta varten.
Jos annat tuotteen eteenpäin, liitä käyttöohje tuotteen
mukaan.
Toimituksen sisältö/osat
(kuva A)
1 x Minipumppu (1)
1 x Suojakansi ylhäällä (2)
1 x Kumirengas (3)
1 x Polkupyöräpidike (4)
1 x Suojakansi alhaalla (5)
2 x Ruuvi (6)
1 x Letku (7)
1 x Schrader-venttiili (8)
1 x Dunlop-venttiili (9)
1 x Sclaverand-venttiili (10)
1 x Käyttöohje
Tekniset tiedot
Mitat: pituus noin 190 mm
Nimellispaine: noin 120 PSI/8,3 bar
Määräystenmukainen käyttö
Tämä tuote on tarkoitettu kaikkien Schrader-, Dunloptai Sclaverand-venttiileillä varustettujen tavallisten
polkupyöränrenkaiden pumppaamiseen yksityiskäytössä. Polkupyöräpidike sopii vain sellaisiin polkupyörän runkoihin, joissa on reiät pidikkeelle (kuva B).
Ei sovellu auton renkaiden pumppaamiseen!
Turvallisuusohjeet
• Suurien käyttövoimien ja niihin sisältyvien riskien
vuoksi tuote ei sovellu lasten tai ruumiillisesti ja/tai
henkisesti vajavaisten henkilöiden käytettäväksi.
• Palohaavojen vaara! Minipumpun männän
ja minipumpun sylinterin kitkan vuoksi ne voivat
pidempään pumpattaessa kuumeta. Tartu tuottee seen käytön jälkeen enää vain kahvasta.
• Tarkasta tuotteen ja erityisesti polkupyöräpidik keen vauriot ja mahdollinen kuluminen sekä
venttiilin ja minipumpun välinen liitos ennen
jokaista käyttökertaa.
• Viallisia tuotteita ei saa enää käyttää, vaan ne on
hävitettävä, sillä viallista tuotetta ei voi korjata.
• Pumppaa rengasta vain valmistajan ilmoittamaan
suurimpaan sallittuun paineeseen. Polkupyöränren kaissa se löytyy tavallisesti renkaan syrjästä.
• Ylipaineessa on vaarana räjähdys!
• Paineen tarkastus on tehtävä kalibroidulla mittalait teella.
9
FI
Page 10

Asennus polkupyörän runkoon
• Irrota rungosta ruuvit, jotka on tarkoitettu juoma pullon pidikkeen kiinnitykseen (kuva B).
• Kiinnitä sitten polkupyöräpidike (4) mukana tulleil la ruuveilla (6) tai juomapullon pidikkeen ruuveilla
runkoon (kuva C).
• Varmista pumppu asettamalla kumirengas (3) sen
ympärille (kuva D).
• Jos mukana tulleet ruuvit ovat liian
suuria tai liian pieniä, hanki sopivat
ruuvit alan liikkeestä. Varmista aina,
että kiinnitys tulee kunnollisesti!
Myös epätasaisessa maastossa ajettaes sa on polkupyöräpidikkeen pysyttävä
kiinni ilman heilumista.
Muutoin on vaarana, että menetät sekä
polkupyöräpidikkeen että minipumpun.
Käyttö
• Avaa suojakansi ylhäältä (2) ja poista letku (7).
• Avaa suojakansi alhaalta (5). Aina sen mukaan,
onko pyörässäsi Schrader-venttiili (8), Dunlop venttiili (9) tai Sclaverand-venttiili (10), kierrä
letkun vastaava puoli minipumpun toiseen päähän
(katso letkussa olevaa merkintää: Schrader/
Dunlop, Sclaverand) (kuva E).
• Avaa renkaan venttiilin tulppa.
• Kierrä letkun vastaava pää AVONAISEEN venttiili in ja pumppaa (kuva F).
Erikoisominaisuus pumpattaessa polkupyöränrengasta, jossa on Sclaverand-venttiili (10):
1. Avaa pyöränventtiilin pyälletty mutteri (pyöränvent tiilin rungossa).
2. Aseta Sclaverand-venttiili pystysuoraan pyörän venttiiliin, pumppaa sitten.
3. Kierrä pumppaamisen jälkeen pyöränventtiilin
pyälletty mutteri jälleen kiinni.
• Huomio! Minipumpun letkua ei saa
taittaa!
• Pumppaa minipumppua tasaisesti, eikä liian
nopeasti.
Kun et käytä pumppua, säilytä letkua aina minipumpun sisällä.
Sulje suojakannet hyvin ja kiinnitä minipumppu sen
pidikkeeseen pumpun kahvaosa aina ylöspäin.
Hoito ja säilytys
Älä upota tuotetta veteen, sillä se vaurioituu silloin.
Säilytä tuotetta aina kuivana ja puhtaana lämmitetyssä tilassa.
Tärkeää! Puhdista vain kostealla puhdistusliinalla ja
pyyhi sen jälkeen kuivaksi.
10 FI
Page 11

Hävittämistä koskevat ohjeet
Vie vanha tuote ja kaikki siihen kuuluvat osat
hävitettäväksi hyväksyttyyn jätealan yritykseen tai
kuntasi jäteasemalle. Ota huomioon voimassa olevat
määräykset. Tiedustele tarvittaessa kuntasi jäteasemalta ympäristöystävällisestä hävittämisestä.
3 vuoden takuu
Tämä tuote on valmistettu erityistä tarkkuutta noudattaen ja jatkuvan tarkastuksen alaisena.
Tälle tuotteelle saat kolmen vuoden takuun ostopäivästä lähtien. Säilytä kassakuitti huolellisesti.
Takuu koskee ainoastaan materiaali- ja valmistusvirheitä ja raukeaa, jos tuotetta käytetään vääränlaisesti tai ei määräysten mukaisesti.
Tämä takuu ei rajoita laissa määrättyjä oikeuksiasi,
erikoisesti koskien takuu- ja reklamointioikeuksia.
Mahdollisissa reklamaatiotapauksissa ota meihin
yhteyttä soittamalla allaolevaan asiakaspalvelunumeroon tai lähettämällä viesti sähköpostitse.
Asiakaspalvelijamme sopivat kanssasi tarvittavista
toimenpiteistä mitä pikimmin. Palvelemme sinua joka
tapauksessa henkilökohtaisesti.
Mahdolliset korjaukset, jotka on suoritettu tämän
takuun, laillisen reklamointioikeuden tai harkintaoikeuden perusteella eivät pidennä takuuaikaa.
Tämä koskee myös vaihdettuja ja korjattuja osia.
Takuuajan päätyttyä suoritetut korjaukset ovat
maksullisia.
IAN: 94826
Huolto Suomi
Tel.: 010309 3582
E-Mail: deltasport@lidl.fi
Varaosia tuotteeseesi löydät myös osoitteesta:
www.delta-sport.com, välilehdestä Palvelu - Lidl varaosapalvelu
11
FI
Page 12

Grattis!
Med ditt köp har du bestämt dig för en högvärdig
produkt. Lär känna produkten innan första användningen. För detta ändamål bör du noga läsa igenom
efterföljande bruksanvisning.
Använd produkten endast i överensstämmelse med
beskrivningen och endast för nämnda användningsändamål. Förvara denna manual väl. Om du ger
produkten vidare glöm inte att samtidigt överlämna
alla handlingar.
Leveransomfång/
delbeteckning (bild A)
1 x Miniluftpump (1)
1 x Lock upptill (2)
1 x Gummiring (3)
1 x Cykelfäste (4)
1 x Lock nertill (5)
2 x Skruvar (6)
1 x Slang (7)
1 x Schraderventil (8)
1 x Dunlopventil (9)
1 x Sclaverandventil (10)
1 x Bruksanvisning
Teknisk information
Mått: Längd ca 190 mm
Nominellt tryck: ca 120 PSI/8,3 bar
Avsedd användning
Denna produkt har utvecklats för privat bruk, för
pumpning av alla vanliga typer av cykeldäck med
schrader-, dunlop- eller sclaverandventilen.
Cykelfästet passar endast cyklar som har hål avsedda för fästen av denna typ (bild B).
Produkten får inte användas för att pumpa bildäck!
Säkerhetsföreskrifter
• På grund av den fysiska styrka som krävs och
därmed förbundna risker ska produkten inte
användas av barn eller personer med fysiska och/
eller kognitiva funktionsnedsättningar.
• Risk för brännskador! På grund av friktionen
mellan miniluftpumpens kolv och cylinder kan
dessa bli varma vid långvarig pumpning.
Håll därför endast produkten i handtaget efter
användning.
• Kontrollera produkten, särskilt cykelfästet och
korrekt anslutning mellan ventil och miniluftpump
innan varje användning med avseende på skador
och slitage.
• Defekta produkter får inte användas och måste
kasseras, eftersom defekta produkter inte kan
repareras.
12
SE
Page 13

• Pumpa endast produkten till det maximala tryck
som anges av tillverkaren. På cykeldäck står detta
oftast på sidan av däcket.
• Risk för explosion föreligger vid övertryck!
• Trycket måste kontrolleras med en kalibrerad
mätare.
Montering på cykelramen
• Lossa skruvarna som är avsedda för att fästa
dryckesflaskor från ramen (bild B).
• Sätt fast cykelfästet (4) med medföljande skruvar
(6) eller skruvarna på flaskhållaren på ramen
(bild C).
• Spänn fast pumpen genom att lägga gummiringen
(3) runt den (bild D).
• Om de medföljande skruvarna är för
stora eller för små hittar du passande
skruvar hos din järnhandel. Se alltid till
att de sitter ordentligt fast! Även i ter räng måste cykelfästet sitta ordentligt
och får inte skaka. Annars kanske det
ramlar av och du förlorar både fäste och
pump.
Användning
• Öppna locket upptill (2) och ta ut slangen (7).
• Öppna locket nertill (5). Beroende på om du har
en schraderventil (8), dunlopventil (9) eller
sclaverandventil (10) skruvar du fast motsvarande
sida på slangen i den andra änden av miniluft pumpen, (se märkningen på slangen: Schrader/
Dunlop, Sclaverand) (bild E).
• Öppna hättan på däckventilen.
• Skruva på motsvarande ände av slangen på den
ÖPPNA ventilen, och pumpa (bild F).
Vid pumpning av cykeldäck med sclaverandventil
(10):
1. Lossa den räfflade muttern (på cykelventilhuset)
på cykelventilen.
2. Sätt sclaverandventilen lodrätt på cykelventilen
och pumpa.
3. Dra åt den räfflade muttern på cykelventilen igen
efter pumpning.
• Observera! Miniluftpumpslangen
får inte böjas!
• Pumpa med jämn takt och inte för snabbt.
När du inte använder produkten ska slangen förvaras inuti miniluftpumpen.
Stäng locken ordentligt och fäst alltid miniluftpumpen
på dess hållare med handtaget uppåt.
13SE
Page 14

Skötsel och förvaring
Doppa inte produkten i vatten. I detta fall kan den
skadas. Förvara artikeln rent och torrt i ett tempererat
utrymme.
Viktigt! Rengör endast med en fuktig rengöringsduk
och torka därefter av den.
Avfallshantering
Avfallshantera produkten och alla tillhörande komponenter genom att lämna in dem på din kommunala
återvinningsstation. Beakta gällande föreskrifter.
Kontakta din lokala återvinningsstation om du har
frågor.
3 års garanti
Produkten är producerad med stor noggrannhet
och under ständig kontroll. Du får tre års garanti på
produkten från och med köpdatumet.
Spara ditt kassakvitto. Garantin gäller endast för
material- och fabrikationsfel och upphör att gälla vid
felaktig eller icke ändamålsenlig användning.
Dina lagliga rättigheter, i synnerhet garantirätter,
begränsas ej av denna garantin. Vid eventuella reklamationer, vänd dig till nedanstående service-hotline eller maila oss.
Våra servicemedarbetare kommer att i samråd med
dig fastlägga den fortsatta handläggningen.
Du erhåller alltid en personlig konsultation.
Garantitiden förlängs ej på grund av reparationer
som utförts på grund av garanti, lagstadgad garanti
eller kulans. Detta gäller även för utbytta och reparerade delar. Reparationer som måste utföras efter
garantins utgång är kostnadspliktiga.
IAN: 94826
Service Sverige
Tel.: 0770 930739
E-Mail: deltasport@lidl.se
Service Suomi
Tel.: 010309 3582
E-Mail: deltasport@lidl.fi
Reservdelar till din produkt hittar du dessutom på:
www.delta-sport.com, Runder rubriken service -
Reservdelsservice Lidl
14
SE
Page 15

Tillykke!
Med dit køb har du valgt et kvalitetsprodukt.
Gør dig fortrolig med produktet inden den første
ibrugtagning. Læs i denne forbindelse opmærksom
den efterfølgende brugsvejledning.
Brug kun produktet som beskrevet og til de oplyste
formål. Gem denne vejledning godt. Hvis du giver
produktet videre til tredje, giv ligeledes alle bilag
med.
Leveringsomfang /
betegnelser på dele (afb. A)
1 x Mini luftpumpe (1)
1 x Afdækningskappe foroven (2)
1 x Gummiring (3)
1 x Cykelbeslag (4)
1 x Afdækningskappe forneden (5)
2 x Skruer (6)
1 x Slange (7)
1 x Schrader-ventil (8)
1 x Dunlop-ventil (9)
1 x Sclaverand-ventil (10)
1 x Brugsvejledning
Tekniske data
Mål: længde ca. 190 mm
Nominelt tryk: ca. 120 PSI/8,3 bar
Tilsigtet brug
Denne pumpe til privatbrug er designet til oppumpning af alle gængse cykeldæk, der har Schrader-,
Dunlop- eller Sclaverand-ventiler. Cykelbeslaget er
kun egnet til cykelstel, der er forsynet med huller til et
sådant beslag (afb. B).
Er ikke egnet til at pumpe bildæk op!
Sikkerhedsoplysninger
• På grund af den store kraft, der skal pumpes med,
og de dermed forbundne risici, er pumpen ikke
egnet til at blive brugt af børn og personer med
fysiske og/eller mentale begrænsninger.
• Fare for forbrænding! På grund af friktion fra
mini luftpumpens stempel og mini luftpumpens
cylinder kan begge dele blive varme, når der
har været pumpet i lang tid. Tag kun fat i pumpens
håndtag efter endt brug.
• Kontrollér pumpen før hver brug, specielt cykelbes laget, og om forbindelsen mellem ventil og
mini luftpumpe er i orden og fri for skader eller
slitage.
• Defekte pumper må ikke bruges mere og skal
kasseres, fordi en defekt pumpe ikke kan repa reres.
DK
15
Page 16

• Der må kun pumpes op til det maksimale tryk,
der er angivet af producenten. Ved cykeldæk
findes denne oplysning normalt på dæksiden.
• Ved overtryk er der risiko for eksplosion!
• Kontrollen af trykket skal ske med en kalibreret
måler.
Montering på cykelstellet
• Fjern de skruer fra stellet, der er beregnet til
montering af en flaskeholder (afb. B).
• Fastgør cykelbeslaget (4) med de medfølgende
skruer (6) eller skruerne til flaskeholderen på
stellet (afb. C).
• Få pumpen sikret ved at lægge gummiringen (3)
omkring pumpen (afb. D).
• Skulle de medfølgende skruer være for
store eller for små, så få fat på passende
skruer i et byggemarked. Sørg altid for
at beslaget sidder sikkert og fast! Selv på
ujævne veje skal cykelbeslaget sidde fast
og må ikke kunne rystes løs. Ellers er der
risiko for at cykelbeslaget og mini-luft pumpen falder af.
Brug
• Åbn afdækningskappen øverst (2) og tag slangen
ud (7).
• Åbn afdækningskappen (5) forneden.
Afhængigt af om du har en Schrader-ventil (8),
en Dunlop-ventil (9) eller en Sclaverand-ventil
(10), skrues den passende side af slangen på den
anden ende af mini luftpumpen (se afmærkningen
på slangen: Schrader/Dunlop, Sclaverand)
(afb. E).
• Tag dækventilens hætte af.
• Den passende ende på slangen skrues på den
ÅBNE ventil, og så pumpes der (afb. F).
Særlige træk ved oppumpning af cykeldæk med
Sclaverand-ventil (10):
1. Løsn fingermøtrikken (på cyklens ventilhus) på
cykelventilen.
2. Sæt Sclaverand-ventilen lodret på cykelventilen,
og så pumpes.
3. Efter at have pumpet dækket til det ønskede tryk,
skrues cykelventilens fingermøtrik fast igen.
• OBS! Slangen på mini luftpumpen må
ikke blive bøjet!
• Pump jævnt og ikke for hurtigt med mini-luftpum pen.
Når pumpen ikke er i brug, skal slangen altid opbevares inde i mini luftpumpen.
Luk afdækningskappen godt til og sæt altid mini
luftpumpen fast på pumpebeslaget med pumpens
håndtag opad.
16 DK
Page 17

Pleje og opbevaring
Kom ikke pumpen i vand. Den kan i givet fald tage
skade. Opbevar altid pumpen ren og tør i et tempereret rum.
Obs: Skal kun rengøres med en fugtig klud og tørres
af.
Oplysninger om bortskaffelse
Bortskaf pumpen og alle tilhørende komponenter hos
et godkendt affaldsfirma eller på den kommunale
genbrugsplads. Overhold aktuelt gældende regler.
I tvivlstilfælde kontaktes genbrugspladsen med
henblik på en miljøvenlig bortskaffelse.
3 års garanti
Produktet er fremstillet med største omhu og under
vedvarende kontrol. Der ydes en garanti på tre år fra
købsdatoen på dette produkt.
Opbevar venligst kvitteringen fra købet.
Garantien gælder kun for materiale- og fabrikationsfejl og bortfalder ved misbrug eller uhensigtsmæssig
anvendelse. Deres lovpligtige rettigheder, særligt
garantikrav, begrænses ikke af denne garanti.
Ved eventuelle klager bedes du henvende dig til
nedenstående service-hotline eller tage kontakt til os
via e-mail.
Medarbejderne i vores kundetjeneste vil så aftale
den videre fremgangsmåde med dig. Vi vil under
alle omstændigheder rådgive dig personlig.
Garantiperioden forlænges ikke ved eventuelle reparationer inden for garantien eller ved kulance.
Dette gælder også for udskiftede og reparerede
dele. Efter udløb af garantien er forefaldende reparationer forbundet med omkostninger.
IAN: 94826
Service Danmark
Tel.: 32 710005
E-Mail: deltasport@lidl.dk
Reservedele til deres produkt finder De også under:
www.delta-sport.com, rubrik service - reservedelservice Lidl
DK
17
Page 18

Félicitations !
Vous avez acquéri un produit de haute qualité.
Apprenez à connaître le produit avant sa première
utilisation. Lisez pour cela attentivement le notice
d’utilisation suivant. N’utilisez le produit que comme
décrit et pour les zones d’application indiquées.
Veuillez conserver ce mode d’emploi.
Transmettez tous les documents en cas de cessation
du produit à une tierce personne.
Contenu de la livraison /
Désignation des pièces (fig. A)
1 x Mini-pompe à air (1)
1 x Capuchon haut (2)
1 x Anneau en caoutchouc (3)
1 x Fixation pour vélo (4)
1 x Capuchon bas (5)
2 x Vis (6)
1 x Flexible (7)
1 x Valve Schrader (8)
1 x Valve Dunlop (9)
1 x Valve Sclaverand (10)
1 x Notice d‘utilisation
Données techniques
Dimensions : longueur : env. 190 mm
Pression nominale : env. 120 PSI/8,3 bars
Utilisation conforme
Cet article, destiné à usage privé, a été conçu pour
gonfler tous les pneus courants de vélo équipés de
valves Schrader, Dunlop ou Sclaverand. La fixation
pour vélo ne convient qu‘aux cadres de vélo qui
disposent de trous pour ce genre de fixation (fig. B).
Ne convient pas pour gonfler les pneus de voiture !
Consignes de sécurité
• En raison de la force exigée pour le gonflage et
des risques liés, cet article ne doit pas être utilisé
par des enfants et des personnes aux capacités
physiques et/ou intellectuelles restreintes.
• Risque de brûlure ! Le frottement des pistons
et des cylindres des mini-pompes peut causer
leur échauffement en cas de gonflage prolongé.
Après utilisation, toucher l‘article par la poignée
uniquement.
• Avant chaque utilisation, vérifier les dommages
ou les usures sur l‘article et en particulier la fixa tion pour vélo ainsi que la liaison correcte entre
valve et mini-pompe.
• Les articles défectueux ne doivent plus être utilisés
et doivent être éliminés, car un article défectueux
ne peut pas être réparé.
18 FR/BE
Page 19

• N‘effectuer le gonflage qu‘avec la pression
maximale indiquée par le fabricant. Pour les
pneus de vélo, cette pression est généralement
indiquée sur le flanc des pneus.
• En cas de surpression, il existe un risque
d‘explosion !
• Le contrôle de la pression doit être effectué à
l‘aide d‘un appareil de mesure calibré.
Montage sur le cadre du vélo
• Dévisser les vis du cadre conçues pour la fixation
du porte-bidon (fig. B).
• Visser alors la fixation pour vélo (4) sur le cadre
avec les vis fournies (6) ou avec les vis du
porte-bidon (fig. C).
• Fixer la pompe en plaçant l‘anneau en caout chouc (3) autour de la pompe (fig. D).
• Si les vis fournies sont trop grandes ou
trop petites, se procurer des vis adaptées
dans le commerce spécialisé.
Toujours veiller à un maintien sûr et
stable ! Même sur les terrains non gou dronnés, la fixation pour vélo ne doit pas
bouger et doit rester stable. Sinon, la
fixation et la mini-pompe risquent de se
perdre.
Utilisation
• Ouvrir le capuchon du haut (2) et enlever le
flexible (7).
• Ouvrir le capuchon du bas (5). Suivant le type de
valve, Schrader (8), Dunlop (9) ou Sclaverand
(10), visser le côté correspondant du flexible sur
l‘autre extrémité de la mini-pompe (voir marquage
sur le flexible : Schrader/Dunlop, Sclaverand)
(fig. E).
• Ouvrir le bouchon de la valve du pneu.
• Visser l‘extrémité correspondante du flexible sur la
valve OUVERTE, puis gonfler (fig. F).
Particularité de gonflage des pneus de vélo avec la
valve Sclaverand (10) :
1. Dévisser l‘écrou moleté (sur le logement de la
valve du vélo) de la valve du vélo.
2. Placer la valve Sclaverand verticalement sur la
valve du vélo, puis gonfler.
3. Une fois le gonflage terminé, revisser à fond
l‘écrou moleté de la valve du vélo.
• Attention ! Le flexible de la mini-pompe
ne doit pas être plié !
• Actionner la mini-pompe régulièrement et pas
trop vite.
En cas de non-utilisation de l‘article, toujours ranger
le flexible à l‘intérieur de la mini-pompe.
Bien refermer les capuchons et toujours fixer la
mini-pompe au porte-pompe avec la poignée de la
mini-pompe dirigée vers le haut.
19FR/BE
Page 20

Entretien et rangement
Ne pas plonger l‘article dans l‘eau : cela l‘endommagerait. Toujours ranger l‘article dans une pièce
tempérée lorsqu‘il est propre et sec.
Important ! Nettoyer uniquement avec un chiffon
humide et ensuite essuyer pour sécher.
Consignes de mise au rebut
Mettre au rebut l‘article et tous ses composants
dans un centre d‘élimination des déchets agréé
ou auprès du centre communal d‘élimination des
déchets compétent. Respecter les directives actuelles
en vigueur. En cas de doute, s‘informer auprès du
centre d‘élimination des déchets sur les procédures
d‘élimination respectueuses de l‘environnement.
3 ans de garantie
Le produit a été fabriqué avec le plus grand soin
et sous un contrôle permanent. Vous avez sur ce
produit une garantie de trois ans à partir de la date
d’achat. Conservez le ticket de caisse.
La garantie est uniquement valable pour les défauts
de matériaux et de fabrication, elle perd sa validité
en cas de maniement incorrect ou non conforme.
Vos droits légaux, tout particulièrement les droits
relatifs à la garantie, ne sont pas limitées par cette
garantie. En cas d‘éventuelles réclamations, veuillez
vous adresser à la hotline de garantie indiquée
ci-dessous ou nous contacter par e-mail.
Nos employés du service client vous indiqueront la
marche à suivre le plus rapidement possible.
Nous vous renseignerons personnellement dans tous
les cas.
La période de garantie n‘est pas prolongée par
d’éventuelles réparations sous la garantie, les garanties implicites ou le remboursement.
Ceci s‘applique également aux pièces remplacées et
réparées. Les réparations nécessaires sont à la charge de l’acheteur à la fin de la période de garantie.
IAN : 94826
Service Belgique
Tel. : 070 270 171
(0,15 EUR/Min.)
E-Mail : deltasport@lidl.be
Veuillez trouver les pièces de rechange pour votre produit sur :
www.delta-sport.com, rubrique Service - Service des pièces de
rechange Lidl
20
FR/BE
Page 21

Hartelijk gefeliciteerd!
Met de aankoop hebt u gekozen voor een hoogwaardig product. Maak u daarom voor de eerste
ingebruikname vertrouwd met het product.
Lees hiervoor deze gebruiksaanwijzing aandachtig
door. Gebruik het product alleen zoals beschreven
en uitsluitend voor de aangegeven doeleinden.
Bewaar de handleiding zorgvuldig. Als u het product
aan derden geeft, dient u ook deze documenten te
overhandigen.
In het leveringspakket
inbegrepen / benaming van
de onderdelen (afb. A)
1 x Mini luchtpomp (1)
1 x Afdekkapjes (2)
1 x Rubberring (3)
1 x Fietshouder (4)
1 x Afdekkap onderaan (5)
2 x Schroef (6)
1 x Slang (7)
1 x Schrader ventiel (8)
1 x Dunlop ventiel (9)
1 x Sclaverand ventiel (10)
1 x Gebruiksaanwijzing
Technische gegevens
Afmetingen: lengte ca. 190 mm
Nominale druk: ca. 120 PSI/8,3 bar
Voorgeschreven gebruik
Dit artikel werd ontwikkeld voor gebruik in de
privésfeer voor het oppompen van alle courante
fietsbanden met Schrader -, Dunlop - of Sclaverand
ventielen. De fietshouder is uitsluitend geschikt voor
fietsframes die gaten voor houders voorzien hebben
(afb. B).
Niet geschikt voor het oppompen van autobanden!
Veiligheidsinstructies
• Omwille van de hoge voor het oppompen beno digde krachten en de daarmee gepaard gaande
risico’s is het artikel niet geschikt om door kin deren en personen met lichamelijke en/of mentale
beperkingen gebruikt te worden.
• Gevaar voor brandwonden! Omwille van
wrijving van mini luchtpompzuiger en mini lucht pompcilinder kunnen deze opwarmen wanneer
de banden gedurende langere tijd opgepompt
worden. Grijp het artikel na gebruik alleen nog
aan het handvat vast.
• Controleer het artikel en in het bijzonder de
fietshouder en de correcte verbinding tussen
ventiel en mini luchtpomp telkens vóór gebruik op
beschadigingen of slijtage.
21NL/BE
Page 22

• Defecte artikelen mogen niet verder gebruikt en
moeten weggegooid worden omdat een defect
artikel niet gerepareerd kan worden.
• Pomp het artikel slechts tot de door de fabrikant
aangegeven maximumdruk op. Bij fietsbanden is
deze meestal aan de zijwand van de luchtband te
vinden.
• Bij overdruk bestaat het gevaar voor een explosie!
• De controle van de druk moet door middel van
een gekalibreerd meetinstrument plaatsvinden.
Montage aan het fietsframe
• Draai de schroeven los uit het frame die voor de
bevestiging van de drinkfleshouder voorzien zijn
(afb. B).
• Bevestig nu de fietshouder (4) met de bijgeleverde
schroeven (6) of de schroeven van de drinkfle shouder aan het frame (afb. C).
• Beveilig de pomp doordat u de rubberring (3)
rond de pomp legt (afb. D).
• Gelieve in de betreffende vakhandel
passende schroeven te kopen indien
de bijgeleverde schroeven te groot of te
klein zijn. Let altijd op een veilige en
vaste grip! Ook op een onverhard terrein
moet de fietshouder vastzitten en mag
hij niet wankel staan. In het andere
gevaar loopt u het risico, de fietshouder
met inbegrip van de mini luchtpomp te
verliezen.
Gebruik
• Open de afdekkapjes (2) en verwijder de slang
(7).
• Open de afdekkap onderaan (5). Al naargelang
u een Schrader ventiel (8), Dunlop ventiel (9) of
Sclaverand ventiel (10) hebt, schroeft u de betref fende zijde van de slang aan het andere uiteinde
van de mini luchtpomp (zie markering op de
slang: Schrader/Dunlop, Sclaverand) (afb. E).
• Open de afsluiting van het bandventiel.
• Het betreffende uiteinde van de slang op het
OPEN ventiel schroeven, dan pompen (afb. F).
Bijzonderheid bij het oppompen van fietsbanden
met Sclaverand ventiel (10):
1. Draai de gekartelde moer (op het fietsventielhuis)
van het fietsventiel los.
2. Plaats het Sclaverand ventiel op het fietsventiel,
dan pompen.
3. Draai na het pompen de gekartelde moer van het
fietsventiel weer vast.
• Let op! De mini luchtpompslang mag niet
gebogen worden!
• Bedien de mini luchtpomp gelijkmatig en niet te
snel.
22 NL/BE
Page 23

Wanneer u het artikel niet gebruikt, bewaart u
de slang altijd in het binnenste gedeelte van de
mini luchtpomp. Sluit de afdekkappen goed af en
bevestig de mini luchtpomp aan de mini luchtpomphouder steeds met het handvat van de mini
luchtpomp naar boven.
Onderhoud en opslag
Dompel het artikel niet in water, anders wordt het
beschadigd. Het artikel altijd droog en netjes in een
op temperatuur gebrachte kamer bewaren.
Belangrijk! Uitsluitend met een vochtig reinigingsdoekje reinigen en vervolgens droog vegen.
Aanwijzingen voor de
afvalverwijdering
Gooi het artikel en alle bijhorende componenten
via een geautoriseerd afvalverwerkend bedrijf of
via uw gemeente weg. Neem de actueel geldende voorschriften in acht. Informeer u in geval van
twijfel bij uw gemeente over een milieuvriendelijke
afvalverwijdering.
3 jaar garantie
Het product is geproduceerd met grote zorg en onder voortdurende controle. U ontvangt een garantie
van drie jaar op dit product, vanaf de datum van
aankoop. Bewaar alstublieft uw aankoopbewijs.
De garantie geldt alleen voor materiaal- en fabricagefouten en vervalt bij foutief of oneigenlijk gebruik.
Uw wettelijke rechten, met name het garantierecht,
worden niet beïnvloed door deze garantie.
In geval van reclamaties dient u zich aan de beneden genoemde service-hotline te wenden of zich per
e-mail met ons in verbinding te zetten. Onze servicemedewerkers zullen de verdere handelswijze zo snel
mogelijk met u afspreken. Wij zullen u in ieder geval
persoonlijk te woord staan.
De garantieperiode wordt na eventuele reparaties
en op basis van de garantie, wettelijke garantie of
coulance niet verlengd. Dit geldt ook voor vervangen en gerepareerde delen.
Na afloop van de garantieperiode dienen eventuele
reparaties te worden betaald.
IAN: 94826
Service België
Tel.: 070 270 171
(0,15 EUR/Min.)
E-Mail: deltasport@lidl.be
Reserve-onderdelen voor uw product vindt u ook via:
www.delta-sport.com, rubriek Service - reserve-onderdelen-service
Lidl
23NL/BE
Page 24

Herzlichen Glückwunsch!
Mit Ihrem Kauf haben Sie sich für ein hochwertiges
Produkt entschieden. Machen Sie sich vor der ersten
Verwendung mit dem Produkt vertraut.
Lesen Sie hierzu aufmerksam die nachfolgende
Gebrauchsanweisung. Benutzen Sie das Produkt nur
wie beschrieben und für die angegebenen Einsatzbereiche. Bewahren Sie diese Anleitung gut auf.
Händigen Sie alle Unterlagen bei Weitergabe des
Produkts an Dritte ebenfalls mit aus.
Lieferumfang /
Teilebezeichnung (Abb. A)
1 x Mini-Luftpumpe (1)
1 x Abdeckkappe oben (2)
1 x Gummiring (3)
1 x Fahrradhalterung (4)
1 x Abdeckkappe unten (5)
2 x Schraube (6)
1 x Schlauch (7)
1 x Schrader-Ventil (8)
1 x Dunlop-Ventil (9)
1 x Sclaverand-Ventil (10)
1 x Gebrauchsanweisung
Technische Daten
Maße: Länge ca. 190 mm
Nenndruck: ca. 120 PSI/8,3 bar
Bestimmungsgemäße
Verwendung
Dieser Artikel ist für den privaten Gebrauch zum Aufpumpen aller gängigen Fahrradreifen mit Schrader-,
Dunlop- oder Sclaverand-Ventilen entwickelt worden.
Die Fahrradhalterung ist nur für Fahrradrahmen
geeignet, die Löcher für Halterungen vorgesehen
haben (Abb. B).
Nicht geeignet für das Aufpumpen von Autoreifen!
Sicherheitshinweise
• Aufgrund der hohen Betätigungskräfte und der
damit verbundenen Risiken ist der Artikel
nicht geeignet, um von Kindern und Personen mit
körperlichen und/oder geistigen Einschränkungen
verwendet zu werden.
• Verbrennungsgefahr! Aufgrund der Reibung
von Mini-Luftpumpenkolben und Mini-Luftpumpen zylinder können sich diese bei längerem Pumpen
erwärmen. Fassen Sie den Artikel nach dem
Verwenden nur noch am Griff an.
• Prüfen Sie den Artikel und besonders die Fahrrad halterung und die korrekte Verbindung zwischen
Ventil und Mini-Luftpumpe vor jedem Gebrauch
auf Beschädigungen oder Abnutzungen.
24 DE/AT/CH
Page 25

• Defekte Artikel dürfen nicht weiter verwendet
werden und müssen entsorgt werden, da ein
defekter Artikel nicht repariert werden kann.
• Pumpen Sie den Artikel nur bis zum angegebenen
maximalen Druck des Herstellers auf.
Bei Fahrradreifen ist dieser meist auf der
Reifenflanke zu finden.
• Bei Überdruck besteht die Gefahr von Explosion!
• Die Kontrolle des Drucks muss über ein kalibriertes
Messgerät erfolgen.
Montage am Fahrradrahmen
• Lösen Sie die Schrauben aus dem Rahmen, die
zur Befestigung des Trinkflaschenhalters gedacht
sind (Abb. B).
• Befestigen Sie nun die Fahrradhalterung (4) mit
den mitgelieferten Schrauben (6) oder den
Schrauben des Trinkflschenhalters am Rahmen
(Abb. C).
• Sichern Sie die Pumpe, indem Sie den
Gummiring (3) um die Pumpe legen (Abb. D).
• Sollten die mitgelieferten Schrauben zu
groß oder zu klein sein, erwerben Sie
bitte im entsprechenden Fachhandel
passende Schrauben. Achten Sie immer
auf einen sichereren und festen Halt!
Auch auf unbefestigtem Gelände muss
die Fahrradhalterung fest sitzen und darf
nicht wackeln. Ansonsten laufen Sie Ge fahr, die Fahrradhalterung samt Mini Luftpumpe zu verlieren.
Verwendung
• Öffnen Sie die Abdeckkappe oben (2) und
entnehmen Sie den Schlauch (7).
• Öffnen Sie die Abdeckkappe unten (5).
Je nachdem, ob Sie ein Schrader-Ventil (8),
Dunlop-Ventil (9) oder Sclaverand-Ventil (10)
haben, schrauben Sie die entsprechende Seite
des Schlauches an das andere Ende der Mini-Luft pumpe, (siehe Kennzeichnung auf dem Schlauch:
Schrader/Dunlop, Sclaverand) (Abb. E).
• Öffnen Sie den Verschluss des Reifenventils.
• Das entsprechende Ende des Schlauches auf das
OFFENE Ventil schrauben, dann pumpen (Abb. F).
Besonderheit beim Aufpumpen von Fahrradreifen mit
Sclaverand-Ventil (10):
1. Lösen Sie die Rändelmutter (auf dem Fahrrad ventilgehäuse) des Fahrradventils.
2. Setzen Sie das Sclaverand-Ventil senkrecht auf
das Fahrradventil, dann pumpen.
3. Drehen Sie nach dem Pumpen die Rändelmutter
des Fahrradventils wieder fest.
25DE/AT/CH
Page 26

• Achtung! Der Mini-Luftpumpenschlauch
darf nicht geknickt werden!
• Betätigen Sie die Mini-Luftpumpe gleichmäßig und
nicht zu schnell.
Wenn Sie den Artikel nicht verwenden, lagern Sie
den Schlauch immer im Mini-Luftpumpeninneren.
Verschließen Sie die Abdeckkappen gut und befestigen Sie die Mini-Luftpumpe am Mini-Luftpumpenhalter stets mit dem Mini-Luftpumpengriff nach oben.
Pflege und Lagerung
Tauchen Sie den Artikel nicht in Wasser. Er wird
ansonsten beschädigt. Den Artikel immer trocken und
sauber in einem temperierten Raum lagern.
Wichtig! Nur mit einem feuchten Reinigungstuch
reinigen und anschließend trocken wischen.
Hinweise zur Entsorgung
Entsorgen Sie den Artikel und alle dazugehörigen
Komponenten über einen zugelassenen Entsorgungsbetrieb oder über Ihre kommunale Entsorgungseinrichtung. Beachten Sie die aktuell geltenden
Vorschriften. Erkundigen Sie sich im Zweifelsfall bei
Ihrer Entsorgungseinrichtung über eine umweltgerechte Entsorgung.
3 Jahre Garantie
Das Produkt wurde mit großer Sorgfalt und unter
ständiger Kontrolle produziert. Sie erhalten auf dieses Produkt drei Jahre Garantie ab Kaufdatum.
Bitte bewahren Sie den Kassenbon auf.
Die Garantie gilt nur für Material- und Fabrikationsfehler und entfällt bei missbräuchlicher oder unsachgemäßer Behandlung. Ihre gesetzlichen Rechte,
insbesondere die Gewährleistungsrechte, werden
durch diese Garantie nicht eingeschränkt.
Bei etwaigen Beanstandungen wenden Sie sich bitte
an die unten stehende Service-Hotline oder setzen
Sie sich per E-Mail mit uns in Verbindung.
Unsere Servicemitarbeiter werden das weitere Vorgehen schnellstmöglich mit Ihnen abstimmen.
Wir werden Sie in jedem Fall persönlich beraten.
Die Garantiezeit wird durch etwaige Reparaturen
aufgrund der Garantie, gesetzlicher Gewährleistung
oder Kulanz nicht verlängert. Dies gilt auch für
ersetzte und reparierte Teile.
Nach Ablauf der Garantie anfallende Reparaturen
sind kostenpflichtig.
26
DE/AT/CH
Page 27

IAN: 94826
Service Deutschland
Tel.: 0800-5435111
E-Mail: deltasport@lidl.de
Service Österreich
Tel.: 0820 201 222
(0,15 EUR/Min.)
E-Mail: deltasport@lidl.at
Service Schweiz
Tel.: 0842 665566
(0,08 CHF/Min.,
Mobilfunk max. 0,40 CHF/Min.)
E-Mail: deltasport@lidl.ch
Ersatzteile zu Ihrem Produkt finden Sie auch unter:
www.delta-sport.com, Rubrik Service - Ersatzteilservice Lidl
DE/AT/CH
27
Page 28

DELTA-SPORT HANDELSKONTOR GMBH
Wragekamp 6 • D-22397 Hamburg
Version: 02/2014
Delta-Sport-Nr.: MP-1781
IAN 94826
 Loading...