


580.761800
Table of contents
 Loading...
Owner’s Manual
CRAFTSMAN
4.5 HORSEPOWER
1800 PSi 2GPM
HIGH PRESSURE WASHER
Model No.
580.761800
CAUTION: Before using this
product, read this manual and
follow all Safety Rules and
Operating Instructions.
HOURS: Mon. - Fri. 8 a.tn. to 5 p.m. (CST)
SEARS, ROEBUCK and CO., Hoffman Estates, IL 60179 U.S.A.
Part No. B1818 Draft 0 (11/I2/97)

TABLE OF CONTENTS
SAFETY RULES
ASSEMBLY.................................................................... 4-5
OPERATION
MAINTENANCE
................................................................
..................................................................
.........................................................
6-9
10-13
3
STORAGE
TROUBLESHOOTING
REPLACEMENT PARTS
HOW TO ORDER PARTS
......................................................................
......................................................
.............................................
................................
LIMITED ONE YEAR WARRANTY ON CRAFTSMAN HIGH PRESSURE WASHER
For one year from the date of purchase, when this Craftsman High Pressure Washer is maintained and operat
ed according to the instructions in the owner's manual, Sears will repair, free of charge, any defect in material
and workmanship.
If this high pressure washer is used for commercial purposes, this warranty applies for only 90 days from the
date of purchase. If this high pressure washer is used for rental purposes, this warranty applies for only 30
days after date of purchase.
This warranty does not cover:
• Expendable items such as spark plugs and air filters, which become worn during normal use.
• Repairs necessary because of operator abuse or negligence, including damage resulting from no water being
supplied to pump or failure to maintain the equipment according to the instructions contained in the owner’s
manual.
WARRANTY SERVICE IS AVAILABLE BY RETURNING THE HIGH PRESSURE WASHER TO THE
NEAREST SEARS SERVICE CENTER OR DEALER IN THE UNITED STATES.
This warranty gives you specific legal rights and you may also have other rights, which vary from state to
state.
14
15
16-27
BACK PAGE
SEARS, ROEBUCK AND CO., D/817 WA, Hoffman Estates, IL 60179

SAFETY RULES
CAUTION; ALWAYS DISCONNECT SPARK PLUG WIRE AND PLACE WIRE WHERE IT CAN
NOT CONTACT SPARK PLUG, TO PREVENT ACCIDENTAL STARTING WHEN SETTING UP,
TRANSPORTING, ADJUSTING OR MAKING REPAIRS TO YOUR HIGH PRESSURE WASHER.
CAUTION: Before using this product,
read this manual and follow all Safety
Rules and Operating Instructions.
WARNING:
The engine exhaust from this product
contains chemicals known to the State
of Cal'ifomia to cause cancer, birth
defects, or other reproductive harm.
Engine exhaust gases contain DEADLY carbon monoxide
gas. This dangerous gas, if breathed in sufficient concen
trations, can cause unconsciousness or even death.
Operate this equipment only in the open air where ade
quate ventilation is availabie.
Gasoline is highly FLAMMABLE and its vapors are
EXPLOSIVE. Do not permit smoking, open flames, sparks
or heat in the vicinity while handling gasoline. Avoid
spiiiing gasoline on a hot engine. Ailow unit to cooi for 2
minutes before refueiing. Comply with all laws regulating
storage and handling of gasoline.
Locate this pressure washer in areas away from com
bustible materials, combustible fumes or dust.
The high pressure equipment is designed to be used with
Sears authorized parts only. If you use this equipment with
parts that do not comply with minimum specifications, the
user assumes all risks and liabilities.
Some chemicals or detergents may be harmful if inhaled
or ingested, causing severe nausea, fainting or poisoning.
The harmful elements may cause property damage or
severe injury.
Do not allow CHILDREN to operate the Pressure Washer
at any time.
Operate engine only at governed speed. Running the
engine at excessive speeds increases the hazard of per
sonal injury. Do not tamper with parts which may increase
or decrease the governed speed.
Do not wear loose clothing, jewelry or anything that may
be caught in the starter or other rotating parts.
Before starting the Pressure Washer in cold weather,
check all parts of the equipment and be sure ice has not
formed there.
Units with broken or missing parts, or without protective
housing or covers should NEVER be operated.
The muffler and air cleaner must be installed and in good
condition before operating the Pressure Washer. These
components act as spark arrestors if the engine backfires.
Check the fuel system for leaks or signs of deterioration
such as chafed or spongy hose, loose or missing clamps
or damaged tank or cap. Correct all defects before operat
ing the Pressure Washer.
Do not spray flammable liquids.
• Never allow any part of the txxiy to come in contact with
the fluid stream. DO NOT come in contact with a fluid
stream created by a leak in the high pressure hose.
High pressure streams of fluid this equipment produces
can pierce skin and its underlying tissues, leading to seri
ous injury and possible amputation.
Never aim the gun at people, animals or plants.
High pressure spray can cause paint chips or other parti
cles to become airborne and fly at high speeds.
Always wear eye protection when you use this equipment or
when you are in the vicinity where the equipment is in use.
Operate the pressure at no more than the PSI fluid pres
sure rated for your pressure washer.
Never move the machine by pulling on the high pressure
hose. Use the hancfle provided on the top of the unit.
Always be certain the spray gun, nozzles and accessories
are correctly attached.
Never use a spray gun which does not have a trigger lock
or trigger guard in place and in working order.
Use a respirator or mask whenever there is a chance that
vapors may be inhaled. Read all instructions with the mask
so you are certain the mask will provide the necessary
protection against inhaling harmful vapors.
High pressure spray may damage fragile items including
glass. Do not point spray gun at glass when in the jet
spray mode.
Keep the hose connected to machine or the spray gun
while the system is pressurized. Disconnecting the hose
while the unit is pressurized is dangerous.
Hold the spray gun firmly in your hand before you start the
unit. Failure to do so could result in an injury from a whip
ping spray gun. Do not leave the spray gun unattended
while the machine is running.
The cleaning area should have adequate slopes and
drainage to reduce the possibility of a fall due to slippery
surfaces.
Keep water spray away from electric wiring or fatal electric
shock may result.
Do not adjust unloader valve to a pressure in excess of
machine rating.
Do not secure trigger gun in the pull-back (open) position.
Do not by-pass any safety device on this machine.
The muffler and engine heat up during operation and
remain hot immediately after shutting it down. Avoid con
tact with a hot muffler or engine or you could be severely
burned.
MAINTENANCE AND STORAGE:
• Operate and store this unit on a stable surface.
• High pressure hose can develop leaks from wear, kinking,
abuse, etc. Water spraying from a leak is capable of inject
ing material into skin. Inspect hose each time before using
it. Check all hoses for cuts, leaks, abrasions or bulging of
cover, or damage or movement of couplings. If any of
these conditions exist, replace hose immediately. Never
repair high pressure hose. Replace it with another hose
that meets minimum pressure rating of your pressure
washer.
LOOK FOR THIS SYMBOL TO POINT OUT IMPORTANT SAFETY PRECAUTIONS.
IT MEANS “ATTENTION!!! BECOME ALERT!!! YOUR SAFETY IS INVOLVED.”
ASSEMBLY
CARTON CONTENTS
The following parts are shipped loose with your pressure
washer
• Main Unit — pressure washer with wheels,
guide handle.
• High Pressure Hose
• Manual Bag (which includes the items listed below)
• Ofliper’s Manual
• Nozzle Cleaner Kit
• Parts Box (which includes items listed below)
• Spray Gun
• Wand Extension with Hi/Lo Adjustable Nozzle.
• Wire Form
• Motor Oil
• “0"-RingKit
Become familiar with each piece before assembling the
pressure washer. Check all contents against the illustra
tion on Page 6. If any parts are missing or damaged, call
the Pressure Washer Helpline at 1-800-222-3136.
TO REMOVE PRESSURE WASHER FROM CARTON
• Remove loose parts and parts box included with pres
sure washer. The high pressure hose is packed in the
bottom of the carton on the guide handle end.
Remove the hose.
• Slice two comers at guide handle end of carton from
top to bottom so the panel can be folded down flat,
then remove all packing material.
• Raise guide handle, secure in place and roll the pres
sure washer out the open end of the carton.
Loosen knobs
to leise handle
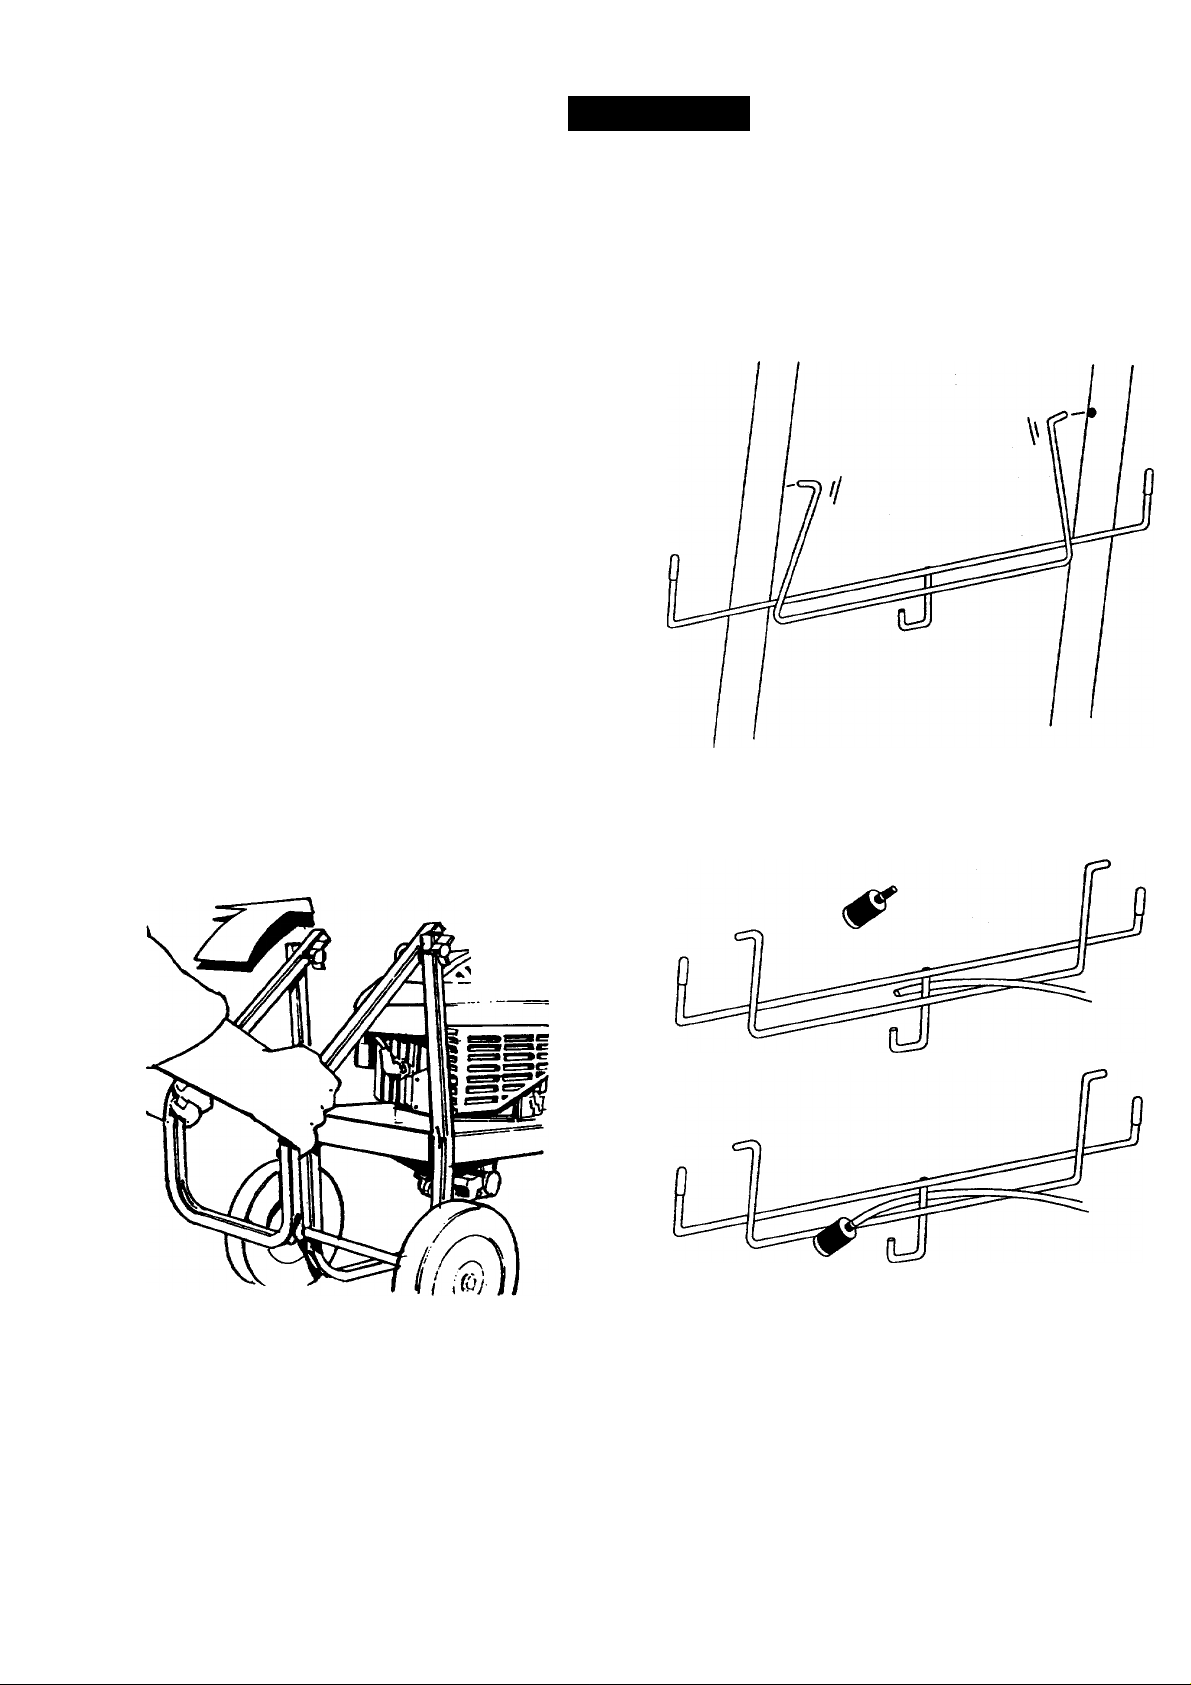
HOW TO SET UP YOUR PRESSURE WASHER
For the most part, your Craftsman High Pressure Washer
has been assembled at the factory. You must, however,
attach the wire form, assemble the spray gun, and attach
the high pressure hose to the pump and spray gua
• While facing the rear of the Pressure Washer, insert
the wire sup^rt with the longer arm positioned on the
left. From this view the hook should resemble a “J".
Cut tie wrap on chemical Ejection tube. Rernove chemi
cal irqectkxi filter, thread chemical rr^ecfion titoe through
the wire form and reinsert fitter mto tube.
Tighten knobs
when handle is
straight.
Check carton for additional loose parts.
\\\^

• Cut the tie wraps on the high pressure hose and
connect high pressure hose to gun. Tighten by
hand.
Remove plastic cap and connect high pressure
hose to pump. Tighten by hand.
Attach nozzle extension to spray gun.
Place assembled spray gun on holder.
CHECKLIST
Before you operate your new high pressure washer
please review the following checklist:
• All assembly instructions have been completed.
• The high pressure hose connections to the spray
gun and to the pump are tight and secure.
While learning how to use your high pressure
washer, pay extra attention to the following important
items:
• Engine oil is at proper level
Important: Any attempt to crank or start the engine
before it has been properly serviced with the recom
mended oil may result in an engine failure. See Page
8 for instructions on adding oil and proper oil specifi
cations.
Important: The water supply to your pressure wash
er must be connected and turned on prior to starting
your engine.
• Be sure gas tank is filled properly with clean,
fresh, unleaded gasoline.
• Become familiar with all controls - their location
and function. Operate those controls before start
ing the engine.
OPERATION
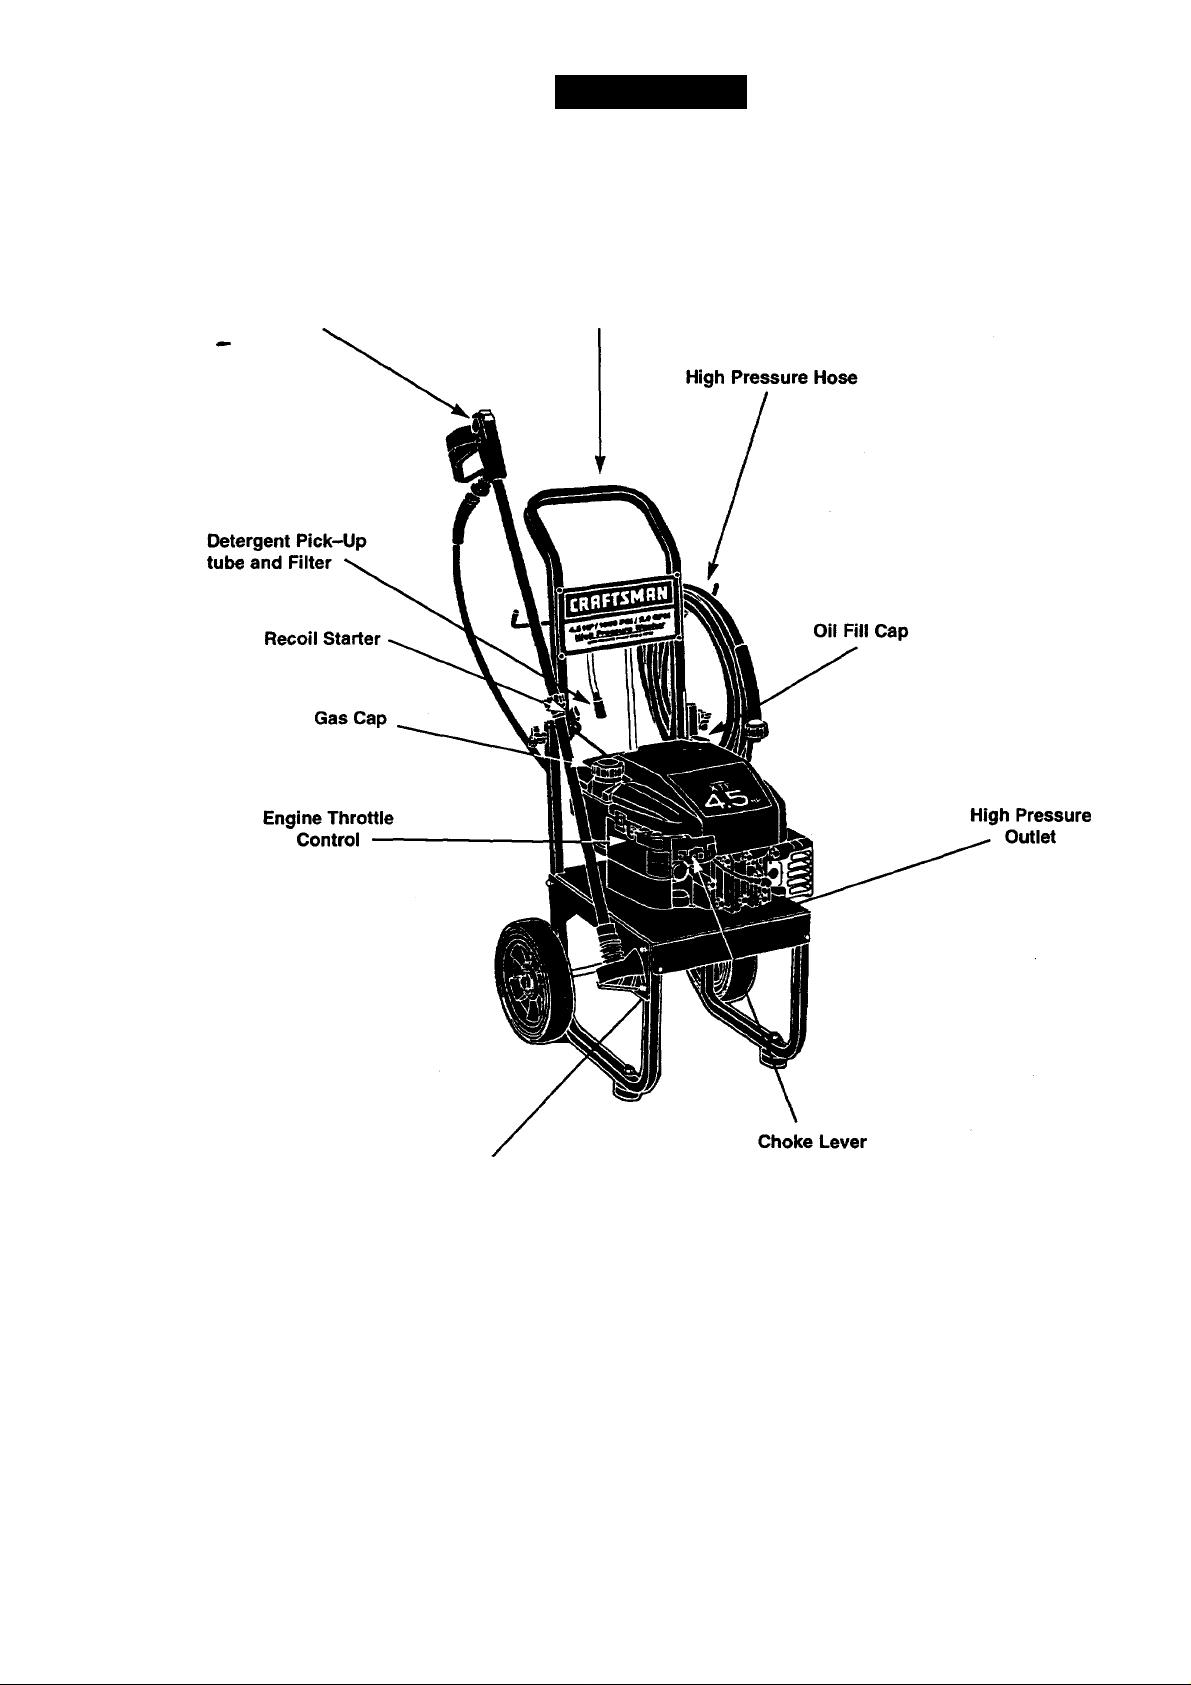
KNOW YOUR HIGH PRESSURE WASHER
Read this owner’s manual and safety rules before operating your high pressure washer. Compare the illustra
tions with your high pressure washer to familiarize yourself with the locations of various controls and adjustments.
Save this manual for future reference.
Spray Gun Assembly
Guide Handle
Water Inlet
Pump - Develops high water pressure.
Engine Throttle Control Lever - Sets engine in starting
mode for recoil starter; STOPS running engine.
Recoil Starter - Used for starting the engine manually.
Choke Lever — Puts a cold engine in starting mode.
Air Cleaner - Dry type filter element limits the amount of
dirt and dust that gets in the engine.
Spray Gun Assernbly - Controls the application of water
onto cleaning surface with trigger device. Includes safety
latch.
Detergent Pick-up Tube and Filter - Mixes water and
detergent in outlet water flow.
High Pressure Outlet - Connection for high pressure
hose.
Water Inlet - Connection for garden hose.
HOW TO USE YOUR PRESSURE WASHER
IF YOU HAVE ANY PROBLEMS operating your pres
sure washer, please call the pressure washer helpline
at 1-800-222-3136.
WARNING NEVER adjust ^ray iMttem
when spraying. NEVER put hands in front
of spray nozzle to ac^ust spray pattern.
You could be injured.
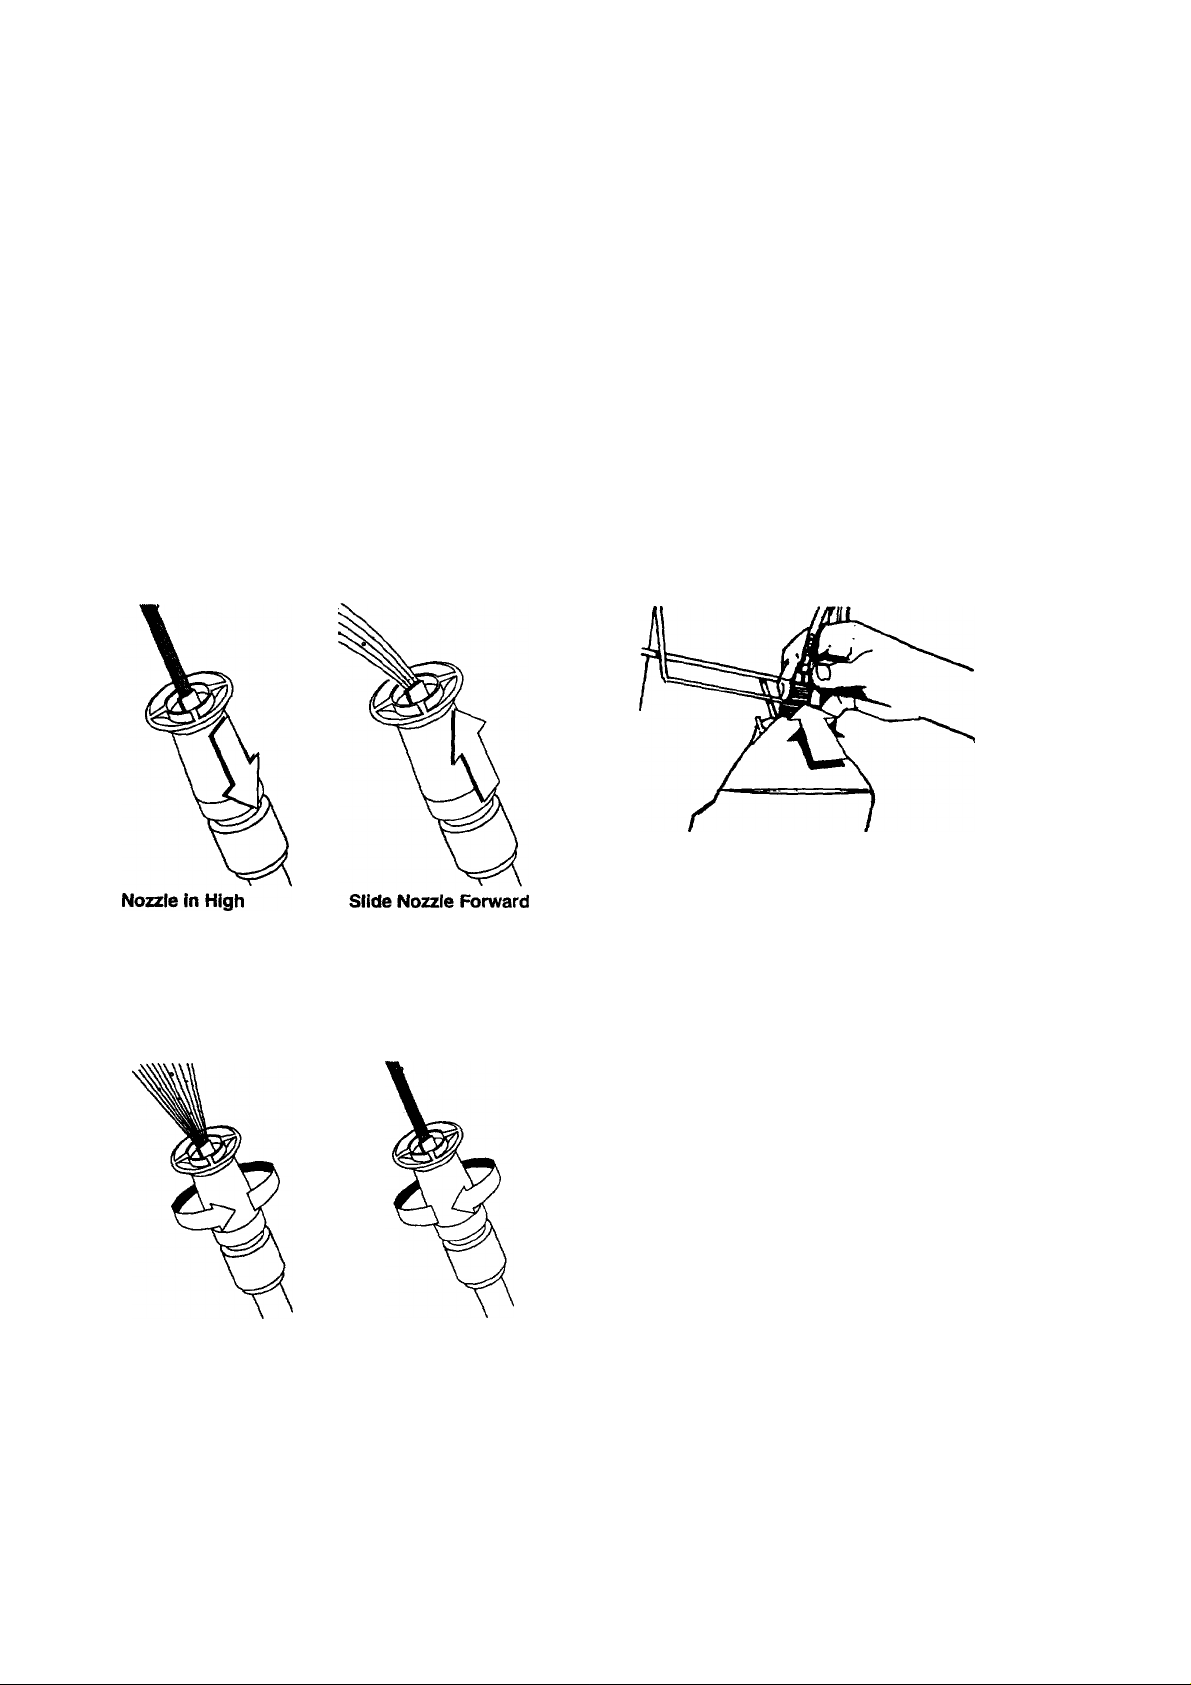
HOW TO USE THB-ADJUSTABLE NOZZLE
On the end of your spray gun is a nozzle that you
can slide forward and backward and that you can
also twist from side to side. With the adjustable noz
zle you can adjust the spray pattern to be either high
pressure or low pressure. You can also adjust the
spray so it is concentrated in a stream pattern or
expanded into a fan pattern.
• Slide the nozzle forward when you wish to adjust
the spray to low pressure mode. Slide the nozzle
backward to achieve high pressure.
• If you get spray nozzle too dose, especially using
high pressure mode, you may damage the clean
ing surface.
APPLYING DETERGENT AND CLEANING WITH
ADJUSTABLE NOZZLE
IMPORTANT: Use soaps designed specifically for
pressure washers. Household detergents could dam
age the pump.
IMPORTANT: You must attach all hoses before you
start the engine. Starting the engine without all the
hoses connected and without the water turned ON
will damage the pump.
To apply detergent follow these steps;
• Prepare the detergent solution as required by the
job.
• Hang the detergent solution on the "J” hook on
the wire forni on the guide handle.
• Place small filter on the clear, chemical injection
tube into the detergent container.
Pressure Mode
Twisting the nozzle adjusts the spray pattern from
a narrow pattern to a fan pattern.
Twist nozzle counter
clockwise for fan
spray pattern
For most effective cleaning, keep spray nozzle
between 8 to 24 inches away from cleaning sur
face.
for low pressure
mode and detergent
application
Twist nozzle clock
wise for narrow
spray pattern
• Slide the adjustable nozzle forward to low pres
sure mode. Detergent cannot be applied with
nozzie in high pressure position.
Note: The first step involves applying an appropriate
detergent/solvent solution to penetrate and loosen
grime. The detergent is applied at low pressure to
avoid splashing, overspraying and waste. Leave the
solution on surface for 3 to 5 minutes to allow solu
tion to work.
Note: The second step involves cleaning the surface
you have prepared with the pressure washer and
then rinsing it clean.
• Review the use of the adjustable nozzle.
• Connect garden hose to water inlet (see “TO
START PRESSURE WASHER”), check that high
pressure hose is connected to spray gun and
pump (see ASSEMBLY), and start engine.
• For cleaning, start at lower portion of area to be
washed and work upward, using long, even over
lapping strokes.
• Allow the detergent to soak in between 3-5 min
utes before washing and rinsing.
RINSING WITH THE PRESSURE WASHER
WARNING Be extremely careful if you must
use the pressure washer from ladder, scaf
folding or any other relatively unstable loca
tion. Pressure in a running washer builds in
the wand as you climb. When you press the
trigger, the recoil from the initial spray could
force you to fall, or if you are too close to the
cleaning surface, high pressure could force
you off a climbing apparatus.
Note: When adding oil to the engine crankcase in the
future, use only high quality detergent oil rated with API
service classification SF or SG rated SAE 30 weight. Use
no special additives.
Select the oil’s viscosity grade according to your expect
ed operating temperature.
colder
5W30
— 32°F -
■
------1--------
—► warmer
SAE 30
• Hook up the water supply and start your pressure
washer (see TO START THE PRESSURE WASHER).
• Slide adjustable nozzle back to high pressure position
and wait for detergent to clear. Detergent will not flow
when in the high pressure mode.
• When detergent has cleared you may want to expand
the spray pattern for a more gentle rinsing action.
Start at top of area to be rinsed, working down with
same action as for cleaning.
You can also stop detergent from flowing by simply
removing siphon from bottle.
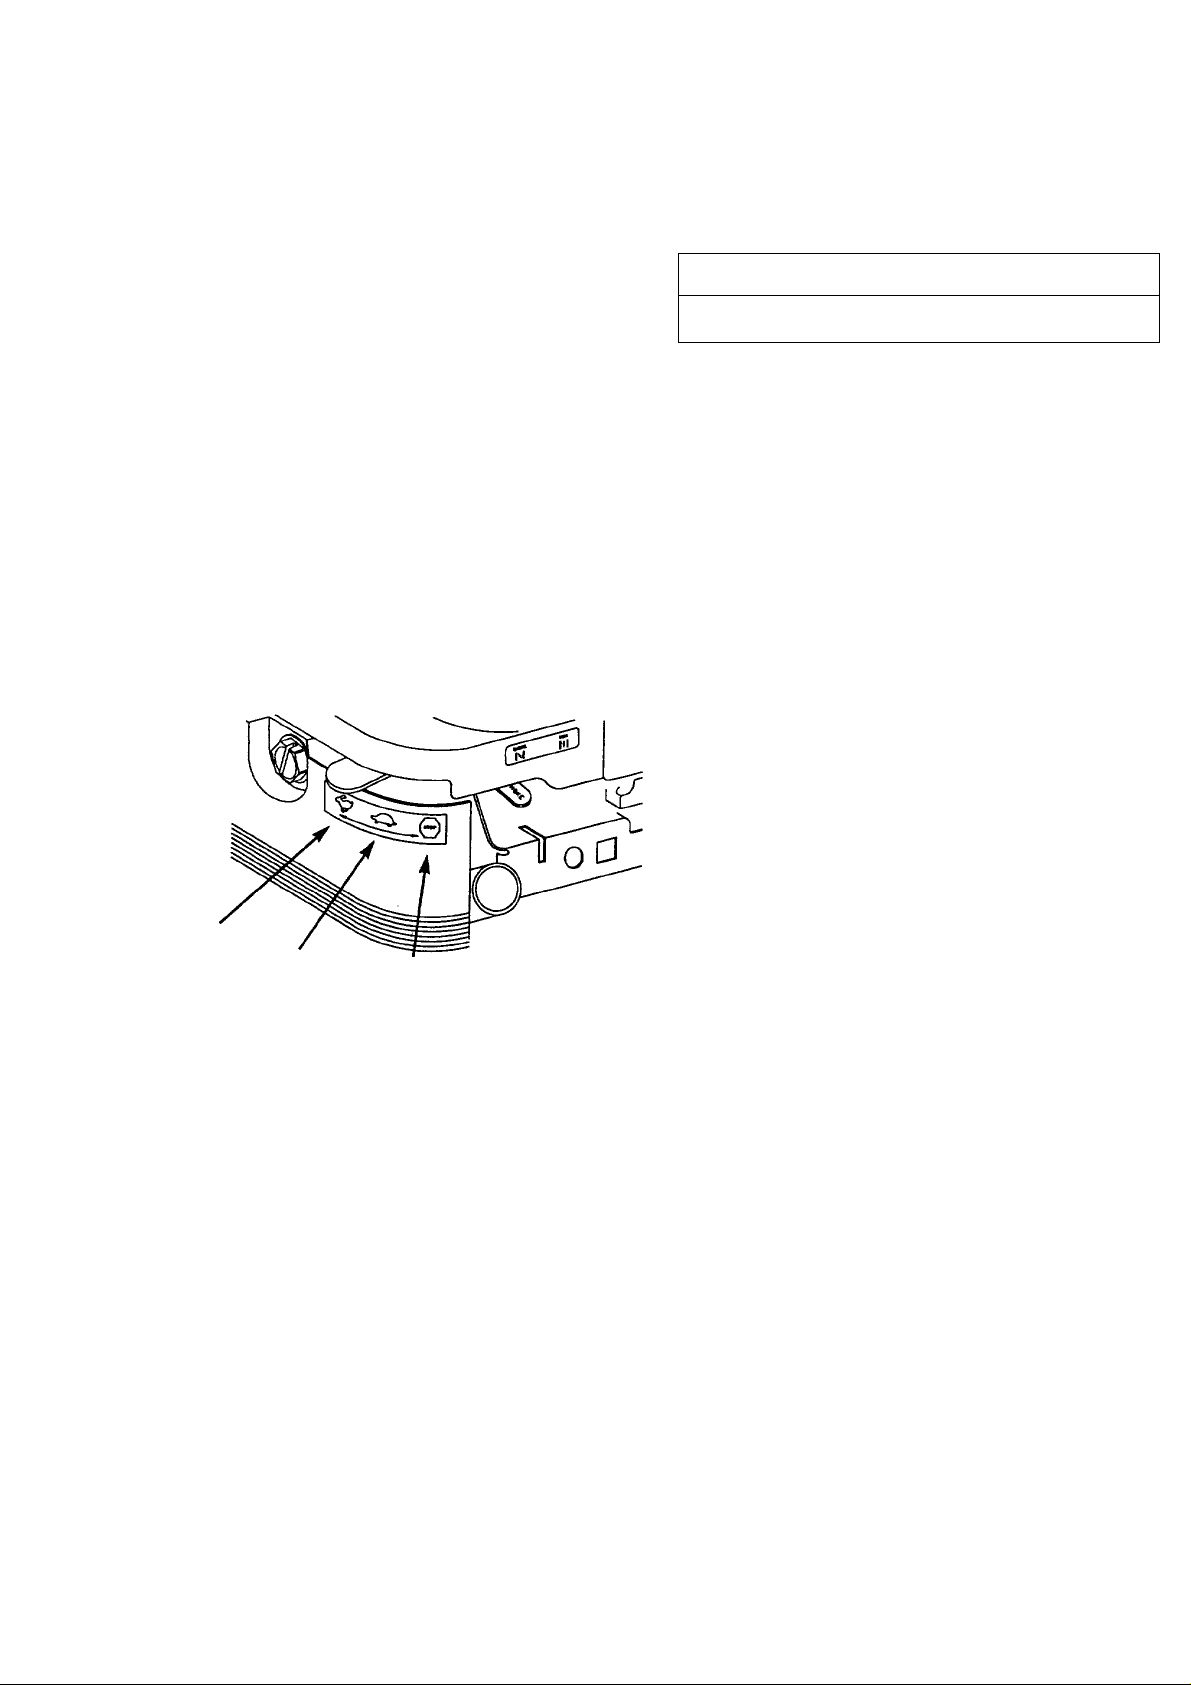
HOW TO STOP YOUR PRESSURE WASHER
• Move the Throttle Control Lever to the ‘Slow’ position
Fast
Slow
• Wait for the engine to idle down.
• Move the Throttle Control Lever to the ‘Stop’ position.
• Simply shutting off the engine wiil not release
pressure In the system. Squeeze trigger on the
spray gun to relieve pressure in the hose.
Note: A small amount of water will squirt out when
you release the pressure.
Stop
BEFORE STARTING THE PRESSURE WASHER
To operate the engine you will need to do the following:
ENGINE OIL
• A 20 oz. bottle of SAE 30 weight oil is included in the
parts carton. Fill engine crankcase with recommended
oil until oil level is at FULL point on dipstick. Do not
overfill above that mark. POUR SLOWLY.
Although multi-viscosity oils (5W30, 10W30, etc.) improve
starting in cold weather, these multi-viscosity oils will
result in increased oil consumption when used above
32°F. Check your engine oil level more frequently to
avoid possible damage from running low on oil.
• Place pressure washer on a level surface
• Clean area around oil fill and remove oil dipstick.
• Wipe dipstick clean.
• Pour oil from enclosed bottle into the oil fill opening
until oil reaches FULL mark on the dipstick. Stop and
check the oil level periodically. DO NOT OVERFILL.
• Install oil dipstick, hand tighten securely.
ADD GASOLINE
WARNING NEVER fill fuel tank indoors.
NEVER fill fuel tank when engine is running
or hot. DO NOT light a cigarette or smoke
when filling the fuel tank.
CAUTION: Do not overfill the fuel tank.
Always leave room for expansion.
• Use regular UNLEADED gasoline with the pressure
washer engine. Regular leaded gasoline may also be
used if UNLEADED is not available. Fuel tank capaci
ty is 1.6 U.S. quart.
IMPORTANT: It is important to prevent gum deposits
from forming in essential fuel system parts such as the
carburetor, fuel filter, fuel hose or tank during storage.
Also, experience indicates that alcohol-blended fuels
(called gasohol, ethanol or methanol) can attract moisture
which leads to separation and formation of acids during
storage. Acidic gas can damage the fuel system of an
engine while in storage. To avoid engine problems, the
fuel system should be emptied before storage of 30 days
or longer. See “Storage" on page 13. Never use engine
or carburetor cleaner products in the fuel tank or perma
nent damage may occur.
• Clean area around fuel fill cap, remove cap.
• Add “UNLEADED” regular gasoline, slowly, to fuel
tank.
• Install fuel cap and wipe up any spilled gasoline.

TO START YOUR PRESSURE WASHER
You have assembled your high pressure washer and
have prepared the engine for starting. You are now ready
to clean your car, boat or whatever you plan to clean.
• Place the pressure washer in an area close enough to
an outside water source that can flow at a rate of at
least 2 gallons per minute. Connect a garden hose to
the water spout.
• Check that thejiigh pressure hose is tightly connected
to the spray gun and to the pump. See ASSEMBLY
section for illustrations.
• Pull back on the locking collar to remove the female
quick-connect from pump.
Assembled
Quick-Connect
Note: You will also need to pull back on the locking collar
to attach the female quick-connect.
• Check inlet screen. If the screen is dirty, clean
before attaching to garden hose. If the screen is
damaged, Do not connect to the garden hose. Call
the pressure washer customer helpline to order a
replacement.
• Attach the female quick-connect to garden hose and
then attach the garden hose to the water inlet. Make
sure the quick-connect is locked together.
Pull back on locking
collar to separate
Disassembled
male end
Disassembled
female end
/
Set Choke Lever to “Choke” position. Note: This is a
multi-position choke.
Note: For a warm engine, be sure the Throttle Control
Lever is in the ‘Fast’ position and the Choke Lever is in
the “Run” position.
• Position the nozzle in the low pressure mode (nozzle
slid forward) and squeeze the trigger on the spray gun
to relieve the air pressure caused by turning ON the
water. Water will spew out the gun in a thin stream.
Continue to hold trigger until you have a steady
stream of water and no air remains in the system. This
will make it easier to pull start the engine. Release the
trigger.
• Engage the safety latch on the gun.
• Grasp rope handle and pull slowly until you feel some
resistance. Then pull cord rapidly to overcome com
pression, prevent kickback and start the engine. Let
rope return to starter
Note: Always keep the Throttle Control Lever in the ‘Fast’
position when operating the pressure washer.
• When the engine starts, gradually move the Choke
Lever from one position to the next until it is in the
“Run” position.
Note: If after 3 pulls the engine fails to start, move the
Choke Lever to the ‘Run’ position and pull the recoil
starter handle rapidly (Max. 3 pulls).
slowly.
SIPHONING
We recommend that you DO NOT siphon standing water
for your water supply. Contaminated, brackish or dirty
water can damage the pump. Connect only to household
water supply.
IMPORTANT: Do not run pump without the water supply
connected and turned on. You must follow this caution or
the pump will be damaged.
• Move the Throttle Control Lever to the ‘Fast’
position
TIPS
• Never use the garden hose inlet to siphon detergent or
wax.
• If you have the spray nozzle too far away, the cleaning
will not be as effective.
Loading...