

Page 1

Page 2

Page 3

Contents
Welcome to Corel PaintShop Pro X4 . . . . . . . . . . . . . . . . 1
What’s in this user guide? . . . . . . . . . . . . . . . . . . . . . . . . . . . . . 1
What’s new in Corel PaintShop Pro X4 . . . . . . . . . . . . . . . . . . . 2
Installing and uninstalling Corel programs . . . . . . . . . . . . . . . . . 5
Starting and exiting the program. . . . . . . . . . . . . . . . . . . . . . . . 6
Registering Corel products. . . . . . . . . . . . . . . . . . . . . . . . . . . . . 6
Updating the program . . . . . . . . . . . . . . . . . . . . . . . . . . . . . . . 7
Corel Support Services. . . . . . . . . . . . . . . . . . . . . . . . . . . . . . . . 7
About Corel . . . . . . . . . . . . . . . . . . . . . . . . . . . . . . . . . . . . . . . 7
The digital workflow . . . . . . . . . . . . . . . . . . . . . . . . . . . . 9
Learning how to use Corel PaintShop Pro . . . . . . . . . . . 15
Documentation conventions . . . . . . . . . . . . . . . . . . . . . . . . . . 15
Using the Help system. . . . . . . . . . . . . . . . . . . . . . . . . . . . . . . 17
Using the Learning Center palette . . . . . . . . . . . . . . . . . . . . . . 18
Using the Corel Guide . . . . . . . . . . . . . . . . . . . . . . . . . . . . . . . 19
Using Web-based resources. . . . . . . . . . . . . . . . . . . . . . . . . . . 20
Workspace tour. . . . . . . . . . . . . . . . . . . . . . . . . . . . . . . 21
Exploring the workspaces . . . . . . . . . . . . . . . . . . . . . . . . . . . . 21
Switching between workspaces . . . . . . . . . . . . . . . . . . . . . . . . 26
Using palettes . . . . . . . . . . . . . . . . . . . . . . . . . . . . . . . . . . . . . 26
Using toolbars. . . . . . . . . . . . . . . . . . . . . . . . . . . . . . . . . . . . . 29
Using tools . . . . . . . . . . . . . . . . . . . . . . . . . . . . . . . . . . . . . . . 30
Getting started . . . . . . . . . . . . . . . . . . . . . . . . . . . . . . . 35
Getting photos into Corel PaintShop Pro . . . . . . . . . . . . . . . . . 35
Contents i
Page 4

Opening and closing images . . . . . . . . . . . . . . . . . . . . . . . . . . 36
Saving images. . . . . . . . . . . . . . . . . . . . . . . . . . . . . . . . . . . . . 38
Deleting images . . . . . . . . . . . . . . . . . . . . . . . . . . . . . . . . . . . 40
Reviewing, organizing, and finding photos . . . . . . . . . . 41
Setting up the Manage workspace . . . . . . . . . . . . . . . . . . . . . 41
Browsing folders for photos . . . . . . . . . . . . . . . . . . . . . . . . . . 44
Finding images on your computer . . . . . . . . . . . . . . . . . . . . . . 45
Working with saved searches. . . . . . . . . . . . . . . . . . . . . . . . . . 47
Adding keyword tags to images . . . . . . . . . . . . . . . . . . . . . . . 47
Viewing photos by tags. . . . . . . . . . . . . . . . . . . . . . . . . . . . . . 49
Using the calendar to find images . . . . . . . . . . . . . . . . . . . . . . 50
Working with thumbnails in the Manage workspace . . . . . . . . 51
Capturing and applying edits to multiple photos . . . . . . . . . . . 54
Displaying and editing photo information . . . . . . . . . . . . . . . . 56
E-mailing and sharing photos from the Manage workspace. . . 58
Using Quick Review to review photos . . . . . . . . . . . . . . . . . . . 59
Working with trays . . . . . . . . . . . . . . . . . . . . . . . . . . . . . . . . . 60
Working with camera RAW photos. . . . . . . . . . . . . . . . . 61
Supported RAW file formats . . . . . . . . . . . . . . . . . . . . . . . . . . 61
Using the Camera RAW Lab . . . . . . . . . . . . . . . . . . . . . . . . . . 62
Applying edits to multiple RAW photos . . . . . . . . . . . . . . . . . . 64
Converting RAW photos to another file format . . . . . . . . . . . . 64
Adjusting images . . . . . . . . . . . . . . . . . . . . . . . . . . . . . . 65
Rotating images . . . . . . . . . . . . . . . . . . . . . . . . . . . . . . . . . . . 66
Cropping images. . . . . . . . . . . . . . . . . . . . . . . . . . . . . . . . . . . 67
Straightening images . . . . . . . . . . . . . . . . . . . . . . . . . . . . . . . 70
Correcting photographic perspective . . . . . . . . . . . . . . . . . . . . 71
Making basic photo corrections automatically . . . . . . . . . . . . . 73
Removing digital noise . . . . . . . . . . . . . . . . . . . . . . . . . . . . . . 76
ii Corel PaintShop Pro X4 User Guide
Page 5

Adjusting color balance. . . . . . . . . . . . . . . . . . . . . . . . . . . . . . 77
Adjusting brightness, contrast, and clarity . . . . . . . . . . . . . . . . 79
Controlling depth of field . . . . . . . . . . . . . . . . . . . . . . . . . . . . 81
Retouching and restoring images . . . . . . . . . . . . . . . . . 83
Removing red-eye . . . . . . . . . . . . . . . . . . . . . . . . . . . . . . . . . . 84
Applying cosmetic changes . . . . . . . . . . . . . . . . . . . . . . . . . . . 85
Removing scratches. . . . . . . . . . . . . . . . . . . . . . . . . . . . . . . . . 89
Removing flaws and objects . . . . . . . . . . . . . . . . . . . . . . . . . . 91
Erasing image areas . . . . . . . . . . . . . . . . . . . . . . . . . . . . . . . . 94
Cutting out image areas . . . . . . . . . . . . . . . . . . . . . . . . . . . . . 96
Recoloring image areas for a realistic effect . . . . . . . . . . . . . . . 99
Adding borders . . . . . . . . . . . . . . . . . . . . . . . . . . . . . . . . . . . 102
Scaling photos by using Smart Carver . . . . . . . . . . . . . . . . . . 103
Merging exposures and content . . . . . . . . . . . . . . . . . 107
Understanding HDR . . . . . . . . . . . . . . . . . . . . . . . . . . . . . . . 107
Taking photos for HDR processing. . . . . . . . . . . . . . . . . . . . . 108
Combining photos by using HDR Exposure Merge . . . . . . . . . 109
Merging batches of photos into HDR images. . . . . . . . . . . . . 116
Combining photos with Photo Blend . . . . . . . . . . . . . . . . . . . 118
Working with colors and materials . . . . . . . . . . . . . . . 121
Using the Materials palette . . . . . . . . . . . . . . . . . . . . . . . . . . 121
Choosing colors by using the Color Picker . . . . . . . . . . . . . . . 124
Choosing colors from an image or the desktop . . . . . . . . . . . 127
Applying effects . . . . . . . . . . . . . . . . . . . . . . . . . . . . . 129
Choosing effects . . . . . . . . . . . . . . . . . . . . . . . . . . . . . . . . . . 129
Applying Photo Effects . . . . . . . . . . . . . . . . . . . . . . . . . . . . . 133
Creating vintage-style photos with the Time Machine . . . . . . 139
Applying film and filter effects to photos. . . . . . . . . . . . . . . . 139
Contents iii
Page 6

Adding picture frames to images. . . . . . . . . . . . . . . . . . . . . . 141
Using the Picture Tube tool . . . . . . . . . . . . . . . . . . . . . . . . . . 143
Warping images . . . . . . . . . . . . . . . . . . . . . . . . . . . . . . . . . . 144
Working with layers . . . . . . . . . . . . . . . . . . . . . . . . . . . 147
Understanding layers. . . . . . . . . . . . . . . . . . . . . . . . . . . . . . . 147
Using the Layers palette . . . . . . . . . . . . . . . . . . . . . . . . . . . . 150
Creating layers . . . . . . . . . . . . . . . . . . . . . . . . . . . . . . . . . . . 152
Renaming layers . . . . . . . . . . . . . . . . . . . . . . . . . . . . . . . . . . 153
Viewing layers. . . . . . . . . . . . . . . . . . . . . . . . . . . . . . . . . . . . 154
Changing the order of layers in an image . . . . . . . . . . . . . . . 155
Setting layer opacity . . . . . . . . . . . . . . . . . . . . . . . . . . . . . . . 155
Working with selections . . . . . . . . . . . . . . . . . . . . . . . . 157
Creating selections . . . . . . . . . . . . . . . . . . . . . . . . . . . . . . . . 157
Modifying selections . . . . . . . . . . . . . . . . . . . . . . . . . . . . . . . 162
Inverting and clearing selections . . . . . . . . . . . . . . . . . . . . . . 163
Working with text. . . . . . . . . . . . . . . . . . . . . . . . . . . . . 165
Applying text . . . . . . . . . . . . . . . . . . . . . . . . . . . . . . . . . . . . 165
Formatting text . . . . . . . . . . . . . . . . . . . . . . . . . . . . . . . . . . . 167
E-mailing and sharing photos. . . . . . . . . . . . . . . . . . . . 169
E-mailing photos. . . . . . . . . . . . . . . . . . . . . . . . . . . . . . . . . . 169
Uploading photos to a sharing site . . . . . . . . . . . . . . . . . . . . 170
Printing. . . . . . . . . . . . . . . . . . . . . . . . . . . . . . . . . . . . . 171
Printing images . . . . . . . . . . . . . . . . . . . . . . . . . . . . . . . . . . . 171
Index. . . . . . . . . . . . . . . . . . . . . . . . . . . . . . . . . . . . . . . 175
iv Corel PaintShop Pro X4 User Guide
Page 7

Welcome to Corel PaintShop Pro X4
Corel® PaintShop™ Pro sets the standard for affordable, professional
image editing. You can manage, adjust, and edit photos, work with
RAW image files, apply effects, and more — all with a set of easy-touse workspaces.
This section presents the following topics:
• What’s in this user guide?
• What’s new in Corel PaintShop Pro X4
• Installing and uninstalling Corel programs
• Starting and exiting the program
• Registering Corel products
• Updating the program
• Corel Support Services
•About Corel
What’s in this user guide?
This user guide contains the information that you need to become
familiar with the Corel PaintShop Pro workspaces and to get started
with basic tasks and creative possibilities. It is designed to accompany
the more comprehensive Help, which is available from within the
program, as well as other learning resources. For more information
about additional learning resources, see “Learning how to use
Corel PaintShop Pro” on page 15.
Welcome to Corel PaintShop Pro X4 1
Page 8

What’s new in Corel PaintShop Pro X4
Corel PaintShop Pro X4 combines speed and performance
improvements with a range of new pro-level tools and features that let
you explore your passion for photography. We’ve been listening to
your suggestions and following the latest photography trends so we
can bring you an application that does what you want, and helps you
discover something new. There is something for everyone — whether
you’re pushing the creative boundaries with your DSLR camera or
quickly fixing and sharing images from your mobile phone or pocket
camera.
New! HDR tools
The HDR (high dynamic range) tools have been completely redesigned
to give you more control over your results and help you take full
advantage of photos taken with auto-bracketing features on DSLRs.
• Exposure Merge lets you combine photos taken with different
exposure settings to create stunning, perfectly exposed images.
For high-contrast backlit scenes, such as sunsets and interior
window shots, you can bring out color and detail in the
foreground, midground, and background areas. For more
information, see “Combining photos by using HDR Exposure
Merge” on page 109.
• Batch Merge lets you merge multiple bracketed sets of photos. If
you use an auto-bracketing feature often, you’ll find this to be an
invaluable tool for processing HDR sets quickly. For more
information, see “Merging batches of photos into HDR images”
on page 116.
New! Photo Blend
Combine photos of the same scene to remove, swap, or add details in
the final image. For example, remove cars and people from a street
2 Corel PaintShop Pro X4 User Guide
Page 9

scene, swap in the best smiles from a series of group photos, or include
multiple poses of the same person in one image. For more information,
see “Combining photos with Photo Blend” on page 118.
New! Selective Focus effect
Selective Focus lets you create a miniature effect (also called a tilt-shift
effect), transforming a real scene into a toy-like miniature model. You
can also use Selective Focus to bring attention to important parts of
your images — it's perfect for blurring out busy details around your
subjects. For more information, see “To apply a miniature effect by
using Selective Focus” on page 136.
New! Vignette effect
Vignette is a classic effect that lets you bring attention to the most
important part of your photo by applying a soft outer border that fades
to white or black. For more information, see “To apply a Vignette
effect” on page 138.
New! Fill Light/Clarity filter
Fill Light brightens shadow areas of photos without affecting other
areas of the photo. Clarity enhances subtle yet important details. For
more information, see “To brighten dark areas and adjust clarity” on
page 80.
New & Enhanced! Built-in sharing to Facebook® and Flickr®
Share to Facebook® or Flickr® with the click of a button. For more
information, see “Uploading photos to a sharing site” on page 170.
Enhanced! Camera RAW Lab
The Camera RAW Lab now has a larger preview area and an improved
histogram that makes it easier to assess your adjustments. New
highlight recovery options can help reconstruct detail in overexposed
Welcome to Corel PaintShop Pro X4 3
Page 10

areas. For more information, see “Working with camera RAW photos”
on page 61.
Enhanced! Tabbed workspaces
The application has been redesigned so you can move easily between
photo workflows. Click the tabs at the top of the Corel PaintShop Pro
window to switch workspaces. The Manage workspace gives you all
the power to review and organize your photos. It also lets you access
multi-photo processing options. The Adjust workspace puts
commonly-used editing tools at your fingertips. Finally, the Edit
workspace provides you with a full range of professional-level editing
tools. No matter which workspace you’re in, the Organizer palette is
always there — no need to go to a separate workspace or application
to find more photos. For more information, see “Workspace tour” on
page 21.
Enhanced! Performance
With new performance updates, including GPU optimizations,
Corel PaintShop Pro is even faster than previous versions. Effects, such
as Noise Reduction, Vibrancy and Tone Mapping, can now be applied
and adjusted in real time.
Enhanced! Full-screen review
Quick Review lets you review your photos in a full-screen window. The
feature now focuses on speed and simplicity. You can quickly view,
delete, rotate, and rate your photos. For more information, see “Using
Quick Review to review photos” on page 59.
4 Corel PaintShop Pro X4 User Guide
Page 11

Installing and uninstalling Corel programs
The Installer makes it easy to install Corel® programs and components.
Before installing
• Close all open programs. Note that antivirus software and firewall
applications may affect installation.
• Ensure that you are logged in to your computer as Administrator
or as a user with local administrative rights.
To install Corel PaintShop Pro
1 Close any open applications.
2 Insert the DVD in the DVD drive.
If the setup does not start automatically, navigate to the DVD drive
on your computer, and double-click Setup.exe.
3 Follow the instructions on your screen.
To uninstall Corel PaintShop Pro
1 On the Windows® taskbar, click Start Control Panel.
2 Click one of the following:
• (Windows Vista® or Windows® 7) In the Programs category,
click the Uninstall a program link.
• (Windows® XP) Click the Add or Remove Programs icon.
3 From the list of applications, choose Corel PaintShop Pro X4, and
click Uninstall/Change or Remove.
4 From the Programs list, choose Corel PaintShop Pro X4, and click
Change/Remove.
5 Follow the instructions on your screen.
Welcome to Corel PaintShop Pro X4 5
Page 12

Starting and exiting the program
You can start Corel PaintShop Pro from the Windows taskbar or your
desktop icon, and exit the program from the File menu.
To start Corel PaintShop Pro
• On the Windows taskbar, click Start All Programs
Corel PaintShop Pro X4 Corel PaintShop Pro X4.
If you associate specific f ile f orm ats, such as J PEG a nd T IFF, with
Corel PaintShop Pro, you can double-click the associated file to
start the program. For information about setting file format
associations, see “Setting file format associations” in the Help.
To exit Corel PaintShop Pro
• Choose File Exit.
Registering Corel products
Registering Corel products is important to ensure that you receive
timely access to the latest product updates, as well as valuable
information about product releases. Registration also gives you access
to free downloads, articles, tips and tricks, and special offers.
You can register the program immediately after you install it, or you
can register at a later date.
You can register the program in one of the following ways:
• online — If you are connected to the Internet when you are
prompted to register, you can launch the online registration. If no
Internet connection is detected, you are presented with a list of
options.
6 Corel PaintShop Pro X4 User Guide
Page 13

• by phone — You can call the Corel Customer Service Center
nearest you.
For more information about registering a Corel product, visit
www.corel.com/support/register.
Updating the program
You can check for product updates. Updates notify you of important
new information about your program.
To update your program
• Choose Help Check for Updates.
You can turn automatic program updates on or off by clicking
Help Corel Guide. In the Corel Guide, click the Product
information and preferences
preferences. Mark the options that you want.
button , and choose Message
Corel Support Services
Corel® Support Services™ can provide you with prompt and accurate
information about product features, specifications, pricing, availability,
services, and technical support. For the most current information on
available support and professional services for your Corel product,
please visit www.corel.com/support.
About Corel
Corel is one of the world's top software companies with more than 100
million active users in over 75 countries. We develop software that
helps people express their ideas and share their stories in more exciting,
creative and persuasive ways. Through the years, we've built a
Welcome to Corel PaintShop Pro X4 7
Page 14

reputation for delivering innovative, trusted products that are easy to
learn and use, helping people achieve new levels of productivity. The
industry has responded with hundreds of awards for software
innovation, design and value.
Our award-winning product portfolio includes some of the world's
most widely recognized and popular software brands, including
CorelDRAW® Graphics Suite, Corel® Painter™, Corel DESIGNER®
Technical Suite, Corel® PaintShop™ Pro, Corel® VideoStudio®,
Corel® WinDVD®, Corel® WordPerfect® Office, WinZip® and Corel®
Digital Studio™.
8 Corel PaintShop Pro X4 User Guide
Page 15

The digital workflow
The digital workflow outlined below can help you understand how to
best use Corel PaintShop Pro. It suggests a sequence for working with
your digital images. Whether you want to organize, retouch, print or
share, you can use the workflow described below as a guide.
Bring photos into Corel PaintShop Pro
Bringing photos into Corel PaintShop Pro is as simple as opening the
application in the Manage workspace and navigating to your favorite
photo folders on your computer. The application automatically
catalogs the folders that you navigate to, essentially “importing” them
into the application, without duplicating any files.
The digital workflow 9
Page 16

For more information, see “Getting photos into Corel PaintShop Pro”
on page 35.
Manage your photos
Digital photography gives you the freedom to experiment. The result is
a large number of digital files, so photographers understand the need
to manage those files by reviewing, culling, and identifying photos as
early in the process as possible.
The Manage workspace lets you access all the tools you need to cull,
rate, tag, and prepare photos for editing or sharing. Double-clicking a
thumbnail opens a full-screen review mode called Quick Review. Search
options and collections make it easy to find and work with the photos
that you currently store on your computer.
Quick Review is a full-screen review mode that opens when
you double-click a thumbnail in the Manage workspace. You
can use arrow keys to zoom and navigate.
10 Corel PaintShop Pro X4 User Guide
Page 17

For more information, see “Reviewing, organizing, and finding
The Adjust pane in the Adjust
workspace gives you quick access to
commonly-used editing options.
photos” on page 41.
Adjust photos quickly
The challenge for many
photographers is finding the time
to edit photos, so the Adjust
workspace lets you move from
photo to photo quickly and puts
commonly-used editing tools at
your finger tips. In some cases, this
will be all the editing your photos
will need.
After you edit photos, you can
return to the Manage workspace to
take advantage of multi-photo
editing features such as Capture
editing and Apply editing. Capture
and Apply editing lets you copy
edits made to a single photo and
apply the edits to multiple photos.
Images photographed under
similar conditions can be fixed with
amazing speed — no scripting
required.
For more information, see the
following topics:
• “The Adjust workspace” on page 23
• “Capturing and applying edits to multiple photos” on page 54
The digital workflow 11
Page 18

Advanced editing and RAW files
Professional-level tools and features are available in the Edit
workspace. For example, you can apply effects, add text, and use
custom painting tools. You can also use layers to create highly editable
composite images, isolate image areas with selections and masks, and
access tone curves, histograms, and other advanced adjustment tools.
If you like the full control of working with RAW files, you can use the
Camera RAW Lab to process your photos.
For more information, explore the following topics:
• “Adjusting images” on page 65
• “Retouching and restoring images” on page 83
• “Working with selections” on page 157
• “Working with layers” on page 147
• “Applying effects” on page 129
12 Corel PaintShop Pro X4 User Guide
Page 19

• “Working with text” on page 165
• “Working with camera RAW photos” on page 61
Share photos
After you adjust and enhance your photos, you’ll want to share them.
Along with printing, layout, and e-mailing options, there are sharing
options that let you post to Facebook and Flickr directly from the
application.
For more information, see the following topics:
• “Printing” on page 171
• “E-mailing and sharing photos” on page 169
Expanded creative options for DSLR photography
Many DSLR (digital single-lens reflex) camera owners are expanding
their knowledge and looking for creative options. HDR (high dynamic
range) features in Corel PaintShop Pro help you take advantage of
bracketing features on your camera. You can also combine multiple
photos with Photo Blend.
The digital workflow 13
Page 20

For more information, see the following topics:
• “Taking photos for HDR processing” on page 108
• “Combining photos by using HDR Exposure Merge” on page 109
• “Merging batches of photos into HDR images” on page 116
• “Combining photos with Photo Blend” on page 118
14 Corel PaintShop Pro X4 User Guide
Page 21

Learning how to use Corel PaintShop Pro
You can learn how to use Corel PaintShop Pro in various ways: by
accessing the Help and videos, by using the Learning Center palette,
or by exploring the Corel Guide and by visiting the Corel website
(www.corel.com), where you can access tips, tutorials, and
information about training.
This section presents the following topics:
• Documentation conventions
• Using the Help system
• Using the Learning Center palette
• Using the Corel Guide
• Using Web-based resources
Documentation conventions
The following table describes important conventions used in the Help.
Convention Description Example
Menu
Menu
command
drop-list A list of options that drops
Learning how to use Corel PaintShop Pro 15
A menu item followed by a
menu command
down when a user clicks a
down arrow button
Choose File
Choose an option from
the Selection Type droplist on the Tool Options
palette.
Open.
Page 22

Convention Description Example
palette A window containing
available commands and
settings relevant to a
specific tool or task
mark and
unmark
Enter The Enter key on your
Terms that refer to enabling
or disabling check boxes by
clicking them
keyboard
A tip related to
photography
A video is available Watch a video: Smart
A note containing
information that is
important to the preceding
steps. It may describe
conditions under which the
procedure can be
performed.
A tip containing
suggestions for performing
the preceding steps. It may
present alternatives to the
steps, or other benefits and
uses of the procedure.
Double-click the name of
the group on the Layers
palette.
To preserve the current
print size, mark the
Maintain original print
size check box.
To save this gradient as a
swatch that you can
access later, click the Add
to swatches button, type
a name, and press Enter.
For best results, use a
tripod when taking
photos for HDR
processing.
Carver™.
Although you can apply
the Texture Preserving
Smooth command to the
entire image, the
command works best
when you select the
problem area.
You can also right-click in
the image to set the
source point for the Clone
tool.
16 Corel PaintShop Pro X4 User Guide
Page 23

Using the Help system
The Help that is available from within the program is the most
comprehensive source of information for Corel PaintShop Pro. The
Help system provides two ways to find information. You can choose a
topic from the Contents page, or use the Search page to search for
specific words and phrases. You can also print topics from the Help.
If you are connected to the Internet, the application displays the Webbased Help. If no Internet connection is available, the application
searches the local Help system.
To use the Help system
1 Do one of the following:
• Click Help
2 In the Help window, click one of the following tabs:
• Contents — lets you browse through topics in the Help
• Search — lets you search the full text of the Help for a particular
word or phrase (no quotation marks required). For example, if
you are looking for information about a specific tool or
command, you can type the name of the tool or command,
such as Backlighting, to display a list of relevant topics.
You can also
Help topics.
Print a specific Help topic Open a Help topic, and from the
Internet Explorer® menu, choose
Print.
File
View Help for a dialog box Click Help at the bottom of the
dialog box.
Learning how to use Corel PaintShop Pro 17
Page 24

Using the Learning Center palette
Home buttonBack button
The Learning Center palette contains helpful information about
Corel PaintShop Pro tasks, commands, and tools to help first-time
users as well as experienced users get their work done faster. The Home
page of the Learning Center palette provides a task-based workflow,
which begins with getting your photos into the program. From there,
the workflow takes you through tasks such as organizing your photos,
adjusting and retouching photos, using layers and selections, adding
text, graphics, and effects, and printing and sharing your creations.
From the Learning Center Home page, click a
task, and then click a topic.
18 Corel PaintShop Pro X4 User Guide
Page 25

To display or hide the Learning Center palette
Edit workspace
• Choose View Palettes Learning Center.
The Learning Center palette is displayed by default. It appears
along the right side of the Edit workspace.
To use the Learning Center palette
Edit workspace
1 From the Home page, click a task.
The topics related to the task appear.
2 Click a topic.
The procedure related to the topic appears.
• For topics describing a tool, the tool becomes active. The Tool
Options palette and any other relevant palettes appear.
• For topics describing a command associated with a dialog box,
the dialog box appears.
3 Read the procedure for using the tool or command.
Some tasks and commands are not available unless an image is
open.
Using the Corel Guide
The Corel Guide provides the most up-to-date information and content
for your program. You can find tips and tricks, download new content
for your projects, explore new ways to share your photos, and access
the latest updates for your program.
To access the Corel Guide
• Choose Help Corel Guide.
Learning how to use Corel PaintShop Pro 19
Page 26

Using Web-based resources
From the Corel PaintShop Pro Help menu and the Corel website, you
can access a number of Web pages dedicated to customer support and
communities. You can find resources such as downloads, tutorials,
tips, newsletters, newsgroups, and other online resources
To access Web-based resources
•From the Help menu, select one of the following website links:
• Contact Information — this link takes you to a Customer
Support page listing customer service and technical support
contact information
• Online Support and Resources — lets you access the Corel
Support Services page to search for answers in the Corel
Knowledgebase and newsgroups, submit questions to Technical
Support, provide feedback, or look for software updates
• Check for Updates — checks the Corel Update Service to see if
there are updates to your copy of Corel PaintShop Pro
You can also visit www.corel.com, and click the Support link to
access the Support page.
To access Corel community sites
• Use your Internet browser to go to www.corel.com, click the
Resources link, and click Community Sites.
20 Corel PaintShop Pro X4 User Guide
Page 27

Workspace tour
Corel PaintShop Pro includes three main workspaces that let you
organize and edit your images: Manage, Adjust, and Edit.
This section presents the following topics:
• Exploring the workspaces
• Switching between workspaces
•Using palettes
•Using toolbars
•Using tools
Exploring the workspaces
Corel PaintShop Pro consists of three workspaces:
• Manage
• Adjust
• Edit
Each workspace contains specific tools and controls to help you
accomplish the task at hand quickly and efficiently.
You can save the workspaces, including all open images and their
magnifications and screen positions, as well as positions and
preferences of palettes, toolbars, dialog boxes, and windows. For
information about using custom workspaces, see “Using custom
workspaces” in the Help.
Workspace tour 21
Page 28

The Manage workspace
Info paletteNavigation palette
Organizer palette
Preview area
Organizer toolbar
Thumbnails
When you open Corel PaintShop Pro, the Manage workspace appears
as your default workspace.
The Manage workspace in Preview mode
The Manage workspace consists of the following components:
• Navigation palette — helps you find and organize photos. You can
use the Search box or click the Collection tab or Computer tab to
display the folders on your computer or you can sort photos by
collection, tags, or ratings.
• Preview area — lets you choose between two views — a large
single-image view or a multi-thumbnail view (expanded Organizer
palette)
22 Corel PaintShop Pro X4 User Guide
Page 29

• Info palette — displays information about the selected image. It
ToolbarAdjust palette
Organizer palette Thumbnails
Set ratingStatus bar
Preview area
consists of a camera-style display of the settings used to take the
photo and a tabbed area that lets you add information, such as
tags and ratings, and access a full list of EXIF or IPTC data.
• Organizer palette — Available in all three workspaces, this palette
lets you select photos (as thumbnails) and includes a toolbar with
a range of commands and options for managing photos.
For more information about the Manage workspace, see “Reviewing,
organizing, and finding photos” on page 41.
The Adjust workspace
Adjust is your workspace for quick edits. It lets you fix and enhance
your photos by offering a set of the most commonly-used tools.
A photo displayed in the Adjust workspace
Workspace tour 23
Page 30

The Adjust workspace includes the following components:
• Preview area — displays the photo selected in the Organizer
palette
• Organizer palette — lets you select photos. It includes a toolbar
with a range of commands and options for managing photos.
• Set Rating control — lets you assign ratings to each photo, so that
you can quickly find your favorites
• Toolbar — displays buttons for accessing common saving and
viewing commands
• Adjust palette — displays tools and controls for adjusting photos
• Status bar — displays information about the selected tool
For more information about the Adjust workspace, see “Using the
Adjust workspace” in the Help.
The Edit workspace
The Edit workspace lets you access in-depth editing features. It
includes menus, tools, and palettes that you can use to create and edit
images. In addition to photo editing, it lets you perform painting and
drawing tasks.
24 Corel PaintShop Pro X4 User Guide
Page 31
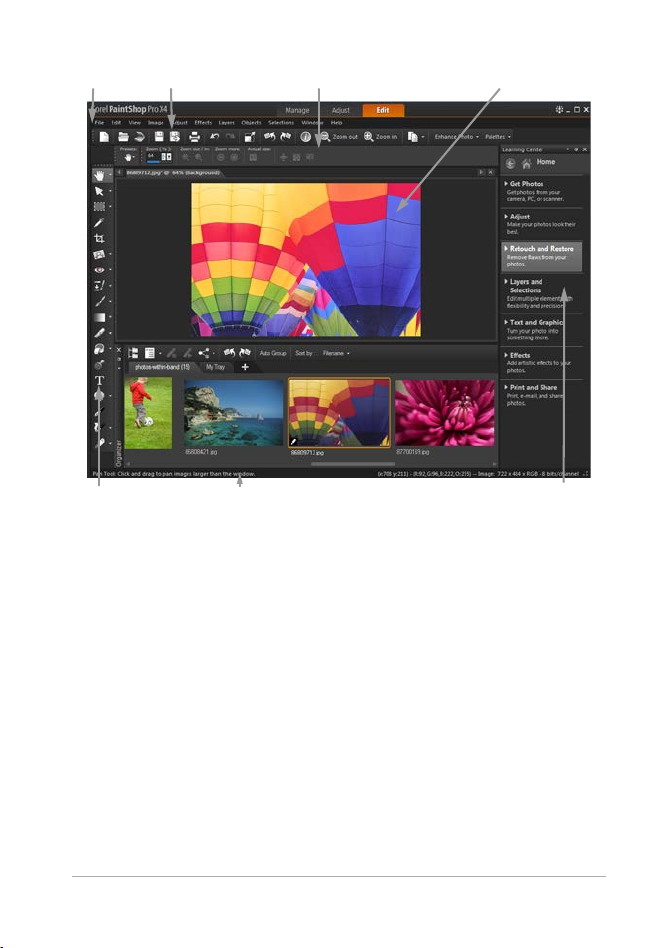
Image window
Tool Options palette
Standard toolbar
Menu bar
Learning Center palette
Tools toolbar
Status bar
A photo displayed in the Edit workspace
The Edit workspace includes the following components:
• Menu bar — displays commands for performing tasks. For
example, the Effects menu contains commands for applying
effects to images.
• Toolbars — display buttons for common commands. For more
information, see “Using toolbars” on page 29.
• Palettes — display image information and help you select tools,
modify options, manage layers, select colors, and perform other
editing tasks. For more information, see “Using palettes” on
page 26.
Workspace tour 25
Page 32

• Status bar — displays information about the selected tool or
menu command, as well as information about image dimensions,
color depth, and pointer position. The status bar appears at the
bottom of the workspace, and unlike other toolbars, it cannot be
customized or moved. For more information about viewing image
information, see “Displaying and editing photo information” on
page 56.
Switching between workspaces
Corel PaintShop Pro lets you switch between different workspaces
quickly and easily so that you can accomplish your photo managing
and editing tasks in the most efficient manner.
To switch between workplaces
• At the top of the application window, click one of the following
tabs:
• Manage
• Adjust
• Edit
Using palettes
Corel PaintShop Pro contains many palettes that organize information
and commands to help you edit your images. Some palettes appear
automatically, others appear when you activate certain tools, and some
palettes appear only when you choose to open them. You can easily
turn a palette on and off by choosing View Palettes. Some palettes
are available only in specific workspaces.
Palettes display information and may contain both controls and
command buttons. Like toolbars, palettes can be moved from their
default docked position.
26 Corel PaintShop Pro X4 User Guide
Page 33

Palette Description
Navigation palette Lets you find and organize photos
Info palette Displays information about the selected image. It
consists of a camera-style display of the settings
used to take the photo and a tabbed area that lets
you add General information, such as tags and
ratings, and access a full list of EXIF or IPTC data.
Learning Center Displays information about workflow, tools, and
commands to help you complete common tasks
quickly and efficiently
Organizer Lets you gather display photos from various folders
so that you can select, edit, e-mail, or print them.
You can add, remove, and rename custom trays
within the palette to match your workflow.
Tool Options Displays settings and controls for the active tool
Materials Lets you choose colors and materials for painting,
drawing, filling, and retouching
Layers Lets you view, organize, and adjust settings for
image layers
Overview Displays a thumbnail of the active image; lets you
set a zoom level, and displays image information
History Lists the actions taken on the active image; lets you
undo and redo adjacent or nonadjacent actions;
and lets you create a Quickscript that can be
instantly applied to other open images
Histogram Displays a graph of the distribution of red, green,
blue, grayscale, hue, saturation, and lightness
values in an image. You can analyze the distribution
of detail in the shadows, midtones, and highlights
to help you decide how to make corrections.
Workspace tour 27
Page 34

Palette Description
Brush Variance Lets you set additional brush options when you use
a paint brush or any other raster painting tool. This
palette is particularly useful when you use a
pressure-sensitive tablet or a four-dimensional
mouse. For example, you can vary the opacity of a
brushstroke by applying pressure with the stylus.
Some options also work well with a mouse.
Mixer Lets you place and mix pigments to use with the
Oil Brush tool and the Palette Knife tool, allowing
you to create realistic strokes with oil paints on
Art Media layers
Script Output Displays a list of your actions and results when you
run scripts
To display or hide a palette
Edit workspace
• Choose View Palettes, and click the palette name.
Palettes that are currently displayed are denoted with a check
mark .
To resize a palette
Edit workspace
• Drag the corner or edge of a palette.
You can also resize a docked palette by clicking the Minimize
palette or Maximize palette button in the upper-right
corner of the palette’s title bar.
28 Corel PaintShop Pro X4 User Guide
Page 35

Using toolbars
All three workspaces contain toolbars with buttons that are useful for
performing common tasks. When you position the pointer over a
button, its name appears in a tooltip, and the status bar displays
additional information about the command. In addition, in the
Edit workspace, the Learning Center provides advice on using the tool.
The Edit workspace is the main access point for the following toolbars:
• Effects — displays commands for applying effects to your images
• Photo — displays commands for enhancing photos
• Script — displays commands for creating and running scripts
• Standard — appears by default toward the top of the workspace
and displays the most common file-management commands,
such as saving images, undoing a command, and cutting and
pasting items
• Status — appears by default at the bottom of the workspace and
displays information about the selected tool
• Tools — contains tools for painting, drawing, cropping, typing
text, and performing other image-editing tasks
• Web — displays commands for creating and saving images for the
Web
To display or hide a toolbar
Edit workspace
• Choose View Toolba rs , and choose the toolbar that you want to
display or hide.
A check mark beside the toolbar name in the menu indicates that
the toolbar is displayed.
Workspace tour 29
Page 36
To hide a specific toolbar, click the Close button on its
Flyout arrow
title bar.
Using tools
You can use the tools to perform a variety of image editing and creative
tasks. When you hold the pointer over a tool, a tooltip displays the tool
name and shortcut key, and the status bar displays hints for using the
tool.
While the Adjust workspace contains a limited number of tools for
quickly touching up your images, the Edit workspace contains a wide
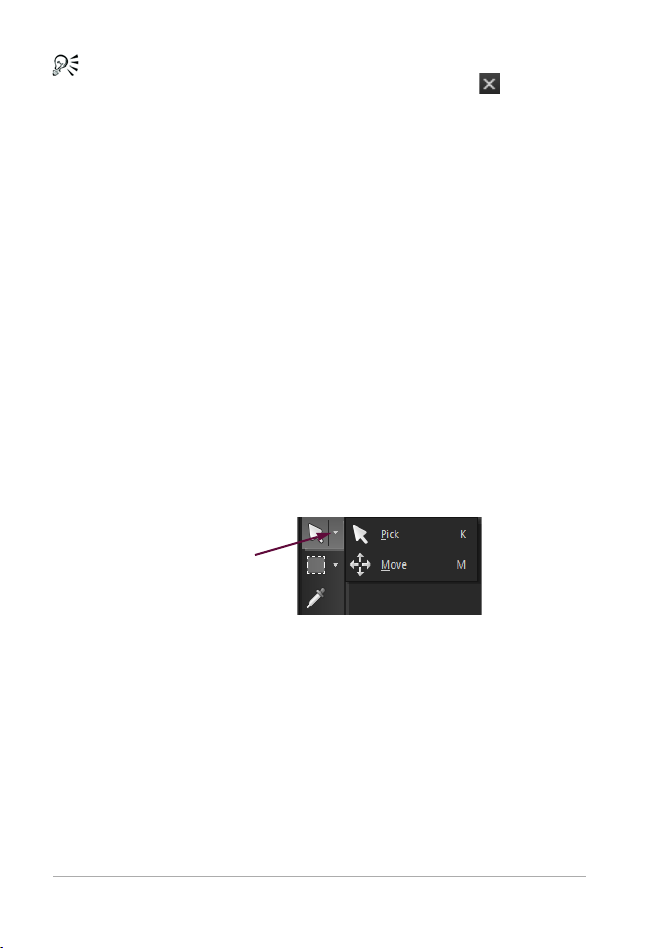
selection of tools for advanced image creation and editing. In the
Edit workspace, some of these tools, such as the Crop, Move, and Text
tools, reside in their own space on the Tools toolbar. Most tools,
however, are grouped with other tools that perform similar tasks. A
group of tools is denoted by a small flyout arrow on the right side of
the active tool.
Some tools are grouped together in flyouts. You can access all
tools in a flyout by clicking the flyout arrow beside the active tool.
For information about moving, hiding, and displaying the Tools toolbar
in the Edit workspace, see “Using toolbars” on page 29.
The following table briefly describes each tool on the Tools toolbar of
the Edit workspace. Some of these tools are also available in the Adjust
workspace.
30 Corel PaintShop Pro X4 User Guide
Page 37
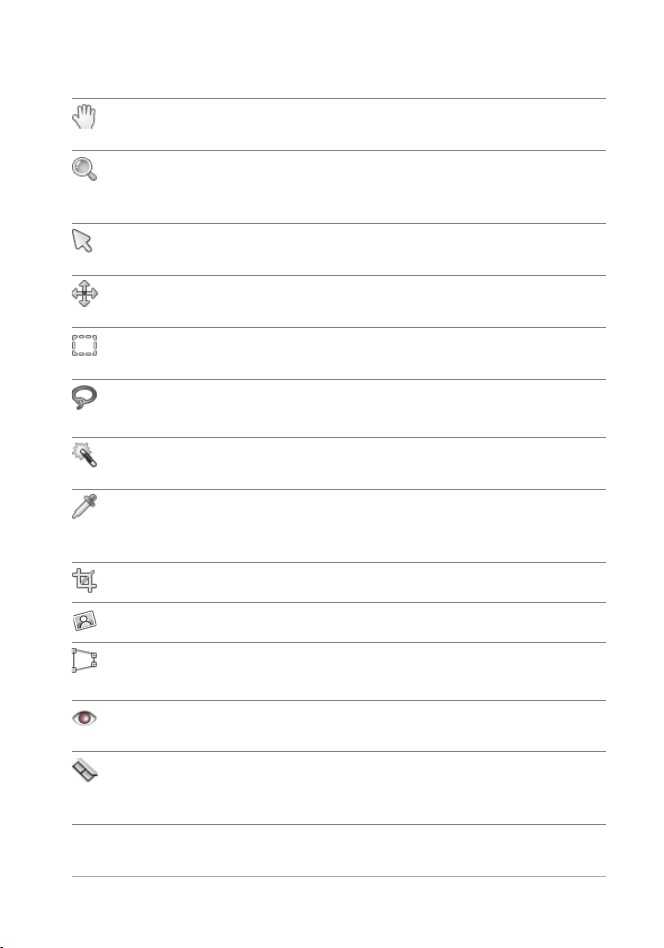
Tool Description
Pan
Zoom
Pick
Move
Selection
Freehand
Selection
Magic Wand
Dropper
Crop
Straighten
Perspective
Correction
Red Eye
Makeover
Lets you control which part of the image is
visible in the image window
Zooms in when you click, or zooms out when
you right-click. You can drag to define an area
for zooming.
Moves, rotates, and reshapes raster layers, and
selects and modifies vector objects
Moves a raster layer or a vector layer on the
canvas
Creates a geometrically shaped selection, such as
a rectangle, ellipse, or triangle
Creates an irregularly shaped selection
Makes a selection based on pixel values within a
specified tolerance level
Lets you choose the foreground/stroke color by
clicking or the background/fill color by rightclicking
Trims or eliminates unwanted edges
Rotates a crooked photo to straighten it
Squares the perspective of buildings or other
objects that appear to be leaning
Quickly corrects the red-eye effect commonly
seen in photos
Provides five modes — Blemish Fixer, Toothbrush,
Eye Drop, Suntan, and Thinify™ — which let you
apply cosmetic fixes to subjects in your photos
Workspace tour 31
Page 38

Tool Description
Clone
Scratch Remover
Object Remover
Paint Brush
Airbrush
Lighten/Darken
Dodge
Burn
Smudge
Push
Soften
Sharpen
Emboss
Removes flaws and objects by painting over
them with another part of the image
Removes wrinkles, wires, and similar linear flaws
from digital photos, and removes scratches from
scanned photos
Covers unwanted elements of a photo with a
neighboring texture in the same photo
Lets you paint on your image with colors,
textures, or gradients
Simulates painting with an airbrush or spray can
Lightens areas as you drag, or darkens areas as
you drag with the right mouse button. This
effect is stronger than the effects produced by
the Dodge and Burn tools.
Lets you lighten areas of a photo by clicking or
darken areas by right-clicking
Lets you darken areas of a photo by clicking, or
lighten areas by right-clicking
Smears pixels by picking up new colors as you
drag, or pushes pixels by not picking up new
colors as you drag with the right mouse button
Pushes pixels by not picking up new colors as
you drag, or smears pixels by picking up new
colors as you drag with the right mouse button
Softens pixels as you drag, or sharpens pixels as
you drag with the right mouse button
Sharpens pixels as you drag, or softens pixels as
you drag with the right mouse button
Creates an embossed effect by suppressing color
and tracing edges as you drag
32 Corel PaintShop Pro X4 User Guide
Page 39

Tool Description
Saturation Up/
Down
Hue Up/Down
Change to Target
Color Replacer
Eraser
Background Eraser
Flood Fill
Color Changer
Picture Tube
Text
Preset Shape
Rectangle
Ellipse
Makes colors more vivid as you drag, or less vivid
as you drag with the right mouse button
Shifts pixel hue values up as you drag, or shifts
them down as you drag with the right mouse
button
Recolors pixels while retaining detail
Replaces the background/fill color with the
foreground/stroke color when you click and
drag, or replaces the foreground/stroke color
with the background/fill color when you rightclick and drag
Erases raster layer pixels to transparency
Erases around the edges of the areas you want
to keep in a photo
Fills pixels of a similar tolerance level with the
current foreground/stroke material when you
click, or with the current background/fill material
when you right-click
Changes the color of an object while preserving
the shading and luminosity of the original color
Places picture tubes, theme-based artistic
elements, in your image
Places text on your image
Adds predefined shapes (such as callouts,
arrows, and starbursts) to your image
Creates a rectangle or square
Creates an ellipse or circle
Workspace tour 33
Page 40

Tool Description
Symmetric Shape
Pen
Warp Brush
Mesh Warp
Oil Brush
Chalk
Pastel
Crayon
Colored Pencil
Marker
Palette Knife
Smear
Art Eraser
Creates symmetric or star-shaped objects
Creates connected or unconnected lines,
freehand curves, and Bézier curve segments
Shrinks, grows, twists, or distorts pixels
Distorts a photo by dragging points along an
overlay grid
Simulates oil brushstrokes on an Art Media layer
Simulates drawing with chalk on an Art Media
layer
Simulates drawing with pastels on an Art Media
layer
Simulates drawing with crayon on an Art Media
layer
Simulates drawing with colored pencil on an Art
Media layer
Simulates drawing with an ink marker on an Art
Media layer
Simulates applying oil paint with a knife (instead
of a brush) on an Art Media layer
Smears whatever pigment you’ve applied to an
Art Media layer
Erases whatever pigment you’ve applied to an
Art Media layer
34 Corel PaintShop Pro X4 User Guide
Page 41

Getting started
You can bring your images into Corel PaintShop Pro in various ways:
you can import photos that you have transferred to your computer,
scan images directly into the application, capture images from the
computer screen; or you can create an image.
After you bring your images into the application, you can access many
basic commands that help you view images and image information.
You can perform basic actions such as cut, copy, undo, and repeat.
For more information about performing basic actions, see “Getting
Started with Corel PaintShop Pro” in the Help.
This section presents the following topics:
• Getting photos into Corel PaintShop Pro
• Opening and closing images
• Saving images
• Deleting images
Getting photos into Corel PaintShop Pro
After you transfer your photos to your computer (by using Windows or
the software for your camera), you can import your photos into
Corel PaintShop Pro. You import photos by browsing to folders. The
photos in the folders are then cataloged automatically in a database.
This makes it easy to find, edit, and update the information for your
photos.
Getting started 35
Page 42

Although you can browse to folders from any workspace, the Manage
workspace is designed to make it easy to review and manage multiple
photos.
To import your photos into Corel PaintShop Pro
Manage workspace
1 In the Navigation palette, click the Collections tab, and click
Browse More Folders.
2 In the Browse For Folder dialog box, navigate to the folder you
want.
3 Click OK.
The folder is added to the folder list and all the images are
cataloged in the application database.
You can open the Navigation palette from any workspace by
clicking the Show/Hide Navigation button on the Organizer
palette.
Opening and closing images
You can open most image formats in Corel PaintShop Pro. You can
open the images by using the menu bar or by using the
Manage workspace. You can associate specific file formats with
Corel PaintShop Pro, such as JPEG, TIF, or PNG, so that these files will
open in Corel PaintShop Pro when you double-click them. For more
information about setting file format associations and supported file
types, see “Setting file format associations” and “Files supported by
Corel PaintShop Pro” in the Help. For information on RAW files, see
“Supported RAW file formats” on page 61.
36 Corel PaintShop Pro X4 User Guide
Page 43

To open an image
Edit workspace
1 Choose File Open.
2 In the Look in drop-list, choose the folder where the file is stored.
3 Click the name of the file that you want to open.
If you want to open multiple files, hold down Ctrl, and click the
filenames.
4 Click Open.
You can also
View information about an image In the Open dialog box, click the
filename, and click Details.
View a thumbnail in the preview
area
In the Open dialog box, mark the
Show preview check box.
To open an image from the Manage workspace
Manage workspace
• Click a thumbnail to select the file.
To view thumbnails from another folder, click Browse More Folders
on the Navigation palette, and from the Browse For Folder dialog
box that appears, choose the folder you want. The folder appears
in the Folders list.
You can work with the file in the Manage workspace, or click the
Adjust tab or Edit tab to edit the file in another workspace.
To open a RAW photo image
Edit workspace
• Do one of the following:
• Choose File
• Double-click on a RAW image thumbnail.
Getting started 37
Open.
Page 44

• Hold down Ctrl, and click the filenames or thumbnails to open
multiple files.
The Camera RAW Lab dialog box opens. This dialog box lets you
adjust the settings that are stored with the RAW photo file.
To close an image
• Choose File Close.
In the Edit workspace, you can also close an image by clicking
the Close button above the image.
Saving images
Before you save an image, you need to consider the file format in
which you want to save it, and you must ensure that you don’t
overwrite an original image that you may need in the future.
The PspImage file format of Corel PaintShop Pro supports layers, alpha
channels, and other features used in creating images. It is
recommended that you save and edit your images as PspImage files.
You can then save the files to common file formats. You can also use
the Save for Office command if you want to optimize your images for
placement in another application, such as a page layout, e-mail, or
Web page design application.
For more information about options available when saving images, see
“Saving images” in the Help.
Important! The Auto-Preserve Original preference setting can help
you avoid overwriting original images. By default, this feature is on.
For more information on this preference setting, see “Setting AutoPreserve preferences” in the Help.
38 Corel PaintShop Pro X4 User Guide
Page 45

To save a n e w i m ag e
Edit workspace
1 Choose File Save.
The Save As dialog box appears.
2 From the Save in drop-list, choose the folder in which you want to
save the file.
3 In the File name field, type a name for the file.
4 In the Save as type drop-list, choose a file format. The most
commonly used formats are listed first.
If you want to change the default settings for the file format (for
example compression or color profile), click Options, and choose
the settings you want.
5 Click Save.
You can also save your work by clicking the Save As button
on the Standard toolbar to avoid overwriting your current file.
You can save in the last-used file format by choosing File
Preferences General Program Preferences, and clicking Display
and Caching from the list on the left side. In the Presentation
group box, mark the Re-use last type in the file save-as dialog
check box.
To save your work
Edit workspace
• Choose File Save.
If the Auto-Preserve Originals preference setting is enabled, and
this is the first time you’ve attempted to save changes to this
image, you are prompted to save a copy of the original unedited
image. If Auto-Preserve Originals is not enabled, the original
image is overwritten by the modified image.
Getting started 39
Page 46

You can avoid overwriting the current file by using the Save As
command.
You can also save your work by clicking the Save button on
the Standard toolbar.
Deleting images
You can delete image files by using the Organizer palette.
To delete an image
Edit workspace
• Right-click a thumbnail in the Organizer palette, and choose
Delete from the context menu.
40 Corel PaintShop Pro X4 User Guide
Page 47

Reviewing, organizing, and finding photos
The Manage workspace is a multifaceted digital image management
feature that lets you preview, organize, and streamline your photoediting workflow.
This section presents the following topics:
• Setting up the Manage workspace
• Finding images on your computer
• Working with saved searches
• Adding keyword tags to images
• Viewing photos by tags
• Using the calendar to find images
• Working with thumbnails in the Manage workspace
• Capturing and applying edits to multiple photos
• Displaying and editing photo information
• E-mailing and sharing photos from the Manage workspace
• Using Quick Review to review photos
• Working with trays
Setting up the Manage workspace
When you start up Corel PaintShop Pro for the first time, the
Manage workspace appears as your main workspace with the
following four components: Navigation palette, Preview area,
Reviewing, organizing, and finding photos 41
Page 48

Organizer palette, and the Info palette. For information about each of
Info paletteNavigation palette
Organizer palette
Preview area
Organizer toolbar
Thumbnails
these palettes, see “The Manage workspace” on page 22.
Depending on your specific needs, you can customize the
Manage workspace by choosing the Preview or Thumbnail mode,
resizing, moving, or hiding the palettes, and selecting display and file
preferences. For more information, see “Setting Manage workspace
preferences” in the Help.
Manage workspace in Preview mode
42 Corel PaintShop Pro X4 User Guide
Page 49

Thumbnails
Organizer
toolbar
Preview
area
Navigation
palette
Info palette
To switch between preview and thumbnail modes
Manage workspace in Thumbnail mode
• In the top-right corner of the Manage workspace, click one of the
following buttons:
• Preview mode — displays a large preview area of a single
image
• Thumbnail mode — expands and locks the Organizer
palette content in the preview area
To hide or show the Navigation palette and Info palette
Manage workspace
• In the Organizer palette, click any of the following buttons on the
Organizer toolbar:
Reviewing, organizing, and finding photos 43
Page 50

• Show/Hide Navigation — shows or hides the Navigation
palette
• Show/Hide Info — shows or hides the Info palette
A convenient way to minimize the Organizer palette (or any
palette) is to click the Auto Hide button on the palette title
bar. For more information, see “To roll up a toolbar or palette”
in the Help.
Browsing folders for photos
You can browse for photos on your computer by using the Collections
and Computer tabs in the Navigation palette:
•The Collections tab is your library of virtual and physical folders. It
offers an easy way to find and search for favorite photos.
•The Computer tab displays a complete list of all folders on your
hard drive and desktop.
When you select a folder in the Navigation palette, the photos in this
folder appear as thumbnails in the Organizer palette. When you
browse to a folder, you are essentially importing the content of the
folder into Corel PaintShop Pro. For more information, see “Getting
photos into Corel PaintShop Pro” on page 35.
To view the photos in a folder
Manage workspace
1 In the Navigation palette, click one of the following tabs:
• Collections — displays a custom list of cataloged folders and a
list of virtual collections
• Computer — displays a list of all folders and devices on your
computer
44 Corel PaintShop Pro X4 User Guide
Page 51

2 Double-click a folder to display the subfolders it contains.
3 Click the folder that contains the photos that you want to view.
The thumbnails of all supported photo or video files in the
selected folder appear in the Organizer palette.
You can also hide the list of subfolders in a folder by clicking the
minus sign next to its name.
To add a folder to the Collections page
Manage workspace
1 In the Navigation palette, click the Collections tab.
2 In Folders tree, click the Browse More Folders icon .
The Browse for Folder dialog box appears.
3 Navigate to the folder containing the images you want to view,
and then click OK.
The folder is added to the Folders list.
You can also create a folder on your computer by clicking the
Make New Folder button in the Browse for Folder dialog box.
To view all cataloged folders
Manage workspace
1 In the Navigation palette, click the Collections tab.
2 In the Smart Collections tree, click the All Photos icon .
Finding images on your computer
When you import photos into Corel PaintShop Pro by navigating to
them from the Navigation palette, they are cataloged automatically.
Cataloged images can be searched for quickly (real-time filtering) and
easily from the Search box. You can do a simple text-based search, use
Reviewing, organizing, and finding photos 45
Page 52

more advanced search options, or use a calendar to search for images
associated with a particular date or date range.
When you perform an advanced search, you can save the search rules
and results as a Smart Collection.
To search for images quickly
Manage workspace
• In the Navigation palette, type a search term in the Search box.
The search results appear in the Organizer palette.
Note: Search terms may be filenames (including extensions),
names of folders in which images reside (including letters
designating drives), tags, caption text, or image metadata (EXIF or
IPTC data).
For more information about the tags that you can assign to
images, see “Adding keyword tags to images” on page 47. For
more information about caption text and image metadata, see
“Displaying and editing photo information” on page 56.
To do an advanced search
Manage workspace
1 In the Navigation palette, click the Collections tab.
2 Double-click Smart Collections to open the list, and click Add
Smart Collection.
The Smart Collection dialog box appears.
3 In the Find photos that match drop-list, select one of the
following options:
• All — searches for images that match all of the specified rules
• Any — searches for images that match any of the specified rules
46 Corel PaintShop Pro X4 User Guide
Page 53

4 From the first drop-list on the left, select a search option.
5 From the next drop-list, select an option to refine the search
further.
The options that appear in the drop-list depend on the search
option that you chose in the previous drop-list.
6 In the text field, type or choose a search term.
7 Click Preview.
The search results appear in the Organizer palette.
Working with saved searches
After you save a custom set of search criteria as a Smart Collection, you
can run the search again simply by clicking it on the Collections tab.
You can also edit, rename, or delete a saved search.
To run a s a v ed s ea r c h
Manage workspace
1 In the Navigation palette, click the Collections tab.
2 Double-click Smart Collections to open the list.
3 Click the Smart Collection you want to use for your search.
Adding keyword tags to images
Keyword tags let you assign descriptive, natural-language terms to
images. By creating tags such as “family,” “children,” or “birthday,”
you can identify specific photos, and then simply click a tag from the
list to view thumbnails of photos associated with the tag. You can
create and assign as many tags as you like to an image. The
Manage workspace provides several ways to create and assign tags.
Reviewing, organizing, and finding photos 47
Page 54

To add a keyword tag to the tags catalog
Manage workspace
1 In the Navigation palette, click the Collections tab.
2 Double-click Ta g s to open the list.
3 In the Tags list, click the Add Tags button .
The Add Tag dialog box appears.
4 Type the tag text, and click OK.
The new tag appears in the Tags list.
To delete a keyword tag from the tags catalog
Manage workspace
1 In the Navigation palette, click the Collections tab.
2 Double-click Ta g s to open the list.
3 Right-click a tag, and click Delete.
To assign a keyword tag to one or more images
Manage workspace
1 In the Navigation palette, click the Collections tab.
2 Double-click Ta g s to open the list.
3 In the Organizer palette, select one or more thumbnails of the
images that you want to tag.
4 Drag the thumbnails onto a tag in the Tags list.
You can also assign one or more tags to the selected
thumbnails by typing the text in the Ta gs box on the General
page of the Info palette, and clicking the Add Tag button to
the right of the text field.
48 Corel PaintShop Pro X4 User Guide
Page 55

To remove keyword tags from one or more images
Manage workspace
1 In the Organizer palette, select one or more thumbnails.
2 In the Info palette, click the General tab to view the tag
information.
3 In the list that appears below the Tags box, click one or more tags
that you want to remove, and click the Delete Tag button that
appears to the right of the tag name.
If the General info panel is not displayed, select the thumbnails,
and then click the Image information button on the
Organizer toolbar.
Viewing photos by tags
After you assign a tag to an image, you can find the image simply by
clicking on the tag.
To display photos by tags
Manage workspace
1 In the Navigation palette, click the Collections tab.
2 Double-click Ta g s to open the list.
3 Click a tag.
Photos associated with the tag display as thumbnails in the
Organizer palette.
You can also type a tag name into the Search box at the top of
the Navigation palette.
You can also display photos that have no tags by clicking the
No Tags button in the Tags list.
Reviewing, organizing, and finding photos 49
Page 56
Using the calendar to find images
The Calendar Search lets you find photos according to the date they
were taken. You can search by a specific date or select a date range.
The image creation dates are highlighted on the calendar.
Note: When you edit and save a photo, the modification date is also
captured in the Calendar Search.
To find images by using the calendar
Manage workspace
1 In the Navigation palette, click the Collections tab.
2 Click the Calendar button .
The Calendar Search dialog box appears. Dates shown in red
indicate images created on that date.
3 Choose one of the following options:
• For photos taken today, click the Tod ay button .
• For a specific date and month, click the Previous (Year/Month)
and Next (Month/Year) buttons, and select a date.
• For a date range, use the Previous and Next buttons to select the
month and year, hold down Shift, click the first date in the
range, and then click the last date in the range.
• For multiple dates not in sequence, use the Previous and Next
buttons to select the month and year, hold down Ctrl, and click
the dates.
When you click a date or a range, the Organizer palette displays
thumbnails of the photos that match the date criteria.
4 Click Close to close the Calendar Search dialog box.
50 Corel PaintShop Pro X4 User Guide
Page 57

Working with thumbnails in the Manage workspace
The Manage workspace makes it easy for you to preview and organize
photos by using thumbnails.
For a larger view of photos, use Preview mode, zoom in and out on
thumbnails, or use Quick Review to view photos in full-screen mode.
You can also sort and rotate photos by using thumbnails, or delete and
rename the files.
Thumbnails let you edit multiple photos by using Capture editing and
Apply editing. For more information, see “Capturing and applying edits
to multiple photos” on page 54.
In addition, you can select one or more RAW file thumbnails to convert
the files to another format. For more information, see “Converting
RAW photos to another file format” on page 64.
To preview an image in the Manage workspace
• In the Organizer palette, click a thumbnail.
If you are not in Preview mode, click the Preview mode button
in the top-right corner of the application window.
The photo displays in the Preview area.
You can also
Display the previous or the next
image in the Preview area by
using the keyboard
Preview an image in full-screen
mode
Reviewing, organizing, and finding photos 51
Press the Left arrow or the Right
arrow keys.
Click View
or double-click a thumbnail to
open Quick Review.
Full Screen Preview,
Page 58

To zoom in or out on thumbnails
1 If the Manage workspace is not in Thumbnail mode, click the
Thumbnail mode button in the top-right corner of the
Manage workspace.
2 On the Organizer toolbar, move the Zoom slider to the left to
zoom out, or to the right to zoom in.
The Zoom slider is not available when the Manage workspace
is in Preview mode.
To sort thumbnails
Manage workspace
1 On the Organizer toolbar, click the Sort by drop-list.
2 Choose a sorting option.
To select more than one thumbnail
Manage workspace
• Do one of the following:
• To select adjacent thumbnails, hold down Shift, and click the
first and the last thumbnail in the sequence of thumbnails.
• To select nonadjacent thumbnails, hold down Ctrl, and click the
thumbnails.
To play a video from a thumbnail
Manage workspace
1 If the Manage workspace is not in Preview mode, click the Preview
mode button in the top-right corner of the
Manage workspace.
2 In the Organizer palette, click a video thumbnail.
3 Click the Play button below the Preview area.
52 Corel PaintShop Pro X4 User Guide
Page 59

Example of a video thumbnail
You can extract a frame from a video and save it as an image
by clicking the Pause button to stop the video on the frame that
you want to save, and clicking the Capture button .
To rotate one or more images in the Organizer palette
Manage workspace
1 Select one or more thumbnails.
2 On the Organizer toolbar, click one of the following buttons:
• Rotate Right — rotates thumbnails 90 degrees clockwise
• Rotate Left — rotates thumbnails 90 degrees
counterclockwise
You can also right-click a thumbnail and choose Rotate Right or
Rotate Left from the context menu.
To delete one or more photos in the Manage workspace
1 Select one or more thumbnails, and press Delete.
The Delete File dialog box or Delete Multiple Items dialog box
appear.
2 Click Ye s to send the images to the Recycle Bin.
You can also right-click selected thumbnails, and choose Delete
in the context menu.
Reviewing, organizing, and finding photos 53
Page 60
To rename a file in the Manage workspace
Capture Editing and
Apply Editing buttons
1 Right-click the thumbnail that you want to rename and choose
Rename.
2 In the Rename dialog box, type the new file name, and click OK.
Capturing and applying edits to multiple photos
In the Manage workspace, you can copy the edits you make to one
photo and apply them to as many photos as you want. For example,
you can easily apply a lighting correction to multiple photos, or apply
the same border and resizing options to a set of photos that you’re
preparing for a website.
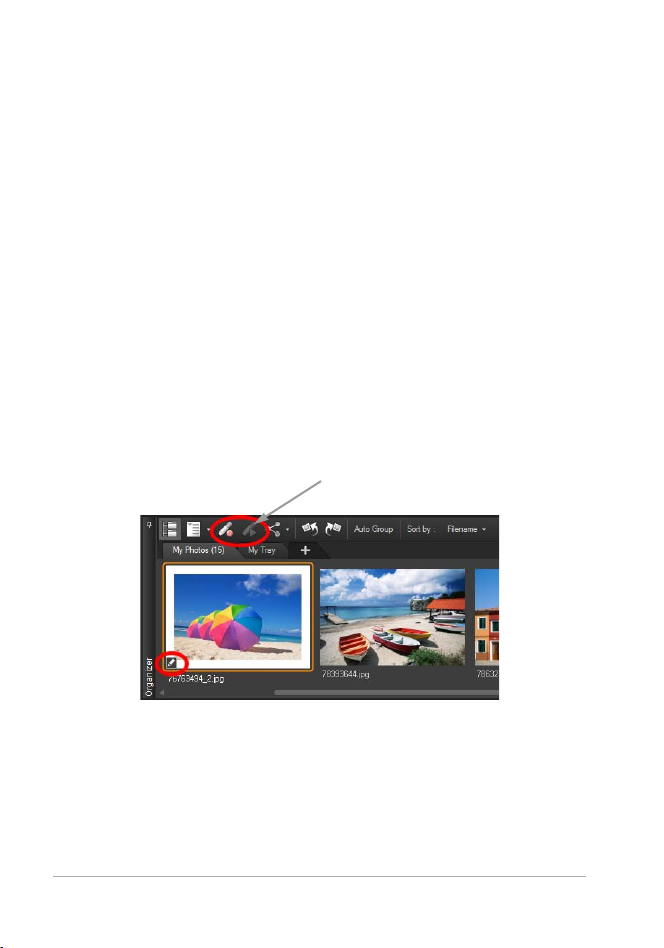
After you edit a photo in the Adjust or Edit workspace, a small editing
icon appears on the photo’s thumbnail. When you return to the
Manage workspace, you can access the Capture editing and Apply
editing commands to copy the changes to other photos.
An icon in the bottom-left corner of a thumbnail indicates that the
edits to the photo can be copied and applied to other photos.
You can capture and apply edits to most file types, but edits to RAW
files can be applied only to other RAW files. You can undo the edits you
apply to one or more photos.
54 Corel PaintShop Pro X4 User Guide
Page 61

To capture edits
Manage workspace
1 After editing an image in the Adjust workspace or Edit workspace,
or the Camera RAW Lab, save the changes, and return to the
Manage workspace.
2 Select the thumbnail of the photo that you edited.
A pencil icon or RAW icon appears in the bottom-left corner of
thumbnails to indicate that the image has been edited.
3 Click the Capture Editing button on the Organizer toolbar.
You can capture the edits of both open or closed files for the
current session only. When you close the program, all captured
edits are automatically deleted.
You can also capture the edits by right-clicking the selected
thumbnail and choosing Capture Editing.
To apply captured edits
Manage workspace
1 In the Organizer palette, select one or more thumbnails.
2 Click the Apply Editing button on the Organizer toolbar.
3 Click OK in the Batch Process dialog box.
For RAW files, the saved settings from the Camera RAW Lab dialog
box are applied.
When you close the program, all captured edits are
automatically cleared.
You can also apply the captured edits by right-clicking the
selected thumbnails and choosing Apply Editing.
Reviewing, organizing, and finding photos 55
Page 62

To undo Apply Editing
1 In the Organizer palette, select one or more thumbnails.
2 Right-click a selected thumbnail, and choose Revert Current
Editing from the context menu.
You can also undo the editing to multiple photos by selecting
the thumbnails of the edited photos, right-clicking a selected
thumbnail, and choosing Revert All Editing from the context
menu.
Displaying and editing photo information
The Info palette in the Manage workspace lets you view, add, and edit
information about your photos, such as the filename, size, and
creation date, as well as EXIF and IPTC metadata. You can also add
tags, captions, and apply star ratings to photos. For more information
about adding tags, see “Adding keyword tags to images” on page 47.
Adding and updating photo information makes it easier to organize
and search for your photos. For example, you can search by caption
text.
At the top of the Info palette there is a camera-style display that helps
you quickly review the camera settings were used for the selected
photo.
56 Corel PaintShop Pro X4 User Guide
Page 63
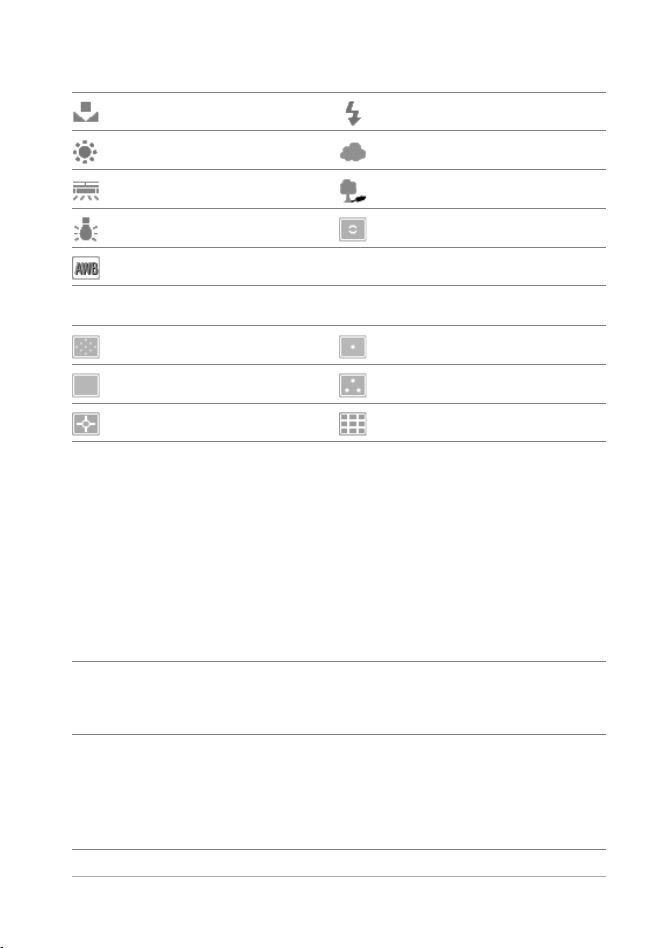
White Balance Symbols
Custom Flash
Daylight Overcast
Fluorescent Shade
Tungsten Partial metering
Auto-white balance
Metering Symbols
Custom metering Spot metering
Averaged metering Multi-spot metering
Center-weighted metering Pattern metering
To assign a rating to one or more images
Manage workspace
1 Select one or more thumbnails.
2 In the Info palette, click a star, starting from left to right, to set a
Rating. For example, if you want to assign a five-star rating, click
the right-most star and all stars will be selected.
You can also
Assign a rating by using the
context menu
Assign a rating by using keyboard
shortcuts
Reviewing, organizing, and finding photos 57
Right-click one or more thumbnails,
click Set Rating, and then click the
number of stars you want to assign.
Select one or more thumbnails, and
press Ctrl + the number of stars you
want to assign. For example, if you
want to assign one star, press
Ctrl+1.
Page 64

To remove the rating of an image
Manage workspace
• Right-click a thumbnail, choose Rating, and the number of stars
that are currently assigned to the image. For example, to remove
the rating of a three-star image, you would choose Rating * * *.
To add a caption to one or more images
Manage workspace
1 Select a thumbnail.
2 In the Info palette, click the General tab, and type text in the
Caption box.
To delete a caption from one or more images
Manage workspace
1 Select on or more thumbnails that have the same caption text.
2 In the Info palette, click the General tab.
3 Highlight the text you want to delete in the Caption box.
4 Press Delete.
To view advanced image information
Manage workspace
• In the Info palette, click the EXIF or IPTC tab.
Note: You can edit only the EXIF or IPTC data that have entry
fields.
E-mailing and sharing photos from the Manage workspace
You can e-mail and share your photos from the Manage workspace, or
any other workspace, by accessing the Share menu on the Organizer
toolbar. For more information, see “E-mailing photos” on page 169
and “Uploading photos to a sharing site” on page 170.
58 Corel PaintShop Pro X4 User Guide
Page 65

Using Quick Review to review photos
You can use Quick Review to review images in full-screen mode. For
example, after downloading photos from your camera, you can use
Quick Review to quickly review all photos, delete the ones you don’t
want, rotate photos, and apply star ratings.
To review images in full-screen mode
Manage workspace
1 In the Organizer palette, double-click a thumbnail in the folder or
tray that you want to review.
The Quick Review window opens.
2 Perform a task from the following table.
To Do the following
View the next photo
View the previous photo
Apply a star rating
Click the Next button .
Click the Previous button .
Click a star below the photo,
starting from left to right, to set a
rating.
Change the Zoom level Drag the Zoom slider, click the Zoom
In or Zoom Out buttons, or
click the Zoom to 100% button
or the Zoom to Fit button .
Delete a photo
Rotate a photo
Exit Quick Review
Reviewing, organizing, and finding photos 59
Click the Delete button .
Click the Rotate Right button or
Rotate Left button .
Click the Exit button or press
Esc.
Page 66

Working with trays
You can use trays to gather images from various folders. The images
remain in their original location, but are referenced in the tray and can
be accessed by clicking a thumbnail.
You can add, remove, and rename trays to suit your workflow. For
instance, you can create a tray for images you want to edit, use for a
project, print, or e-mail. Trays are created in the Organizer palette.
The default tray automatically displays the photos from the folder or
collection that is currently selected in the Navigation palette. A custom
tray, called My Tray, is a blank tray that is created automatically. For
more information about trays, see “Working with trays” in the Help.
To add a tray
Manage workspace
1 In the Organizer palette, click the More Options button on the
Organizer toolbar, and click Add Tray.
2 Type a name for the new tray in the Name field, and click OK.
To remove a tray
Manage workspace
1 In the Organizer palette, select the tray that you want to remove.
Note: Removing a tray does not delete the photos in the tray.
2 Click the More Options button on the Organizer toolbar, and
click Remove Tray.
The custom tray, “My Tray”, cannot be removed.
60 Corel PaintShop Pro X4 User Guide
Page 67

Working with camera RAW photos
Most DSLR cameras give you the option to take photos in RAW mode.
RAW mode records more image data than a typical JPEG. A RAW
photo is a 12-bit or 14-bit image and comprises of up to 16,384 levels
of brightness. The camera records information, such as ISO, color
temperature, and saturation settings, but stores this information in a
header. The RAW image data itself remains uncompromised and
uncompressed, making it similar to a photo negative that you can print
as you like. Compare this to an 8-bit JPEG photo which contains 256
brightness levels, and which has already had some irreversible
processing applied by the camera. The Camera RAW Lab in
Corel PaintShop Pro acts like a digital darkroom and lets you apply a
personal touch to your RAW files.
After processing a RAW image, you can leave it as a read-only RAW file,
or export it to a JPEG, GIF, or PNG file so you can edit it.
This section presents the following topics:
• Supported RAW file formats
• Using the Camera RAW Lab
• Applying edits to multiple RAW photos
• Converting RAW photos to another file format
Supported RAW file formats
Camera RAW Lab works with common RAW formats from the major
camera manufacturers. You can find an updated list at
www.corel.com.
Working with camera RAW photos 61
Page 68

To find supported RAW file formats
1 Go to www.corel.com.
2 On the corel.com Web page, click Support.
3 On the Support page, click Knowledgebase.
4 In the Search Text box, type PaintShop RAW support list.
A list of related Knowledgebase articles is displayed.
Using the Camera RAW Lab
The Camera RAW
Lab lets you develop
a RAW image by
saving a variety of
processing settings.
After processing a
RAW image, you can
leave it as a read-only
RAW file, or open it
in the Edit workspace
and save it to a
different file format,
such as JPEG, GIF, or
PNG.
To launch the Camera RAW Lab
• Do one of the following:
• In the Manage workspace, select File Open Filename.
• In the Edit workspace, drag a thumbnail from the Organizer
palette to the image window, or double-click the thumbnail.
The Camera RAW Lab dialog box opens with the image.
62 Corel PaintShop Pro X4 User Guide
Page 69

To adjust settings for a RAW photo
1 In the Camera RAW Lab dialog box, do any of the following:
• Drag the Brightness, Saturation, or Shadow sliders for a quick
overall image adjustment.
• In the White balance area, adjust color by clicking a preset
lighting option from the Scenario drop-list, or by clicking the
preview area to set the white point with the Dropper tool. You
can also adjust or fine-tune color with the Te mperature and Tint
sliders.
• In the Highlight recovery area, click an option in the drop-list.
Highlight recovery works particularly well on images that are
overexposed — it can help restore detail in blown-out areas.
• Drag the Threshold slider in the Reduce noise area to smooth
digital noise.
You can preview the changes to the photo in the Preview area.
If you want to keep the settings for future use, check the Save
image settings checkbox.
2 Click one of the following:
— resets the settings to their original values
• Reset
— applies the settings and opens the photo in the Edit
• Edit
workspace. When you edit a RAW photo, you must save it to a
JPEG, TIFF, or another writable file format.
• Apply
• Cancel
— applies the settings, and exits the Camera RAW Lab
— exits the Camera RAW Lab without adjusting the
photo’s settings
Image settings for RAW images are saved to a database.
Changes to the file name or file location can be tracked in the
database only if you make the changes in Corel PaintShop Pro.
Working with camera RAW photos 63
Page 70

Applying edits to multiple RAW photos
With Corel PaintShop Pro, you can copy the edits you made to a photo
in the Camera RAW Lab, and quickly apply the same edits to a batch
of photos. For more information about applying edits to multiple
photos, see “Capturing and applying edits to multiple photos” on
page 54.
Converting RAW photos to another file format
The RAW file format is read-only and the settings for a RAW file are
stored as a separate header. It is these settings that you can adjust in
the Camera RAW Lab. However, to use the editing features in the
Adjust and Edit workspaces, you need save the RAW file to a different
file format, such as JPEG, TIFF, or the native format, .pspimage. To
quickly convert the file, you can use Convert RAW.
To convert a RAW file to another file type
Manage workspace
1 In the Organizer palette, select one or more RAW file thumbnails.
2 Right-click a selected thumbnail, and click Convert RAW.
3 In the Batch Process dialog box, choose a file format from the Type
drop-list.
If you want to change the default conversion settings, click
Options, and adjust the settings.
4 Click Browse and choose a folder in which the converted file will
be saved.
5 Click Start.
You can rename converted files by clicking Modify, choosing an
option from the Rename Options list, and clicking Add.
64 Corel PaintShop Pro X4 User Guide
Page 71

Adjusting images
When you view your photos in Corel PaintShop Pro, you may notice
problems that you want to correct. In some photos, the problems are
obvious, such as when the subject is too dark. In other photos, you
may sense the need for improvement but not know what to fix. With
Corel PaintShop Pro, you can correct specific aspects of a photo or
allow the program to make basic photo adjustments.
This section presents the following topics:
• Rotating images
• Cropping images
• Straightening images
• Correcting photographic perspective
• Making basic photo corrections automatically
• Removing digital noise
• Adjusting color balance
• Adjusting brightness, contrast, and clarity
• Controlling depth of field
For more information about adjusting images, including correcting
light and lens distortions, controlling noise, adding blur, or sharpening
images, see “Adjusting images” in the Help.
Adjusting images 65
Page 72

Rotating images
You can rotate an image by 90 degrees to change its orientation to
landscape (horizontal) or portrait (vertical). If your camera contains
sensors that tag photos taken in portrait orientation, your photos are
automatically rotated to the correct orientation.
You can rotate an image in Corel PaintShop Pro.
You can also rotate an image to any angle by specifying a degree of
rotation or by rotating it interactively on the canvas. For information
about rotating an image to straighten it according to reference points
within the image, such as the horizon, see “Straightening images” on
page 70.
You can also use the Manage workspace to apply lossless rotation to
JPEG images while retaining all of the original image data.
To rotate an image
Edit workspace
• Select an image, and perform a task from the following table.
To Do the following
Rotate an image 90 degrees
clockwise or counterclockwise
66 Corel PaintShop Pro X4 User Guide
Choose Image
choose Image
Rotate Right, or
Rotate Left.
Page 73

To Do the following
Rotate an image to a specific
angle
Rotate an image interactively On the Tools toolbar, choose the
Choose Image
the Free Rotate dialog box,
choose either the Right option or
the Left option to set the direction
of rotation. In the Degrees group
box, choose the Free option, and
type or set a value in the control.
Pick tool . Rotate the image by
dragging the rotation handle (the
square connected by a line to the
rotation pivot point). The cursor
changes to two curved arrows
when it is positioned over the
rotation handle.
Free Rotate. In
You can also rotate an image by clicking the Rotate Right or
Rotate Left button on the Standard toolbar.
If you want to change the center of rotation before you
interactively rotate the image, hold down Ctrl, and drag the
rotation pivot point (the circle at the center of the image) to a
new position.
Cropping images
You can remove unwanted portions of an image to create stronger
compositions or to draw attention to another area of the image.
Corel PaintShop Pro helps you crop by providing presets to common
image sizes, such as 4 × 6 inches or 10 × 15 centimeters.
Cropping reduces the amount of hard drive memory required for
storing the image. In addition, cropping can improve color corrections
Adjusting images 67
Page 74
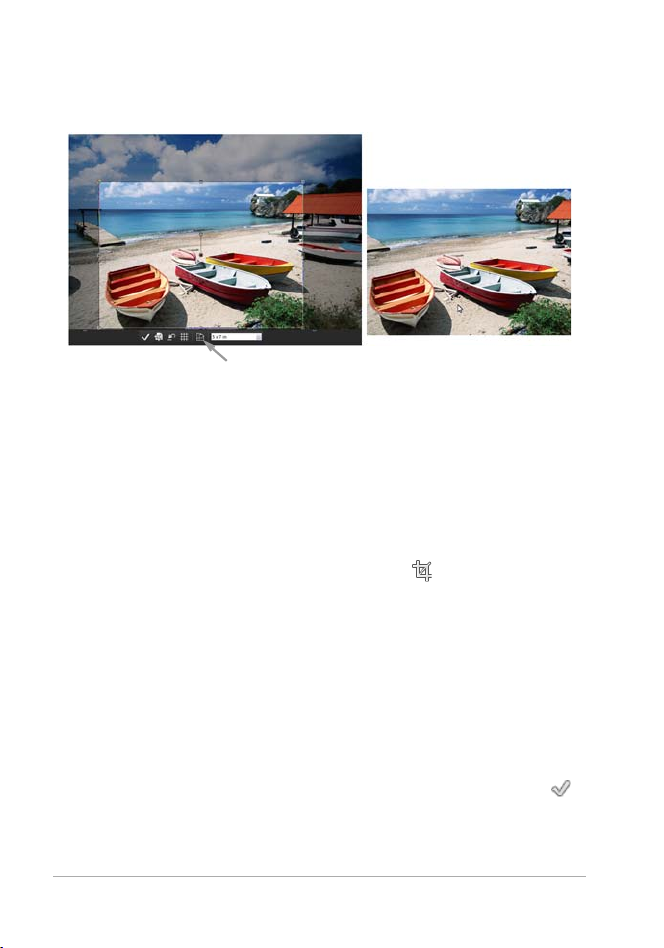
by eliminating extraneous areas of color. If a photograph requires both
Floating toolbar for the Crop tool
cropping and color correction, you should crop the image first and
then apply the color correction.
Important! Cropping permanently removes the image
area outside the crop rectangle. To preserve the original
photo, use the Save As command, and save the
cropped version of your image to a new filename.
To crop an image
Edit workspace
1 On the Tools toolbar, choose the Crop tool .
By default, the crop rectangle appears on the image, and the area
outside the crop rectangle is shaded.
2 Adjust the crop area size by dragging any of the handles or edges.
To reposition the crop rectangle, place the cursor inside and drag.
You can use a preset crop size by choosing an option from the
Presets drop-list on the floating toolbar for the Crop tool, or from
the drop-list on the Tool Options palette.
3 When you’re ready to crop the image, click the Apply button
on the Tool Options palette or on the floating toolbar for the Crop
tool.
68 Corel PaintShop Pro X4 User Guide
Page 75

You can also
Apply the crop by using your
mouse or keyboard
Set the size of the crop rectangle
on the Tool Options palette
Constrain the crop area to its
current proportions
Double-click inside the crop
rectangle, or press Enter.
Specify the values in the Width,
Height, and Units controls.
Mark the Maintain aspect ratio
check box on the Tool Options
palette. This option is available
only for custom-defined crop
rectangles.
Rotate the crop rectangle by
90 degrees
Click the Rotate Crop Rectangle
button on the floating
toolbar.
Freely rotate the crop rectangle Drag the square end of the
rotation handle. This feature can
be helpful when, for example, you
want to straighten and then crop
a crookedly scanned photo.
Clear the crop area
Click the Clear button on the
floating toolbar for the Crop tool.
To crop an image for printing
Edit workspace
1 On the Tools toolbar, choose the Crop tool .
2 Define the crop area by dragging within the image.
3 On the Tool Options palette, mark the Specify Print Size check box.
Note: If the Specify Print Size check box is marked, the image
resolution changes when you change values in the Height and
Width controls. The current resolution appears to the right of the
Units drop-list.
4 In the Units drop-list, select Inches or Centimeters.
Adjusting images 69
Page 76

Note: The Pixels option is unavailable for this method of
cropping.
5 Type or set position values in the Top , Bottom, Left, and Right
controls.
6 Type or set the dimension values in the Height and Width controls.
The final crop area is sized as specified, and the image resolution
is reduced or increased as needed.
7 Click the Apply button on the Tool Options palette, or on the
floating toolbar for the Crop tool.
Straightening images
You can easily straighten crooked images by aligning a straightening
bar with an image feature. Corel PaintShop Pro rotates the image so
that this straightening bar is perfectly horizontal and vertical. This
feature is especially useful when an image has a strong vertical or
horizontal feature, such as a building or horizon.
The Straighten tool lets you position a straightening bar
within an image.
To straighten an image
Edit workspace
1 On the Tools toolbar, choose the Straighten tool .
70 Corel PaintShop Pro X4 User Guide
Page 77

A straightening bar with end handles appears on the image.
2 Drag each handle of the straightening bar to align it with the part
of the image that you want to straighten.
3 On the Tool Options palette, choose one of the following options
from the Mode drop-list:
• Auto — automatically straightens the image based on the
position of the straightening bar
• Make vertical — rotates the image to make the straightening
bar vertical
• Make horizontal — rotates the image to make the straightening
bar horizontal
4 Click the Apply button .
You can also
Choose a specific angle for the
straightening bar
Crop the edges of the image to
make it rectangular after
straightening
Fill the edge areas of your image
with the background color
Type or set a value in the Angle
control on the Tools Options palette.
Mark the Crop image check box on
the Tools Options palette.
Unmark the Crop image check box
on the Tools Options palette.
You can also double-click the image to apply the command.
Correcting photographic perspective
When you take pictures of tall or wide objects, the resulting
photographs may have perspective distortion — that is, the objects
may seem to be leaning or angled. This distortion occurs when the
camera is at an angle to the subject.
Adjusting images 71
Page 78
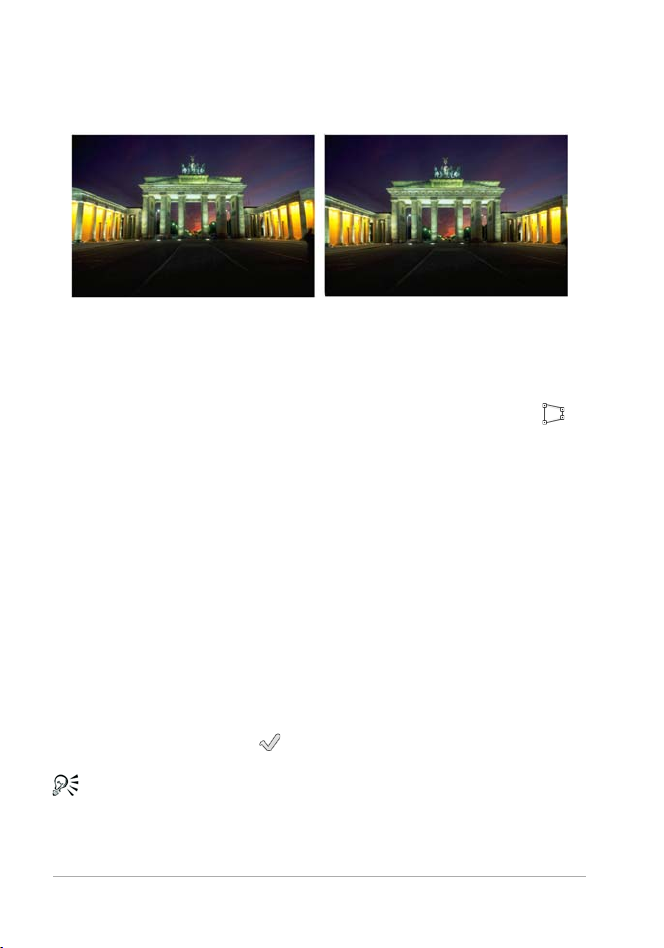
By using the Perspective Correction tool, you can fix perspective
distortion, such as the angled sides of a building. You can also fix
photographic perspective in an entire layer by using the Pick tool.
Using the Perspective Correction tool changes the angle of the building.
To correct perspective in a photo
Edit workspace
1 On the Tools toolbar, choose the Perspective Correction tool .
A bounding box with corner handles appears on the image.
2 On the Tool Options palette, choose settings for the following
controls:
• Grid lines — lets you type or set the number of gridlines to
display
• Crop image — recrops the image to a rectangular shape after
the perspective is applied
Note: Marking the Crop image check box deletes the areas of the
image that fall outside the rectangle.
3 Drag each handle to the corner of the object that should be
rectangular.
4 Click the Apply button .
You can also apply the command by double-clicking the image.
72 Corel PaintShop Pro X4 User Guide
Page 79
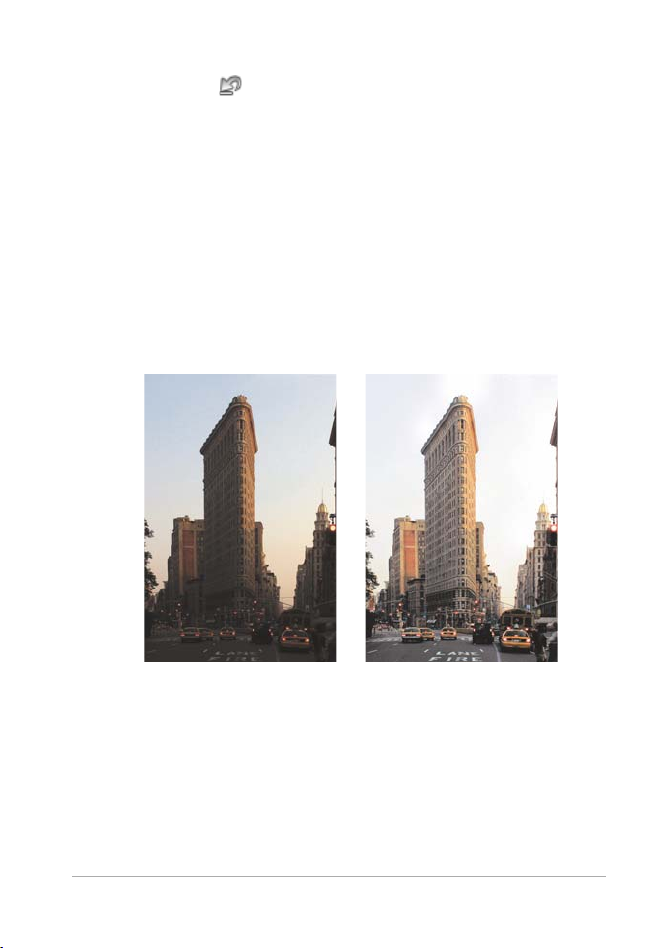
To reset the perspective correction box to the original rectangle,
click Cancel on the Tool Options palette.
Making basic photo corrections automatically
If you are not sure what adjustments to make to a photo, you can
apply either the One Step Photo Fix command or the Smart Photo Fix
command and see if you like the results. The One Step Photo Fix
command automatically applies a predetermined set of color
balancing and sharpening corrections to your photo — all you need to
do is select the command. If you want the option of fine-tuning the
same corrections before applying them, you can use the Smart Photo
Fix command.
You can use the One Step Photo Fix command to improve the
exposure and color balance of images quickly and easily.
Adjusting images 73
Page 80
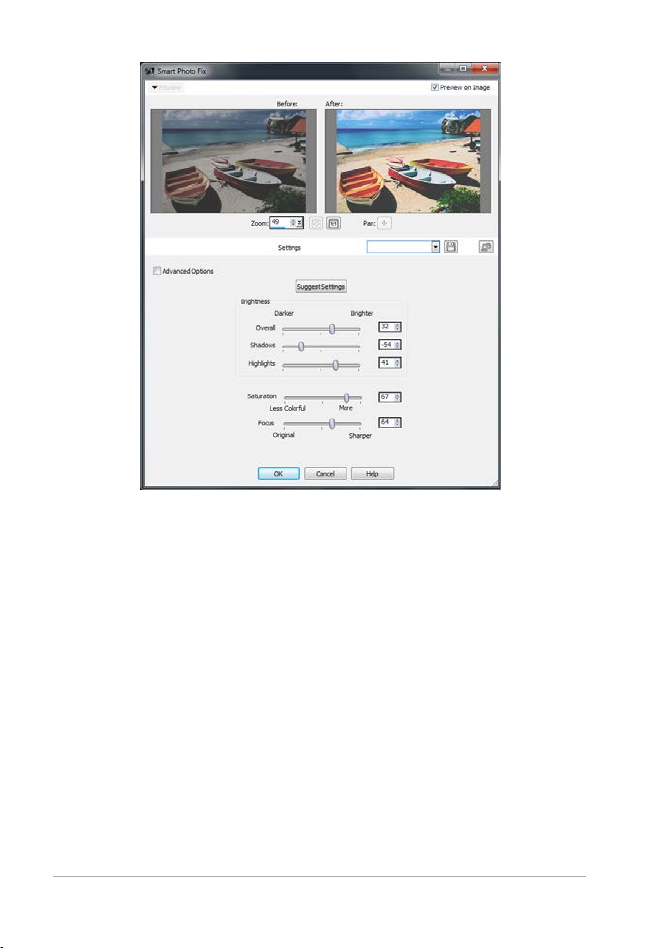
The Smart Photo Fix feature gives you control over the
amount and type of corrections applied to an image.
The advanced options of the Smart Photo Fix feature let you adjust
color balance by identifying the neutral areas in the photo (black, gray,
and white), which are used as sampling points. The advanced options
also let you modify the darkest and lightest pixels of the photo without
affecting the photo’s color balance. For information about advanced
options, see “To use advanced options of Smart Photo Fix” in the Help.
To apply basic corrections with One Step Photo Fix
Edit workspace
• Choose Adjust One Step Photo Fix.
After a brief pause, several basic corrections are applied to your
photo.
74 Corel PaintShop Pro X4 User Guide
Page 81

The corrections applied are identical to what would be applied
by accepting the suggested settings of the Smart Photo Fix
feature.
If you are not satisfied with the changes made to your
photo, choose
Photo Fix
try using other
Brightness and Contrast Curves or Brightness and Contrast
Levels.
Edit Undo. Then, choose Adjust Smart
, and adjust the available settings. You can also
Adjust menu commands, such as
To fine-tune basic corrections with Smart Photo Fix
Edit workspace
1 Choose Adjust Smart Photo Fix.
The Smart Photo Fix dialog box appears. In the upper portion of
the dialog box, the Before pane shows the original photo. The
After pane shows how the photo would appear after applying the
suggested set of basic adjustments.
2 Perform one or more tasks from the following table, and click OK.
To Do t he f o l l o w i n g
Brighten or darken the photo In the Brightness group box, type
or set a value in the Overall,
Shadows, and Highlights controls,
or adjust their corresponding
sliders.
Note: Positive settings brighten
the photo, and negative settings
darken the photo.
Adjusting images 75
Page 82

To Do t he f o l l o w i n g
Increase or decrease saturation Type or set a value in the
Saturation control, or adjust the
slider.
Note: Positive settings make
colors more vibrant; negative
settings make colors less vibrant.
Sharpen the edges of the photo Type or set a value in the Focus
control, or adjust the slider.
You can reset all settings to their initial values by clicking
Suggest Settings, or to null settings by clicking the Reset to
Default button .
To use advanced settings of the Smart Photo Fix feature, mark
the Advanced Options check box.
Removing digital noise
The term “noise” as it relates to photos refers to small specks of color
that interfere with image clarity. These specks are usually caused by
poor lighting conditions or the limitations of the sensor in your digital
camera. For example, when you zoom in on a photo of a clear blue sky,
you may see tiny specks of orange, red, purple, green, or other colors.
Corel PaintShop Pro gives you two fast, powerful commands for
removing noise from your photos: One Step Noise Removal and Digital
Noise Removal. When you use a noise removal command, the program
analyzes your photo, identifies the noise artifacts, and applies
corrections based on these identified areas, while preserving the
important edge details of your photo.
76 Corel PaintShop Pro X4 User Guide
Page 83

The image on the left looks grainy because of digital camera
noise. The image on the right appears smoother and less
grainy after the noise has been removed.
You can automatically apply noise correction to your photo with the
One Step Noise Removal command. You can also control more
precisely how the same corrections are applied by using the more
comprehensive Digital Noise Removal command. For more information
about this command, see “Removing digital noise” in the Help.
To remove digital noise quickly
Edit workspace
• Choose Adjust One Step Noise Removal.
After a brief pause, the noise is automatically removed.
Adjusting color balance
You can often improve a photo dramatically by adjusting the colors.
Different types of lighting, cameras, and the processing that occurs
inside the camera can cause incorrect coloring in photos. Scanned
images may have unnatural color casts.
To adjust color balance
Edit workspace
1 Choose Adjust Color Balance.
The Color Balance dialog box appears.
Adjusting images 77
Page 84

2 Mark the Smart White Balance check box.
This allows Corel PaintShop Pro to evaluate and make minor
corrections to the image automatically.
3 Drag the temperature slider to the left for cooler colors (more
blue), or to the right for warmer colors (more orange).
4 Click OK.
If you know what color temperature the photo should be, you
can set precise tonal balance values by marking the Advanced
Options check box and typing or setting the temperature values
in the Temperature and Tint controls in the White Balance
group box. You can tweak the colors by adjusting values in the
Temperature and Tint controls in the Enhance Color Balance
group box.
To correct faded colors
Edit workspace
1 Choose Adjust Color Fade Correction.
Drag in the Before pane to center an important part of the image
(such as a face).
2 Adjust the value in the Amount of correction control until the
image looks the most natural.
The default value is 45.
Note: Use the minimum value that produces a good correction. If
you apply too much correction, highlight and shadow areas may
lose detail, and objects may blend together.
3 Click OK.
To change color cast
Edit workspace
1 Choose Adjust Color Red/Green/Blue.
The Red/Green/Blue dialog box appears.
78 Corel PaintShop Pro X4 User Guide
Page 85

2 In the Red, Green, and Blue controls, type or set a value to change
the percentage for each color.
A value of 0% preserves the original value. To add more of a color,
use a positive number. To remove some of a color, use a negative
number.
Note: Reducing the amount of blue adds a yellow cast to the
image, reducing the amount of green adds a magenta cast to the
image, and reducing the amount of red adds a cyan cast to the
image.
3 Click OK.
Adjusting brightness, contrast, and clarity
Corel PaintShop Pro lets you adjust the brightness, contrast, and clarity
in your photos. Contrast is the difference between the photo’s lightest
and darkest pixels. Clarity lets you adjust the level of detail in the image
by analyzing contrast within localized areas.
For more information about adjustment filters in the Brightness/
Contrast group, including Curves, Levels, and Histogram Adjustment,
see “Adjusting brightness, clarity, and contrast” in the Help.
To change brightness or contrast
Edit workspace
1 Choose Adjust Brightness and Contrast Brightness/Contrast.
The Brightness/Contrast dialog box appears.
2 Type or set a value in the Brightness control.
A positive number lightens the photo; a negative number darkens
the photo. A value of zero preserves the original setting.
3 Type or set a value in the Contrast control.
A positive number increases contrast; a negative number
decreases contrast. A value of zero preserves the original setting.
Adjusting images 79
Page 86

4 Click OK.
You can use the zoom control in the dialog box to set your view
of the image in the Before and After panes.
To brighten dark areas and adjust clarity
Edit workspace
1 Choose Adjust Brightness and Contrast Fill Light/Clarity.
The Fill Light/Clarity dialog box appears.
2 Type or set a value in the Fill Light control.
A positive number lightens the darkest areas of the photo; a
negative number darkens the light areas of the photo. A value of
zero preserves the original setting.
3 Type or set a value in the Clarity control.
A positive number increases detail; a negative number decreases
detail and focus. A value of zero preserves the original setting.
4 Click OK.
To enhance depth and clarity
Edit workspace
1 Choose Adjust Brightness and Contrast Local Tone Mapping.
The Local Tone Mapping dialog box appears.
2 Type or set a value in the Strength control.
Use the smallest value that produces a satisfying result. Values
that are too high cause unwanted artifacts to appear in the photo.
3 Click OK.
You can use the zoom control in the dialog box to set your view
of the image in the Before and After panes.
80 Corel PaintShop Pro X4 User Guide
Page 87

Controlling depth of field
You can control the depth of field to create an area of focus that draws
attention to the subject in your photo. For example, in a photo of a
person surrounded by a field of flowers, you can defocus (blur) the
surrounding flowers while retaining a clear focus on the person.
You can apply the Depth of Field effect to draw attention to
the subject in your photo.
To create an area of focus by using the Depth of Field effect
Edit workspace
1 In the Edit workspace, select the area that you want to keep in
focus.
For information about selecting image areas, see “Creating
selections” on page 157.
2 Click Adjust Depth of Field.
The Depth of Field dialog box appears.
3 Move the Blur slider to adjust the amount of blur applied to the
out-of-focus area.
Adjusting images 81
Page 88
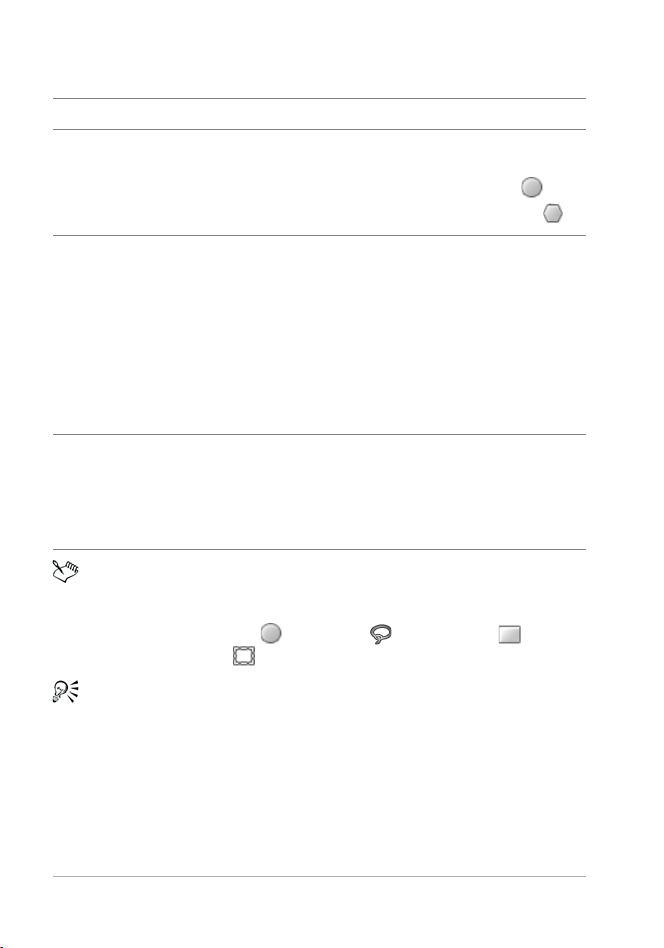
You can also
Invert the selected area Mark the Invert check box.
Control the aperture shape for the
blurred area
Adjust the transition between the
area in focus and the blurred area
Fine-tune the size of the area in
focus
Click one of the following
buttons:
• Circular Aperture Shape
• Hexagonal Aperture Shape
Move the Feather edge slider.
Moving the slider to the right
increases the feathering; moving the
slider to the left decreases the
feathering. Note that a setting of 0
produces a hard, undefined edge,
which is probably not what you
want. In general, do not set this
slider to less than 2 or 3.
Move the Focus range slider to the
left to shrink the area in focus. Move
the slider to the right to expand the
area in focus to the edge of the
selection.
If you don’t have a pre-existing selection, you can select an area
of focus using any of the selection tools in the Depth of Field
dialog box: Circular
, Freehand , Rectangular , or
Raster Selection .
Make your selection slightly larger than the area you want to
keep in focus, and then fine-tune the edge of the selection by
using the Focus range slider.
82 Corel PaintShop Pro X4 User Guide
Page 89

Retouching and restoring images
Corel PaintShop Pro provides you with many ways to retouch your
images. Whether you want to remove a small scratch, erase the entire
background, or simply correct red-eye, you’ll find the tools you need.
This section presents the following topics:
•Removing red-eye
• Applying cosmetic changes
• Removing scratches
• Removing flaws and objects
• Erasing image areas
• Cutting out image areas
• Recoloring image areas for a realistic effect
•Adding borders
• Scaling photos by using Smart Carver
For more topics related to retouching images, such as dodging and
burning, filling image areas (with colors, gradients, or patterns),
flipping, scaling, or transforming images, see “Retouching and
restoring images” in the Help.
Retouching and restoring images 83
Page 90

Removing red-eye
Red-eye in photos is a common problem. When light from the
camera’s flash reflects off the retina of a photo subject, a red-eye effect
is captured in the photo. Corel PaintShop Pro has two methods of
removing red-eye from a color photo.
The fastest method of removal is to use the Red Eye tool. A more
powerful method is to use the advanced Red Eye Removal command,
which lets you change the eye color. For more information about the
advanced red-eye removal method, see “To use advanced options for
red-eye removal” in the Help.
The Red Eye tool replaces the red color in the subject’s
pupil with a dark gray color, restoring a natural look.
To remove red-eye quickly
Edit workspace
1 On the Tools toolbar, choose the Red Eye tool .
2 On the Tool Options palette, adjust the Size of Red-Eye control so
that the pointer is about twice the size of the red area needing
correction.
3 Position the pointer directly over the eye, and click.
You can zoom in on the photo, if necessary, for better control
of the Red Eye tool.
You can size the pointer interactively by holding down Alt while
dragging the Red Eye tool over the eye area.
84 Corel PaintShop Pro X4 User Guide
Page 91

Applying cosmetic changes
You can quickly improve the appearance of the subjects in your photos
by performing the following cosmetic changes:
• removing blemishes — by using the Blemish Fixer mode of the
Makeover tool
• whitening teeth — by using the Toothbrush mode of the
Makeover tool
• fixing bloodshot eyes — by using the Eye Drop mode of the
Makeover tool
• adding a suntan — by using the Suntan mode of the Makeover
tool
• thinning a photo subject — by using the Thinify mode of the
Makeover tool
• removing wrinkles — by using the Scratch Remover tool
• smoothing skin tone quickly — by using the Skin Smoothing
command in the Adjust menu
You can remove blemishes, whiten teeth, and apply a suntan.
Retouching and restoring images 85
Page 92

To remove facial blemishes
Edit workspace
1 On the Tools toolbar, choose the Makeover tool .
2 On the Tool Options palette, choose the Blemish Fixer mode.
The pointer changes to concentric circles.
3 On the Tool Options palette, adjust the Size control to the smallest
size that allows the inner circle to enclose the blemish.
The outer circle is for the material used to cover the blemish.
4 On the Tool Options palette, adjust the Strength control.
Values range from 1 to 100. Higher values apply more of the
source material (enclosed in the outer circle) to the blemish area
(enclosed in the inner circle).
5 Click directly over the blemish.
You can zoom in on the photo for better control of the
Makeover tool.
To whiten teeth
Edit workspace
1 On the Tools toolbar, choose the Makeover tool .
2 On the Tool Options palette, choose the Too th br us h mode.
3 On the Tool Options palette, adjust the Strength control as
desired.
Higher settings produce more intense whitening but may also
produce an unnatural appearance.
4 Click directly over the teeth.
If the teeth are separated or partially obscured, you may need to
apply this tool to each tooth individually.
86 Corel PaintShop Pro X4 User Guide
Page 93

The Toothbrush mode of the Makeover tool works only with
color photos.
To apply whitening eye drops
Edit workspace
1 On the Tools toolbar, choose the Makeover tool .
2 On the Tool Options palette, choose the Eye Drop mode.
3 Type or set a value in the Strength control.
Higher values whiten more of the eye area but may spread the
whitening beyond the affected area of the eye.
4 Zoom in as necessary, and then carefully click over the bloodshot
portion of the eye.
To apply a suntan
Edit workspace
1 On the Tools toolbar, choose the Makeover tool .
2 On the Tool Options palette, choose the Suntan mode.
3 Type or set a value in the Size control.
4 Type or set a value in the Strength control.
Higher values produce a darker tan.
5 Carefully drag over the skin of the photo subject.
To apply a thinning effect
Edit workspace
1 On the Tools toolbar, choose the Makeover tool .
2 On the Tool Options palette, choose the Thinify mode.
3 Type or set a value in the Strength control.
Higher values compress more pixels in the horizontal axis.
4 Click the middle of the photo subject.
Retouching and restoring images 87
Page 94

The pixels compress on either side of the point you click. You can
continue clicking to enhance the thinning effect.
To remove facial wrinkles
Edit workspace
1 On the Tools toolbar, choose the Scratch Remover tool .
2 On the Tool Options palette, choose either the square edge or
the beveled edge selection box.
3 Type or set a value in the Width control so that the wrinkle fits
inside the inner portion of the selection box you drag.
4 Position the pointer just outside the wrinkle, and carefully drag
over the wrinkle so that the wrinkle is enclosed in the inner
rectangle.
The wrinkle is covered by the surrounding skin texture.
If you need to start again, you can undo the correction, adjust
the Width control, and redrag.
For wrinkle lines that are not straight, correct just one portion
at a time.
To smooth skin tone
Edit workspace
1 Choose Adjust Skin Smoothing.
2 In the Skin Smoothing dialog box, adjust the Amount slider.
Moving the slider to the right applies more smoothing; moving
the slider to the left applies less smoothing.
88 Corel PaintShop Pro X4 User Guide
Page 95
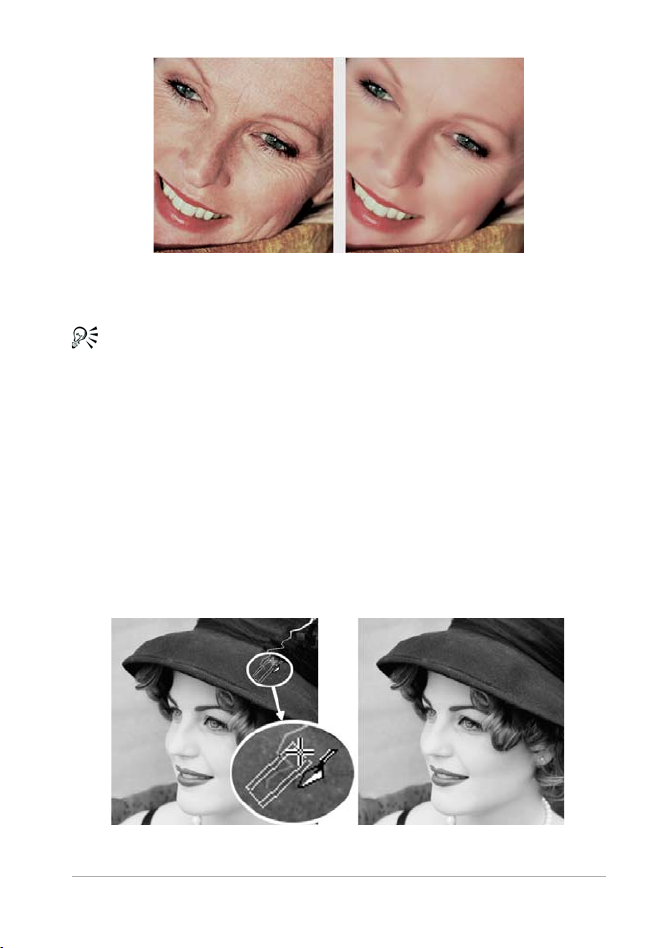
The Skin Smoothing command smooths skin tones and diminishes
the appearance of wrinkles and blemishes quickly.
The Skin Smoothing command automatically detects and
smooths skin tones without affecting eyes or lips. However, if
other areas in your photo are affected because they are similar
in color to the skin tone, you can use a selection to isolate the
area you want to smooth. For more information about
selections, see “Creating selections” on page 157.
Removing scratches
The Scratch Remover tool lets you remove scratches, cracks, and other
unwanted image areas from photos.
You can repair individual scratches by using the Scratch Remover tool.
Retouching and restoring images 89
Page 96

You can use the tool to enclose the flawed area and fill it with the
surrounding content that you want to keep. If the background is
relatively smooth, the result is usually satisfying. Scratches on a
textured or more complex background may be more effectively
removed with the Clone Brush tool. For information about the Clone
Brush tool, see “Removing flaws and objects” on page 91.
For images containing many small scratches, you can use the
Automatic Small Scratch Remover command. For more information,
see “To remove scratches automatically” in the Help.
To remove scratches
Edit workspace
1 On the Layers palette, select the layer that contains the area you
want to remove.
2 On the Tools toolbar, choose the Scratch Remover tool .
3 On the Tool Options palette, choose one of the following options
to define the shape of the Scratch Remover tool:
• square edge — corrects scratches that are perpendicular to
object edges, in an open area, or of uniform color
• beveled edge — corrects scratches that are at an angle to
object edges
4 Position the pointer just outside the scratch on one end, hold
down the left mouse button, and drag to set a selection box over
the scratch.
5 Release the mouse button.
The enclosed area is replaced with the surrounding pixels.
You can also
Move the selection box starting
point in 1-pixel increments
90 Corel PaintShop Pro X4 User Guide
Before releasing the mouse
button, press an Arrow key.
Page 97

You can also
Increase or decrease the width of
the selection box in 1-pixel
increments
Use surrounding pixels to fill the
area perpendicular to the edge of
the selection box
Before releasing the mouse
button, press Page up or Page
down.
Before releasing the mouse
button, press Shift.
This technique is ideal for photos
in which the background contains
areas with defined borders and
lines, such as a brick wall.
To avoid removing important details from areas surrounding
the scratch, you can limit the correction by creating a selection.
For information about creating selections, see “Creating
selections” on page 157.
If you are not satisfied with the result, click the Undo button
, reselect the scratch, and try varying the width of the tool.
If the scratch extends over several different backgrounds, you
can try removing the scratch one section at a time.
Removing flaws and objects
You can remove flaws and objects in your images by using the Clone
Brush tool or the Object Remover tool. The Clone Brush tool lets you
remove flaws and objects by painting over them with another part of
the image. The paint source can be a part of the same layer, another
layer in the image, a merged image, or a layer from another image.
Retouching and restoring images 91
Page 98

The Clone Brush tool was used to remove the garbage bag from
the photo on the left.
The Object Remover tool lets you remove objects when the
surrounding area is fairly uniform in color and texture. This tool is
similar to the Clone Brush tool in that it lets you identify the area to
remove and then choose a background for covering that area.
The Object Remover tool was used to remove one boat from the water.
To clone a part of an image
Edit workspace
1 On the Tools toolbar, choose the Clone Brush tool .
2 On the Tool Options palette, choose the brush tip, size, opacity,
and other settings.
If you want the Clone Brush tool to reset the source point each
time you resume painting, mark the Aligned mode check box. You
92 Corel PaintShop Pro X4 User Guide
Page 99

can continue dragging over the target area to fill in the source
image. Unmark the check box if you want every stroke to copy the
same data from the original source point.
If you want to clone data from all layers merged together, mark
the Use all layers check box. If you want to clone data from the
current layer only, unmark the check box.
3 On the source image, right-click the center point of the source
area.
If the image has more than one layer, click the name of the layer
on the Layers palette before you define the source area.
4 Drag in the image where you want to paint the cloned area.
When you clone an image area, you must select a source area
with data.
If your image contains a selection, you must right-click within
the selection to set your clone source. If you are using a pen
tablet, you can achieve the same result by holding down Shift.
You can also hold down Shift and click the image to set the
source point.
You can resize the brush interactively by pressing Alt while
dragging in the image window.
To remove objects from a photo
Edit workspace
1 On the Tools toolbar, choose the Object Remover tool .
2 On the Tool Options palette, choose the Selection Mode
button .
3 Drag around the object that you want to remove.
4 On the Tool Options palette, choose the Source Mode button .
Retouching and restoring images 93
Page 100

A rectangle is displayed in the image window.
5 Position the rectangle over the area that will replace the previous
selection.
6 Drag the handles on the rectangle to resize it, or drag the rotation
handle on the rectangle to rotate it.
It is recommended that you make the rectangle as large as, or
slightly larger than, the area you are removing.
7 On the Tool Options palette, click the Apply button .
8 Choose Selections Select None to deselect the selection.
You can also create a selection by using any of the selection
tools before you activate the Object Remover tool.
You can deselect the selection by pressing Ctrl + D.
Erasing image areas
You can use the Eraser tool to erase areas of a layer to transparency.
When you use the Eraser tool on a raster layer, all pixels in the tool’s
path become transparent. A gray-and-white checkerboard pattern
indicates transparent areas.
You can quickly remove the background from
an image by using the Background Eraser tool.
94 Corel PaintShop Pro X4 User Guide
 Loading...