

Page 1
4XLFN6WDUW*XLGH
Page 2

Contents | 1
Contents
Corel Painter Essentials 6.......................................................................................................................................................................3
Using Corel Painter Essentials 6 with a computer, tablet, or 2-in-1 device.............................................................................................. 5
Photo art: Auto-painting........................................................................................................................................................................ 5
Photo art: Painting by hand................................................................................................................................................................... 6
Photo art: Tracing...................................................................................................................................................................................7
Drawing and painting from scratch........................................................................................................................................................8
Choosing brushes................................................................................................................................................................................... 9
Acquiring brushes.................................................................................................................................................................................10
Exploring brush categories....................................................................................................................................................................11
Exploring the toolbox........................................................................................................................................................................... 17
Exploring panels and palettes...............................................................................................................................................................19
The Corel Painter family of products.................................................................................................................................................... 21
Page 3

2 | Quick Start Guide
Page 4
Corel Painter Essentials 6 | 3
Corel Painter Essentials 6
Corel® Painter® Essentials™ is an intuitive, lightweight, agile software that enables you to create paintings from photos, or draw and paint
from scratch. A variety of painting styles let you produce compelling preset-driven photo art with a couple of clicks. Or you can use the
available brushes to create your own paintings and illustrations.
The clean look and feel of the Corel Painter Essentials 6 workspace has been designed to give you easy access to the most frequently used
tools, effects, commands, and features in a clutter-free environment.
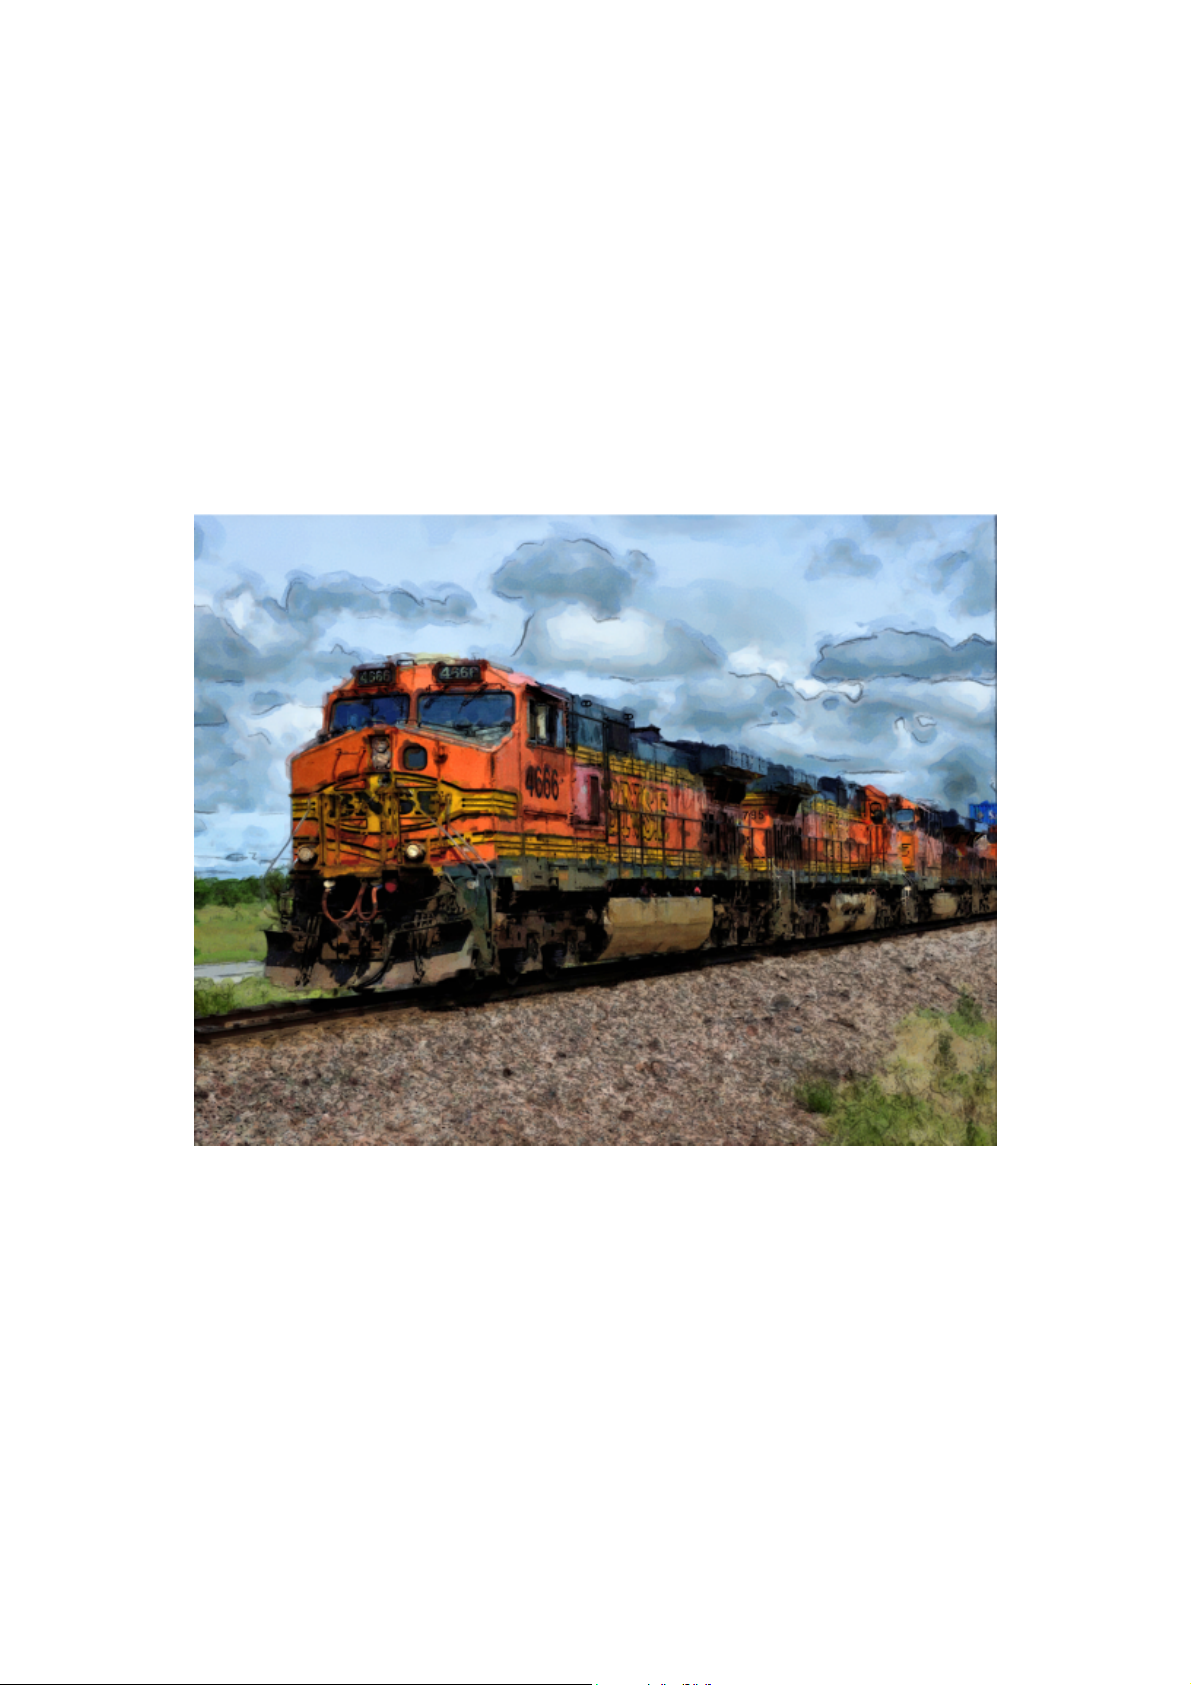
Artwork created with Corel Painter Essentials. Image by John Grant
Page 5
4 | Quick Start Guide
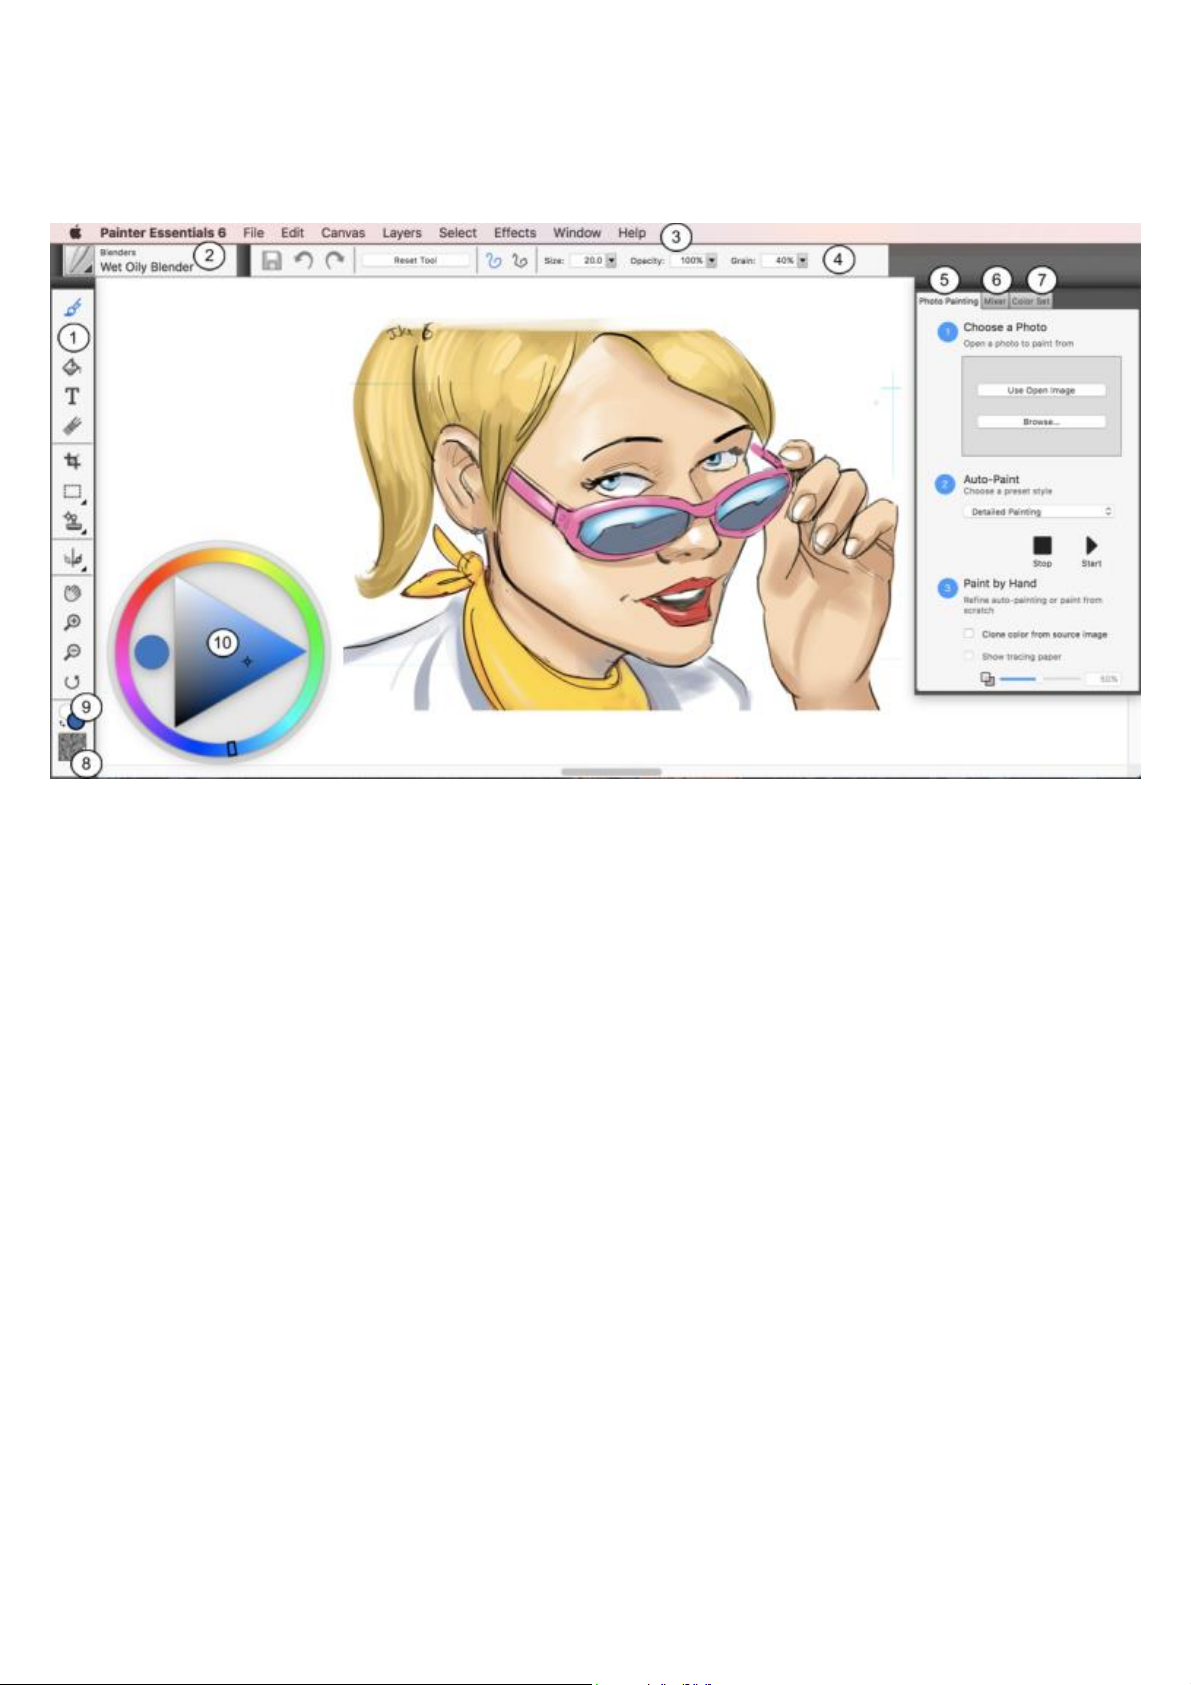
Workspace overview
The workspace is organized by using a series of menus, selectors, panels, and interactive palettes.
Circled numbers correspond to the numbers in the following table, which describes
the main components of the application window. (Artwork by Alan Wade)
Part Description
1. Toolbox Access tools for creating and modifying images
2. Brush selector bar Choose brushes
3. Menu bar Access commands and options
4. Property bar Access settings that relate to the active tool
5. Photo Painting panel Paint on a photo automatically or by hand
6. Mixer panel Blend colors
7. Color Set panel View the colors in the current color set
8. Paper selector Choose a paper texture
9. Current color View or change the current color
10. Color wheel Choose a color to paint with
Page 6

Corel Painter Essentials 6 | 5
Using Corel Painter Essentials 6 with a computer, tablet, or 2-in-1 device
The application features a dual workspace that automatically adapts to your device configuration from laptop to tablet mode on a 2-in-1
device, and optimizes the interface for tablet use with larger icons and buttons. You can also switch between tablet and laptop mode at any
time by clicking Window Layouts Quick Switch and choosing the option you want.
Corel Painter Essentials 6 supports Wacom-compatible tablets and devices as well as devices that support the Real-Time Stylus (RTS) feature
of the Windows operating system. Both groups have multi-touch capabilities.
Wacom-compatible devices are supported on both Mac OS and Windows. RTS-compatible devices include tablet PCs and graphics tablets
and are supported only on Windows.
By default, Corel Painter uses tablet options that are suitable for Wacom-compatible devices. To take full advantage of your RTS-compatible
graphics tablet or other device with Corel Painter, you must configure it first. Otherwise, you cannot use stylus information such as pressure
and tilt to adjust and control brushstrokes.
Stylus settings (Windows only)
If you received Corel Painter Essentials 6 pre-installed on your computer, pre-configured pen tablet support lets you engage seamlessly with
the application when switching from mouse to stylus or vice versa.
If you downloaded the product, and if you are using a stylus, you may need to change the tablet settings for the stylus to work properly. The
tablet preferences let you choose a suitable option for the tablet and other devices that you use with the application on Windows.
To change the stylus settings
1
Click Edit Preferences Tablet.
2 In the Tablet Options area, enable one of the following options:
• Wacom-compatible device (Wintab) — allows you to use compatible Wacom devices
• RTS-compatible device (Real-Time Stylus) — allows you to use a tablet or device that has the RTS feature
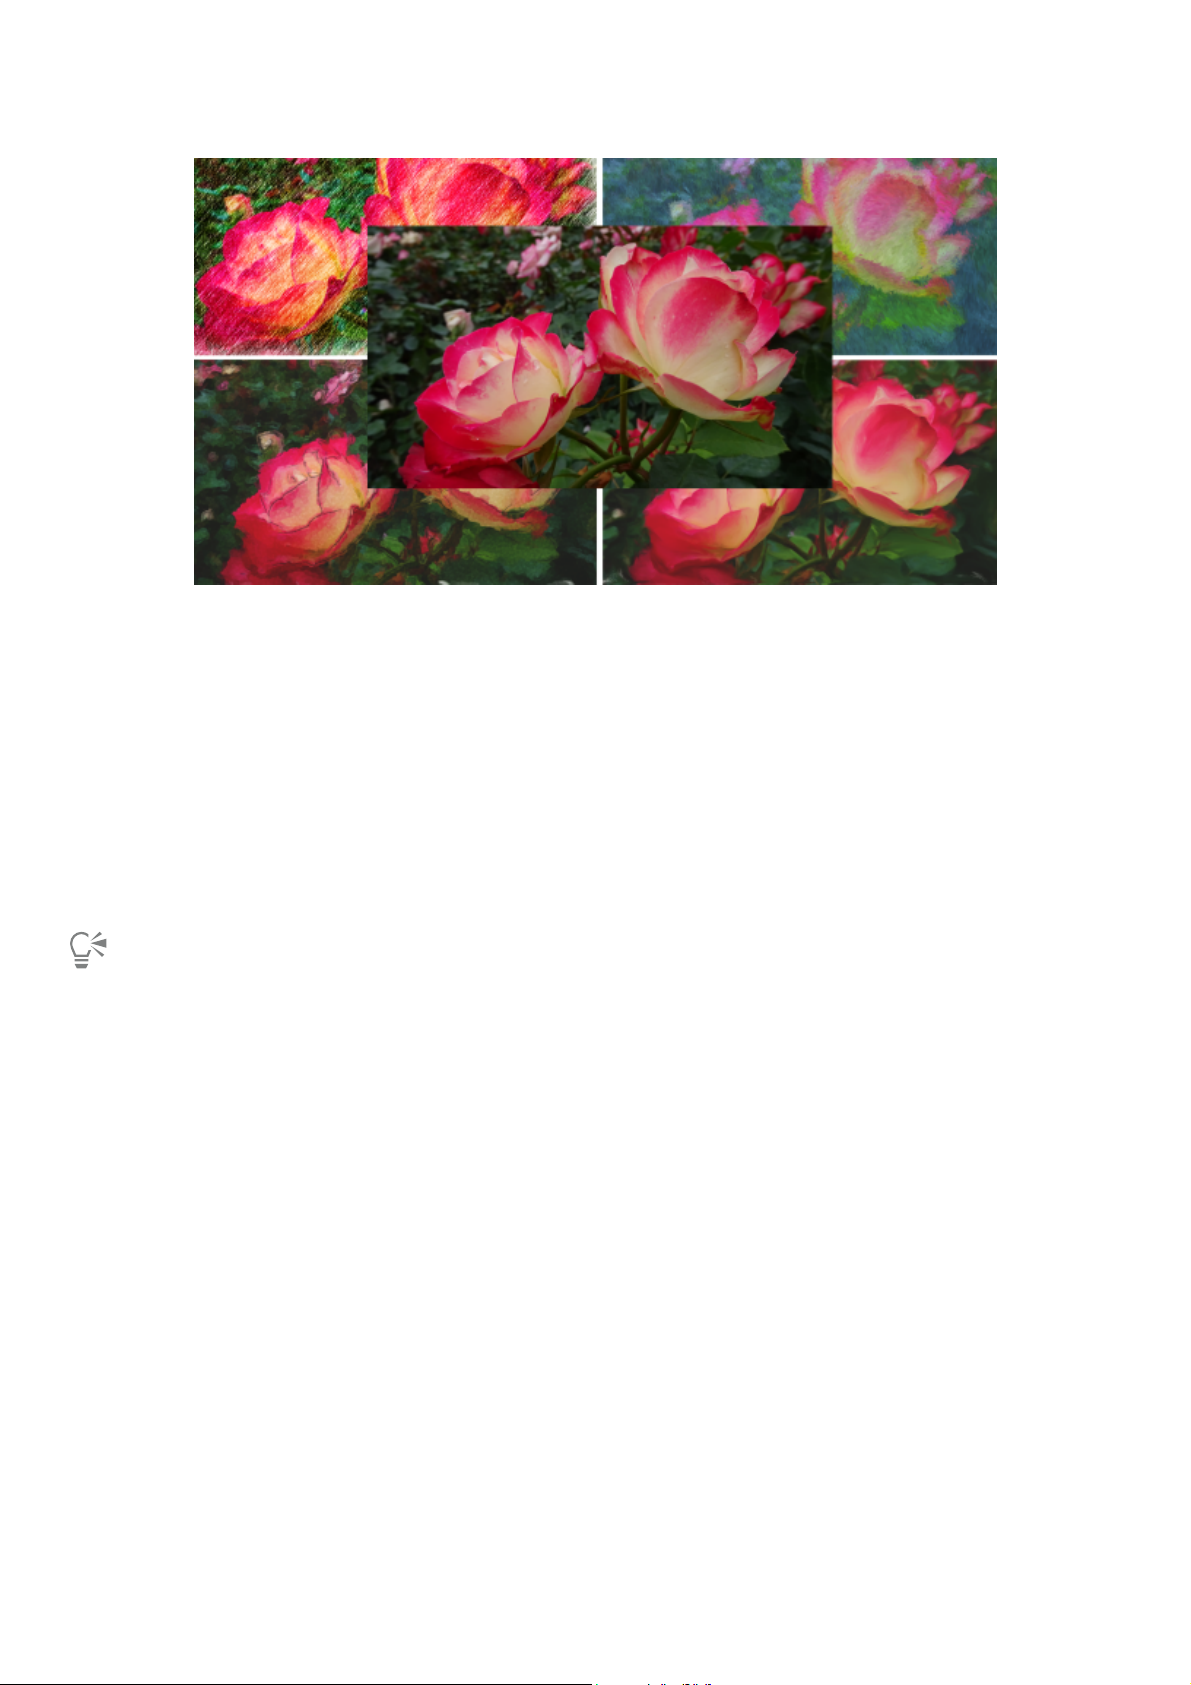
Photo art: Auto-painting
A great way to become acquainted with Corel Painter Essentials 6 is to create photo art by painting on a photo. All you need to start is a
photo to use as a source image. The tools for creating photo art are found in the Photo Painting panel. Available presets include painting
styles such as Impressionist Painting and Watercolor Sketch.
Page 7
6 | Quick Start Guide
You can use various preset styles to turn your photo into a painting.
Auto-painting may leave portraits looking too blurry. In such cases, you can refine the auto-painting by hand, by using a brush such as the
Soft Cloner in the Photo Painting Brushes category to add back some detail to the eyes and face. For information about choosing a brush,
see “Choosing brushes” on page 9.
To auto-paint
1 Open the photo that you want to turn into a painting, and click Use Open Image on the Photo Painting panel.
If you want to use a different image, click Browse .
2 In the Auto-Paint area, choose a preset style from the pop-up menu.
3 Click the Start button.
The auto-painting stops automatically when the painting is finished. To stop the auto-painting earlier, click the Stop button.
You can apply any finishing touches by hand. To vary the look of your painting, experiment with different brushes, paper textures,
and other settings.
Photo art: Painting by hand
In addition to using preset painting styles, you can paint a photo by hand. Paintings do not typically contain the fine detail that photos do.
When painting by hand, choose a key compositional element, and begin painting the selected area by using quick, loose strokes. Don’t
attempt to paint every square inch of the canvas. Allowing some of the canvas to show through adds to the loose, fluid quality of the
image. Don’t be concerned about slight overlaps with adjacent areas. The basic idea is to work quickly and with spontaneity.
It is recommended that you use a stylus and tablet to achieve the best artistic results.
When painting a photo by hand, you can experiment with different brushes from the Photo Painting Brushes category to achieve different
styles. For more information, see “Choosing brushes” on page 9. You can enable tracing paper, which helps you apply clone colors
precisely. Tracing paper displays a faded-out version of the source image in the clone document. Unlike traditional tracing paper, the Corel
Painter tracing paper is not a real object, such as a layer or a document. It's a viewing mode that allows you to see the clone source image
and use it as a reference when painting. When you enable tracing paper and start painting, the media is applied to the clone document
the way it would be applied to traditional tracing paper. If you can’t see all image details when tracing paper is enabled, you can toggle the
tracing paper view to switch between showing and hiding the clone source. You can also control the opacity of the tracing paper.
Page 8

Corel Painter Essentials 6 | 7
Painting a photo by hand
To paint a photo by hand
1 On the Photo Painting panel, click Browse, and open the photo that you want to turn into a painting.
Make sure that the Clone color from source image check box is enabled.
2 Click the Brush Selector on the Brush Selector bar, and choose a brush variant from the Photo Painting Brushes category.
3 Paint on the image.
Tip: Enable the Show tracing paper check box if you want to use the clone source image as a reference while painting.
You can adjust the zoom level while you work on details in the painting. You can also turn the tracing paper off occasionally to see
the results.
Photo art: Tracing
In addition to painting on a photo, you can use tracing paper to outline a photo or other artwork. You can then use the outline as a starting
point for a painting. Or you can trace a photo to create a sketch, such as a charcoal or chalk drawing.
Tracing a photo to create a sketch
Page 9

8 | Quick Start Guide
To trace a photo
1 On the Photo Painting panel, click Browse, and open the photo or other artwork that you want to trace.
2 Enable the Show tracing paper check box, and disable the Clone color from source image check box.
Now you can see a visual reference of the original photo as you paint, but you can choose the color that you paint with.
3 Outline the image by drawing on the canvas, using the underlying source image as reference.
By varying the pressure of the stylus, you can apply darker or lighter tones. The shading doesn’t have to be exact.
You can change the opacity of tracing paper by moving the Tracing Paper Opacity slider, or turn off the tracing paper by disabling
the Show tracing paper check box.
Drawing and painting from scratch
When you draw or paint from scratch, you can set the canvas size and orientation, choose from a variety of brushes, and paint with colors
from the color wheel.
Corel Painter Essentials 6 offers a wide range of brushes that are designed with the real media in mind, so you can predict how a brush will
behave. Painter brushes can paint or draw with any kind of media — not just oils and watercolor, but also pencils, pens, pastels, and other
media.
Individual brushes, known as brush variants, are stored in the Brush library panel in different brush categories. For more information, see
“Choosing brushes” on page 9.
You can use the brush variants as they are, or you can adjust them to suit your purposes. Many artists use brush variants with only minor
adjustments — to size, opacity, or grain (how brushstrokes interact with paper texture). These settings are found on the property bar.
You can use a variety of brushes to create original artwork.
Most Corel Painter brushes apply color to an image. However, some brushes make changes to color already in the image. For example, the
Just Add Water brush variant (in the Blenders brush category) smudges and dilutes existing colors in the image with smooth brushstrokes.
Using one of these brushes on a blank area of the canvas has no effect.
The color wheel
You can use the color wheel to choose a color.
Page 10

Corel Painter Essentials 6 | 9
Color wheel: (1) Hue Ring, (2) Selected color, (3) Saturation/Value Triangle
On the color wheel, you can choose a color from the Hue Ring and adjust the color from the Saturation/Value Triangle.
The top of the triangle represents the highest value (white), and the bottom of the triangle represents the lowest value (black). Saturation
levels increase from left to right. Dragging to the right, or clicking on the right, produces purer colors within the predominant hue. Dragging
to the left, or clicking on the left, reduces the color saturation and produces “muddier” or grayer colors.
You can move the color wheel in the application window by dragging it to a new location.
To paint from scratch
1
Click File New , and choose any options to set up your canvas.
2
In the toolbox, click the Brush tool .
3 Click the Brush Selector on the Brush Selector bar, and choose a brush category and variant.
4 Click a color on the color wheel.
5 Paint on the canvas.
You can use the controls on the property bar to change the brush size or other brush settings.
You can undo brushstrokes by clicking the Undo button on the property bar or by using the Eraser tool from the toolbox.
Choosing brushes
The Brush library panel lets you choose brushes from different brush categories. You can also view the most recently used brushes.
Page 11

10 | Quick Start Guide
The Brush library panel allows you to browse the brush categories and variants. You can
access the Brush library panel by clicking the Brush Selector on the Brush Selector bar.
In the Brush library panel, brushes are organized into categories, which contain brush variants. Brush categories are groups of similar
brushes and media. Brush variants are specific brushes within a brush category.
To hide or show the Brush Selector bar
•
Choose Window Brush Selector .
To select a brush category and variant
1
In the toolbox, click the Brush tool .
2 Click the Brush Selector on the Brush Selector bar.
3 In the Brush library panel, click a brush category, and click a brush variant.
Acquiring brushes
You can expand your collection of brushes by purchasing creative brush packs from within Corel Painter. New brush packs appear in the
Welcome screen. The Welcome screen lets you quickly start or open an image, choose a layout that suits your needs, access online learning
Page 12

Corel Painter Essentials 6 | 11
resources, get inspired by a gallery of original artwork created with Corel Painter, and find new brushes for enhancing photos, designs, and
paintings to enrich your projects. The selection is updated with new offerings as they become available. After you purchase a brush pack, it
is installed and appears as the active brush in the Brush Selector.
If you reinstall Corel Painter or install it on another computer, you can restore your purchases. This will help you download the items that you
have already purchased and reinstall them.
To acquire a brush pack
1
In the Welcome screen (Help Welcome), click Get More, and click New Brushes.
2 Click a brush pack.
3 Click Buy now and follow the onscreen instructions to purchase the item.
The brush pack that you purchased is installed and appears as the active brush in the Brush Selector.
To restore your purchases
1
Click Help Restore Purchases
2 In the dialog box that appears, type the email address that was used to make the purchases, and click Continue.
A list of your purchases is displayed.
If prompted for an administrator permission, enter your system password to continue with the installation.
3 Click Close.
This procedure can help you restore only brush packs that you purchased from within Corel Painter Essentials 6.
Exploring brush categories
The following table provides descriptions of the available brush categories in Corel Painter Essentials 6 and shows brushstroke samples.
Brush category Sample brushstroke
Acrylics & Oils
The Acrylic brush variants are versatile brushes that let you apply
quick-drying paints to the canvas. Most of the brushes allow
you to cover underlying brushstrokes and many are capable of
multicolored brushstrokes.
Wet Soft Acrylic
Page 13

12 | Quick Start Guide
Brush category Sample brushstroke
The Oils brush variants let you create effects you’d expect from
oil paints. Some variants are semitransparent and can be used
to produce a glazed effect. Other variants are opaque and cover
underlying brushstrokes.
Fine Camel
Airbrushes
Airbrushes apply fine sprays of color, which mirror the feel of a
real airbrush in action. Most airbrushes support color buildup on a
single brushstroke. However, some of the digital airbrushes do not.
To achieve color buildup with the digital airbrushes, you need to
overlay multiple brushstrokes.
Fine Spray
Artists
The Artist brush variants help you paint in the styles of master
artists. For example, you can paint in the style of Vincent Van Gogh,
with multishaded brushstrokes.
Sargent Brush
Page 14

Corel Painter Essentials 6 | 13
Brush category Sample brushstroke
Photo Painting Brushes
Although you can use any brushes when auto-painting a photo,
the Photo Painting brush variants are specifically optimized for
auto-painting. To use a Photo Painting brush, you must open a
photo or another image that can be used a source for the painting.
If you want more control over how the brushstrokes interact with
the canvas, you can change the individual stroke settings on the
property bar.
Soft Cloner
Blenders
Blenders brushes affect underlying pixels by moving and mixing
them. The brushes can reproduce the effects of blending paint
by applying water or oil. You can also smooth drawing lines and
create shading just as you would on a pencil sketch or charcoal
drawing.
Just Add Water
Page 15

14 | Quick Start Guide
Brush category Sample brushstroke
Chalk, Pastel & Crayons
Chalk brush variants produce the thick, rich texture of natural chalk
sticks, and have strokes that interact with the paper grain. The
opacity is linked to stylus pressure.
Square Chalk
Pastels, which include oil pastels, range from hard pastel styles
that reveal the paper grain to extra soft pastels that glide on
to completely cover existing strokes. Opacity is linked to stylus
pressure.
Square X-Soft Pastel
Crayons offer a range of styles. From soft and dull, to waxy and
grainy, they produce textured strokes that interact with the paper
grain. As with other dry media brush variants, the opacity is linked
to stylus pressure.
Basic Crayons
Page 16

Corel Painter Essentials 6 | 15
Brush category Sample brushstroke
Digital Watercolor
Digital Watercolor brush variants produce watercolor effects
that react with the canvas texture and allow colors to flow, mix,
and absorb more realistically. The width of Digital Watercolor
brushstrokes is affected by stylus pressure.
Diffuse Water
F-X
F-X brush variants can give you an array of creative results.
Some add color; others affect underlying pixels. The best way to
appreciate the F-X brush variants is to experiment with them on an
image or a blank canvas.
Glow
Particles
Particle brushes are physics-inspired brushes that give a unique
look and feel to your artwork. They emit particles from a central
point, and in turn the particles draw a pattern of lines (paths) as
they move across the canvas.
Spring Rainbow Silk
Page 17

16 | Quick Start Guide
Brush category Sample brushstroke
Pattern Pens
Pattern Pens brush variants let you use a brush to apply a pattern
to an image. You can vary features such as the size of the pattern
and the transparency.
Pattern Pen
Pencils, Pens & Markers
Pencil brush variants are great for any artwork that would
traditionally require pencils, from rough sketches to fine-line
drawings. Like their natural counterparts, Pencil brush variants
interact with canvas texture. All variants build to black and link
opacity to stylus pressure. The width of Pencil strokes varies
according to the speed of the stroke, so dragging quickly produces
a thinner line and dragging slowly leaves a thicker line.
Cover Pencil
Pens brush variants create realistic effects without the drawbacks
of traditional pens, which can clog, spatter, or run dry. The
Calligraphy Pen brush lets you reproduce the look of calligraphy
pen strokes on a grainy texture.
Calligraphy Pen
Page 18

Corel Painter Essentials 6 | 17
Brush category Sample brushstroke
Marker brush variants replicate conventional, real-world markers.
The brush variants range from fine point to blunt and have a variety
of nib shapes and opacity levels.
Felt Marker
Sponges
Sponges let you create a variety of textures by applying the current
paint color to cover or blend existing colors. The Smeary Wet
Sponge variant lets you blend the current paint color with existing
colors as you drag across the canvas.
Smeary Wet Sponge
Exploring the toolbox
You can use the tools in the toolbox to paint, fill shapes with color, view and navigate documents, and make selections. Under the toolbox
are a color selector and a paper selector.
The following table provides descriptions of the tools in the Corel Painter Essentials 6 toolbox.
To ol Description
Color tools
The Brush tool lets you paint and draw on the canvas or a layer.
Brush categories include pencils, pens, chalk, airbrushes, oil paints,
watercolors, and more. When the Brush tool is selected, you can
choose specific brushes from the Brushlibrarypanel.
The Dropper tool lets you pick up a color from an existing image.
The property bar shows the values of the color. When you select a
Page 19

18 | Quick Start Guide
To ol Description
color with the Dropper tool, that color becomes the current color
in the Color panel.
The Paint Bucket tool lets you fill an area with color. The property
bar shows options for the areas that you can fill and the media that
you can use.
Text, Eraser, and Crop tools
The Text tool creates text shapes. Use property bar to set the font
and point size.
The Eraser tool lets you remove unwanted areas from an image by
using brushstrokes.
The Crop tool lets you remove unwanted areas from an image by
cutting them out.
Selection tools
The Rectangular Selection tool lets you create rectangular
selections.
The Oval Selection tool lets you create oval selections.
The Lasso Selection tool lets you draw a freehand selection.
The Magic Wand tool lets you select an area of similar color by
clicking or dragging in an image.
The Selection Adjuster tool lets you select, move, and manipulate
selections created with the Rectangular , Oval, and Lasso selection
tools.
The Transform tool lets you modify selected areas of an image by
using different transformation modes.
The Layer Adjuster tool is used to select, move, and manipulate
layers.
Photo tools
The Rubber Stamp tool gives you quick access to the Straight
Cloner brush variant, and lets you sample areas within an image or
between images.
The Dodge tool lets you lighten the highlights, midtones, and
shadows in an image.
The Burn tool lets you darken the highlights, midtones, and
shadows in an image.
Page 20

Corel Painter Essentials 6 | 19
To ol Description
Symmetry tools
The Mirror Painting mode lets you create a perfectly symmetrical
painting.
The Kaleidoscope mode lets you transform basic brushstrokes into
colorful and symmetric kaleidoscope images.
Navigation tools
The Grabber tool lets you scroll through an image quickly.
The Zoom In tool lets you magnify areas of an image when you are
performing detailed work.
The Zoom Out tool lets you view larger areas of an image.
The Rotate Page tool lets you rotate an image window to
accommodate the way you naturally draw.
Selectors
The Color selector lets you choose main and additional colors. The
front swatch displays the main color, and the back swatch displays
the additional color.
The Paper Selector opens the Papers panel. From the Papers
panel, you can choose a paper texture to alter the canvas surface
and achieve more realistic results when applying brushstrokes.
Exploring panels and palettes
The interactive panels in Corel Painter Essentials 6 are single-tabbed containers that let you access content libraries, commands, controls, and
settings. Panels are stored in palettes. You can store one or multiple panels in a palette. For example, you can place the panels that you use
most often in one palette. You can also arrange panels and palettes in the application window to quickly access the tools and controls that
you use most often or to maximize screen space. For example, you can display all color-specific panels in one color palette, or display panels
individually.
Page 21

20 | Quick Start Guide
This palette includes three panels: Photo Painting, Mixer, and Color Set. You can access a panel by clicking its tab.
Exploring panels
Corel Painter Essentials 6 includes several panels that contain various tools and settings.
Panel Description
Photo Painting Provides all the tools you need for creating photo art
Mixer Lets you mix and blend colors as you would on an artist’s palette
Color Set Displays the colors in the current color set so you can organize
groups of colors
Navigator panel Lets you navigate the document window without zooming out
Layers Lets you preview and arrange all layers in a Corel Painter Essentials
6 document. You can add, delete, and collapse layers. In addition,
Page 22

Corel Painter Essentials 6 | 21
Panel Description
you can set the composite method, adjust the opacity, and lock and
unlock layers.
Rearranging panels and palettes
You can rearrange panels to better match your workflow. For example, you can group panels together in one palette. At any time, you can
further customize the palettes by adding or removing a panel, repositioning a panel, or moving a panel to another palette.
You can display a panel when you need it and close it when you’re done. If you want to save screen space, but keep the panels and palettes
displayed in the application window, you can collapse or resize them.
Palettes and panels float in the workspace. Docking attaches the panel or palette to the vertical edge of the application window. Undocking
detaches them, so you can move them. To perform docking, grab a panel’s tab or a palette’s header bar.
A typical palette features a header bar (1) and panel tabs (2).
To group panels into palettes
• Perform a task from the following table.
To Do the following
Group panels into a palette Drag a panel by its tab to another open panel to create a group.
Add a panel to a palette Drag the panel tab to the palette.
Remove a panel from a palette Drag the panel tab out of the palette.
Reposition a panel in a palette Drag the panel tab to a new location in the palette.
To hide or show a panel or palette
•
Choose Window [Panel name].
You can restore a previously hidden palette by choosing Window and choosing the name of a panel that is contained in the
palette.
To hide all panels, click Window Hide Panels. When you choose Window Show Panels, only the panels that were open when
you chose Hide Panels are displayed.
To expand or collapse a panel
• Double-click the panel tab.
The Corel Painter family of products
For information about the products available in the Corel Painter family, visit www.painterartist.com.
Page 23

22 | Quick Start Guide
Corel Corporation
1600 Carling Ave.
Ottawa, ON
K1Z 8R7
Canada
Copyright 2018 Corel Corporation. All rights reserved.
 Loading...