

Page 1
Pa
int
er
Essenti a l s
USER GUIDE
3
Page 2

Page 3

Copyright 1991 - 2005 Corel Corporation. All rights reserved.
Corel® Painter™ Essentials 3 Getting Started Guide
The contents of this user guide and the associated Corel Painter Essentials software are
the property of Corel Corporation and its respective licensors, and are protected by
copyright. For more complete copyright information about Corel Painter Essentials,
please refer to the About Corel Painter Essentials 3 section in the Help menu of the
software.
Corel, the Corel logo, Corel Painter Essentials, Corel Painter, Natural-Media,
Corel Paint Shop Pro, and Corel Photo Album are trademarks or registered
trademarks of Corel Corporation and/or its subsidiaries in Canada, the U.S. and/or
other countries.
Apple, Mac OS, and iPhoto are registered trademarks of Apple Computer, Inc.,
registered in the United States and other countries. Wacom, Graphire, Cintiq, and
Intuos are registered trademarks of Wacom Company, Ltd. Microsoft and Windows
are registered trademarks of Microsoft Corporation in the United States and/or other
countries.
Corel’s licensor(s) makes no warranties, express or implied, including without
limitation the implied warranties of merchantability and fitness for a particular
purpose, regarding the software, Corel’s licensor(s) does not warrant, guaranty,
or make any representations regarding the use of the results of the use of the
software in terms of its correctness, accuracy, reliability, currentness, or
otherwise. The entire risk as to the results and performance of the software is
assumed by you. The exclusion of the implied warranties is not permitted by
some states. The above exclusion may not apply to you.
In no event will Corel’s licensor(s), and their directors, officers, employees, or
agents (collectively "Corel's licensor") be liable to you for any consequential,
incidental, or indirect damages (including damages for loss of business profits,
business interruption, loss of business information, and the like) arising out of
the use of, or inability to use, the software even if Corel’s licensor has been
advised of the possibility of such damages. Because some states do not allow the
exclusion or limitation of liability for consequential or incidental damages, the
above limitations may not apply to you.
Page 4

Page 5

Table of contents
Quick Start Tutorials . . . . . . . . . . . . . . . . . . . . . . . . . . . . . . . . . . . . . . 1
Using the new Artists' Oils . . . . . . . . . . . . . . . . . . . . . . . . . . . . . . . . . . . . . . . 1
Using Digital Watercolor . . . . . . . . . . . . . . . . . . . . . . . . . . . . . . . . . . . . . . . . 2
Erasing techniques . . . . . . . . . . . . . . . . . . . . . . . . . . . . . . . . . . . . . . . . . . . . . 2
Transforming a photo into a painting . . . . . . . . . . . . . . . . . . . . . . . . . . . . . . . 3
Cloning within an image. . . . . . . . . . . . . . . . . . . . . . . . . . . . . . . . . . . . . . . . . 4
Cloning with an Artistic style . . . . . . . . . . . . . . . . . . . . . . . . . . . . . . . . . . . . . 4
Creating an Underpainting . . . . . . . . . . . . . . . . . . . . . . . . . . . . . . . . . . . . . . . 5
Auto-Painting your photos . . . . . . . . . . . . . . . . . . . . . . . . . . . . . . . . . . . . . . . 6
Restoring detail to your painting . . . . . . . . . . . . . . . . . . . . . . . . . . . . . . . . . . 7
Applying Surface Texture . . . . . . . . . . . . . . . . . . . . . . . . . . . . . . . . . . . . . . . . 8
Welcome to Corel Painter Essentials 3 . . . . . . . . . . . . . . . . . . . . . . . 11
What’s New in Corel Painter Essentials 3? . . . . . . . . . . . . . . . . . . . . . . . . . . 11
Learn to Draw and Paint Digitally . . . . . . . . . . . . . . . . . . . . . . . . . . . . . . . . . . 11
Turn Photos into Paintings . . . . . . . . . . . . . . . . . . . . . . . . . . . . . . . . . . . . . . . . 12
Have Fun with Digital Art . . . . . . . . . . . . . . . . . . . . . . . . . . . . . . . . . . . . . . . . 13
Enjoy Compatibility with Popular Software and Hardware . . . . . . . . . . . . . . . . 14
How to Use the Documentation . . . . . . . . . . . . . . . . . . . . . . . . . . . . . . . . . . 16
Documentation Conventions . . . . . . . . . . . . . . . . . . . . . . . . . . . . . . . . . . . . . . 16
Using Corel Painter Essentials 3 Help . . . . . . . . . . . . . . . . . . . . . . . . . . . . . . . . 18
Using the Quick Guide palette . . . . . . . . . . . . . . . . . . . . . . . . . . . . . . . . . . . . . 19
How to Sign Up for Free Training from lynda.com . . . . . . . . . . . . . . . . . . . . 19
How to Access Corel Support Services. . . . . . . . . . . . . . . . . . . . . . . . . . . . . . 19
A Workspace Tour . . . . . . . . . . . . . . . . . . . . . . . . . . . . . . . . . . . . . . . 21
Corel Painter Essentials 3 Workspace . . . . . . . . . . . . . . . . . . . . . . . . . . . . . . 21
The Menus and the Document Window . . . . . . . . . . . . . . . . . . . . . . . . . . . . 22
The Toolbox. . . . . . . . . . . . . . . . . . . . . . . . . . . . . . . . . . . . . . . . . . . . . . . . . 22
Toolbox Basics . . . . . . . . . . . . . . . . . . . . . . . . . . . . . . . . . . . . . . . . . . . . . . . . . 22
Accessing Tools in the Toolbox . . . . . . . . . . . . . . . . . . . . . . . . . . . . . . . . . . . . . 23
Exploring the Toolbox . . . . . . . . . . . . . . . . . . . . . . . . . . . . . . . . . . . . . . . . . . . 24
Using Selectors . . . . . . . . . . . . . . . . . . . . . . . . . . . . . . . . . . . . . . . . . . . . . . . . . 27
The Property Bar . . . . . . . . . . . . . . . . . . . . . . . . . . . . . . . . . . . . . . . . . . . . . 27
Property Bar Basics . . . . . . . . . . . . . . . . . . . . . . . . . . . . . . . . . . . . . . . . . . . . . 27
Table of contents i
Page 6

Using Tool Settings on the Property Bar . . . . . . . . . . . . . . . . . . . . . . . . . . . . . .28
The Brush Selector Bar . . . . . . . . . . . . . . . . . . . . . . . . . . . . . . . . . . . . . . . . . 29
Working with the Brush Selector Bar . . . . . . . . . . . . . . . . . . . . . . . . . . . . . . . . .29
The Palettes . . . . . . . . . . . . . . . . . . . . . . . . . . . . . . . . . . . . . . . . . . . . . . . . . 31
Showing and Hiding Palettes . . . . . . . . . . . . . . . . . . . . . . . . . . . . . . . . . . . . . . .31
Navigating Palettes . . . . . . . . . . . . . . . . . . . . . . . . . . . . . . . . . . . . . . . . . . . . . .32
Exploring the Palette Groups . . . . . . . . . . . . . . . . . . . . . . . . . . . . . . . . . . . . . . .32
Grouping, Repositioning, and Resizing Palettes . . . . . . . . . . . . . . . . . . . . . . . . .33
Docking Palettes . . . . . . . . . . . . . . . . . . . . . . . . . . . . . . . . . . . . . . . . . . . . . . . .34
Restoring Palette Layout . . . . . . . . . . . . . . . . . . . . . . . . . . . . . . . . . . . . . . . . . .35
Restoring the default Corel Painter Essentials settings . . . . . . . . . . . . . . . . . . . .35
The Basics. . . . . . . . . . . . . . . . . . . . . . . . . . . . . . . . . . . . . . . . . . . . . . 37
Working with Documents . . . . . . . . . . . . . . . . . . . . . . . . . . . . . . . . . . . . . . 37
Creating and Opening Documents . . . . . . . . . . . . . . . . . . . . . . . . . . . . . . . . . .37
Creating and Opening Templates . . . . . . . . . . . . . . . . . . . . . . . . . . . . . . . . . . . .40
Placing Files . . . . . . . . . . . . . . . . . . . . . . . . . . . . . . . . . . . . . . . . . . . . . . . . . . .40
Understanding Resolution . . . . . . . . . . . . . . . . . . . . . . . . . . . . . . . . . . . . . . . . .41
Zooming . . . . . . . . . . . . . . . . . . . . . . . . . . . . . . . . . . . . . . . . . . . . . . . . . . . . . .42
Repositioning Documents . . . . . . . . . . . . . . . . . . . . . . . . . . . . . . . . . . . . . . . . .44
Rotating Documents . . . . . . . . . . . . . . . . . . . . . . . . . . . . . . . . . . . . . . . . . . . . .45
Cropping Images . . . . . . . . . . . . . . . . . . . . . . . . . . . . . . . . . . . . . . . . . . . . . . . .46
Using Full Screen Mode . . . . . . . . . . . . . . . . . . . . . . . . . . . . . . . . . . . . . . . . . . .47
Resizing the Canvas . . . . . . . . . . . . . . . . . . . . . . . . . . . . . . . . . . . . . . . . . . . . . .47
Rotating and Flipping the Canvas . . . . . . . . . . . . . . . . . . . . . . . . . . . . . . . . . . .48
Saving Files . . . . . . . . . . . . . . . . . . . . . . . . . . . . . . . . . . . . . . . . . . . . . . . . . . . .49
Editing iPhoto Images in Corel Painter Essentials (Mac OS) . . . . . . . . . . . . . . . .52
Sending Images to Corel Photo Album (Windows) . . . . . . . . . . . . . . . . . . . . . .52
Closing Documents and Quitting the Application . . . . . . . . . . . . . . . . . . . . . . .53
Drag-and-Drop Features . . . . . . . . . . . . . . . . . . . . . . . . . . . . . . . . . . . . . . . . . .53
Setting Preferences . . . . . . . . . . . . . . . . . . . . . . . . . . . . . . . . . . . . . . . . . . . . 54
General Preferences . . . . . . . . . . . . . . . . . . . . . . . . . . . . . . . . . . . . . . . . . . . . . .55
Brush Tracking Preferences . . . . . . . . . . . . . . . . . . . . . . . . . . . . . . . . . . . . . . . .57
Memory and Scratch Preferences . . . . . . . . . . . . . . . . . . . . . . . . . . . . . . . . . . . .58
Using Two Monitors . . . . . . . . . . . . . . . . . . . . . . . . . . . . . . . . . . . . . . . . . . . . .59
Wacom Intuos Support . . . . . . . . . . . . . . . . . . . . . . . . . . . . . . . . . . . . . . . . . . .59
Textures and Patterns . . . . . . . . . . . . . . . . . . . . . . . . . . . . . . . . . . . . 63
Using Paper Texture . . . . . . . . . . . . . . . . . . . . . . . . . . . . . . . . . . . . . . . . . . . 63
Choosing Paper Textures . . . . . . . . . . . . . . . . . . . . . . . . . . . . . . . . . . . . . . . . . .64
Using Patterns . . . . . . . . . . . . . . . . . . . . . . . . . . . . . . . . . . . . . . . . . . . . . . . 65
ii Table of contents
Page 7

Choosing Patterns . . . . . . . . . . . . . . . . . . . . . . . . . . . . . . . . . . . . . . . . . . . . . . 65
Color . . . . . . . . . . . . . . . . . . . . . . . . . . . . . . . . . . . . . . . . . . . . . . . . . . 67
Getting Started with Color . . . . . . . . . . . . . . . . . . . . . . . . . . . . . . . . . . . . . . 67
Changing the Paper Color . . . . . . . . . . . . . . . . . . . . . . . . . . . . . . . . . . . . . . . . 67
Using the Colors Palette . . . . . . . . . . . . . . . . . . . . . . . . . . . . . . . . . . . . . . . . . . 68
Understanding Main and Additional Colors . . . . . . . . . . . . . . . . . . . . . . . . . . . 69
Sampling Colors from Images . . . . . . . . . . . . . . . . . . . . . . . . . . . . . . . . . . . . . . 70
Cloning Color . . . . . . . . . . . . . . . . . . . . . . . . . . . . . . . . . . . . . . . . . . . . . . . . . . 71
Working with Gradients . . . . . . . . . . . . . . . . . . . . . . . . . . . . . . . . . . . . . . . 71
Using Gradients . . . . . . . . . . . . . . . . . . . . . . . . . . . . . . . . . . . . . . . . . . . . . . . . 72
Painting. . . . . . . . . . . . . . . . . . . . . . . . . . . . . . . . . . . . . . . . . . . . . . . . 73
Exploring Brushes . . . . . . . . . . . . . . . . . . . . . . . . . . . . . . . . . . . . . . . . . . . . 73
Understanding Brush Categories . . . . . . . . . . . . . . . . . . . . . . . . . . . . . . . . . . . 74
Selecting a Brush . . . . . . . . . . . . . . . . . . . . . . . . . . . . . . . . . . . . . . . . . . . . . . . 82
Choosing Brush Settings . . . . . . . . . . . . . . . . . . . . . . . . . . . . . . . . . . . . . . . . . . 83
Adjusting Opacity and Grain . . . . . . . . . . . . . . . . . . . . . . . . . . . . . . . . . . . . . . 84
Using a Stylus or Mouse . . . . . . . . . . . . . . . . . . . . . . . . . . . . . . . . . . . . . . . . . . 86
Marking the Canvas . . . . . . . . . . . . . . . . . . . . . . . . . . . . . . . . . . . . . . . . . . . 87
Freehand vs. Straight-Line Drawing . . . . . . . . . . . . . . . . . . . . . . . . . . . . . . . . . 87
Constraining, Fading, and Undoing Strokes . . . . . . . . . . . . . . . . . . . . . . . . . . . 89
Erasing Image Areas . . . . . . . . . . . . . . . . . . . . . . . . . . . . . . . . . . . . . . . . . . . . . 90
Exploring Painting . . . . . . . . . . . . . . . . . . . . . . . . . . . . . . . . . . . . . . . . . . . . 91
Painting with Color . . . . . . . . . . . . . . . . . . . . . . . . . . . . . . . . . . . . . . . . . . . . . 91
Troubleshooting . . . . . . . . . . . . . . . . . . . . . . . . . . . . . . . . . . . . . . . . . . . . . . . . 93
Working with the Impasto Layer . . . . . . . . . . . . . . . . . . . . . . . . . . . . . . . . . . . 93
Painting with Airbrushes . . . . . . . . . . . . . . . . . . . . . . . . . . . . . . . . . . . . . . . . . 94
Working with Fill. . . . . . . . . . . . . . . . . . . . . . . . . . . . . . . . . . . . . . . . . . . . . 96
Filling an Area with Media . . . . . . . . . . . . . . . . . . . . . . . . . . . . . . . . . . . . . . . . 96
Using the Image Hose . . . . . . . . . . . . . . . . . . . . . . . . . . . . . . . . . . . . . . . . . 98
How the Image Hose Works . . . . . . . . . . . . . . . . . . . . . . . . . . . . . . . . . . . . . . 98
Getting Started with the Image Hose . . . . . . . . . . . . . . . . . . . . . . . . . . . . . . . . 99
Controlling the Image Hose . . . . . . . . . . . . . . . . . . . . . . . . . . . . . . . . . . . . . . 100
Cloning and Tracing. . . . . . . . . . . . . . . . . . . . . . . . . . . . . . . . . . . . . 103
Cloning Images . . . . . . . . . . . . . . . . . . . . . . . . . . . . . . . . . . . . . . . . . . . . . 103
Cloning a Document . . . . . . . . . . . . . . . . . . . . . . . . . . . . . . . . . . . . . . . . . . . 104
Using Tracing Paper . . . . . . . . . . . . . . . . . . . . . . . . . . . . . . . . . . . . . . . . . . . . 105
Changing Clone Source . . . . . . . . . . . . . . . . . . . . . . . . . . . . . . . . . . . . . . . . . 107
Table of contents iii
Page 8

Using Quick Clone . . . . . . . . . . . . . . . . . . . . . . . . . . . . . . . . . . . . . . . . . . . . .107
Using Cloner Brushes . . . . . . . . . . . . . . . . . . . . . . . . . . . . . . . . . . . . . . . . . 108
Painting in the Clone . . . . . . . . . . . . . . . . . . . . . . . . . . . . . . . . . . . . . . . . . . . .108
Using Point-to-Point Cloning . . . . . . . . . . . . . . . . . . . . . . . . . . . . . . . . . . . . .109
Turning Other Brushes into Cloners . . . . . . . . . . . . . . . . . . . . . . . . . . . . . . 111
Using Clone Color . . . . . . . . . . . . . . . . . . . . . . . . . . . . . . . . . . . . . . . . . . . . . .111
Cloning with Photo Painting Palettes . . . . . . . . . . . . . . . . . . . . . . . . . . . . . 112
Preparing a photo for cloning . . . . . . . . . . . . . . . . . . . . . . . . . . . . . . . . . . . . .112
Cloning photos . . . . . . . . . . . . . . . . . . . . . . . . . . . . . . . . . . . . . . . . . . . . . . . .113
Restoring photo detail . . . . . . . . . . . . . . . . . . . . . . . . . . . . . . . . . . . . . . . . . . .114
Selections . . . . . . . . . . . . . . . . . . . . . . . . . . . . . . . . . . . . . . . . . . . . . 117
Getting Started with Selections . . . . . . . . . . . . . . . . . . . . . . . . . . . . . . . . . . 117
Selecting a Drawing Mode . . . . . . . . . . . . . . . . . . . . . . . . . . . . . . . . . . . . . . . .117
Turning Selections On and Off . . . . . . . . . . . . . . . . . . . . . . . . . . . . . . . . . . . . .118
Inverting Selections . . . . . . . . . . . . . . . . . . . . . . . . . . . . . . . . . . . . . . . . . . . . .118
Creating Selections . . . . . . . . . . . . . . . . . . . . . . . . . . . . . . . . . . . . . . . . . . . 119
Editing Selections . . . . . . . . . . . . . . . . . . . . . . . . . . . . . . . . . . . . . . . . . . . . 120
Layers . . . . . . . . . . . . . . . . . . . . . . . . . . . . . . . . . . . . . . . . . . . . . . . . 125
Getting Started with Layers . . . . . . . . . . . . . . . . . . . . . . . . . . . . . . . . . . . . 125
Layer Basics . . . . . . . . . . . . . . . . . . . . . . . . . . . . . . . . . . . . . . . . . . . . . . . . . . .126
The Layers Palette . . . . . . . . . . . . . . . . . . . . . . . . . . . . . . . . . . . . . . . . . . . . . .126
The Layer Adjuster Tool . . . . . . . . . . . . . . . . . . . . . . . . . . . . . . . . . . . . . . . . . .126
Creating Layers . . . . . . . . . . . . . . . . . . . . . . . . . . . . . . . . . . . . . . . . . . . . . . . .126
Naming Layers . . . . . . . . . . . . . . . . . . . . . . . . . . . . . . . . . . . . . . . . . . . . . . . .128
Saving Files That Contain Layers . . . . . . . . . . . . . . . . . . . . . . . . . . . . . . . . . . .129
Deleting Layers . . . . . . . . . . . . . . . . . . . . . . . . . . . . . . . . . . . . . . . . . . . . . . . .129
Managing Layers . . . . . . . . . . . . . . . . . . . . . . . . . . . . . . . . . . . . . . . . . . . . . 129
Selecting Layers . . . . . . . . . . . . . . . . . . . . . . . . . . . . . . . . . . . . . . . . . . . . . . . .129
Moving Layers . . . . . . . . . . . . . . . . . . . . . . . . . . . . . . . . . . . . . . . . . . . . . . . . .130
Viewing Layers . . . . . . . . . . . . . . . . . . . . . . . . . . . . . . . . . . . . . . . . . . . . . . . .132
Changing Layer Hierarchy . . . . . . . . . . . . . . . . . . . . . . . . . . . . . . . . . . . . . . . .132
Grouping Layers . . . . . . . . . . . . . . . . . . . . . . . . . . . . . . . . . . . . . . . . . . . . . . .133
Merging Layers with the Canvas . . . . . . . . . . . . . . . . . . . . . . . . . . . . . . . . . . .135
Editing Layers . . . . . . . . . . . . . . . . . . . . . . . . . . . . . . . . . . . . . . . . . . . . . . . 135
Painting on Layers . . . . . . . . . . . . . . . . . . . . . . . . . . . . . . . . . . . . . . . . . . . . . .135
Working with Floating Objects . . . . . . . . . . . . . . . . . . . . . . . . . . . . . . . . . . . .136
Setting Layer Opacity . . . . . . . . . . . . . . . . . . . . . . . . . . . . . . . . . . . . . . . . . . .137
Adding Notes to a Layer . . . . . . . . . . . . . . . . . . . . . . . . . . . . . . . . . . . . . . . . .137
iv Table of contents
Page 9

Image Effects . . . . . . . . . . . . . . . . . . . . . . . . . . . . . . . . . . . . . . . . . . 139
Applying Effects . . . . . . . . . . . . . . . . . . . . . . . . . . . . . . . . . . . . . . . . . . . . . 139
Where to Apply Effects . . . . . . . . . . . . . . . . . . . . . . . . . . . . . . . . . . . . . . . . . 139
Using Fade with Effects . . . . . . . . . . . . . . . . . . . . . . . . . . . . . . . . . . . . . . . . . 140
Applying Recently Used Effects . . . . . . . . . . . . . . . . . . . . . . . . . . . . . . . . . . . 141
Understanding the Using Pop-up Menu . . . . . . . . . . . . . . . . . . . . . . . . . . . . . 141
Using Orientation Effects . . . . . . . . . . . . . . . . . . . . . . . . . . . . . . . . . . . . . . 141
Rotating Images . . . . . . . . . . . . . . . . . . . . . . . . . . . . . . . . . . . . . . . . . . . . . . . 141
Scaling Images . . . . . . . . . . . . . . . . . . . . . . . . . . . . . . . . . . . . . . . . . . . . . . . . 142
Flipping Images . . . . . . . . . . . . . . . . . . . . . . . . . . . . . . . . . . . . . . . . . . . . . . . 143
Adjusting Brightness and Contrast . . . . . . . . . . . . . . . . . . . . . . . . . . . . . . . . . 144
Equalizing Images . . . . . . . . . . . . . . . . . . . . . . . . . . . . . . . . . . . . . . . . . . . 145
Using the Equalize Effect to Equalize Images . . . . . . . . . . . . . . . . . . . . . . . . . 145
Using Lighting . . . . . . . . . . . . . . . . . . . . . . . . . . . . . . . . . . . . . . . . . . . . . . 147
Applying Preset Lighting Effects . . . . . . . . . . . . . . . . . . . . . . . . . . . . . . . . . . 148
Creating Custom Lighting . . . . . . . . . . . . . . . . . . . . . . . . . . . . . . . . . . . . . . . 148
Adding, Deleting, and Repositioning Light Sources . . . . . . . . . . . . . . . . . . . . 148
Setting Light Properties . . . . . . . . . . . . . . . . . . . . . . . . . . . . . . . . . . . . . . . . . 149
Working with Surface Texture . . . . . . . . . . . . . . . . . . . . . . . . . . . . . . . . . . 150
Setting Appearance of Depth Properties . . . . . . . . . . . . . . . . . . . . . . . . . . . . . 151
Using Paper to Create Texture . . . . . . . . . . . . . . . . . . . . . . . . . . . . . . . . . . . . 151
Using Image Luminance to Create Texture . . . . . . . . . . . . . . . . . . . . . . . . . . . 152
Applying Express Texture . . . . . . . . . . . . . . . . . . . . . . . . . . . . . . . . . . . . . . . . 153
Applying Woodcut Effects . . . . . . . . . . . . . . . . . . . . . . . . . . . . . . . . . . . . . . . 154
Applying the Sketch Effect . . . . . . . . . . . . . . . . . . . . . . . . . . . . . . . . . . . . . . . 155
Using Focus Effects. . . . . . . . . . . . . . . . . . . . . . . . . . . . . . . . . . . . . . . . . . . 156
Sharpening Focus . . . . . . . . . . . . . . . . . . . . . . . . . . . . . . . . . . . . . . . . . . . . . . 157
Softening Focus . . . . . . . . . . . . . . . . . . . . . . . . . . . . . . . . . . . . . . . . . . . . . . . 157
Using Esoterica Effects . . . . . . . . . . . . . . . . . . . . . . . . . . . . . . . . . . . . . . . . 158
Using Auto Van Gogh . . . . . . . . . . . . . . . . . . . . . . . . . . . . . . . . . . . . . . . . . . 158
Working with Text. . . . . . . . . . . . . . . . . . . . . . . . . . . . . . . . . . . . . . 161
Understanding the Text Layer . . . . . . . . . . . . . . . . . . . . . . . . . . . . . . . . . . 161
Creating and Formatting Text . . . . . . . . . . . . . . . . . . . . . . . . . . . . . . . . . . 161
Adding Text . . . . . . . . . . . . . . . . . . . . . . . . . . . . . . . . . . . . . . . . . . . . . . . . . . 161
Changing the Font, Point Size, and Color of Text . . . . . . . . . . . . . . . . . . . . . . 162
Aligning Text . . . . . . . . . . . . . . . . . . . . . . . . . . . . . . . . . . . . . . . . . . . . . . . . . 162
Stretching, Rotating, and Skewing Text . . . . . . . . . . . . . . . . . . . . . . . . . . . . . 163
Dropping Text . . . . . . . . . . . . . . . . . . . . . . . . . . . . . . . . . . . . . . . . . . . . . . . . 164
Table of contents v
Page 10

Printing. . . . . . . . . . . . . . . . . . . . . . . . . . . . . . . . . . . . . . . . . . . . . . . 165
Understanding Printing . . . . . . . . . . . . . . . . . . . . . . . . . . . . . . . . . . . . . . . 165
Printing Composited Images . . . . . . . . . . . . . . . . . . . . . . . . . . . . . . . . . . . . . .165
Printing Your Work . . . . . . . . . . . . . . . . . . . . . . . . . . . . . . . . . . . . . . . . . . 166
Setting Up Printing . . . . . . . . . . . . . . . . . . . . . . . . . . . . . . . . . . . . . . . . . . . . .166
Sizing an Image . . . . . . . . . . . . . . . . . . . . . . . . . . . . . . . . . . . . . . . . . . . . . . . .166
Printing an Image . . . . . . . . . . . . . . . . . . . . . . . . . . . . . . . . . . . . . . . . . . . . . .166
Keyboard Shortcuts . . . . . . . . . . . . . . . . . . . . . . . . . . . . . . . . . . . . . 169
Toolbox Commands . . . . . . . . . . . . . . . . . . . . . . . . . . . . . . . . . . . . . . . . . . 170
Palette Commands . . . . . . . . . . . . . . . . . . . . . . . . . . . . . . . . . . . . . . . . . . . 171
Corel Painter Essentials 3 Menu Commands (Mac OS) . . . . . . . . . . . . . . . . 171
File Menu Commands . . . . . . . . . . . . . . . . . . . . . . . . . . . . . . . . . . . . . . . . . 172
Edit Menu Commands . . . . . . . . . . . . . . . . . . . . . . . . . . . . . . . . . . . . . . . . 172
Canvas Menu Commands . . . . . . . . . . . . . . . . . . . . . . . . . . . . . . . . . . . . . . 172
Select Menu Commands . . . . . . . . . . . . . . . . . . . . . . . . . . . . . . . . . . . . . . . 173
Effects Menu Commands. . . . . . . . . . . . . . . . . . . . . . . . . . . . . . . . . . . . . . . 173
Window Menu Commands . . . . . . . . . . . . . . . . . . . . . . . . . . . . . . . . . . . . . 173
Screen Navigation . . . . . . . . . . . . . . . . . . . . . . . . . . . . . . . . . . . . . . . . . . . . 174
Palette Menu Commands . . . . . . . . . . . . . . . . . . . . . . . . . . . . . . . . . . . . . . 174
Brush Tools. . . . . . . . . . . . . . . . . . . . . . . . . . . . . . . . . . . . . . . . . . . . . . . . . 175
Selection Tools . . . . . . . . . . . . . . . . . . . . . . . . . . . . . . . . . . . . . . . . . . . . . . 176
Adjuster Tools. . . . . . . . . . . . . . . . . . . . . . . . . . . . . . . . . . . . . . . . . . . . . . . 176
Other Commands . . . . . . . . . . . . . . . . . . . . . . . . . . . . . . . . . . . . . . . . . . . . 177
vi Table of contents
Page 11

Quick Start Tutorials
Quick Start Tutorials guide you through basic tasks in a few easy steps.
Using the new Artists' Oils
The new Artists’ Oils brush category gives users an incredibly realistic oil painting
experience. Each dab of an Artists’ Oils brush on the canvas loads a preset, finite
amount of paint. As the paint runs out, the bristly brush stroke becomes fainter. Brush
strokes interact with any paint already on the canvas as they would with natural
media. Corel Painter Essentials 3 includes five Artists’ Oils brush variants: Blender
Brush, Grainy Dry Brush, Impasto Palette Knife, Thick Wet Impasto, and Wet Oily
Brush.
To paint with Artists’ Oils
1 Choose File menu > New, and select a white paper color.
Artists’ Oils blend with all colors on the canvas, including paper color. This is
useful when painting on a photograph or using a color wash as an underpainting.
To prevent Artists’ Oils from blending with the canvas color, create a new layer
exclusively for the Artists’ Oils (choose Layers menu > New Layer).
2 On the Brush Selector Bar, choose Artists’ Oils from the Brush Category Selector.
3 On the Brush Selector Bar, choose a brush variant from the Brush Variant Selector.
4 Paint on the canvas.
Quick Start Tutorials 1
Page 12

Using Digital Watercolor
Digital Watercolor brush variants produce watercolor effects that react with the canvas
texture. You can apply a Digital Watercolor brush stroke to any layer or the canvas.
For example, if you’re applying watercolor effects to a digital photo, Digital
Watercolor brush strokes can be applied directly to the image.
To paint with Digital Watercolor
1 Choose File menu > New, choose a paper size and color, and click OK.
2 On the Brush Selector Bar, choose Digital Watercolor from the Brush Category
Selector.
3 On the Brush Selector Bar, choose a brush variant from the Brush Variant Selector.
4 Paint on the canvas.
Erasing techniques
Conveniently located in the toolbox, the new Eraser tool gives you easy access to the
Erasers brush category. When you choose the Eraser tool, you activate the last Eraser
brush variant you used. Eraser brush variants erase down to the paper color.
Some brush categories, such as Digital Watercolor, have eraser variants that only erase
media applied by brushes from that category. These media-specific eraser variants are
useful because they only let you erase brush strokes that you applied with certain brush
categories, leaving everything else unaffected.
In the following example, you’ll paint on the canvas with brush strokes from the
Airbrushes and Digital Watercolor brush categories. Then, you’ll use the Eraser tool
and the Digital Watercolor brush category’s media-specific eraser to erase portions of
the brush strokes.
To apply brush strokes
1 Choose File menu > New.
2 On the Brush Selector Bar, choose Airbrushes from the Brush Category Selector
and Coarse Spray from the Brush Variant Selector.
3 Paint on the canvas.
2 Corel Painter Essentials 3 User Guide
Page 13

4 On the Brush Selector Bar, choose Digital Watercolor from the Brush Category
Selector and Broad Water Brush from the Brush Variant Selector.
5 Paint on the canvas.
To erase with the Eraser tool
1 Choose the Eraser tool from the toolbox.
2 Drag over parts of both brush strokes.
Both brush strokes are erased.
To erase with a media-specific eraser
1 On the Brush Selector Bar, choose Digital Watercolor from the Brush Category
Selector and Gentle Wet Eraser from the Brush Variant Selector.
2 Drag over parts of both brush strokes.
Only the Digital Watercolor brush stroke is erased.
Transforming a photo into a painting
Quick Clone helps you transform photos into paintings. This is done by creating a
clone of your image, and painting in the clone. The clone of the file is more than a
copy. It maintains a pixel-for-pixel correspondence with its source document.
This new feature speeds up the manual image-cloning process by reducing five steps to
one. You can adjust Quick Clone settings on the General page of the Preferences dialog
box.
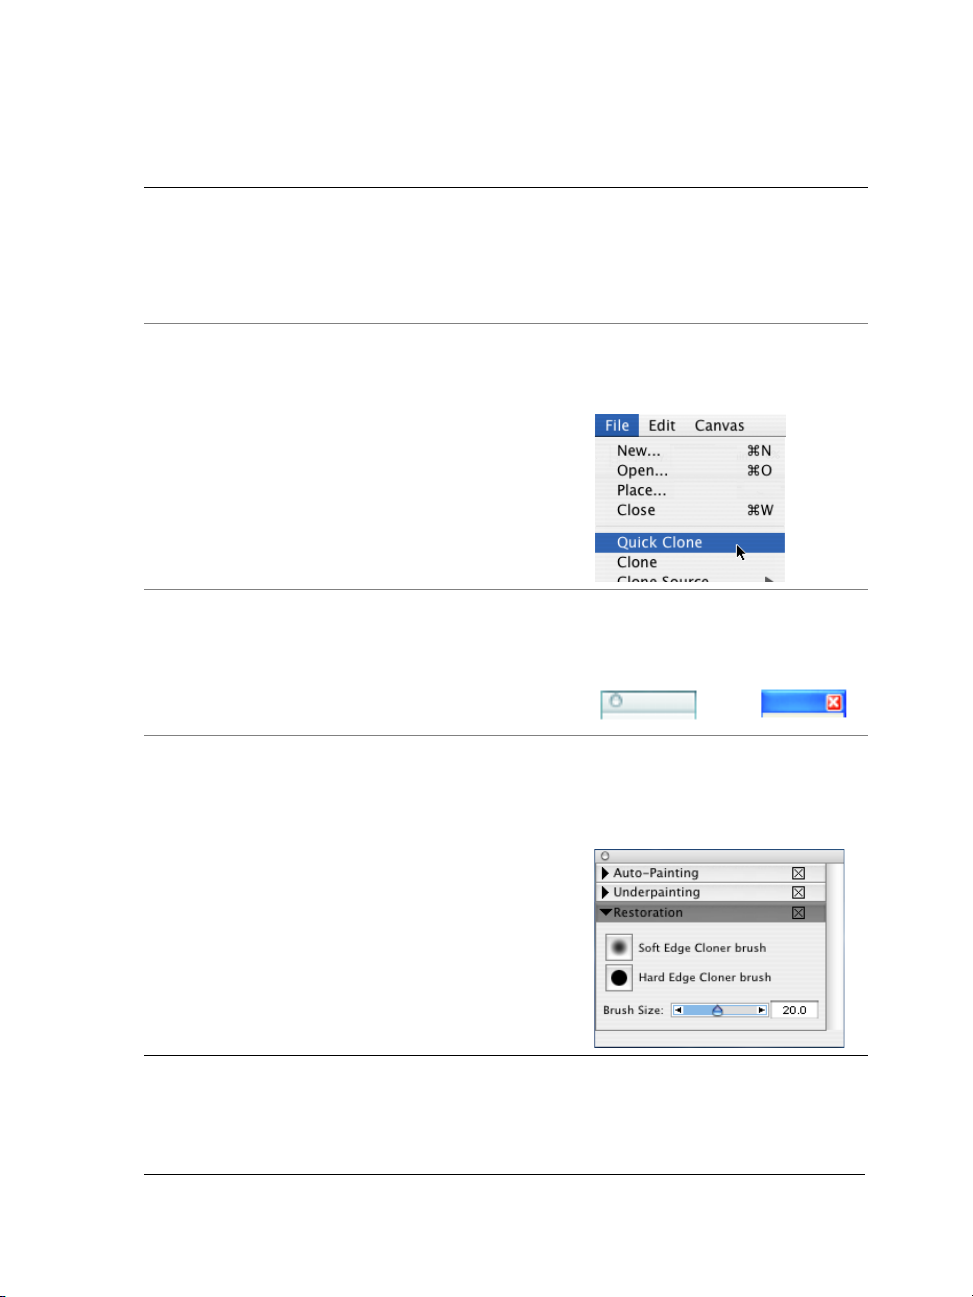
To clone using Quick Clone
1 Choose File menu > Open.
2 In the Open (Mac OS) or Select Image (Windows) dialog box, choose the image
that you want to clone, and click Open.
3 Choose File menu > Quick Clone.
4 Trace over the image using any Corel Painter Essentials brush variant.
If you have enabled the Switch to Cloner Brushes check box in the Preferences
dialog box, the last Cloner brush you used is automatically selected.
Quick Start Tutorials 3
Page 14

You can customize the Quick Clone effect. You can choose whether to delete
the image from the clone or to turn on Tracing Paper. You can also select the
last-used Cloner brush or choose to clone color with any brush variant.
Cloning within an image
The new Rubber Stamp Tool is located in the Toolbox to make it easy for you to set up
point-to-point cloning. By setting source and destination reference points, you can
clone within a document or between different areas of separate documents.
To clone point to point within a document
1 Choose File menu > Open, choose an image from the Open (Mac OS) or Select
Image (Windows) dialog box, and click Open.
2 Choose the Rubber Stamp tool in the toolbox.
3 Choose File menu > Clone Source, and choose the image you want to reference.
4 Hold down Option (Mac OS) or Alt (Windows).
A crosshair cursor appears.
5 Click inside the source image to set the source reference point.
A green marker appears on the image, indicating the reference point for the source
image.
6 Begin painting in the destination area.
Cloning with an Artistic style
Using the Artists brush category and the Clone Color button, you can clone an image
in the style of Vincent Van Gogh, Georges Seurat, or an Impressionist.
You can turn almost any brush into a cloner with the Clone Color button. The
Clone Color button causes a brush to pick up color from the source image while
staying true to its own stroke nature.
Artist brush variants help you paint in the styles of master artists. For example, you
can paint in the style of Vincent Van Gogh, where brush strokes are multishaded, or in
the style of Georges Seurat, where multiple dots combine to form an image.
4 Corel Painter Essentials 3 User Guide
Page 15
To clone with an artistic style
1 Choose File menu > Open.
2 In the Open (Mac OS) or Select Image (Windows) dialog box, choose the image
that you want to clone, and click Open.
3 Choose File menu > Quick Clone.
4 On the Brush Selector Bar, choose Artists from the Brush Category Selector and
Seurat from the Brush Variant Selector.
5 On the Colors palette, click the Clone Color button .
6 Choose File menu > Clone Source, and choose the active image.
7 Paint over the image.
To see the results, you can toggle Tracing Paper off or on by pressing Command +
T (Mac OS) or Ctrl + T (Windows).
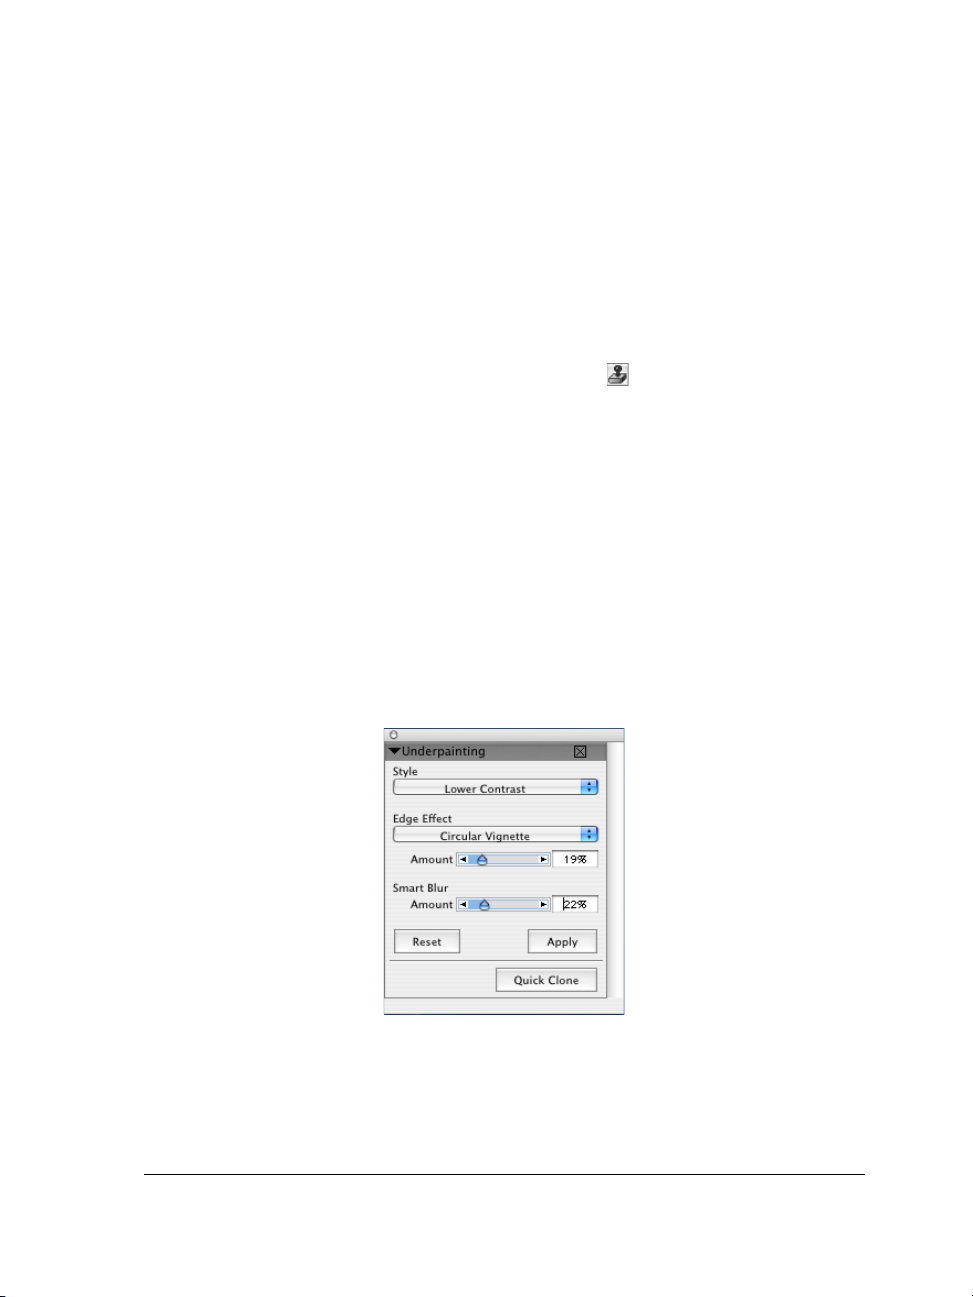
Creating an Underpainting
The new Underpainting palette gives you access to several options for preparing an
image for cloning. You can adjust the contrast, lightness, or saturation of an image. In
addition, you can add a decorative edge effect to an image, such as rectangular,
circular, or jagged vignettes.
You can prepare a photo for cloning by using the Underpainting palette.
Quick Start Tutorials 5
Page 16
To create an underpainting
1 Choose File menu > Open, choose an image from the Open (Mac OS) or Select
Image (Windows) dialog box, and click Open.
2 On the Underpainting palette, choose an option from Style pop-up menu.
A preview of the change is shown in the photo, but the change is not applied until
you click Apply.
3 If you want to add a decorative border to your cloned image, choose an option from
the Edge Effect pop-up menu, and adjust the Amount slider.
The edge effect is previewed in the image, but isn’t set until you click Apply.
4 In the Smart Blur area, adjust the Amount slider.
The range is 0 to 100. Moving the slider to the right increases the amount of blur.
More detail is maintained in high contrast areas than in low contrast areas.
5 Click Apply.
6 Click Quick Clone.
A clone of the photo is created.
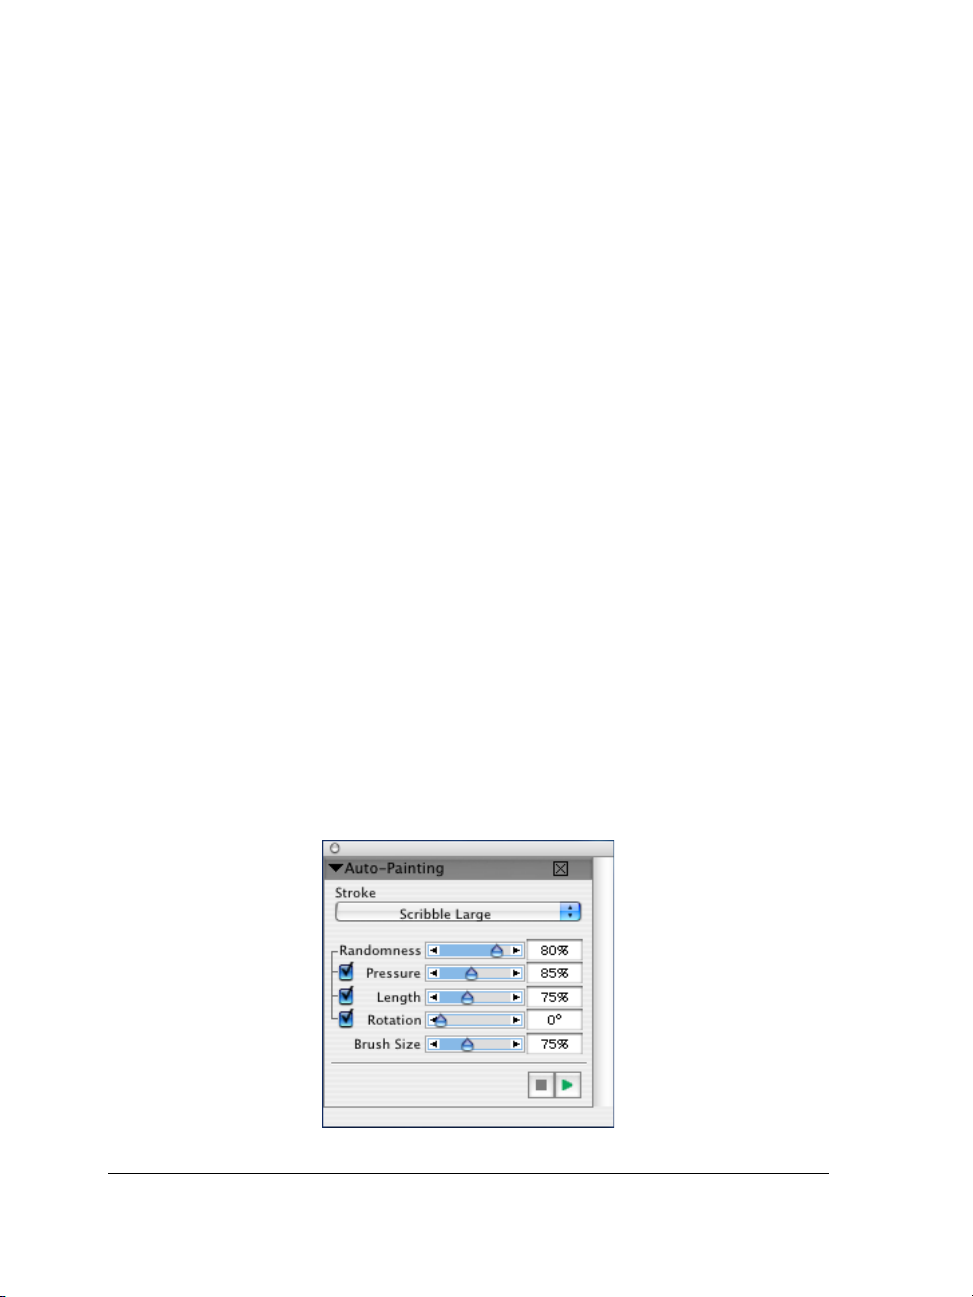
Auto-Painting your photos
Even if you have no experience with digital art, the new Auto-Painting palette lets you
create painted portraits from digital images or scanned photos. You simply choose a
brush stroke and adjust several preset options that determine how the brush strokes
interact with the canvas. Then, with the click of a button, Corel Painter Essentials
auto-paints a portrait based on the original image.
The Auto-Painting palette provides a range of cloning options.
6 Corel Painter Essentials 3 User Guide
Page 17
To auto-paint a photo
1 On the Brush Selector Bar in the upper-right corner of the application window,
choose a Cloner brush variant from the Brush Variant Selector.
2 With the clone of the image open, choose an option from the Stroke pop-up menu
on the Auto-Painting palette.
3 Adjust the Pressure slider to set the amount of pressure with which the brush
strokes are applied.
The range is 0 to 200. This setting represents the percentage of the preset pressure
for the Stroke option.
4 Adjust the Length slider to set the length of the brush strokes.
The range is 0 to 200. This setting represents the percentage of the preset length
for the Stroke option.
5 Adjust the Rotation slider to set the rotation of the brush strokes.
The value range is 0 to 360 degrees.
6 Adjust the Brush Size slider.
7 Click the Play button .
Brush strokes are automatically applied.
8 When you’re satisfied with the results, click the Stop button .
You can view the progress of the cloning at any time by clicking the Stop
button and choosing Canvas menu > Tracing Paper. You can resume cloning
by clicking the Play button.
Restoring detail to your painting
After you’ve used the Auto-Painting palette to create the clone, you can use the
Restoration palette to recover photo detail. The Restoration Palette is ideal for
restoring a subject’s eyes when converting a photo to a portrait.
Quick Start Tutorials 7
Page 18
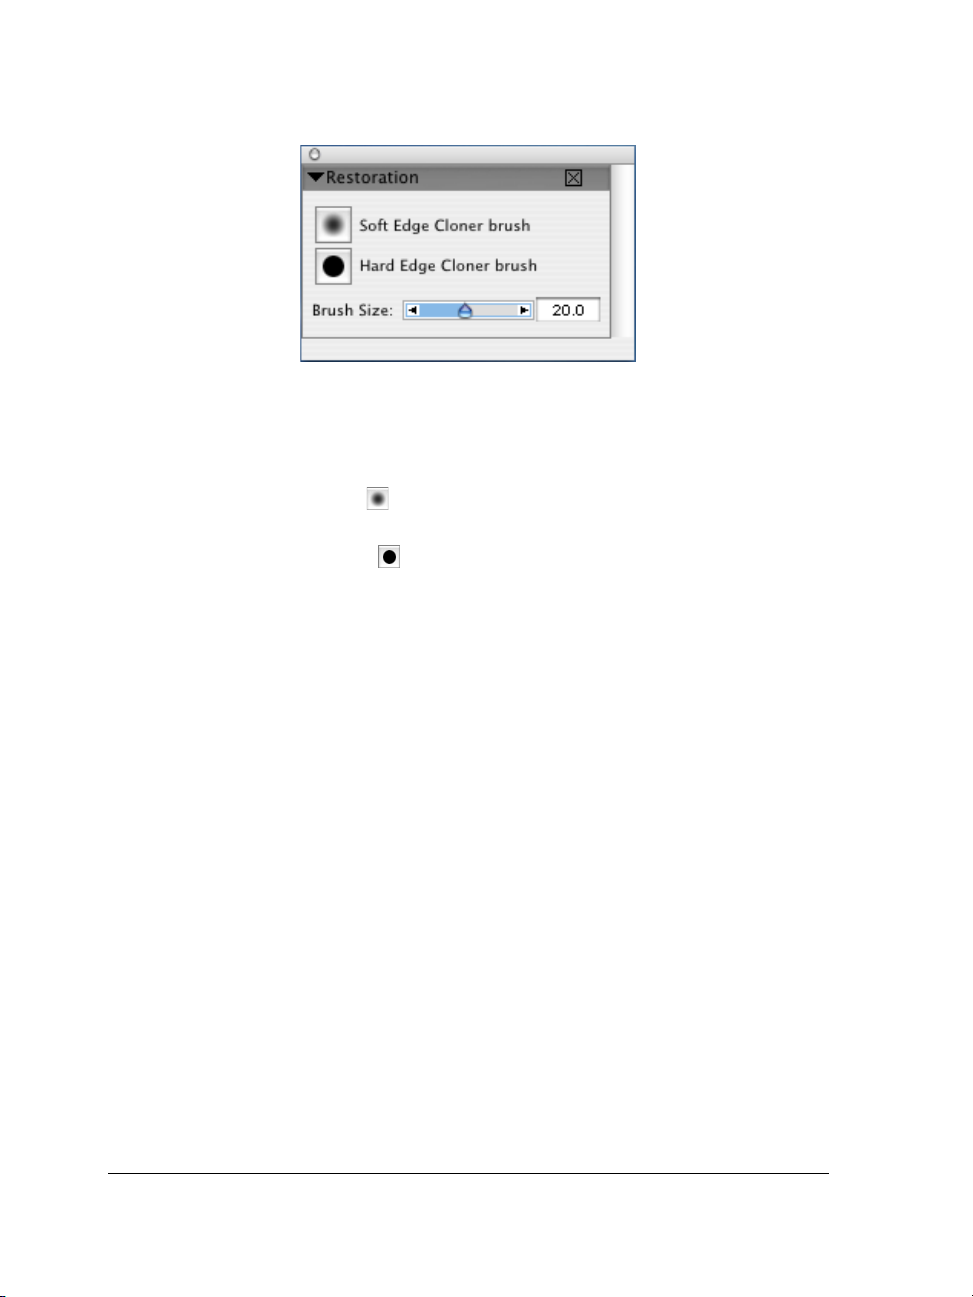
You can restore detail using the Restoration palette.
To restore photo detail
1 On the Restoration palette, click one of the following buttons:
• Soft Edge Cloner Brush — activates the Soft Edge Cloner brush variant,
which restores detail gradually
• Hard Edge Cloner Brush — activates the Straight Cloner brush variant,
which restores detail quickly with a few brush strokes
2 Adjust the Brush Size slider.
3 Paint over the area in which you want to restore detail.
Applying Surface Texture
The Apply Surface Texture effect lets you add a three-dimensional (3D) surface texture
to your image. You can use this feature to apply a paper texture across the image or to
give depth to the brush strokes of an oil painting.
Surface texture is created either by applying a paper texture or by using information
from a clone source to determine depth and height. There are two methods for
creating texture:
• Using a paper texture
• Using image luminance
When you create a texture using the Paper method, the current paper texture is
applied to your image. The Preview window is updated automatically to reflect paper
changes.
8 Corel Painter Essentials 3 User Guide
Page 19

To create surface texture by using paper
1 Choose File menu > Open.
2 In the Open (Mac OS) or Select Image (Windows) dialog box, choose the image to
which you want to apply surface texture, and click Open.
3 Choose Effects menu > Surface Control > Apply Surface Texture.
4 In the Apply Surface Texture dialog box, choose Paper from the Using pop-up
menu.
5 Adjust the Softness slider to control the amount of distortion created by the
texture.
Increasing softness creates more intermediate steps, which produces a smoother
distortion.
6 Adjust the Amount slider.
This controls how much surface texture is applied to the image. Moving the slider
all the way to the right applies the maximum amount.
7 Adjust the Brightness slider.
Quick Start Tutorials 9
Page 20

Page 21

Welcome to Corel Painter Essentials 3
Built on the award-winning power of Corel Painter IX, Corel Painter Essentials 3 is a
complete home art studio that includes everything a new user needs to get started with
digital art and create stunning paintings from photos.
What’s New in Corel Painter Essentials 3?
Corel Painter Essentials 3 includes a range of new tools and features that help users get
started on their next digital art project. The new Photo Painting Palettes magically
transform photos into stunning paintings, and the new Artists’ Oils brushes take
Painter’s legendary Natural-Media features into a new dimension of realism. In
addition, to ensure that digital camera enthusiasts get the most out of their photos,
Corel Painter Essentials 3 integrates with Corel Paint Shop Pro X,
Corel Photo Album 6, and Apple iPhoto.
Learn to Draw and Paint Digitally
Corel Painter Essentials 3 makes it easier than ever for you to start creating
breathtaking digital works of art. The application includes a convenient new Quick
Guide palette, free lynda.com training videos, the printed
Corel Painter Essentials 3 Getting Started Guide, and 10 Quick Start tutorials that
launch from the new Welcome screen.
Quick Guide Palette
Providing context-sensitive information about the options available from workspace
items, the Quick Guide palette makes it easy for you to get started. When you click on
a palette, the toolbox, the Brush Selector bar, or the property bar, the Quick Guide
palette displays relevant information about the options available, as well as a link to
the more comprehensive Help.
Welcome to Corel Painter Essentials 3 11
Page 22

New lynda.com Training Videos
Corel Painter Essentials 3 includes 10 new training videos created by lynda.com, one
of the world’s most renowned graphics training companies, to guide you through the
Corel Painter Essentials workspace, tools, features, and techniques. Ten more training
videos can be downloaded for free upon product registration.
Welcome Screen
Getting started with digital art has never been more straightforward, thanks to the
new Corel Painter Essentials 3 Welcome screen. The Welcome screen gives you quick
access to recently used files, tutorials, and settings. It also showcases original artwork
from renowned Corel Painter Masters to inspire you to explore the application and
create your own works of art.
Quick Start Tutorials
These short, instructive tutorials guide you through basic tasks, such as transforming a
photo into a painting, in a few easy steps.
Turn Photos into Paintings
With Corel Painter Essentials 3, it’s never been easier for you to turn digital photos
into stunning paintings.
Photo Painting Palettes
Right out of the box, the new Photo Painting Palettes let you create beautiful
paintings from digital photos. The three Photo Painting Palettes are the
Underpainting palette, the Auto-Painting palette, and the Restoration palette.
With the Underpainting palette, you can prepare a photo for painting and can add
beautiful effects and borders, such as a vignette. The Auto-Painting palette lets you
magically transform a photo into a painting by automatically applying random paint
strokes that vary in stroke type, direction, and pressure. The Restoration palette allows
you to touch up your painting manually with one of two special brushes that “restore”
areas of the image — such as facial features — to their original pristine detail.
12 Corel Painter Essentials 3 User Guide
Page 23

Underpainting Palette
The new Underpainting palette gives you access to several options for preparing an
image for cloning. You can adjust the contrast, lightness, or saturation of an image. In
addition, you can add a decorative edge effect to an image, such as rectangular,
circular, or jagged vignettes.
Auto-Painting Palette
Even if you have never before experimented with digital art, the new Auto-Painting
palette makes it easy to create painted portraits from digital photos. Simply choose a
brush stroke, and adjust the preset options to determine how the brush strokes interact
with the canvas. Then, with the click of a button, watch Corel Painter Essentials autopaint a portrait based on the original image.
Restoration Palette
When painting a portrait, you can take advantage of the Restoration palette to restore
detail from your original image. This palette is particularly beneficial for finishing a
subject’s eyes.
Quick Clone
Quick Clone gives you total control when transforming photos into paintings. This
new feature speeds up the manual image-cloning process by reducing five steps to one.
You can adjust Quick Clone settings on the General page of the Preferences dialog box.
Cloner Tool
The new Cloner tool is conveniently located in the toolbox to give you immediate
access to your last-used Cloner brush and brush variant.
Have Fun with Digital Art
Corel Painter Essentials 3 an impressive array of new features that give you
unprecedented ability to replicate a real-world painting experience with your
computer.
Welcome to Corel Painter Essentials 3 13
Page 24

Artists’ Oils Brush Category
The new Artists’ Oils brush category gives you an incredibly realistic oil-painting
experience. Each dab of an Artists’ Oils brush on the canvas loads a preset, finite
amount of paint. As the paint runs out, the bristly brush stroke becomes fainter. Brush
strokes interact with any paint already on the canvas as they would in the real world.
Corel Painter Essentials 3 includes five Artists’ Oils brush variants: Blender Brush,
Grainy Dry Brush, Impasto Palette Knife, Thick Wet Impasto, and Wet Oily Brush.
Digital Watercolor Brush Category
Digital Watercolor produces watercolor effects that react with the canvas texture.
Significantly enhanced in Corel Painter Essentials 3, the Digital Watercolor paint now
stays wet between sessions, enabling you to start one session where the last one ended.
Rotate/Flip Canvas
Corel Painter Essentials 3 now lets you rotate or flip images directly in the application,
just as you would do with non-digital images in the real world. You can choose from
preset rotation values or specify your own custom rotation value. Image composition is
easily verified at the touch of a button.
Rubber Stamp Tool
The new Rubber Stamp tool is located in the toolbox to make it easy for you to set up
point-to-point cloning. By setting source and destination reference points, you can
clone within a document or between different areas of separate documents.
Enjoy Compatibility with Popular Software and Hardware
Corel Painter Essentials 3 is fully compatible with Corel Paint Shop Pro X and
Corel Photo Album 6. As a result, you can enjoy a complete digital photography
workflow, ranging from photo editing and digital painting to organizing image
collections and creating keepsakes and crafts. For Mac OS X users,
Corel Painter Essentials 3 is also compatible with Apple iPhoto. In addition,
Corel Painter Essentials offers extensive support for Wacom pen tablet technology.
What’s more, the application has been enhanced to run faster and smoother — with
some brushes operating 10 times faster than ever before.
14 Corel Painter Essentials 3 User Guide
Page 25

Support for Corel Paint Shop Pro file format
Users of the Windows operating system can now open Corel Paint Shop Pro file
formats (versions 9 and X) in Corel Painter Essentials 3, which ensures that you can
seamlessly exchange images between the applications.
Integration with Corel Photo Album
For users of the Windows operating system, Corel Painter Essentials 3 is integrated
with Corel Photo Album. You can now use Corel Photo Album 6 to organize and
showcase the paintings you’ve crafted with Corel Painter Essentials, so that your
creative projects can be easily shared with friends and family.
Support for Apple iPhoto
If you use the Mac OS, you can now easily add their Corel Painter Essentials artwork
to your digital image collections, thanks to support for Apple iPhoto. You can now set
your iPhoto preferences to designate Corel Painter Essentials as your photo-editing
software. This means that double-clicking an iPhoto image will open the image for
editing in Corel Painter Essentials. When the you save your work, changes are
instantly updated in iPhoto.
Support for Microsoft Tablet PC Edition
Corel Painter Essentials 3 supports Windows XP Tablet PC Edition 2005, the latest
pen-based mobile operating system from Microsoft.
Support for Wacom Pen Tablets
Corel Painter Essentials 3 supports the most recent advancements in pen tablet
technology from Wacom, including the Wacom Intuos 3 pen tablet, the Cintiq 2 UX
interactive pen display, and the 6D Art Pen.
Support for Mac OS X.4 (Tiger)
Corel Painter Essentials 3 supports Mac OS X.4 (Tiger), the latest Apple operating
system.
Welcome to Corel Painter Essentials 3 15
Page 26

Improved Speed and Performance
This is the fastest version of Corel Painter Essentials yet. Some brushes perform up to
10 times faster than in earlier versions. On average, all brushes work twice as fast. In
addition, you can now change the default scratch disk location and memory allocation
in the Preferences dialog box.
Enhanced Zoom
With Corel Painter Essentials 3, you can zoom by pressing Command and + (Mac OS)
or Ctrl and + (Windows). These shortcuts now use predefined values, so it’s easier to
return to common zoom levels.
How to Use the Documentation
You can find answers to many of your questions in the
Corel Painter Essentials 3 User Guide and the Help available from within the
Corel Painter Essentials workspace.
Corel Painter Essentials 3 Getting Started Guide contains commonly used procedures
and information. A Portable Document Format (PDF) version of the entire
Corel Painter Essentials Help is available on the Corel Painter Essentials 3 CD.
The Help gives you access to a full range of topics in a searchable format. You can
access the Help by clicking Help > Help topics.
Documentation Conventions
The following table describes important conventions used in the
Corel Painter Essentials 3 Getting Started Guide and in the Help.
Convention Description Example
Multiple platforms This guide is for both the Mac
OS and Windows platforms. As a
convention, Mac OS commands
precede Windows commands in
the text.
16 Corel Painter Essentials 3 User Guide
Hold down Command (Mac OS)
or Ctrl (Windows).
Page 27
Convention Description Example
Modifier keys When a modifier key differs
between Mac OS and Windows,
the Mac OS modifier is listed
first, followed by the Windows
modifier.
Choose X menu >
menu item
Title bar A title bar is located at the top or
Palette title bar The palette title bar appears at
On the menu bar, click the menu
name, and choose the menu item
from the list.
side of some UI elements, such as
the toolbox, property bar, and
palettes. It may not display title
text.
the top of a palette. When
expanded, the palette’s title bar
changes to dark gray. When a
palette is collapsed, you can still
see the palette’s title bar, which is
now light gray.
“Command + I (Mac OS) or Ctrl
+ I (Windows)” means that
Mac OS users would press
Command + I and Windows
users would press Ctrl + I.
“Choose File menu >
Quick Clone” means the
following:
Examples of the toolbox title bar
on the Mac OS (left) and in
Windows (right):
Palette title bars for the AutoPainting, Underpainting palettes
are collapsed, and the
Restoration palette is expanded.
Welcome to Corel Painter Essentials 3 17
Page 28
Convention Description Example
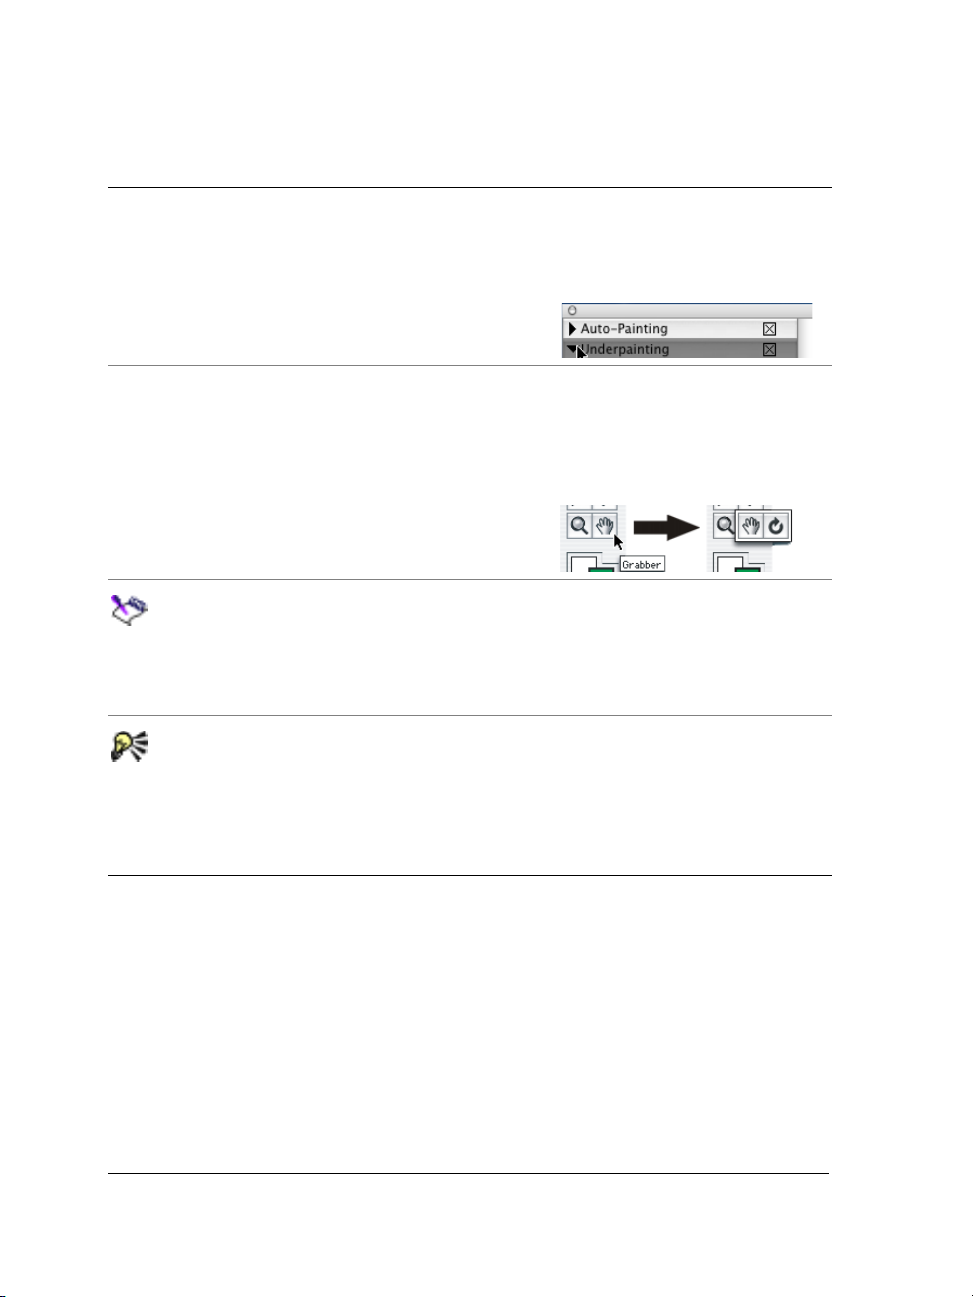
Palette arrow The palette arrow is used to
expand or collapse a palette.
Flyout Some tools share a space in the
toolbox. Hold down the tool
button that’s displayed to open
the flyout.
A note contains information that
is important to the steps that
precede it. It can describe
conditions under which the
procedure can be performed.
A tip contains suggestions for
performing the steps that
precede it. It can present
alternatives to the steps, as well
as other benefits and uses of the
procedure.
The Auto-Painting palette arrow
is collapsed, and the
Underpainting palette arrow is
expanded.
In the toolbox, by clicking and
holding the Grabber tool, you
can display a flyout that includes
another tool: the Rotate Page
tool.
For example: “This command is
available only if you have turned
off a selection.”
For example: “You can quickly
access the Dropper tool by
pressing D on the keyboard.”
Using Corel Painter Essentials 3 Help
The Help is the documentation that can be accessed from within the
Corel Painter Essentials workspace. It is fully searchable and includes all the
information in the Corel Painter Essentials 3 User Guide and more.
To use Help
1 Choose Help menu > Help Topics.
18 Corel Painter Essentials 3 User Guide
Page 29

2 Click one of the following tabs:
• The Contents tab lets you browse through topics in the Help.
• The Index tab lets you use the index to find a topic.
• The Search tab lets you search the full text of the Help for a particular word. For
example, if you are looking for information about RGB color mode, you can
type “RGB” to display a list of relevant topics.
Using the Quick Guide palette
You can find information about the toolbox, the property bar, Brush Selector bar, or
any palette you are using by referring to the Quick Guide palette. By displaying Help
topics about the functionality and controls the features you are using, the Quick Guide
palette can help you get the most out of each Corel Painter Essentials session.
To display the Quick Guide palette
• Choose Window menu > Show Quick Guide.
The Quick Guide palette is displayed by default.
You can get more information about related to a palette by clicking More
Help on the Quick Guide palette.
How to Sign Up for Free Training from lynda.com
When you register Corel Painter Essentials 3, you will receive free access to some of
the lynda.com “Getting Started With Corel Painter Essentials 3” training videos.
These videos are designed to allow new users to start working quickly and give
experienced users a tour of the new features.
How to Access Corel Support Services
Corel Support Services can provide you with prompt and accurate information about
product features, specifications, pricing, availability, services, and technical support.
For the most current information on support services available for your Corel product,
please visit www.corel.com/support.
Welcome to Corel Painter Essentials 3 19
Page 30

Page 31

A Workspace Tour
Corel Painter Essentials 3 is the leading Natural-Media painting application.
Corel Painter Essentials 3 lets you simulate a wide range of art tools — from crayons,
chalk, and air brushes to watercolor and oils.
Corel Painter Essentials 3 Workspace
The Corel Painter Essentials 3 workspace has been designed to give you easy access to
tools, effects, commands, and features. The workspace is organized across a series of
menus, selectors, and interactive palettes. Some features are also available in the frame
of the document window.
Menu bar
Property
bar
Toolbox
Color
Selection
box
Selectors
Canvas
Document
window
Drawing
mode icon
Zoom slider
Navigation
icon
Tracing Paper and
Impasto Effect
Photo Painting Palettes:
Underpainting,
Auto-Painting, and
Restoration
Brush
selector
bar
Quick
Guide
palette
Colors
palette
Layers
palette
A Workspace Tour 21
Page 32

The Menus and the Document Window
Using the commands on the Corel Painter Essentials menu bar, you can:
• work with files and editing commands
• apply and adjust effects
• perform selection operations
• control the document window or the Corel Painter Essentials workspace
The document window lets you access the following features with the click of a button:
• Tracing Paper — Lets you trace a clone source. When Tracing Paper is in use,
you see a faded-out version of the clone source, as if it were displayed under real
tracing paper on top of a light box.
• Impasto Effect — Lets you view the depth effect of the Impasto layer.
• Drawing Mode — Lets you choose where you can apply brush strokes to your
image when you have an active selection. Click and hold down the icon to choose
between drawing anywhere, drawing outside the selection only, or drawing inside
the selection only.
• Navigation — Lets you view a pop-up window of the entire image and choose
which area is displayed in the document window. For example, when you are
working at a high zoom level or with a large image, you can find a different image
area without having to adjust the zoom level.
The Toolbox
In the toolbox, there are tools to paint, erase, clone, fill image areas with color, view
and navigate, and make selections. Under the toolbox is a color selector, plus four
content selectors that let you choose papers, gradients, patterns, and nozzles.
Toolbox Basics
The toolbox is open by default; however, it can be closed. You can move the toolbox
around the application window, and you can attach the toolbox to the document
window or to other palettes.
22 Corel Painter Essentials 3 User Guide
Page 33

To open or close the toolbox
To Do the following
Open the toolbox Choose Window menu > Hide Toolbox.
Close the toolbox Click the close button in the top-right
corner of the toolbox. You can also choose
Window menu > Hide Toolbox.
To move or dock the toolbox
• Place the cursor over the title bar of the toolbox.
To Do the following
Move the toolbox Drag the toolbox title bar to a new location
in the application window.
Dock the toolbox Drag the toolbox title bar to the edge of the
application window or a palette. When the
toolbox lines up with the edge of the
application window or palette, it will snap
into place.
Accessing Tools in the Toolbox
Some tools of similar function share a space in the toolbox. The button for only one of
these tools is displayed at a time. Any tool that has a triangle in the bottom-right
corner has one or more tools underneath it in a flyout.
The current tool can be modified by options on the property bar, which change as you
change tools. For more information, see “Property Bar Basics” on page 27.
To access tools grouped in flyouts
1 In the toolbox, click and hold the tool icon whose flyout you want to open.
A flyout menu of the entire group of related tools appears.
2 Choose the tool you want to use.
The tool you’ve chosen now appears on the toolbox.
A Workspace Tour 23
Page 34

Some tools share a space in the toolbox. Hold down
the tool button that’s displayed to open the flyout.
Exploring the Toolbox
To o l D e s c r i p t i o n
Navigation and Utility Tools
Magnifier tool You can use the Magnifier tool to magnify
areas of an image when you are performing
detailed work, or to reduce areas to get an
overall view of an image. For more
information, see “Zooming” on page 42.
Grabber tool The Grabber tool gives you a quick way to
scroll an image. For more information, see
“Repositioning Documents” on page 44.
Rotate Page tool The Rotate Page tool lets you rotate an
image window to accommodate the way you
naturally draw. Refer to “Rotating
Documents” on page 45 for more
information.
Eraser tool The Eraser tool lets you remove unwanted
areas from the image. For more information,
see “Erasing Image Areas” on page 90.
24 Corel Painter Essentials 3 User Guide
Page 35

To o l D e s c r i p t i o n
Crop tool The Crop tool lets you remove unwanted
edges from the image. For more information,
see “Cropping Images” on page 46.
Tools that Apply Color
Brush tool The Brush tool lets you paint and draw on
the canvas or a layer. Brush categories
include pencils, pens, chalk, an airbrush, oil
paints, watercolors, and more.
When the Brush tool is selected, you can
choose specific brushes from the
Brush Selector bar. For more information,
refer to “Selecting a Brush” on page 82.
Paint Bucket tool The Paint Bucket tool lets you fill an area.
The property bar shows choices for what area
to fill and what to fill it with. For more
information on the Paint Bucket tool, refer
to “Filling an Area with Media” on page 96.
Dropper tool The Dropper tool lets you pick up a color
from an existing image. The property bar
shows you values for the color. When you
select a color with the Dropper tool, that
color becomes the current color on the
Colors palette. For more information, see
“Sampling Colors from Images” on page 70.
Cloner tool The Cloner tool gives you quick access to the
last Cloner brush variant you used. For more
information, see “To paint with cloner
brushes” on page 109.
Rubber Stamp tool The Rubber Stamp tool gives you quick
access to the Straight Cloner brush variant,
allowing you to clone point-to-point in an
image or between images. For more
information, see “Using Point-to-Point
Cloning” on page 109.
A Workspace Tour 25
Page 36

To o l D e s c r i p t i o n
Selection Tools
Rectangular Selection tool You use the Rectangular Selection tool to
create rectangular selections. Refer to
“Creating Selections” on page 119 for more
information.
Oval Selection tool You use the Oval Selection tool to create oval
selections. Refer to “Creating Selections” on
page 119 for more information.
Lasso tool The Lasso tool lets you draw a freehand
selection. Refer to “Creating Selections” on
page 119 for more information.
Adjuster Tools
Layer Adjuster tool The Layer Adjuster tool is used to select,
move, and manipulate layers. Refer to “The
Layer Adjuster Tool” on page 126 for more
information.
Selection Adjuster tool The Selection Adjuster tool lets you select,
move, and manipulate selections created
with the Rectangular, Oval, and Lasso
selection tools. For more information, see
“Editing Selections” on page 120.
Text tool The Text tool creates text shapes. Use the
Text palette to set the font, point size, and
tracking. For more information, see
“Working with Text” on page 161.
Color Selector The Color Selector lets you choose main and
additional colors. The front square displays
the main color, and the back square displays
the additional color. For more information,
refer to “Understanding Main and
Additional Colors” on page 69.
26 Corel Painter Essentials 3 User Guide
Page 37

Using Selectors
The selectors in the toolbox give you quick access to the libraries for the following
Corel Painter Essentials elements: papers, gradients, patterns, and nozzles.
To u s e a s e l e c t o r
• Click the selector you want to open.
Paper
Selector
Pattern
Selector
The selectors give you quick access to the libraries.
Gradient
Selector
Nozzle
Selector
The Property Bar
The property bar displays options for the tool that is currently selected in the toolbox.
Here, you can access and change tool options and settings. Tool settings are retained
when you switch from one tool to another. You can also use the property bar to restore
the default settings of the selected tool. By default, the property bar is docked below
the menu bar. You can move the property bar or dock it again. You can also hide the
property bar.
Property Bar Basics
The property bar is docked horizontally below the menu bar by default. You can move
the property bar anywhere in the application window, dock it under the menu bar
again, or close it.
The property bar for the Rectangular Selection tool. You can restore the default settings
for the current tool by clicking the Reset Tool button at the left end of the property bar.
A Workspace Tour 27
Page 38

To show or hide the property bar
To Do the following
Show the property bar Choose Window menu > Show Property
Bar.
Hide the property bar Do one of the following:
•Choose Window menu > Hide Property
Bar.
•If the property bar is undocked, click the
close button on the title bar.
To m o v e o r d o c k the property bar
To Do the following
Move the property bar Drag the left side of the property bar
to its new location.
Dock the property bar Drag the property bar’s title bar ,
and move it under the menu bar. The
property bar snaps into place.
Using Tool Settings on the Property Bar
You can access settings and options for each tool, and you can change them according
to your preferences using the boxes or pop-up sliders. Tool settings are retained when
you switch from one tool to another. You can also use the property bar to restore the
default settings of the selected tool.
To access tool settings on the property bar
• Choose a tool from the toolbox.
Tool settings are displayed on the property bar.
To change tool settings on the property bar
1 Choose a tool from the toolbox.
2 On the property bar, do any of the following:
28 Corel Painter Essentials 3 User Guide
Page 39

• Click a button.
• Type a value in the box next to a control, or click the arrow
and access a pop-up slider or menu.
• Enable or disable the check box next to the option you want to use.
Not all of these options are available for every tool. The settings change
depending on the tool selected.
next to a control
To reset the default tool settings
• Click the Reset Tool button on the property bar.
The Reset Tool button on the property bar has the same icon as the selected tool in
the toolbox.
The Brush Selector Bar
The Brush Selector bar lets you choose from a variety of brush categories and variants.
Brush categories are groups of similar brushes and media. Brush variants are specific
brushes and brush settings within a brush category. For example, in the Pastels
category, there are pencil, chalk, soft, and hard pastel variants.
The name of the selected brush category appears at the top of the Brush Selector bar.
The name of the selected brush variant appears under the brush category name.
The Brush Selector bar.
Working with the Brush Selector Bar
You can use the Brush Selector bar to choose brush categories and variants. The Brush
Category selector shows you a preview of the currently selected brush category and lets
you choose a new brush category. The Brush Variant selector does the same for brush
variants.
A Workspace Tour 29
Page 40

The Brush Selector bar is displayed to the right of the property bar by default. It can
be moved to a new location in the application window, or it can be docked to the edge
of the application window or other palettes.
To show or hide the Brush Selector bar
To Do the following
Show the Brush Selector bar Choose Window menu > Show Brush
Selector Bar.
Hide the Brush Selector bar Do one of the following:
•Choose Window menu > Hide Brush
Selector Bar.
•If the Brush Selector bar is undocked, click
the close button on the title bar.
To move or dock the Brush Selector bar
To Do the following
Move the Brush Selector bar Drag the left side of the Brush Selector bar
to a new location.
Dock the Brush Selector bar Drag the title bar on the left side of the
Brush Selector bar , and move it to
the edge of the application window or a
palette. The bar snaps into place.
To choose a brush from the Brush Selector bar
1 On the Brush Selector bar, click the Brush Category arrow and choose a brush
category.
2 Click the Brush Variant arrow, and choose a variant.
30 Corel Painter Essentials 3 User Guide
Page 41

The Palettes
The interactive palettes in Corel Painter Essentials let you access commands, controls,
and settings.
You can set up the palette layout in Corel Painter Essentials to best suit your working
style. Palettes can be arranged in the application window to give you easy access to the
tools and controls you use most often, and to maximize screen space. You can also
group and reposition palettes according to your preferences, and you can dock them to
the edges of the application window or other palettes.
Showing and Hiding Palettes
You can show or hide a palette by choosing its name from the Window menu, from a
selector, or by using the key combination shown on the Window menu.
To show or hide a palette
• Choose Window menu, and choose either Show [Palette name] or Hide [Palette
name].
You can use keyboard shortcuts to show or hide the Layers and Colors
palettes. Press Command (Mac OS) or Ctrl (Windows) + 1 to show or hide
the Colors palette. Press Command (Mac OS) or Ctrl (Windows) + 4 to show
or hide the Layers palette.
You can also hide a palette by clicking the close box on the palette title bar
.
To show or hide all palettes
• Choose Window menu > Show Palettes, or Hide Palettes.
When you choose Show Palettes, only the palettes that were open when you
chose Hide Palettes display.
A Workspace Tour 31
Page 42

Navigating Palettes
When a palette is displayed, it must be expanded for you to access its settings. You can
collapse palettes to save screen space, while keeping them displayed in the application.
If you have many palettes displayed and expanded, the view of other palettes can be
obscured. You can scroll through palettes to locate the elements you want to work
with.
To expand or collapse a palette
• Click the palette arrow in the top left corner of the palette.
When the triangle points down , the palette is expanded. When it points to the
right , the palette is collapsed.
To scroll through a palette
• Do one of the following:
• Use the scrollbar on the right side of the palette to scroll through the palette.
• Press Option + click (Mac OS) or Alt + click (Windows), and drag vertically
inside the palette. The cursor changes to a hand and the palette scrolls as you
drag.
Exploring the Palette Groups
As you work with Corel Painter Essentials, you’ll use the following palettes.
Palette Description
Quick Guide The Quick Guide palette displays helpful
information when you click the property bar,
the toolbox, Brush Selector bar or any
palette.
32 Corel Painter Essentials 3 User Guide
Page 43

Palette Description
Colors The Colors palette lets you choose main and
additional colors for painting in
Corel Painter Essentials documents. You can
also use the Clone Color option on the Colors
palette.For more information, see “Using the
Colors Palette” on page 68.
Layers The Layers palette contains thumbnail
previews of all the layers in a
Corel Painter Essentials document. You can
use the buttons on the Layers palette to
arrange layers, group layers, add new layers,
and delete layers. You can also adjust the
opacity.For more information, see “Layers”
on page 125.
Photo Painting Palettes The Photo Painting Palettes let you create
paintings from digital photos. The three
Photo Painting Palettes are the
Underpainting palette, the Auto-Painting
palette, and the Restoration palette. For
more information, see “Cloning with Photo
Painting Palettes” on page 112.
Grouping, Repositioning, and Resizing Palettes
In Corel Painter Essentials, palettes appear by default in small, intuitive groupings.
You can customize these groupings by moving palettes from one group to another. You
can include as many palettes as you want in a group. You can also reposition items to a
new location within a group.
A Workspace Tour 33
Page 44

A customized palette grouping. In this example, the Colors palette has been grouped with the
Photo Painting palettes.
To group, ungroup, rearrange, and resize palettes
To Do the following
Group palettes Drag the palette title bar, and place it on top
of the palette with which you want to create
a group. A new group of palettes is formed.
Ungroup palettes Drag the palette title bar away from the
group. The palette is removed from the
group.
Reposition items in grouped palettes Drag the palette title bar to a new location
in the group.
Resize palettes Drag the resize handle in the bottom-
right corner of the open palette.
Docking Palettes
If you need some room on your screen, but don’t want to collapse or group palettes,
you can save valuable screen space by docking palettes. This handy feature of
Corel Painter Essentials lets them be docked into place when they get close to the top
or bottom edge of another palette. In addition to tidying up your workspace, this
feature can help keep a palette from being covered up by another palette.
34 Corel Painter Essentials 3 User Guide
Page 45

To dock or undock a palette
To Do the following
Dock a palette Drag the title bar of the palette you want to
dock to the top or bottom of a second palette
until the first palette lines up with the
second palette. The moved palette will snap
into place.
Undock a palette Drag the title bar of the palette you want to
undock to another location in the workspace.
Restoring Palette Layout
You can drag a palette to any location that’s convenient for your work.
Corel Painter Essentials saves palette arrangements so that the next time you start the
program, the workspace appears as you left it.
You can save several different palette layouts for future use, and you can later delete
layouts. You can also return the palette layout to the Corel Painter Essentials default.
To return to the default palette layout
• Choose Window menu > Arrange Palettes > Default.
Restoring the default Corel Painter Essentials settings
Corel Painter Essentials is designed to run from a locked volume (such as a read-only
disk image or a CD) or from within a limited-user mode. All user settings are saved to
a local user folder; when Corel Painter Essentials starts, it recalls these user settings
rather than the application settings. At any time, you can restore the
Corel Painter Essentials workspace to its default factory settings by replacing the
settings in the user folder with copies of the settings from the originating read-only
installation.
Restoring the Corel Painter Essentials workspace to its default factory settings removes
all modifications you have made to the application — including the brushes, papers,
textures, and similar customizations. The user folders are located as follows:
• Mac OS — /Users/<username>/Library/Application Support/
Corel Painter Essentials/
A Workspace Tour 35
Page 46

• Windows — \Documents and Settings\<username>\Application Data\
Corel Painter Essentials\
Restoring Corel Painter Essentials to its default factory settings is particularly useful in
a multiuser environment, where many users are working from the same installation.
To restore Corel Painter Essentials to its default factory settings
• Hold Shift when you start Corel Painter Essentials.
A warning appears, asking you to verify that you want to erase all of the
modifications that you have made to Corel Painter Essentials. Restoring the default
factory settings copies the original workspace settings from the installation to the
user folder.
36 Corel Painter Essentials 3 User Guide
Page 47

The Basics
The Corel Painter Essentials application provides a digital workspace in which you can
create new images, or alter existing images, using the Corel Painter Natural-Media
tools and effects. Your working image is known as a document and is displayed in a
document window. This document window includes navigation and productivity
features to help you work efficiently.
As you create an image, you can save your document in a number of different file
formats: RIFF (Corel Painter native format), Adobe Photoshop (PSD), JPEG, TIFF,
and Corel Paint Shop Pro (PSP), to name a few. Corel Painter Essentials also lets you
open or import images in many file formats.
Every artist works in a unique way, and every computer system has its own
configuration of memory, disks, printers, and accessories. Corel Painter Essentials
preferences let you customize the program for your own work style and for optimum
performance on your particular system. You can also customize the features of your
tablet and pens in Corel Painter Essentials.
Wor k i n g w i t h D oc u m e n t s
The first step in creating an image in Corel Painter Essentials is opening a document.
You can open a blank canvas by creating a new document, work with an existing
image by opening a file already created, or acquire an image from a scanner or digital
camera. Once you have created your image, you can place it directly into a document.
Creating and Opening Documents
The File menu > New command creates a blank, untitled document based on the
specifications you set in the New dialog box. Canvas Size shows the RAM requirement
for creating the document at the specified width, height, and resolution. This number
The Basics 37
Page 48

does not reflect the file size for the saved document. A saved Corel Painter Essentials
file is usually 25% to 50% of the size of the working document, depending on the
number of colors it contains.
You can also open documents from other graphics applications and use
Corel Painter Essentials to add brush strokes, tints, or paper textures. Or, you can
clone a document to re-create it in a different medium. Corel Painter Essentials lets
you open the following file formats:
• RIFF — Corel Painter native format (RIF). Corel Painter Essentials converts
Watercolor, Liquid Ink, Shape, and Dynamic layers to default layers, and applies
layer masks to the associated layer. Alpha channels remain unchanged, but are not
visible.
• TIFF (TIF)
• Adobe Photoshop formats (PSD) — Corel Painter Essentials applies layer masks to
the associated layer.
•Windows Bitmap (BMP)
• GIF — Corel Painter Essentials does not convert GIF animations to frame stacks.
•JPEG (JPG)
• Corel Paint Shop Pro (PSP) — All layers are flattened.
• Mac PICT (PCT)
Corel Painter Essentials does not support LZW compressed TIFF file format.
Only uncompressed TIFF files open in Corel Painter Essentials.
To create a new document
1 Choose File menu > New.
2 In the New dialog box, enter values for the following:
• Width and Height determine the dimensions of the canvas. You can change the
unit of measurement by using the menu. Choose from pixels (the default),
inches, centimeters (CM), points, picas, and columns (2 inches wide).
• Resolution is the number of pixels per inch (ppi) or pixels per centimeter that
make up an image. In the New dialog box, setting the document’s pixels per
inch is the same as setting its dots per inch (dpi). Refer to “Understanding
Resolution” on page 41 for detailed information about document, screen, and
print resolutions.
38 Corel Painter Essentials 3 User Guide
Page 49

3 Click the Paper Color chip to set the document’s background to a color other than
white.
Choose a color from the Color dialog box that appears.
4 Click OK.
A new document appears in the workspace.
To open an existing document
1 Choose File menu > Open.
Corel Painter Essentials remembers the location of the last file you opened.
2 In the Open (Mac OS) or Select Image (Windows) dialog box, use the controls to
locate the file you want to open.
Corel Painter Essentials lists every image’s dimensions (in pixels), file size, and file
format. In addition, files saved in Corel Painter Essentials include thumbnails for
browsing purposes.
3 Click Open.
The File menu also offers you a shortcut to previously opened documents.
Before choosing Open in the File menu, see if the file you want is in the
recently opened files list at the bottom of the File menu.
To b r o w s e f o r a d o cument (Mac OS)
1 Choose File menu > Open.
2 Click Browse.
The Browse dialog box shows thumbnails for all the RIFF files in a folder.
3 Double-click the file name, or select a file and click Open.
The Browse dialog box (Mac OS) displays a thumbnail image of files.
The Basics 39
Page 50

Acquiring Images (Windows)
You can acquire images for Corel Painter Essentials directly from an external device —
such as a scanner or digital camera — if the device provides a TWAIN driver.
Before acquiring images make sure your TWAIN driver is properly installed.
Creating and Opening Templates
If you regularly create documents that contain similar dimensions, formatting, and
resolution, you can create document templates so that you don’t have to start each
document from scratch.
To open a document template
1 Choose Help menu > Welcome.
2 Choose a template from the Open a Template pop-up menu.
To s a v e a d o c u m e nt as a template
1 Set up a file with all the sizing, formatting, and resolution attributes you want in
the template.
2 Choose File menu > Save As.
3 In the Save Image As dialog box, save the file to the
Corel Painter Essentials 3\Templates folder.
Placing Files
Placing a file lets you import an image into an existing Corel Painter Essentials
document. The placed image becomes a new reference layer in the document — you
can transform (resize, rotate, slant) it on screen by dragging its handles. A placed file
maintains its link to the source file until you commit it to standard layer format.
To place a file
1 Choose File menu > Place.
2 Select an image file, and click Open.
3 In the Place dialog box, set the options:
40 Corel Painter Essentials 3 User Guide
Page 51

• In the Scaling area, the Horizontal and Vertical boxes suggest a scale to fit the
image in the current document. To change the size, enter scaling percentages in
the Horizontal and Vertical boxes.
• Constrain Aspect Ratio maintains the proportions of the image. Disable this
check box to distort the image.
4 Do one of the following:
• To place the image in a particular location, click on that location in the
document.
• To place the image in the center of the document, click OK.
Understanding Resolution
When working with images in a digital workspace, it is helpful to understand the
concept and applications of resolution. Resolution refers to how
Corel Painter Essentials measures, displays, saves, and prints images — either as small
squares of color known as pixels or as mathematical objects known as vectors.
A document’s resolution affects both its appearance on your computer screen and its
print quality. You can specify a document’s resolution when you create a new
document, acquire an image, or save or export a file.
Resolution and Screen Appearance
Most monitors have a resolution of 72 dpi (dots per inch). Because of this, the
Corel Painter Essentials display default is 72 ppi (pixels per inch). This means that each
pixel in the Corel Painter Essentials image occupies 1 pixel on your monitor. The
display resolution does not affect the document’s actual pixels per inch — only how
the image is displayed on the monitor.
For example, a 300-ppi document displays at approximately four times its actual size.
This happens because each pixel in the Corel Painter Essentials image occupies 1 pixel
on your monitor, and the monitor’s pixels are four times the size of the image’s pixels.
Put another way, at 300 ppi your printed document will be approximately one-quarter
of its on-screen size. In this example, if you wanted to view the image at actual size,
you would set the zoom level to 25%.
Keep in mind that if you leave the dimensions in pixels and then change the pixels per
inch (resolution), the actual printed size will be affected by the change. If you set your
document size in inches, centimeters, points, or picas and change resolution, the
dimensions will not be affected by the change.
The Basics 41
Page 52

Resolution and Print Quality
The resolution of output devices (printers) is measured in dots per inch, and, in the
case of halftones, lines per inch (lpi). Output device resolutions vary, depending on the
type of press and paper you’re printing on. Generally, a photograph will be output at a
crisp 150 lpi if printed on glossy magazine stock and at 85 lpi for newspaper stock.
If you are using a personal laser or inkjet printer, set your document size in inches,
centimeters, points, or picas at the dots-per-inch setting specific to your printer. Most
printers will produce excellent output from images set at 300 ppi. Your file will be
output correctly — in the proper size and at the best resolution for your printer.
Increasing the file’s pixels-per-inch setting does not necessarily improve the output and
may create a large, unwieldy file.
If you are using a commercial printer or a more sophisticated output device, the
dimensions of the image should always be set to the actual size it will appear in the
printed piece. For the resolution, a good rule of thumb is to set your document’s pixels
per inch to twice the desired lines per inch. So, at 150 lpi, the pixels per inch should be
twice that, or 300 ppi; at 85 lpi, the pixels per inch should be 170 ppi. It’s a good idea
to check with your service bureau if you have questions about output device resolution.
Zooming
By default, Corel Painter Essentials opens a document at 100% magnification, but you
can change the level of magnification by zooming. You can zoom in and out using the
Magnifier tool, reset magnification, or zoom to fit the screen. You can even zoom in
and out while working with other tools.
42 Corel Painter Essentials 3 User Guide
Page 53

The Magnifier tool lets you zoom in and out by clicking in the document window.
To z o o m i n
1 Do one of the following:
• In the toolbox, click the Magnifier tool .
• Hold down Command + Spacebar (Mac OS) or Ctrl + Spacebar (Windows).
The Magnifier cursor shows a plus sign (+), indicating that you are increasing
magnification (zooming in).
2 Click or drag in the document window.
When you drag, Corel Painter Essentials chooses the magnification level that most
closely conforms to the selected area and centers the screen view on that area.
The document’s magnification level appears in the document window’s title bar.
To zoom out
1 Do one of the following:
• In the toolbox, click the Magnifier tool and hold down Option (Mac OS) or Alt
(Windows).
• Hold down Option + Command + Spacebar (Mac OS) or Alt + Ctrl +
Spacebar (Windows).
The Magnifier cursor shows a minus sign (-), indicating that you are decreasing
magnification (zooming out).
2 Click in the document window.
The Basics 43
Page 54

Each click reduces the magnification to the next level, as defined in the Zoom Level
at the bottom of the image window.
You can also zoom in or out by moving the Scale slider, typing a value in the
Scale box at the bottom of the image window, or choosing an option from the
Zoom Level pop-up menu on the property bar.
To z o o m u s i n g t h e Magnifier tool
1 In the toolbox, click the Magnifier tool.
2 Choose a zoom level from the Zoom Level pop-up menu on the property bar.
To reset magnification to 100%
• Double-click the Magnifier tool.
To zoom to fit the screen
• Do one of the following:
• Choose Window menu > Zoom to Fit.
• In the toolbox, double-click the Grabber tool .
Corel Painter Essentials generates a view of the entire document to fit the size of
your screen.
To access the Magnifier tool while any other tool is selected
• Press Command + Spacebar (Mac OS) or Ctrl + Spacebar (Windows), and click to
zoom in; press Command + Option + Spacebar (Mac OS) or Ctrl + Alt +
Spacebar (Windows), and click to zoom out.
Repositioning Documents
The Grabber tool allows you to reposition a document in the Corel Painter Essentials
workspace and view different areas of an image.
To use the Grabber tool
1 Activate the Grabber tool by doing one of the following:
44 Corel Painter Essentials 3 User Guide
Page 55

• In the toolbox, click the Grabber tool .
• Hold down the Spacebar.
The cursor changes to the Grabber tool.
2 Do one of the following:
• Drag in the document window to scroll through your image.
• Click once in the document window to center the image.
Rotating Documents
The Rotate Page tool lets you rotate an image on the screen to accommodate the way
you draw naturally.
To rotate the page
1 Activate the Rotate Page tool by doing one of the following:
• In the toolbox, click the Rotate Page tool .
• Hold down Option + Spacebar (Mac OS) or Alt + Spacebar (Windows).
The cursor changes to a hand with a pointing finger.
2 Drag in the document window to rotate the image.
Move the cursor clockwise to rotate the image clockwise. Move the cursor
counterclockwise to rotate the image counterclockwise.
The new rotation angle appears on the property bar.
You can also rotate an image by typing a rotation angle in the Rotation Angle
box on the property bar.
The Basics 45
Page 56

Rotate a document to accommodate the way you naturally draw.
To return an image to its original orientation
1 In the toolbox, click the Rotate Page tool .
2 Do one of the following:
• Click once in the document window.
• Double-click the Rotate Page tool.
• On the property bar, click the Reset Tool button.
To constrain rotation to 90° increments
• Hold down the Shift key while rotating.
Cropping Images
You can remove unwanted edges from the image with the Crop tool. You can adjust
the ratio of the cropped image and choose to maintain the aspect ratio.
To crop an image
1 In the toolbox, click the Crop tool .
2 Drag inside the image to define the rectangular area you want to keep.
You can adjust the rectangle by dragging a corner or any of its edges.
3 When you’re ready to execute the crop, click inside the rectangle.
46 Corel Painter Essentials 3 User Guide
Page 57

To constrain the cropping rectangle to a certain aspect ratio, enter values for
the width and height aspect, and enable the Ratio option on the property bar.
To constrain cropping to a square
• Hold down Shift while dragging to define the area with the Crop tool.
To adjust the ratio of the cropped image
1 In the toolbox, click the Crop tool.
2 On the property bar, type ratio values in the boxes.
If necessary, enable the Ratio check box to maintain aspect ratio when cropping the
image.
Using Full Screen Mode
Full screen mode allows you to hide your computer’s desktop and view the document
window without scroll bars. When full screen mode is on, the document window is
centered over a solid background. All Corel Painter Essentials features — except the
buttons on the document window — work when you use full screen mode.
To toggle the full screen mode on and off
• Press Command + M (Mac OS) or Ctrl + M (Windows), or click Window menu >
Screen Mode Toggle from the menu bar.
You can position the image window anywhere on the screen by holding down
the Spacebar and dragging.
Resizing the Canvas
If you want the same image at a different scale, you can resize the canvas. You can also
change the size of the drawing area or crop the canvas.
To r e s i z e t h e c a n v a s
1 Choose Canvas menu > Resize.
The Basics 47
Page 58

The Resize dialog box appears, showing the current and new sizes by width, height,
and resolution.
2 Enter a new value for width, height, or resolution.
For more information on these values, refer to “Creating and Opening Documents”
on page 37.
3 The Constrain File Size check box lets you choose how to deal with dimensions
relative to resolution.
When Constrain File Size is enabled, you can change the height and width of the
image together. The resolution will change accordingly.
When Constrain File Size is disabled, you can change the height and width
independently of the resolution, and vice versa.
If you choose pixels or percent as the unit and enter a value,
Corel Painter Essentials automatically disables the Constrain File Size check box.
To resize the drawing area
1 Choose Canvas menu > Canvas Size.
2 In the Canvas Size dialog box, specify the number of pixels you want to add to any
side of the canvas.
Enter negative values to reduce the canvas size.
Rotating and Flipping the Canvas
Corel Painter Essentials lets you rotate and flip the Canvas layer. When you rotate or
flip the Canvas layer, all other layers move along with it. You can rotate the Canvas
layer by a predefined amount, or you can choose the amount of rotation. If your
document has layers of different varieties, you are prompted to commit all of them to
default, pixel-based layers. The Canvas layer increases in size when necessary, so
rotating or flipping it does not cause the contents of other layers to be cropped.
To rotate the Canvas layer by a predefined amount
1 Choose Canvas menu > Rotate Canvas.
2 Choose one of the following:
• 180 to rotate 180 degrees
• 90 CW to rotate 90 degrees clockwise
48 Corel Painter Essentials 3 User Guide
Page 59

• 90 CCW to rotate 90 degrees counterclockwise
To rotate the Canvas layer by a user-defined amount
1 Choose Canvas menu > Rotate Canvas > Arbitrary.
2 In the Rotate Selection dialog box, type the number of degrees of rotation you want
in the Angle box.
To f l i p t h e C a n v a s
1 Choose Canvas menu > Rotate Canvas.
2 Choose one of the following:
• Flip Canvas Horizontal
• Flip Canvas Vertical
Saving Files
You have several options for saving files. You can save a file in its current format or to a
different format. In addition, Corel Painter Essentials remembers the location of the
last file you saved.
Saving RIF Files
RIF is the Corel Painter native format, which retains special information about your
document. For example, a RIF file maintains layers so that you can return to the file to
re-access them.
It is a good idea to always save files in RIF format first. Think of RIF files as
“work-in-progress” files. When a file is ready for production, then save it to GIF,
JPEG, TIF, or another file format.
Corel Painter Essentials lets you compress files and save disk space with a lossless
compression method. When saving in RIF format, leave the Uncompressed option
disabled to minimize the file size on your hard disk.
Saving JPEG Files
Corel Painter Essentials supports the JPEG file format. Because of its small file size and
high quality, JPEG is commonly used to transmit files through a modem. Unlike GIF,
the JPEG file format displays a full range of colors.
The Basics 49
Page 60

The JPEG file format allows you to compress your file on a scale of Fair to Excellent,
where quality is directly proportional to file size. These quality settings will let you
achieve compression ratios of less than 10:1 to greater than 100:1. JPEG is a “lossy”
file format, meaning that a decompressed JPEG file will not be identical pixel-for-pixel
to the original. However, because the JPEG algorithm takes into account the
sensitivity of the eye to different colors, the higher-quality settings should achieve
visually satisfying results.
When you save a file in JPEG format, Corel Painter Essentials displays the JPEG
Encoding Quality dialog box, with the following options:
• The Quality options — Excellent, High, Good, and Fair — let you set the degree
of file compression.
The Excellent option compresses the least, but retains the most data. Fair
compresses the most, but loses the most data.
You can also use the Quality slider to adjust file compression.
• The Smoothness slider applies smoothing to the entire image. This is useful when
using the Fair option, to blur the edges of JPEG artifacts. The default is 0. Keep in
mind that using a high smoothness setting can cause blurring.
• The Progressive JPEG check box creates a progressive JPEG file. Progressive
format is useful for files used on the Web. As the name implies, progressive format
displays an image in stages — as a series of scans — while the file downloads. The
first scan is a low-quality image; the following scans improve in quality. This allows
the user to see the whole image very quickly.
It is best not to decompress and recompress a file multiple times. Although JPEG can
compress and discard data not visible or obvious, the degradation of the data can affect
the condition of your file.
When a file has lost a significant amount of data, block patterns may appear in areas of
the image. If you try to use the Apply Surface Texture feature on a JPEG file, you may
find it will accent the block patterns.
Saving GIF Files
Corel Painter Essentials allows you to save documents as GIF files. GIF, a file format
using 8 or fewer bits, is commonly used to display graphics on the Web. When you
save a GIF file, you can choose settings from 4 Colors to 256 Colors. You can choose
how your colors will be displayed and what part of your image will be transparent.
50 Corel Painter Essentials 3 User Guide
Page 61

The Imaging Method setting determines how your 24-bit Corel Painter Essentials
document will be converted to the limited number of colors that GIF uses. If you
choose Quantize to Nearest Color, Corel Painter Essentials picks the color nearest to
that of each pixel. If you choose Dither Colors, Corel Painter Essentials applies a
pattern to the colors chosen to generate a more accurate, less banded result.
If you want your image to have transparency, enable the check box for Output
Transparency. Most programs that display GIF files support transparency, but for those
that don’t, you should specify the color of the “transparent” area. If your image will be
displayed on the Web, enable the Background is WWW Gray option. You can also
choose to use the background color of your Web page by enabling the Background is
BG Color option.
For programs that support transparency, your selection will determine which areas are
transparent. The Threshold slider determines which selection (loaded mask) value
becomes transparent. You can see how the Threshold slider is affecting the
transparency of your image in the Preview window in the dialog box. Transparency is
displayed in the Preview window by a rectangular lattice. You can toggle between the
Preview window and your Save As GIF options to get exactly what you want. Enable
the Interlaced check box if your image will be displayed on a Web page.
Saving TIF Files
The TIF format is a widely supported bitmap image format that facilitates exchange
between applications and computer platforms.
Saving Adobe Photoshop (PSD) Files
Corel Painter Essentials can save files in Adobe Photoshop (PSD) format.
To save a file in its current format
• Choose File menu > Save.
To save a file with a different name or format
1 Choose File menu > Save As.
2 In the Save (Mac OS) or Save Image As (Windows) dialog box, use the controls to
specify a location, file name, and format.
The Basics 51
Page 62

Editing iPhoto Images in Corel Painter Essentials (Mac OS)
You can set iPhoto preferences so that you can open an iPhoto image for editing in
Corel Painter Essentials.
To set iPhoto editing preferences (Mac OS)
1 In iPhoto, choose iPhoto menu > Preferences.
2 In the Preferences dialog box, enable the Opens In Other option.
3 Click Select.
4 Click the Corel Painter Essentials 3 folder, and choose Corel Painter Essentials 3.
5 Click Open.
To open an iPhoto image for editing in Corel Painter Essentials (Mac
OS)
• In iPhoto, double-click an image.
The image opens in Corel Painter Essentials.
Sending Images to CorelPhotoAlbum (Windows)
Corel Photo Album is a powerful tool that lets you organize, fix, share, and protect
your images. You can send an image directly to Corel Photo Album if you have it
installed on your computer. For more information about Corel Photo Album, please
visit www.corel.com/products.
To send an image to Corel Photo Album (Windows)
1 Choose File menu > Send to Corel Photo Album.
2 In the Save dialog box, type a name in the Save Image As box.
By default, the image’s filename appears in the Save Image As box with the .jpg
filename extension.
3 Click OK.
The image is saved in the My Pictures folder, and Corel Photo Album opens.
52 Corel Painter Essentials 3 User Guide
Page 63

Closing Documents and Quitting the Application
You can close documents or quit Corel Painter Essentials using menu commands,
keyboard shortcuts, or the Close button of the current window.
To c l o s e a d o c u m e n t
• Do one of the following:
• Click the current window’s Close button.
• Choose File menu > Close.
• Press Command + W (Mac OS) or Ctrl + W (Windows).
To quit Corel Painter Essentials
• Do one of the following:
• (Mac OS) Choose Corel Painter Essentials 3 menu > Quit
Corel Painter Essentials 3.
• (Windows) Choose File menu > Exit.
You can also quit Corel Painter Essentials by pressing Command + Q (Mac
OS) or Ctrl + Q (Windows).
Drag-and-Drop Features
Corel Painter Essentials supports drag-and-drop copying of documents from one
window to another. For Mac OS users, Corel Painter Essentials supports drag-and-drop
copying of documents between applications.
Dragging Between Documents
You can copy selections and layers between Corel Painter Essentials documents by
dragging from one window to the other. When you drag a selection to a new
document window, Corel Painter Essentials automatically turns the selection into a
layer. When you drag a layer to a new document, the layer keeps its original
properties.
The Basics 53
Page 64

Dragging Between Programs (Mac OS)
Corel Painter Essentials supports drag-and-drop functionality between applications on
Mac OS. This can be a quick, convenient way to acquire or export images. On the Mac
OS, you can drag files from Adobe Photoshop directly into Corel Painter Essentials.
Raster images that you drag into a Corel Painter Essentials document window become
layers. You can drag a PICT file from the Finder to a Corel Painter Essentials
document. The PICT image becomes a layer.
You can also drag layers out of Corel Painter Essentials to another application or to the
Finder; the exported image is in PICT format, supported by most applications. When
you drag out one of these objects, it will automatically rasterize a shape or dynamic
layer (at its current settings) to become a PICT.
Though dragging and dropping between programs is not supported on the
Windows platform, computers running on either Mac OS or Windows
platforms support copying and pasting between Corel Painter Essentials and
other programs.
Setting Preferences
Corel Painter Essentials has three different pages of the Preferences dialog boxes:
General, Brush Tracking, and Memory & Scratch.
Use the Preferences dialog box to customize your application.
54 Corel Painter Essentials 3 User Guide
Page 65

General Preferences
To access General preferences
• Do one of the following:
• (Mac OS) Choose Corel Painter Essentials 3 menu > Preferences > General.
• (Windows) Choose Edit menu > Preferences > General.
To make changes to other preferences before closing the Preferences dialog
box, choose another preference type from the pop-up menu.
Setting up the Drawing Cursor
You can choose a cursor icon and its orientation. You can also set the drawing cursor to
show the brush size and shape.
To choose a drawing cursor icon
1 On the General page of the Preferences dialog box, enable the Brush option in the
Cursor Type area.
2 Choose one of the following drawing cursor icon options from the pop-up menu to
the right of the Brush option:
•Brush
• Cross
•Torus
•Triangle
• Hollow Triangle
•Gray Triangle
If you want to set the cursor to show the brush size and shape, enable the
Brush Ghosting check box. Brush Ghosting gives you immediate visual
feedback on the cursor, showing you the shape and size of the selected brush.
If you want the drawing cursor icon to be a single pixel, enable the Single
Pixel option in the Cursor Type area.
The Basics 55
Page 66

When you use a brush with “Enable Brush Ghosting”
enabled, the cursor shows the shape of the brush.
Setting Quick Clone Preferences
You can customize the Quick Clone effect. You can choose whether to delete the image
from the clone or to turn on Tracing Paper. You can also select the last-used Cloner
brush or choose to clone color with any brush variant.
To set Quick Clone preferences
1 Choose Corel Painter Essentials 3 menu > Preferences > General (Mac OS), or
Edit menu > Preferences > General (Windows).
2 In the Quick Clone area of the Preferences dialog box, enable or disable the
following check boxes:
• Delete Image From Clone. When enabled, this option automatically deletes the
contents of the clone file.
• Turn on Tracing Paper. When enabled, this option automatically activates the
Tr a c in g Pa p e r f e a t u r e .
3 Enable one of the following check boxes:
• Switch to Cloner Brushes automatically activates the last Cloner brush variant
used.
• Clone Color uses the current brush variant to clone the underlying color.
By default, the Switch to Cloner Brushes check box is enabled. To enable the
Clone Color check box, you must disable the Switch to Cloner Brushes check box.
56 Corel Painter Essentials 3 User Guide
Page 67

Cloning Preference
When you clone an image, Corel Painter Essentials uses the color information from the
original as you fill in your clone. If you would like Corel Painter Essentials to display
what part of the original you’re cloning, check the box next to Indicate Clone Source
with Crosshairs While Cloning.
Draw Zoomed-out Views Using Area-Averaging
When you are viewing an image at under 100% magnification, screen draw is faster
when Draw Zoomed-out Views Using Area-Averaging is enabled, and slower — but
more accurate — when this check box is not enabled.
Display Warning When Drawing Outside Selection
Checking this box enables the warning that appears when you draw outside a
selection.
Show Commit Dialog When Converting to a Layer
Enable this check box if you have enabled the Commit and Don’t Ask Again check box
in the Commit dialog box and want to reinstate the dialog box.
Brush Tracking Preferences
When you draw with traditional media, the amount of pressure you use with a tool
determines how dense and how wide your strokes are. Using a pressure-sensitive stylus
with Corel Painter Essentials gives you this same kind of control. Each artist has a
different strength or pressure level in a stroke. The Brush Tracking preference lets you
adjust Corel Painter Essentials to match your stroke strength. This is particularly
useful for artists with a light touch. If a light stroke leaves no color on the canvas, you
should use Brush Tracking to increase sensitivity.
You might also change brush tracking between phases of a project. You could use a
light touch when sketching with a pencil brush variant, then set tracking for more
pressure when you switch to an oil paint variant. Corel Painter Essentials saves Brush
Tracking between sessions, so whatever tracking sensitivity you set will be the default
the next time you open the application.
The Basics 57
Page 68

To s e t B r u s h Tr a c k i n g
1 Do one of the following:
• (Mac OS) Choose Corel Painter Essentials 3 menu > Preferences > Brush
Tr a c k i n g .
• (Windows) Choose Edit menu > Preferences > Brush Tracking.
2 Drag in the scratch pad in a “normal” stroke.
Use the pressure and speed you prefer when drawing or painting. For specific
adjustments, you can move the sliders.
Use the Brush Tracking dialog box to customize how
Corel Painter Essentials responds to your stroke pressure and speed.
Memory and Scratch Preferences
You can change the percentage of memory usage dedicated to Corel Painter Essentials,
which is set to 80% by default. You can dedicate as much as 100% of memory to
Corel Painter Essentials. The lowest percentage you can choose is 5%. You can also
choose the scratch disk, which selects the disk volume that Corel Painter Essentials
uses to store its temporary file and to access virtual memory.
To s e t m e m o r y u s a g e
1 Do one of the following:
• (Mac OS) Choose Corel Painter Essentials 3 menu > Preferences > Memory &
Scratch.
• (Windows) Choose Edit menu > Preferences > Memory & Scratch.
58 Corel Painter Essentials 3 User Guide
Page 69

2 Type a number in the Memory Usage box.
To choose a scratch disk
1 Do one of the following:
• (Mac OS) Choose Corel Painter Essentials 3 menu > Preferences > Memory &
Scratch.
• (Windows) Choose Edit menu > Preferences > Memory & Scratch.
2 Choose the volume name (Mac OS) or letter (Windows) from the Scratch Disk
pop-up menu.
Using Two Monitors
The Corel Painter Essentials user interface can be displayed across two or more
monitors. You can drag any of the Corel Painter Essentials palettes, the property bar,
and the toolbox to any monitor; however, each palette must be displayed entirely on
one monitor at a time. If a palette straddles two monitors, it will automatically snap to
the nearest vertical edge of the monitor with the largest portion of the palette. If the
palette is displayed equally on both monitors, it will snap to the vertical edge of the
left monitor.
For best performance, make sure that both monitors are set to the same resolution. In
Windows, you must stretch the application window to straddle both monitors, then
redesign your workspace. For information on configuring your system to display across
two or more monitors, refer to your operating system documentation.
Wacom Intuos Support
Corel Painter Essentials supports the Wacom Intuos tablet, pen, and airbrush
technology.
Painting with an Intuos Tablet and Pen
The Intuos tablet provides 1,024 levels of pressure sensitivity to help you create
smooth curves, gradual transitions, and precise brush strokes. Corel Painter Essentials
allows you to take advantage of tilt and bearing input from an Intuos pen in new and
exciting ways.
The Basics 59
Page 70

Before you use Corel Painter Essentials with your Wacom Intuos 3 tablet on
the Mac OS, you need to ensure that the Wacom Intuos 3 driver you’ve
installed is optimized for use with Corel Painter Essentials. To do this, access
the Mac OS System Preferences, and choose the Wacom Tablet command.
Choose Functions from the Tool area, and then click the Touch Strip button
that appears. In the Touch Strip area, make sure that the left and right Touch
Strip functions are both set to Scroll.
The mouse mode option in the Wacom controls panel, which causes a stylus
to behave like a mouse, is not compatible with Corel Painter Essentials.
Always use pen mode when painting with an Intuos tablet and pen.
Brush Tracking
Every artist uses a different pressure when drawing on an Intuos tablet. The
Corel Painter Essentials Brush Tracking preferences help you customize your Intuos
tablet to meet your pressure sensitivity needs. Refer to “Brush Tracking Preferences”
on page 57 for more information.
Using the Intuos Airbrush Wheel
The Intuos Airbrush — the first true computer airbrush — provides fingertip media
flow control. Corel Painter Essentials airbrushes respond to angle (tilt), bearing
(direction), and flow (wheel setting) data from the Intuos stylus, allowing for a truly
realistic brush stroke. For example, as you tilt your stylus, specks of media land on the
paper in a way that reflects that tilt. Corel Painter Essentials airbrushes create conic
sections that mirror your stylus movements.
Corel Painter Essentials airbrushes take advantage of the Intuos Airbrush stylus wheel
control. Like the needle control on a real airbrush, the Intuos wheel control adjusts
airbrush flow, or how much medium is applied. For more information about using the
new airbrushes, refer to “Painting with Airbrushes” on page 94.
Using Multiple Intuos Pens
All Intuos pens — both standard and airbrush — feature ToolID, which allows you to
configure and work with multiple pens during a Corel Painter Essentials session. All
Intuos pens — both standard and airbrush — feature ToolID, which allows you to
configure and work with multiple pens during a Corel Painter Essentials session. For
example, let’s assume you have two Intuos pens: Pen 1 and Pen 2. Pen 1 is set to an Oil
brush variant; Pen 2 is set to an Artists variant.
60 Corel Painter Essentials 3 User Guide
Page 71

Every time you bring Pen 1 into the tablet’s proximity, Corel Painter Essentials
automatically changes the active brush to the Oil brush. Every time you bring Pen 2
into the tablet’s proximity, Corel Painter Essentials switches to the Artists brush. If
you’ve adjusted the tool assigned to a pen’s size or other settings,
Corel Painter Essentials remembers those changes for the next time you use that pen.
The Basics 61
Page 72

Page 73

Textures and Patterns
In Corel Painter Essentials, paper textures, gradients, and patterns can all be applied to
your image. You can brush some of them on, get them to interact with each other,
spray them, smear them, and even create your own. Best of all, you never have to run
to the store in the middle of creating to get a new tube of paint or the right kind of
paper.
You’ll use these items in several ways:
• to load a Brush tool with media for painting
• to fill selections with the Effects menu > Fill command or the Paint Bucket tool
• to control certain image effects, like Apply Surface Texture
Using Paper Texture
In the real world, a marking tool has different results when applied to surfaces with
different textures. Corel Painter Essentials allows you to control the texture of the
canvas to achieve the results you’d expect from natural media on a given surface —
pencil on water color paper, chalk on pavement, and so on.
Of course, some brushes, like those in the Airbrush category, don’t reveal paper texture
in their strokes. This behavior follows that of the natural tool.
Te x tu re s a n d P a t te r ns 6 3
Page 74

Most of the brushes interact with the current paper texture.
You can use paper textures in many ways. Brushes interact with paper “grain,” just as
natural tools react with the texture of the surfaces beneath them. Working with paper
grains is useful when you use the Apply Surface Texture command or other effects. You
can select different paper textures, modify them, organize them in libraries, and even
create your own custom textures.
The terms “paper grain” and “paper texture” are used here synonymously.
Choosing Paper Textures
The Papers Selector in the toolbox is where all paper textures are stored.
The Paper Selector in the toolbox.
To choose a paper texture
1 In the toolbox, click the Paper Selector to display the available paper textures.
64 Corel Painter Essentials 3 User Guide
Page 75

2 Choose a paper texture from the Paper Selector.
Corel Painter Essentials uses the currently selected texture. You can make a
few strokes, and then change the paper and make a few more strokes to get
different results.
Using Patterns
A pattern is a repeating design. The smallest unit of a pattern is known as a “tile.”
When you fill an area with a pattern, the tile is repeated across the selected area.
With patterns, you can
• fill selections with an image
• paint patterns directly onto your image using a cloning brush
• control image effects
Choosing Patterns
The Patterns Selector in the toolbox shows a preview of the pattern.
The Pattern Selector in the toolbox.
To choose a pattern
1 In the toolbox, click the Pattern Selector.
2 Choose a pattern from the list.
To fill an image with pattern tiles
1 In the toolbox, choose a pattern from the Pattern Selector.
2 Choose Effects menu > Fill.
3 In the Fill dialog box, choose Pattern.
Te x tu re s a n d P a t te r ns 6 5
Page 76

To see tiling in an image, the image must be larger than the tile.
To paint with a pattern
1 From the Brush Selector bar, choose a brush category and variant.
2 In the toolbox, choose a pattern from the Pattern Selector.
3 On the Colors palette, click the Clone Color button .
4 Paint in the image.
If you have not set a clone source, Corel Painter Essentials uses the current
pattern in any operation referring to clone source colors or luminance. This
means you can paint with a pattern using a Cloner brush.
If the Source option is not available (grayed out), the selected brush can apply
color only.
When painting with a pattern, keep in mind that direction matters.
Corel Painter Essentials flips the pattern you’re painting when you change
directions, so apply strokes in the same direction for a uniform effect.
66 Corel Painter Essentials 3 User Guide
Page 77

Color
Corel Painter Essentials offers many ways to apply color to your image. For example,
you can change the paper color, choose colors for your brush strokes, or apply gradients
to an entire image or selection.
Getting Started with Color
You can select colors in several ways. You can use
• the color squares on the Colors palette
• the Dropper tool, which samples color from the image
• the Clone Color button, which pulls color from a source
Changing the Paper Color
You can change a document’s paper color — the color of the background canvas — at
any time. This color appears when you delete a filled area or use the Eraser tool to
remove color.
An example of changing the paper color.
Color 67
Page 78

To display the Colors palette
• Choose Window menu > Show Colors.
To change the existing paper color
1 Choose a main color from the Colors palette.
2 Choose Canvas menu > Set Paper Color.
3 To expose the new paper color, do one of the following:
• Make a selection, and cut or delete it.
• Use a the Eraser tool to erase part of your image.
Using the Colors Palette
The Colors palette includes the Hue Ring and the Saturation/Value Triangle.
• Values span the triangle from top to bottom, with the top of the triangle being the
highest value (white) and the bottom being the lowest value (black).
• Saturation levels go from left to right. Dragging or clicking to the right produces
the purest color within the predominant hue. Dragging or clicking to the left
reduces the level of color saturation, producing “muddier” or grayer colors.
You can also use the Clone Color button on the Colors palette to transform regular
brushes into cloning brushes.
The Colors palette is one place where you can select a color to add to your image.
To choose a hue and color from the Colors palette
1 Choose Window menu > Show Colors to display the Colors palette.
68 Corel Painter Essentials 3 User Guide
Page 79

If the Colors palette is not expanded, click the palette arrow.
2 Drag the circle on the Hue Ring to select the predominant hue.
The Saturation/Value Triangle displays all available colors within that selected hue.
3 Select a color on the Saturation/Value Triangle by dragging the circle or by clicking
the color you want.
You can also select a hue by clicking once anywhere on the Hue Ring.
Understanding Main and Additional Colors
The color you select appears in one of two overlapping squares displayed on the Colors
palette. The front square represents the selected main color. The back square shows the
selected additional color. By default, blue is the main color, and white is the additional
color. Most of the time, you work with the main color.
Don’t confuse the additional color with what other graphics programs call “the
background color.” In Corel Painter Essentials, the “background color” is the paper
color.
Overlapping squares display the current main and additional colors.
To choose the main color
1 Choose Window menu > Show Colors to display the Colors palette.
2 Double-click the front square.
3 Choose a color from the Colors dialog box.
Click the front square to set the main color.
To choose the additional color
1 On the Colors palette, double-click the back square.
Color 69
Page 80

2 Choose a color from the Colors dialog box.
If you usually work with the main color, you might want to re-click the front
square to reselect it.
Click the back square to set the additional color.
To swap main and additional colors
• Click the Color Swap Icon .
Sampling Colors from Images
In addition to choosing colors on the Colors palette, you can use the Dropper tool to
select, or “pick up,” a color from an existing image.
To use the Dropper tool
1 Click the front or back square to select a main or additional color.
2 Click the Dropper tool in the toolbox.
3 Move the cursor to the color you want to pick up, and click it.
The color square updates to display the color you’ve selected.
The Dropper tool picks up visible color only; it cannot be used to select a
hidden color.
You can quickly access the Dropper tool by pressing D on the keyboard.
To access the Dropper tool from other tools
• Press Option (Mac OS) or Alt (Windows).
The Dropper tool works with the Brush, Crop, Text, and Paint Bucket tools.
70 Corel Painter Essentials 3 User Guide
Page 81

Cloning Color
The Clone Color option offers another way to choose color. This feature lets the brush
pick up dabs of color from an original (source) image. For more information about
cloning, refer to “Cloning Images” on page 103.
To set up a clone source
1 Choose File menu > Open, and choose the file you want to use as a clone source.
2 Choose File menu > Clone.
3 Choose Select menu > All, and press Delete (Mac OS) or Backspace (Windows).
Now you can work in the new file, taking data from the original source file.
To use clone colors
1 Set up a clone source.
If you don’t set a file as the source, Corel Painter Essentials uses the currently
selected pattern.
2 Choose a brush from the Brush Selector bar.
3 Choose Window menu > Show Colors to display the Colors palette.
4 Click the Clone Color button on the Colors palette.
Enabling the Clone Color option disables the Colors palette. This is a reminder that
your color information is coming from the clone source.
5 When you paint in the clone file, Corel Painter Essentials uses colors from the clone
source image.
When you change the brush or variant, Corel Painter Essentials turns Use
Clone Color off. Be sure to turn it back on to continue working with the clone
color.
Working with Gradients
A gradient is a gradual transformation from one color into another. Sometimes
gradients are called blends or fountains.
Color 71
Page 82

Using Gradients
Corel Painter Essentials provides several different types of gradients.
You can use gradients to
• Fill an image selection, layer, or channel. For more information, see “Selections” on
page 117 and “Layers” on page 125.
• Express the gradient in an existing image by mapping gradient colors to image
luminance. For more information, see “Using Image Luminance to Create Texture”
on page 152.
The Gradient Selector in the toolbox.
To select a gradient
• In the toolbox, click the Gradient Selector, and choose a gradient.
72 Corel Painter Essentials 3 User Guide
Page 83

Painting
Corel Painter Essentials lets you draw and paint as you might with real artists’ tools
and media. In your studio, you use brushes, pencils, chalk, airbrushes, and palette
knives to make marks on a canvas or piece of paper. With Corel Painter Essentials, an
infinite variety of marks are possible. Like a fully stocked art store,
Corel Painter Essentials supplies you with many different brushes and drawing tools,
each with modifiable characteristics.
Exploring Brushes
The Corel Painter Essentials Brush tool offers users a wide range of preset painting and
drawing tools called brush variants. Brush variants are organized into categories, such
as Airbrushes, Artists’ Oils, Pencils, and Digital Watercolor. They are designed with
real media in mind, so you can select a tool with an expectation of how it will behave.
For example, you’ll find a 2B Pencil brush variant in the Pencils category, and a Fine
Camel brush variant in the Oils category. The Brush Selector Bar lets you choose a
category and brush variant quickly and easily.
The Brush Selector Bar lets you choose a brush category (left)
and a brush variant (right) quickly and easily.
You can use the Corel Painter Essentials brush variants as they are, or you can adjust
them to suit your purposes. Many artists use Corel Painter Essentials brush variants
with only minor adjustments — to size, opacity, or grain (how much color penetrates
paper texture).
Painting 73
Page 84

Most Corel Painter Essentials brushes apply media (a color, gradient, or pattern) to an
image. Some brushes, however, do not apply media. Instead, they make changes to
media already in the image. For example, the Smudge brush variant (in the Blenders
brush category) smudges existing colors in the image with smooth, anti-aliased
strokes. Using one of these brushes on a blank area of the canvas has no effect.
Understanding Brush Categories
The section below lists the brush categories and highlights some of the brush variants
you can find in Corel Painter Essentials.
Acrylics Airbrushes Art Pen Brushes Artists
Artists’ Oils Blenders Chalk Cloners
Crayons Digital Watercolor Erasers Image Hose
Oils Palette Knives Pastels Pattern Pens
Pencils Tinting
Acrylics
All Acrylic brush variants cover underlying brush strokes.
Captured Bristle Thick Acrylic Flat Wet Acrylic
Airbrushes
Airbrushes apply fine sprays of color. Computed airbrushes carefully mirror the feel of
a real airbrush in action. The Wacom airbrush stylus is fully compatible with the
airbrush brush variants.
74 Corel Painter Essentials 3 User Guide
Page 85

Coarse Spray Fine Spray Digital Airbrush
Art Pen Brushes
The Art Pen Brushes offer you a range of tools you’d expect to find in an arts supply
store. You can choose from a range of unique tools, such as calligraphy pens, gouache
brushes, or felt art markers.
Thin Smooth
Calligraphy
Tapered Gouache Felt Art Marker
Artists’ Oils
Brush variants from the Artists’ Oils category let you mix paints on the canvas as
though you were working with traditional oil paints. Each stroke created with an
Artists’ Oils brush variant loads the brush with a finite amount of oil, which is then
transferred to the image. As you apply a stroke to the canvas, the Artists’ Oil brush
loses oil, and the brush stroke becomes fainter. Because layers don’t have the oily
properties of the canvas, brush strokes applied to a layer don’t fade as rapidly. Some
Artists’ Oil brush variants are palette knives, allowing artists to mix paint directly on
the canvas.
Painting 75
Page 86

Blender Brush Grainy Dry Brush Thick Wet Impasto
Artists
Artist brush variants help you paint in the styles of master artists. For example, you
can paint in the style of Vincent Van Gogh, where brush strokes are multishaded, or in
the style of an Impressionist, where brush strokes are short and use unmixed colors.
When you use any of the Artist brush variants, dragging quickly produces wider
strokes.
Impressionist Auto Van Gogh Seurat
Blenders
Blenders affect underlying pixels by moving and mixing them. You can smooth
drawing lines and create shading just as you would on a pencil sketch or charcoal
drawing.
Smear Smudge
76 Corel Painter Essentials 3 User Guide
Page 87

Chalk
Chalk brush variants produce the thick, rich texture of natural chalk sticks and cover
with strokes that interact with the paper grain. The opacity is linked to stylus pressure.
Sharp Chalk Square Chalk
Cloners
The Cloner brush variants behave like other brush variants, except that they take color
from a clone source. These variants recreate the source imagery while effectively
filtering it, reproducing the image in an artistic style, such as pastel chalk or
watercolor. For more information, see “Cloning and Tracing” on page 103.
Original photo used
as Clone Source
Coarse Watercolor Impressionist Cloner Soft Cloner
Painting 77
Camel Oil Cloner Chalk Cloner
Page 88

Crayons
Crayons offer a range of styles. From soft and dull, to waxy and grainy, they produce
textured strokes that interact with the paper grain. As with other dry media brush
variants, the opacity is linked to stylus pressure.
Basic Crayon Waxy Crayon
Digital Watercolor
Digital Watercolor brush variants produce watercolor effects that react with the canvas
texture. You can apply a Digital Watercolor brush stroke to any layer or the canvas.
For example, if you’re applying watercolor effects to a digital photo, Digital
Watercolor brush strokes can be applied directly to the image.
Broad Water Brush Diffuse Water Dry Brush
Gentle Wet Eraser
applied to a brush stroke
78 Corel Painter Essentials 3 User Guide
New Simple Water Salt applied to a brush
stroke
Page 89

Erasers
Eraser brush variants erase down to the paper color. Pressure determines how much
you erase.
Eraser Flat Eraser
Image Hose
The Image Hose is a special brush that applies images instead of color. The images it
“paints” with come from special image files called nozzles. Each nozzle file contains
multiple images that are organized by characteristics such as size, color, and angle.
Each characteristic (parameter) can be linked to a stylus attribute (animator), such as
Velocity, Pressure, and Direction.
The name of each Image Hose variant tells you which parameter and animator are in
effect. For example, the Linear-Size-P Angle-R brush variant links size to stylus
pressure (P) and sets the angle randomly (R).
Linear-Angle-B
(Bearing)
Linear-Size-P
(Pressure)
Oils
Oil brush variants let you create effects you’d expect from oil paints. Some variants are
semitransparent and can be used to produce a glazed effect. Other variants are opaque
and cover underlying brush strokes.
Painting 79
Page 90

Fine Camel Opaque Flat Smeary Round
Palette Knives
You can use Palette Knife brush variants to scrape, push, or pick up and drag colors in
your image. Only one Palette Knife brush variant, the Loaded Palette Knife, applies
the current paint color. Palette Knife dabs are always parallel to the shaft of the stylus.
Loaded Palette Knife Palette Knife applied
to a brush stroke
Smeary Palette Knife
Pastels
Pastels range from hard pastel styles that reveal the paper grain to extra soft pastels
that glide on to completely cover existing brush strokes. Opacity is linked to stylus
pressure.
Artist Pastel Chalk Soft Pastel
80 Corel Painter Essentials 3 User Guide
Page 91

Pattern Pens
Pattern Pen brush variants let you use a brush to apply a pattern to an image.
Pattern Pen Pattern Pen Masked Pattern Pen Soft Edge
Pencils
Pencil brush variants are great for any artwork that would traditionally require pencils;
from rough sketches to fine line drawings. Like their natural counterparts, Pencil brush
variants interact with canvas texture. All of the variants build to black and link opacity
to stylus pressure. The width of Pencil strokes varies according to the speed of the
stroke, so dragging quickly produces a thinner line and dragging slowly leaves a
thicker line.
2B Pencil Grainy Variable Pencil
Tinting
Tinting brush variants let you apply effects to photos or existing artwork. For example,
you can apply translucent color to areas of a black and white photo using the Basic
Round brush variant.
Painting 81
Page 92

Basic Round Blender Soft Grainy Round
Selecting a Brush
On the Brush Selector bar, you can choose from brush variants that are arranged in
recognizable categories. Corel Painter Essentials brushes are built to emulate NaturalMedia tools, which lets you select a tool with a reasonable expectation of how it will
behave. In an art store, if the tools in one aisle don’t produce the results you want, you
can try a different aisle. Similarly, with Corel Painter Essentials, you can try different
brush categories to find the tool you want.
To show the Brush Selector bar
• In the toolbox, double-click the Brush tool .
You can also show the Brush Selector bar by choosing Window menu > Show
Brush Selector Bar.
To choose a brush
1 On the Brush Selector bar, choose a brush category from the Brush Category
selector.
2 Choose a variant from the Brush Variant selector.
82 Corel Painter Essentials 3 User Guide
Page 93

The Brush Category pop-up menu of the Brush Selector bar.
Choosing Brush Settings
Basic brush controls for size, opacity, and grain are located on the property bar. The
property bar may also contain additional controls for the selected brush category, such
as resaturation, bleed, and jitter.
When a brush is selected and positioned over the canvas, the cursor changes, by
default, into a “ghost” of the brush — mirroring size and shape — so you can see the
area that you’re about to paint. This ghost brush provides a handy way to see if a
change in size is required.
Setting Brush Size
The Size slider on the property bar determines the size of a single brush dab. The text
field next to this slider lets you enter a specific size (in pixels).
Painting 83
Page 94

To set brush size
1 Choose the Brush tool from the toolbox.
2 Choose a brush from the Brush Selector bar.
3 On the property bar, type a value in the Size box, or adjust the pop-up slider.
Corel Painter Essentials may need to rebuild the brush after you resize it.
Automatic rebuilding of modified brushes is the default in Corel Painter Essentials.
Expect a short delay while Corel Painter Essentials is rebuilding the brush.
To use the resize shortcut
1 Hold down Command + Option + Shift (Mac OS) or Ctrl + Alt + Shift
(Windows).
2 With the Brush tool, drag in the image window.
A circle representing the brush size is displayed beside the pointer. When the circle
is the size you want, release the mouse button.
3 Click the image to reactivate the Brush tool.
A handy way to set brush size is to use the keyboard shortcut:
Command + Option + Shift (Mac OS) or Ctrl + Alt + Shift (Windows).
You can also adjust brush size “on the fly” by using the square bracket keys:
To increase brush size incrementally, click the right square bracket ( ] ) key. To
decrease brush size incrementally, click the left square bracket ( [ ) key.
Adjusting Opacity and Grain
The Opacity slider controls the degree to which a stroke “covers” or “builds up” on the
underlying pixels.
84 Corel Painter Essentials 3 User Guide
Page 95

80% opacity (top) and 20% opacity (bottom).
The Grain slider controls how much color penetrates into the paper texture. Lower
settings show more of the grain.
89% grain (top), and 12% grain (bottom).
To s e t o p a c i t y
1 Choose the Brush tool from the toolbox.
2 Choose a brush from the Brush Selector bar.
3 On the property bar, type a percentage in the Opacity box, or adjust the pop-up
slider.
When Opacity setting is low, the applied color is thin, allowing you to see through
to the underlying colors. When the setting is high, the applied color covers
underlying pixels more completely.
To s e t g r a i n
• On the Brush property bar, type a percentage in the Grain box, or adjust the
pop-up slider.
Painting 85
Page 96

Move the slider to the left to reduce penetration and reveal more texture. Move it
to the right to increase penetration and reveal less grain.
For liquid media brushes, Grain controls the amount of “pull.” For
Image Hose brushes, Grain controls the mixture with the additional color. For
other brushes, such as airbrushes, the Grain slider is not available.
Using a Stylus or Mouse
When you reach for a wide, flat brush, you expect the stroke you make to depend on
how you hold the brush. A stroke using the face of the brush comes out wide. A mark
using the edge is narrow.
Paint with the face of a flat brush for a wide stroke; use the edge for a narrow stroke.
Corel Painter Essentials produces realistic brush strokes that fade in and out; change
width, tilt, and angle; and penetrate based on the stylus input. Some brush variants,
such as the Smeary Flat variant in the Oils category, also react to stylus tilt (how close
to vertical the stylus is held) and bearing (the compass direction in which the stylus is
pointing).
Tilt can significantly affect brush strokes. If you get unexpected results, especially with
bristle-type brushes or airbrushes, you can try reducing the tilt of your stylus. Extreme
tilt angles are usually undesirable.
Many Corel Painter Essentials brushes also respond to stylus pressure (how hard you
press with the stylus). Depending on variant settings, greater stylus pressure can
increase the width of a brush stroke, the penetration of color, or the degree of other
86 Corel Painter Essentials 3 User Guide
Page 97

effects. The Corel Painter Essentials airbrushes also respond to the fingerwheel on the
Wacom Intuos airbrush, simulating a needle control that adjusts how much ink is
sprayed.
You can link brush settings (such as size, opacity, and angle) to stylus input data (such
as velocity, direction, pressure, airbrush fingerwheel, tilt, and bearing).
In theory, a mouse has no pressure information. A mouse button is either “on” (button
down) or “off ” (button up). Corel Painter Essentials introduces mouse controls that let
you simulate stylus pressure, tilt, bearing, and fingerwheel settings.
If you are using a mouse with Corel Painter Essentials, you can compensate for the lack
of pressure information by adjusting size, opacity, and grain on the property bar. For
example, reducing opacity or grain can produce the same results as pressing more
lightly with a stylus.
Marking the Canvas
You can paint on the canvas or on a layer above the canvas. When you select a layer on
the Layers palette, that layer becomes the target for your brush strokes.
When you have an active selection, painting is confined to the selection by default.
Refer to “Selections” on page 117 for more information about selections.
In all cases, your brush strokes go to the selected target, so you should check that it
matches your intended destination before you start to paint.
You mark the canvas by selecting the Brush tool and dragging in the document
window with a brush variant that applies media. Each time you drag, you create a
brush stroke.
Freehand vs. Straight-Line Drawing
You can draw unconstrained lines by using the freehand drawing style, or you can
draw straight lines. Options on the property bar
When you use Freehand Strokes, you can drag with any motion or in any direction.
The stroke follows your drag path.
Painting 87
let you choose the drawing style.
Page 98

With the Freehand Stroke option, you drag to create strokes.
When you use Straight Line Strokes, Corel Painter Essentials connects points with a
straight line.
With the Straight Line Strokes option, you click to create the first
point and then click or drag to create a stroke.
To draw freehand lines
1 On the Brush property bar, click the Freehand Strokes button .
2 Drag on the canvas.
You can use shortcut keys to toggle between the freehand and straight line
drawing styles. Press B to choose the freehand style, or V to choose the
straight-line style.
To draw straight lines
1 On the Brush property bar, click the Straight Line Strokes button .
2 Click a point on the canvas where you want to start your line.
3 Do one of the following:
• Click the point where you want to end the line.
• Drag to place the end point exactly where you want it.
Corel Painter Essentials connects the first and second points with a straight line.
88 Corel Painter Essentials 3 User Guide
Page 99

4 To continue drawing from the second point, click or drag to create additional
points on the canvas.
Corel Painter Essentials connects each point with a straight line.
5 To end a line, do one of the following:
• Press Return (Mac OS) or Enter (Windows) to close the polygon. The final point
is connected to the origin with a straight line.
• Click the Freehand Strokes button to return to the freehand drawing style
without closing the polygon.
• Press V to end the current polygon without closing it, so that you can begin a
new one.
Constraining, Fading, and Undoing Strokes
In either drawing style, you can constrain your strokes to 45° angle increments. With
the Freehand Strokes option, each stroke is constrained to a straight line, with the
angle depending on the orientation of the stroke. With the Straight Line Strokes
option, points are connected with lines at 45° angle increments.
If you apply a stroke, but want it to be less opaque, you can fade it.
You can use the Undo command to remove it. You can repeat the command to remove
previous strokes and set how many individual strokes can be undone.
To constrain strokes to 45° angle increments
• Hold down Shift as you drag or click.
In Straight Line mode, you can also constrain lines to the grid by enabling the
Snap to Grid option. Choose Canvas menu > Grid > Snap to Grid.
To f a d e a s t r o ke
1 Choose Edit menu > Fade.
2 Set the Undo Amount slider for the opacity you want, and click OK.
The Preview window shows the results of your selection.
Painting 89
Page 100
To undo a stroke
• Choose Edit menu > Undo Brush Stroke.
You can also undo a stroke by pressing Command + Z (Mac OS) or Ctrl + Z
(Windows).
Erasing Image Areas
You can erase any part of your image and control the opacity of erased areas. You can
link the opacity to stylus pressure or specify a fixed opacity value.
To erase an image area
1 On the Layers palette, choose the layer on which you want to erase.
2 Choose the Eraser tool in the toolbox.
3 On the property bar, adjust the Size pop-up slider.
4 Adjust the Opacity pop-up slider.
5 Click one of the following buttons:
• Soft Mode — sets opacity based on stylus pressure. The more pressure you
apply, the higher the opacity. The initial opacity level is determined by the
Opacity pop-up slider.
• Hard Mode — sets opacity based on the value set by the Opacity pop-up
slider
You can toggle between Soft Mode and Hard Mode by holding down Option
(Mac OS) or Alt (Windows) as you drag in the image window.
You can erase in straight lines by clicking the Straight Line Strokes button
on the property bar, clicking a point on the canvas where you want to start
your line, and clicking where you want to end the line.
You can also erase image areas by choosing the Brush tool in the toolbox, and
choosing Erasers from the Brush Category selector on the Brush Selector bar.
90 Corel Painter Essentials 3 User Guide
 Loading...