


MO1504-EB © 2015 CASIO COMPUTER CO., LTD.
Operation Guide 3440 3441
Getting Acquainted
Congratulations upon your selection of this CASIO watch. To get the most out of your purchase, be sure to read this manual carefully.
Keep the watch exposed to bright light
Bright Light
l
l |
l |
l |
l |
l |
l |
l |
Solar panel
l
l
l
The electricity generated by the solar panel of the watch is stored by a rechargeable battery. Leaving or using the watch where it is not exposed to light causes the battery to run down. Make sure the watch is exposed to light as much as possible.
•When you are not wearing the watch on your wrist, position the face so it is pointed at a source of bright light.
•You should try to keep the watch outside of your sleeve as much as possible. Charging is reduced significantly if the face is covered only partially.
E-1
•The watch continues to operate, even when it is not exposed to light. Leaving the watch in the dark can cause the battery to run down, which will result in some watch functions to be disabled. If the battery goes dead, you will have to re-configure watch settings after recharging. To ensure normal watch operation, be sure to keep it exposed to light as much as possible.
Battery charges in the light. |
Battery discharges in the dark. |
|
Solar panel |
Bright Light |
|
(Converts light to |
Electrical |
|
electrical power.) |
|
|
energy |
|
|
|
|
|
•The actual level at which some functions are disabled depends on the watch model.
•Be sure to read “Power Supply” (page E-40) for important information you need to know when exposing the watch to bright light.
If the display of the watch is blank...
If the display of the watch is blank, it means that the watch’s Power Saving function has turned off the display to conserve power.
• See “Power Saving Function” (page E-53) for more information.
About This Manual
|
LEVEL 1 |
All |
LEVEL 1 |
|
|
|
functions |
|
|||
|
LEVEL 2 |
LEVEL 2 |
|
||
|
enabled |
|
|||
|
|
|
Some or all |
||
|
LEVEL 3 |
Dis- |
LEVEL 3 |
||
|
functions |
||||
Charge |
LEVEL 4 |
charge |
LEVEL 4 |
||
disabled |
•The operational procedures for Modules 3440 and 3441 are identical. All of the illustrations in this manual show Module 3440.
•Button operations are indicated using the letters shown in the illustration.
•Each section of this manual provides you with the information you need to perform operations in each mode. Further details and technical information can be found in the “Reference” section.
Rechargeable battery
E-2 |
E-3 |
|
|
[Module 3440]
C (Module 3440 charge indicator)
[Module 3441]
CHG (Module 3441 charge indicator)
Contents
General Guide ………………………………………………………………………… E-8
To exit the demo mode …………………………………………………………E-10
Timekeeping ……………………………………………………………………………E-11
To set the time and date ………………………………………………………E-12 To change the Daylight Saving Time (summer time) setting ………………E-16
Stopwatch ………………………………………………………………………………E-17
To measure times with the stopwatch ………………………………………E-18 To position the lap time and split time on the display ………………………E-20
Recall Mode ……………………………………………………………………………E-22
To recall stopwatch records ……………………………………………………E-22 To delete a log …………………………………………………………………E-24 To delete all logs ………………………………………………………………E-25
E-4 |
E-5 |
|
|
Countdown Timer………………………………………………………………………E-26
To configure the countdown timer ……………………………………………E-27 To use the countdown timer……………………………………………………E-29
World Time………………………………………………………………………………E-30
To view the time in another city ………………………………………………E-31
To toggle a city code time between Standard Time and
Daylight Saving Time ………………………………………………………E-32
Alarms……………………………………………………………………………………E-33
To set an alarm time ……………………………………………………………E-34 To test the alarm ………………………………………………………………E-35 To turn an alarm on and off ……………………………………………………E-36 To turn the Hourly Time Signal on and off ……………………………………E-37
Illumination ……………………………………………………………………………E-38
To illuminate the display manually ……………………………………………E-38 To specify the illumination duration……………………………………………E-39
E-6
Power Supply …………………………………………………………………………E-40
Reference ………………………………………………………………………………E-48
To turn the button operation tone on and off …………………………………E-52 To recover from the sleep state ………………………………………………E-54 To turn Power Saving on and off………………………………………………E-54
Specifications …………………………………………………………………………E-57
E-7
General Guide
Recall Mode |
Countdown Timer Mode |
• Press C to change from mode to mode.
• In any mode, press L to illuminate the display.
Stopwatch Mode
Timekeeping Mode
Alarm Mode |
|
World Time Mode |
|||
|
|
|
|
|
|
|
|
|
|
|
|
E-8 |
E-9 |
Operation Guide 3440 3441
Demo Mode
In the Timekeeping Mode, holding down C for about three seconds will enter the demo mode. In the demo mode, the screen cycles through the normal timekeeping, stopwatch, and World Time screens in five-second intervals.
To exit the demo mode
Press any button.
E-10
Timekeeping
Use the Timekeeping Mode to set and view the current time and date.
Day of week
PM indicator
 Hour : Minutes Seconds


 Year – Month – Day
Read This Before You Set the Time and Date!
This watch is preset with a number of city codes, each of which represents the time zone where that city is located. When setting the time, it is important that you first select the correct city code for your Home City (the city where you normally use the watch). If your location is not included in the preset city codes, select the preset city code that is in the same time zone as your location.
•Note that all of the times for the World Time Mode city codes (page E-30) are displayed in accordance with the time and date settings you configure in the
Timekeeping Mode.
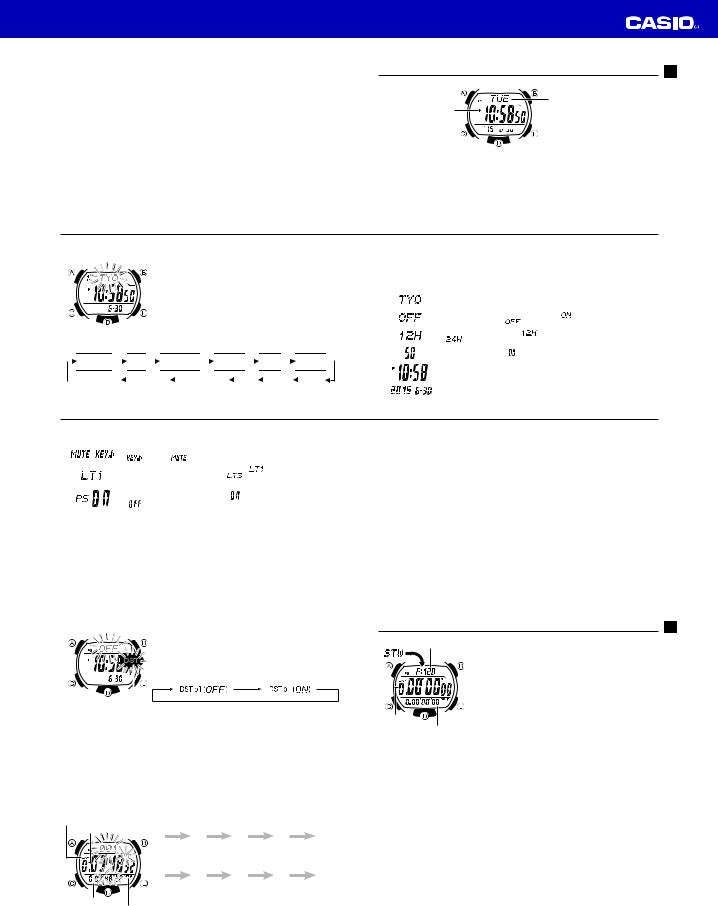
To set the time and date
1. In the Timekeeping Mode, hold down A until the city code starts to flash, which indicates the setting screen.
2. Use D and B to select the city code you want.
• Make sure you select your Home City code before changing any other setting.
• For full information on city codes, see the “City Code Table” at the back of this manual.
3.Press C to move the flashing in the sequence shown below to select the other settings.

 City Code
 DST
DST 
 12/24-Hour
 Seconds
 Hour
Hour 
 Minutes
Format
|
Power Saving |
|
|
Illumination |
|
|
Button |
|
|
Day |
|
|
Month |
|
|
Year |
|
|
|
Duration |
|
|
Operation Tone |
|
|
|
|
|
|
||||
|
|
|
|
|
|
|
|
|
|
|
|
|
|
|
E-12
•The following steps explain how to configure timekeeping settings only.
4.When the timekeeping setting you want to change is flashing, use D or B to change it as described below.
Screen: |
|
To do this: |
|
|
Do this: |
|
|
Change the city code |
|
|
|
Use D (east) and B |
|
|
|
|
|
(west). |
||
|
|
|
|
|
|
|
|
Toggle between Daylight Saving Time ( |
) |
Press D. |
|||
|
and Standard Time ( |
) |
|
|
||
|
|
|
|
|||
|
Toggle between 12-hour ( |
) and 24-hour |
Press D. |
|||
|
( |
) timekeeping |
|
|
|
|
|
|
|
|
|
||
|
Reset the seconds to |
|
|
|
Press D. |
|
|
|
|
|
|
||
|
Change the hour and minutes |
|
|
Use D (+) and B (–). |
||
|
|
|
|
|||
|
Change the year, month, or day |
|
Use D (+) and B (–). |
|||
|
|
|
|
|
|
|
E-13
Screen: |
|
|
To do this: |
Do this: |
/ |
Toggle the button operation tone between |
Press D. |
||
|
(on) and |
(off) |
||
|
|
|
||
|
Toggle the illumination duration between |
|
||
|
(approximately 1.5 seconds) and |
Press D. |
||
|
(approximately 3 seconds). |
|
||
|
Toggle between Power Saving on ( ) and off |
Press D. |
||
|
( |
) |
|
|
12-hour and 24-hour timekeeping
•With the 12-hour format, the P (PM) indicator appears to the left of the hour digits for times in the range of noon to 11:59 p.m. and no indicator appears to the left of the hour digits for times in the range of midnight to 11:59 a.m.
•With the 24-hour format, times are displayed in the range of 0:00 to 23:59, without any indicator.
•The 12-hour/24-hour timekeeping format you select in the Timekeeping Mode is applied in all other modes.
Daylight Saving Time (DST)
5. Press A to exit the setting screen.
•The day of the week is displayed automatically in accordance with the date (year, month, and day) settings.
Daylight Saving Time (summer time) advances the time setting by one hour from Standard Time. Remember that not all countries or even local areas use Daylight Saving Time.
E-14 |
E-15 |
|
|
To change the Daylight Saving Time (summer time) setting
1. In the Timekeeping Mode, hold down A until the city code starts to flash, which indicates the setting screen.
|
|
2. |
Press C and the DST setting screen appears. |
||||
|
|
3. |
Use D to cycle through the DST settings in the |
||||
|
|
|
sequence shown below. |
||||
|
|
|
|
|
' |
|
|
|
|
|
|
|
|
|
|
|
|
|
|
|
|
|
|
DST indicator |
4. |
When the setting you want is selected, press A to exit |
|||||
|
|
||||||
the setting screen.
•The DST indicator appears to indicate that Daylight Saving Time is turned on.
Stopwatch
Remaining memory
Lap time
Split time
The 1/100-second stopwatch can measure elapsed time and lap/split times. Stopwatch times are stored in memory.
•The stopwatch measurement operation continues even if you exit the Stopwatch Mode.
•Exiting the Stopwatch Mode while a lap/split time is frozen on the display clears the lap/split time and returns to elapsed time measurement.
•All of the operations in this section are performed in the Stopwatch Mode, which you enter by pressing & (page E-8).
Note
•See page E-50 for information about the type of data the watch stores in memory when you use the stopwatch.
•Use the Recall Mode (page E-22) to view data stored in memory.
E-16 |
E-17 |
|
|
To measure times with the stopwatch
Lap/Split indicator |
Elapsed Time |
|
|
|
|
Lap time |
D |
B |
D |
B |
B |
|
|||||
|
Start |
Stop |
Resume |
Stop |
Reset |
Lap/Split Times |
|
|
|
|
D |
D |
D |
B |
B |
Start |
Lap/Split |
Next Lap/ |
Stop |
Reset |
|
|
Split |
|
|
Split time |
|
|
|
|
Note
•Pressing D to perform a lap/split time operation freezes the lap/split time at that point on the display for about eight seconds. After that, the display returns to normal stopwatch time measurement.
•During a stopwatch time measurement operation, the current lap/split number is shown at the top of the display, and the lap time and split time are shown in the
middle and at the bottom. You can change the positions of the lap time and split time by pressing A while a stopwatch operation is in progress or stopped. For details, refer to “To position the lap time and split time on the display” (page E-20).
Lap/Split indicator
E-18 |
E-19 |

Operation Guide 3440 3441
To position the lap time and split time on the display
Each press of A cycles the lap time and split time positions in the sequence shown below.
•You can perform the above operation while stopwatch operation is ongoing or stopped.
Remaining memory |
|
|
Lap time |
Lap time |
Split time |
Split time |
||
Lap time |
Hours Seconds |
Hours Seconds |
Split time |
Minutes |
Minutes |
E-20
Recall Mode
Creation date (Month – Day)
Log number
Time measurement was performed
Log Title Screen
E-22
Use the Recall Mode to recall and delete records stored by the Stopwatch Mode.
•Stopwatch records are stored in “logs” that are created automatically by the watch. See “Memory Management” on page E-48 for more information.
•The title screen of the newest log appears first whenever you enter the Recall Mode.
•Log numbers are automatically assigned in sequence, starting from .
.
•All of the operations in this section are performed in the Recall Mode, which you enter by pressing C (page E-9).
To recall stopwatch records
In the Recall Mode, use A to scroll through the log title screens, starting from the newest one, as shown below. When the title screen of the log you want is displayed, use D (+) and B (–) to cycle through the records contained in the log.
•The locations of the lap time and split time in the Stopwatch Record screen are determined by the display format you last selected in the Stopwatch Mode (page E-17).
•The BEST indicator identifies the record that contains the best lap time in the log.
•If a best lap time record is deleted automatically when the log becomes full, the BEST indicator will not be transferred to the record with the next best lap time. See “Memory Management” on page E-48 for more information about automatic deletion of records.
To delete a log
1.In the Recall Mode, display the title screen or one of the records of the log you want to delete.
2.While holding down B, hold down D for about two seconds until the watch beeps.
• “CLR” will flash on the display for two seconds and then the watch will beep. Release B and D at this time.
• You cannot delete the log of an ongoing elapsed time measurement operation.
E-24
Countdown Timer
Number of Repeats
Seconds |
|
Minutes |
Timer 1 |
Dual timers can be set with two different starting times. The watch can be configured so the two timers alternate, so when one reaches the end of its countdown, the other timer starts. You can specify a “number of repeats” value, which controls how many times the two-timer countdown operation is performed (1 = once, 2 = twice, etc.). The starting time of each timer can be set in five-second steps up to 99 minutes, 55 seconds.
You can specify up to 10 repeats. The watch emits a short beep whenever either of the timers reaches the end of its countdown during an ongoing timer operation. The watch emits a 5-second beep when the end of the final timer operation (specified by the number of repeats) is reached.
Countdown End Beeper
The countdown end beeper lets you know when the countdown reaches zero. The beeper stops after about 5 seconds or when you press any button.
E-26
3.When the setting you want to change is flashing, use D and B to change it as described below.
Setting |
Screen |
Button Operation |
Minutes, Seconds |
|
Use D (+) and B (–) to change the setting. |
|
|
|
Number of Repeats |
|
Use D (+) and B (–) to change the setting. |
|
|
|
• To disable either timer, set 00'00" as its countdown start time.
4.Press A to exit the setting screen.
E-28
More than 10 hours
•Whenever the elapsed time exceeds 10 hours, the measurement changes from 1/100-second units to 1-second units.
E-21
Stopwatch Record |
Best Lap Time |
Screen |
Screen |
Lap/Split number |
BEST indicator |
|
|
Log Title Screen |
|
Lap time |
|
Split time |
|
E-23
To delete all logs
While holding down B, hold down D for about five seconds until the watch beeps once and then a second time.
•“CLR” will flash on the display for two seconds and then the watch will beep once. Keep B and D depressed and “ALL” will flash on the display for three seconds, and then the watch will beep again. This indicates that all log data is cleared.
•You cannot delete logs while an elapsed timing operation is in progress.
E-25
To configure the countdown timer |
|
|
|
|
|
|
|
|
|
|
|
|||||||||||
|
|
|
|
|
|
1. While the countdown start time is on the display in the |
||||||||||||||||
|
|
l |
l |
l |
Countdown Timer Mode, hold down A until the current |
|||||||||||||||||
|
l |
countdown start time starts to flash, which indicates the |
||||||||||||||||||||
|
|
|
|
l |
||||||||||||||||||
|
l |
|
|
|
l |
setting screen. |
|
|
|
|
|
|
|
|
|
|
|
|||||
|
l |
|
|
|
l |
• If the countdown start time is not displayed, use |
||||||||||||||||
|
l |
|
|
l |
||||||||||||||||||
|
l |
|
|
l |
the procedure under “To use the countdown timer” |
|||||||||||||||||
|
|
ll |
|
|||||||||||||||||||
|
|
|
|
|
|
(page E-29) to display it. |
|
|
|
|
|
|||||||||||
|
|
|
|
|
|
2. Press C to move the flashing in the sequence shown |
||||||||||||||||
|
|
|
|
|
|
below to select other settings. |
|
|
|
|
|
|||||||||||
|
|
|
|
|
|
|
|
|
|
|
|
|
|
|
|
|
|
|
|
|
|
|
|
|
|
|
|
|
|
Timer 1 |
|
|
Timer 1 |
|
|
|
Timer 2 |
|
|
Timer 2 |
|
||||
|
|
|
|
|
|
|
Minutes |
|
|
Seconds |
|
|
|
Minutes |
|
|
Seconds |
|
||||
|
|
|
|
|
|
|
|
|
|
|
|
|
|
|
|
|
|
|
||||
|
|
|
|
|
|
|
|
|
|
|
|
|
Number of Repeats |
|
|
|
|
|||||
|
|
|
|
|
|
|
|
|
|
|
|
|
|
|
|
|
|
|
|
|
E-27 |
|
|
|
|
|
|
|
|
|
|
|
|
|
|
|
|
|
|
|
|
|
|
||
To use the countdown timer |
|
|
|
|
|
|
|
|
|
|
|
|||||||||||
|
Current repeat count |
|
|
|
|
|
|
|
|
Preset number of repeats |
||||||||||||
|
|
|
|
|
|
|
|
|
|
|
|
|
(Reset) |
|
|
|
|
|
||||
Current timer time 

 Timer 1 or 2
Current time
(Start/Stop)
Press D while in the Countdown Timer Mode to start the countdown timer.
•The countdown is performed by alternating between Timer 1 and Timer 2. A short beep is emitted to signal a changeover from one timer to the other.
•Press D to pause a countdown. Press D again to resume.
•Pressing B while a countdown timer is stopped resets it to the start time specified by you.
•The watch emits a 5-second beep when the end of the final timer operation (specified by the number of repeats) is reached.
•Even if you exit the Countdown Timer Mode, the countdown timer operation
continues and the watch beeps as required.
 Loading...