


4334
Table of contents
 Loading...
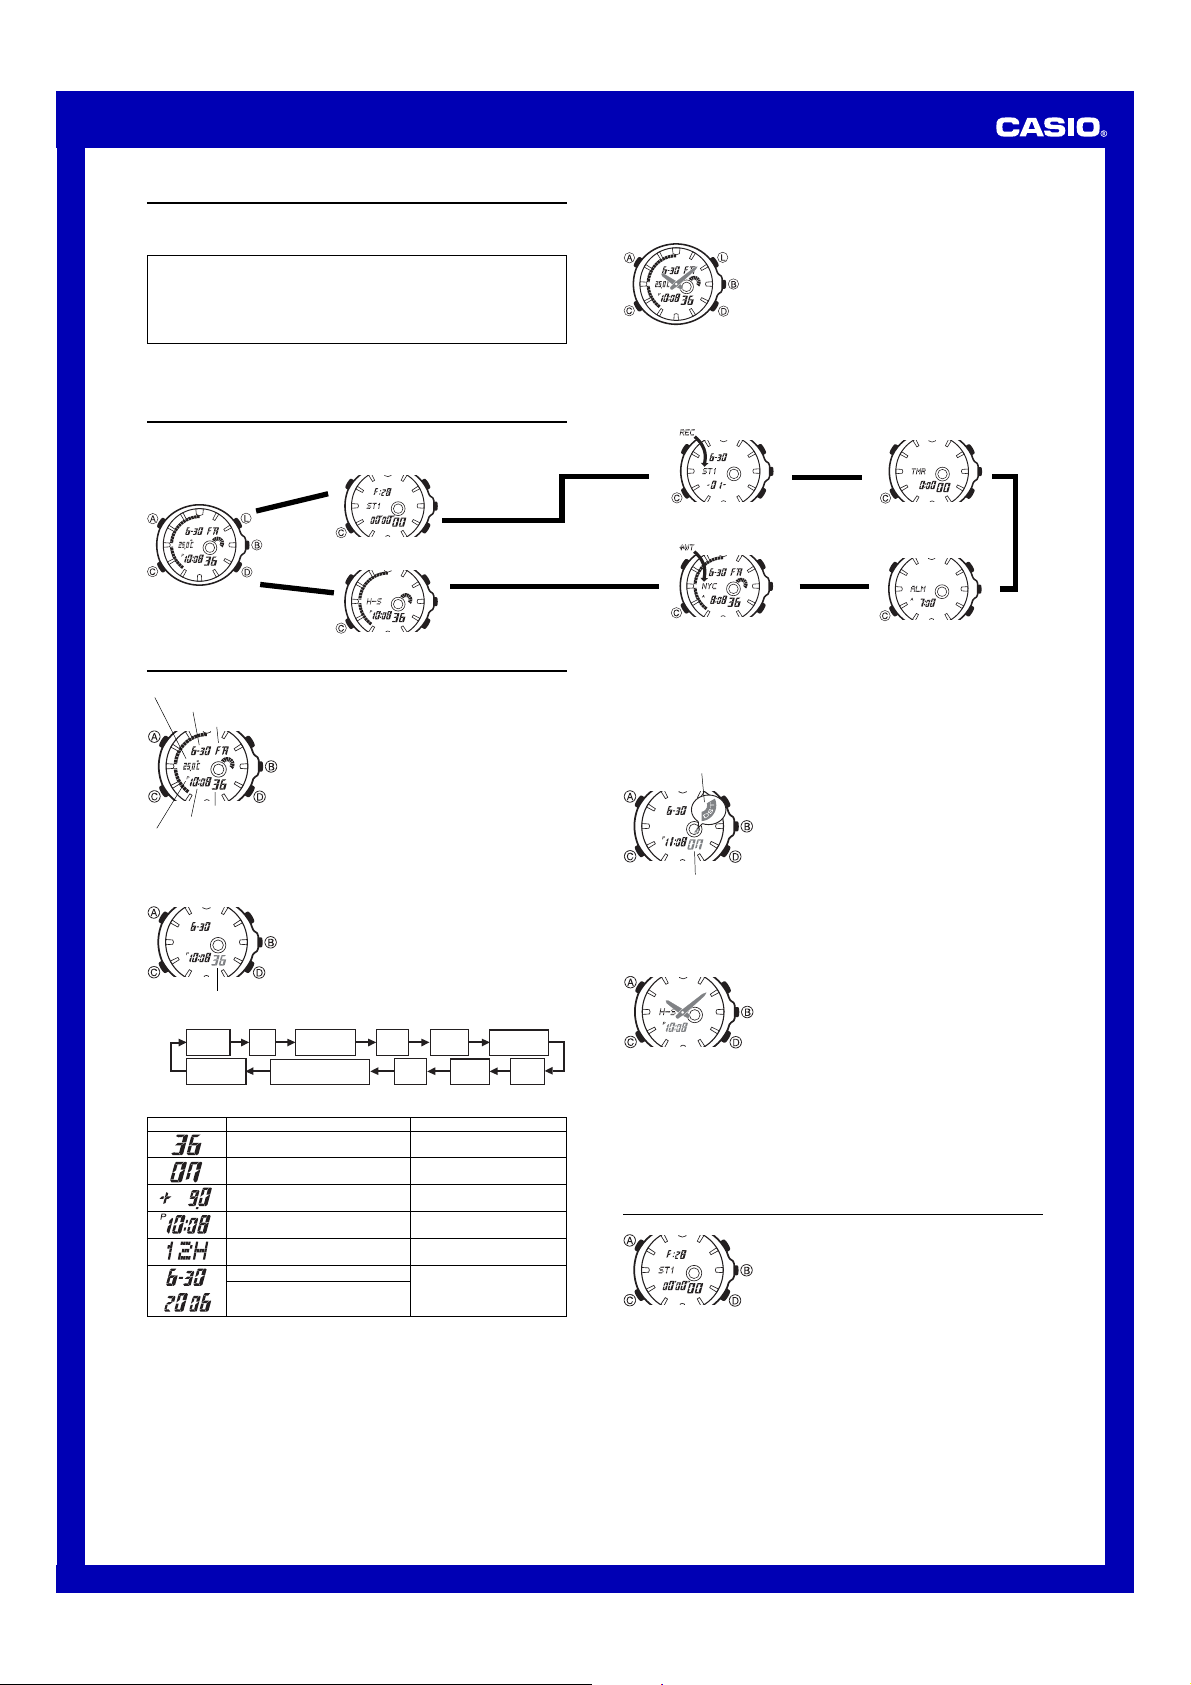
Operation Guide 4334
1
MO0607-EB
Warning!
• The measurement functions built into this watch are not intended for use in taking
measurements that require professional or industrial precision. Values produced
by this watch should be considered as reasonably accurate representations only.
• CASIO COMPUTER CO., LTD. assumes no responsibility for any loss, or any
claims by third parties that may arise through the use of this watch.
Getting Acquainted
Congratulations upon your selection of this CASIO watch. T o get the most out of your
purchase, be sure to read this manual carefully.
About This Manual
• Button operations are indicated using the letters shown
in the illustration.
• For the sake of simplicity, the sample displays in this
manual do not show the analog hands of the watch.
• Depending on the model of your watch, display text
appears either as dark figures on a light background, or
light figures on a dark background. All sample displays
in this manual are shown using dark figures on a light
background.
• Each section of this manual provides you with the
information you need to perform operations in each
mode. Further details and technical information can be
found in the “Reference” section.
(Light)
General Guide
• Press C to change from mode to mode.
• In any mode, press L to illuminate the display.
Recall Mode
World Time Mode
Stopwatch Modes
▲
▲
Countdown Timer
Mode
▲
▲
Alarm Mode
Press C.
▲
Hand Setting Mode
TimeKeeping Mode
▲
▲
This watch has two
stopwatch modes. See
“Stopwatches” for more
information.
Timekeeping
Use the Timekeeping Mode to set and view the current
time and date.
This watch features separate digital and analog
timekeeping. The procedures for setting the digital time
and analog time are different.
• See “Thermometer” for details about the thermometer.
Setting the Digital Time and Date
This watch is preset with UTC differential values that
represent each time zone around the globe. Before setting
the digital time, be sure to first set the UTC differential for
your Home Time, which is the location where you normally
will be using the watch.
• Note that World Time mode times are all displayed
based on the time and date settings you configure in the
Timekeeping Mode.
PM indicator
Hour : Minutes
Seconds
Month – Day
Thermometer
Day of week
To set the digital time and date
1.In the Timekeeping Mode, hold down A until the
seconds start to flash, which indicates the setting
screen.
• Be sure to configure the correct UTC differential for
your Home Time before configuring any other
Timekeeping Mode settings.
• See the “UTC Differential/City Code List” for
information about the UTC differential settings that are
supported.
2.Press C to move the flashing in the sequence shown
below to select other settings.
l
l
l
l
l
l
l
l
l
l
l
l
l
l
l
l
Seconds
Hour
UTC
Differential
Minutes
Year
DST
Day
Month
Seconds
Temperature
Unit
12/24-Hour
Format
Temperature Sensor
Calibration
Screen: To do this:
Reset the seconds to 00
Toggle between Daylight Saving
Time (ON) and Standard Time (OF)
Specify the UTC differential
Change the hour or minutes
Toggle between 12-hour (12H) and
24-hour (24H) timekeeping
Do this:
Press D.
Press D.
Use D (+) and B (–).
Use D (+) and B (–).
Press D.
Use D (+) and B (–).
Change the year
Change the month or day
3. When the setting you want to change is flashing, use D and B to change it as
described below.
• The UTC differential setting range is –12.0 to +14.0, in 0.5-hour units.
• For information about settings other than the time and date, see the following.
Temperature Sensor Calibration: “Thermometer”
Temperature Unit: “Thermometer”
4. Press A to exit the setting screen.
• The 12-hour/24-hour timekeeping format you select in the Timekeeping Mode is
applied in all modes.
• The day of the week is displayed automatically in accordance with the date (year,
month, and day) settings.
• When DST is turned on, the UTC differential setting range is –11.0 to +15.0, in 0.5-
hour units.
• Any time the seconds setting is changed, the analog hands are adjusted accordingly.
• See “Daylight Saving Time (DST) Setting” below for details about the DST setting.
Daylight Saving Time (DST) Setting
Daylight Saving Time (summer time) advances the time setting by one hour from
Standard Time. Remember that not all countries or even local areas use Daylight
Saving Time.
To toggle the Timekeeping Mode digital time between DST and Standard Time
1.In the Timekeeping Mode, hold down A until the
seconds start to flash, which indicates the setting
screen.
2. Press C once and the DST setting screen appears.
3. Press D to toggle between Daylight Saving Time (
ON
displayed) and Standard Time (OF displayed).
4. Press A to exit the setting screen.
• The DST indicator appears on the Timekeeping, Alarm,
and Hand Setting Mode screens to indicate that
Daylight Saving Time is turned on.
Setting the Analog Time
Perform the procedure below when the time indicated by the analog hands does not
match the time of the digital display.
l
l
l
l
l
l
l
l
l
l
l
l
l
l
l
l
l
l
l
l
l
l
l
l
l
l
l
l
DST indicator
On/Off status
To adjust the analog time
1.In the Timekeeping Mode, press C six times to enter
the Hand Setting Mode.
2.Hold down A until the current digital time starts to
flash, which indicates the setting screen.
3. Use D to adjust the analog setting.
• Press D once to advance the hands 20 seconds.
• Hold down D to advance the hands at high speed.
• To lock high speed hands movement, hold down D to start it and then press B
to lock. The hands will continue to advance for one 12-hour cycle or until you
press any button to stop it.
High-speed hand movement also will stop automatically after the time advances
12 hours or if an alarm (daily alarm, Hourly Time Signal, or countdown beeper)
starts to sound.
4. Press A to exit the setting screen.
• The minute hand will be adjusted slightly to match the seconds when you exit the
setting screen.
• To return to the Timekeeping Mode, press C.
l
l
l
l
l
l
l
l
l
l
l
l
l
l
l
l
l
l
Stopwatches
Your watch has two stopwatch modes: a Single Stopwatch
Mode and a Dual Stopwatch Mode. Both stopwatch
modes measure times in 1/100-second units for the first
hour, and in 1-second units after that. In both stopwatch
modes, timing is possible up to 99 hours, 59 minutes,
59.99 seconds.
The Single Stopwatch Mode (ST1) displays the total
elapsed time and lap times for a single vehicle or runner.
The Dual Stopwatch Mode (ST2) can be used to measure
elapsed time for two vehicles or runners at the same time,
including separate lap times and the time differential
between vehicles or runners.
The data produced by either stopwatch mode is stored
automatically in watch memory, for later recall when you
need it.
• When the elapsed time being kept by either of the stopwatches exceeds 99 hours,
59 minutes, 59.99 seconds, the displayed time returns to all zeros and time
measurement continues from there. Elapsed time measurement continues until you
reset it to all zeros.
• All of the operations in this section are performed in the stopwatch modes, which
you enter by pressing C.

Operation Guide 4334
2
To select the Single Stopwatch Mode or Dual Stopwatch Mode
In the Stopwatch Mode, press A to toggle the Single Stopwatch Mode and the Dual
Stopwatch Mode.
• You cannot toggle between the Single Stopwatch Mode and Dual Stopwatch Mode
while an elapsed time operation is in progress.
After pressing A to reset the elapsed time to all zeros, press A again to toggle
between stopwatch modes.
• The indicator “
ST1” indicates the Single Stopwatch Mode, while “ST2” indicates
the Dual Stopwatch Mode.
Remaining free records
Single Stopwatch
Mode Screen
Dual Stopwatch
Mode Screen
Press A.
▲
▲
• Both the Single Stopwatch Mode screen and the Dual Stopwatch Mode screen show
the number of free memory records available for storing data. The watch’s memory
can hold up to 50 records total, including both Single Stopwatch Mode and Dual
Stopwatch Mode records.
Using the Single Stopwatch Mode
The Single Stopwatch Mode displays the total elapsed time and lap times for a single
vehicle or runner.
Stopwatch mode indicator
To perform a Single Stopwatch Mode operation
1. While the Single Stopwatch Mode screen is displayed,
press D to start elapsed time measurement.
2. To display a lap time, press D while elapsed time
measurement is in progress.
• After about 10 seconds, the upper display will change
automatically to timing of the next lap, with the total
elapsed time shown in the lower display.
• Each press of D dur ing elapsed time measurement
stores the applicable lap number, lap time, and total
elapsed time in memory.
• Lap numbers are displayed in the range of 01 to 99.
After lap 99, pressing D does not display a lap time
(elapsed time continues without stopping).
• During the first hour, the stopwatch displays elapsed time in minutes, seconds,
and 1/100 second. After the first hour, the display changes to shows hours,
minutes, and seconds.
• Use the Recall Mode to view data in memory.
3. To stop elapsed time measurement and reset, press A.
l
l
l
l
l
l
l
l
l
l
l
l
l
l
l
l
l
l
l
l
l
l
l
l
l
l
l
l
l
l
l
l
l
l
l
l
l
l
l
l
Total elapsed time
Lap number
Lap time
Using the Dual Stopwatch Mode
The Dual Stopwatch Mode can be used to measure elapsed time for two vehicles or
runners at the same time, including separate lap times and the time differential
between vehicles or runners.
To perform a Dual Stopwatch Mode operation
The table below shows how to time two vehicles or
runners (Measurement A and Measurement B).
• The lower display shows Measurement A, while the
upper display shows Measurement B.
• In the Dual Stopwatch Mode, you can start timing from
either Measurement A or Measurement B.
Measurement B
Measurement A
• The lap number for the current displayed lap time (A or
B) appears in the center left of the display, and the
applicable lap time appears in the upper or lower display.
The other display (upper or lower) shows elapsed time
measurement.
• After about 10 seconds, the display will change
automatically to timing of the next lap.
• Each press of D or B during elapsed time
measurement stores the applicable lap number and lap
time in memory.
l
l
l
l
l
l
l
l
l
l
l
l
l
l
l
l
l
l
l
l
l
l
l
l
l
l
l
l
l
l
l
l
l
l
l
l
l
l
l
l
Measurement B Lap Time
Lap number
Measurement A Lap Time
Lap time screen
Start first
elapsed
time.
Press D.
Press B.
Display
lap time
screen.
Press D.
Press B.
Start other
elapsed
time.
Press B.
Press D.
Measurement A
Measurement B
Display lap
time of other
elapsed time.
Press B.
Press D.
Reset
elapsed
time to all
zeros.
Press A.
• Lap numbers are displayed in the range of 01 to 99.
After lap 99, pressing D does not display a lap time
(elapsed time continues without stopping).
• After starting Measurement A or Measurement B
elapsed time measurement and then starting the other
time's elapsed time measurement displaying a lap time
for one of the times will display the other time's lap time
and the difference between Measurement A and
Measurement B. After about 5 seconds, the display will
change automatically to timing of the next lap.
• After you press one of the buttons to display one of the
lap times (without the lap time differential displayed),
pressing the other button displays the other lap time and
the differential between the two laps for about five
seconds.
• The “±” indicator on the lap time differential screen
indicates both times are for the same lap.
• “-'--"--” is shown for the lap time differential if it is greater
than 10 minutes.
l
l
l
l
l
l
l
l
l
l
l
l
l
l
l
l
l
l
l
l
Measurement B
Lap Time
Measurement A and
Measurement B
differential
• Pressing A stops elapsed time measurement and reset.
• During the first hour, the stopwatch displays elapsed time in minutes, seconds, and
1/100 second. After the first hour, the display changes to shows hours, minutes, and
seconds.
• Use the Recall Mode to view data in memory.
Recalling Stopwatch Data
You can use the Recall Mode to recall and delete
stopwatch data stored in memory.
• Your watch automatically creates logs for storage of
stopwatch data in memory. For information about using
logs, see “Managing Memory Data”.
To recall stopwatch log data
1. Enter the Recall Mode.
• The title screen of the newest log appears first when
you enter the Recall Mode.
2. Use the A button to scroll through log title screens
until the one for the log you want to view is on the
display.
• Logs are numbered from 01 (oldest) to 50.
3. Press D (+) or B (–) to view the log data.
Log number
Log title screen
Log creation
date
Stopwatch mode in
which the recalled
log data was
measured
Press B.
Press D.
▲
▲
Best lap indicator
Lap number of
best lap
Best lap
▲
▲
Lap time
Lap number
▲
▲
▲
▲
▲
▲
*
Total elapsed time
Recalled log data measured in the Single Stopwatch Mode (ST1)
Press B.
Press D.
▲
▲
▲
▲
▲
▲
Recalled log data measured in the Dual Stopwatch Mode (ST2)
▲
▲
Lap timeLap number
Lap time
Best lap indicator
Best lap
(Measurement A)
*
Best lap
(Measurement B)
▲
▲
▲
One second
later
Lap number of best lap
(Measurement B)
Lap number of best lap
(Measurement A)
*
The best lap time is for the best time in the newest log only. The Best Lap Time
screen is the one that has the best lap indicator.
To delete stopwatch data
1. In the Recall Mode, use A to scroll through log title screens until the one for the log
you want to delete is on the display.
• Displaying lap time data (not the log title screen), deleting the data also will delete
the log that contains the data.
2. Hold down B and D until the watch beeps and “
CLR” stops flashing on the
display.
• This will delete all of the data in the currently selected log.
• Deleting the newest log also will delete the best lap time data.
Countdown Timer
You can set the countdown timer within a range of one
minute to 100 hours. An alarm sounds when the
countdown reaches zero.
• You also can select auto-repeat, which automatically
restarts the countdown from the original value you set
whenever zero is reached.
• All of the operations in this section are performed in the
Countdown Timer Mode, which you enter by pressing
C.
Second
Hours
Minutes
To use the countdown timer
Press D while in the Countdown Timer Mode to start the countdown timer.
• When the end of the countdown is reached and auto-repeat is turned off, the alarm
sounds for 10 seconds or until you stop it by pressing any button. The countdown
time is reset automatically to its starting value after the alarm stops.
• When auto-repeat is turned on, the countdown will restart automatically without
pausing when it reaches zero. The alarm sounds when the countdown reaches zero.
• The countdown timer measurement operation continues even if you exit the
Countdown Timer Mode.
• To stop a countdown operation completely, first pause it (by pressing D), and then
press A. This returns the countdown time to its starting value.
To configure countdown start time and auto-repeat settings
1. While the countdown start time is on the display in the
Countdown Timer Mode, hold down A until the hour
setting of the countdown start time starts to flash, which
indicates the setting screen.
• If the countdown start time is not displayed, use the
procedure under “To use the countdown timer” to
display it.
2. Press C to move the flashing in the sequence shown
below, and select the setting you want to change.
Start Time
(Minutes)
Auto-Repeat
On/Off
Start Time
(Hours)
l
l
l
l
l
l
l
l
l
l
l
l
l
l
l
Auto-repeat on indicator
On/Off status
Loading...