


MO1104-EA
Operation Guide 3261 3281
ENGLISH
Congratulations upon your selection of this CASIO watch.
E-1
Warning !
•The measurement functions built into this watch are not intended for taking measurements that require professional or industrial precision. Values produced by this watch should be considered as reasonable representations only.
•The Moon phase indicator that appears on the display of this watch is not intended for navigation purposes. Always use proper instruments and resources to obtain data for navigation purposes.
•When engaging in mountain climbing or other activities in which losing your way can create a dangerous or life-threatening situation, always use a second compass to confirm direction readings.
•Note that CASIO COMPUTER CO., LTD. assumes no responsibility for any damage or loss suffered by you or any third party arising through the use of this product or its malfunction.
E-2
About This Manual
•Depending on the model of your watch, display text appears either as dark figures on a light background (Module 3261), or light figures on a dark background (Module 3281). All of the illustrations in this manual show Module 3261.
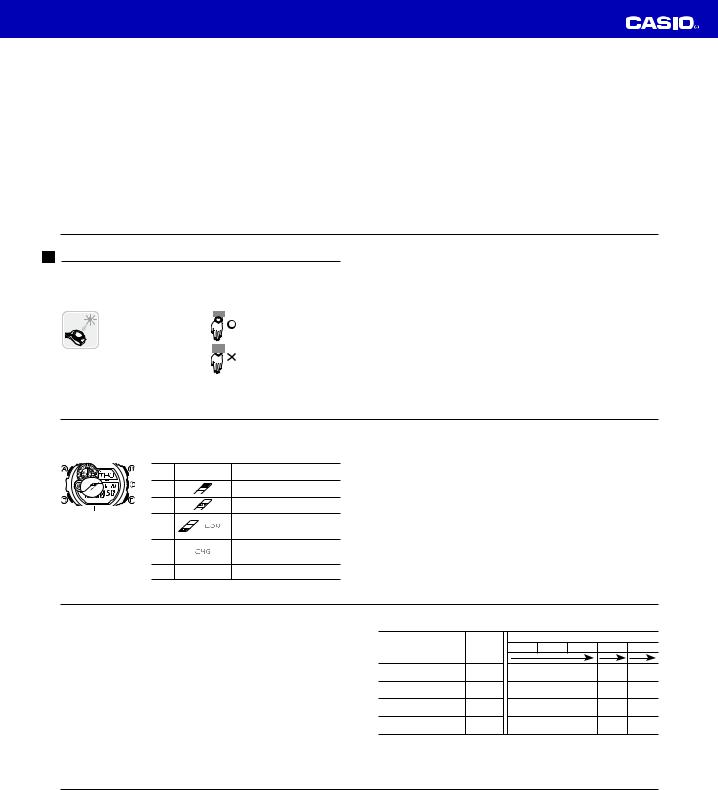
•Button operations are indicated using the letters shown in the illustration.
•Note that the product illustrations in this manual are intended for reference only, and so the actual product may appear somewhat different than depicted by an illustration.
Module 3261 |
Module 3281 |
E-3
|
|
Things to check before using the watch |
|
2. Check the Home City and the daylight saving time (DST) setting. |
|
|
|
|
Use the procedure under “To configure Home City settings” (page E-26) to configure |
|
|
1. Check the battery power level. |
||
|
|
|
your Home City and daylight saving time settings. |
|
|
|
|
|
Is “H” or “M” displayed for the battery power indicator (page E-14)?
 NO
NO
Does any one of the following conditions exist?
• Battery power indicator shows “L” and “LOW” is displayed in the upper right corner of the screen.
• “CHG” is displayed in the upper right corner of the screen.
• The face is blank.
 YES
YES
Power is low. Charge the watch by placing it in a location where it is exposed to light. For details, see “Charging the Watch” (page E-12).
E-4
 Battery power indicator
 YES
YES
The watch is charged sufficiently.
For details about charging, see “Charging the Watch” (page E-12).
 NEXT
NEXT
Go to step 2.
Important!
World Time Mode data depend on correct Home City, time, and date settings in the Timekeeping Mode. Make sure you configure these settings correctly.
3.Set the current time.
•To set the time manually
See “Configuring Current Time and Date Settings” (page E-29).
The watch is now ready for use.
E-5
|
|
Contents |
E-29 Configuring Current Time and Date Settings |
|
|
|
E-29 To change the current time and date settings |
|
|
|
E-3 About This Manual
E-4 Things to check before using the watch
E-12 Charging the Watch
E-19 To recover from the sleep state
E-20 To turn Power Saving on and off
E-21 Mode Reference Guide
E-25 Timekeeping
E-26 Configuring Home City Settings
E-26 To configure Home City settings
E-28 To change the Daylight Saving Time (summer time) setting
E-6
E-33 Digital Compass
E-34 To take a digital compass reading
E-40 To perform magnetic declination correction E-42 To perform bidirectional calibration
E-43 To perform northerly calibration
E-46 To store a direction angle reading in Bearing Memory E-48 To set a map and find your current location
E-50 To find the bearing to an objective
E-52 To determine the direction angle to an objective on a map and head in that direction
E-7
E-57 Thermometer
E-57 To enter and exit the Digital Compass/Thermometer Mode E-59 To calibrate the temperature sensor
E-61 Specifying Temperature Unit
E-61 To specify temperature unit
E-63 Temperature Reading Precautions
E-64 Using the Moon Data
E-64 To enter the Moon Data Mode
E-67 To reverse the displayed Moon phase
E-71 Checking the Current Time in a Different Time Zone
E-71 To enter the World Time Mode
E-72 To view the time in another time zone
E-72 To specify standard time or daylight saving time (DST) for a city
E-74 Using the Stopwatch
E-74 To enter the Stopwatch Mode
E-74 To perform an elapsed time operation E-75 To pause at a split time
E-75 To measure two finishes
E-77 Using the Countdown Timer
E-77 To enter the Countdown Timer Mode E-78 To specify the countdown start time E-79 To perform a countdown timer operation E-79 To stop the alarm
E-8 |
E-9 |
Operation Guide 3261 3281
E-80 Using the Alarm
E-80 To enter the Alarm Mode E-81 To set an alarm time E-82 To test the alarm
E-82 To turn an alarm and the Hourly Time Signal on and off E-83 To stop the alarm
E-84 Illumination
E-84 To turn on illumination manually
E-85 To change the illumination duration
E-88 To turn the auto light switch on and off
E-91 Graphic Area
E-92 Button Operation Tone
E-93 To turn the button operation tone on and off
E-10
Charging the Watch
The face of the watch is a solar cell that generates power from light. The generated power charges a built-in rechargeable battery, which powers watch operations. The watch charges whenever it is exposed to light.
Charging Guide
Whenever you are not |
When wearing the watch, |
wearing the watch, leave it in |
make sure that its face is not |
a location where it is exposed |
blocked from light by the |
to light. |
sleeve of your clothing. |
• Best charging performance |
• The watch may enter a |
is achieved by exposing the |
sleep state (page E-18) if its |
watch to the strongest light |
face is blocked by your |
available. |
sleeve even only partially. |
E-12
Power Levels
You can get an idea of the watch’s power level by observing the battery power indicator on the display.
|
Level |
Battery Power |
|
Function Status |
|||||||||
|
Indicator |
|
|
|
|
|
|
|
|||||
|
|
|
|
|
|
|
|
|
|
||||
|
1 |
|
|
|
|
|
|
|
|
|
|
|
All functions enabled. |
|
(H) |
|
|
|
|
|
|
|
|
|
|
|
|
|
|
|
|
|
|
|
|
|
|
|
|
|
|
|
2 |
|
|
|
|
|
|
|
|
|
|
|
All functions enabled. |
|
(M) |
|
|
|
|
|
|
|
|
|
|
|
|
Battery power |
|
|
|
|
|
|
|
|
|
|
|
|
|
3 |
|
|
|
|
l |
l |
l |
|
|
Illumination, beeper, and sensor |
|||
indicator |
|
|
|
l |
|
l |
|||||||
|
(L) |
|
|
l |
|
|
|
|
l |
l |
operation disabled. |
||
|
|
|
|
l |
l l |
|
|||||||
|
|
|
|
|
|
|
|
|
|
|
|||
|
4 |
l |
l |
l |
ll |
|
|
|
|
Except for the CHG (charge) |
|||
|
|
|
|
|
|
l |
|
|
|
|
indicator, all functions and display |
||
|
l |
|
|
|
|
|
|
|
|
|
|||
|
(C) |
|
|
|
|
|
|
|
|
|
|||
|
l |
l l |
l |
|
|
|
|
|
indicators disabled. |
||||
|
|
|
|
|
|
|
|
|
|
||||
5 All functions disabled.
E-14
Power Recovery Mode
•Performing multiple sensor, illumination, or beeper operations during a short period may cause all of the battery power indicators (H, M, and L) to start flashing on the display. This indicates that the watch is in the power recovery mode. Illumination, alarm, countdown timer alarm, hourly time signal, and sensor operations will be disabled until battery power recovers.
•Battery power will recover in about 15 minutes. At this time, the battery power indicators (H, M, L) will stop flashing. This indicates that the functions listed above are enabled again.
•If all of the battery power indicators (H, M, L) are flashing and the CHG (charge) indicator also is flashing, it means the battery level is very low. Expose the watch to bright light as soon as possible.
•Even if battery power is at Level 1 (H) or Level 2 (M), the Digital Compass/ Thermometer Mode sensor may be disabled if there is not enough voltage available to power it sufficiently. This is indicated when all of the battery power indicators (H, M, L) are flashing.
•Frequent flashing of all of the battery power indicators (H, M, L) probably means that remaining battery power is low. Leave the watch in bright light to allow it to charge.
E-16
•The above exposure times all are for reference only. Actual exposure times depend on lighting conditions.
•For details about the operating time and daily operating conditions, see the “Power Supply” section of the Specifications (page E-101).
Power Saving
When turned on, Power Saving enters a sleep state automatically whenever the watch is left for a certain period in an area where it is dark. The table below shows how watch functions are affected by Power Saving.
• There actually are two sleep state levels: “display sleep” and “function sleep”.
Elapsed Time in Dark |
Display |
Operation |
|
60 to 70 minutes |
Blank, with PS flashing |
Display is off, but all functions are |
|
(display sleep) |
enabled. |
||
|
|||
|
|
|
|
6 or 7 days |
Blank, with PS not flashing |
All functions are disabled, but |
|
(function sleep) |
timekeeping is maintained. |
||
|
|||
|
|
|
E-94 Troubleshooting
E-99 Specifications
E-11
Warning!
Leaving the watch in bright light for charging can cause it to become quite hot. Take care when handling the watch to avoid burn injury. The watch can become particularly hot when exposed to the following conditions for long periods.
•On the dashboard of a car parked in direct sunlight
•Too close to an incandescent lamp
•Under direct sunlight
Important!
•Allowing the watch to become very hot can cause its liquid crystal display to black out. The appearance of the LCD should become normal again when the watch returns to a lower temperature.
•Turn on the watch’s Power Saving function (page E-18) and keep it in an area normally exposed to bright light when storing it for long periods. This helps to ensure that power does not run down.
•Storing the watch for long periods in an area where there is no light or wearing it in such a way that it is blocked from exposure to light can cause power to run down. Expose the watch to bright light whenever possible.
E-13
•The flashing LOW indicator at Level 3 (L) tells you that battery power is very low, and that exposure to bright light for charging is required as soon as possible.
•At Level 4 or Level 5, all functions are disabled and settings return to their initial factory defaults. Once the battery reaches Level 2 (M) after falling to Level 4 or Level 5, reconfigure the current time, date, and other settings.
•If charging starts from Level 5, CHG will start flashing on the display when Level 4 is reached. Note, however, that watch functions are not restored at this time. Leave the watch exposed to sufficiently strong light until the battery level reaches Level 2 or Level 1 before using it.
•Leaving the watch exposed to direct sunlight or some other very strong light source can cause the battery power indicator to show a reading temporarily that is higher than the actual battery level. The correct battery level should be indicated after a few minutes.
•All data stored in memory is deleted, and the current time and all other settings return to their initial factory defaults whenever battery power drops to Level 4 or Level 5, and when you have the battery replaced.
E-15
Charging Times
Exposure Level
Daily
(Brightness)
Operation
*1
Outdoor sunlight
5 min.
(50,000 lux)
Sunlight through a window
24 min.
(10,000 lux)
Daylight through a window
48 min.
on a cloudy day (5,000 lux)
Indoor fluorescent lighting
8 hours
(500 lux)
Level Change *2
Level 5 |
Level 4 |
Level 3 |
Level 2 |
Level 1 |
|
2 hours |
|
16 hours |
5 hours |
|
6 hours |
|
79 hours |
21 hours |
|
12 hours |
|
159 hours |
43 hours |
|
168 hours |
|
– – – |
– – – |
*1 Approximate amount of exposure time required each day to generate enough power for normal daily operation.
*2 Approximate amount of exposure time (in hours) required to take power from one level to the next.
E-17
•The watch will not enter a sleep state between 6:00 AM and 9:59 PM. If the watch is already in a sleep state when 6:00 AM arrives, however, it will remain in the sleep state.
•The watch will not enter a sleep state while it is in the Stopwatch Mode or Countdown Timer Mode.
To recover from the sleep state
Move the watch to a well-lit area, press any button, or angle the watch towards your face for reading (page E-86).
E-18 |
E-19 |

Operation Guide 3261 3281
To turn Power Saving on and off
|
Power saving |
1. In the Timekeeping Mode, hold down Auntil SET |
|||||
|
starts to flash and the city name starts to scroll on the |
||||||
|
on indicator |
||||||
|
display. |
||||||
|
|
|
|
|
|
|
|
|
|
l |
l |
l |
ll |
• This is the setting screen. |
|
|
|
2. Use Dto display the Power Saving On/Off screen |
|||||
|
|
|
|
|
l |
||
|
l |
|
|
||||
|
l |
l |
lll |
|
shown nearby. |
||
l |
l |
|
|
3. Press Eto toggle Power Saving on (On) and off (OFF). |
|||
|
|
l |
|
||||
l |
|
|
|
||||
l |
|
|
l |
|
|
||
|
ll |
l |
|
|
4. Press Ato exit the setting screen. |
||
|
|
|
|
|
|||
• The Power Saving on indicator (PS) is on the display in all modes while Power Saving is turned on.
E-20
Selecting a Mode
World Time Mode Moon Data Mode Timekeeping Mode
|
ll |
|
|
|
|
|
l l |
|
|
|
|
||
ll |
|
l |
|
|
|
|
|
l |
|
|
|
|
|
ll |
|
|
|
|
|
|
Stopwatch Mode |
Countdown Timer |
Alarm Mode |
||||
|
|
|
Mode |
|
ll |
|
|
|
|
|
|
||
|
|
|
|
l l |
||
|
|
|
|
ll |
|
l |
|
|
|
|
|
l |
|
|
|
|
|
ll |
|
|
E-22
General Functions (All Modes)
The functions and operations described in this section can be used in all of the modes.
Auto Return Features
•The watch returns to the Timekeeping Mode automatically if you do not perform any button operation for two or three minutes in the Alarm, or Moon Data Mode.
•If you leave a screen with flashing digits on the display for two or three minutes without performing any operation, the watch exits the setting screen automatically.
Initial Screens
When you enter the World Time or Alarm Mode, the data you were viewing when you last exited the mode appears first.
Scrolling
The Eand Bbuttons are used on the setting screen to scroll through data on the display. In most cases, holding down these buttons during a scroll operation scrolls through the data at high speed.
E-24
Configuring Home City Settings
City name
ll |
|
|
|
l |
ll |
||
l |
|
|
l |
l |
l |
||
|
ll |
|
|
|
|
|
|
Hour : Minutes
PM indicator Seconds
|
l |
l |
l |
||
l |
|
l |
l |
|
l |
ll ll |
||
There are two Home City settings: actually selecting the Home City and selecting either standard time or daylight saving time (DST).
To configure Home City settings
1.In the Timekeeping Mode, hold down Auntil SET starts to flash and the city name starts to scroll on the display.
•This is the setting screen.
•The watch will exit the setting mode automatically if you do not perform any operation for about two or three minutes.
•For details about city names, see the “City Code Table” at the back of this manual.
E-26
To change the Daylight Saving Time (summer time) setting
|
l |
l |
l |
||
l |
|
l |
l |
|
l |
ll ll |
||
1.In the Timekeeping Mode, hold down Auntil SET starts to flash and the city name starts to scroll on the display.
•This is the setting screen.
2.Press Dto display the DST setting screen.
3.Use Ato toggle the DST settings between OFF and
On.
4.After all the settings are the way you want, press Ato return to the Timekeeping Mode.
•The DST indicator appears to indicate that Daylight Saving Time is turned on.
Mode Reference Guide
Your watch has 7 “modes”. The mode you should select depends on what you want to do.
To do this: |
Enter this mode: |
See: |
|
• View the current date in the Home City |
Timekeeping Mode |
E-25 |
|
• Configure Home City and daylight saving time (DST) settings |
|||
• Configure time and date settings |
|
|
|
• Determine your current bearing or the direction from your current |
Digital Compass/ |
E-33 |
|
location to a destination as a direction indicator and angle value |
Thermometer Mode |
||
• Determine your current location using the watch and a map |
|
||
|
|
||
• View the temperature at your current location |
Digital Compass/ |
E-57 |
|
Thermometer Mode |
|||
|
|
||
View the current time in one of 48 cities (31 time zones) around the globe |
World Time Mode |
E-71 |
|
Use the stopwatch to measure elapsed time |
Stopwatch Mode |
E-74 |
|
Use the countdown timer |
Countdown Timer Mode |
E-77 |
|
Set an alarm time |
Alarm Mode |
E-80 |
|
|
|
E-21 |
•The illustration below shows which buttons you need to press to navigate between modes.
•Press Dto change from mode to mode.
•Hold down Dfor about two seconds to return to the Timekeeping Mode from any other mode.
•In any mode, press Cto enter the Digital Compass/Thermometer Mode. Press D in the Digital Compass/Thermometer Mode to return to the mode you entered from.
•In any mode (except when a setting screen is on the display), press Bto illuminate the display.
Digital Compass/
Thermometer Mode
Press 
Press 
E-23
Timekeeping
Use the Timekeeping Mode to set and view the current time and date.
•Press Ato toggle between the day of the week and date (Date screen), and the currently selected World Time (Dual Time).
Date Screen |
Dual Time Screen |
|
|
Day of week |
|
PM indicator |
Month – Day |
Dual time |
|
Hour : Minutes Seconds |
|
E-25
2.Press E(East) and B(West) to select the city name you want to use as your Home City.
•Keep pressing Eor Buntil the city name you want to select as your Home City appears on the display.
3.Press Dto display the DST setting screen.
4.Use Ato toggle the DST settings between OFF and On.
•Note that you cannot switch between standard time and daylight saving time (DST) while UTC is selected as your Home City.
5.After all the settings are the way you want, press Ato return to the Timekeeping Mode.
•The DST indicator appears to indicate that Daylight Saving Time is turned on.
Note
•After you specify a city name, the watch will use UTC* offsets in the World Time Mode to calculate the current time for other time zones based on the current time in your Home City.
* Coordinated Universal Time, the world-wide scientific standard of timekeeping. The reference point for UTC is Greenwich, England.
E-27
Configuring Current Time and Date Settings
You can use the procedure below to adjust the Timekeeping Mode time and date settings if they are off.
To change the current time and date settings |
|||||
City name |
|
|
|
1. In the Timekeeping Mode, hold down Auntil SET |
|
|
|
|
starts to flash and the city name starts to scroll on the |
||
|
|
|
|
||
|
|
|
|
display. |
|
ll |
|
|
• This is the setting screen. |
||
|
|
|
|||
l |
ll |
|
|||
l |
|
|
l |
2. Use Eand Bto select the city name you want. |
|
l |
l |
||||
|
|||||
|
ll |
|
• Select your Home City name before changing any |
||
|
|
|
|
other setting. |
|
Hour : Minutes |
• For full information on city names, see the “City |
PM indicator Seconds |
Code Table” at the back of this manual. |
E-28 |
E-29 |
Operation Guide 3261 3281
3.Press Dto move the flashing in the sequence shown below to select the other settings.
City Name |
|
|
DST |
|
12/24-Hour |
|
Seconds |
|
|
Hour |
|
|
Minutes |
|
|
Year |
|||||||
|
|
|
Format |
|
|
|
|
|
|
|
|
|
|||||||||||
|
|
|
|
|
|
|
|
|
|
|
|
|
|
|
|
|
|
|
|
|
|
|
|
|
|
|
|
|
|
|
|
|
|
|
|
|
|
|
|
|
|
|
|
|
|
|
|
Thermometer |
|
Power Saving |
|
Illumination |
|
Button Operation |
|
Day |
|
Month |
|||||||||||||
unit |
|
|
Duration |
|
Tone On/Off |
|
|
||||||||||||||||
|
|
|
|
|
|
|
|
|
|
|
|
||||||||||||
•The following steps explain how to configure timekeeping settings only.
4.When the timekeeping setting you want to change is flashing, use Eand/or Bto change it as described below.
Screen |
To do this: |
Do this: |
|
Change the city name |
Use E(East) and |
|
B(West). |
|
|
|
|
|
Toggle between Daylight Saving Time (On) |
Press E. |
|
and Standard Time (OFF). |
|
|
|
E-30
•While 12-hour format is selected for timekeeping, a P (PM) indicator will appear for times from noon to 11:59 p.m. No indicator appears for times from midnight to 11:59 a.m. With 24-hour format, time is displayed from 0:00 to 23:59, without any P (PM) indicator.
•The watch’s built-in full automatic calendar makes allowances for different month lengths and leap years. Once you set the date, there should be no reason to change it except after you have the watch’s rechargeable battery replaced or after power drops to Level 5 (page E-14).
E-32
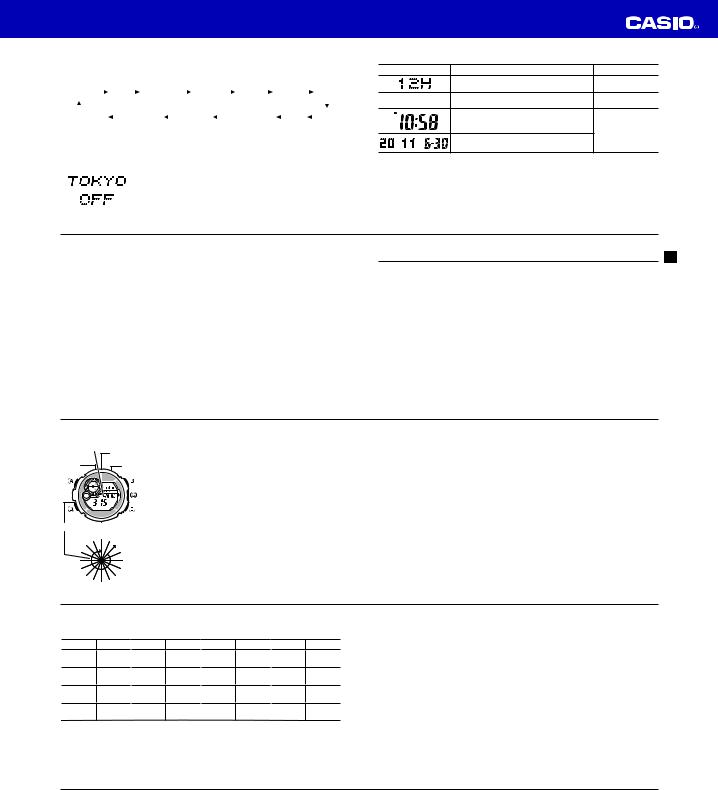
To take a digital compass reading
Temperature |
12 o’clock |
|||||
|
|
|
|
|||
North |
|
|
|
position |
||
|
|
|
|
|
Direction |
|
pointer |
|
|
|
|
|
|
|
|
|
|
|
indicator |
|
|
|
|
|
|
|
|
Angle value (in degrees) |
||||||
270 |
W |
|
NW |
NNW |
0 |
|
W |
NW |
|
|
|
|
|
|
|
|
|
N |
|
|
WSW |
|
|
|
|
NNE |
|
SW |
|
|
|
|
|
NE |
SSW |
|
|
|
|
E |
E |
|
|
|
|
|
||
|
|
|
|
|
|
|
S |
|
|
|
|
E |
|
180 |
SE |
S |
SE |
ESE |
90 |
|
E-34 |
|
|
|
|
||
|
|
|
|
|
|
|
1.Place the watch on a flat surface. If you are wearing the watch, make sure that your wrist is horizontal (in relation to the horizon).
2.Point the 12 o’clock position of the watch in the direction you want to check.
3.Press Cto enter the Digital Compass/Thermometer Mode and take a digital compass reading.
•COMP will appear on the display to indicate that a digital compass operation is in progress.
•See “Digital Compass Readings” on page E-35 for information about what appears on the display.
Note
•If a value appears to the right of the direction indicator, it means that the bearing memory (page
E-45) screen is displayed. If this happens, press Ato exit the bearing memory screen.
•The following table shows the meanings of each of the direction abbreviations that appear on the display.
Direction |
Meaning |
Direction Meaning |
Direction |
Meaning |
Direction Meaning |
|||
N |
North |
NNE |
North- |
NE |
Northeast |
ENE |
East- |
|
northeast |
northeast |
|||||||
|
|
|
|
|
|
|||
E |
East |
ESE |
East- |
SE |
Southeast |
SSE |
South- |
|
southeast |
southeast |
|||||||
|
|
|
|
|
|
|||
S |
South |
SSW |
South- |
SW |
Southwest |
WSW |
West- |
|
southwest |
southwest |
|||||||
|
|
|
|
|
|
|||
W |
West |
WNW |
West- |
NW |
Northwest |
NNW |
North- |
|
northwest |
northwest |
|||||||
|
|
|
|
|
|
|||
•The margin of error for the angle value and the direction indicator is ±11 degrees while the watch is horizontal (in relation to the horizon). If the indicated direction is northwest (NW) and 315 degrees, for example, the actual direction can be anywhere from 304 to 326 degrees.
E-36
• Magnetic Declination Correction
With magnetic declination correction, you input a magnetic declination angle (difference between magnetic north and true north), which allows the watch to indicate true north. You can perform this procedure when the magnetic declination angle is indicated on the map you are using. Note that you can input the declination angle in whole degree units only, so you may need to round off the value specified on the map. If your map indicates the declination angle as 7.4°, you should input 7°. In the case of 7.6° input 8°, for 7.5° you can input 7° or 8°.
• Bidirectional Calibration and Northerly Calibration
Bidirectional calibration and northerly calibration calibrate the accuracy of the bearing sensor in relation to magnetic north. Use bidirectional calibration when you want to take readings within an area exposed to magnetic force. This type of calibration should be used if the watch becomes magnetized for any reason. With northerly calibration, you “teach” the watch which way is north (which you have to determine with another compass or some other means).
Screen |
To do this: |
Do this: |
|
Toggle between 12-hour (12H) and 24-hour |
Press E. |
|
(24H) timekeeping. |
|
|
|
|
50 |
Reset the seconds to 00 |
Press E. |
|
Change the hour or minutes |
Use E(+) and B |
|
|
|
|
|
(–). |
|
Change the year, month, or day |
|
5.Press Ato exit the setting screen.
Note
•For information about selecting a Home City and configuring the DST setting, see “Configuring Home City Settings” (page E-26).
E-31
Digital Compass
A built-in bearing sensor detects magnetic north at regular intervals and indicates one of 16 directions on the display.
•The watch also takes temperature readings in the Digital Compass/Thermometer Mode. For more information, see “Thermometer” (page E-57).
E-33
4.After you are finished using the digital compass, press Dto return to the mode you entered the Digital Compass/Thermometer Mode from.
Digital Compass Readings
•When you press C to start digital compass measurement, COMP will appear on the display initially to indicate that a digital compass operation is in progress.
•About two seconds after you start a digital compass measurement operation, letters on the display will indicate the direction that the 12 o’clock position of the watch is pointing. Four pointers that indicate magnetic north, south, east, and west also will appear.
•After the first reading is obtained, the watch will continue to take digital compass readings automatically each second for up to 20 seconds. After that, measurement will stop automatically.
•The direction indicator and angle value will show - - - to indicate that digital compass readings are complete.
•The auto light switch is disabled during the 20 seconds that digital compass readings are being taken.
E-35
•Note that taking a measurement while the watch is not horizontal (in relation to the horizon) can result in large measurement error.
•You can calibrate the bearing sensor if you suspect the direction reading is incorrect.
•Any ongoing direction measurement operation is paused temporarily while the
watch is performing an alert operation (daily alarm, Hourly Time Signal, countdown timer alarm) or while illumination is turned on (by pressing B). The measurement operation resumes for its remaining duration after the operation that caused it to pause is finished.
•See “Digital Compass Precautions” (page E-54) for important information about taking direction readings.
Calibrating the Bearing Sensor
You should calibrate the bearing sensor whenever you feel that the direction readings being produced by the watch are off. There are three different calibration methods available: magnetic declination correction, bidirectional calibration, and northerly calibration.
E-37
Important!
The more correctly you perform bidirectional calibration, the better the accuracy of the bearing sensor readouts. You should perform bidirectional calibration whenever you change environments where you use the bearing sensor, and whenever you feel that the bearing sensor is producing incorrect readings.
E-38 |
E-39 |
 Loading...