


Zoemini

Mini Photo Printer
User Manual

CONTENTS
SAFETY INFORMATION
PRINTER OVERVIEW
PRINTER SETUP
A) Charge Printer
B) Power On
C) Load Paper
INSTALLING APP
PAIRING DEVICE & PRINTER
USER INTERFACE
Home Screen / Main Menu
Camera Mode
Photo Gallery
Print Photos
Edit Photos
Using Tile Print
Using Collage Print
Share Photos
Save Photos
Send to Mini Print
SPECIFICATIONS
2

SAFETY INFORMATION
READ BEFORE USE
Please read the following instructions and safety precautions before using the Printer.
For regulatory and additional safety information, refer to the Regulation and Safety
Information sheet included in your printer package contents.
ABOUT SYMBOLS
CAUTION
Indicates information that if ignored, could
result in accidental injury caused by improper
use of the equipment. These must be
observed for safe operation.
Instructions or content are important
and must be followed accordingly.
NOTE
NOTE
• Do not use or leave the product under direct sunlight. Also avoid areas subject to
rapid temperature changes, high humidity, dust and dirt.
• When operating in extreme weather, the printer might not print. Let the printer
temperature adjust to recommended operating temperature of 15º to 32ºC,
before attempting to print again.
• When charging, please charge the printer in an environment with the
recommended temperature of 15º to 32ºC.
CAUTION
• In areas with low humidity, the printer may build up a static electric charge.
Take precautions before handling the printer.
• Keep the printer away from liquids or containers of liquids.
• Keep the ventilation openings clear of any objects that could block them.
• Do not under any circumstances dismantle the printer. If the product is not
functioning properly, please contact the dealer you purchased this product from or
Canon Service & Support at www.canon-europe.com/Support.
• Do not improperly dispose of the product as it may cause personal injury or harm.
Please dispose of the product in accordance with local regulations.
• Do not handle near Medical Electrical Equipment. Weak magnetism is emitted by
this product. Do not stand near implanted electronic devices, such as a cardiac
pacemaker. Please see your doctor if the printer does come close to such a device.
• Disassembling the battery may cause leakage, explosion, damage or personal injury.
• Do not use the printer if the battery or product has swelled.
• Never expose the battery to high temperature, direct heat, or dispose by incineration.
3
PRINTER OVERVIEW
SUPPLIED ITEMS
Mini Print
Mini Photo Printer Quick Start Guide USB Cable Regulation and Safety
Information sheet
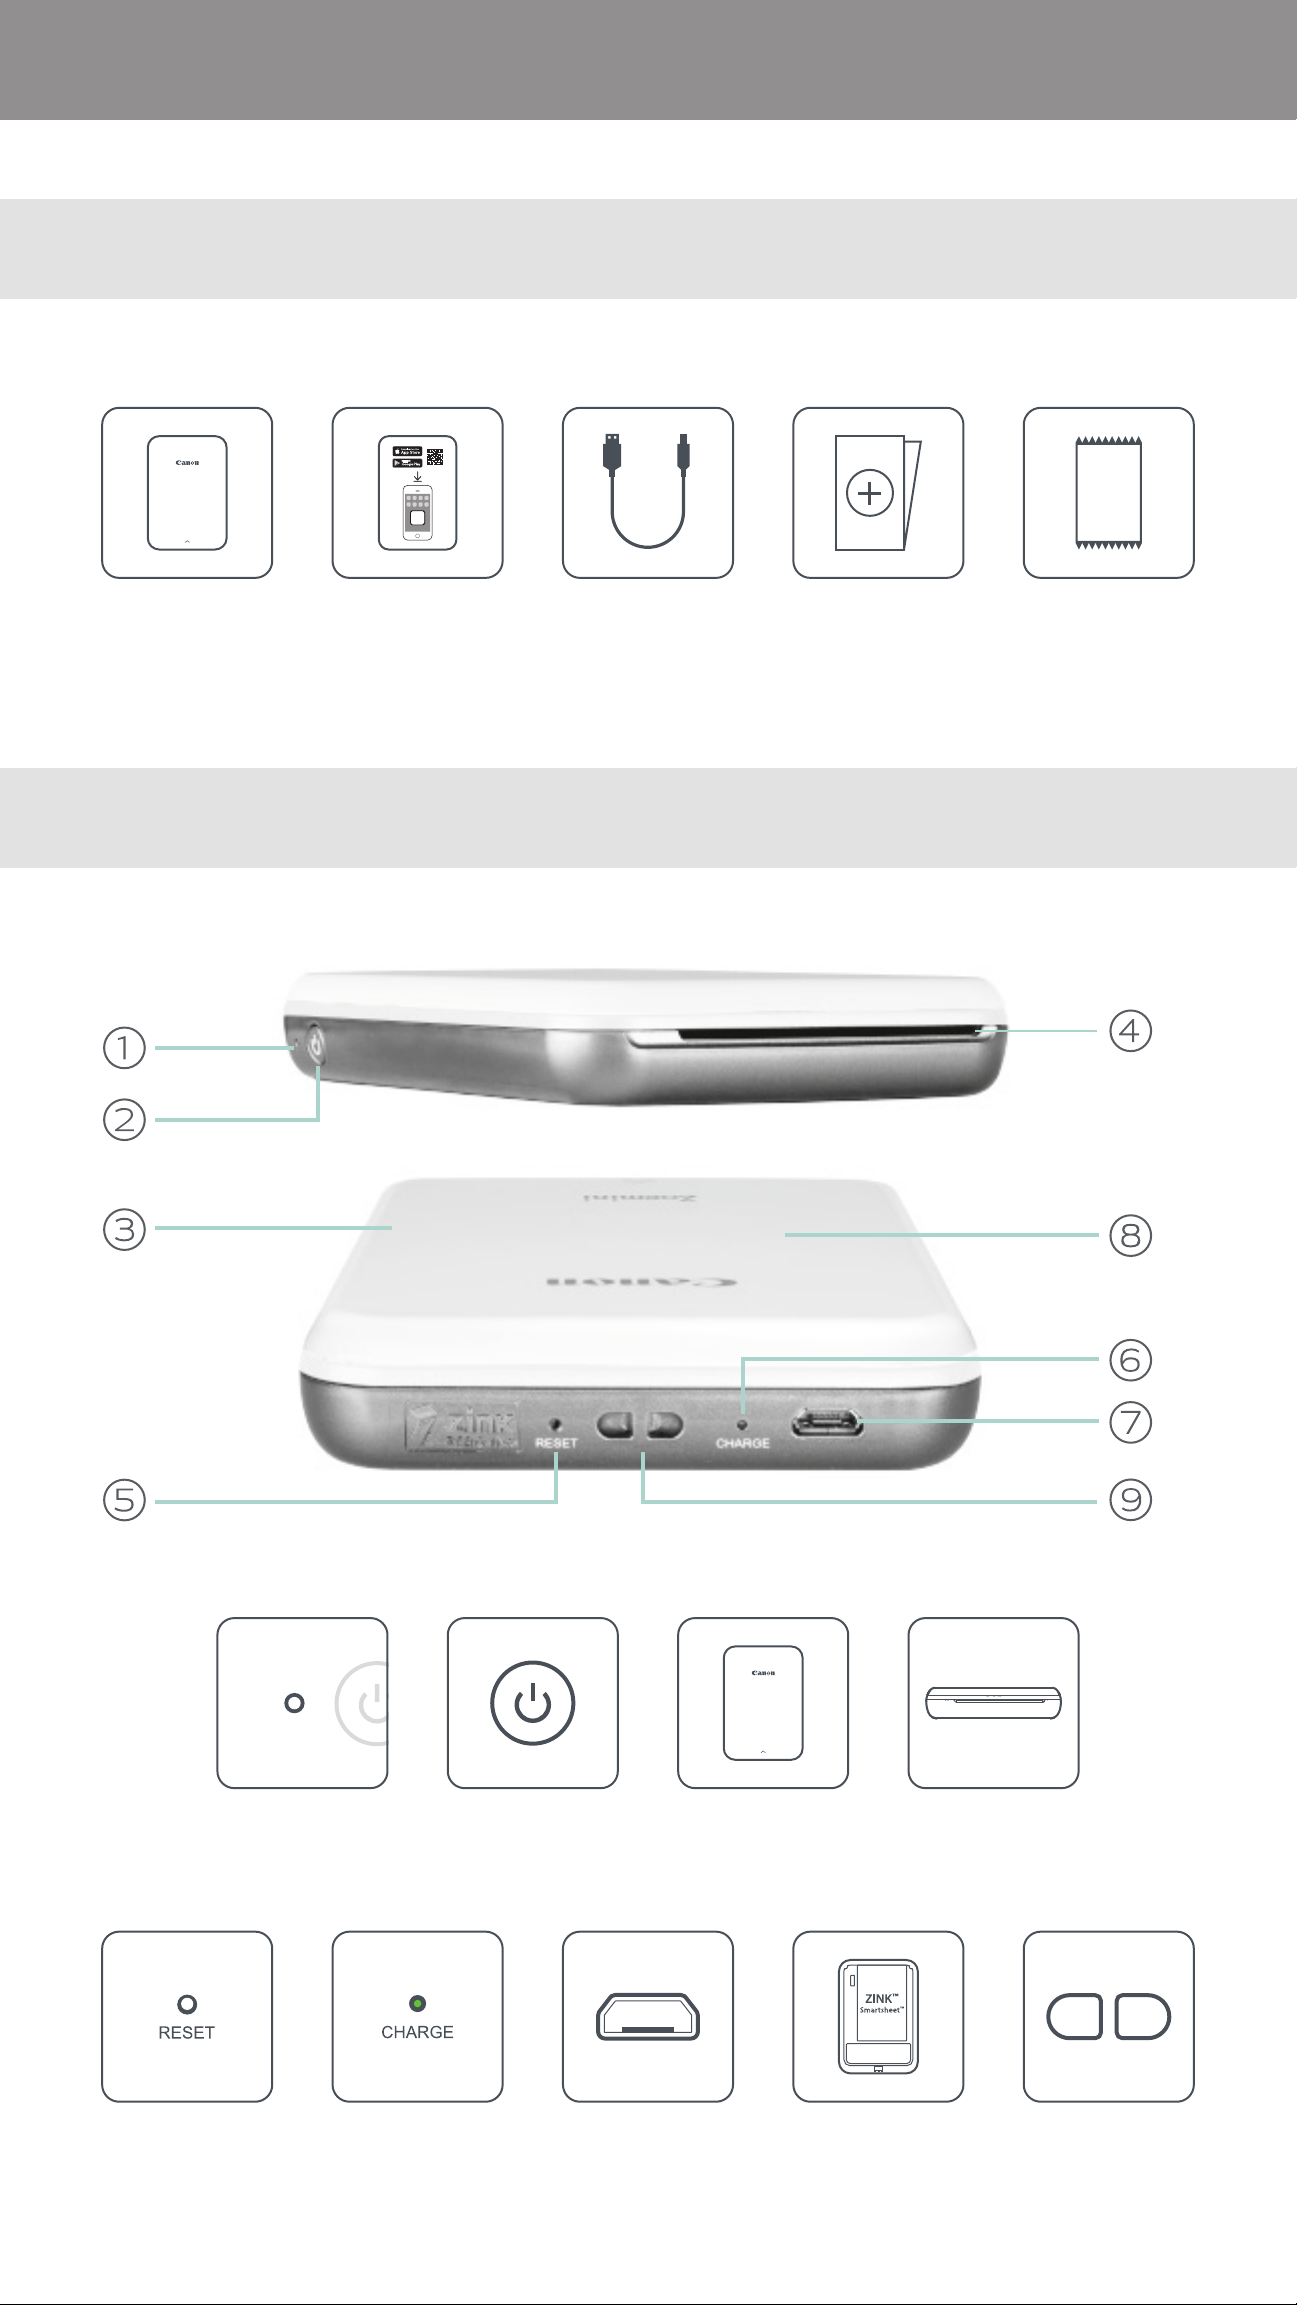
PRODUCT FEATURES
CANON ZINK™
Photo Paper
(10 sheets)
Reset button
⑤
Power LED light
①
⑥
Power button
②
Charging LED light
USB port
⑦
(for charging)
Top cover
③
Paper output slot
④
Paper tray
⑧
(visible with top cover open)
Wristband eyelet
⑨
4
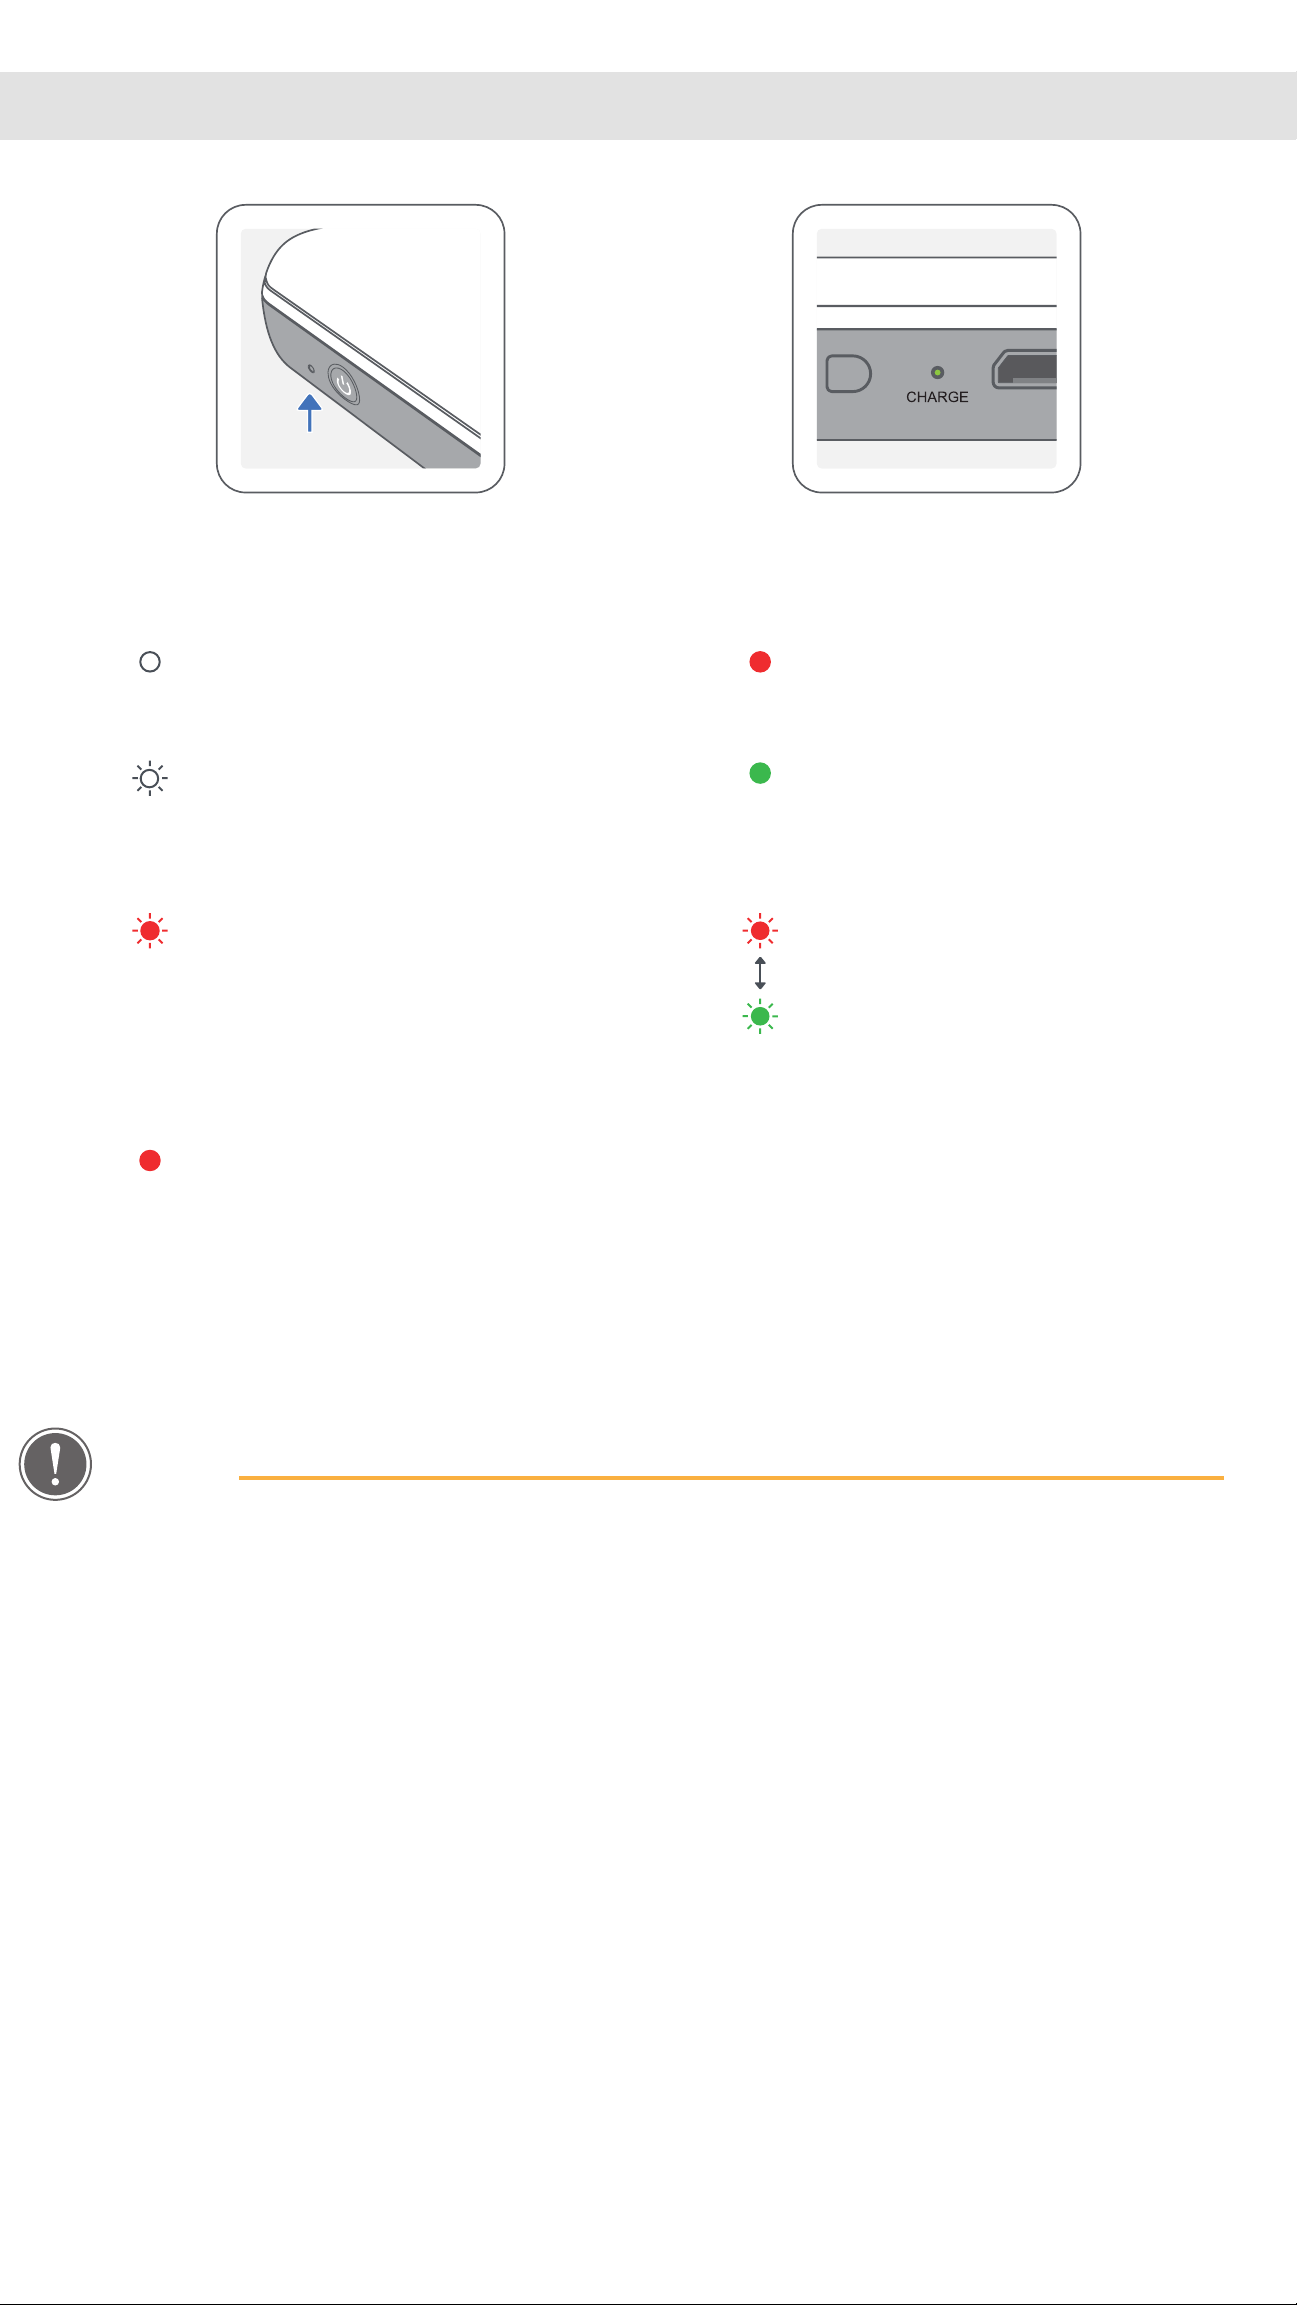
POWER & CHARGING LED Indicator Lights
POWER CHARGING
White – Printer is powered on Red - Charging
White flashing – Printing /
Processing / Cooling
Red flashing – No paper /
Cover open / Paper jam /
Low battery / storage full /
other errors
Red - Firmware updating
Green - Charge completed
Red & Green flashing
alternatively - Charging error
NOTE
MAINTAINING YOUR CANON MINI PRINTER
• Use a soft, dry cloth to clean the product. Do not clean with a damp cloth or
volatile liquids such as paint thinner.
• Keep the top cover closed to avoid dust and other particles from entering the
inside of your printer.
• Use and keep your printer in the recommended environment of 15º to 32º C and
40-55% relative humidity.
• Keep your printer firmware up-to-date. To check if your firmware needs to be
upgraded, open the Canon Mini Print app, go to the Main Menu > Printer Settings >
Select the connected printer > then tap "Firmware Upgrade".
-- Make sure your mobile device has a Internet connection before checking. If you
need to upgrade/update the firmware, your printer must be charged to 50% or
higher or connected to a power source.
• Make sure you’re using the latest Canon Mini Print app version. If your apps don’t
automatically update, go to your app store to check if you need to update.
5
PRINTER SETUP
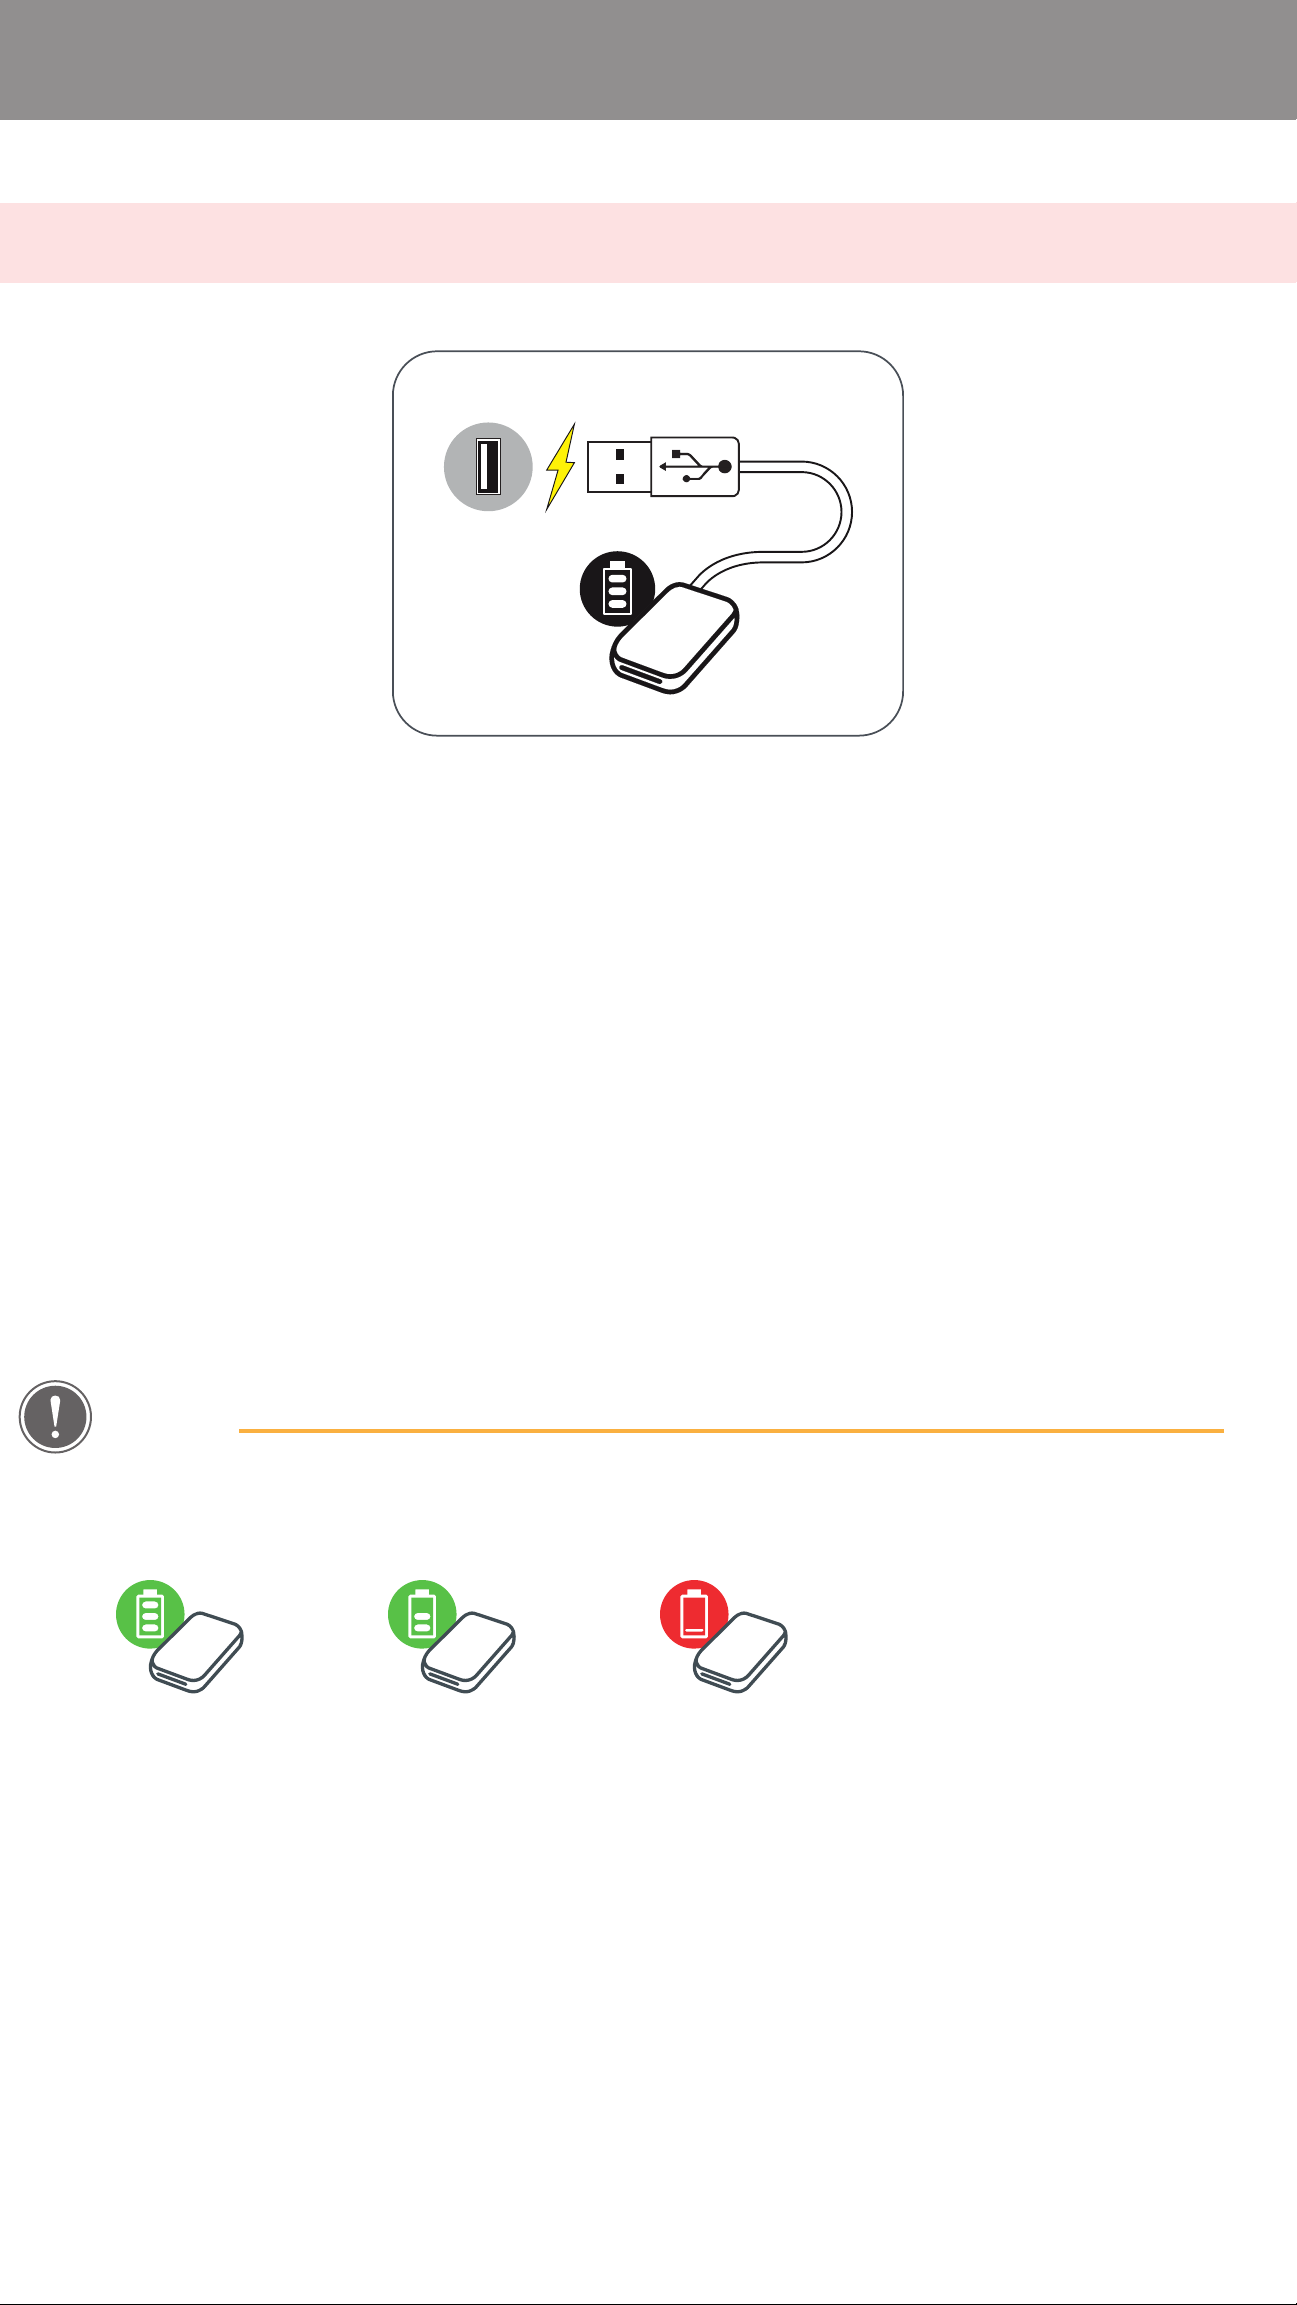
A CHARGE PRINTER
Printer uses a built-in battery. Before using the printer, fully charge
the battery using the USB cable provided.
Insert the smaller end of the supplied USB cable into the
①
Printer and the other end into a chargeable USB adapter.
The charging LED light will turn red to indicate charging.
②
Once fully charged, the charging LED will turn green.
③
-- Operating time may vary depending on the battery status,
operational status and environment conditions.
NOTE
Battery Status Icon (shown in App)
FULL MID LOW
About USB Cable
HANDLE THE USB CABLE WITH CARE WHILE CHARGING
• Do not place any heavy objects on top of the cable.
• Do not place the USB cable near heat.
• Do not scratch, damage, twist or pull hard on the cable.
• Do not plug or unplug the cable with wet hands.
• Avoid too high/too low temperature or humid condition.
• Please unplug the USB cable from power source after charging.
• Please use supplied USB cable for charging.
6
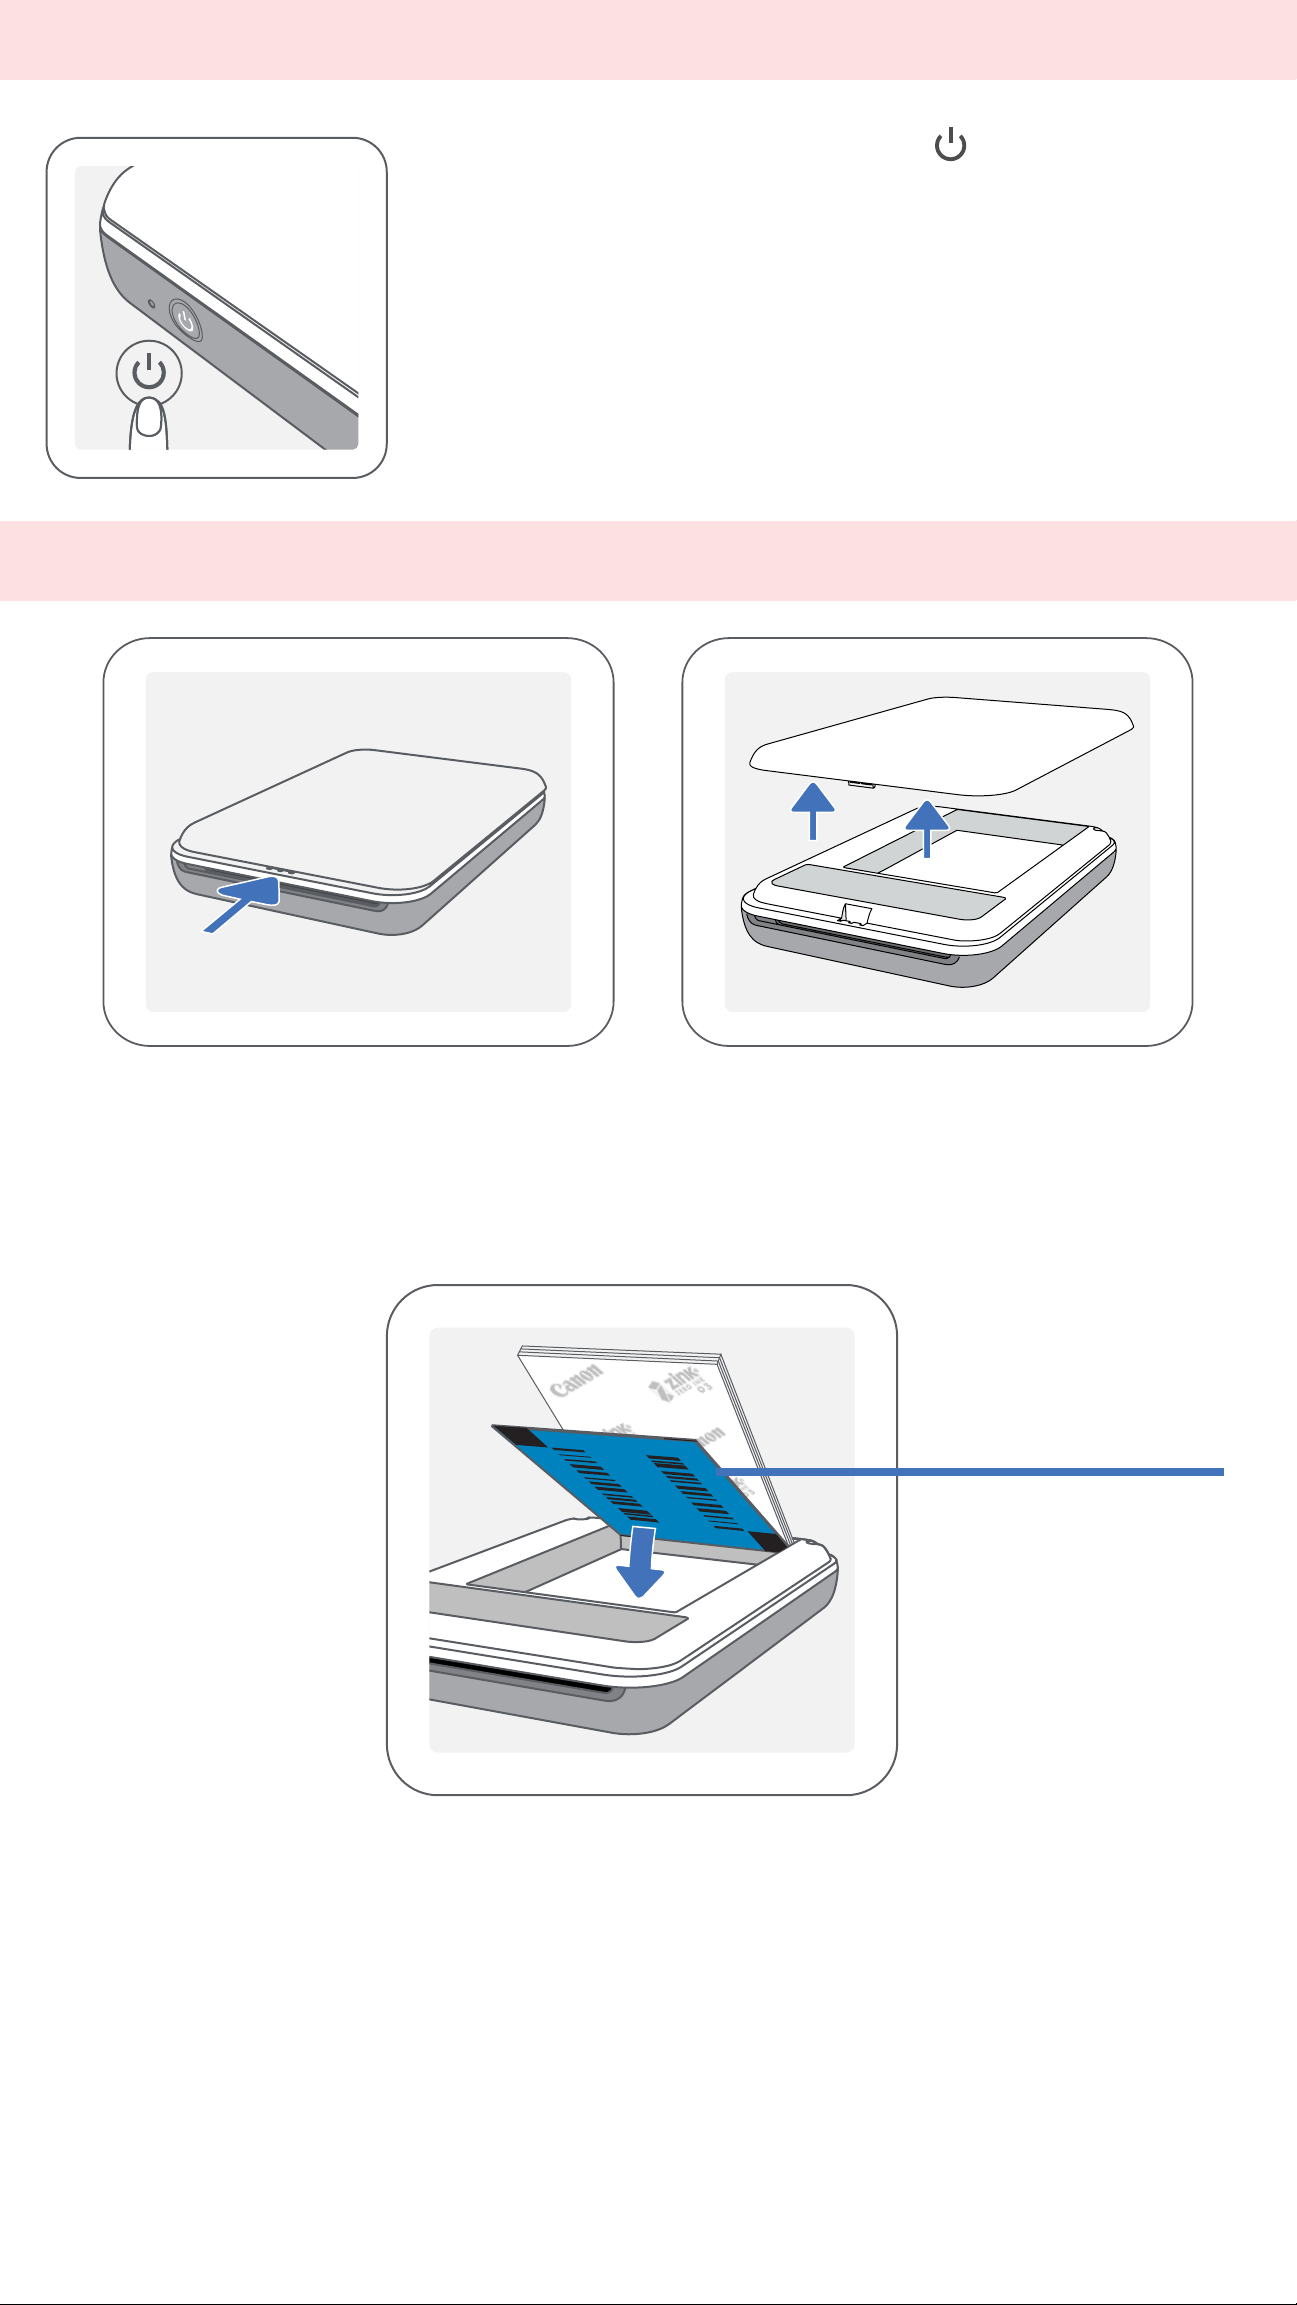
B POWER ON
①
-- The LED indicator will flash as the printer is powering on.
②
Press and hold the Power button ( ) until the LED
indicator light turns on.
When the LED indicator turns to a steady white light, the
printer is ready to print.
C LOAD PAPER
Remove the top cover by sliding it forward in the direction of the arrow.
①
Open a single pouch of photo paper (10 sheets + blue SMART SHEET™).
②
Blue SMART SHEET™
on bottom with photo
All logos facing down.
papers on top.
Place all 10 photo paper sheets and the one SMART SHEET™ into the
③
photo paper compartment.
-- Stack the photo paper on top of the blue SMART SHEET™, making sure
the blue barcode and the photo paper logos are facing down.
Place the top cover back onto the printer. It should click into place when
④
closed properly.
-- The blue SMART SHEET™ will be sent through the printer automatically
before the first print.
7

NOTE
WHEN USING PAPER
• Only load 10 ZINK™ photo paper sheets and 1 SMART SHEET™. Do not load more
as it can result in paper jams or printing errors.
• For optimal print results, use ZINK™ photo paper for Canon Zoemini printers.
--You may purchase additional photo paper within the Canon Mini Print App by
tapping "Buy Paper" in the main menu.
• If there is a paper jam, simply turn the printer OFF and ON to automatically clear
the paper jam. Don’t try to pull the paper out.
• While the printer is printing, don’t pull or tug on the photo paper.
• Handle photo paper carefully to avoid damage or bending.
• Keep the paper clean when loading. If paper is dirty or damaged it may result in a
paper jam or print error.
• Don’t open a new pouch of paper until you are ready to load it into your printer.
• Don’t expose photo paper to direct sunlight or moisture.
• Don’t leave your photo paper in an area where the temperature or humidity is out
of the suggested conditions indicated on the pouch. It may reduce the quality of
the printed photo.
ABOUT THE SMART SHEET™
• Each pouch of photo paper contains 10 sheets of photo paper and 1 blue SMART
SHEET™.
• Load the SMART SHEET™ and photo paper from within the same pouch for
optimal print quality. Each SMART SHEET™ is specifically tuned for the pouch of
paper it is contained in.
• The SMART SHEET™ will be sent through the printer automatically before the first
print to clean the printer and optimize print quality for that specific paper pouch
(10 sheets).
• Keep the SMART SHEET™ and only discard after you have printed all 10 sheets
of photo paper in the pouch. If print quality is not as expected, you can reuse the
SMART SHEET™ if the paper is still from the same pouch. Simply slide the SMART
SHEET™ with its barcode-side down underneath the remaining photo paper.
• Using a SMART SHEET™ from another pouch may result in reduced print quality.
8
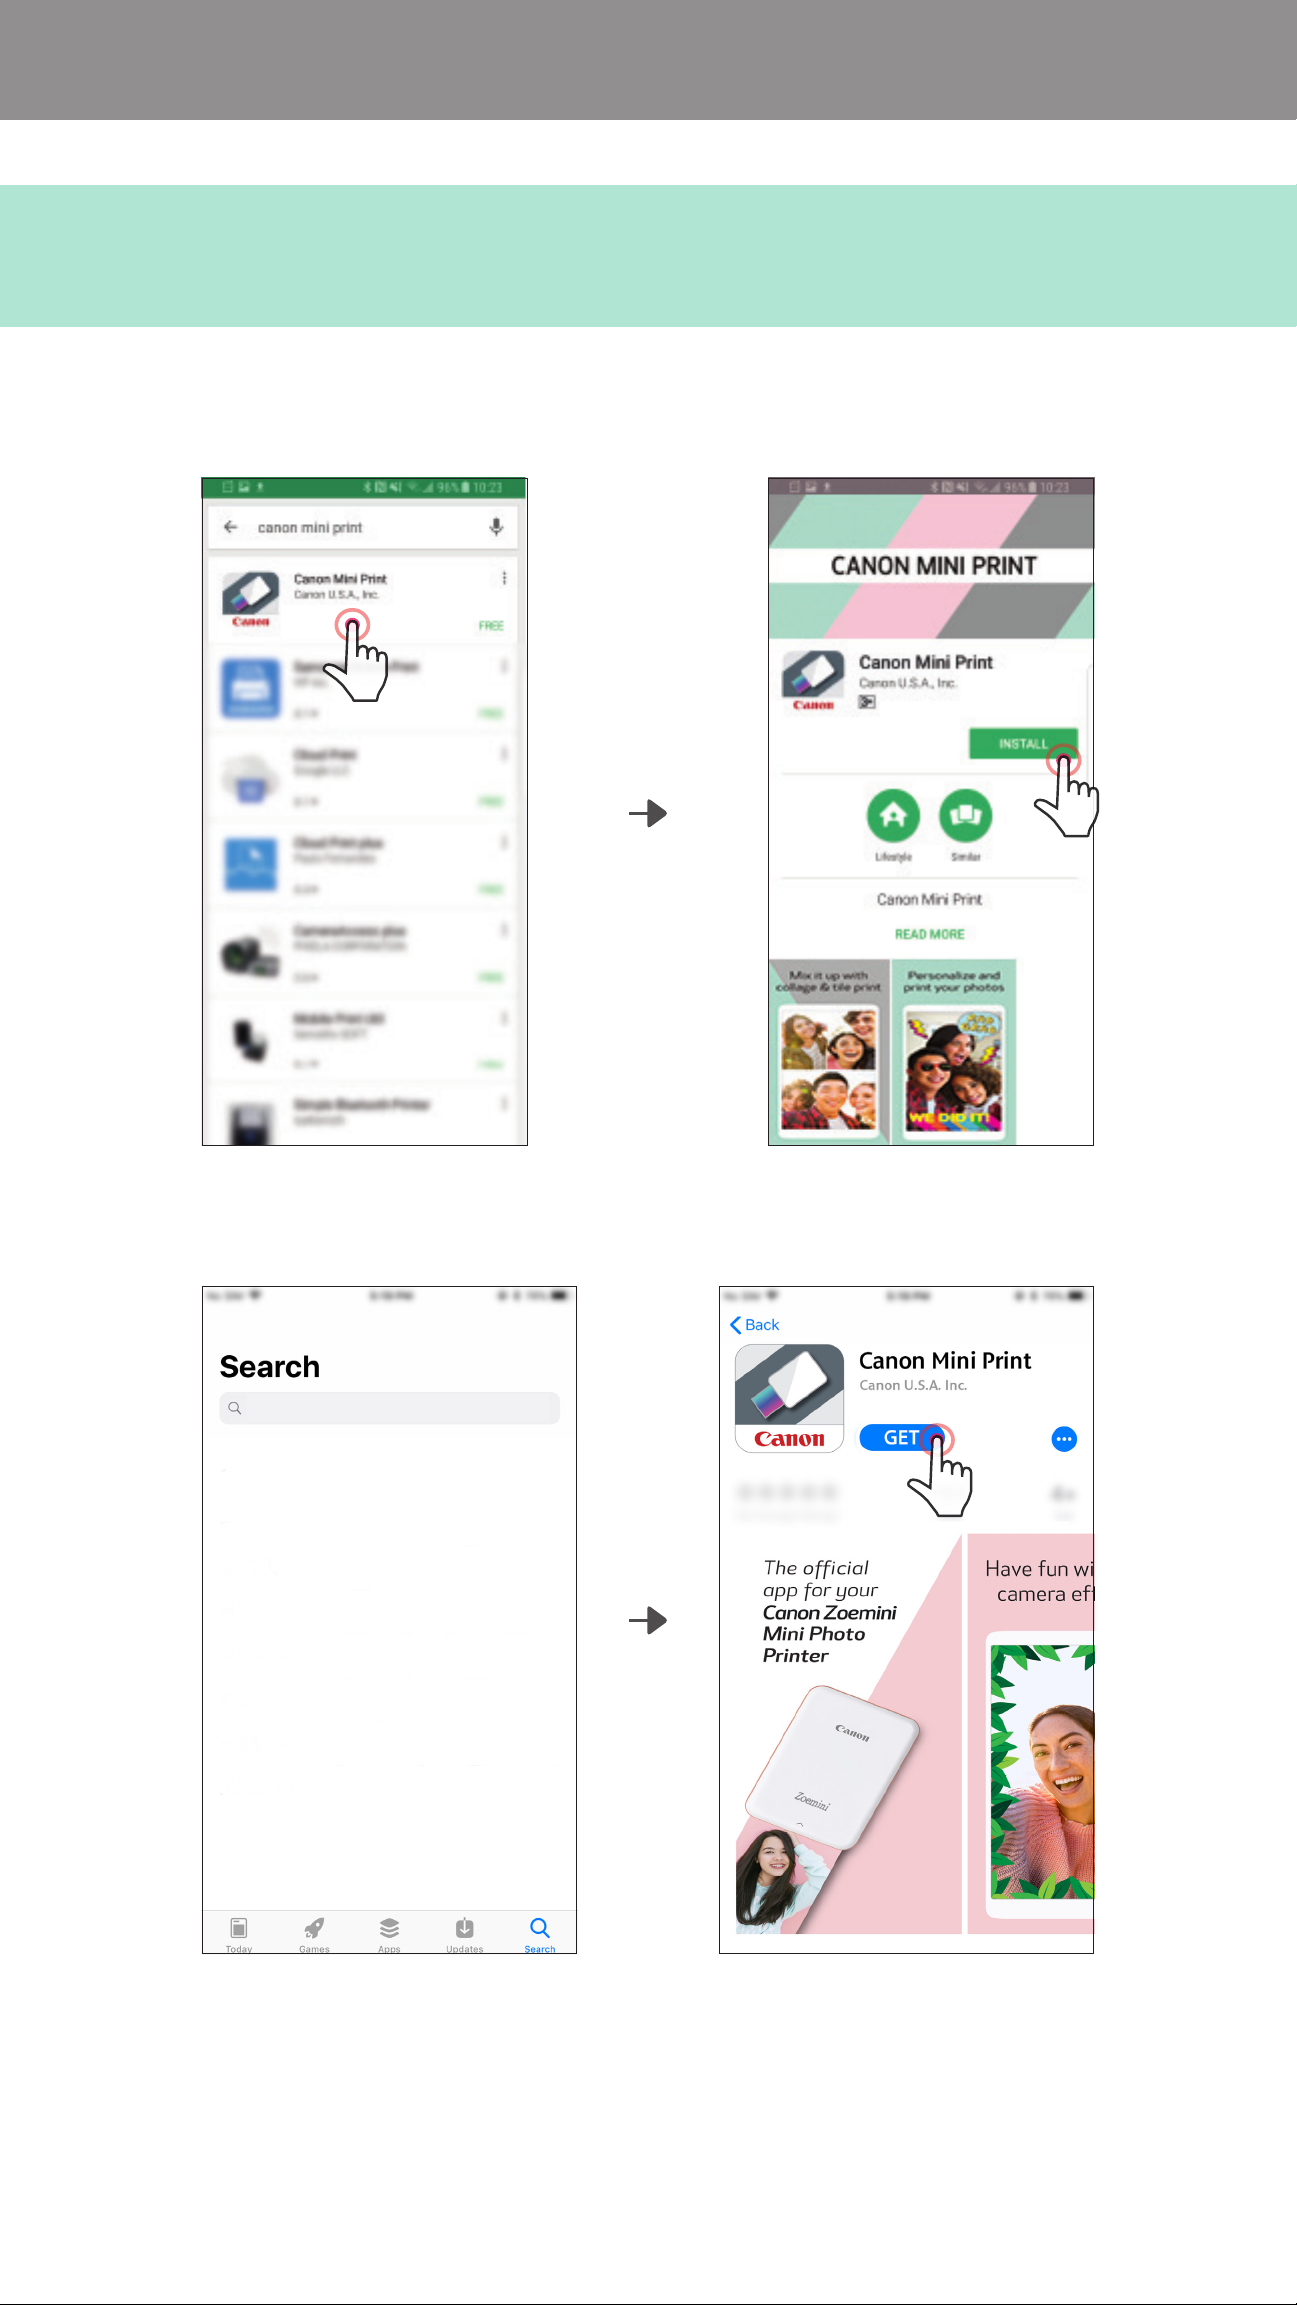
INSTALLING APP
OPTION
SEARCH FOR "Canon Mini Print" IN APP STORES
For Android™ - from Google Play™
①
Canon Mini Print
For iOS® - from the App Store®
9
 Loading...