


Getting Started |
En |
|
|
Mise en route |
Fr |
|
|
Erste Schritte |
De |
|
|
Introduzione |
It |
|
|
Introducción |
Es |
|
|
Introdução |
Pt |
|
|
Sådan kommer du i gang |
Da |
|
|
Aan de slag |
Nl |
|
|
Komme i gang |
No |
|
|
Komma igång |
Sv |
|
|
Aloittaminen |
Fi |
|
|
|
Ru |
|
|
Pierwsze kroki |
Pl |
|
|
Začínáme |
Cs |
|
|
Kezdeti lépések |
Hu |
|
|
Ba langıç |
Tr |
|
|
|
Ar |
|
|
|
For some languages not listed above, documentation is provided |
FT6-1279 (000) |
in PDF format on the DVD-ROM. |
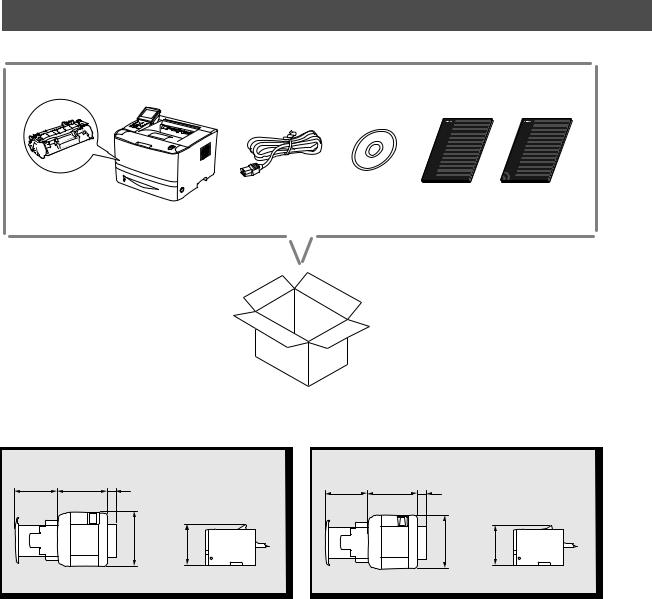
Installing the Printer
Installation Requirements
LBP253x |
LBP252dw/LBP251dw |
369 mm |
377 mm |
90 mm |
369 mm |
377 mm |
90 mm |
|
|
|
403 mm |
317 mm |
400 mm |
298 mm |
2
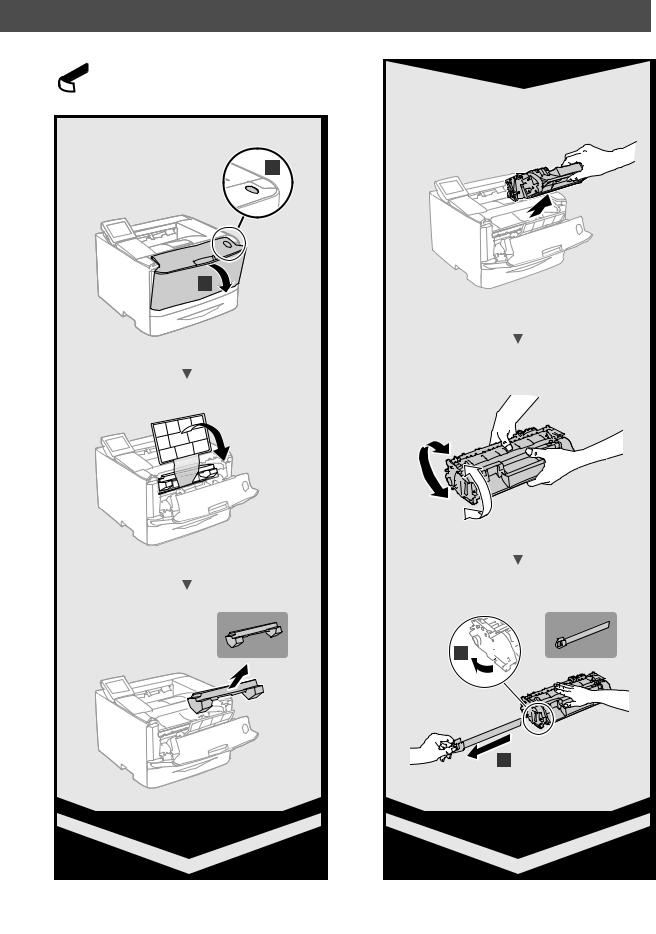
Remove all the tape.
 1
1
2
1 


2
3

Installing the Printer
4
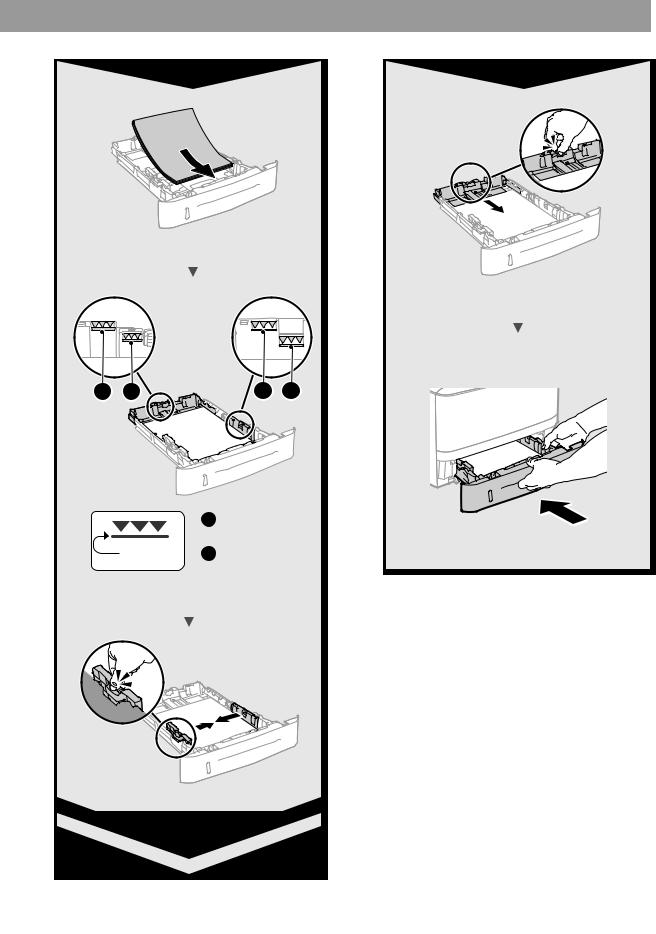
a |
b |
a |
b |
Fill paper up to here
aFor A5 or larger paper size
bFor paper size smaller than A5
5

Installing the Printer
Paper Feeder Unit PF-44 (Option)
6

Contents |
|
About the Supplied Manuals....................................... |
9 |
Navigating the Menu and Text Input Method....... |
9 |
Connecting the Power Cord and Turning ON |
|
the Power......................................................................... |
10 |
Specifying the Initial Settings................................... |
10 |
Selecting the Method to Connect the |
|
Machine............................................................................ |
10 |
Selecting the Method to Connect: |
|
Via Wireless LAN or Other Method......................... |
11 |
Connecting via a Wired LAN..................................... |
11 |
Connecting via a USB Cable...................................... |
11 |
Setting the Paper Size and Type.............................. |
12 |
Clearing Paper Jams..................................................... |
13 |
Replacing Toner Cartridges....................................... |
14 |
Before Using the Printer........................................... |
112 |
R&TTE Directive........................................................... |
114 |
Table des matières |
|
À propos des manuels fournis.................................. |
15 |
Navigation dans le menu et méthode de |
|
saisie du texte................................................................. |
15 |
Branchement du cordon d'alimentation et |
|
mise sous tension......................................................... |
16 |
Configuration des réglages initiaux....................... |
16 |
Sélection de la méthode de connexion de |
|
l'appareil........................................................................... |
16 |
Sélection de la méthode de connexion : |
|
via un réseau sans fil ou par une autre |
|
méthode........................................................................... |
17 |
Connexion via un réseau filaire................................ |
17 |
Connexion via un câble USB..................................... |
17 |
Réglage du format et du type de papier.............. |
18 |
Élimination des bourrages papier........................... |
19 |
Remplacement des cartouches de toner............. |
20 |
Avant d’utiliser l’imprimante.................................. |
112 |
R&TTE Directive........................................................... |
114 |
Inhalt |
|
Informationen zu den mitgelieferten |
|
Anleitungen.................................................................... |
21 |
Navigieren durch das Menü und |
|
Texteingabemethode.................................................. |
21 |
Anschließen des Netzkabels und Einschalten |
|
des Geräts über den Netzschalter........................... |
22 |
Festlegen der anfänglichen Einstellungen.......... |
22 |
Auswählen der Methode zum Herstellen einer |
|
Verbindung zum Gerät............................................... |
22 |
Auswahl der Verbindungsmethode: |
|
Über Wireless-LAN oder eine andere |
|
Methode........................................................................... |
23 |
Verbindung über Wired LAN |
|
(kabelgebunden).......................................................... |
23 |
Verbindung über ein USB-Kabel.............................. |
23 |
Einstellen von Papierformat und Papiertyp........ |
24 |
Beseitigen von Papierstau......................................... |
25 |
Austauschen der Tonerpatronen............................. |
26 |
Bevor Sie den Drucker verwenden....................... |
112 |
R&TTE Directive........................................................... |
114 |
Indhold |
|
Om de medfølgende vejledninger......................... |
45 |
Navigation i menuen og |
|
tekstindlæsningsmetode........................................... |
45 |
Tilslutning af netledningen og aktivering af |
|
maskinen.......................................................................... |
46 |
Angivelse af startindstillingerne.............................. |
46 |
Valg af maskinens forbindelsesmetode................ |
46 |
Valg af forbindelsesmetode: |
|
Via trådløst LAN eller med en anden metode.... |
47 |
Forbindelse med et kablet LAN............................... |
47 |
Forbindelse via USB-kabel......................................... |
47 |
Indstilling af papirformat og -type......................... |
48 |
Udbedring af papirstop.............................................. |
49 |
Udskiftning af tonerpatroner................................... |
50 |
Før du bruger denne printer................................... |
113 |
R&TTE Directive........................................................... |
114 |
Inhoudsopgave |
|
Informatie over de meegeleverde |
|
handleidingen................................................................ |
51 |
Navigeren in het menu en |
|
tekstinvoermethode.................................................... |
51 |
Het netsnoer aansluiten en de machine |
|
inschakelen..................................................................... |
52 |
De begininstellingen opgeven................................ |
52 |
De methode voor aansluiting op het apparaat |
|
selecteren........................................................................ |
52 |
De aansluitmethode selecteren:via draadloos |
|
LAN of op een andere manier.................................. |
53 |
Verbinding maken via een bekabeld LAN........... |
53 |
Verbinden via een USB-kabel................................... |
53 |
Papierformaat en -soort instellen........................... |
54 |
Papierstoringen verhelpen........................................ |
55 |
Tonercartridges vervangen....................................... |
56 |
Voordat u de printer gebruikt................................ |
113 |
R&TTE Directive........................................................... |
114 |
Innhold |
|
Om de medfølgende håndbøkene......................... |
57 |
Navigere i menyen og |
|
tekstinnskrivingsmetode........................................... |
57 |
Koble til strømledningen og slå på |
|
maskinen.......................................................................... |
58 |
Angi oppstartsinnstillingene.................................... |
58 |
Velge metode for tilkobling av maskinen............ |
58 |
Velge tilkoblingsmetode |
|
Via trådløst LAN eller annen metode..................... |
59 |
Koble til via kablet LAN............................................... |
59 |
Koble til via en USB-kabel.......................................... |
59 |
Angi papirformat og -type......................................... |
60 |
Fjerne fastkjørt papir................................................... |
61 |
Bytte tonerkassetter..................................................... |
62 |
Før skriveren tas i bruk.............................................. |
113 |
R&TTE Directive........................................................... |
114 |
Spis treści |
|
Informacje o dostarczonych podręcznikach....... |
81 |
Poruszanie się po menu i sposób wpisywania |
|
tekstu................................................................................. |
81 |
Podłączanie przewodu zasilania i włączanie |
|
urządzenia....................................................................... |
82 |
Konfigurowanie ustawień początkowych............ |
82 |
Wybór metody podłączenia urządzenia............... |
82 |
Wybór metody połączenia: przez sieć |
|
bezprzewodową LAN lub inną metodą................ |
83 |
Podłączanie za pośrednictwem przewodowej |
|
sieci LAN........................................................................... |
83 |
Podłączanie za pomocą kabla USB......................... |
83 |
Ustawianie formatu i rodzaju papieru................... |
84 |
Usuwanie zaciętego papieru.................................... |
85 |
Wymiana kaset z tonerem......................................... |
86 |
Przed rozpoczęciem używania drukarki............. |
113 |
R&TTE Directive........................................................... |
114 |
Obsah |
|
Dodané příručky............................................................ |
87 |
Navigace v nabídce a metoda zadávání textu.... |
87 |
Připojení napájecího kabelu a zapnutí |
|
přístroje............................................................................ |
88 |
Zadání počátečního nastavení................................. |
88 |
Výběr metody připojení přístroje............................ |
88 |
Výběr metody připojení: |
|
Pomocí bezdrátové sítě LAN nebo jiné |
|
metody............................................................................. |
89 |
Připojení přes kabelovou síť LAN............................ |
89 |
Připojení pomocí kabelu USB................................... |
89 |
Nastavení velikosti a typu papíru............................ |
90 |
Odstraňování zachyceného papíru........................ |
91 |
Výměna tonerových kazet......................................... |
92 |
Než tiskárnu začnete používat............................... |
113 |
R&TTE Directive........................................................... |
114 |
Tartalom |
|
A mellékelt kézikönyvek............................................. |
93 |
Navigálás a menüben és a szövegbeviteli |
|
mód megadása.............................................................. |
93 |
A tápkábel csatlakoztatása és a készülék |
|
bekapcsolása.................................................................. |
94 |
A kezdeti beállítások megadása.............................. |
94 |
A készülék csatlakozási módjának kiválasztása.... |
94 |
A csatlakozási mód kiválasztása: |
|
Vezeték nélküli helyi hálózaton keresztül vagy |
|
más módon..................................................................... |
95 |
Csatlakozás vezetékes helyi hálózaton |
|
keresztül........................................................................... |
95 |
Csatlakozás USB-kábellel............................................ |
95 |
A papírméret és a papírtípus beállítása................ |
96 |
A papírelakadások megszüntetése........................ |
97 |
A festékkazetták cseréje............................................. |
98 |
A nyomtató használata előtt................................... |
113 |
R&TTE Directive........................................................... |
114 |
7

Sommario |
|
Informazioni sui manuali in dotazione................. |
27 |
Esplorazione del menu e metodo |
|
d'immissione del testo................................................ |
27 |
Collegamento del cavo di alimentazione e |
|
accensione....................................................................... |
28 |
Selezione delle impostazioni iniziali...................... |
28 |
Selezione del metodo di connessione della |
|
macchina.......................................................................... |
28 |
Selezione del metodo di connessione: |
|
con LAN wireless o altro metodo............................ |
29 |
Connessione tramite LAN cablata........................... |
29 |
Connessione tramite cavo USB................................ |
29 |
Impostazione del formato e del tipo di carta..... |
30 |
Rimozione degli inceppamenti carta.................... |
31 |
Sostituzione delle cartucce del toner.................... |
32 |
Prima di usare la stampante.................................... |
112 |
R&TTE Directive........................................................... |
114 |
Contenido |
|
Acerca de los manuales suministrados................. |
33 |
Navegación por el menú y método de |
|
introducción de texto.................................................. |
33 |
Conexión del cable de alimentación y |
|
encendido del interruptor de alimentación........ |
34 |
Especificación de la configuración inicial............ |
34 |
Selección del método de conexión al equipo.... |
34 |
Selección del método de conexión: |
|
a través de LAN inalámbrica o con otro |
|
método............................................................................. |
35 |
Conexión mediante una red LAN cableada......... |
35 |
Conexión con un cable USB...................................... |
35 |
Configuración del tamaño y el tipo de papel..... |
36 |
Eliminación de atascos de papel............................. |
37 |
Sustitución de los cartuchos de tóner................... |
38 |
Antes de utilizar la impresora................................. |
113 |
R&TTE Directive........................................................... |
114 |
Índice |
|
Acerca dos manuais fornecidos............................... |
39 |
Navegar no menu e método de introdução |
|
de texto............................................................................ |
39 |
Ligar o cabo de alimentação e a alimentação.... |
40 |
Especificar as definições iniciais.............................. |
40 |
Selecionar o método de ligação da máquina..... |
40 |
Selecionar método de ligação: |
|
Via rede LAN sem fios ou outro método.............. |
41 |
Ligar através de LAN com fios.................................. |
41 |
Ligar através de um cabo USB.................................. |
41 |
Definir tipo e tamanho de papel............................. |
42 |
Retirar papel encravado............................................. |
43 |
Substituir cartridges de toner.................................. |
44 |
Antes de Usar a Impressora..................................... |
113 |
R&TTE Directive........................................................... |
114 |
Innehåll |
|
Om de medföljande handböckerna....................... |
63 |
Navigering i menyn och |
|
textinmatningsmetod................................................. |
63 |
Ansluta nätkabeln och slå på strömmen.............. |
64 |
Ange de inledande inställningarna........................ |
64 |
Välja metod för att ansluta till enheten................ |
64 |
Välja anslutningsmetod: |
|
Via trådlöst LAN eller en annan metod................. |
65 |
Ansluta via ett trådbundet nätverk........................ |
65 |
Ansluta via en USB-kabel........................................... |
65 |
Ange pappersformat och papperstyp................... |
66 |
Ta bort papper som fastnat....................................... |
67 |
Byta tonerpatroner....................................................... |
68 |
Innan du använder skrivaren.................................. |
113 |
R&TTE Directive........................................................... |
114 |
Sisällys |
|
Tietoja laitteen mukana toimitettavista |
|
oppaista............................................................................ |
69 |
Valikossa siirtyminen ja tekstinsyöttötapa.......... |
69 |
Virtajohdon liittäminen ja virran kytkeminen.... |
70 |
Perusasetusten määrittäminen................................ |
70 |
Laitteen yhdistämistavan valitseminen................ |
70 |
Langaton lähiverkko tai jokin muu tapa............... |
71 |
Yhdistäminen kiinteän lähiverkon kautta............ |
71 |
Kytkeminen USB-kaapelilla....................................... |
71 |
Paperikoon ja -tyypin asettaminen........................ |
72 |
Paperitukosten poistaminen.................................... |
73 |
Väriainekasettien vaihtaminen................................ |
74 |
Ennen tulostimen käyttämistä............................... |
113 |
R&TTE Directive........................................................... |
114 |
Содержание |
|
Сведения о входящих в комплект |
|
руководствах................................................................ |
75 |
Поиск в меню и способ ввода текста................. |
75 |
Подсоединение кабеля питания и включение |
|
аппарата.......................................................................... |
76 |
Указание начальных параметров........................ |
76 |
Выбор способа подключения аппарата........... |
76 |
Выбор способа подключения: |
|
по беспроводной сети или другим способом... |
77 |
Подключение через проводную локальную |
|
сеть.................................................................................... |
77 |
Подключение с помощью кабеля USB............... |
77 |
Установка формата и типа бумаги....................... |
78 |
Устранение замятия бумаги................................... |
79 |
Замена картриджей с тонером............................. |
80 |
Перед началом использования принтера..... |
113 |
R&TTE Directive........................................................... |
114 |
İçindekiler
Makineyle Birlikte Gelen Kılavuzlar Hakkında. |
...99 |
105 . |
.......................................... ةقفرملا ةلدلأا لوح |
Menüde Gezinilmesi ve Metin Giriş Yöntemi...... |
99 |
105 .................... |
صنلا لاخدإ ةقيرطو ةمئاقلا ربع لقنتلا |
Güç Kablosunu Bağlama ve Makineyi Açık |
|
106 ............................... |
ليغشتلاو ةقاطلا كلس ليصوت |
Konuma Getirme......................................................... |
100 |
106 ...................................... |
ةيلولأا تادادعلإا ديدحت |
Başlangıç Ayarlarının Belirlenmesi........................ |
100 |
106 ............................. |
زاهجلاب لاصتلاا ةقيرط رايتخا |
Makineye Bağlanma Yönteminin Seçilmesi....... |
100 |
|
:لاصتلاا ةقيرط ديدحت |
Bağlanma Yönteminin Seçilmesi: |
|
107 ................. |
ىرخأ ةقيرط وأ ةيكلسلا LAN ةكبش ربع |
Kablosuz LAN ya da Başka Yöntem....................... |
101 |
107 ........................... |
ةيكلس LAN ةكبش ربع لاصتلاا |
Kablolu LAN aracılığıyla bağlanılması................. |
101 |
107 .................................. |
USB لباك ربع ليصوتلا |
USB Kablosu aracılığıyla Bağlanılması................. |
101 |
108 .................................... |
قرولا عونو ساقم طبض |
Kağıt Boyutunun ve Türünün Ayarlanması........ |
102 |
109 .................................. |
قرولا راشحنا نم صلختلا |
Kağıt Sıkışmalarının Giderilmesi............................ |
103 |
110 ............................ |
ربحلا قوحسم شيطارخ لادبتسا |
Toner Kartuşlarının Değiştirilmesi......................... |
104 |
113............................................. |
ةعباطلا مادختسا لبق |
Yazıcıyı Kullanmadan Önce..................................... |
113 |
114 ......................................... |
R&TTE Directive |
R&TTE Directive........................................................... |
114 |
|
|
8
About the Supplied Manuals
Getting Started (This manual):
Read this manual first. This manual describes the installation of the machine, the settings, and a caution.
b Wireless LAN Setting Guide:
This manual describes the wireless LAN setup procedures and the causes and solutions for troubles you might face during setup.
Printer Driver Installation Guide
(Provided DVD-ROM):
This manual describes software installation.
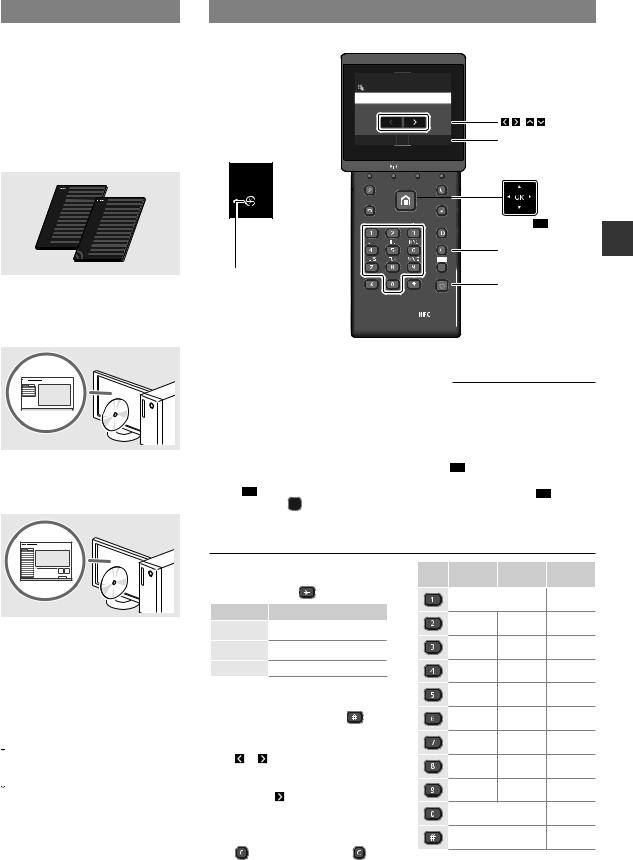
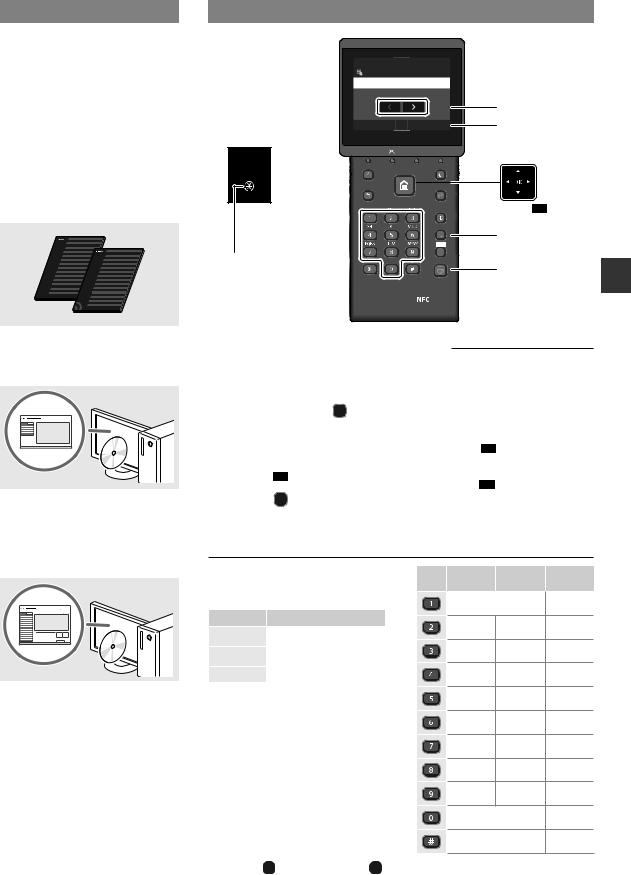
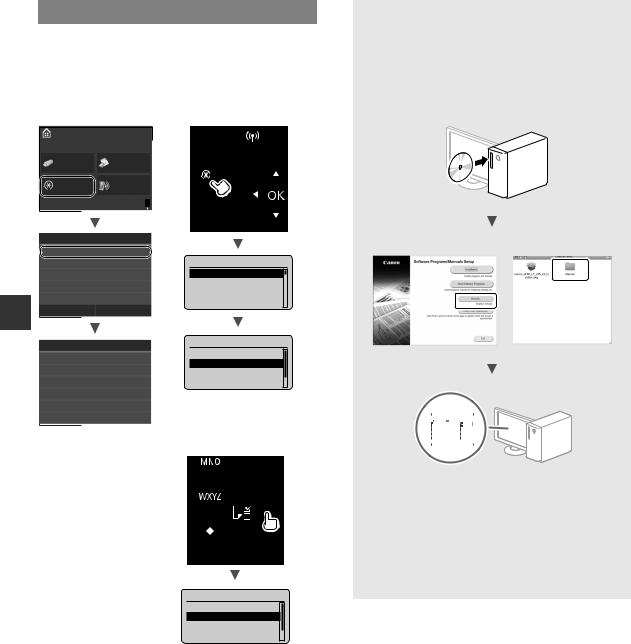
Navigating the Menu and Text Input Method
System Manager Name
A
|
|
Administrator |
|
|
|
|
|
|
|
|
|
( |
) |
LBP252dw/ |
<A/a/12> |
A/a/12 |
# |
Apply |
<Apply> |
|
|
|
|
|
|
|
|
LBP251dw |
|
|
|
|
LBP252dw/ |
|
|
|
|
|
|
|
|
|
|
|
|
|
LBP251dw |
|
|
Back |
|
|
|
|
|
|
|
|
|
|
▲▼▲▲OK |
|
Numeric keys |
|
|
|
Clear |
En |
|
|
|
|
|
|||
Menu
* |
# |
Navigating the Menu
d e-Manual (Provided DVD-ROM):
The e-Manual is categorized by subject to find desired information easily.
Item selection or moving the cursor among the menu items
LBP253x
Tap an item to select it. Press  to return to the previous screen.
LBP252dw/LBP251dw
Select an item with [▲] or [▼].
Press OK or [►] to proceed to the next hierarchy. Press  or [◄] to return to the previous hierarchy.
Setting confirmation
LBP253x
Tap the item. However, when <Apply> appears, tap <Apply>.
LBP252dw/LBP251dw
Press OK . However, when <Apply> appears on the display, select <Apply>, and then press OK .
|
Text Input Method |
|
|
|
|
|
|
|
||||
|
Changing entry mode |
|
|
|
|
Entry mode: |
Entry mode: |
Entry mode: |
||||
|
To change the entry mode, tap |
|
<A> |
<a> |
<12> |
|||||||
|
<A/a/12> or press |
. |
|
|
|
@ . - _ / |
1 |
|||||
|
|
|
|
|
|
|
|
|
||||
|
Entry mode |
|
Available text |
|
|
|
|
|||||
|
<A> |
|
Uppercase alphabetic letters and |
ABC |
abc |
2 |
||||||
|
|
symbols |
|
|
|
|
|
|
|
|||
|
|
|
|
|
|
|
|
|
|
|||
Viewing the e-Manual from the |
<a> |
|
Lowercase alphabetic letters and |
DEF |
def |
3 |
||||||
|
symbols |
|
|
|
|
|
|
|
||||
DVD-ROM |
<12> |
Numbers |
|
|
|
|
GHI |
ghi |
4 |
|||
|
|
|
|
|
||||||||
1 Insert the provided DVD-ROM in your |
|
|
|
|
|
|
|
|
|
|
|
|
computer*. |
Entering text, symbols, and numbers |
JKL |
jkl |
5 |
||||||||
2 Click [Manuals]. |
|
|
|
|||||||||
Enter with the numeric keys or |
. |
MNO |
mno |
6 |
||||||||
3 Click [e-Manual]. |
||||||||||||
|
|
|
|
|
|
|
|
|
|
|
||
* If [AutoPlay] is displayed, click [Run MInst.exe]. |
Moving the cursor (Entering a space) |
PQRS |
pqrs |
7 |
||||||||
Depending on the operating system you |
||||||||||||
Tap |
or |
, or press [ |
|
] or [ |
|
], to |
|
|
|
|||
are using, a security protection message |
|
|
|
|
|
|||||||
|
|
|
◄ |
|
► |
TUV |
tuv |
8 |
||||
appears. |
move the cursor. To enter a space, |
|||||||||||
|
|
|
||||||||||
If the provided DVD-ROM has been already |
move the cursor to the end of the |
WXYZ |
wxyz |
9 |
||||||||
text, and tap |
or press [►]. |
|
|
|||||||||
inserted in your computer and [Manuals] is |
|
|
|
|
|
|||||||
not displayed, remove the DVD-ROM and |
|
|
|
|
|
|
|
|
(Not available) |
0 |
||
insert it again. |
|
|
|
|
|
|
|
|
|
|
|
|
|
Deleting characters |
|
|
|
|
(space) - . * # ! ” , ; : ^ ` _ = / | ’ |
(Not available) |
|||||
|
Press |
. Pressing and holding |
|
? $ @ % & + \ ˜ ( ) [ ] { } < > |
|
|||||||
|
|
|
|
|
||||||||
|
deletes all characters. |
|
|
|
|
|
|
|
||||
9
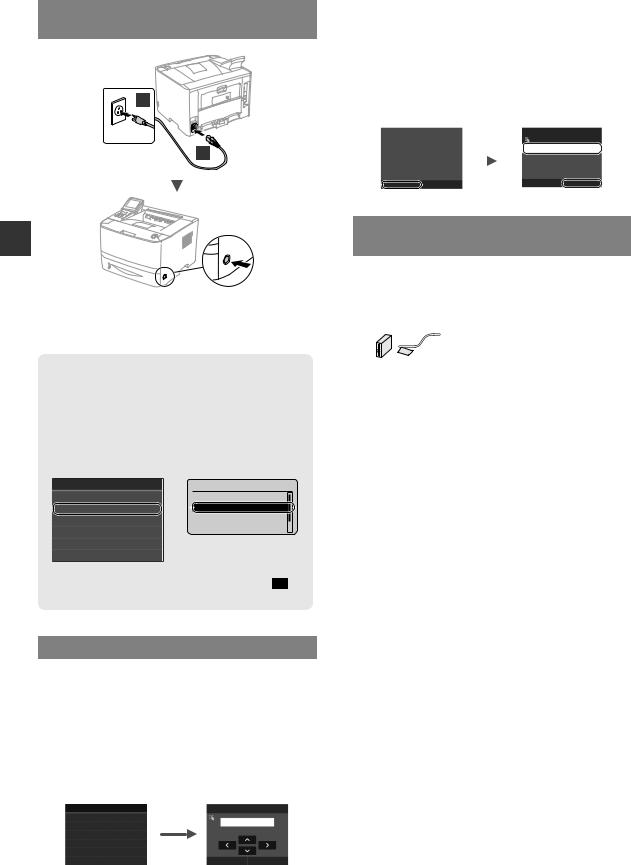
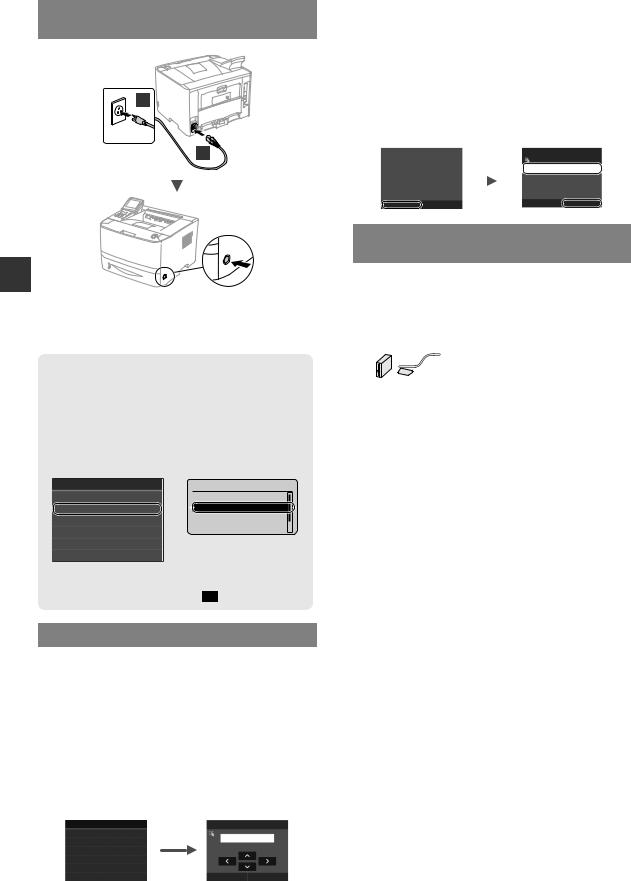
Connecting the Power Cord and Turning ON
the Power
2
1
En
 Do not connect the USB cable at this time. Connect it when installing software.
PrincipleofDescribingtheOperatingInstructions
ThisGettingStartedGuidedescribestheoperating instructionsusingillustrationsoftheLBP253x'sscreen.
In following some operating instructions, such as “select …,” the operation you perform differs, depending on the model of the machine.
● LBP253x
Paper Settings
Multi-Purpose Tray
Drawer 1
Drawer 2
Register Custom Paper
Select Frequently Used Paper S
Tap the item the operating instruction refers to.
● LBP252dw/LBP251dw
Paper Settings
Multi-Purpose Tray
Drawer 1
Drawer 2
Register Custom Paper
Use [▲], [▼], [◄], or [►] to select the item the operating instruction refers to, and press OK .
Specifying the Initial Settings
The first time you turn ON the power, follow the instructions on the screen. For details on navigating the menu and how to input the numbers, see “Navigating the Menu and Text Input Method” on p. 9.
●● Complete settings starting with language and through to date and time
Follow the instructions on the screen, set the language, region, time zone, and date and time.
Language |
|
Current Date/Time Settings |
English |
|
10/10/2015 10:26 AM |
Japanese |
|
|
|
(0:00-12:59) |
|
French |
|
|
|
|
|
Spanish |
|
|
German |
|
|
Italian |
|
Apply |
●● Setting a Remote UI PIN
You can set a PIN for access to the Remote UI.Protect the machine from unauthorized access by only allowing users with access privileges to use the machine.
To specify settings later, please refer to“Setting a Remote UI PIN” in the e-Manual.
 e-Manual “Setting a Remote UI PIN”
  e-Manual “Setting the System Manager ID”
Setting the Remote UI Access |
|
5HPRWH 8, $FFHVV 3,1 |
|
PIN is recommended when |
|
|
|
using Remote UI to prevent |
|
[[[[[[[ |
|
unauthorized access by a |
|
||
|
|
||
third party. |
|
|
|
Do you want to configure the |
|
|
|
settings? |
|
|
|
Yes |
No |
|
$SSO\ |
|
|
|
|
Selecting the Method to Connect the Machine
●● Connecting via a Wired LAN
You can connect the machine to a wired router. Use the LAN cables to connect the machine to the wired router (access point).
 Connect the computer to the router by cable or wirelessly.
 Make sure that there is an available port in the router to connect the machine and the computer.
 Have a LAN Cable of Category 5 or higher twisted-pair cable ready.
●● Connecting via a USB cable
You can connect the machine to the computer using a USB cable.
 Make sure that the USB cable you use has the following

 mark.
mark. 


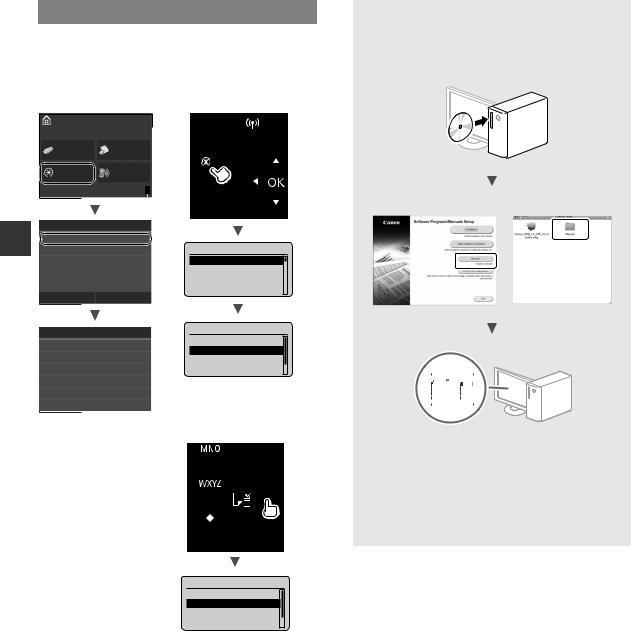
●● Connecting via a Wireless LAN
You can connect the machine to a wireless router*. Since it is connected to wireless, no LAN cables are needed.
*A wireless router (access point), which supports IEEE802.11b/g/n, is required.
 Connect the computer to the router by cable or wirelessly.
●● Direct Connection
Connect a mobile device to the machine wirelessly and directly without routing through a wireless LAN router (or access point)
 e-Manual “Can Be Used Conveniently with a Mobile Device” ►“Connecting to a Mobile Device” ►“Make Direct Connection (Access Point Mode)”
10
Selecting the Method to Connect:
Via Wireless LAN or Other Method
Do you want to use the wireless LAN to connect the computer?
The settings can be configured later.
|
Yes |
No |
|
Connect to the computer via a wireless LAN |
|
Yes |
immediately |
|
|
|
|
 Start from step 4 of “Setting Up a Wireless LAN” in the Wireless LAN Setting Guide.
|
Connect to the computer via a wired LAN |
|
|
Proceed to “Connecting via a Wired LAN” (P. 11). |
|
No |
||
Connect to the computer via a USB cable |
||
|
||
|
 Proceed to “Connecting via a USB Cable” (P. 11).
Connecting via a Wired LAN
Checking before the Setup
Router Internet or
hub
LAN cable
Are the computer and the router (or hub) properly connected using a LAN cable?
For more information, see the instruction manual for the network device you are using, or contact the networking device manufacturer.
Have the network settings on the computer been completed?
If the computer is not properly configured, you may not use the wired LAN connection even after completing the following settings.
NOTE
•You cannot connect both the wired LAN and wireless LAN at the same time. In addition, the machine is set to the “Wired LAN” by default.
•When you connect to a network environment that is not security protected, your personal information could be disclosed to third parties. Please use caution.
•If you connect through a LAN in the office, contact your network administrator.
Connecting via a Wired LAN
1 Connect the LAN cable.
The IP address will be automatically configured in 2 minutes. If you want to set the IP address manually, see the following items.
 e-Manual “Network” ►“Connecting to a Network” ►
“Setting IP Addresses”
En
2 Install the driver and software using the provided DVD-ROM.
 See “For details on the installation procedures:” (P. 12).
  Proceed to “Setting the Paper Size and Type” (P. 12).
Connecting via a USB Cable
Install the driver and software on the DVD-ROM included with the machine.
NOTE
If you connected the USB cable before installing, first remove the USB cable, and then re-install.
1 Install the driver and software using the User Software and Manuals DVD-ROM.
 See “For details on the installation procedures:” (P. 12).
2 Connect the USB cable.
 Proceed to “Setting the Paper Size and Type” (P. 12).
11
Setting the Paper Size and Type
Following the instructions on the screen, set the paper size and type. Depending on the model you are using, make settings as shown below.
|
●● LBP253x |
|
●● LBP252dw |
|
Home |
|
|
|
Memory |
Secure |
|
|
Media Print |
|
|
|
Menu |
Direct |
|
|
Connection |
|
|
|
|
|
|
|
Menu |
|
|
En |
Paper Settings |
|
Menu |
|
Network Settings |
|
|
|
Preferences |
|
Paper Settings |
|
|
Direct Connection |
|
|
Timer Settings |
|
|
|
|
Network Settings |
|
|
Common Settings |
|
|
|
|
Output Reports |
|
|
|
|
|
|
|
Output Report |
|
|
Paper Settings |
|
Paper Settings |
|
|
Multi-Purpose Tray |
|
|
Multi-Purpose Tray |
||
|
Drawer 1 |
||
|
Drawer 1 |
|
|
|
|
Drawer 2 |
|
|
Drawer 2 |
|
Register Custom Paper |
Register Custom Paper
Select Frequently Used Paper S
●● LBP251dw
Paper Settings
Multi-Purpose Tray
Drawer 1
Drawer 2
Register Custom Paper
For details on the installation procedures:
Install the driver and software using the provided DVD-ROM. For details on the installation procedures, see the Printer Driver Installation Guide.
 You can also download the driver from the Canon Web site.
|
|
|
|
|
|
|
|
|
|
|
|
|
|
|
|
|
|
|
|
Windows |
|
|
Mac OS |
||||||
|
|
|
|
|
|
|
|
|
|
|
|
|
|
|
|
|
|
|
|
|
|
|
|
|
|
|
|
|
|
|
|
|
|
|
|
|
|
|
|
|
|
|
|
|
|
|
|
|
|
|
|
|
|
|
|
|
|
|
|
|
|
|
|
|
|
|
|
|
|
For Mac users:
The DVD-ROM supplied with this machine may not include the driver for Mac OS. This is different, depending on when you purchase the machine. Please find and download the appropriate driver on our Canon home page. For further information on installation or using the driver, see the Printer Driver Installation Guide.
12
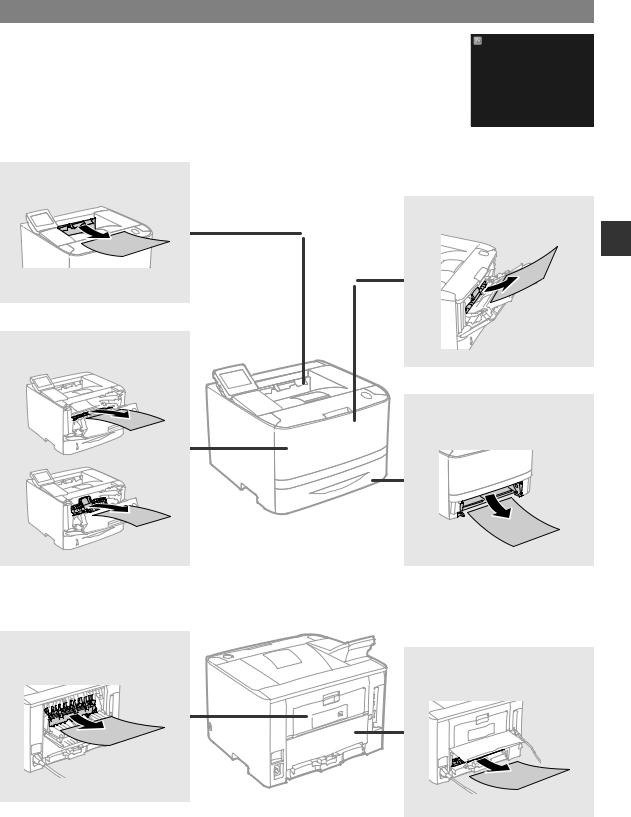
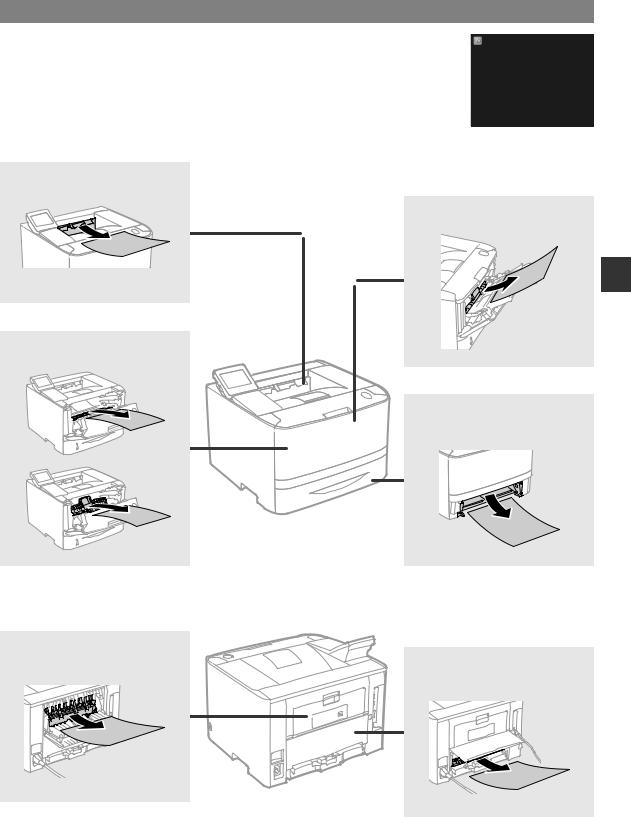
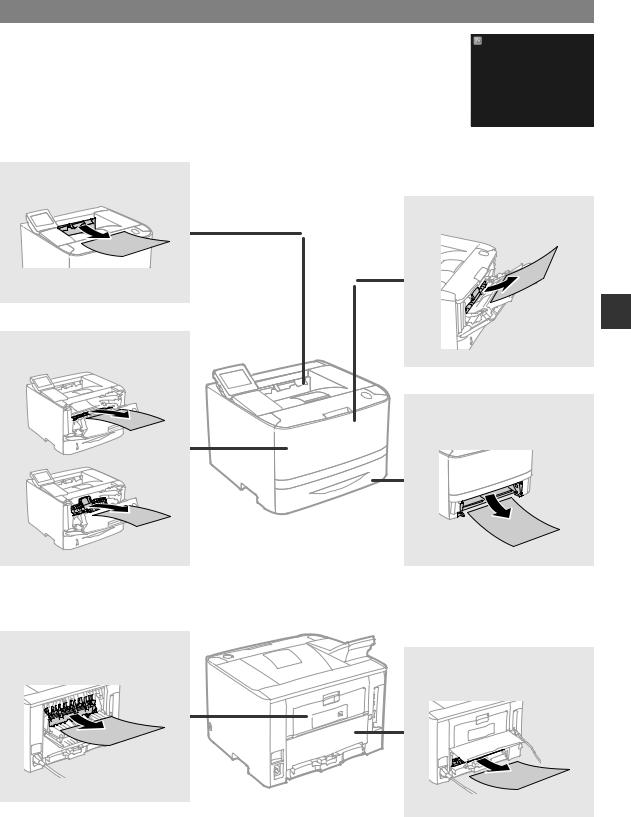
Clearing Paper Jams
If the following screen appears, a paper jam has occurred in the feeder or inside the machine. Follow the procedure displayed on the screen to remove the jammed document or paper. This manual indicates only the areas where paper jams occur. For details on each function, see the e-Manual.
Paper jammed.
Press [Next] to display the steps.
Next
Output tray
Multi-purpose tray
En
Inside the Front cover
Paper drawer
(of the main unit)
Back side
Back side
13

Replacing Toner Cartridges
Toner cartridges are consumables. When the amount remaining in a toner cartridge is low, a message appears on the screen or the following problems may occur. Take the appropriate Corresponding action.
When a Message Appears
The machine displays a message when the amount remaining in a toner cartridge is low.
|
Message |
When the message is |
Description and solutions |
|
displayed on the screen |
||
|
|
|
|
|
Prepare a |
The toner cartridge needs |
Check the level of remaining toner in the toner cartridge and replace the toner |
|
cartridge. |
a replacement soon. |
cartridge with a new one before printing high-volume documents. |
|
|
|
e-Manual “Replacing Toner Cartridges” |
|
Cartridge has |
The toner cartridge has |
If this message does not disappear, replace the toner cartridge. You can |
En |
reached end of |
reached the end of its life. |
continue printing, but the print quality cannot be guaranteed. |
lifetime. Rplcmt |
|
e-Manual “Replacing Toner Cartridges” |
|
|
|
||
|
recommended. |
|
|
|
|
|
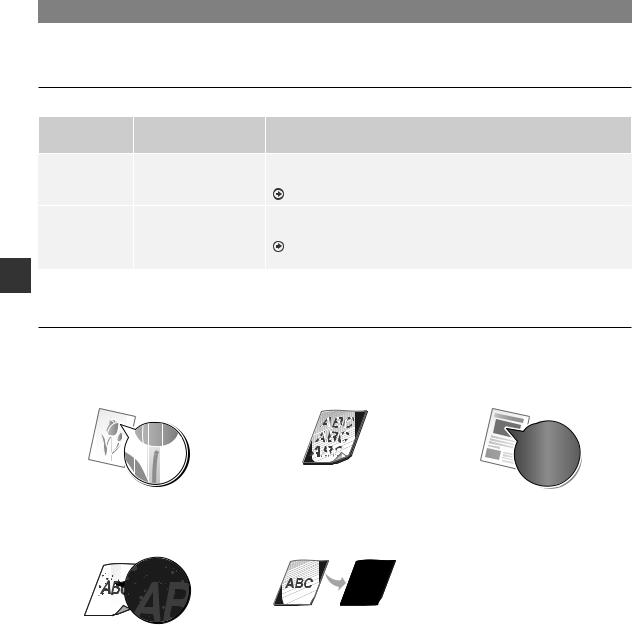
If Printouts Are Poor in Quality
If your printouts begin to show any of the following features, one of your toner cartridges is nearly empty. Replace the nearly empty toner cartridge even if no message is displayed.
White streaks appear |
Partially faded |
Uneven density |
Toner smudges and splatters |
Blank space of originals becomes |
appear |
slightly colored |
14
Àpropos des manuels fournis
Mise en route (ce manuel) :
Commencez par lire ce manuel. Il explique comment installer et
configurer l'appareil et indique les précautions à suivre.
b Guide d'installation du pilote d'imprimante :
Ce manuel décrit les procédures de configuration du réseau sans fil ainsi que les causes des problèmes auxquels vous pourriez être confronté pendant la configuration et les remèdes à y apporter.
Navigation dans le menu et méthode de saisie du texte
Nom administrateur système
A
|
|
Administrator |
|
LBP252dw/ |
<A/a/12> |
A/a/12 |
# Appliquer |
|
|
|
|
LBP251dw |
|
|
|
Précédent
Clavier numérique
Menu
*

 (
(
 ) <Appliquer>
LBP252dw/
LBP251dw
▲▼▲ ▲OK
Effacement
# |
Fr |
|
Manuel électronique (DVD-ROM fourni) :
Il explique comment installer le logiciel.
d Manuel électronique (DVD-ROM fourni) :
Le manuel électronique est divisé en rubriques afin de faciliter la recherche d'informations.
Affichage du manuel électronique depuis le DVD-ROM
1Insérez le DVD-ROM fourni dans votre ordinateur*.
2Cliquez sur [Manuels].
3Cliquez sur [Manuel électronique].
*Si [Lecture automatique] s'affiche, cliquez sur [Exécuter MInst.exe].
 Avec certains systèmes d'exploitation, un message d'avertissement de sécurité apparaît parfois.
 Si le DVD-ROM a déjà été inséré dans l'ordinateur et que [Manuels] ne s'affiche pas, retirez le DVD-ROM et insérez-le à nouveau.
Navigation dans le menu
Sélection des options ou déplacement du curseur d'une option à l'autre
LBP253x
Tapez sur une option pour la sélectionner. Appuyez sur  pour retourner à l'écran précédent.
LBP252dw/LBP251dw
Sélectionnez une option à l'aide de [▲] ou [▼].
Appuyez sur OK ou [►] pour passer au niveau hiérarchique suivant. Appuyez sur  ou [◄] pour retourner au niveau hiérarchique précédent.
Validation des réglages LBP253x
Tapez sur l'option. Cependant, si <Appliquer> s'affiche, tapez sur <Appliquer>.
LBP252dw/LBP251dw
Appuyez sur OK . Cependant, si <Appliquer> s'affiche sur l'afficheur, sélectionnez <Appliquer>, puis appuyez sur OK .
Méthode de saisie du texte
Modification du mode de saisie
Pour changer le mode de saisie, tapez sur <A/a/12> ou appuyez sur  .
.
Mode de saisie |
Texte disponible |
|
<A> |
Lettres alphabétiques en |
|
majuscule et symboles |
||
|
||
<a> |
Lettres alphabétiques en |
|
minuscule et symboles |
||
|
||
<12> |
Chiffres |
|
|
|
Saisie de texte, de symboles et de chiffres
Utilisez le clavier numérique ou  .
.
Déplacement du curseur (ajout d'un espace)
Tapez sur  ou
ou  , ou appuyez sur [◄] ou [►], pour déplacer le curseur. Pour saisir un espace, déplacez le curseur jusqu'à la fin du texte, et tapez sur
  ou appuyez sur [►].
Suppression de caractères
Appuyez sur  . Maintenez la touche
  enfoncée pour effacer tous les caractères.
Mode de |
Mode de |
Mode de |
saisie : <A> |
saisie : <a> |
saisie : <12> |
@ . - _ / |
1 |
|
AÀÂBCÇ |
aàâbcç |
2 |
DEËÉÈÊF |
deëéèêf |
3 |
GHIÏÎ |
ghiïî |
4 |
JKL |
jkl |
5 |
MNOÔ |
mnoô |
6 |
PQRS |
pqrs |
7 |
TUÜÙÛV |
tuüùûv |
8 |
WXYZ |
wxyz |
9 |
(Non disponible) |
0 |
|
(espace) - . * # ! ” , ; : ^ ` _ = / | ’ |
(Non |
|
? $ @ % & + \ ˜ ( ) [ ] { } < > |
disponible) |
|
|
|
15 |
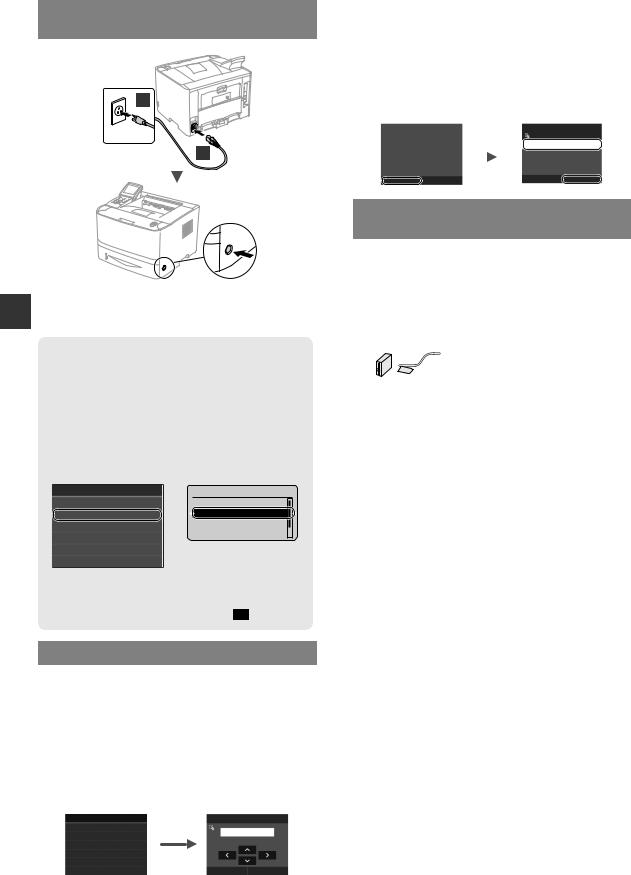
Branchement du cordon d'alimentation et mise sous tension
2
1
Fr
 Ne branchez pas le câble USB pour l'instant. Branchez-le au moment de l'installation du logiciel.
Principe des descriptions des instructions
Ce guide de démarrage décrit les instructions d'utilisation de l'appareil à l'aide de captures d'écran du modèle LBP253x.
Pour certaines instructions, comme « sélectionnez …, » l'opération à exécuter varie d'un modèle d'appareil à l'autre.
● LBP253x
Réglages papier Bac multifonctions Cassette 1 Cassette 2
Mémoriser format personnalisé Sélec. formats pap. couramment
Tapez sur l'option indiquée par les instructions.
● LBP252dw/LBP251dw
Réglages papier
Bac multifonctions Cassette 1 Cassette 2
Mémoriser format personn
Utilisez [▲], [▼], [◄], ou [►] pour sélectionner l'option indiquée par les instructions, et appuyez sur OK.
Configuration des réglages initiaux
La première fois que vous mettez l'appareil sous tension, suivez les instructions à l'écran. Pour en savoir plus sur la navigation dans le menu et la saisie des chiffres, consultez la section « Navigation dans le menu et méthode de saisie du texte » on p. 15.
●● Faites tous les réglages nécessaires, de la sélection de la langue au réglage de la date et de l'heure.
Suivez les instructions à l'écran, et définissez la langue, la région, le fuseau horaire et la date et l'heure.
Language |
|
Réglages date/heure actuelle |
English |
|
10/10/2015 10:26 AM |
Japanese |
|
|
|
(0:00-12:59) |
|
French |
|
|
|
|
|
Spanish |
|
|
German |
|
|
Italian |
|
Appliquer |
●● Définition d'un code PIN pour l'IU distante
Vous pouvez définir un code PIN pour accéder à l'IU distante. Protégez l'appareil contre les intrusions en n'autorisant que les utilisateurs titulaires des droits d'accès à utiliser l'appareil. Pour définir un PIN plus tard, consultez la section « Définition d'un code PIN pour l'IU distante » dans le manuel électronique.
 Manuel électronique « Définition d'un code PIN pour l'IU distante »
 Manuel électronique « Définition de l'ID d'administrateur système »
La définition d'un PIN |
|
3,1 DFFqV ,8 GLVWDQWH |
|
d'accès à l'IU distante est |
|
|
|
recommandée pour éviter tout |
|
[[[[[[[ |
|
accès non autorisé par des |
|
||
|
|
||
tiers. |
|
|
|
Souhaitez-vous effectuer les |
|
|
|
réglages ? |
|
|
|
Oui |
Non |
|
$SSOLTXHU |
|
|
|
|
Sélection de la méthode de connexion de l'appareil
●● Connexion via un réseau filaire
Vous pouvez connecter l'appareil à un routeur filaire. Utilisez des câbles réseau pour connecter la machine au routeur filaire (point d'accès).
 Connectez l'ordinateur au routeur à l'aide d'un câble ou par connexion sans fil.
 Assurez-vous que le routeur dispose d'un port libre pour connecter l'appareil et l'ordinateur.
 Procurez-vous un câble réseau à paire torsadée de catégorie 5 minimum.
●● Connexion via un câble USB
Vous pouvez connecter l'appareil à l'ordinateur à l'aide d'un câble USB.
 Vérifiez que le câble USB utilisé porte le marquage suivant.
●● Connexion via un réseau sans fil
Vous pouvez connecter l'appareil à un routeur sans fil*. Étant donné qu'il est connecté au réseau sans fil, aucun câble réseau n'est nécessaire.
*Un routeur sans fil (ou point d'accès) prenant en charge IEEE802.11b/g/n est nécessaire.
 Connectez l'ordinateur au routeur à l'aide d'un câble ou par connexion sans fil.
●● Connexion directe
Connectez sans fil un appareil mobile directement à l'appareil, sans passer par un routeur réseau sans fil (ou point d'accès)
 Manuel électronique « Utilisable commodément avec un périphérique mobile » ►« Connexion à un terminal mobile » ►« Connexion directe (Mode Point d'accès) »
16

Sélection de la méthode de connexion :
via un réseau sans fil ou par une autre méthode
Souhaitez-vous utiliser le réseau sans fil pour connecter l'ordinateur ? Les réglages peuvent être effectués plus tard.
Oui Non
Connecter immédiatement l'ordinateur via un réseau sans fil
Oui |
Commencez à l'étape 4 de la section « Configuration |
|
|
d'un réseau sans fil » dans le guide de configuration du |
|
|
réseau sans fil. |
|
|
Connecter l'ordinateur via un réseau câblé |
|
|
Passez à « Connexion via un réseau filaire » (P.17). |
|
Non |
||
Connecter l'ordinateur via un câble USB |
||
|
||
|
 Passez à « Connexion via un câble USB » (P.17).
Connexion via un réseau filaire
Points à vérifier avant la configuration
Routeur Internet ou
concentrateur
Câble réseau (LAN)
L'ordinateur et le routeur (ou concentrateur) sont-ils connectés à l'aide d'un câble réseau (LAN) ?
Pour en savoir plus, consultez le mode d'emploi du périphérique réseau ou contactez son fabricant.
La configuration réseau de l'ordinateur a-t-elle été effectuée ?
Si l'ordinateur n'est pas correctement configuré, vous risquez de ne pas pouvoir utiliser le réseau filaire, même après avoir fait les réglages suivants.
REMARQUE
•Vous ne pouvez pas utiliser simultanément le réseau filaire et le réseau sans fil. En outre, l'appareil est réglé par défaut pour utiliser le réseau sans fil.
•Si vous vous connectez à un réseau non sécurisé, vos informations confidentielles risquent d'être divulguées à un tiers. Prenez toutes les précautions nécessaires.
•En cas de connexion à un réseau d'entreprise, contactez votre administrateur réseau.
Connexion via un réseau filaire
1 Connectez le câble réseau (LAN).
|
L'adresse IP est automatiquement configurée dans |
|
|
un délai de 2 minutes. Si vous souhaitez configurer |
|
|
l'adresse IP manuellement, reportez-vous aux sections |
|
|
suivantes. |
|
|
Manuel électronique « Réseau » ►« Connexion à un |
|
|
réseau » ►« Définition des adresses IP » |
|
2 |
Installez le pilote et le logiciel à l'aide du DVD-ROM |
Fr |
|
fourni.
 Voir la section « Pour en savoir plus sur les procédures d'installation : » (P.18).
 Passez à « Remplacement des cartouches de toner » (P.20).
Connexion via un câble USB
Installez le pilote et le logiciel se trouvant sur le DVD-ROM fourni avec l'appareil.
REMARQUE
Si vous avez branché le câble USB avant de procéder à l'installation, débranchez-le puis recommencez l'installation.
1 Installez le pilote et le logiciel à l'aide du DVD-ROM « User Software and Manuals ».
 Voir la section « Pour en savoir plus sur les procédures d'installation : » (P.18).
2 Connectez le câble USB.
 Passez à « Réglage du format et du type de papier » (P.18).
17

Réglage du format et du type de papier
Suivez les instructions à l'écran pour définir le format et le type de papier. Faites les réglages indiqués ci-dessous en fonction du modèle que vous utilisez.
|
●● LBP253x |
|
●● LBP252dw |
|
Accueil |
|
|
|
Impression |
Impression |
|
|
support mém |
sécurisée |
|
|
Menu |
Connexion |
|
|
directe |
|
|
|
|
|
|
|
Menu |
|
|
|
Réglages papier |
|
|
|
Réglages réseau |
|
Menu |
|
Préférences |
|
Réglages papier |
|
|
Connexion directe |
|
Fr |
Réglages horloge |
|
|
|
Réglages réseau |
||
Réglages communs |
|
||
|
|
Impression rapports |
|
|
|
|
|
|
|
Impr. rapport |
|
|
Réglages papier |
|
Réglages papier |
|
|
Bac multifonctions |
|
|
Bac multifonctions |
||
|
Cassette 1 |
||
|
Cassette 1 |
|
|
|
|
Cassette 2 |
|
|
Cassette 2 |
|
Mémoriser format personn |
Mémoriser format personnalisé
Sélec. formats pap. couramment
●● LBP251dw
Réglages papier
Bac multifonctions
Cassette 1
Cassette 2
Mémoriser format personn
Pour en savoir plus sur les procédures d'installation :
Installez le pilote et le logiciel à l'aide du DVD-ROM fourni. Pour en savoir plus sur les procédures d'installation, reportez-vous au guide d'installation des pilotes d'imprimante.
 Vous pouvez également télécharger le pilote depuis le site Web Canon.
|
|
|
|
|
|
|
|
|
|
|
|
|
|
|
|
|
|
|
|
Windows |
|
|
Mac OS |
||||||
|
|
|
|
|
|
|
|
|
|
|
|
|
|
|
|
|
|
|
|
|
|
|
|
|
|
|
|
|
|
|
|
|
|
|
|
|
|
|
|
|
|
|
|
|
|
|
|
|
|
|
|
|
|
|
|
|
|
|
|
|
|
|
|
|
|
|
|
|
|
Pour les utilisateurs de Macintosh :
Il est possible que le DVD-ROM fourni avec cet appareil ne comprenne pas le pilote d'imprimante pour MacOS. Ceci dépend du moment où vous avez acheté la machine. Recherchez et téléchargez le pilote approprié sur la page d'accueil de Canon. Pour de plus amples informations sur l'installation ou l'utilisation du pilote, reportez-vous au guide d'installation des pilotes d'imprimante.
18
Élimination des bourrages papier
Lorsque l'écran suivant s'affiche, cela signifie qu'un bourrage de papier s'est produit dans le |
|
Bourrage papier. |
|
chargeur ou l'appareil. Suivez les instructions à l'écran pour retirer le document ou le papier coincé. |
Appuyer sur [Suivant] pour |
Seules les zones où un bourrage de papier risque de se produire sont indiquées dans ce manuel. |
afficher la procédure. |
Pour en savoir plus sur chacune des fonctions, reportez-vous au manuel électronique. |
|
|
|
|
Suivant |
|
|
Réceptacle de sortie
Bac multifonctions
Fr
À l'intérieur du capot avant
Cassette à papier (de l'unité principale)
Face arrière
Face arrière
19
Remplacement des cartouches de toner
Les cartouches de toner sont des consommables. Lorsqu'il ne reste plus beaucoup de toner dans la cartouche, un message s'affiche à l'écran ou les problèmes suivants surviennent. Prenez les mesures appropriées.
Lorsqu'un message apparaît
L'appareil affiche un message lorsqu'il ne reste plus beaucoup de toner dans la cartouche.
Message |
Moment où le message |
Description et solutions |
|
s'affiche à l'écran |
|||
|
|
||
Préparer une |
La cartouche de toner doit |
Vérifiez le niveau de toner restant dans la cartouche et remplacez-la par une |
|
cartouche. |
être bientôt remplacée. |
cartouche neuve avant d'imprimer de grands volumes de documents. |
|
|
|
Manuel électronique « Remplacement des cartouches de toner » |
|
Le cartouche |
La cartouche de toner a |
Si ce message ne disparaît pas, remplacez la cartouche de toner. Vous pouvez |
|
est en fin de vie. |
atteint sa fin de vie. |
continuer à imprimer, mais la qualité d'impression ne peut être garantie. |
|
Remplacement |
|
Manuel électronique « Remplacement des cartouches de toner » |
|
conseillé. |
|
|
Fr
Si les imprimés sont de mauvaise qualité
Si vos imprimés commencent à montrer l'une des caractéristiques suivantes, l'une de vos cartouches de toner est presque vide. Remplacez la cartouche de toner presque vide, même si aucun message n'est affiché.
Apparition de traînées blanches |
Zones pâles |
Densité irrégulière |
Apparition de taches et |
Les |
zones blanches des originaux |
d'éclaboussures de toner |
deviennent légèrement colorées |
|
20
Informationen zu den mitgelieferten Anleitungen
Erste Schritte (Diese Anleitung):
Lesen Sie zuerst diese Anleitung. In dieser Anleitung werden die Installation des Geräts, die Einstellungen sowie Sicherheitshinweise erläutert.
b Handbuch der WLAN-Einstellungen:
In diesem Handbuch werden die Verfahren zur Einrichtung des Wireless LAN sowie die Symptome und Abhilfen für Probleme erläutert, mit denen
Sie möglicherweise während der Einrichtung konfrontiert werden.
Installationsanleitung für
Druckertreiber (auf mitgelieferter DVD-ROM):
In dieser Anleitung wird die Installation der Software beschrieben.
d e-Anleitung (auf mitgelieferter
DVD-ROM):
Die e-Anleitung ist nach Themen geordnet, so dass Sie die benötigten Informationen problemlos finden können.
Anzeigen der e-Anleitung von der DVD-ROM
1Legen Sie die mitgelieferte DVD-ROM in Ihren Computer ein.*
2Klicken Sie auf [Handbücher].
3Klicken Sie auf [e-Handbuch].
*Wenn [Automatische Wiedergabe] angezeigt wird, klicken Sie auf [MInst.exe ausführen].
 Abhängig von dem von Ihnen verwendeten Betriebssystem wird eine Sicherheitswarnung angezeigt.
 Wenn die mitgelieferte DVD-ROM bereits in den Computer eingelegt wurde und [Handbücher] nicht angezeigt wird, nehmen Sie die DVD-ROM heraus, und legen Sie sie erneut ein.
Navigieren durch das Menü und Texteingabemethode
Name Systemmanager
|
|
|
|
A |
|
|
|
Administrator |
|
|
|
|
|
|
|
( |
) |
LBP252dw/ |
<A/a/12> |
A/a/12 |
# Anwenden |
<Anwenden> |
|
|
|
|
|
|
|
LBP251dw |
|
|
|
LBP252dw/ |
|
|
|
|
|
||
|
|
|
|
LBP251dw |
|
|
Zurück |
|
|
|
|
|
|
|
|
▲▼▲ |
▲OK |
Zahlentasten |
|
|
Löschen |
||
Menü
* |
# |
De
Navigieren durch das Menü
Auswählen von Elementen oder Versetzen des Cursors zwischen den Menüelementen
LBP253x
Tippen Sie auf ein Element, um es auszuwählen. Drücken Sie  , um zum vorherigen Bildschirm
zurückzukehren.
LBP252dw/LBP251dw
Wählen Sie mit [▲] oder [▼] ein Element aus.
Drücken Sie OK oder [►], um zur nächsten Ebene zu wechseln. Drücken Sie  oder [◄], um zur vorherigen Ebene zu wechseln.
Bestätigen einer Einstellung LBP253x
Tippen Sie auf das Element. Wenn jedoch <Anwenden> angezeigt wird, tippen Sie auf <Anwenden>.
LBP252dw/LBP251dw
Drücken Sie OK . Wenn auf dem Display jedoch <Anwenden> angezeigt wird, wählen Sie <Anwenden> aus, und drücken Sie dann OK .
Texteingabemethode
Ändern des Eingabemodus
Um den Eingabemodus zu ändern, tippen Sie auf <A/a/12>, oder drücken Sie  .
.
Eingabemodus |
Verfügbarer Text |
<A> |
Großbuchstaben und Symbole |
<a> |
Kleinbuchstaben und Symbole |
<12> |
Zahlen |
Eingeben von Text, Symbolen und Zahlen
Nehmen Sie die Eingabe mit den numerischen Tasten oder  vor.
vor.
Versetzen des Cursors (Eingeben eines Leerzeichens)
Tippen Sie auf  oder
oder  , oder drücken Sie [◄] oder [►], um den Cursor
zu versetzen. Um ein Leerzeichen einzugeben, setzen Sie den Cursor an das Textende, und tippen Sie auf  , oder drücken Sie [►].
Löschen von Zeichen
Drücken Sie  . Wenn Sie
  gedrückt halten, werden alle Zeichen gelöscht.
Eingabemodus: |
Eingabemodus: |
Eingabemodus: |
<A> |
<a> |
<12> |
@ . - _ / |
1 |
|
AÄBC |
aäbc |
2 |
DEF |
def |
3 |
GHI |
ghi |
4 |
JKL |
jkl |
5 |
MNOÖ |
mnoö |
6 |
PQRSß |
pqrs |
7 |
TUÜV |
tuüv |
8 |
WXYZ |
wxyz |
9 |
(nicht verfügbar) |
0 |
|
(Leerzeichen) - . * # ! ” , ; : ^ ` _ = / | ’ |
(nicht |
|
? $ @ % & + \ ˜ ( ) [ ] { } < > |
verfügbar) |
|
|
|
21 |
Anschließen des Netzkabels und Einschalten des Geräts über den Netzschalter
2
1
 Schließen Sie das USB-Kabel zu diesem Zeitpunkt noch De nicht an. Sie können es bei der Installation der Software
anschließen.
Grundsätze für die Erläuterung der Bedienungsverfahren
In dieser Erste-Schritte-Anleitung werden die Bedienungsverfahren anhand der
Bildschirmabbildungen des Modells LBP253x erläutert.
Im Folgenden unterscheiden sich einige Bedienanweisungen, wie beispielsweise “Wählen Sie ...”, für das von Ihnen durchgeführte Verfahren je nach dem Modell des Geräts.
● LBP253x
Papirindstillinger Universalbakke Skuffe 1
Skuffe 2
Registrér brugerdefineret papir Vælg ofte anvendte papirformate
Tippen Sie auf das Element, auf das Sie im Bedienungsablauf hingewiesen werden.
● LBP252dw/LBP251dw
Papirindstillinger
Universalbakke
Skuffe |
1 |
Skuffe |
2 |
Registrér brugerdefinere
Verwenden Sie [▲], [▼], [◄], oder [►], um das Element auszuwählen, auf das Sie im Bedienungsablauf hingewiesen werden, und drücken Sie OK.
Festlegen der anfänglichen Einstellungen
Beim ersten Einschalten der Stromversorgung befolgen Sie die Anweisungen auf dem Bildschirm. Näheres zum Navigieren durch das Menü und Eingabe von Zahlen finden Sie unter “Navigieren durch das Menü und Texteingabemethode” auf S. 21.
●● Nehmen Sie die Einstellungen beginnend mit der
Sprache bis zu dem Datum und der Uhrzeit vor
Befolgen Sie die Anweisungen auf dem Bildschirm, und stellen Sie die Sprache, die Region, die Zeitzone sowie Datum und Uhrzeit ein.
Language |
|
Indstil. for aktuel dato/tid |
English |
|
10/10/2015 10:26 AM |
Japanese |
|
|
|
(0:00-12:59) |
|
French |
|
|
|
|
|
Spanish |
|
|
German |
|
|
Italian |
|
Anvend |
●● Einrichten einer PIN für Remote UI
Sie können eine PIN für den Zugriff auf Remote UI einrichten. Schützen Sie das Gerät vor unbefugten Zugriffen, indem Sie nur Benutzern mit Zugriffsrechten erlauben, das Gerät zu verwenden. Wie Sie die Einstellungen später festlegen können, finden Sie unter “Einrichten einer PIN für Remote UI” in der e-Anleitung.
 e-Anleitung “Einrichten einer PIN für Remote UI”
  e-Anleitung “Einrichten der Systemmanager-ID”
Bei der Verw. von Remote UI |
|
3,1 W DGJ W )MHUQ8, |
|
wird die Einrichtung der |
|
|
|
Zugriffs-PIN für Remote UI |
|
[[[[[[[ |
|
empfohlen, um den nicht au- |
|
||
|
|
||
torisierten Zugr. durch eine |
|
|
|
Drittpartei zu verhindern. |
|
|
|
Sollen die Einstellungen |
|
|
|
Ja |
Nein |
|
$QYHQG |
|
|
|
|
Auswählen der Methode zum Herstellen einer Verbindung zum Gerät
●● Verbindung über Wired LAN
(kabelgebunden)
Sie können das Gerät an einem kabelgebundenen Router anschließen. Verwenden Sie zum Herstellen einer Verbindung zwischen dem Gerät und dem
kabelgebundenen Router (Zugangspunkt) die LAN-Kabel.
 Schließen Sie den Computer und den Router über Kabel oder eine drahtlose Verbindung an.
 Stellen Sie sicher, dass am Router ein Port für den Anschluss zwischen Gerät und Computer zur Verfügung steht.
 Verwenden Sie als LAN-Kabel ein Kabel der Kategorie 5 oder höher mit verdrilltem Adernpaar.
●● Verbindung über ein USB-Kabel
Sie können das Gerät über ein USB-Kabel mit einem Computer verbinden.
 Vergewissern Sie sich, dass das von Ihnen verwendete USB-Kabel die folgende Markierung aufweist.
●● Verbindung über Wireless LAN (drahtlos)
Sie können das Gerät an einem Wireless-Router anschließen*. Da diese Verbindung drahtlos ist, sind keine LAN-Kabel erforderlich.
*Es wird ein Wireless-Router (Zugangspunkt) benötigt, der IEEE802.11b/g/n unterstützt.
 Schließen Sie den Computer und den Router über Kabel oder eine drahtlose Verbindung an.
●● Direkte Verbindung
Schließen Sie ein Mobilgerät drahtlos und ohne zwischengeschalteten Wireless-LAN-Router (oder Zugangspunkt) direkt am Gerät an
 e-Anleitung “Kann bequem mit einem Mobilgerät verwendet werden” ►“Herstellen einer Verbindung zu einem Mobilgerät” ►“Herstellen einer direkten Verbindung (Zugriffspunktmodus)”
22
Auswahl der Verbindungsmethode:
Über Wireless-LAN oder eine andere Methode
Vil du bruge trådløst LAN til at forbinde computeren? Indstillingerne kan konfigureres senere.
|
Ja |
Nej |
|
Verbindung über ein WLAN zum Computer |
|
Ja |
unmittelbar herstellen |
|
|
|
|
 Beginnen Sie mit Schritt 4 im Abschnitt “Ein Wireless LAN einrichten” im Handbuch der WLAN-Einstellungen.
Verbindung über Wired LAN (kabelgebunden) zum Computer herstellen
 Fahren Sie mit “Verbindung über Wired LAN Nein (kabelgebunden)” (S. 23) fort.
Verbindung über ein USB-Kabel zum Computer herstellen
 Fahren Sie mit “Verbindung über ein USB-Kabel” (S. 23) fort.
Verbindung über Wired LAN (kabelgebunden)
Überprüfung vor der Einrichtung
Router
Internet oder
Hub
LAN-Kabel
Sind Computer und Router (oder Hub) ordnungsgemäß über ein LAN-Kabel verbunden?
Weitere Informationen finden Sie im Handbuch für das von Ihnen verwendete Netzwerkgerät, oder wenden Sie sich an den Hersteller des Netzwerkgeräts.
Sind die Netzwerkeinstellungen auf dem Computer abgeschlossen?
Wenn der Computer nicht korrekt konfiguriert wurde, können Sie die kabelgebundene LAN-Verbindung möglicherweise auch nach Abschluss der folgenden Einstellungen nicht verwenden.
HINWEIS
•Die Verbindung kann nicht gleichzeitig über das LAN und das WLAN erfolgen. Das Gerät ist standardmäßig auf “Wired LAN” (kabelgebundenes LAN) eingestellt.
•Wenn die Verbindung in einer Netzwerkumgebung erfolgt, die nicht sicherheitsgeschützt ist, könnten Ihre persönlichen Daten für Dritte offengelegt werden.
•Wenn die Verbindung über ein LAN im Büro erfolgt, wenden Sie sich an Ihren Netzwerkadministrator.
Verbindung über Wired LAN (kabelgebunden)
1 Schließen Sie das LAN-Kabel an.
Die IP-Adresse wird innerhalb von 2 Minuten automatisch konfiguriert. Wie Sie die IP-Adresse manuell festlegen können, finden Sie im folgenden Abschnitt.
 e-Anleitung “Netzwerk” ►“Anschließen an ein Netzwerk” ►“Einstellen von IP-Adressen”
2 Installieren Sie den Treiber und die Software von der mitgelieferten DVD-ROM.
Siehe “Nähere Informationen zu den |
De |
Installationsprozessen:” (S. 24). |
|
Fahren Sie mit “Einstellen von Papierformat und Papiertyp” |
|
|
|
(S. 24) fort. |
|
Verbindung über ein USB-Kabel
Installieren Sie den Treiber und die Software von der DVDROM aus dem Lieferumfang des Geräts.
HINWEIS
Wenn Sie das USB-Kabel vor der Installation angeschlossen haben, trennen Sie zuerst das USB-Kabel, und wiederholen Sie dann die Installation.
1 Installieren Sie den Treiber und die Software von der DVD-ROM “User Software & Manuals ”.
 Siehe “Nähere Informationen zu den Installationsprozessen:” (S. 24).
2 Schließen Sie das USB-Kabel an.
 Fahren Sie mit “Einstellen von Papierformat und Papiertyp” (S. 24) fort.
23
Einstellen von Papierformat und Papiertyp
Stellen Sie das Papierformat und den Papiertyp gemäß den Anweisungen auf dem Bildschirm ein. Je nach dem von Ihnen verwendeten Modell nehmen Sie wie unten dargestellt die Einstellungen vor.
●● LBP253x |
|
●● LBP252dw |
|
Hjem |
|
|
|
Huk.m.print |
Sikret |
|
|
|
|
||
Menu |
Direkte |
|
|
forbindelse |
|
||
|
|
||
Menu |
|
|
|
Papirindstillinger |
|
||
Netværksindstillinger |
Menu |
||
Præferencer |
|
Papirindstillinger |
|
|
Direkte forbindelse |
||
Timerindstillinger |
|||
Netværksindstillinger |
|||
Almene indstillinger |
|||
Outputrapporter |
|||
De |
|
||
Leveringsrap. |
|
||
Papirindstillinger |
Papirindstillinger |
||
Universalbakke |
|||
Universalbakke |
|
||
|
Skuffe 1 |
||
Skuffe 1 |
|
||
|
Skuffe 2 |
||
Skuffe 2 |
|
Registrér brugerdefinere |
|
Registrér brugerdefineret papir
Vælg ofte anvendte papirformate
●● LBP251dw
Papirindstillinger
Universalbakke
Skuffe |
1 |
Skuffe |
2 |
Registrér brugerdefinere
Nähere Informationen zu den Installationsprozessen:
Installieren Sie den Treiber und die Software von der mitgelieferten DVD-ROM. Nähere Informationen zu den Installationsprozessen finden Sie in der Installationsanleitung für Druckertreiber.
 Sie können den Treiber auch von der Canon-Website herunterladen.
|
|
|
|
|
|
|
|
|
|
|
|
|
|
|
|
|
|
|
|
Windows |
|
|
Mac OS |
||||||
|
|
|
|
|
|
|
|
|
|
|
|
|
|
|
|
|
|
|
|
|
|
|
|
|
|
|
|
|
|
|
|
|
|
|
|
|
|
|
|
|
|
|
|
|
|
|
|
|
|
|
|
|
|
|
|
|
|
|
|
|
|
|
|
|
|
|
|
|
|
Für Mac-Benutzer:
Die mit dem Gerät gelieferte DVD-ROM enthält möglicherweise keinen Treiber für Mac OS. Dies hängt davon ab, wann Sie das Gerät erworben haben. Suchen Sie den entsprechenden Treiber auf unserer Canon-Homepage und laden Sie ihn herunter. Weitere Informationen zur Installation oder Verwendung des Treibers finden Sie in der
Installationsanleitung für Druckertreiber.
24
Beseitigen von Papierstau
Wenn der folgende Bildschirm erscheint, ist ein Papierstau in der Zufuhr oder im Geräteinneren aufgetreten. Befolgen Sie den auf dem Bildschirm angezeigten Ablauf zum Entfernen des gestauten Dokuments oder Papiers. In dieser Anleitung werden nur die Bereiche gezeigt, in den ein Papierstau auftreten kann. Ausführliche Informationen zu den jeweiligen Funktionen finden Sie in der e-Anleitung.
Fastsiddende papir.
Tryk på [Næste] for at få vist trinene.
Næste
Ausgabefach
Mehrzweckfach
De
Hinter der vorderen Abdeckung
Papierkassette
(der Haupteinheit)
Rückseite
Rückseite
25
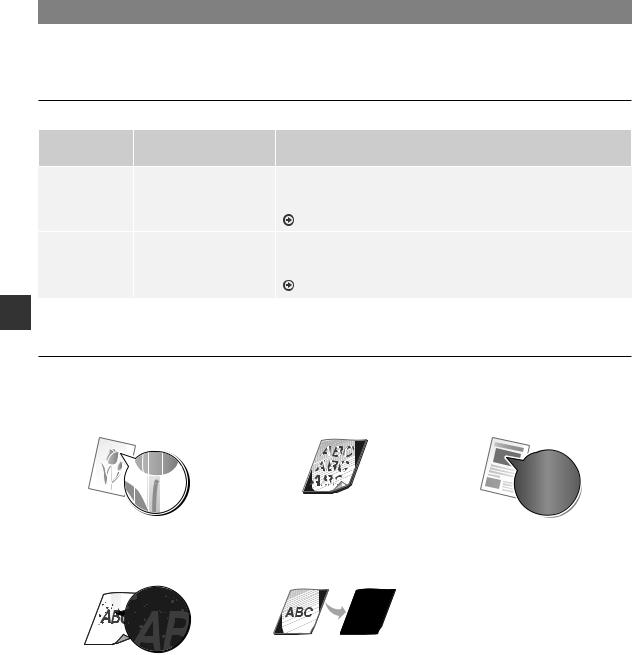
Austauschen der Tonerpatronen
Bei den Tonerpatronen handelt es sich um Verbrauchsmaterial. Wenn die Menge des in einer Tonerpatrone verbleibenden Toners gering ist, erscheint eine Meldung auf dem Bildschirm, oder es können folgende Probleme auftreten. Führen Sie die entsprechenden Abhilfemaßnahmen durch.
Wenn eine Meldung angezeigt wird
Das Gerät zeigt eine Meldung an, wenn die Menge des in einer Tonerpatrone verbleibenden Toners gering ist.
Meldung |
Wenn die Meldung auf dem |
Beschreibung und Abhilfe |
|
Bildschirm angezeigt wird |
|||
|
|
||
Patrone |
Die Tonerpatrone muss bald |
Prüfen Sie den Stand des restlichen Toners in der Tonerpatrone, und |
|
vorbereiten. |
ausgetauscht werden. |
tauschen Sie die Tonerpatrone vor dem Drucken von hochvolumigen |
|
|
|
Dokumenten gegen eine neue aus. |
|
|
|
e-Anleitung “Austauschen von Tonerpatronen” |
|
Le cartouche |
Die Tonerpatrone hat das |
Wenn diese Meldung nicht verschwindet, tauschen Sie die Tonerpatrone aus. |
|
est en fin de vie. |
Ende ihrer Lebensdauer |
Sie können den Druckvorgang fortsetzen, jedoch kann die Druckqualität |
|
Remplacement |
erreicht. |
nicht gewährleistet werden. |
|
conseillé. |
|
e-Anleitung “Austauschen von Tonerpatronen” |
De
Wenn Ausdrucke eine schlechte Qualität aufweisen
Wenn Ihre Ausdrucke beginnen, eine der folgenden Eigenschaften zu zeigen, ist eine Ihrer Tonerpatronen fast leer. Tauschen Sie die fast leere Tonerpatrone aus, auch wenn keine Meldung angezeigt wird.
Weiße Streifen erscheinen |
Teilweise blass |
Ungleichmäßige Dichte |
Tonerflecken und Tonerspritzer |
Leere Bereiche auf Originalen |
erscheinen |
erscheinen leicht gefärbt |
26
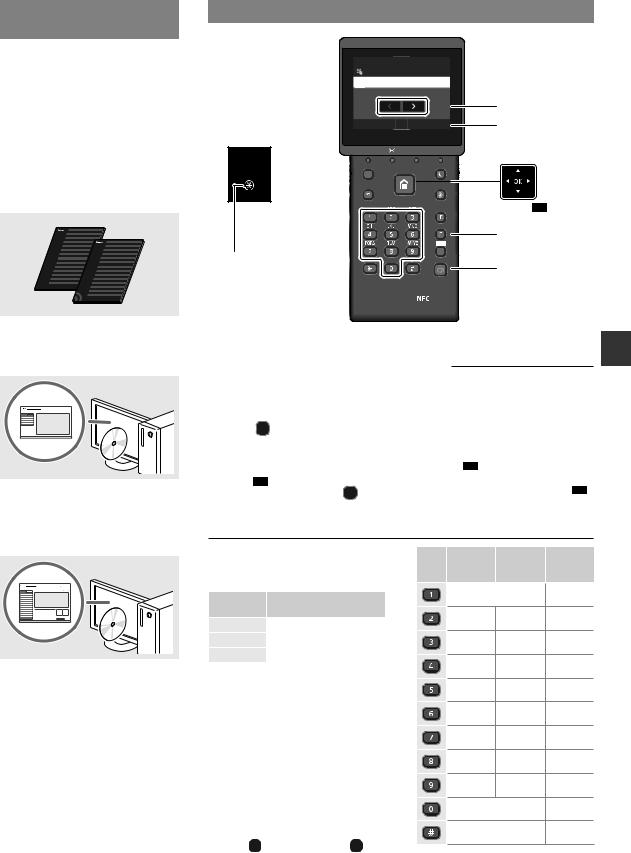
Informazioni sui manuali in dotazione
Introduzione (questo manuale):
Per prima cosa leggere il presente manuale. Illustra l'installazione della macchina, le impostazioni e una nota di attenzione.
b Guida alla configurazione LAN wireless:
Descrive le procedure di configurazione della LAN wireless e le cause, nonché le soluzioni a eventuali problemi durante la configurazione.
Esplorazione del menu e metodo d'immissione del testo
|
|
Nome gestore sistema |
|
|
|
|
|
|
A |
|
|
Administrator |
|
|
LBP252dw/ |
<A/a/12> |
A/a/12 |
# |
Applica |
|
|
|
|
|
LBP251dw
Indietro
Tasti numerici
Menu
*

 (
(
 ) <Applica>
LBP252dw/
LBP251dw
▲▼▲ ▲OK
Azzera
#
Guida di Installazione del Driver
Stampante (DVD-ROM fornito):
Descrive l'installazione del software.
d e-Manual (DVD-ROM fornito):
L'e-Manual è organizzato per argomenti per trovare facilmente le informazioni desiderate.
Visualizzazione dell'e-Manual dal DVD-ROM
1Inserire il DVD-ROM fornito nel lettore del computer*.
2Fare clic su [Manuali].
3Fare clic su [Manuale in formato elettronico].
*Se appare [AutoPlay], fare clic su [Esecuzione di MInst.exe].
 In base al sistema operativo in uso, compare un messaggio di protezione.
 Se il DVD-ROM fornito è già stato inserito nel lettore del computer e [Manuali] non viene visualizzato, rimuovere il DVD-ROM e reinserirlo.
Esplorazione del menu
Selezione degli elementi o spostamento del cursore tra le voci di menu
LBP253x
Toccare un elemento per selezionarlo. Premere  per tornare alla schermata precedente.
LBP252dw/LBP251dw
Selezionare un elemento con [▲] o [▼]. Premere OK o [►] per passare alla gerarchia successiva. Premere  o [◄] per tornare alla gerarchia precedente.
It
Conferma impostazione LBP253x
Toccare l'elemento. Quando viene visualizzato <Applica>, toccare <Applica>.
LBP252dw/LBP251dw
Premere OK . Tuttavia, quando il display visualizza <Applica>,
selezionare <Applica> e premere OK .
Metodo d'immissione del testo
Cambio del modo d'immissione
Per cambiare il modo d'immissione, toccare <A/a/12> o premere  .
.
Modo di |
Testo disponibile |
|
immissione |
||
|
||
<A> |
Lettere maiuscole e simboli |
|
|
|
|
<a> |
Lettere minuscole e simboli |
|
|
|
|
<12> |
Numeri |
|
|
|
Immissione di testo, simboli e numeri
Eseguire l'immissione con i tasti numerici o con  .
.
Spostamento del cursore (immissione di uno spazio)
Toccare  o
o  oppure premere [◄] o [►] per spostare il cursore. Per inserire uno spazio, spostare il cursore alla fine del testo e toccare
  oppure premere [►].
Eliminazione dei caratteri
Premere  . Tenendo premuto
  , tutti i caratteri vengono eliminati.
Modo di |
Modo di |
Modo di |
immissione: |
immissione: |
immissione: |
<A> |
<a> |
<12> |
|
@ . - _ / |
1 |
AÀBC |
aàbc |
2 |
DEÈF |
deèf |
3 |
GHIÌ |
ghiì |
4 |
JKL |
jkl |
5 |
MNOÒ |
mnoò |
6 |
PQRS |
pqrs |
7 |
TUÙV |
tuùv |
8 |
WXYZ |
wxyz |
9 |
(Non disponibile) |
0 |
|
(spazio) - . * # ! ” , ; : ^ ` _ = / | ’ |
(Non |
|
? $ @ % & + \ ˜ ( ) [ ] { } < > |
disponibile) |
|
|
|
27 |
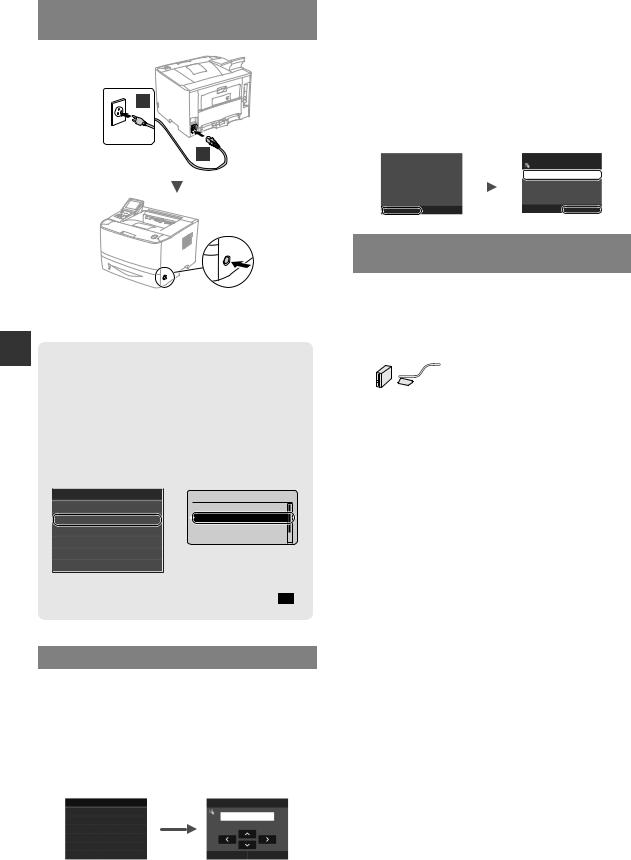
Collegamento del cavo di alimentazione e accensione
2
1
 Non collegare il cavo USB in questa fase. Collegarlo quando si installa il software.
It
Principio di descrizione delle istruzioni operative
La presente Guida introduttiva descrive le istruzioni operative ricorrendo a delle immagini della schermata del modello LBP253x.
Seguendo alcune istruzioni operative come “selezionare…”, l'operazione eseguita varia in base al modello della macchina.
● LBP253x
Impostazioni carta Vassoio multiuso Cassetto 1 Cassetto 2
Registra carta personalizzata Seleziona formati carta più uti
Toccare l'elemento a cui si riferisce l'istruzione operativa.
● LBP252dw/LBP251dw
Impostazioni carta
Vassoio multiuso Cassetto 1 Cassetto 2
Registra carta personali
Utilizzare [▲], [▼], [◄], o [►] per selezionare l'elemento a cui si riferisce l'istruzione operativa e premere OK.
Selezione delle impostazioni iniziali
Alla prima accensione, attenersi alle istruzioni visualizzate. Per informazioni sull'esplorazione del menu e sull'inserimento dei numeri, vedere “Esplorazione del menu e metodo d'immissione del testo” a pag. 27.
●● Impostazioni complete a partire dalla lingua, fino alla data e all'ora
Attenersi alle istruzioni visualizzate, impostare la lingua, l'area geografica, il fuso orario, la data e l'ora.
Language |
|
Impostazioni data/ora correnti |
English |
|
10/10/2015 10:26 AM |
Japanese |
|
|
|
(0:00-12:59) |
|
French |
|
|
|
|
|
Spanish |
|
|
German |
|
|
Italian |
|
Applica |
●● Impostazione di un PIN per la IU Remota
Èpossibile impostare un PIN per accedere alla IU Remota. Proteggere la macchina da accessi non autorizzati, consentendo l'uso della macchina solo agli utenti dotati dei privilegi di accesso.
Per specificare le impostazioni in un secondo momento, fare riferimento a “Impostazione di un PIN per la IU Remota” nell'e-Manual.
 e-Manual “Impostazione di un PIN per la IU Remota”
  e-Manual “Impostazione dell'ID System Manager”
L'impostazione del PIN di |
|
3,1 DFFHVVR ,8 UHPRWD |
|
accesso IU remota è |
|
|
|
consigliabile quando si |
|
[[[[[[[ |
|
utilizza la IU remota per |
|
||
|
|
||
impedire l'accesso non |
|
|
|
autorizzato a terzi. |
|
|
|
Configurare le impostazioni? |
|
|
|
Sì |
No |
|
$SSOLFD |
|
|
|
|
Selezione del metodo di connessione della macchina
●● Connessione tramite LAN cablata
Èpossibile collegare la macchina ad un router cablato. Utilizzare i cavi LAN per collegare la macchina al router cablato (access point).
 Collegare il computer al router tramite il cavo o in modalità wireless.
 Assicurarsi che sia disponibile una porta sul router per collegare la macchina e il computer.
 Tenere a portata di mano un cavo LAN incrociato categoria 5 o superiore.
●● Connessione tramite cavo USB
Èpossibile collegare la macchina al computer tramite cavo USB.
 Verificare che il cavo USB in uso presenti il seguente simbolo.
●● Connessione tramite LAN wireless
Èpossibile collegare la macchina ad un router wireless*. Data la connessione al wireless, non sono necessari cavi LAN.
*È necessario un router wireless (access point), che rispetti gli standard IEEE802.11b/g/n.
 Collegare il computer al router tramite il cavo o in modalità wireless.
●● Connessione diretta
Collegare un dispositivo mobile alla macchina in modalità wireless e direttamente senza passare attraverso un router LAN wireless (o access point).
 e-Manual “Può essere utilizzata comodamente con un dispositivo mobile” ►“Connessione a un dispositivo mobile” ►“Connessione diretta (modo punto di accesso)”
28
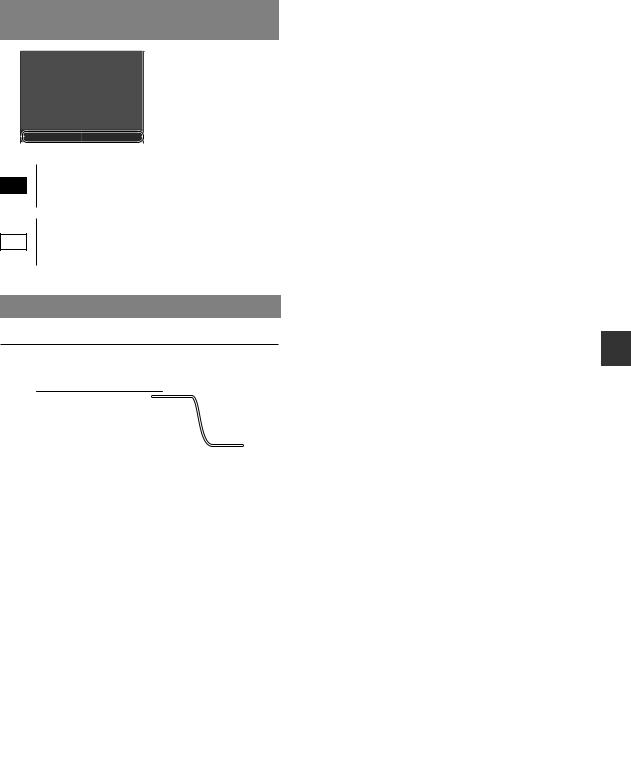
Selezione del metodo di connessione: con LAN wireless o altro metodo
Usare la rete LAN wireless per connettere il computer? È possibile configurare le impostazioni in un secondo momento.
|
Sì |
No |
|
Collegamento immediato al computer tramite LAN |
|
Sì |
wireless |
|
|
|
|
 Iniziare dal punto 4 di “Impostazione di una LAN wireless” della Guida alla configurazione LAN wireless.
Collegamento al computer tramite LAN cablata
No  Passare a “Connessione tramite LAN cablata” (Pag. 29).
Collegamento al computer tramite cavo USB
 Passare a “Connessione tramite cavo USB” (Pag. 29).
Connessione tramite LAN cablata
Verifiche prima della configurazione
Router Internet oppure
hub
Cavo LAN
Il computer e il router (o hub) sono collegati correttamente tramite cavo LAN?
Per ulteriori informazioni, consultare il manuale di istruzioni del dispositivo di rete o contattare il produttore.
Sono state definite le impostazioni di rete sul computer?
Se il computer non è configurato in modo corretto, potrebbe essere impossibile utilizzare la connessione LAN cablata anche dopo l'inserimento delle impostazioni seguenti.
NOTA
•Non è possibile utilizzare nello stesso tempo la connessione LAN cablata e LAN wireless. Inoltre, per impostazione predefinita, la macchina è impostata su “LAN cablata”.
•La connessione a un'ambiente di rete non protetto potrebbe rendere le informazioni personali accessibili a terzi. Prestare molta attenzione a questo aspetto.
•Se si utilizza una connessione LAN aziendale, contattare l'amministratore di rete.
Connessione tramite LAN cablata
1 Collegare il cavo LAN.
L'indirizzo IP verrà configurato automaticamente in 2 minuti. Per impostare l'indirizzo IP manualmente, vedere le sezioni seguenti.
 e-Manual “Rete” ►“Connessione ad una rete” ► “Impostazione indirizzi IP”
2 Installare il driver e il software utilizzando il DVDROM fornito.
 Vedere “Per i dettagli relativi alle procedure di installazione:” (Pag. 30).
Passare a “Impostazione del formato e del tipo di carta” |
|
(Pag. 30). |
It |
Connessione tramite cavo USB
Installare il driver e il software presenti nel DVD-ROM fornito con la macchina.
NOTA
Se il cavo USB è stato collegato prima dell'installazione, prima rimuovere il cavo USB, poi reinstallare.
1 |
Installare il driver e il software utilizzando il DVD- |
|
ROM “User Software and Manuals”. |
|
Vedere “Per i dettagli relativi alle procedure di |
|
installazione:” (Pag. 30). |
2 |
Collegare il cavo USB. |
 Passare a “Impostazione del formato e del tipo di carta” (Pag. 30).
29
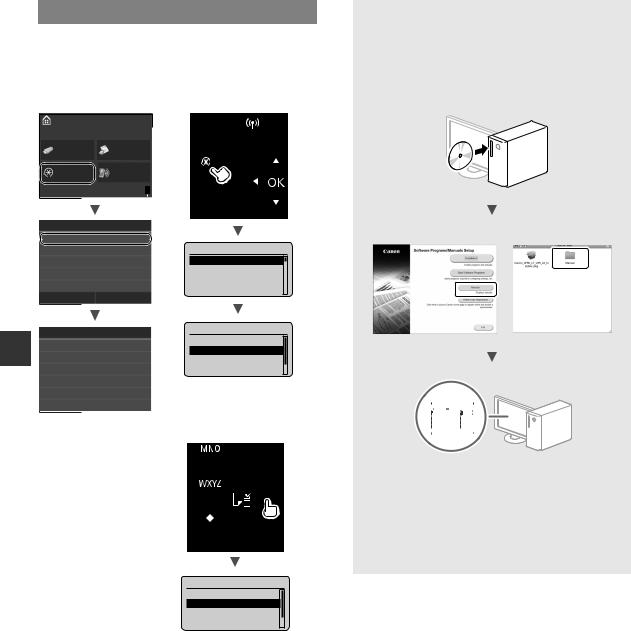
Impostazione del formato e del tipo di carta
Seguire le istruzioni visualizzate, impostare il formato e il tipo di carta. In base al modello in uso, eseguire le impostazioni come mostrato di seguito.
|
●● LBP253x |
●● LBP252dw |
|
|
Schermata principale |
||
|
Stampa |
Stampa |
|
|
supp. mem. |
protetta |
|
|
Menu |
Connessione |
|
|
diretta |
||
|
|
||
|
Menu |
|
|
|
Impostazioni carta |
|
|
|
Impostazioni rete |
Menu |
|
|
Preferenze |
Impostazioni carta |
|
|
Connessione diretta |
||
|
Impostazioni timer |
||
|
Impostazioni rete |
||
|
Impostazioni comuni |
||
|
Stampa rapporti |
||
|
|
||
|
Stampa rappor. |
||
|
Impostazioni carta |
Impostazioni carta |
|
|
Vassoio multiuso |
||
It |
Vassoio multiuso |
||
Cassetto 1 |
|||
Cassetto 1 |
|||
|
Cassetto 2 |
||
|
Cassetto 2 |
Registra carta personali |
|
|
Registra carta personalizzata |
||
|
Seleziona formati carta più uti |
||
●● LBP251dw
Impostazioni carta
Vassoio multiuso
Cassetto 1
Cassetto 2
Registra carta personali
Per i dettagli relativi alle procedure di installazione:
Installare il driver e il software utilizzando il DVD-ROM fornito. Per maggiori informazioni sulle procedure di installazione, consultare la Guida di Installazione del Driver della Stampante.
 È inoltre possibile scaricare il driver dal sito Web di Canon.
|
|
|
|
|
|
|
|
|
|
|
|
|
|
|
|
|
|
|
|
Windows |
|
|
Mac OS |
||||||
|
|
|
|
|
|
|
|
|
|
|
|
|
|
|
|
|
|
|
|
|
|
|
|
|
|
|
|
|
|
|
|
|
|
|
|
|
|
|
|
|
|
|
|
|
|
|
|
|
|
|
|
|
|
|
|
|
|
|
|
|
|
|
|
|
|
|
|
|
|
Per utenti Mac:
Il DVD-ROM fornito con questa macchina potrebbe non includere il per Mac OS. Tale condizione varia in base a quando è stato effettuato l'acquisto. I driver corretti si trovano nella home page Canon. Per ulteriori informazioni sull'installazione o sull'uso del driver, vedere la Guida di Installazione del Driver della Stampante.
30
 Loading...