


 Loading...
EOS-1D X Mark II (G)
Wired LAN Instruction Manual
This manual is for the EOS-1D X Mark II installed with firmware version 1.1.0 or later.
ENGLISH
INSTRUCTION MANUAL
Introduction
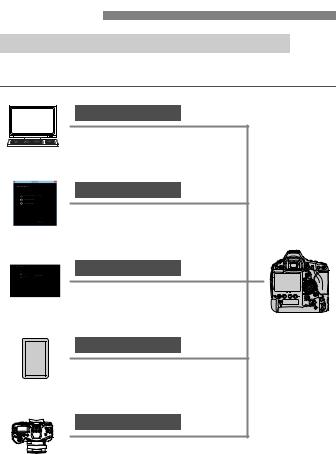
What You Can Do Using the Wired LAN Functions
Using the camera’s wired LAN functions enables you to do the following:
FTP Transfer
Transfer images to an FTP server
EOS Utility
Use EOS Utility to shoot, view, and download images remotely
WFT Server
Use a web browser to shoot, view, and download images remotely
Smartphone
Use a smartphone to shoot, view, and download images remotely
Sync the Camera Time
Synchronize time between the same camera models
2

Chapter List
|
Introduction |
2 |
|
|
|
||
|
|
|
|
1 |
Basic Network Settings |
7 |
|
|
|||
|
|
|
|
2 |
Transferring Images to an FTP Server |
21 |
|
|
|||
|
|
|
|
|
|
|
|
3 |
Operating Remotely Using EOS Utility |
39 |
|
|
|||
|
|
|
|
|
|
|
|
4 |
Operating Remotely Using WFT Server |
43 |
|
|
|||
|
|
|
|
|
|
|
|
5 |
Operating Remotely Using a Smartphone |
59 |
|
|
|||
|
|
|
|
|
|
|
|
6 |
Synchronizing the Camera Time |
67 |
|
|
|||
|
|
|
|
|
|
|
|
7 |
Terminating the Connection and Reconnecting |
71 |
|
|
|||
|
|
|
|
|
|
|
|
8 |
Checking and Operating Connection Settings |
75 |
|
|
|||
|
|
|
|
|
|
|
|
9 |
Troubleshooting Guide |
87 |
|
|
|||
|
|
|
|
|
|
|
|
10 |
Reference |
103 |
|
|
|||
|
|
|
|
|
|
|
|
3

Contents |
|
|
|
Introduction |
2 |
|
Chapter List ...................................................................................... |
3 |
|
Conventions Used in this Manual..................................................... |
6 |
1 |
Basic Network Settings |
7 |
|
LAN Cable Connection..................................................................... |
8 |
|
Preparation....................................................................................... |
9 |
|
Basic Communication Function Settings........................................ |
12 |
|
Displaying the Connection Wizard ................................................. |
16 |
2 |
Transferring Images to an FTP Server |
21 |
|
Configuring FTP Server Connection Settings ................................ |
22 |
|
Transferring Images Individually..................................................... |
27 |
|
Batch Transfer ................................................................................ |
32 |
|
Viewing Transferred Images........................................................... |
37 |
3 |
Operating Remotely Using EOS Utility |
39 |
|
Configuring EOS Utility Connection Settings ................................. |
40 |
|
Using EOS Utility............................................................................ |
42 |
4 |
Operating Remotely Using WFT Server |
43 |
|
Configuring WFT Server Connection Settings ............................... |
44 |
|
Displaying WFT Server .................................................................. |
46 |
|
Viewing Images .............................................................................. |
49 |
|
Shooting Remotely [Camera control] ............................................. |
51 |
|
Shooting Remotely [Simple control] ............................................... |
56 |
5 |
Operating Remotely Using a Smartphone |
59 |
|
Configuring Smartphone Connection Settings ............................... |
60 |
|
Operating the Camera Using a Smartphone .................................. |
62 |
|
Specifying Viewable Images........................................................... |
64 |
4

|
|
Contents |
6 |
Synchronizing the Camera Time |
67 |
|
Synchronizing the Time................................................................... |
68 |
7 |
Terminating the Connection and Reconnecting |
71 |
|
Terminating the Connection ............................................................ |
72 |
|
Reconnecting .................................................................................. |
73 |
8 |
Checking and Operating Connection Settings |
75 |
|
Displaying the Connection Settings Screen.................................... |
76 |
|
Changing Settings........................................................................... |
78 |
|
Saving and Loading Settings .......................................................... |
82 |
|
Function Settings Screen................................................................ |
84 |
9 |
Troubleshooting Guide |
87 |
|
Responding to Error Messages ...................................................... |
88 |
|
Troubleshooting Guide.................................................................. |
100 |
|
Checking Network Settings........................................................... |
101 |
10 |
Reference |
103 |
|
Creating and Registering Captions ............................................... |
104 |
|
Setting IP Address Manually......................................................... |
106 |
|
Wired LAN Specifications.............................................................. |
108 |
|
Index ............................................................................................. |
113 |
5

Conventions Used in this Manual
In this manual, the term “access point” indicates wireless LAN access points, wireless LAN routers, etc. that relay a LAN connection. These instructions should be followed only after setting up your LAN and FTP server environments. For information about setting up the environments, refer to the documentation provided with each device or contact the manufacturer.
Read the Camera Instruction Manual and familiarize yourself with operating the camera before following the instructions on camera options.
Icons in this Manual
<6> : Indicates the Main Dial.
<5> : Indicates the Quick Control Dial. <9> : Indicates the Multi-controller. <0> : Indicates the Setting button.
*In addition to the above, the icons and symbols used on the camera’s buttons and displayed on the LCD monitor are also used in this manual when discussing relevant operations and functionality.
(p.**) : Reference page numbers for more information.
 : Warnings to prevent potential problems during operation.
 : Supplemental information.
Basic Assumptions
All operations explained in this manual assume that the power switch is set to <1>.
It is assumed that all the menu settings, Custom Functions, etc. are set to their defaults.
Image transfer, remote shooting, or viewing images requires adequate knowledge of configuring your wired LAN and FTP server. Canon cannot provide support for configuring wired LANs or FTP servers.
Note that Canon cannot be held liable for any loss or damage to the camera from erroneous network or FTP server settings. In addition, Canon cannot be held liable for any other loss or damage caused by use of the camera.
When using wired LAN functions, establish appropriate security at your own risk and discretion. Canon cannot be held liable for any loss or damage caused by unauthorized access or other security breaches.
6

1
Basic Network Settings
Complete the basic network settings by using the menu screen on the camera’s LCD monitor.
7
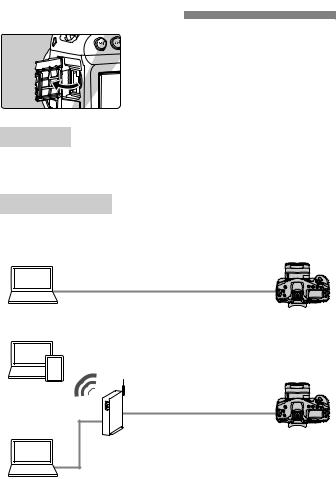
LAN Cable Connection
Connecting a LAN Cable
Open the Ethernet RJ-45 terminal cover, then connect the camera to a computer, access point, etc. with a LAN cable.
LAN Cable
Use a highly shielded Category 5e or higher STP (Shielded Twisted Pair) Gigabit Ethernet cable.
Connection Types
The connection types shown below are available for connecting the camera to a computer, smartphone, etc. over a LAN.
LAN cable
Wireless
LAN cable
Access point or router
LAN cable
8

Preparation
The connection instructions help you connect the camera to a network that is already set up.
Connect a device such as a computer or smartphone to the network in advance so that you can connect it to the camera.
[FTP trans.]
You can transfer captured images to an FTP server.
Images can be automatically transferred as you shoot them, or you can select images to be transferred later.
Computer Operating Systems
Use of [FTP trans.] requires that one of the following operating systems be installed on a computer. In addition, the computer must be set up as an FTP server in advance.
•Windows 8, Windows 8 Pro, Windows 8.1, Windows 8.1 Pro
•Windows 7 (Professional, Enterprise, or Ultimate Edition for 32or 64-bit systems)
•Windows Vista (Business, Enterprise, or Ultimate Edition for 32or 64-bit systems)
For instructions on setting up a computer as an FTP server, refer to the documentation provided with each device or contact the manufacturer.
Note that the following operating systems cannot be used because FTP server functionality is not provided.
•Windows 7 Home Premium
•Windows Vista Home Premium or Home Basic Edition
9

Preparation
[EOSUtility]
You can perform remote shooting over a wired LAN using EOS Utility (EOS software).
In addition to remote shooting, almost all EOS Utility camera operations are supported, because this option utilizes a wired LAN instead of an interface cable.
Requires a computer with EOS Utility (EOS software) installed.
[WFTserver]
You can perform advanced remote shooting or view images stored in the camera by connecting to the camera from a web browser on a computer, smartphone, or other device, as easily as accessing a website.
Browsers
The following operating systems and web browsers have been confirmed to be compatible with this camera. Depending on your environment, operation may differ.
Windows 8.1, Windows 7: Google Chrome Ver. 44 Windows 8.1, Windows 7: Internet Explorer 11
OS X (operating system version 10.10): Safari Ver. 8.0 iOS (operating system version 8.4): Safari
Android (operating system version 4.4): Google Chrome
*Operation on the above operating systems and web browsers cannot be guaranteed for all the terminals.
*Not available unless the web browser is set to allow cookies.
*Not available unless the web browser is set to use JavaScript.
*Movies cannot be played back unless the web browser supports HTML 5.
10
Preparation
[Smartphone]
You can perform basic remote shooting or view images stored in the camera on a smartphone or tablet.
To use this function, the camera must be connected to an access point over a wired LAN.
In addition, the dedicated application Camera Connect (free of charge) must be installed on a smartphone on which iOS or Android is installed.
•Camera Connect can be downloaded from the App Store or Google Play.
•For the operating system versions supported by Camera Connect, refer to the download site of Camera Connect.
•The interface and functionality of the camera and Camera Connect are subject to change due to firmware updates for the camera or application updates for Camera Connect, iOS, Android, etc. In such a case, features of the camera or Camera Connect may differ
from sample screens or operation instructions in this manual. In this manual and on the camera’s LCD monitor, “smartphone” refers to smartphones and tablets.
[Sync time between cameras]
You can set the master camera time on up to 10 slave cameras. Note that even after synchronization, there will be a slight margin of error between master and slave camera time of ±0.05 seconds, at most.
Set up multiple cameras of the same camera model.
11
Basic Communication Function Settings
First, configure basic communication function settings.
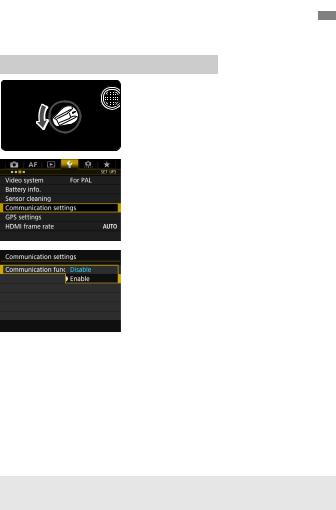
Setting the Communication Function

 1 Turn the camera on.
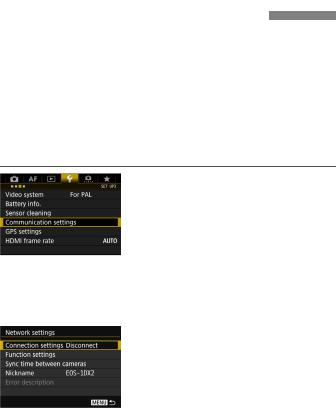
2 Select [Communication settings].
On the camera, press the <M> button.
Under the [53] tab, select [Communication settings], then press <0>.
3 Select [Enable] in [Communication func].
X [Network settings] is now available.
 If [z1: Multiple exposure] is set to any setting other than [Disable], [53: Communication settings] cannot be selected.
12
Basic Communication Function Settings
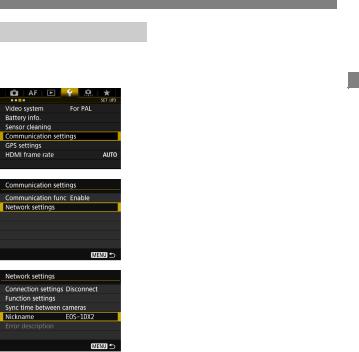
Registering a Nickname
Set a nickname (for identification) for the camera.
When the camera is connected to another device over a LAN, the nickname will be displayed on the device.
1
2
Select [Communication settings].
Under the [53] tab, select [Communication settings], then press <0>.
Select [Network settings].
Set [Communication func] to [Enable], then select [Network settings].
3 Select [Nickname].
13
Basic Communication Function Settings
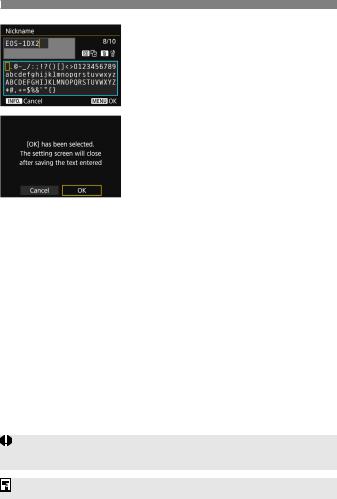
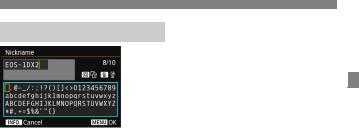
4 Enter a nickname.
For instructions on entering characters, see the next page.
Enter any characters between 1 to 10 characters in length.
5 Exit the setting.
When you are finished, press the <M> button.
Select [OK] on the confirmation dialog and press <0> to return to the menu screen.
The basic settings for the communication function are now complete.
For information on syncing the camera time, see the explanation starting on page 67. For information on other functions, see the explanations starting on page 16.
Since the nickname is mandatory information for a LAN connection, you cannot delete all the characters.
By default, the camera name will be displayed for the nickname.
14
Basic Communication Function Settings
Virtual Keyboard Operation
Changing the entry area
Press the <Q> button to toggle between the top and bottom entry areas.
Moving the cursor
Use <5> or <9> in the top area to move the cursor.
Entering text
In the bottom area, use <5> or <9> to select a character, then press <0> to enter it.
You can check how many characters you have entered, and how many more can be entered, by referring to [*/*] on the upper right of the screen.
Deleting a character
Press the <L> button to delete one character.
Finishing the text entry
Press the <M> button to confirm what you have entered and exit. If a confirmation dialog is displayed, select [OK] to exit.
Canceling the text entry
Press the <B> button to cancel text entry and exit. If a confirmation dialog is displayed, select [OK] to exit.
15
Displaying the Connection Wizard
This section describes the process following the connection instructions. If an error is displayed, see “Troubleshooting Guide” in Chapter 9 (p.87) and check the settings.
Pressing the shutter button or other camera controls during configuration using the connection instructions will close the connection instructions. Do not press the shutter button or other controls until configuration is finished.
Under the [52] tab, set [Auto power off] to [Disable]. If auto power off is activated, the connection instructions will be closed during the configuration process.
1
 2
2
Select [Communication settings].
Under the [53] tab, select [Communication settings], then press <0>.
Select [Network settings].
Set [Communication func] to [Enable], then select [Network settings].
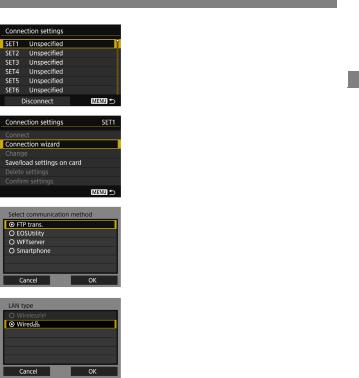
3 Select [Connection settings].
16
Displaying the Connection Wizard
4
5
Select [SET*].
Select [Connection wizard].
The [Select communication method] screen is displayed.
XThe <Y> lamp on the camera will blink in green.
6 Select the communication method.
Select the communication method by referring to page 9.
Select [OK] and press <0> to go to the next screen.
7 Select [Wired].
Select [OK] and press <0> to go to the next screen.
17
Displaying the Connection Wizard
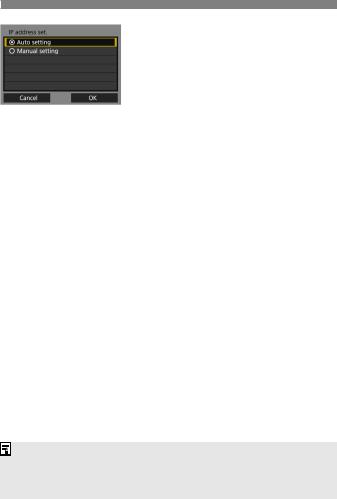
8 Select [Auto setting].
Select [OK] and press <0> to display the setting screen for the communication method (p.19).
If [Auto setting] results in an error or if you want to specify the settings manually, see page 106.
The IP address can only be set automatically in environments using DHCP servers, or access points or routers with DHCP server functionality, such that IP addresses and related settings are assigned and configured automatically.
18
Displaying the Connection Wizard
Completing Settings for the Communication Method
The following instructions are for settings screens that vary depending on the communication method. Read the page that introduces the selected communication method.
FTP Transfer
Chapter 2 (p.21)
EOS Utility
Chapter 3 (p.39)
WFT Server
Chapter 4 (p.43)
Smartphone
Chapter 5 (p.59)
19

20
2
Transferring Images to an FTP Server
By connecting to an FTP server, you can transfer images stored in the camera to a computer.
With FTP transfer, you can automatically transfer images to the FTP server as you shoot or transfer a set of shots together.
The instructions in this chapter are continued from Chapter 1.
21
Configuring FTP Server Connection Settings 
These instructions are continued from Chapter 1.
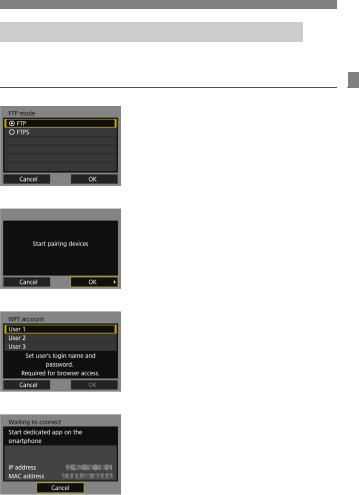
1 Select an FTP mode.
To establish security for FTP transfer using a root certificate, select [FTPS]. For root certificate settings, see page 25.
Select [OK] and press <0> to go to the next screen.
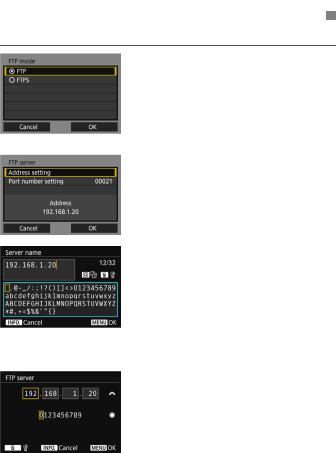
2 Select [Address setting].
X The virtual keyboard is displayed.
3 Enter the FTP server’s server name or IP address.
If you have set the IP address setting to [Auto setting] or the DNS address setting to [Manual setting], the screen on the left is displayed.
For instructions on screen operations, see “Virtual Keyboard Operation” (p.15).
If you have set the DNS address setting to [Disable], the screen on the left is displayed.
Turn the <6> dial to move the input position in the upper area and turn the <5> dial to select the number. Press <0> to enter the selected number.
22
Configuring FTP Server Connection Settings
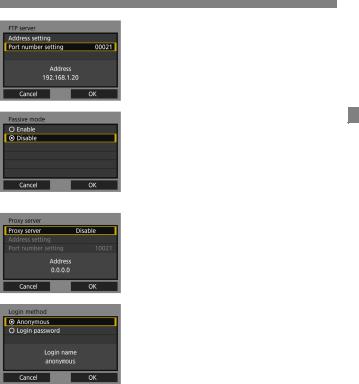
4 Set the port number.
[Port number setting] should usually be 00021.
Select [OK] and press <0> to go to the next screen.
5 Set the passive mode setting.
Select [OK] and press <0> to go to the next screen.
If an Error 41 (“Cannot connect to FTP server”) is displayed in step 8, setting [Passive mode] to [Enable] may resolve it.
6
7
Set the proxy server.
Select [OK] and press <0> to go to the next screen.
Set the login method.
Select [OK] and press <0> to go to the next screen.
23
Configuring FTP Server Connection Settings
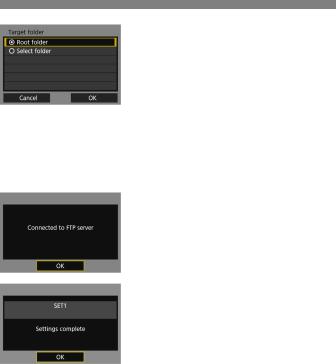
8 Set the target folder.
Select [Root folder] to have images saved in the root folder as specified in FTP server settings (p.37).
Select [Select folder] to specify a target folder in the root folder. If no folder exists, a folder will be created automatically.
Select [OK] and press <0> to go to the next screen.
XThe <Y> lamp on the camera will light up in green.
9 Select [OK].
Press <0>. A connection completion screen will appear.
10 Select [OK].
Press <0> to return to the [Network settings] screen.
The connection settings for FTP transfer are now complete.
During image transfer, the <Y> lamp on the camera blinks in green.
24
Configuring FTP Server Connection Settings
Importing a Root Certificate for FTPS
If the FTP mode is set to [FTPS] when configuring the connection settings, the same root certificate as the FTP server must be imported to the camera.
Only the root certificate whose file name is “root.cer”, “root.crt”, or “root.pem” can be imported to the camera.
Only one root certificate file can be imported to the camera. Insert a card containing the root certificate file in advance.
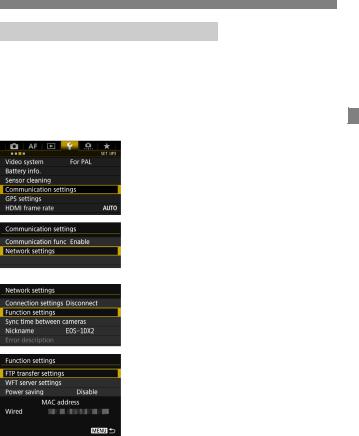
1 Select [Communication settings].
Under the [53] tab, select [Communication settings], then press <0>.
 2
2
3
Select [Network settings].
Set [Communication func] to [Enable], then select [Network settings].
Select [Function settings].
4 Select [FTP transfer settings].
25
Configuring FTP Server Connection Settings
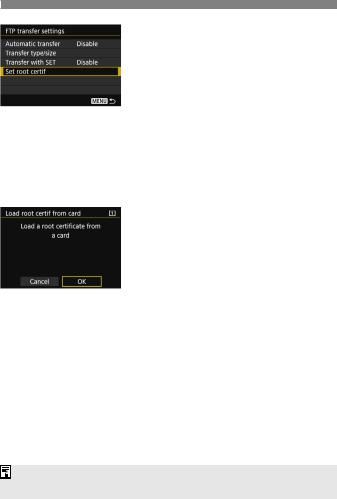
5 Select [Set root certif].
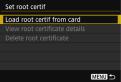 6 Selectcard]. [Load root certif from
7 Select [OK].
X The root certificate is imported. Select [OK] on the confirmation dialog to return to the [Set root certif] screen.
Select [Delete root certificate] on the screen for step 6 to delete the root certificate imported to the camera. Select [View root certificate details] to check the issuer, subject, validity period, and other information.
You can import a certificate from the card selected for [Record/play] or [Playback] under [51: Record func+card/folder sel.].
26

Transferring Images Individually
Automatic Image Transfer After Each Shot
An image can be automatically transferred to the FTP server immediately after shooting. You can also continue still photo shooting even while images are being transferred.
Before shooting, be sure to insert a card into the camera. If you shoot without recording images, they cannot be transferred. Note that automatic transfer of movies during shooting is not
supported. Transfer the movie after shooting, as described on pages 32-36.
1 Select [Communication settings].
Under the [53] tab, select [Communication settings], then press <0>.
 2
2
3
Select [Network settings].
Set [Communication func] to [Enable], then select [Network settings].
Select [Function settings].
4 Select [FTP transfer settings].
27
Transferring Images Individually
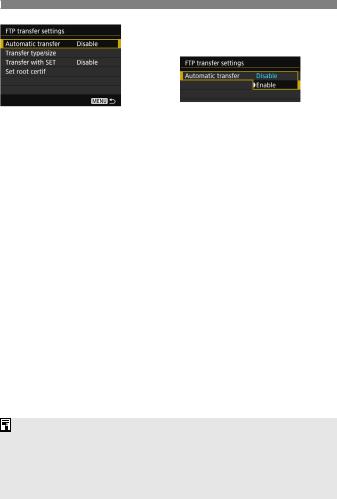
5
6
Select [Automatic transfer].
Select [Enable].
Take the picture.
XThe captured image is transferred to the FTP server.
During continuous shooting, images are transferred to the FTP server in the order they are captured.
The captured images are also stored on the card.
Any images for which transfer fails or is interrupted will be transferred automatically when the connection is recovered (p.31). These images can also be re-transferred in batch at a later time (p.32).
28
Transferring Images Individually
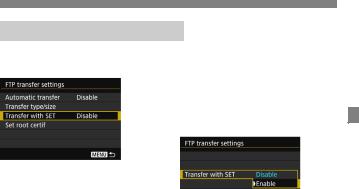
Transferring the Current Image
Simply play back an image and press <0> to transfer it. You can also continue still photo shooting even while images are being transferred.
1
2
Select [Transfer with SET].
On the setting screen of FTP transfer, select [Transfer with SET].
Select [Enable].
Select the image.
Press the <x> button on the camera.
Select the image to transfer, then press <0> to transfer the image.
Movies cannot be transferred this way. Selecting a movie and pressing <0> will display the movie playback panel.
29
Transferring Images Individually
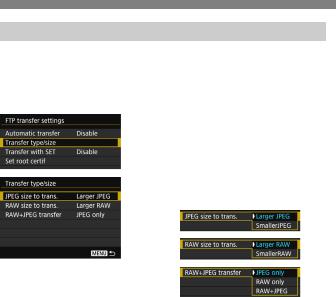
Selecting Particular Sizes or Types of Images to Transfer
You can select which images to transfer when recording images of different sizes to a CF card and CFast card simultaneously, or when shooting in RAW+JPEG image quality.
Select [Transfer type/size] in step 5 on page 28 to select the size or type of images to transfer.
1 Select [Transfer type/size].
2 Select the size and type of images to transfer.
To transfer smaller JPEGs when the camera is set up to record larger JPEGs to either a CF card or CFast card and smaller JPEGs to the other, set [JPEG size to trans.] to [SmallerJPEG].
When the camera is set up to record RAW images to either a CF card or CFast card and JPEGs to the other, specify which images to transfer in the [RAW+JPEG transfer] setting. Similarly, complete the same setting when RAW+JPEG images are recorded simultaneously to a single card.
When images of the same size are recorded to both a CF card and CFast card simultaneously, images recorded to the card selected for [Record/play] or [Playback] in [Record func+card/folder sel.] under the [51] tab are transferred.
30
Loading...