


 Loading...
Basic Operation Guide
After you finish reading this guide, store it in a safe place for future reference. |
ENG |

How to Use This Manual
How to Use This Manual
This manual describes the following functions, operations, and maintenance procedures.
•Functions that can be operated from the touch panel display of the machine
•Remote UI functions that can operate the machine from a computer
•Printing from a computer
•Routine Maintenance Procedures
•Clearing paper jams/staple jams
Store this manual next to the machine so it can be used when the user encounters trouble operating the machine.
*Some functions explained in this manual may require optional equipment.
*Screen shots used in this manual may differ from the ones you actually see.
Contents
■ Before You Start Using This Machine
What This Machine Can Do• • • • • • • • • • • • • • • • • • • • • • • • • • • • • • • • • • • • • • • • • • • • • • • • • • • • • • • • • • • • • • • • • • • • • • • •10 Main Power and Energy Saver Key• • • • • • • • • • • • • • • • • • • • • • • • • • • • • • • • • • • • • • • • • • • • • • • • • • • • • • • • • • • • • • • • • •12 Parts and Their Functions • • • • • • • • • • • • • • • • • • • • • • • • • • • • • • • • • • • • • • • • • • • • • • • • • • • • • • • • • • • • • • • • • • • • • • • • •14 Control Panel and Touch Panel Display • • • • • • • • • • • • • • • • • • • • • • • • • • • • • • • • • • • • • • • • • • • • • • • • • • • • • • • • • • • • • •20 Main Menu Screen Settings • • • • • • • • • • • • • • • • • • • • • • • • • • • • • • • • • • • • • • • • • • • • • • • • • • • • • • • • • • • • • • • • • • • • • • •22 Changing Settings According to Your Needs • • • • • • • • • • • • • • • • • • • • • • • • • • • • • • • • • • • • • • • • • • • • • • • • • • • • • • • • •24
■ Flow of Basic Operations
How to Make a Copy• • • • • • • • • • • • • • • • • • • • • • • • • • • • • • • • • • • • • • • • • • • • • • • • • • • • • • • • • • • • • • • • • • • • • • • • • • • • •26 Things You Can Do with the Copy Functions • • • • • • • • • • • • • • • • • • • • • • • • • • • • • • • • • • • • • • • • • • • • • • • • • • • • • • • • •28 Sending a Fax • • • • • • • • • • • • • • • • • • • • • • • • • • • • • • • • • • • • • • • • • • • • • • • • • • • • • • • • • • • • • • • • • • • • • • • • • • • • • • • • • •32 Things You Can Do with the Fax Functions • • • • • • • • • • • • • • • • • • • • • • • • • • • • • • • • • • • • • • • • • • • • • • • • • • • • • • • • • • •34 Sending Scanned Data (E-Mail/I-Fax/File Servers) • • • • • • • • • • • • • • • • • • • • • • • • • • • • • • • • • • • • • • • • • • • • • • • • • • • • •38 Things You Can Do with the Scan and Send Functions • • • • • • • • • • • • • • • • • • • • • • • • • • • • • • • • • • • • • • • • • • • • • • • • •40 Storing Scanned Data• • • • • • • • • • • • • • • • • • • • • • • • • • • • • • • • • • • • • • • • • • • • • • • • • • • • • • • • • • • • • • • • • • • • • • • • • • • •44 Things You Can Do with the Scan and Store Functions • • • • • • • • • • • • • • • • • • • • • • • • • • • • • • • • • • • • • • • • • • • • • • • • •46 Printing Stored Data • • • • • • • • • • • • • • • • • • • • • • • • • • • • • • • • • • • • • • • • • • • • • • • • • • • • • • • • • • • • • • • • • • • • • • • • • • • • •48 Sending Stored Data• • • • • • • • • • • • • • • • • • • • • • • • • • • • • • • • • • • • • • • • • • • • • • • • • • • • • • • • • • • • • • • • • • • • • • • • • • • • •50 Things You Can Do with the Access Stored Files Functions (File Operation)• • • • • • • • • • • • • • • • • • • • • • • • • • • • • • • • •52 Things You Can Do with the Access Stored Files Functions (Print) • • • • • • • • • • • • • • • • • • • • • • • • • • • • • • • • • • • • • • • •53 Things You Can Do with the Access Stored Files Functions (Send) • • • • • • • • • • • • • • • • • • • • • • • • • • • • • • • • • • • • • • • •56 Operating the Machine from a Computer (Remote UI) • • • • • • • • • • • • • • • • • • • • • • • • • • • • • • • • • • • • • • • • • • • • • • • • •58 Printing from a Computer • • • • • • • • • • • • • • • • • • • • • • • • • • • • • • • • • • • • • • • • • • • • • • • • • • • • • • • • • • • • • • • • • • • • • • • •60
■ Routine Maintenance
Loading Paper • • • • • • • • • • • • • • • • • • • • • • • • • • • • • • • • • • • • • • • • • • • • • • • • • • • • • • • • • • • • • • • • • • • • • • • • • • • • • • • • • •64 Loading Tab Paper Using the Tab Feeding Attachment Kit-B1 (Optional)• • • • • • • • • • • • • • • • • • • • • • • • • • • • • • • • • • •73 Loading Envelopes Using the Envelope Feeder Attachment-D1 (Optional)• • • • • • • • • • • • • • • • • • • • • • • • • • • • • • • • •76 Replacing the Stamp Cartridge (Feeder) • • • • • • • • • • • • • • • • • • • • • • • • • • • • • • • • • • • • • • • • • • • • • • • • • • • • • • • • • • • • •83 Replacing the Staple Cartridge (For Optional Products) • • • • • • • • • • • • • • • • • • • • • • • • • • • • • • • • • • • • • • • • • • • • • • • •87 Removing Punch Waste (External 2/3 Hole Puncher-B2) • • • • • • • • • • • • • • • • • • • • • • • • • • • • • • • • • • • • • • • • • • • • • • • •94 Replacing the Toner Cartridge • • • • • • • • • • • • • • • • • • • • • • • • • • • • • • • • • • • • • • • • • • • • • • • • • • • • • • • • • • • • • • • • • • • • •96 Replacing the Waste Toner Container • • • • • • • • • • • • • • • • • • • • • • • • • • • • • • • • • • • • • • • • • • • • • • • • • • • • • • • • • • • • • •102 Routine Cleaning • • • • • • • • • • • • • • • • • • • • • • • • • • • • • • • • • • • • • • • • • • • • • • • • • • • • • • • • • • • • • • • • • • • • • • • • • • • • • •105 Consumables• • • • • • • • • • • • • • • • • • • • • • • • • • • • • • • • • • • • • • • • • • • • • • • • • • • • • • • • • • • • • • • • • • • • • • • • • • • • • • • • • •114
2

■ Troubleshooting
Clearing Paper Jams • • • • • • • • • • • • • • • • • • • • • • • • • • • • • • • • • • • • • • • • • • • • • • • • • • • • • • • • • • • • • • • • • • • • • • • • • • • •118 Reducing the Frequency of Paper Jams • • • • • • • • • • • • • • • • • • • • • • • • • • • • • • • • • • • • • • • • • • • • • • • • • • • • • • • • • • • •150 Clearing Staple Jams (For Optional Products)• • • • • • • • • • • • • • • • • • • • • • • • • • • • • • • • • • • • • • • • • • • • • • • • • • • • • • • •151 If Memory Becomes Full During Scanning • • • • • • • • • • • • • • • • • • • • • • • • • • • • • • • • • • • • • • • • • • • • • • • • • • • • • • • • • •159 When an Error Message Is Displayed• • • • • • • • • • • • • • • • • • • • • • • • • • • • • • • • • • • • • • • • • • • • • • • • • • • • • • • • • • • • • • •161 When an Error Code Is Displayed• • • • • • • • • • • • • • • • • • • • • • • • • • • • • • • • • • • • • • • • • • • • • • • • • • • • • • • • • • • • • • • • • •162 Printer/Fax Driver Troubleshooting • • • • • • • • • • • • • • • • • • • • • • • • • • • • • • • • • • • • • • • • • • • • • • • • • • • • • • • • • • • • • • • •163 Service Call Message• • • • • • • • • • • • • • • • • • • • • • • • • • • • • • • • • • • • • • • • • • • • • • • • • • • • • • • • • • • • • • • • • • • • • • • • • • • •164 Frequently Asked Questions • • • • • • • • • • • • • • • • • • • • • • • • • • • • • • • • • • • • • • • • • • • • • • • • • • • • • • • • • • • • • • • • • • • • •170
Manual This Use to How
3
How to Use This Manual
Refer to the following manuals included with your machine according to your needs.
●Before Using This Machine
■Describes precautions for using the machine.
■Includes the specifications of the machine.
Before Using This Machine
Read this guide first.
Please read this guide before operating this product. |
|
After you finish reading this guide, store it in a safe place for future reference. |
ENG |
●Setup Guide
■Describes the settings required before using functions, such as the network settings for sending e-mail.
■Describes how to add applications and update the firmware.
Setup Guide
|
|
After you finish reading this guide, store it in a safe place for future reference. |
ENG |
●Basic Operation Guide (This Manual)
■Provides an overview of the functions and describes the basic operations.
■Describes the maintenance and troubleshooting procedures for the machine.
Basic Operation Guide
|
|
After you finish reading this guide, store it in a safe place for future reference. |
ENG |
4
●e-Manual
■ Describes all the functions of the machine. Also provided with a
search function that is useful for finding and checking information.
■Includes “Practical Workflows,” which introduces flows of practical operations using functions of the machine.
●Driver Installation Guide
■Provides instructions on installing the printer, fax, and other drivers.
• Printer Driver Installation Guide
• Mac Printer Driver Installation Guide
•Fax Driver Installation Guide
•Network ScanGear Installation Guide
■Included on the same CD-ROM as each driver.
Symbols Used in This Manual
The following symbols are used in this manual to explain procedures, restrictions, handling precautions, and instructions that should be observed for safety.
Indicates a warning concerning operations that may lead to death or injury to persons if not performed correctly. To use the machine safely, always pay attention to these warnings.
Indicates a caution concerning operations that may lead to injury to persons if not performed correctly. To use the machine safely, always pay attention to these cautions.
Indicates operational requirements and restrictions. Be sure to read these items carefully to operate the machine correctly, and avoid damage to the machine or property.
Indicates a clarification of an operation, or contains additional explanations for a procedure. Reading these notes is highly recommended.
Indicates an operation that must not be performed. Read these items carefully, and make sure not to perform the described operations.
Manual This Use to How
5

How to Use This Manual (e-Manual)
● Follow the procedure below to install the e-Manual.
● Windows
1. Insert the e-Manual CD-ROM into your computer. 2. Select the language for the e-Manual.
3. Select [Install].
If you select [Display Manuals], the e-Manual is displayed without installation. 4. Read the License Agreement, and then click [Yes].
The e-Manual is saved in the [Documents]* folder on your computer. If the shortcut icon is created on the Desktop or if the [index. html] file is double-clicked, the e-Manual is displayed.
*The folder name differs, depending on your operating system. The folder name is [Documents] if you are using Windows Vista/7/8 and [My Documents] if you are using Windows 2000/XP.
●Macintosh
1. Insert the e-Manual CD-ROM into your computer.
2. Drag-and-drop the [iRADV_C5255_Manual_us] folder to the location you want to save it.
3. Double-click the index.html file inside the [iRADV_C5255_Manual_us] folder to display the e-Manual.
•Depending on the operating system you are using, a security protection message may appear. In this case, allow the content to be displayed.
•When you start the e-Manual, the following page (the top page) appears.
■If the e-Manual (CD-ROM) Does Not Start
The CD-ROM auto run function may be disabled. In this case, perform the following procedure.
• Windows 8/Server 2012
1. Show the Desktop click the File Explorer icon on the taskbar. 2. Click [Computer].
3. Double-click the e-Manual icon. 4. Double-click [Maninst.exe].
• Windows Vista/7/Server 2008
1. Click [Start] on the Windows taskbar click [Computer]. 2. Double-click the e-Manual icon.
3. Double-click [Maninst.exe].
• Windows XP/Server 2003
1. Click [Start] on the Windows taskbar click [My Computer]. 2. Double-click the e-Manual icon.
3. Double-click [Maninst.exe].
• Windows 2000
1. Double-click [My Computer] on the desktop. 2. Double-click the e-Manual icon.
3. Double-click [Maninst.exe].
6
3 4 5 6
|
|
|
|
|
1 |
2 |
7 |
|
|||
|
|
|
|
8
13 12 11 10 9
1 Enter keyword(s) here |
|
8 Select from purpose |
Enter a keyword in the search dialog box, and press |
. The |
This section includes the introduction of functions of the machine for |
search results page is displayed. |
|
each purpose. |
2Select from functions
The instructions of each function and operation method are described.
3[Top]
The top page of the e-Manual is displayed.
4[Site map]
The site map of the e-Manual is displayed.
5[Help]
The usage of the e-Manual is displayed.
6[Glossary]
The glossary is displayed.
7First of all…
9[Office Locations]
Inquiries for the machine are displayed.
10 [Third Party Software]
The information about the third party software is displayed.
11 [Trademarks]
The trademarks are displayed.
12 [Copyright]
The information of copyrights is displayed.
13 [Disclaimers]
The disclaimers are displayed.
This section describes the required information to use the machine, and the information of optional product and software.
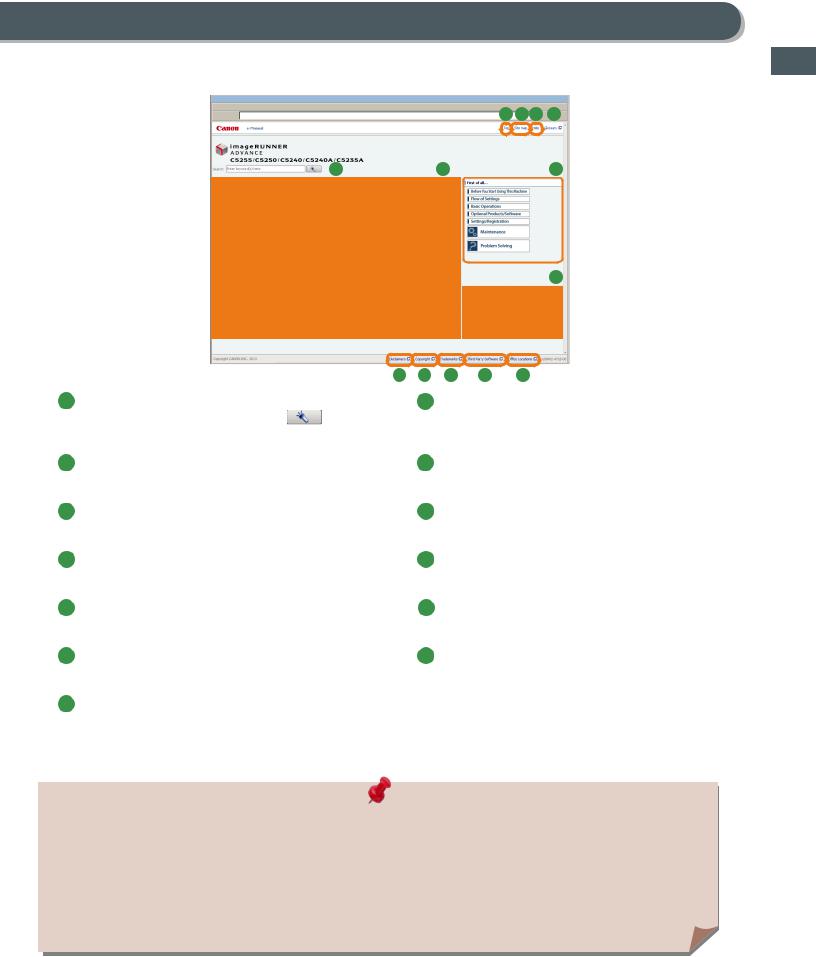
■ Performing a Search
Enter a keyword in the entry field which is located at the top of the “Top page” or on the search area in the “Topic page,” and then click  to display the search results.
■Printing a Topic Page
•On a topic page, you can print by category or by topic.
•Depending on the settings of the Web browser, the background color and images of the topic page may not be printed.
Manual This Use to How
7

MEMO
8

Before You Start Using This Machine
Before You Start Using This |
1 |
Machine |
What This Machine Can Do . . . . . . . . . . . . . . . . . . . . . . . . . . . . . . . . . . . . . . . . 10
Main Power and Energy Saver Key . . . . . . . . . . . . . . . . . . . . . . . . . . . . . . . . . 12
Parts and Their Functions . . . . . . . . . . . . . . . . . . . . . . . . . . . . . . . . . . . . . . . . . 14
External View• • • • • • • • • • • • • • • • • • • • • • • • • • • • • • • • • • • • • • • • • • • • • • • • • • • • • • • • • • • • • • • • • • • • • • • • • • • • • • • • • • • • • • • • • • • • • • • • • • • • 14 Internal View • • • • • • • • • • • • • • • • • • • • • • • • • • • • • • • • • • • • • • • • • • • • • • • • • • • • • • • • • • • • • • • • • • • • • • • • • • • • • • • • • • • • • • • • • • • • • • • • • • • • 16 Feeder • • • • • • • • • • • • • • • • • • • • • • • • • • • • • • • • • • • • • • • • • • • • • • • • • • • • • • • • • • • • • • • • • • • • • • • • • • • • • • • • • • • • • • • • • • • • • • • • • • • • • • • • • 18
Control Panel and Touch Panel Display. . . . . . . . . . . . . . . . . . . . . . . . . . . . . 20 Main Menu Screen Settings . . . . . . . . . . . . . . . . . . . . . . . . . . . . . . . . . . . . . . . 22 Changing Settings According to Your Needs. . . . . . . . . . . . . . . . . . . . . . . . 24
9
Before You Start Using This Machine
What This Machine Can Do
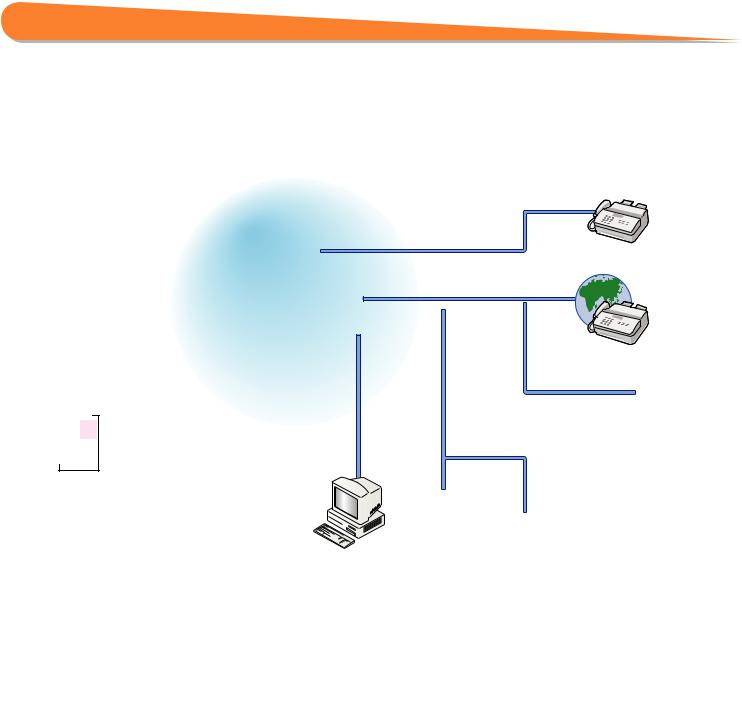
Revolutionary Documentation Work with an Evolving Multitasking Machine
|
|
|
|
Send Outside |
|
|
|
|
|
the Company |
Fax |
Original |
Color Scan |
|
|
|
|
Function |
|
|
|
||
|
|
|
Telephone Line |
|
|
|
|
|
Fax |
|
|
|
|
|
|
|
|
|
|
|
Function |
|
I-Fax |
1 |
2 |
|
|
|
|
|
|
|
|
||
|
3 |
|
|
|
|
|
4 |
|
Send |
|
|
|
|
|
Internet |
|
|
|
Copy |
|
Function |
|
|
|
|
|
|
||
|
MEAP |
|
|
|
|
|
Function |
|
|
|
|
|
Function |
|
|
|
|
|
|
|
|
|
|
|
|
|
|
|
|
Copy/Print |
LAN |
|
|
||
|
|
Function |
|
|
|
|
|
|
|
|
|
|
|
|
Remote UI |
|
|
1 |
2 |
|
Function |
|
|
|
3 |
|
|
|
|
|
4 |
|
|
|
|
|
|
|
|
|
|
|
|
|
|
|
|
|
|
|
|
|
|
|
|
|
|
|
|
|
|
|
|
|
|
|
|
|
|
|
|
|
|
|
|
|
|
|
|
|
|
|
|
|
|
|
|
|
|
|
|
|
|
|
|
|
|
|
|
|
|
|
|
|
|
|
|
|
|
|
|
|
|
|
|
|
|
|
|
|
|
|
|
|
|
|
In-Company |
|
|
|
|||||||||
File Server |
||||||||||||
Computer |
|
|
|
|
|
|
|
|
|
|||
The imageRUNNER ADVANCE C5255/C5250/C5240/C5240A/C5235A incorporates a rich array of input and output features that can greatly enhance your efficiency. Equipped with features that meet the needs of document work in a digitized office, the imageRUNNER ADVANCE C5255/C5250/C5240/C5240A/ C5235A represents the ultimate in a color digital multitasking machines.
● Copy
You can make two-sided copies from one-sided originals or copy two pages onto one side of the paper to reduce printing cost. There are other modes, such as the Collate modes. (p. 26)
● Fax
Scanned documents as well as stored files and computer data can be sent by facsimile. You can also send documents to multiple addresses and forward received facsimile to another destination. Also, by using Remote Fax sending function, you can share the Fax function on the same network. (p. 32)
10
●Send Documents (E-Mail/Fax/I-Fax/File
Server/Store in Mail Box)
You can send scanned documents by e-mail or I-fax, as well as store them on a network file server. You can also store sent documents in the Mail Box. (p. 38)
● Use Mail Box (Store/Print/Send)
You can store scanned documents or data from a computer in a mail box. You can print documents stored in a mail box, and sent them to other destinations. (p. 44, p. 48)
● Use Memory Media
You can scan and store documents in the memory media connected to the USB port. You can also print stored files directly from the memory media. (p. 44, p. 48)
● Use Advanced Box
You can set a file format to the scanned document so that it can be accessed from your computer. You can also store files in the Advanced Box with a file format that can be used on your computer.
The stored data can be shared by accessing it from a computer.
The Advanced Box can also be accessed from other imageRUNNER ADVANCE machines for operations, such as printing stored data. (p. 44, p. 48)
● Use Remote Scanner |
|
● Print Secured File |
You can use this machine as a remote scanner by TWAIN compatible |
|
You can send print data protected with a PIN/password from a |
computer software. You can scan up to 11” x 17” in size at a resolution |
|
computer to the machine. This data can be printed only by entering |
of 600 x 600 dpi. (See e-Manual > Scanner.) |
|
the correct PIN/password on the machine. This enables you to print |
|
|
without unauthorized people viewing your data. (See e-Manual > |
|
|
Secure Print.) |
●Printing a Fax/I-Fax File in the Memory RX inbox
If Memory RX is set, files received by Fax/I-Fax function are not printed, but stored in the Memory RX Inbox. You can print the stored files whenever necessary. This can help prevent outputs being forgotten at the machine. (See e-Manual > Fax/I-Fax Inbox.)
* Some functions explained in this manual may require optional equipment.
● View Web Page
You can use this machine to browse Web pages from the touch panel display of the machine or print PDF files on the Web pages. (See e-Manual > Web Access.)
Machine This Using Start You Before
11
Main Power and Energy Saver Key
This section describes how to use the main power switch and the Energy Saver key.
Do not connect or disconnect the power cord with wet hands, as this may result in electrical shock.
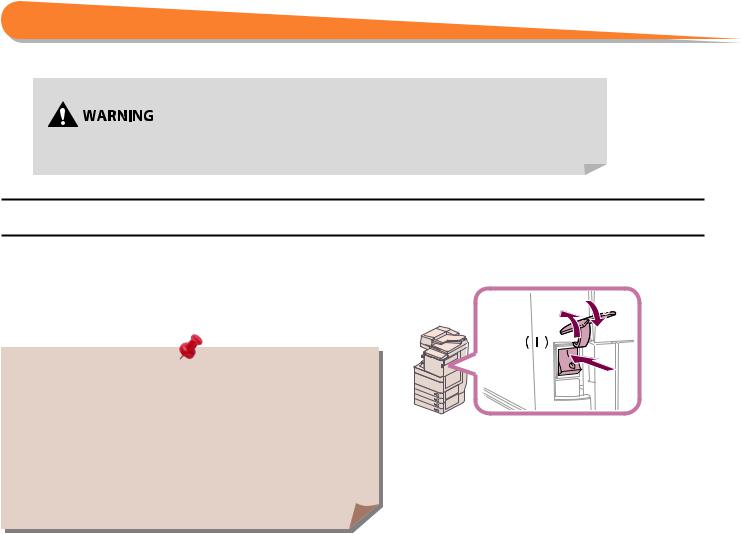
● How to Turn ON the Main Power
Make sure that the power plug is firmly inserted into the power outlet and that the Security Key is in the ON positions (turn it to the right) if it is inserted into the machine, and then turn ON the main power of the machine following the procedure below.
1. |
Open the main power switch cover. |
|
|
2. |
Press the main power switch to the “I” side. |
|
3 |
3. |
Close the main power switch cover. |
1 |
|
|
|
|
|
|
|
|
2 |
• If you are using a login service, log in using the procedure for the login |
|
|
|
|
service you are using. |
|
|
• If the main power indicator on the control panel does not light even |
|
|
|
|
though the main power switch is ON, be sure to check the breaker to see |
|
|
|
if it is OFF. |
|
|
•If you want to turn OFF the main power and then back ON again, wait for at least 10 seconds after the main power indicator is turned OFF before turning ON the main power. However, when [Quick Startup Settings for Main Power] is enabled, if you don’t wait more than 20 seconds after the main power indicator is turned OFF, quick startup is not performed.
12

● Shutting Down the Machine
This machine performs a procedure to protect hard disk when the machine is shut down. This enables the machine to be shut down safely, even if there are any jobs being processed, or a MEAP application is running while the machine is shutting down.
1.Open the main power switch cover.
2.Press the main power switch to the “ ” side.
3.Close taver.
•Do not turn the main power OFF while using the Fax/I-Fax function. Sending or receiving I-fax or fax documents cannot be done when the main power is turned OFF.
•If the message <Backing up stored data from the Remote UI...> is displayed on the touch panel display, do not turn the main power OFF. This may cause the machine to fail to back up the stored data.
•Data stored in the machine may be damaged if the Advanced Box is accessed by another imageRUNNER ADVANCE machine or a computer immediately before the machine shuts down.
•The machine may take some time to completely shutdown. Do not unplug the power cord until the main power indicator of the machine is OFF.
•If the main power is turned OFF during scanning or printing, a paper jam may occur.
•If [Quick Startup Settings for Main Power] in [Preferences] (Settings/ Registration) and [Sleep Mode Alert], which appears when you press  on the control panel, are both set to ‘On’, the tone sounds when turning OFF the main power of the machine. (Depending on the situations, the machine does not startup quickly and the tone does not sound.)
1


 3
3


 2
2
● Energy Saver Key
If the machine is idle for a certain period of time, the machine will enter the Auto Sleep mode to minimize energy consumption. Press  (Energy Saver) to cancel the Sleep mode and resume normal machine operations.
13
Machine This Using Start You Before

Parts and Their Functions
This section provides you with the names and functions of all the parts of the machine.
External View
When the Cassette Feeding Unit-AD2 is attached
13
2
14
15 |
1
12
11
10 |
9
8
3

 4
4
7 |
6 |
5 |
17 |
16 |
21 |
18 |
|
19 |
|
20 |
14

1Feeder
Originals placed in the feeder are fed one sheet at a time to the platen glass for scanning.
2USB Port (1)
Use the USB port to connect a USB device.
3Security Key (Optional)
For managing the use of the machine and preventing unauthorized copies.
4Main Power Switch
Press to the “I” side to turn the power ON.
5Main Unit’s Right Cover
Open this cover when clearing a paper jam inside the main unit.
6Multi-Purpose Tray
Use the multi-purpose tray to feed paper manually, and for loading nonstandard paper stock, such as envelopes.
7Paper Drawer’s Right Cover
Open this cover when clearing a paper jam in Paper Drawers 1 and 2.
8Paper Drawer 2
Holds up to 550 sheets of paper (20 lb bond (80 g/m2)).
9Paper Drawer 1
Holds up to 550 sheets of paper (20 lb bond (80 g/m2)).
10 Output Tray
Prints and copies are output to this tray.
11 Output Paper Tray Guide
Tilt the output paper tray guide up to prevent output papers from falling down.
12 Control Panel
Includes the keys, touch panel display, and indicators required for operating the machine.
13 LAN Port
Use a LAN cable to connect the machine to a network.
14 USB Port (2)
Use the USB port to connect external hard disks and other devices to the machine.
15 USB Connector
Use a USB cable to connect the machine to a computer.
16 Test Button
Press this button to test the circuit breaker.
17 Breaker
Detects excess current or leakage current.
18 LINE 4
Use this port to connect the Super G3 3rd/4th Line Fax Board to the machine.
19 LINE 3
Use this port to connect the Super G3 3rd/4th Line Fax Board to the machine.
20 LINE 2
Use this port to connect the Super G3 2nd Line Fax Board to the machine.
21 LINE 1
Use this port to connect a fax line to the machine.
Machine This Using Start You Before
15

Parts and Their Functions
Internal View
When the Cassette Feeding Unit-AD2 is attached
6 


 1
1


 2
2
5
4
3
16

1Platen Glass
Use the platen glass when scanning books, thick originals, thin originals, transparencies, etc.
2Upper Cover of the Fixing Unit
Open this cover to clear a paper jam in the fixing unit.
3Duplexing Unit
Pull out the duplexing unit to clear a paper jam.
4Waste Toner Container
Waste toner accumulates here.
5Toner Replacement Cover
Open this cover to replace the toner cartridge.
6Toner Cartridge
When toner runs out, pull out the toner cartridge, and replace it with a new one.
Machine This Using Start You Before
17

Parts and Their Functions
Feeder
Both sides of two-sided originals can be scanned simultaneously.
1 |
2 |
3 |
4 |
8 |
7 |
6 |
5 |
||
|
|
|
|
|
|
|
|
|
|
|
|
9
12 |
11 |
10 |
13
18

1Feeder Cover
Open this cover to remove jammed paper.
2Original Set Indicator
Lights when originals are placed in the original supply tray.
3Original Supply Tray
Originals placed here are automatically fed sheet by sheet into the feeder. Place originals into this tray with the surface that you want to scan face up.
4Auxiliary Original Supply Tray
Pull out this tray when feeding large sized paper.
5Auxiliary Original Output Tray
Pull out this tray when outputting large sized paper. You can pull out this tray up to 2 levels.
6Original Output Tray
Originals that have been scanned from the original supply tray are output into the original output tray in the order that they are fed into the feeder.
7Slide Guides
Adjust these guides to match the width of the original.
8Original Output Indicator
Lights when originals are being output and starts blinking in a specified period after outputting originals is complete.
9Inner Cover
Open this cover to clean the document feed scanning area.
10 Document Scan Cover
Open this cover to replace the stamp cartridge or clean the document feed scanning area.
11 Platen Glass
Use the platen glass when scanning books, thick originals, thin originals, transparencies, etc.
12 Document Feed Scanning Area
Scans documents sent from the feeder.
13 Original Stopper
Holds down originals to support outputting originals neatly.
Machine This Using Start You Before
19

Control Panel and Touch Panel Display
This section provides you with the names and functions of all the parts of the control panel and touch panel display.
14
19 
18 
17 
16 |
15 |
|
|
|
|
1Energy Saver key
Press to set or cancel the Sleep mode. Lights when the machine enters the Sleep mode. For information on the Auto Sleep mode, see “Main Power and Energy Saver Key,” on p. 12.
2Settings/Registration key
Press to specify settings/registration. (p. 24)
13 


 1
1
|
|
|
|
|
|
|
|
|
|
|
2 |
|
|
|
|
|
|
|
|
|
|
|
3 |
|
|
|
|
|
|
|
|
|
|
|
|
12 |
|
4 |
|
|
|
|
|
||||
|
|
|
|
|
|
||||||
|
|
|
|
|
|
5 |
|||||
11 |
|
|
|
|
|
|
|
|
|
|
|
|
|
|
|
|
|
|
|
|
|
|
|
|
|
|
|
|
|
|
|
7 |
|
6 |
|
|
|
|
|
|
|
|
|
|
|||
|
|
|
|
|
|
|
|
|
|
|
|
|
|
|
|
|
|
|
|
|
|
|
|
|
|
|
10 |
|
9 |
8 |
|
||||
11 Reset key
Press to restore the standard settings of the machine.
12 ID (Log In/Out) key
Press to log in/out when a login service, such as Department ID Management or SSO-H has been set.
3Counter Check key
Press to display the copy and print count totals on the touch panel display.
4Clear key
Press to clear entered values or characters.
13 Numeric keys
Press to enter numerical values.
14 Touch Panel Display
The settings screen for each function is shown on this display. Eight function keys are displayed by default.
5Stop key
Press to stop a job in progress, such as a scan, copy, or fax (scanning only) job.
6Edit Pen
Use when operating the touch panel display, such as to enter characters.
15 Brightness Adjustment Dial
Use to adjust the brightness of the touch panel display.
16 Volume Settings key
Press to display the screen for adjusting settings such as the transmission volume and fax sending/receiving alarm volume.
7Start key
Press to start an operation.
8Main Power Indicator
Lights when the main power is turned ON.
9Error Indicator
Flashes or lights if there is an error in the machine.
10 Processing/Data Indicator
Flashes or blinks green when the machine is performing operations, and maintains a steady green light when fax data is stored in memory.
17 Status Monitor/Cancel key
Press to check the status of jobs or to cancel print jobs. Also, press to check status of the machine, such as checking the amount of paper remaining.
18 Quick Menu key
Press to retrieve favorite functions stored in Quick Menu.
19 Main Menu key
Press to return to the Main Menu screen, such as when you want to switch functions.
20
● Use Quick Menu
If functions that are frequently used are set in the Quick Menu beforehand, you can recall the function by pressing  (Quick Menu). If you are using a login service, Quick Menu screen set for each user appears. To register a function in the Quick Menu, set the function and press [Register to Quick Menu] from
  .
.
● Logging In/Out
If you are managing the machine with a login service, such as Department ID Management or SSO-H (Single Sign-On H), a log in screen appears. If the log in screen appears, enter the Department ID and PIN or the user name and password press  (Log In/Out) or [Log In] on the screen. Press
  (Log In/Out) or [Log Out] after you finish using the machine to log out.
● Use Help
If  (Help) is displayed on the top right of the function setting screen, press
  (Help) to check the explanation of the function or how to specify settings. Press to check the explanation of the function or how to specify settings.
Machine This Using Start You Before
21
Main Menu Screen Settings
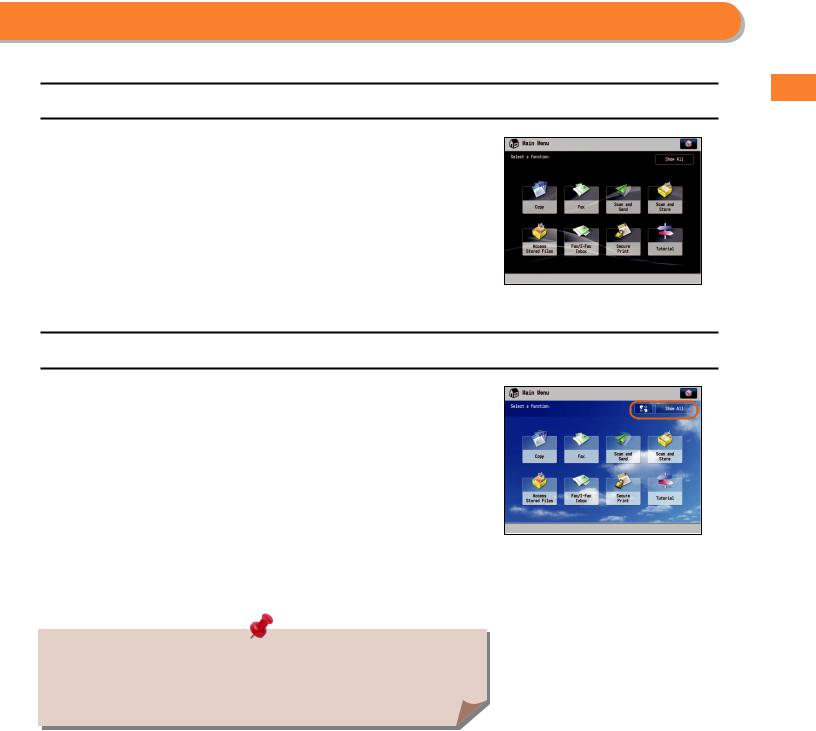
You can specify settings for the displayed screen by pressing  on the top right of the screen. To perform this procedure, log in to the machine as an administrator.
•The items displayed when  is pressed may differ, depending on the function.
•If authentication function is used, items displayed may differ or  may not be available, depending on the login user’s privileges.
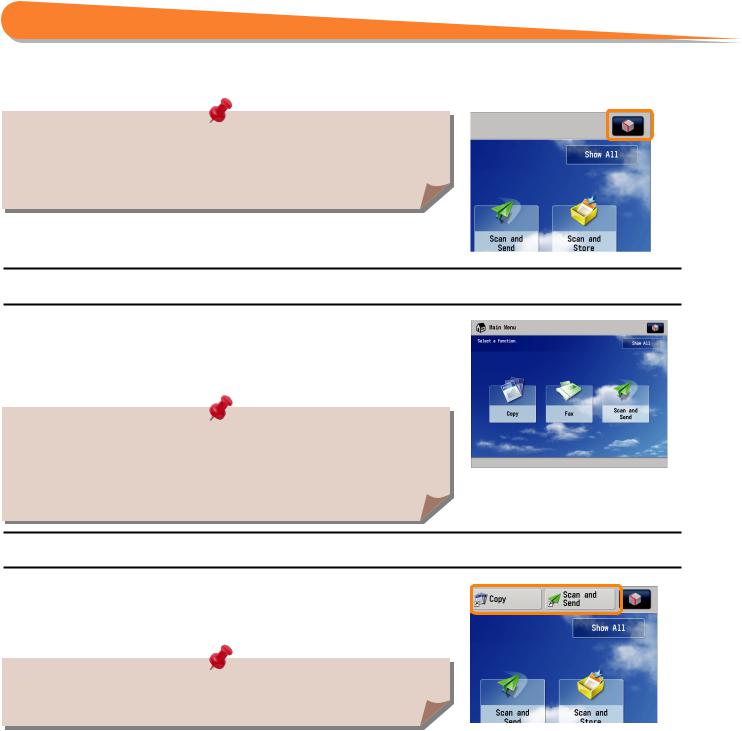
● Specifying the Main Menu Settings
You can set the number of buttons and the layout displayed on the Main Menu screen.
1.Press  [Main Menu Button Display Settings].
2.Press or
or  to select the number of buttons and the layout to be displayed.
3.Select the function that appears on the list change the order in which it is displayed.
4.Press [OK].
•Select the function that appears on the list and press [Up] or [Down] to change the order in which it is displayed.
•You can place or delete one blank button space by pressing [Add Blank] or [Delete Blank], respectively.
Example of Customized Screen
● Top Buttons Settings
You can display up to two function shortcut buttons on the top of the screen.
1.Press  [Top Buttons Settings].
2.Select the shortcut button and the function to assign to it.
3.Press [OK].
If you do not want to select a function, press [Unassigned].
Example of Registration
22
● Setting the Main Menu Wallpaper
You can select the wallpaper for the Main Menu screen.
1.Press  [Main Menu Wallpaper Settings].
2.Select the wallpaper.
3.Press [OK].
Example of Customized Screen
● Other Main Menu Settings
You can set whether the shortcut buttons for modes, such as changing the displayed language or changing the paper settings for copying/printing are displayed on the Main Menu screen.
1.Press  [Other Main Menu Settings].
2.Specify the other settings.
3.Press [OK].
If <Display [Language/Keyboard Switch]> is set to ‘On’,  appears on the Main Menu screen.
If <Display [Settings/Reg.Shortcut]> is set to ‘On’, [Settings/Reg.Shortcut] appears on the Main Menu screen.
From [Settings/Reg.Shortcut], you can select shortcut buttons to the setting screens for
[Auto Adjust Gradation], [Paper Settings], and [Paper Type Management Settings].
Example of Customized Screen
If <Display [Show All]> is set to ‘On’, [Show All] appears on the Main Menu screen.
For more information on [Language/Keyboard Switch], [Auto Adjust Gradation], [Paper
Settings], and [Paper Type Management Settings], see e-Manual > Settings/Registration.
Machine This Using Start You Before
23

Changing Settings According to Your Needs
The Settings/Registration screen appears when you press  (Settings/Registration) on the control panel.
The machine provides various settings that enable you to use it more conveniently and easily. You can register or change the settings according to your needs. For more information, see e-Manual > Settings/Registration.
● Preferences
You can specify basic settings for using the machine, such as changing the paper size to load, changing the default screen to display, setting the date and time, setting the time it takes to enter the low power mode, and specifying the settings for connecting to a network.
● Adjustment/Maintenance
You can specify settings for using the machine more comfortably, such as adjusting the density, adjusting the gradation, and cleaning the feeder.
● Function Settings
You can specify and register settings for using each function more conveniently, such as registering shortcut buttons for the Copy function, setting automatic redialing for the Fax function, and setting the maximum data size to send via e-mail.
● Set Destination
You can register fax and e-mail destinations in the address book. In addition to registering frequently used destinations, you can also register multiple destinations as a group, enabling you to send to those destinations at the same time. You can also register different types of destinations (e-mail and file server) as a group.
● Management Settings
You can set the administrator settings for managing the machine. This enables you to set an ID and password for each department, manage confidential information, and count the number of pages printed for each ID. You can also register licenses and certificates.
24

Flow of Basic Operations |
2 |
|
Flow of Basic Operations |
||
|
How to Make a Copy . . . . . . . . . . . . . . . . . . . . . . . . . . . . . . . . . . . . . . . . . . . . . . 26 Things You Can Do with the Copy Functions . . . . . . . . . . . . . . . . . . . . . . . . 28 Sending a Fax . . . . . . . . . . . . . . . . . . . . . . . . . . . . . . . . . . . . . . . . . . . . . . . . . . . . 32 Things You Can Do with the Fax Functions. . . . . . . . . . . . . . . . . . . . . . . . . . 34 Sending Scanned Data (E-Mail/I-Fax/File Servers). . . . . . . . . . . . . . . . . . . 38 Things You Can Do with the Scan and Send Functions . . . . . . . . . . . . . . . 40 Storing Scanned Data. . . . . . . . . . . . . . . . . . . . . . . . . . . . . . . . . . . . . . . . . . . . . 44 Things You Can Do with the Scan and Store Functions. . . . . . . . . . . . . . . 46 Printing Stored Data. . . . . . . . . . . . . . . . . . . . . . . . . . . . . . . . . . . . . . . . . . . . . . 48 Sending Stored Data . . . . . . . . . . . . . . . . . . . . . . . . . . . . . . . . . . . . . . . . . . . . . 50
Things You Can Do with the Access Stored Files Functions
(File Operation) . . . . . . . . . . . . . . . . . . . . . . . . . . . . . . . . . . . . . . . . . . . . . . . . . . 52 Things You Can Do with the Access Stored Files Functions (Print) . . . . 53 Things You Can Do with the Access Stored Files Functions (Send) . . . . 56 Operating the Machine from a Computer (Remote UI). . . . . . . . . . . . . . . 58 Printing from a Computer . . . . . . . . . . . . . . . . . . . . . . . . . . . . . . . . . . . . . . . . . 60
25

How to Make a Copy
This section describes the flow of basic copy operations.
1
Placing Originals
Place the original on the feeder or the platen glass.
Placing originals in the feeder
Adjust the slide guides to fit the size of your originals. Neatly place your originals with the side to be copied face up.
Placing originals on the platen glass
Open the feeder/platen cover.
Place your originals face down.
Gently close the feeder/platen cover.
2
Selecting Function
Select [Copy] from the Main Menu screen.
Press [Copy].
Copy Basic Features Screen is displayed.
You can set various copying functions. For more information, see from p. 28 to p. 31 in this manual.
•If a log in screen for Department ID Management or SSO-H appears, you must enter the applicable authentication information (ID, password/ PIN). If the Copy Card Reader-F1 is attached, first insert a control card.
•If a login service, such as Department ID Management or SSO-H has been set, press  (Log In/Out) to log out.
26

3
Setting the Number of Copies
Enter the number of copies.
Press the numeric keys to enter the desired copy quantity (1 to 999).
If you make a mistake when entering values, press  (Clear) enter the correct value.
The specified copy quantity appears on the screen, as shown below.
4
Start Copying
After specifying the settings, press  (Start).
Press  (Start).
If the following screen appears, press  (Start) to scan the next original. After all of the originals are
scanned, press [Start Copying].
When copying is complete, remove your originals.
Operations Basic of Flow
27

Things You Can Do with the Copy Functions
To use Copy functions, press [Copy] on the Main Menu screen. This section describes the functions you can use on the Copy Basic Features screen and the [Options] (1/3) screen. The [Options] screen is divided into three screens. Pressing  or
or  on the bottom right of the screen displays the next or previous screen.
4 |
|
|
|
|
|
|
|
|
|
|
3 |
|
|
|
|
|
|
|
|
|
5 |
|
|
|
|
|
|
|
|
|
||
2 |
|
|
|
|
|
|
|
|
|
|
|
|
|
|
|
|
|
|
|
6 |
|
|
|
|
|
|
|
|
|
|
||
1 |
|
|
|
|
|
|
|
7 |
||
|
|
|
|
|
|
|
||||
|
|
|
|
|
|
|
||||
9 |
|
|
|
|
|
|
|
|
8 |
|
|
|
|
|
|
|
|
|
|||
|
|
|
|
|
|
|
|
|
|
|
|
|
|
|
|
|
|
|
|
|
|
|
|
|
|
|
|
|
|
|
|
|
Regular Copy Basic Features Screen
1 |
[Direct]/[Copy Ratio] |
5 |
[Check Settings] |
|
You can specify the copy ratio for a copy job. You can change |
|
You can check, edit, or clear the current copy settings. |
|
the zoom ratio by reducing/enlarging a scanned document to |
|
[Favorite Settings] |
|
a preset paper size, or by entering a value to specify a desired |
6 |
|
|
scan ratio. |
|
You can register frequently used copy settings. You can recall |
the registered frequently used settings for future use.
2[Select Color]
You can select the color mode for copying.
3[Select Paper]
You can select the paper size/type and the paper source. You can also set the machine to automatically recognize the original size and the copy ratio, and then copy.
4[Copy Sample]
You can check the copy result of one set before making multiple sets of copies. You can also copy a specified page.
Quickly Make Settings and Copy
You can set the settings on the Regular Copy Basic Features screen quickly by using the Express Copy Basic Features screen. For instructions on displaying the Express Copy Basic Features Screen, see e-Manual >
Settings/Registration.
7[Previous Settings]
You can recall the three most recent copy jobs, and make copies using the recalled copy settings.
8Shortcuts to [Options]
Press to select a [Options] mode. [Finishing], [2-Sided], [Density], and [Original Type] are set as default.
9[Interrupt]
You can temporarily stop the current copy job and give priority to a rush copy.
28
2 |
3 |
1 |
4 |
12 |
|
11 |
5 |
|
|
|
6 |
10 |
9 |
8 |
7 |
|
|
|
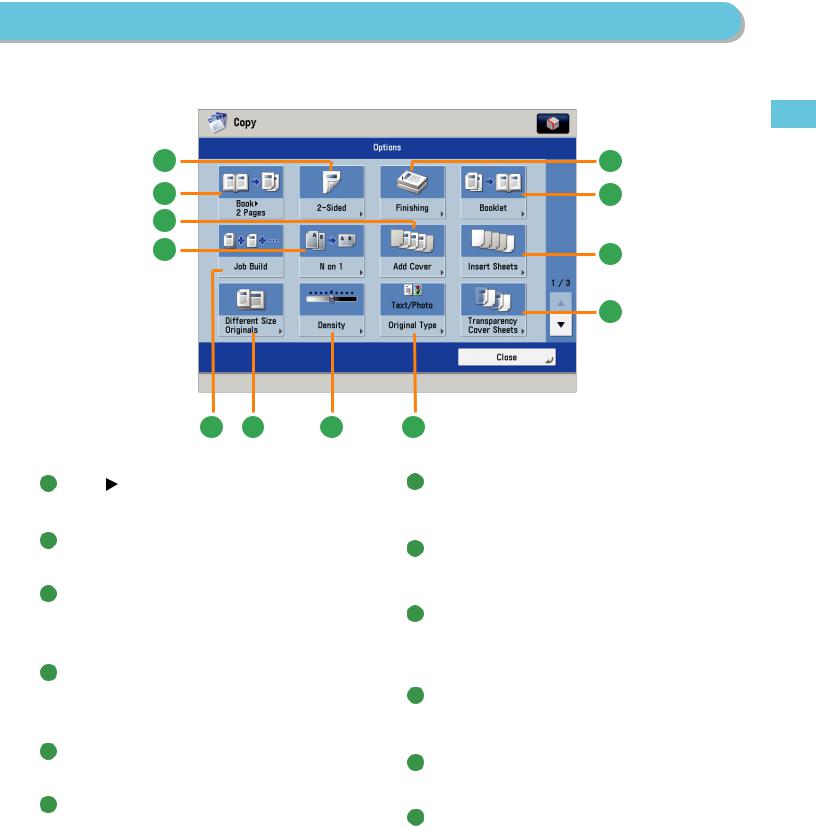
[Options] 1/3 |
1 [Book 2 Pages] |
|
|
7 [Original Type] |
You can copy facing pages in a book onto separate sheets of |
Image quality for scanning is adjusted according to the type |
|
of original, such as [Text/Photo], [Map], [Printed Image], |
||
paper. |
||
[Photo Printout], or [Text]. |
||
|
2[2-Sided]
You can make one-sided copies from two-sided originals, or make two-sided copies of your originals.
3[Finishing]
You can collate copies in page order or into groups of the same page.
You can staple the printed sheets.
* To staple printed sheets, optional products are required.
4[Booklet]
You can layout the scanned documents to make a booklet. You can also print a cover sheet or make a saddle stitch booklet.
* To make a saddle stitch booklet, optional products are required.
5[Insert Sheets]
Press to insert blank sheets or chapter pages between specified pages.
6[Transparency Cover Sheets]
The machine automatically interleaves a sheet of paper between each transparency when copying onto transparencies.
8[Density]
Change the exposure. You can press  to make the exposure darker or
  to make the exposure lighter. You can set the machine to automatically adjust the exposure.
9[Different Size Originals]
You can make copies of different size originals at the same time without separating the documents. If the paper setting is set to Auto, the machine automatically selects the appropriate paper size.
10 [Job Build]
You can scan originals that are too many to be placed at once, by dividing them into multiple batches. After all originals are scanned, copying is started.
11 [N on 1]
You can reduce multiple pages of the original to copy onto a single page. You can also change the order of the page layout.
12 [Add Cover]
You can add covers.
Operations Basic of Flow
29

Things You Can Do with the Copy Functions
This section describes the functions you can use on the [Options] (2/3 and 3/3) screen of the Copy function. The [Options] screen is divided into three screens. Pressing  or
or  on the bottom right of the screen displays the next or previous screen.
2 |
|
|
|
|
|
|
|
|
|
|
3 |
||
|
|
|
|
|
|
|
|
|
|||||
1 |
|
|
|
|
|
|
|
|
|
|
4 |
||
|
|
|
|
|
|
|
|
|
|
||||
|
|
|
|
|
|
|
|
|
|||||
12 |
|
|
|
|
|
|
|
|
|
|
|
|
|
|
|
|
|
|
|
|
|
|
|
|
|
||
11 |
|
|
|
|
|
|
|
|
|
|
|
5 |
|
|
|
|
|
|
|
|
|
|
|
|
|||
|
|
|
|
|
|
|
|
|
|
|
|
|
6 |
|
|
|
|
|
|
|
|
|
|
|
|
|
|
|
|
|
|
|
|
|
|
|
|
|
|
|
|
|
|
|
|
|
|
|
|
|
|
|
|
|
|
|
|
|
|
|
|
|
|
|
|
|
|
|
|
10 |
9 |
8 |
7 |
[Options] 2/3
1[Secure Watermark]
You can embed hidden text, such as “CONFIDENTIAL” in the background of copies. The embedded text appears when the copies are printed, helping prevent unauthorized copying and information leakage.
7[Shift]
This mode enables you to make copies with the entire image shifted to the center or a corner. You can use the numeric keys to specify the location.
2[Document Scan Lock]
You can embed tracking information in copies. This increases security by preventing unauthorized copies.
3[Color Balance]
This mode enables you to make color balance adjustments.
4[Adjust One-Touch Color]
This mode enables you to make fine adjustments to the image quality on copies.
8[Print Date]
You can copy the date (day, month, and year) onto the output. You can specify the size, position, or direction of the date.
9[Watermark]
This mode enables you to copy a watermark and user-defined text onto the output. You can specify the size, position, or direction of the watermark.
10 [Page Numbering]
You can copy with page numbers. You can also specify the size, position, or direction of the page number.
5[Erase Frame]
This mode enables you to erase shadows that appear when scanning various types of originals. You can also erase shadows of the punch holes.
6[Gutter]
This mode enables you to make copies with the entire original image shifted by a designated width to create a margin on the copies. You can set different width values for the each side of the paper.
11 [Copy Set Numbering]
This mode enables you to print copy set numbers. You can specify the size, position, or direction of the copy set number.
12 [Sharpness]
This mode enables you to adjust image quality for copying. You can use this mode when you want to soften and sharpen text, lines, or the outline of the image.
Functions with this mark require an optional product(s).
30
Loading...