


BJC-85
IS-12 Color Image Scanner Cartridge

Contents
Introduction
Using the Scanner
Using the Scanner With Windows
Using the Scanner With Macintosh
Scanner Problems
®
®
2Contents

Introduction
■
Copyright
This manual is copyrighted by Canon Computer Systems, Inc. (CCSI) with all rights
reserved. Under the copyright laws, this manual may not be reproduced in any form, in
whole or part, without the prior written consent of CCSI.
© 2000 Canon Computer Systems, Inc.
■
Disclaimer
Canon Computer Systems, Inc. has reviewed this manual thoroughly in order that it will be
an easy to use guide to using your optional IS-12 Color Image Scanner Cartridge with the
Canon BJC-85 Color Bubble Jet Printer. All statements, technical information, and
recommendations in this manual and in any guides or related documents are believed
reliable, but the accuracy and completeness thereof are not guaranteed or warranted, and
they are not intended to be, nor should they be understood to be, representations or
warranties concerning the products described.
Your printer and the software media included with your printer have been sold to you
subject to the limited warranties set forth in the warranty card and license agreement
enclosed with the respective product. All software is licensed AS IS, as described in the
license agreement enclosed with the software media. Further, CCSI reserves the right to
make changes in the specifications of the products described in this manual at any time
without notice and without obligation to notify any person of such changes.
3Contents

Introduction
■
Trademarks
Canon, BJ, and Bubble Jet are trademarks of Canon Inc.
Microsoft and Windows are registered trademarks of Microsoft Corporation in the U.S. and
other countries. Mac and the Mac logo are trademarks of Apple Computer, Inc., registered
in the U.S. and other countries.
All other product and brand names are trademarks or service marks of their respective
owners.
ENERGY STAR® COMPLIANT
As an E
NERGY STA R
the E
NERGY STA R
®
®
Partner, Canon U.S.A., Inc. has determined that this product meets
guidelines for energy efficiency.
4Contents

Using the Scanner
Scanner Driver Basics
Unpacking the Scanner Cartridge
Installing the IS Scan Software
Installing the Scanner Cartridge
Basic Scanning Procedure
Using the White Calibration Sheet
Scanning Area Guidelines
Loading an Image
5Using the Scanner
Scanner Driver Basics
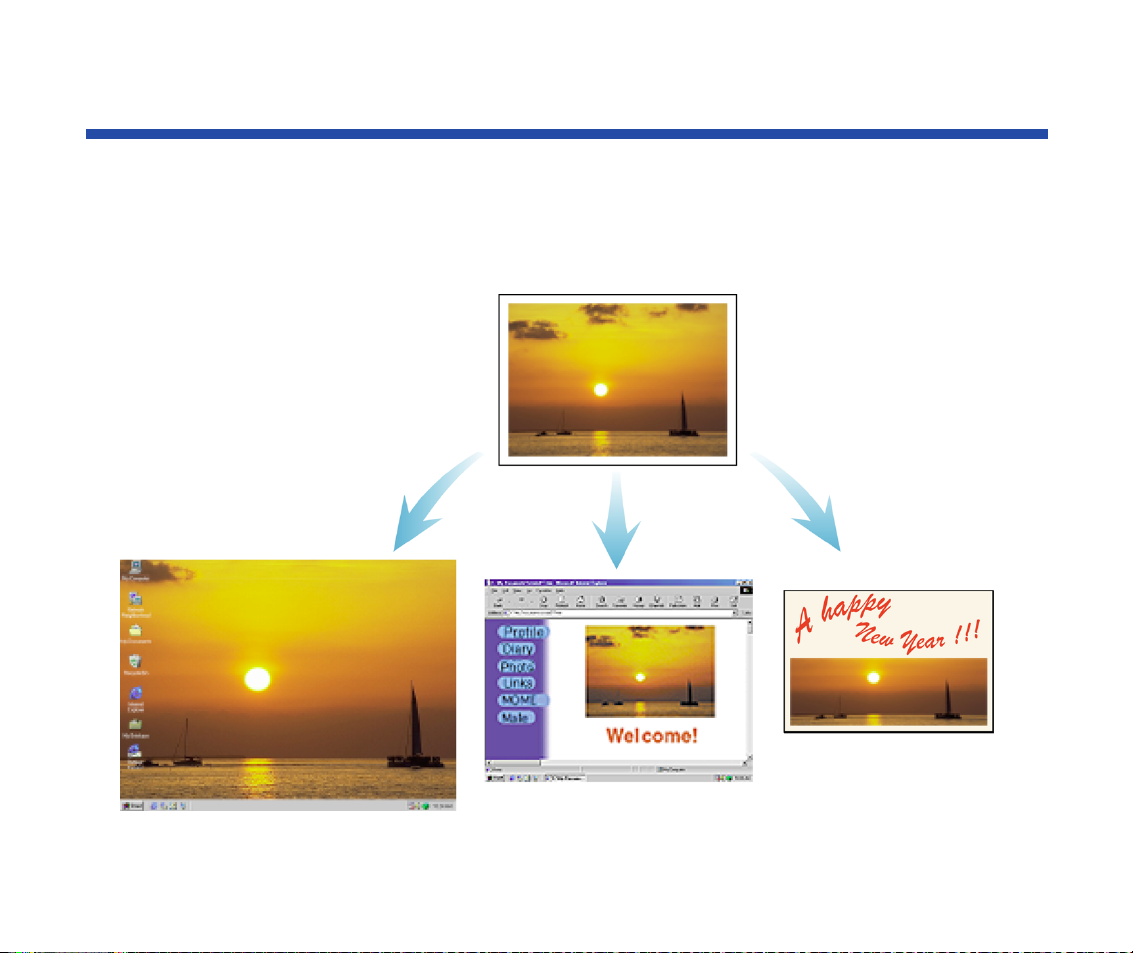
Installing the optional IS-12 Color Image Scanner Cartridge in the printer makes it possible
to scan and save images such as your favorite photographs and greeting cards.
Photograph
Wallpaper for your computer
Greeting card
Home page
6Using the Scanner

Scanner Driver Basics
Windows
Macintosh
To use the scanner cartridge, you must install the IS Scan software, which includes the
IS Scan scanner driver and the IS Scan Plus utility program. These two programs provide
many features that allow you to perform simple color adjustments to improve the quality of
the original image or enhance the image for artistic effect.
You can run the IS Scan driver from within a TWAIN-compliant graphics application
program, or you can run the IS Scan Plus utility program directly as a stand-alone
application program. The IS Scan Plus utility program allows you to scan, edit, enhance,
and save the image data.
To use the scanner cartridge, you must install the IS Scan software. You can run the
IS Scan driver from within a TWAIN-compliant graphics application, or you can run it
directly as a stand-alone program.
Note
TWAIN is an industry interface standard that allows software applications
to communicate with digital imaging devices such as scanners.
Applications that support TWAIN provide a standardized method of
acquiring images.
7Using the Scanner
Unpacking the Scanner Cartridge
Make sure you have the following items.
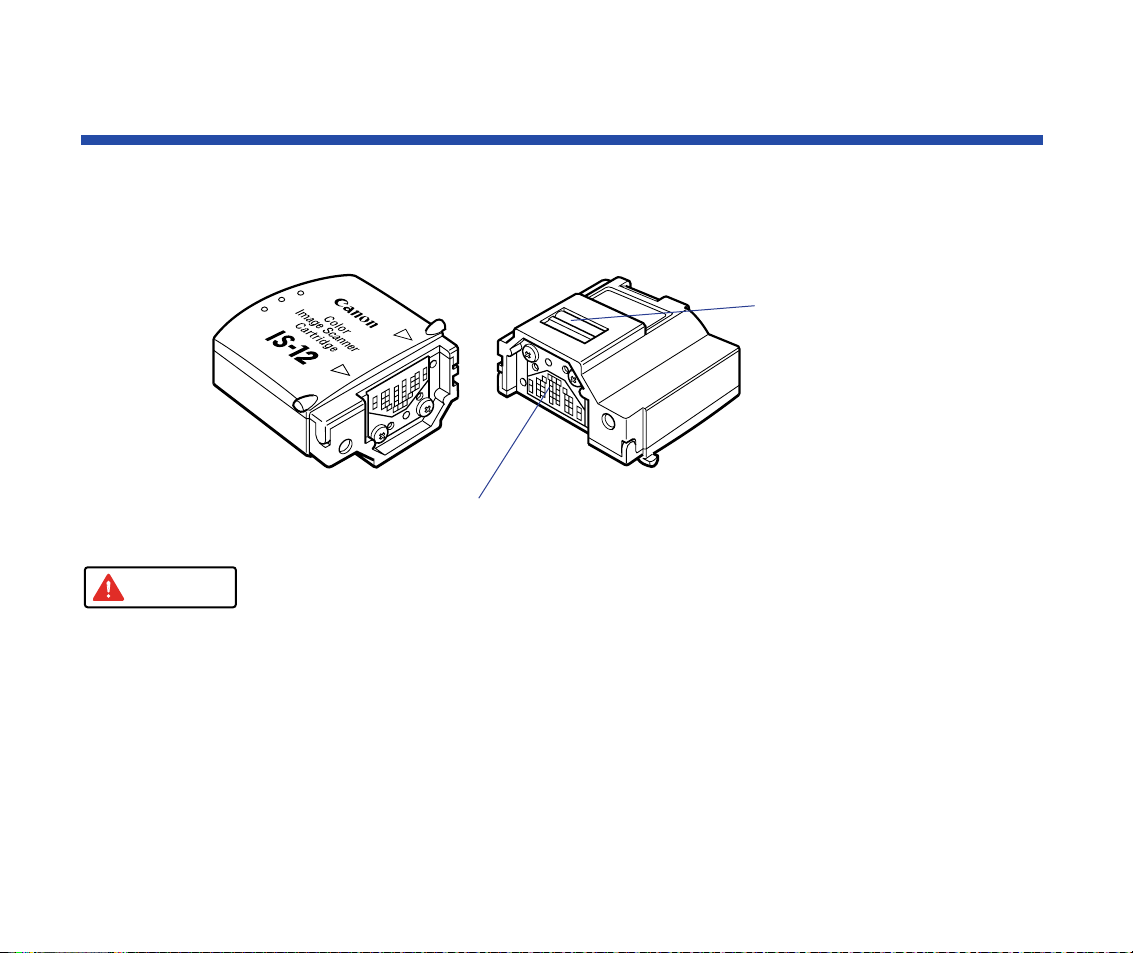
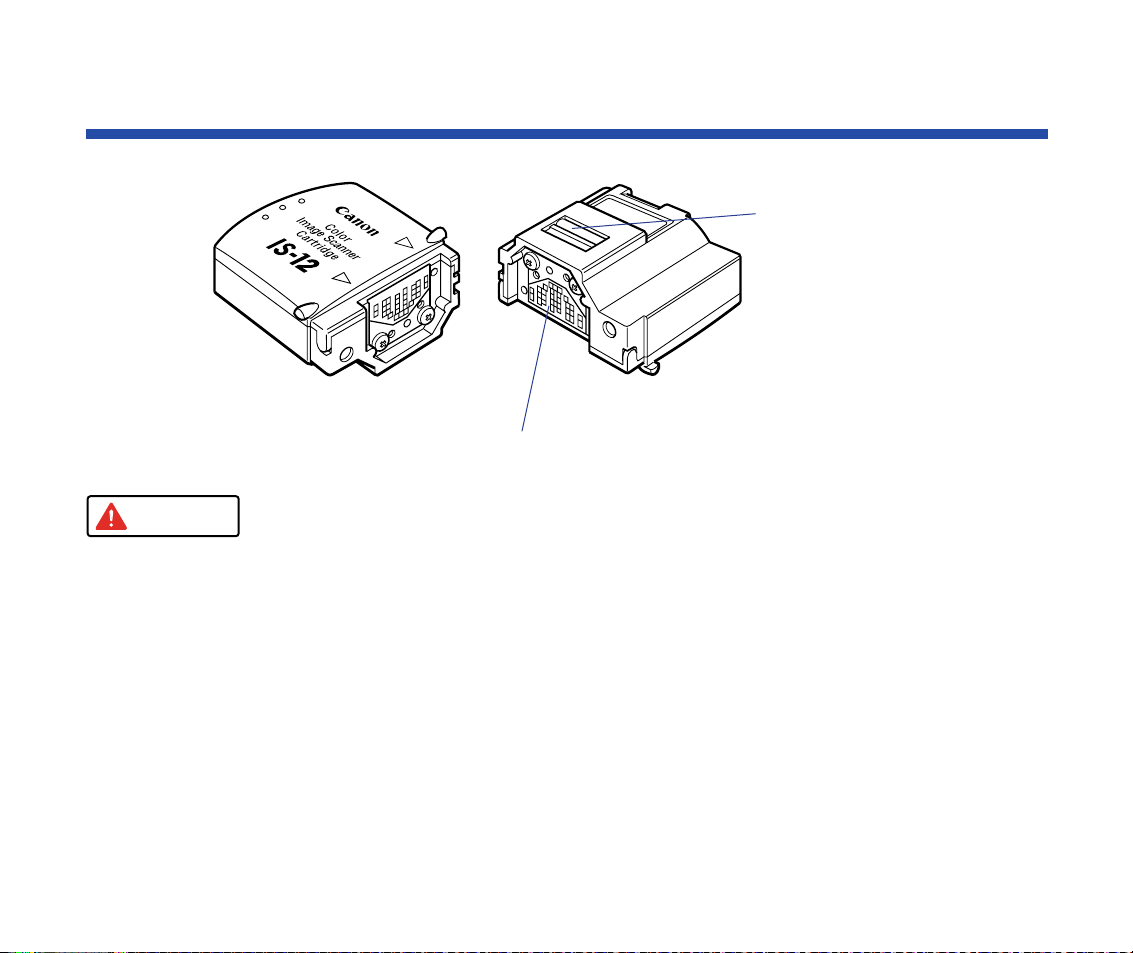
■
IS-12 Color Image Scanner Cartridge
Electrical contacts
Optical components
Caution
The scanner cartridge is composed of precision components. To avoid
poor scanning results, do not touch the optical components or electrical
contacts.
8Using the Scanner
Unpacking the Scanner Cartridge
■
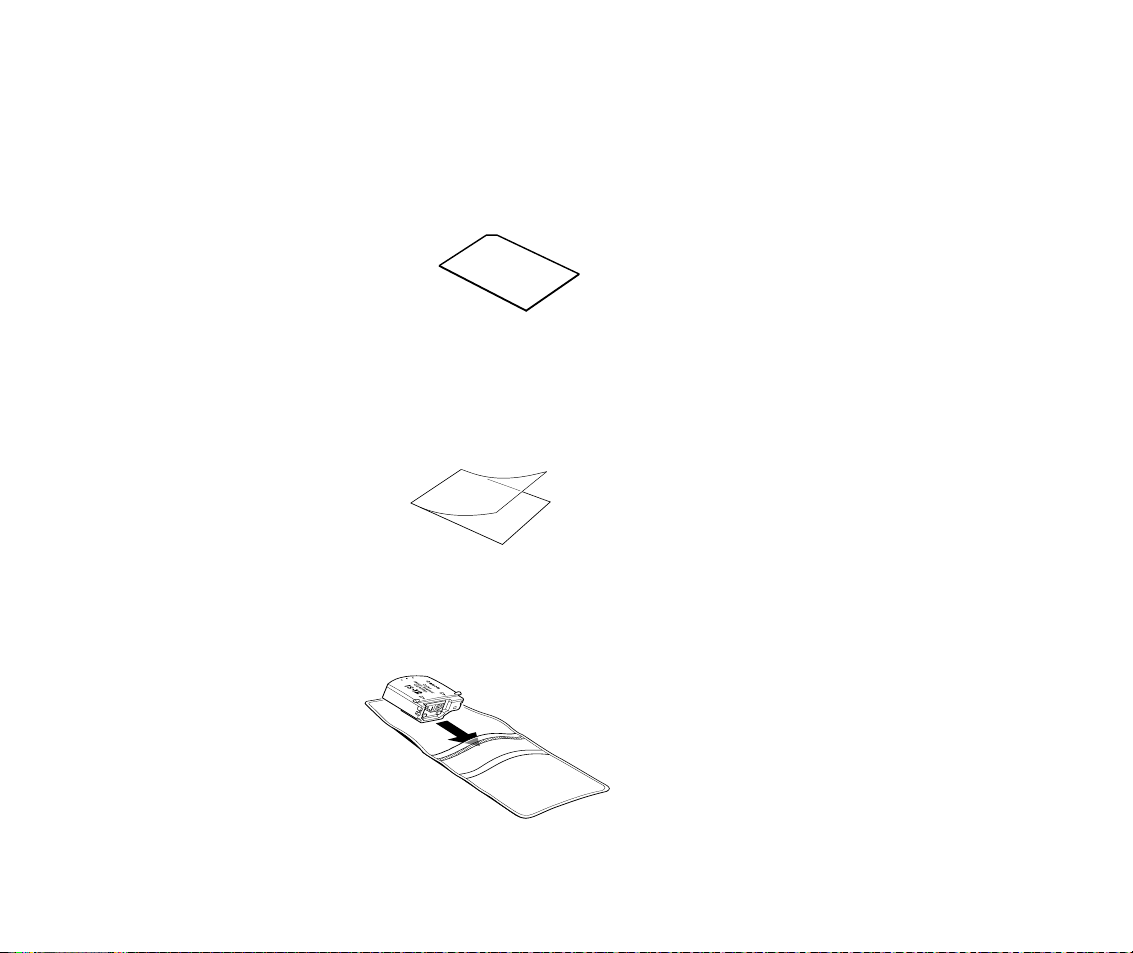
White Calibration Sheet
You use this sheet to maintain the correct color balance of scanned images. The first time
you install the scanner cartridge, you need to run the white level calibration. You will also
run calibration when the white level calibration data needs to be updated.
■
Scanning Holder
You can use this holder to hold a photo or other small image you wish to scan. The holder is
two layers, one being a clear plastic cover to protect photographs.
■
Scanner Cartridge Container
Use this plastic container to store the IS-12 Color Image Scanner Cartridge.
9Using the Scanner
Installing the IS Scan Software
Make sure the BJC-85 printer driver is installed before you proceed with the following
instructions.
1
2
3
4
Insert the printer driver CD-ROM into your CD-ROM drive.
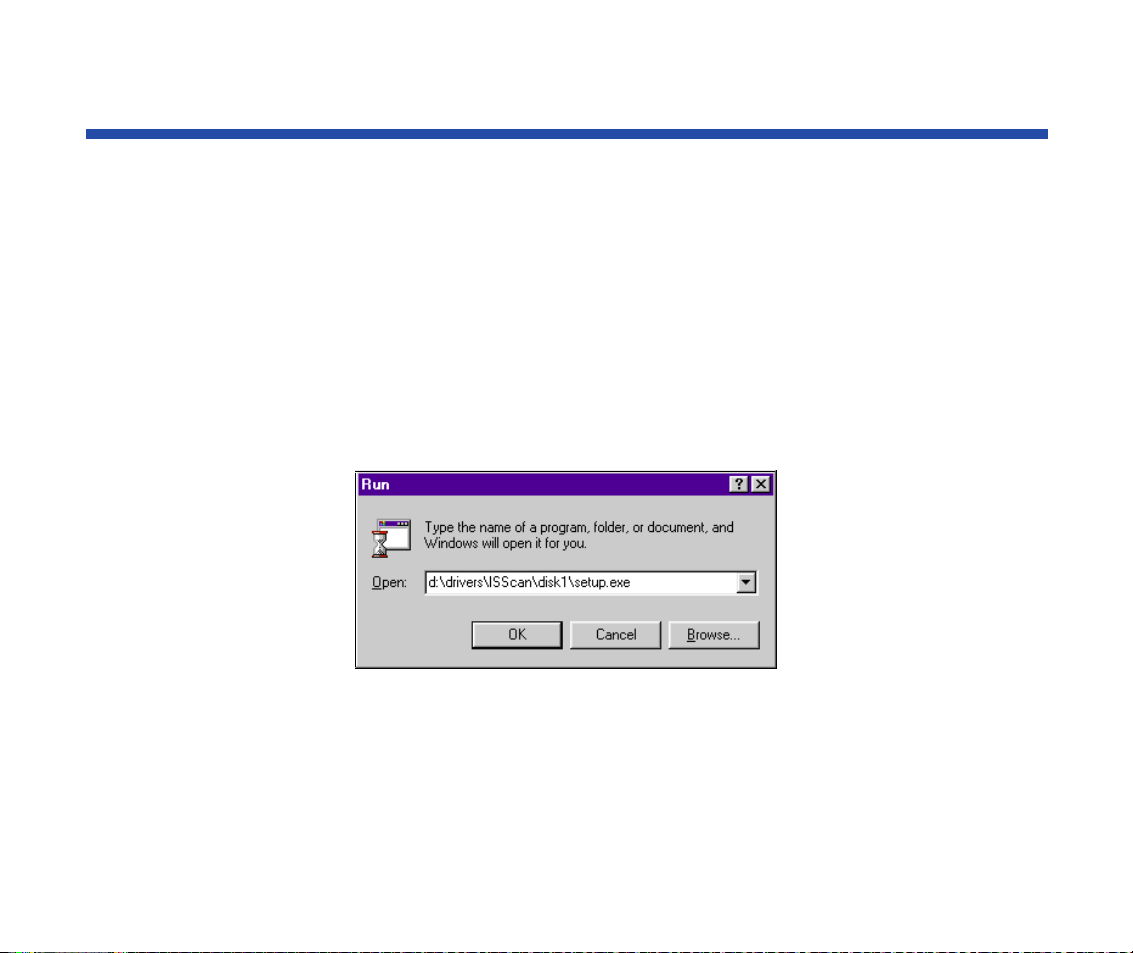
Click Start and then click Run.
In the Run dialog box, type:
d:\drivers\ISScan\disk1\setup.exe
where d: is your CD-ROM drive.
Click OK and follow the instructions on the screens.
10Using the Scanner
Installing the Scanner Cartridge
Electrical contacts
Optical components
Caution
• The scanner cartridge is composed of precision components. To avoid
poor scanning results, do not touch the optical components or electrical
contacts.
• To avoid damaging the scanning head of the scanner cartridge, do not
attempt to store the scanner cartridge in an SB-10 Ink Cartridge Storage
Box. There may be ink inside the container that could damage the
scanning head of the scanner cartridge.
11Using the Scanner
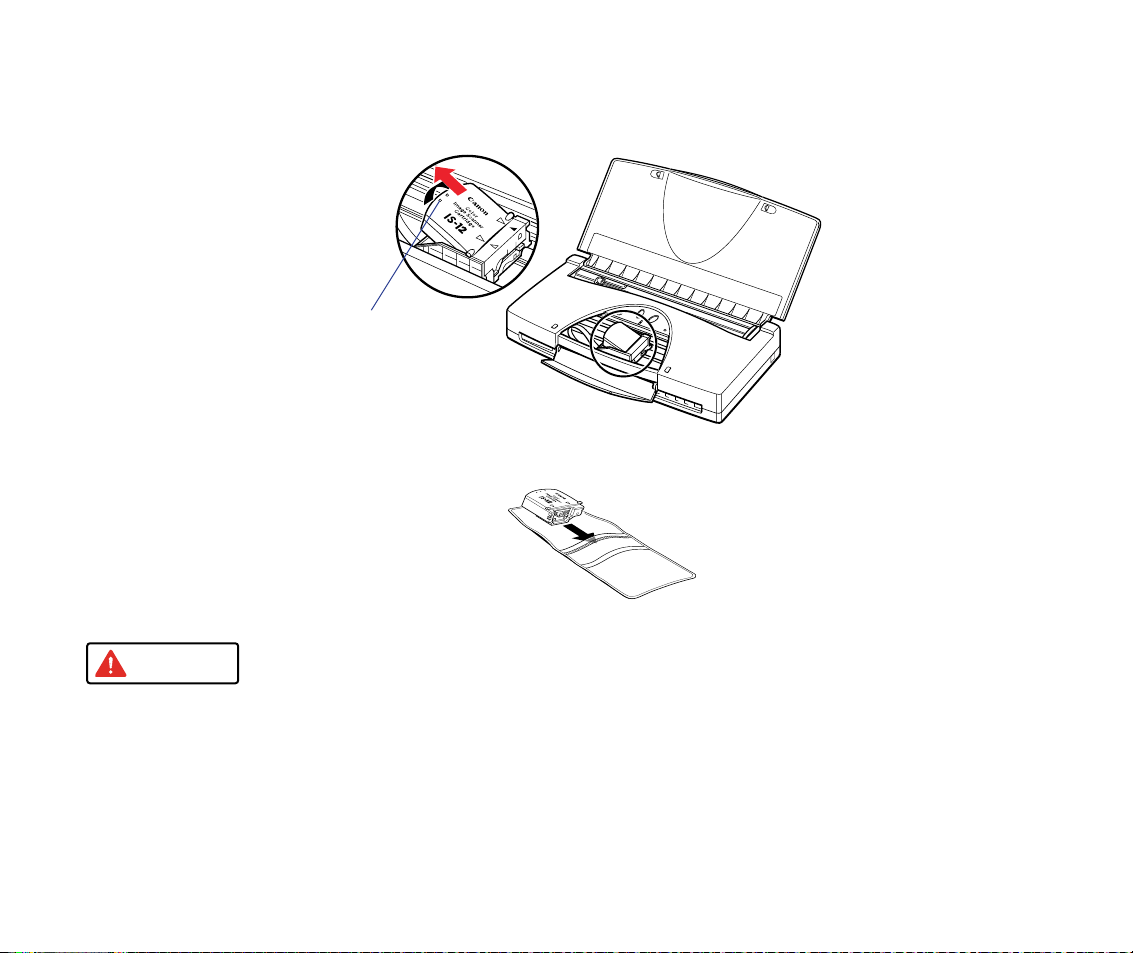
■
Replacing a BJ Cartridge With the Scanner Cartridge
Installing the Scanner Cartridge
1
2
3
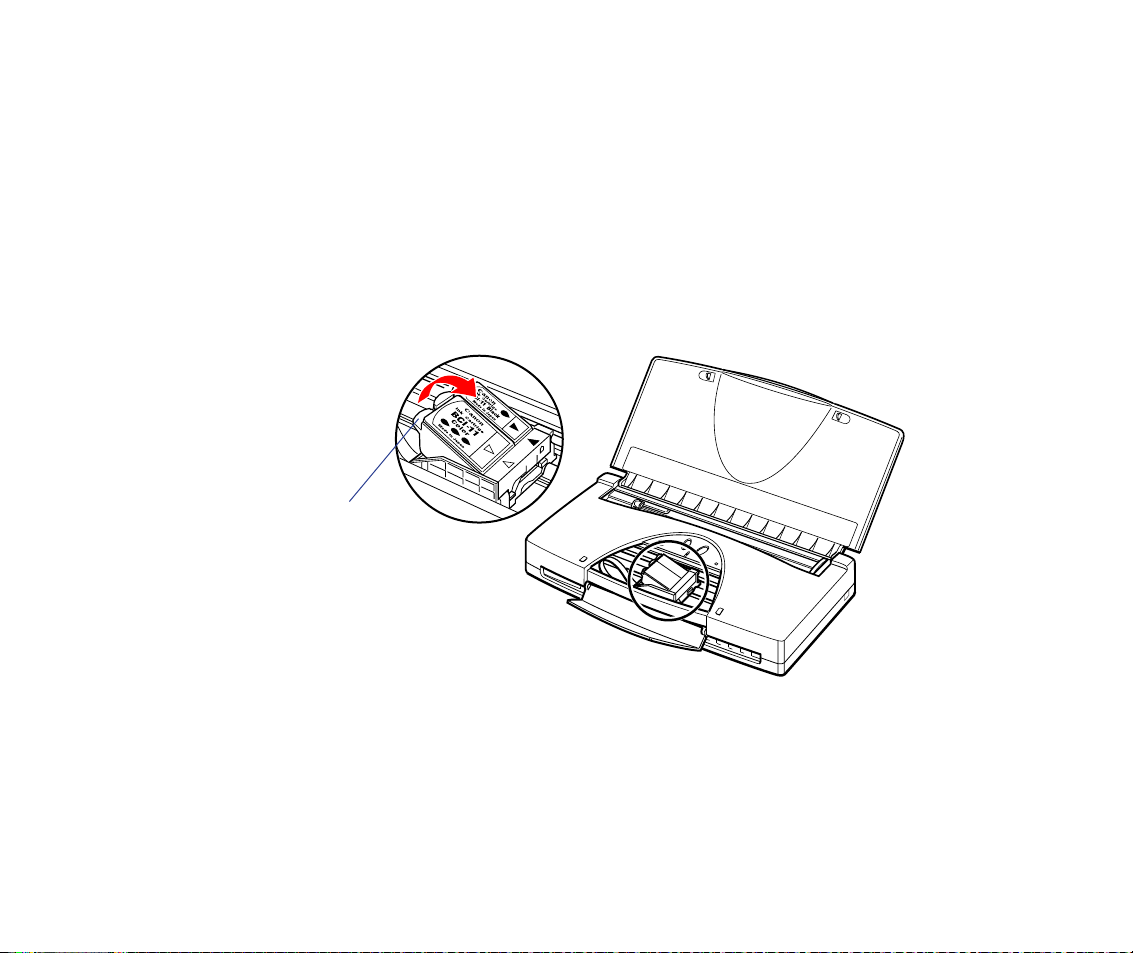
Make sure that the printer is plugged in and turned on. Open the cartridge
cover and press the CARTRIDGE button; the cartridge holder moves to
the center of the printer.
Lift up on the green tab to remove the BJ cartridge from the cartridge
holder. Take care that you do not raise any other tab nor remove an ink
tank.
Lift the green tab
Immediately store the BJ cartridge in an Ink Cartridge Storage Box.
Close the container tightly to prevent the print head of the BJ cartridge
from drying out. If the print head dries out, the BJ cartridge will become
unusable.
12Using the Scanner
Installing the Scanner Cartridge
4
5
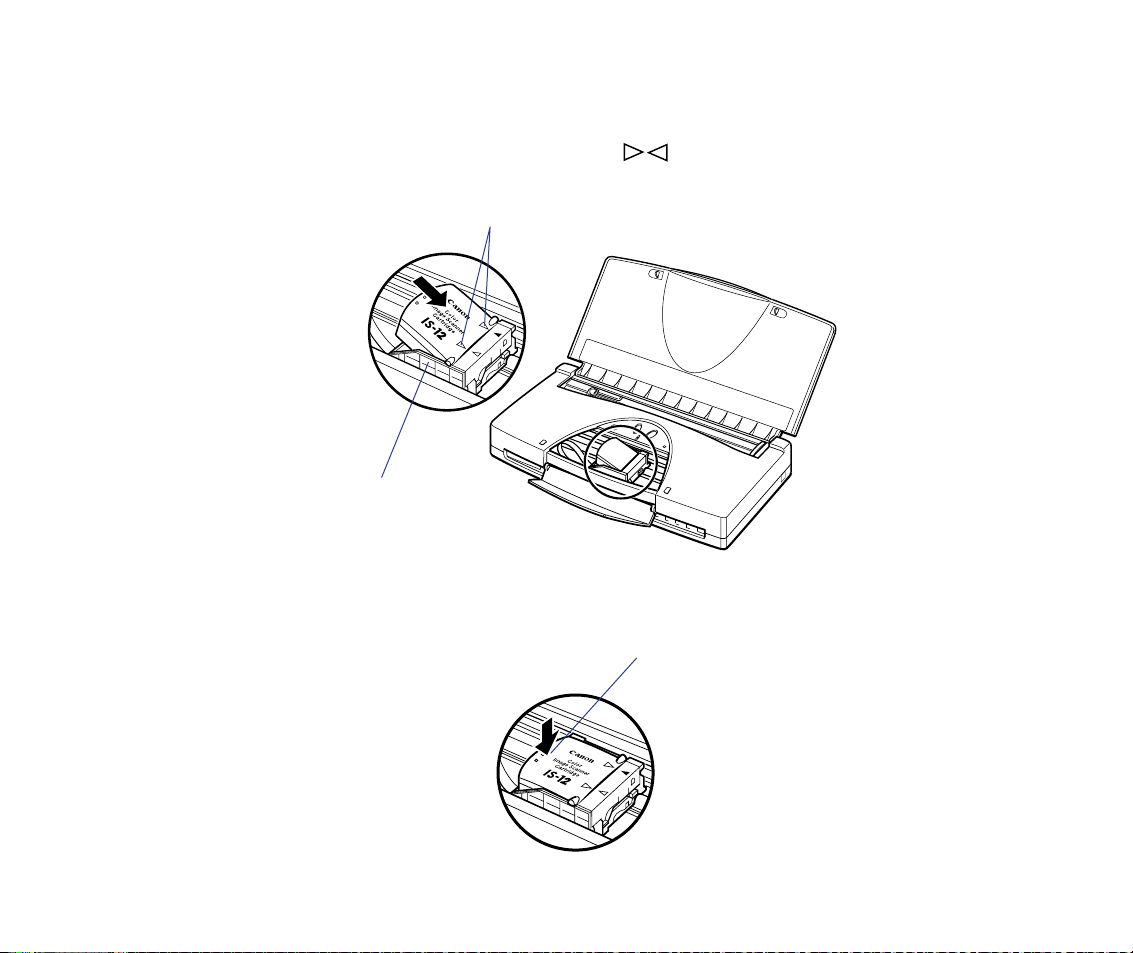
Remove the scanner cartridge from its protective case. With the label on
the scanner cartridge up, set the scanner cartridge in the cartridge holder
at a slight angle. Align the marks ( ) on the scanner cartridge with the
marks on the holder.
Align these marks
Cartridge holder
Press down on the raised left side of the scanner cartridge until it locks in
place.
Press down here
13Using the Scanner

Installing the Scanner Cartridge
Note
6
7
Close the cartridge cover.
Press the CARTRIDGE button. The scanner cartridge moves to the home
position.
Removing the Scanner Cartridge
Follow this procedure to remove the scanner cartridge and install the BJ cartridge when you
are finished scanning.
1
Make sure that the printer is turned on and then press the CARTRIDGE
button to move the cartridge holder to the center of the printer.
POWER RESUME
2
CARTRIDGE
Open the cartridge cover.
ERROR
To avoid damaging the printer, do not touch the orange film cable under
the cartridge cover.
14Using the Scanner
Installing the Scanner Cartridge
Caution
3
4
Lift up the tab on the scanner cartridge to remove it from the cartridge
holder.
Lift up the tab
Place the scanner cartridge in its protective case.
Always remove the scanner cartridge from the printer and store it in its
protective case when it is not being used. To avoid damaging the scanning
lens on the scanner cartridge, do not attempt to store it in an Ink Cartridge
Storage Box.
5
6
7
Remove the BJ cartridge from its container and install it in the holder.
Close the cartridge cover.
Press the CARTRIDGE button. The cartridge holder returns to the home
position.
15Using the Scanner

Basic Scanning Procedure
Windows
Macintosh
After installing the IS Scan scanner driver, you can use the BJC-85 printer as a scanner.
1
2
• If you use a TWAIN-compliant graphics application program, launch the TWAINcompliant application program. IS Scan launches from within the application
program.
• If you use IS Scan Plus, select Programs from the Start menu first. Point to
IS Scan Plus and then select IS Scan Plus.
• If you use a TWAIN-compliant graphics application program, launch the TWAINcompliant application program first. IS Scan launches from within the application
program.
• If you use IS Scan as a stand-alone application program, double-click IS Scan
BJC-85 in the folder you specified during the installation procedure.
Remove the BJ cartridge installed in the cartridge holder and then install
the IS-12 Color Image Scanner Cartridge.
Start a graphics application program.
For Windows Users
For Macintosh Users
16Using the Scanner

Basic Scanning Procedure
3
4
5
6
7
The first time you use the scanner, you need to perform the White Level
Calibration.
Using the White Calibration Sheet
Insert the image you wish to scan into the scanning holder, then load the
scanning holder into the auto sheet feeder.
Loading an Image
Scan the image.
Windows
Macintosh
Save the scanned image.
Now you can install the BJ cartridge and print the scanned image.
Scanning an Image
Scanning an Image
17Using the Scanner
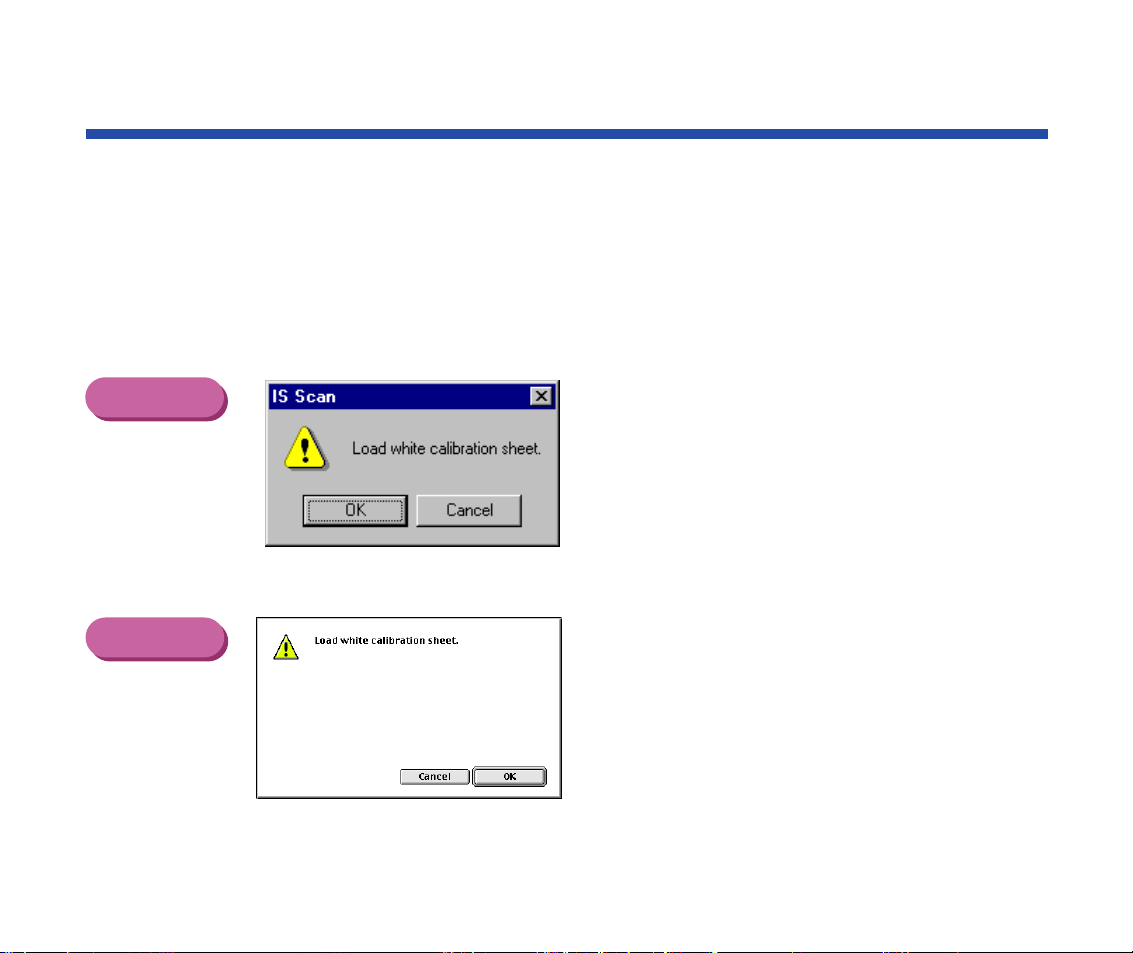
Using the White Calibration Sheet
Macintosh
The white calibration sheet provided with the scanner cartridge is used for maintaining the
correct color balance of scanned images. White level calibration is required when the
scanner cartridge is used for the first time and when the white level calibration data needs
to be updated.
When white level calibration is needed, you will see this screen when you click the Prescan
or Scan button.
Windows
18Using the Scanner
Using the White Calibration Sheet
1
2
3
Load the white calibration sheet with the cropped corner at upper left.
Align the sheet with the right side of the sheet feeder. Adjust the paper
guide to the left side of the sheet.
Follow any instructions on your screen.
When the white calibration sheet is ejected from the paper output tray,
White Level Calibration processing is complete.
19Using the Scanner

Using the White Calibration Sheet
Note
Macintosh
• Do not leave the white calibration sheet in locations that are exposed to
direct sunlight or that are subject to high temperatures or humidity.
• Do not bend or wrinkle the white calibration sheet.
• When cleaning the white calibration sheet, use a soft cloth that is dipped
in a weak, neutral detergent solution, and then wipe its wet surface off
with a dry, soft cloth.
• The white level calibration data is stored into memory and used for
maintaining the correct color balance of scanned images. When a
message appears and prompts you to load the white calibration sheet,
click the OK button and perform white level calibration.
You can also initiate White Level Calibration from the IS Scan driver.
Windows
Other IS Scan Features
Other IS Scan Functions
20Using the Scanner

Scanning Area Guidelines
Paper size Scanning area
A6 105.0 × 148.0 mm 3.86 × 5.43 Inches
A5 148.0 × 210.0 mm 5.55 × 7.87 Inches
A4 210.0 × 297.0 mm 8.00 × 11.29 Inches
B5 182.0 × 257.0 mm 6.89 × 9.72 Inches
Letter 8.50 × 11.00 in 8.19 × 10.60 Inches
Legal 8.50 × 14.00 in 8.19 x 13.09 Inches
• The scanning area varies according to conditions such as the scanning resolution and
display resolution.
• If you wish to scan images larger than the size of the scanning holder provided with the
IS-12 Color Image Scanner Cartridge, the SH-101 A4/LTR scanning holder is available
for purchase. Visit the Canon Web site to find out about accessories and supplies
(
www.ccsi.canon.com
).
• The maximum thickness of the image must be within 0.45 mm, including the scanning
holder. The scanning holder is 0.2 mm thick so the image you wish to scan must be less
than 0.25 mm thick.
• To prevent possible damage to the printer or scanner cartridge, do not scan an image
with paper clips or staples.
21Using the Scanner
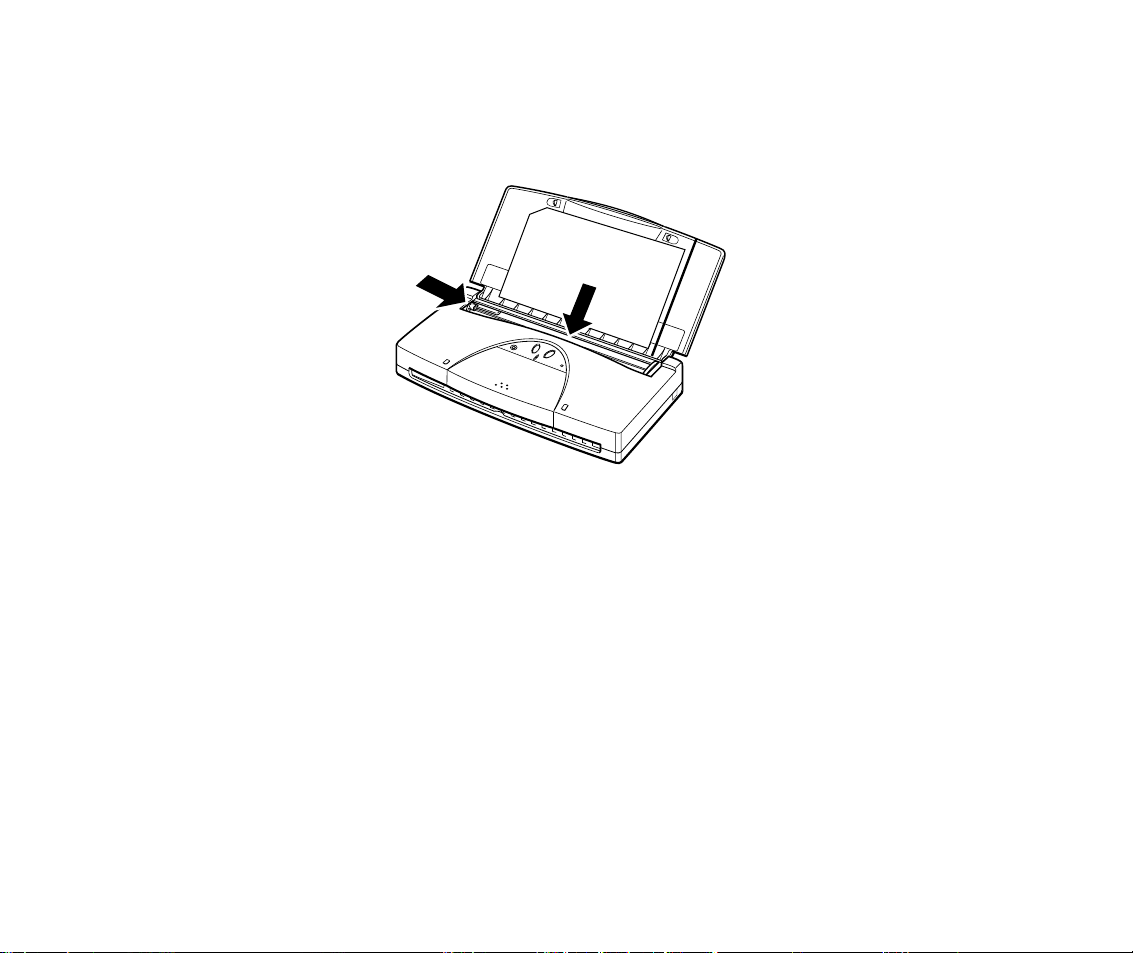
Loading an Image
1
Slide the paper guide to the left edge of the auto sheet feeder.
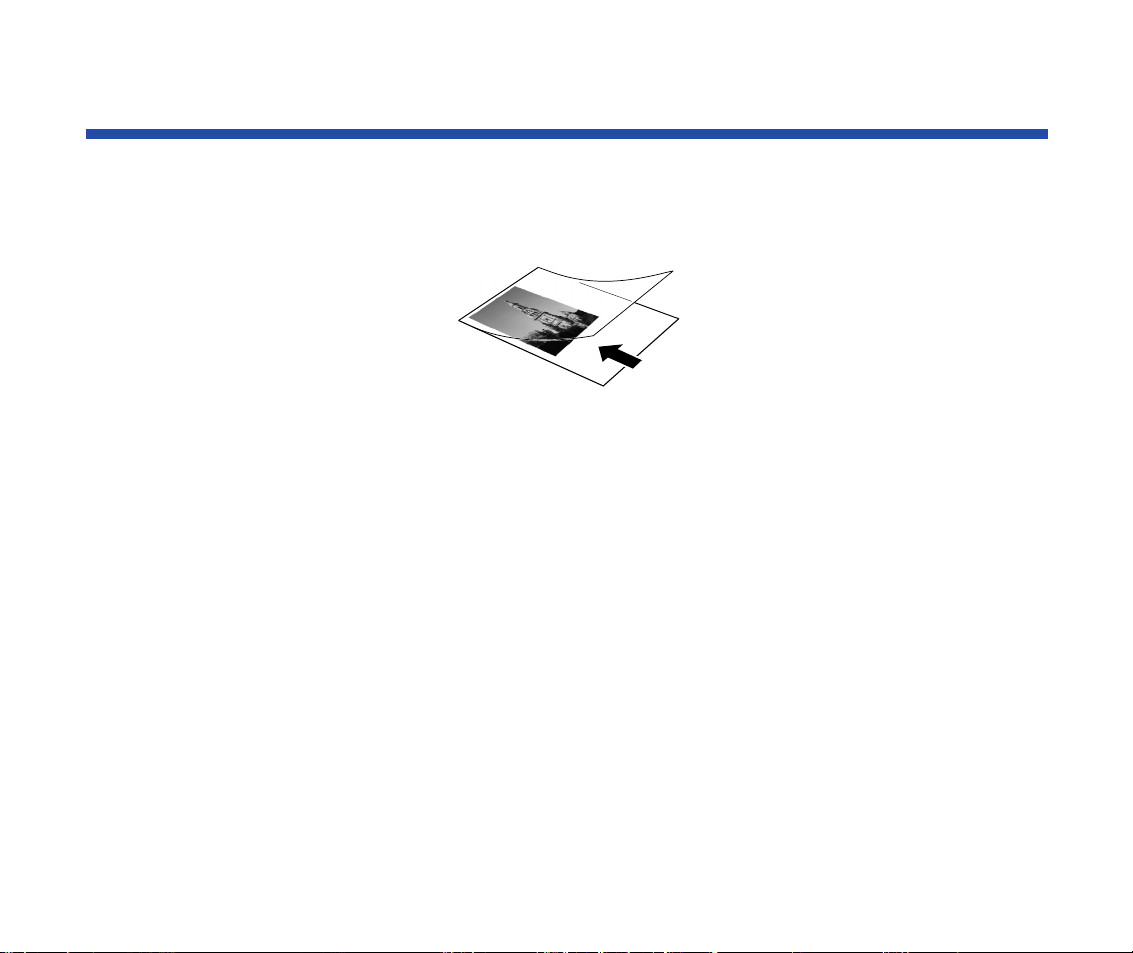
2 Place the image in the scanning holder.
• To prevent paper jams, always insert the image you wish to scan into
the scanning holder.
• Do not leave the scanning holder in locations that are exposed to direct
sunlight or that are subject to high temperatures or humidity.
• When you load the scanning holder on the printer, be sure to set the
paper thickness lever to the down (or envelope) position. Scanning with
the lever set incorrectly will adversely affect the print quality.
3 Load the scanning holder in the auto sheet feeder of the printer.
22Using the Scanner

4 Adjust the paper guide to the left edge of the scanning holder.
Caution
Paper Guide
To prevent possible damage to the scanning holder, always insert the
seamed side into the auto sheet feeder first.
Loading an Image
23Using the Scanner

Using the Scanner With Windows
Using IS Scan
Changing the Scanning Mode
Using the Customized Scanning Mode
Saving the Settings
Using the Saved Settings
Other IS Scan Features
Using IS Scan Plus
Using Copy
Using Capture Image
Using Capture Photo
Editing a Scanned Image
Printing a Scanned Image
Saving a Scanned Image
24Using the Scanner With Windows
Using IS Scan
Note
This section describes how to scan an image when you launch IS Scan from within a
TWAIN-compatible application program.
■ Scanning an Image
These basic procedures may vary according to the application program
you are using.
1 Install the IS-12 Color Image Scanner Cartridge in the printer.
Installing the Scanner Cartridge
2 Make sure Canon IS Scan 2 is set as the Acquire Source and then select
the command used for scanning (such as Acquire or TWAIN) from the
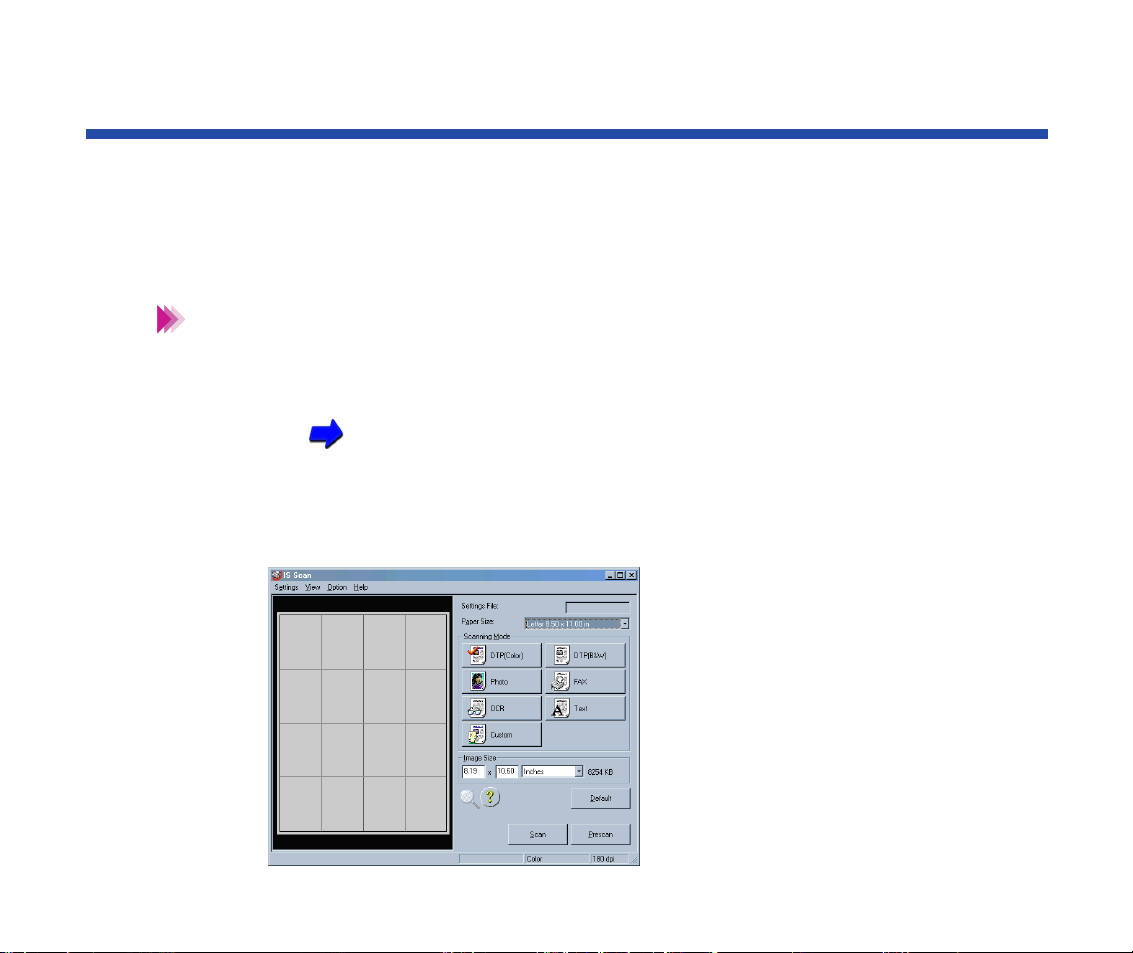
menu of the application program. The main IS Scan dialog box displays:
25Using the Scanner With Windows

Using IS Scan
Note
3 Specify the basic settings.
• Click the down-arrow on the right of the Paper Size box and select the
most appropriate paper size for the image you wish to scan.
• Select the most appropriate scanning mode for the image you wish to
scan in the Scanning Mode box.
Changing the Scanning Mode
4 Load the image you wish to scan in the auto sheet feeder of the printer
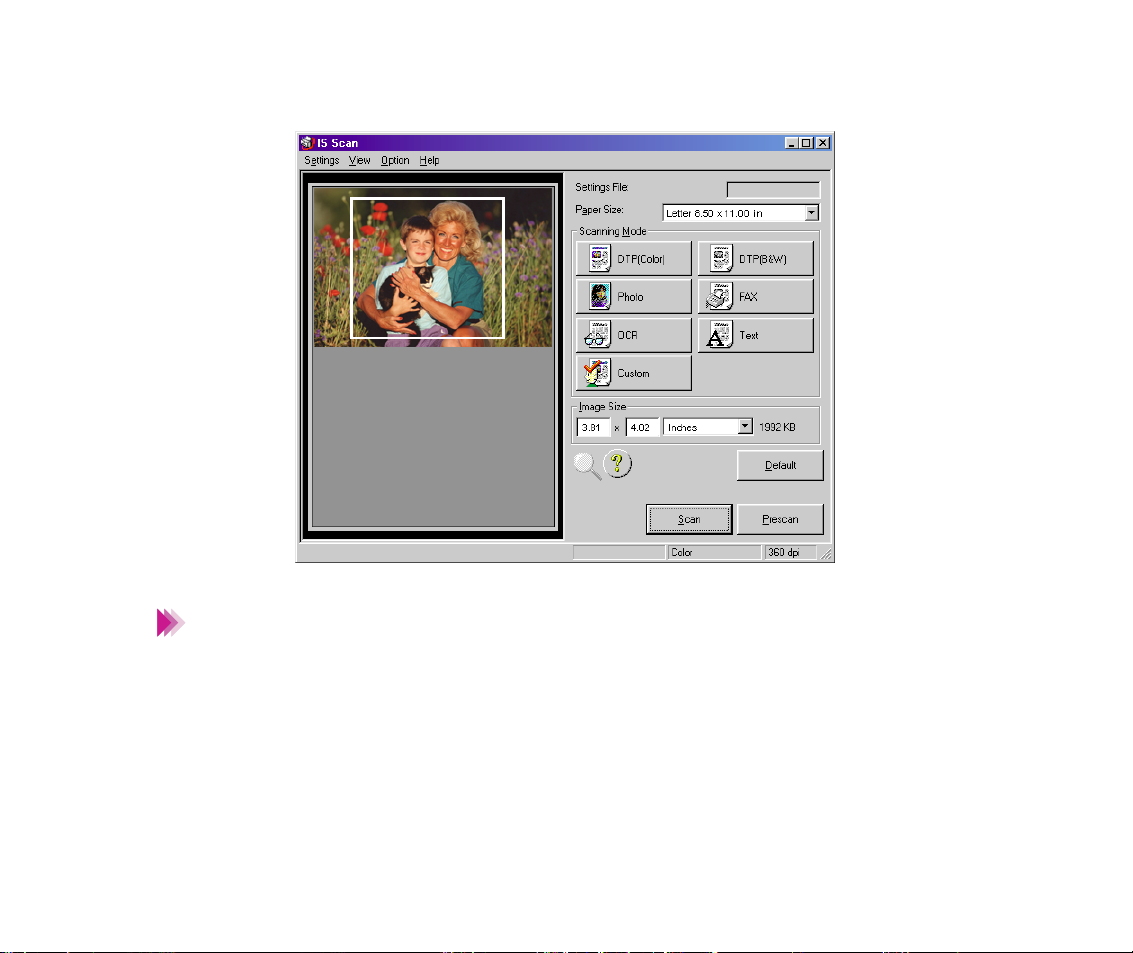
and click the Prescan button.
It’s a good idea to use prescanning to determine whether or not an image
can be scanned properly or to test the effects of image adjustments. If the
image is slanted or a portion of the image is cut off in the preview area,
click the Clear button. Load the image correctly and click the Prescan
button again.
5 To scan only a portion of the image, you can drag the mouse to specify the
portion. The specified portion is called a Selection Box and only the area in
the Selection Box will be scanned. To specify the Selection Box:
• Point to a corner of the rectangular area of the image that you want to
select.
• Drag the mouse to the opposite corner of the rectangle.
26Using the Scanner With Windows
Using IS Scan
Note
• Release the mouse button. The Selection Box appears on the image.
• To move the Selection Box, place the mouse pointer within the Selection
Box and drag the mouse to the desired position.
• To resize the Selection Box, point to a corner of the Selection Box and
then drag the mouse.
• You can confirm the dimensions of the Selection Box in the Image Size
box.
• The minimum size of the Selection Box is 1" × 1" (25.4 mm × 25.4 mm).
27Using the Scanner With Windows

Using IS Scan
6 Load the image you wish to scan in the auto sheet feeder again.
7 Click the Scan button. Remember, if you specified a Selection Box in
step 5, only that portion of the image is scanned.
8 After scanning is complete, click the Transfer button to transfer the image
data to the TWAIN-compatible graphics application program. Adjust, edit,
or enhance the image in the application program as needed.
28Using the Scanner With Windows

Note
Using IS Scan
• Some TWAIN-compliant graphics application programs do not display
the main IS Scan dialog box but instead display a different screen
characteristic of the application program. If you are using this type of
application program, read the documentation of the application program
carefully and perform prescanning or normal scanning.
• After launching IS Scan from within a TWAIN-compatible application
program, do not close the application program. If you do, the system may
not be able to respond.
• To quit IS Scan, select Exit Driver from the Settings menu.
29Using the Scanner With Windows
Changing the Scanning Mode
You can select a scanning mode according to your scanning purpose. Optimum settings,
such as image type and resolution, are pre-assigned based on the contents of a scanning
job. When you wish to customize the settings for special scanning jobs, click the Custom
button.
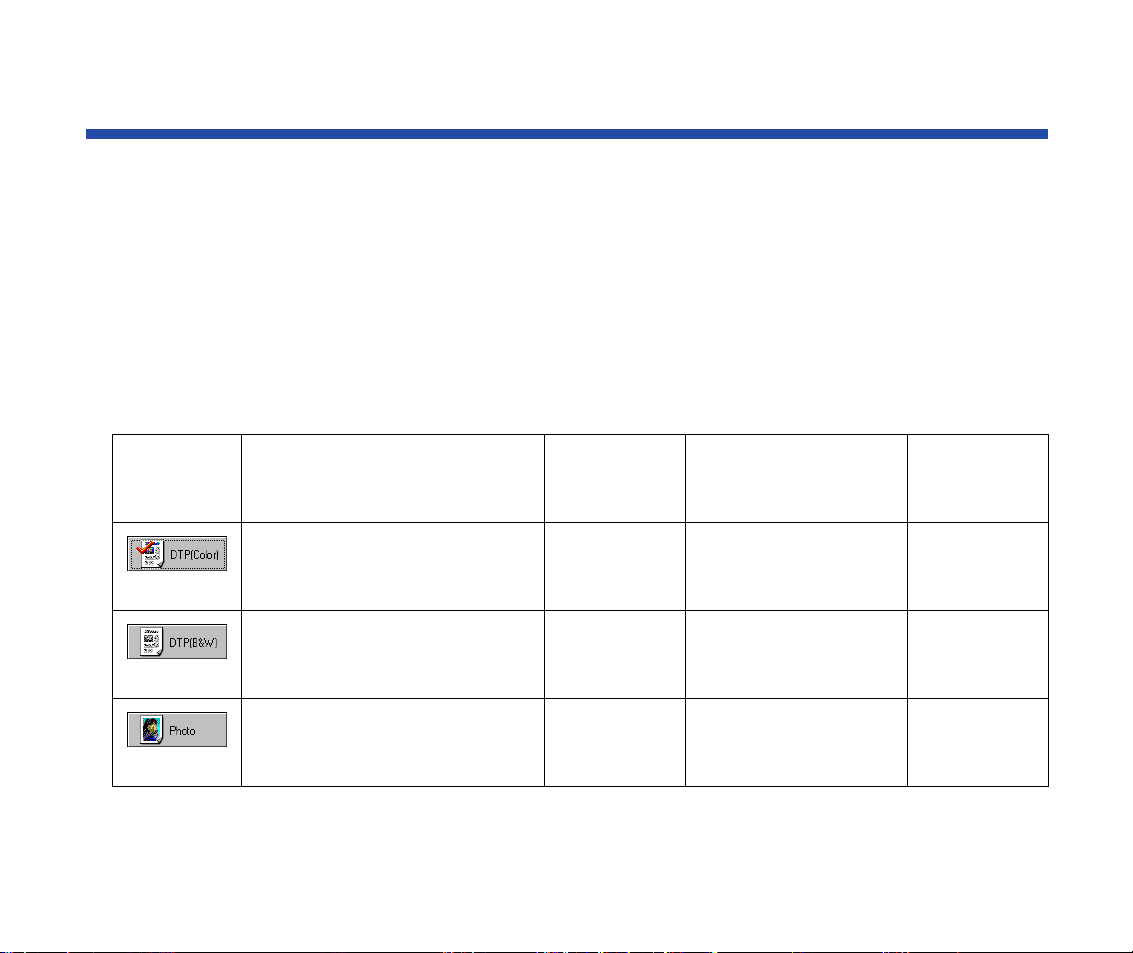
■ Selecting a Default Scanning Mode
Select the most appropriate icon in the Scanning Mode box of the main IS Scan dialog box
according to your scanning purpose.
Scanning
Mode
Purpose
Standard setting for scanning a
color image
Standard setting for scanning a
monochrome image
Suitable for scanning a
photographic print such as a
snapshot
Image Type
Resolution
Color
180 dpi
Grayscale
180 dpi
Color
360 dpi
Edge Emphasis
Character Emphasis
Color Matching
Off
Off
On
Off
Off
Off
Off
Off
On
Prescan
Mode
Grayscale
Grayscale
Grayscale
30Using the Scanner With Windows
 Loading...