


|
|
|
|
|
|
BUILT-IN FRIDGE-FREEZER ............. |
page 1 to page 4 |
GB |
|
|
|
|
|
|
COMBINADO EMPOTRADO............. |
de pág. 5 a pág. 8 |
ES |
|
|
|
|
|
|
.........COMBINADO DE ENCAIXAR |
de pág. 9 à pág. 12 |
PT |
|
|
|
|
|
|
EINBAUGERÄT....................................... |
Seite 13 bis 16 |
DE |
|
|
|
|
|
|
COMBINÉ ENCASTRABLE ....... |
de page 17 à page 20 |
FR |
|
|
|
|
|
|
COMBINATO INCASSO ................ |
da pag. 21 a pag. 24 |
IT |
|
|
|
|
|
|
ΕΝΤΟΙΧΙΖΟΜΕΝΟΣ ΨΥГΕΙΟΚΑΤΑΨΥΚΤΗΣ από σελ. 25 έωλ. 28.. |
EL |
|
|
|
|
|
|
|
|
|
|
|
|
|
|
|
|
|
|
|
|
|
|
|
|
|
|
|
|
|
|
|
|
|
|
|
|
|
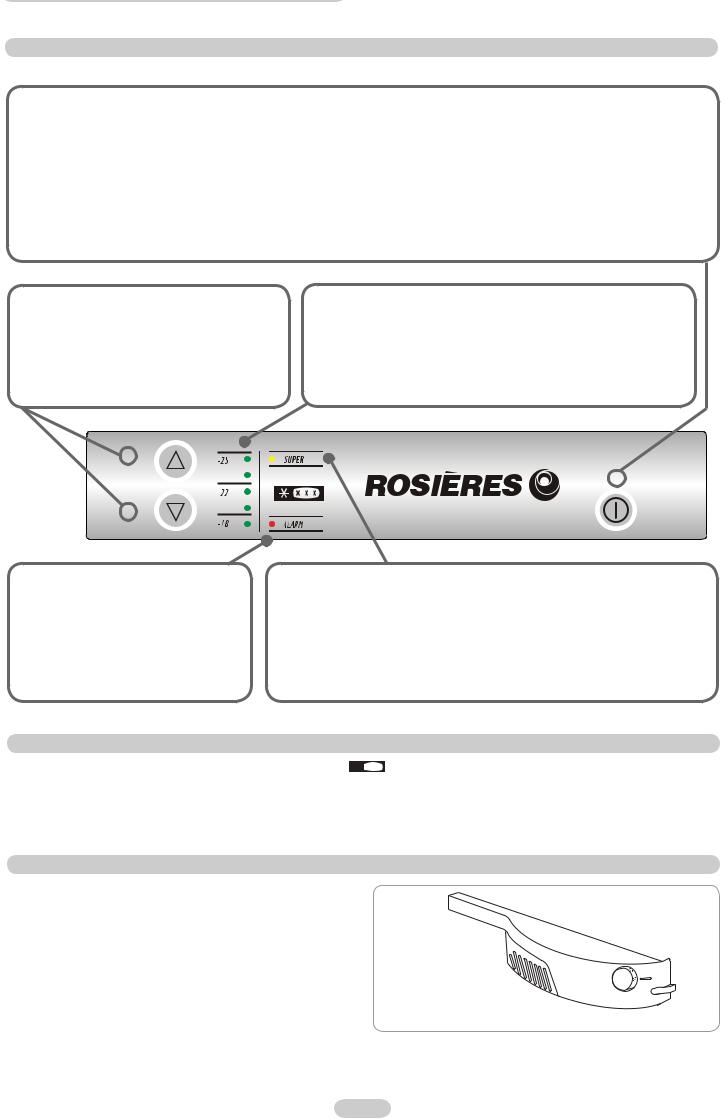
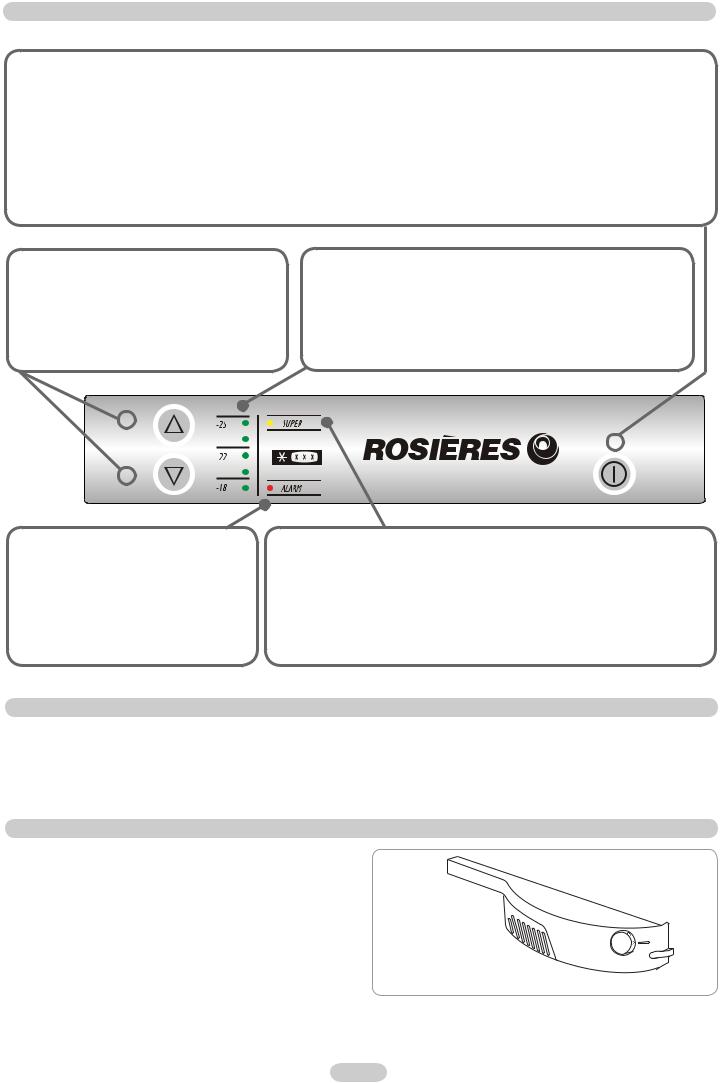
FREEZER COMPARTMENT CONTROL PANEL
Open the top door of the fridge-freezer to access the control panel.
Press button (1) to turn the freezer compartment on/off.
The manufacturer normally supplies the appliance with the temperature on an intermediate setting, so you simply have to connect the appliance.
NOTE: if no temperature is displayed when you connect the appliance, press button (1) to turn on the freezer compartment.
The appliance‘s electronic memory stores the control panel settings when you turn off the appliance, so you simply have to press button (1) to turn the freezer compartment on again.
If the appliances stops because the electricity goes off, press button (1) to start up the fridge-freezer when the electricity comes back on.
NOTE: When you press the button and the freezer compartment is turned off, the compressor takes 15 seconds before it stops. If you press in the button again this time, the appliance will keep working. This prevents the appliance being accidentally turned off, when cleaning it for example.
Use these buttons to set the freezer compartment temperature.
Press button (2) to lower the temperature and button (3) to raise the temperature.
These LEDs show whether the temperature increases or decreases in the freezer compartment.
More LEDs come on and the lights get brighter as the temperature decreases.
The freezer compartment is off when all the LEDS are off. Each LED has two display modes. A dull light means the freezer is set to an intermediate temperature, while a bright light means the freezer is set to a colder temperature.
3
(Figure 1) |
1 |
|
2
The red alarm light comes on if the freezer compar tment temperature is -7°C. If the temperature goes below -8°C the fight will automatically turn off.
NOTE: If the appliance is turned off for a long time or is switched on for the first time, the red light will come on until the freezer temperature decreases.
The orange light comes on when SUPER mode is working.To select this mode. keep pressing button (2) so that all LEDs come on with a bright light and press the button again until the orange light comes on.
This mode powers the compressor of the freezer compartment continually for a maximum of 50 hours, for quick freezing. Press button (3) to stop Super mode, before the end of the 50-hour period.
NOTE: If the compressor is not operating when you select SUPER mode, the system will watt for the compressor to work before starling SUPER mode.
FREEZING
If you want considerably faster freezing times, you can also remove the 
 box. Set the freezer control pane! to SUPER and the orange light will come on (see figure 1). After 24 hours, put foods directly on the metal rack. Freezing takes 24 hours and you can then put the box back and arrange the foods in the freezer. After 50 hours the electronic memory board will automatically reset the temperature to the previous intermediate setting.
The maximum quantities of food that you can freeze are indicated on the rating plate (see figure 2). Remove all boxes apart from the bottom one for freezing and storage standards‘ tests.
FREEZER COMPARTMENT CONTROL PANEL
Turn the knob on the control panel to set and adjust the temperature of the fridge and freezer.
The thermostat panel is inside the fridge, in the top right-hand corner. The appliance is turned off when the knob is set to „0“. We recommend you set the temperature to 2 or 3.
1 GB

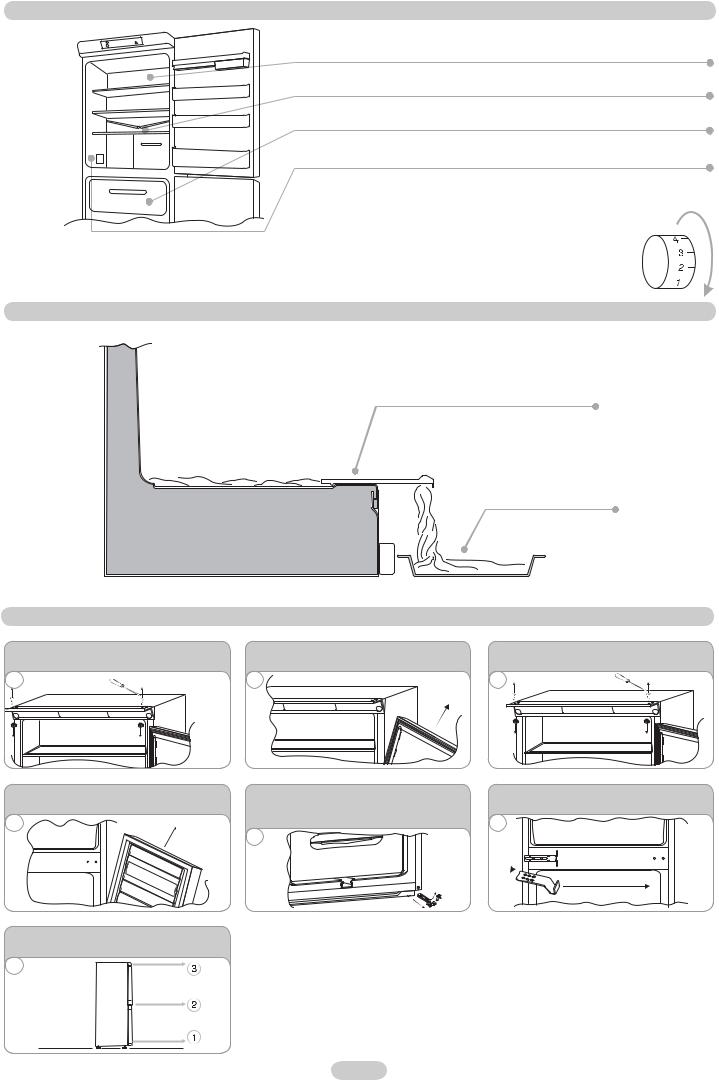
DEFROSTING
(Figure 2) |
The fridge compartment is automatically defrosted when the compressor is not |
|
working. |
||
|
||
|
A small amount of frost or drops of water on the back of the fridge compartment when |
|
|
the fridge is working is normal. |
|
|
Make sure the water outlet is always clean. Make sure foods do not touch the back or |
|
|
sides of the fridge. |
|
|
We recommend you defrost the freezer compartment when the frost is more than 3 mm |
|
|
thick. |
|
|
NB. This is the rating plate. If you need to contact our Service Department in the |
|
|
event of faults, remember to give them the information on the plate. |
Note: if the room temperature is very warm, the appliance may work continually and a layer of frost will deposit on the back of the fridge compartment, in this case, turn the knob to lower settings (1-2).
DRAINING WATER
The appliance has a system for draining water from defrosting.
This system comprises
A bar to remove when defrosting so water can flow into a basin.
A drainage basin (not supplied).
REVERSING THE FRIDGE-FREEZER DOORS
Remove the pin and bushing from the top |
Remove the top door. |
panel. |
|
Remove the middle hinge and washers.
1 |
2 |
3 |
Remove the bottom door. |
Remove the pin of the bottom right-hand hinge |
|
and refit it on the bottom left-hand hinge. |
4 |
5 |
Reverse the bracket cover snap, which is snap-fitted on the bracket.
6
Fit the hinge and doors, working from top to bottom 1 2 3
7
2 GB

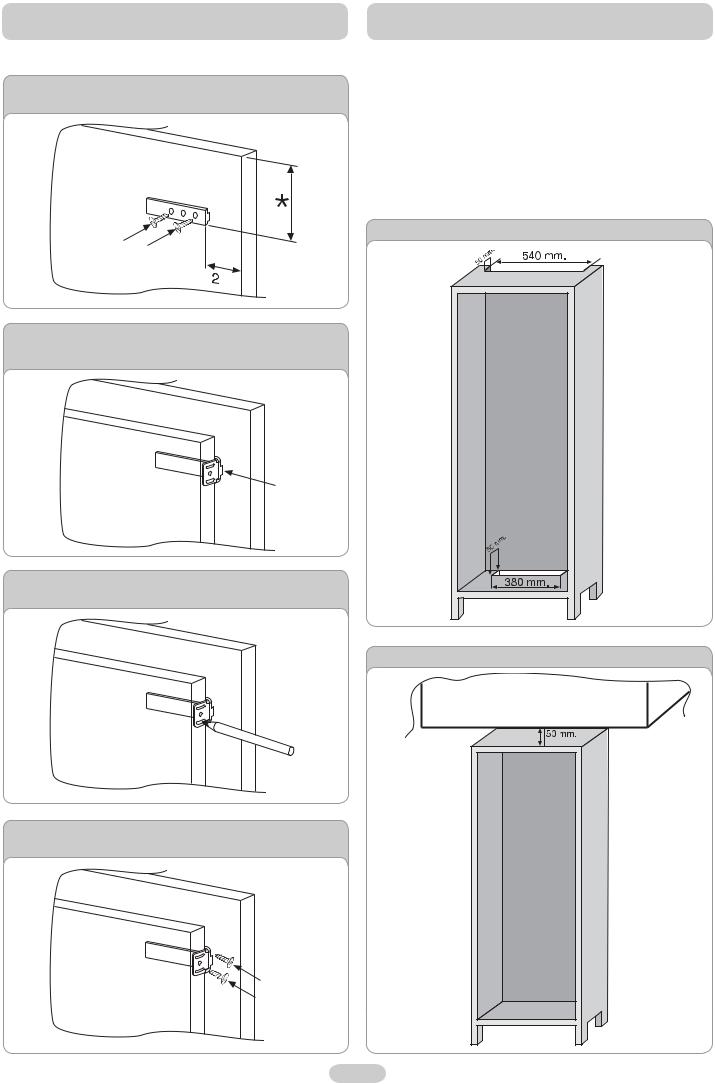
SIZE OF THE APPLIANCE
AND UNIT
INSTALLING THE APPLIANCE IN A UNIT
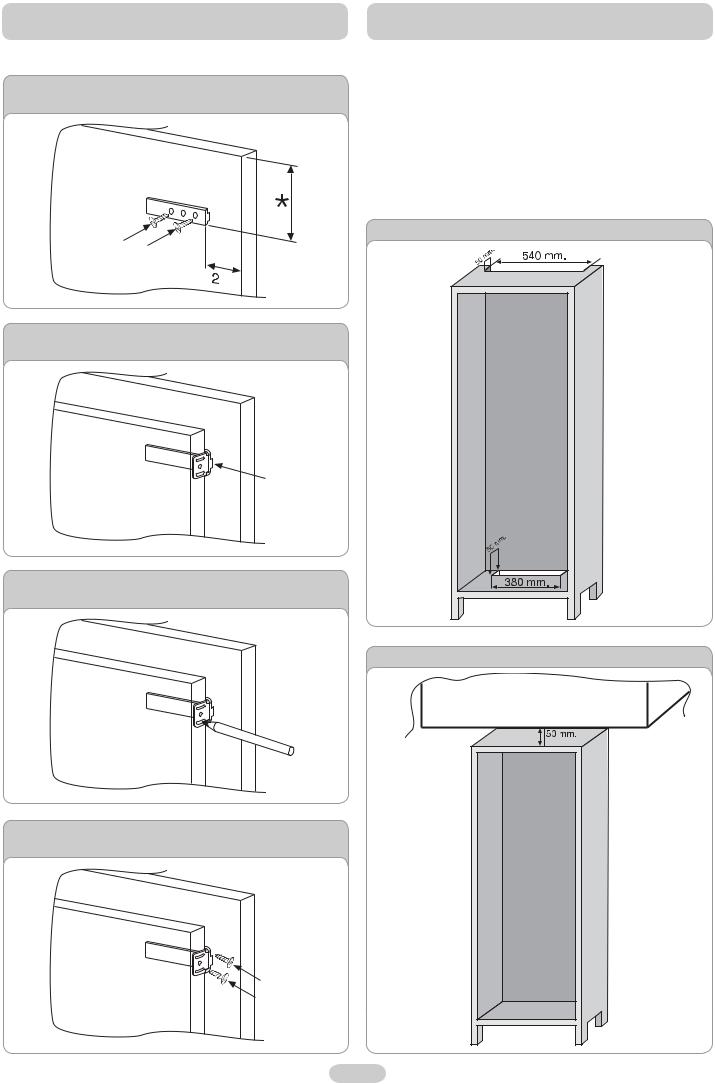
Secure the seal (supplied ) to the appliance, on the opposite side from the hinges.
1
Install the appliance in the unit, aligning it on the opposite side from the hinges.
2
Make sure the top bracket of the appliance is against the unit.
3
Secure the top of the appliance to the unit with the screws provided.
4
Secure the bottom of the appliance with the screws provided.
5
Fit the ventilation grid. |
Loosen the screws on the middle right-hand |
|
hinge. |
6 |
7 |
Secure the bottom of the appliance with the screws provided.
8
Fit the bracket to the unit with the screws |
Tighten the screws in the middle right-hand |
Repeat the same steps for the middle left- |
provided. |
hinge. |
hand hinge. |
9 |
10 |
11 |
3 GB
ALLIGNING UNIT DOORS WITH THE FRIDGE-
FREEZER DOORS
The appliance is supplied with fittings (slides and slide brackets) to align the fridge-freezer doors with the doors of the unit
Fix the slide on the inside of the unit door, at the height you want. Make sure it is approximately 20 mm from the outside edge of the door.
Open the doors of the unit and fridge. Position the slide bracket around the slide and secure to the appliance door.
Mark the holes for the screws and drill with a 2.5 mm diameter bit.
Fit the appliance door to the door of the unit, using the slots on the slide bracket as a guide.
ENSURING YOUR FRIDGE-FREEZER
WORKS PROPERLY
After fitting the appliance, place the rear of the unit against the wall to prevent access to the compressor unit.
To make sure the fridge-freezer works properly, air must circulate to cool the condenser which is situated at the bottom of the appliance.
The unit must have a rear outlet with top opening that is not obstructed and a front opening which is covered by the ventilation grid.
Size of the unit cut outs.
Room to leave between the unit and ceiling.
4 GB
CAUDRO DE MANDOS DEL CONGELADOR
Para ver el cuadro de mandos, basta con abrir la puerta superior del frigorífico.
La tecla (1) permite encender o apagar el congelador.
Generalmente, el aparato viene de fábrica con una temperatura intermedia, por lo que únicamente es necesario enchufarlo a la toma de corrinente eléctrica.
ATENCIÓN: en caso de que al enchufarlo a la toma de red no visualizara ninguna temperatura, pulse el botón (1) para encender la sección congelador.
La placa electrónica de este aparato memoriza la programación del panel de mandos en el momento del encendido, por lo tanto sólo será necesario pulsar la tecla (1) para poner de nuevo en marcha el congelador.
En caso de que se produzca un corte del suministro eléctrico y el aparato se apague, una vez recuperada la corriente el aparato se volverá a poner en marcha con sólo pulsar la tecla (1).
ATENCIÓN: en caso de que pulse el botón y se apague el congelador, el compresor tardará 15 segundos en apagarse. Si durante este lapso de tiempo vuelve a pulsar el botón, el aparato seguirá funcionando sin que se interrumpa su funcionamiento. Esta medida está destinada a evitar desconexiones accidentales, por ejemplo durante la limpieza periódica del aparato.
Estos botones permiten seleccionar la temperatura del congelador.
El botón (2) reduce la temperatura, mientras que el botón
(3) aumenta la temperatura del congelador.
Los indicadores luminosos (LED) indican el aumento o la disminución de la temperatura en el congelador.
La temperatura disminuye con el aumento de los indicadores encendidos y con el aumento de la intensidad luminosa de los LED.
Cuando todos los LED están apagados, el congelador está apagado Cada LED dispone de 2 estados de encendido, el estado de baja luminosidad corresponde a una temperatura intermedia, mientras que una alta luminosidad corresponde a una temperatura más baja.
3
(Figura 1) |
1 |
|
2
El indicador rojo de Alarma se enciende cuando la temperatura del congelador es de –7ºC. Cuando la temperatura es más fría que –8ºC, el indicador se apaga automáticamente.
ATENCIÓN: cada vez que el aparato se encienda después de un largo período de desconexión o se encienda por primera vez, el indicador rojo permanecerá encendido hasta que disminuya la temperatura del congelador.
El indicador naranja se enciende cuando se activa la función SUPER. Para poder activar esta función, pulse repetidamente el botón (2) de manera que todos los LED se enciendan y presenten una alta luminosidad; a continuación vuelva a pulsar el botón hasta que el indicador naranja se ilumine.
Esta función alimenta el compresor del congelador de modo continuo durante un tiempo máximo de 50 horas y es ideal para proceder a congelaciones rápidas. Para salir de la función Super antes de que hayan transcurrido 50 horas, basta con pulsar el botón (3).
ATENCIÓN: si el compresor está en pausa en el momento de activar la función SUPER, el sistema finalizará dicha pausa antes de activar la función SUPER.
CONGELACIÓN
Si desea reducir considerablemente los tiempos de congelación, retire temporalmente el cajón y seleccione la función SUPER en el panel de control del congelador; inmediatamente se encenderá el correspondiente indicador naranja (véase la figura 1). Al cabo de 24 horas, introduzca los alimentos directamente en la rejilla metálica. Una vez transcurridas otras 24 horas, la congelación habrá finalizado y podrá volver a introducir el cajón y repartir de nuevo los alimentos en el interior del congelador. Al cabo de 50 horas, la placa electrónica recuperará automáticamente la temperatura intermedia anteriormente seleccionada.
CUADRO DE MANDOS DEL FRIGORÍFICO
Para poder encender y modificar la temperatura del frigorífico deberá accionar la rueda del cuadro de mandos. La rueda del termostato est situada en la parte superior derecha del interior del frigorífico. Si la rueda está en la posición „0“, el frigorífico estará apagado. Las posiciones recomendadas son 2-3.
5 ES
DESCONGELACIÓN
(Figura 2) |
La descongelación del frigorífico se produce de modo automático durante las pausas |
|
del compresor. |
||
|
||
|
La presencia de una ligera capa de escarcha o de gotas de agua durante el funcionamiento |
|
|
debe considerarse normal. |
|
|
Es importante mantener siempre limpio el conducto de desagüe y evitar que los alimentos |
|
|
estén en contacto con la pared trasera de! frigorífico. |
|
|
Es aconsejable descongelar el congelador en cuanto la capa de hielo alcanza un espesor |
|
|
superior a 3 mm. |
|
|
Nota: aquí se encuentra la placa que contiene los datos que deberá comunicar al |
|
|
Servicio de Asistencia Técnica en caso de producirse una avería. |
Importante: si la temperatura ambiente es muy elevada, el aparato podría funcionar ininterrumpidamente, con la consiguiente formación anómala de hielo en la pared interior trasera del frigorífico. En estos casos, gire la rueda del frigorífico y colóquela en los números más bajos (1-2).
DRENAJE DEL AGUA
El congelador está equipado con un sistema de evacuación del agua de deshielo
Dicho sistema está formado por:
Una palanca que debe ser extraída durante el deshielo para permitir la evacuación del agua.
Bandeja de recogida del agua, no suministrada con el frigorífico
INVERSIÓN DEL SENTIDO DE APERTURA DE LAS PUERTAS
Saque el perno y el correspondiente casquillo superpuesto del travesaño superior
1
Extraiga la puerta inferior
4
Extraiga la puerta superior
2
Retire el perno de la bisagra inferior derecha y vuélvalo a montar en ta bisagra inferior izquierda
5
Desmonte la bisagra central y tetire las correspondientes arandelas
3
Invierta en el mueble la tapa de la escuadra montada a presión en la escuadra
6
Vuelva a montar las bisagras y tas puertas de abajo a arriba 1 2 3
7
6 ES

DIMENSIONES DEL APARATO Y DEL
HUECO DE ENCASTRAMIENTO
INSTALACIÓN DEL APARATO EN UN ARMARIO
Fije los revestimientos suministrados al aparato en el lado contrario a las bisagras
1
Introduzca el aparato en el armario, empujándolo por el lado opuesto a las bisagras
2
Adhiera perfectamente la escuadra superior del frigorífico al mueble
3
Bloquee la parte superior del frigorífico al mueble utilizando los tornillos suministrados
4
Bloquee la parte inferior del frigorífico medíante los tornillos suministrados
5
Instale a presión la rejilla de ventilación |
Afloje los tornillos de fijación de la bisagra |
|
central derecha |
6 |
7 |
Bloquee la parte inferior del aparato mediante los tornillos suministrados
8
Atornille la escuadra a la columna mediante los tornillos suministrados
9
Apriete los tornillos de fijación de la bisagra central derecha
10
Repita las mismas operaciones en la escuadra central izquierda
11
7 ES
ACOPLAMIENTO DE US HOJAS DEL ARMARIO DE INSTALACIÓN A LAS PUERTAS DEL FRIGORÍFICO
El frigorífico estáó equipado con un sistema que permite fijar sus puertas a las del armario de instalación (correderas de empuje).
Fije la corredera en la parte interior de la hoja de la columna de encastre a la altura deseada y a unos 20 mm del borde extenor de la puerta.
Abra las puertas del armario de instalación y del frigorífico. Coloque e! empuje a presión en la corredera y a continuación adhiéralo a la puerta del frigorífico.
Marque los puntos de fijación para los agujeros y perfórelos con una broca de 2,5 de diámetro
FUNCIONAMIENTO PARA UN CORRECTO
FUNCIONAMIENTO
Una vez encajado el producto, coloque la parte posterior del armario en contacto con la pared, de manera que impida el acceso al espacio del compresor.
Rara un correcto funcionamiento del producto, es indispensable permitir la oportuna ventilación de aire, de manera que pueda enfriarse el condensador que está situado en la parte posterior del aparato.
Para ello, el armario deberá estar provisto de un espacio por detrás, cuya abertura superior no debe quedar obstruida, y por una rendija delantera que se tapará con una rejilla de ventilación.
Dimensiones interiores del armario
Espacio que debe dejarse entre el armario y el techo
Una la puerta del aparato a la hoja del mueble teniendo como referencia los orificios del empuje
8 ES
 Loading...