


Freeview+ HD Digital TV Recorder
Installation & Operating Instructions |
|
127/8037 |
BU102ZRH50
 HD
HD
Important - Please read these instructions fully before installing or operating
These instructions contain important information which will help you get the best from your digital TV recorder and ensure safe and correct installation and operation.
For any help concerning set up and use of your digital TV recorder please call the Customer Helpline: 0845 604 0105
Lines open: 9am - 8pm Monday to Saturday and 10am - 4pm Sunday
BU102ZRH50 - 13/6/13
BU102ZRH50 User Guide_v2.indd 1 |
|
|
13/06/2013 09:49:12 |
|
|
||
|
|
|
|

Contents
Getting Started |
4-9 |
Product Features |
4 |
Accessories included |
4 |
Recording and Playback - Features |
4 |
Your remote control |
5 |
Connecting your digital box to your TV |
6 |
Connecting your digital box to your |
|
broadband router |
6 |
Power connection |
7 |
Remote control - inserting batteries |
7 |
Initial set up |
8 |
|
|
Basic Features |
10-14 |
|
|
Using your digital box |
10 |
Selecting channels |
10 |
Using the number buttons |
10 |
Using the change channel buttons |
10 |
Using the guide |
10 |
Using the channel list |
10 |
Changing the volume |
11 |
Using mute |
11 |
Pausing live TV |
11 |
Recording a programme |
12 |
Using the library |
12 |
Other remote control buttons |
13 |
|
|
Advanced Features |
15-22 |
|
|
Main menu |
15 |
Guide |
15 |
Recording |
16 |
Setting a reminder |
18 |
Library |
19 |
BBC iPlayer |
21 |
Channel list |
21 |
|
|
Settings Menu |
23-28 |
|
|
Using settings |
23 |
Display and audio |
23 |
Language |
24 |
Parental |
24 |
Recording |
25 |
System |
27 |
|
|
Safety Information |
29 |
|
|
|
|
Product Support |
31-34 |
|
|
Argos technical helpline |
31 |
Trouble shooting |
32 |
Disposal information |
34 |
|
|
Guarantee |
36 |
|
|
2 |
For any help concerning set up and use of your digital TV recorder please call the Customer Helpline: 0845 604 0105 |
|
|||
BU102ZRH50 User Guide_v2.indd 2 |
|
|
|
13/06/2013 09:49:12 |
|
|
|
|
|||
|
|
||||
|
|
|
|
|
|
Getting Started
The Argos Technical Helpline is here to help
Technical experts are available 7 days a week
•Simple help and advice on setting up your digital TV recorder.
•Guidance on connecting other devices to your digital TV recorder such as a DVD player.
•Order spare parts, including that lost remote control.
•Any other technical issues you may need assistance with.
Call us today: 0845 604 0105
Local call rates applies*
Lines open 9am-8pm Monday to Saturday and 10am-4pm Sunday.
* Calls to Argos enquiry lines may attract a charge and set up fee from residential lines depending on your call plan/tariff. Mobile and other providers costs may vary, see www.bt.com/pricing for details.
For security and training purposes, telephone calls to and from customer service centres may be recorded and monitored. Calls from Republic of Ireland will attract international call charges.
For any help concerning set up and use of your digital TV recorder please call the Customer Helpline: 0845 604 0105 |
3 |
|||
BU102ZRH50 User Guide_v2.indd 3 |
|
|
|
13/06/2013 09:49:12 |
|
|
|
||
|
|
|||
|
|
|
|
|
Getting Started
Product Features
•Twin tuners.
•Play, pause, record and rewind live TV.
•8 day Electronic Programme Guide (EPG).
•Watch High Definition (HD) programmes.
•Catch up TV service (BBC iPlayer).
•First time install wizard.
•High definition user interface.
•Less than 0.5 Watt standby power consumption.
•Subtiltles.
•Audio description.
Recording and Playback - Features
•Hard Disk Drive information.
•Record over 300 hours of your favourite programmes:
312 hours standard definition.
125 hours high definition.
•Simultaneously watch one channel and record another.
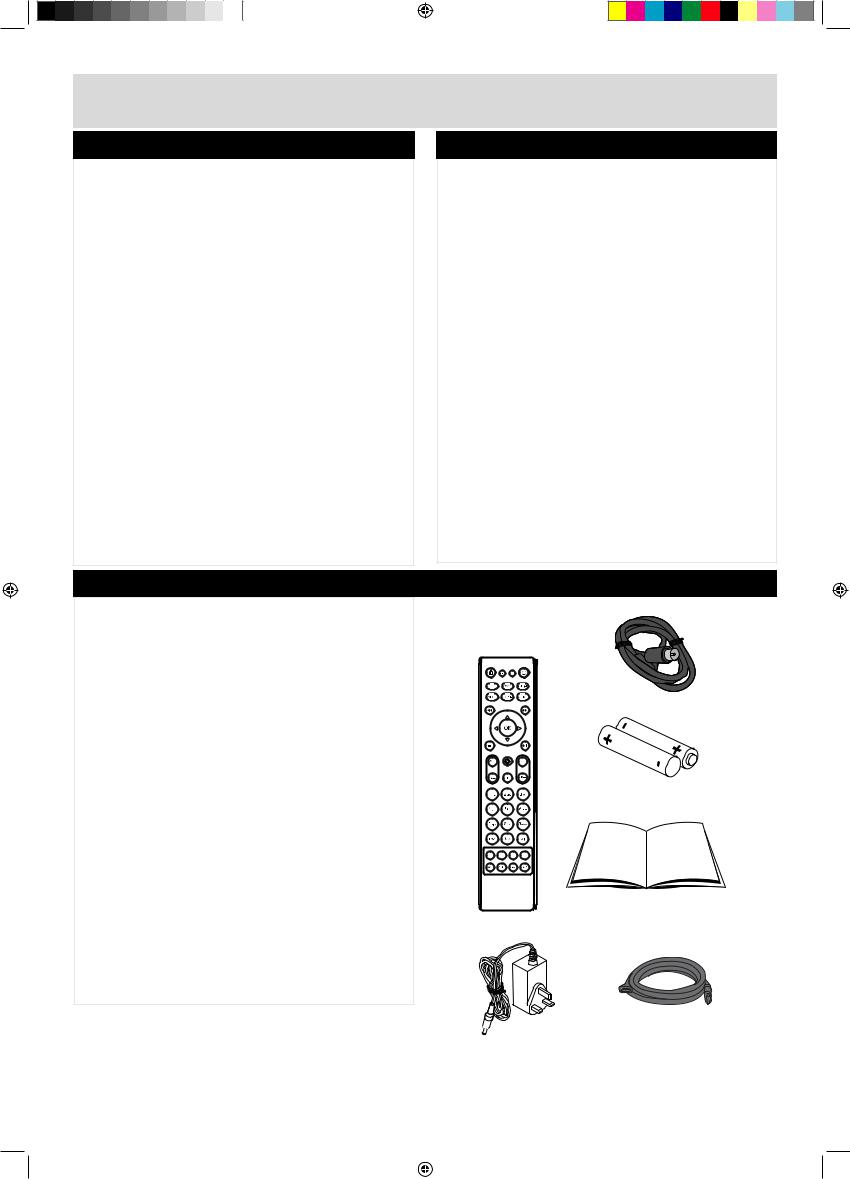
Accessories included
Remote control
RF cable
Batteries: 2 x AAA
Instruction Book
Power Adapter
HDMI cable
FA V |
ONLINE |
4 |
For any help concerning set up and use of your digital TV recorder please call the Customer Helpline: 0845 604 0105 |
|
|||
BU102ZRH50 User Guide_v2.indd 4 |
|
|
|
13/06/2013 09:49:12 |
|
|
|
|
|||
|
|
||||
|
|
|
|
|
|

Getting Started
Your remote control
MUTE: Turns your TV sound on/off
HOME: Press to return to BBC1 at any time
FAV
ONLINE: Display the online menu
LIBRARY: Displays a library of |
ONLINE |
previously recorded programming  MENU: Display the Main Menu
REWIND:
(1)Fast Rewind at variable speeds
(2)Step through menu bars
Navigation: Navigate up/down/left/right in menus/on screen displays
 STOP:
STOP:
Stops recording or live paused TV
Volume (V+ V-):
Changes your TV volume
0 – 9: Numerical keys
BACK: Return to previous menu


AD: Set Audio Description on/off 


SUB: Set subtitles on/off
FAV (Favourites List): Displays the list of your favourite channels
POWER: Switches the main unit to standby
SWAP: Switches between previous and currently watched TV channels
CH LIST (Channel List): Display the list of stored channels
GUIDE: Display the TV programme guide
FAST FWD: (1) Fast Forward at variable speeds
(2) Step through menu bars
OK: Press to confirm current selection
 PLAY/PAUSE : Toggle action for recordings and Live Pause TV
R (RECORD)
(1)Record a programme
(2)Set a future recording
P+, P- (Change Channel): Changes your TV channels
i (Information):
Displays information about programmes and recordings
EXIT: Exit the menu and return to live TV
RED, GREEN, YELLOW, BLUE
Coloured Buttons: quick keys
AUD: Select audio language (if available)
TEXT: Load text services available on some channels
For any help concerning set up and use of your digital TV recorder please call the Customer Helpline: 0845 604 0105 |
5 |
BU102ZRH50 User Guide_v2.indd 5 |
|
|
13/06/2013 09:49:13 |
|
|
||
|
|
|
|
Getting Started
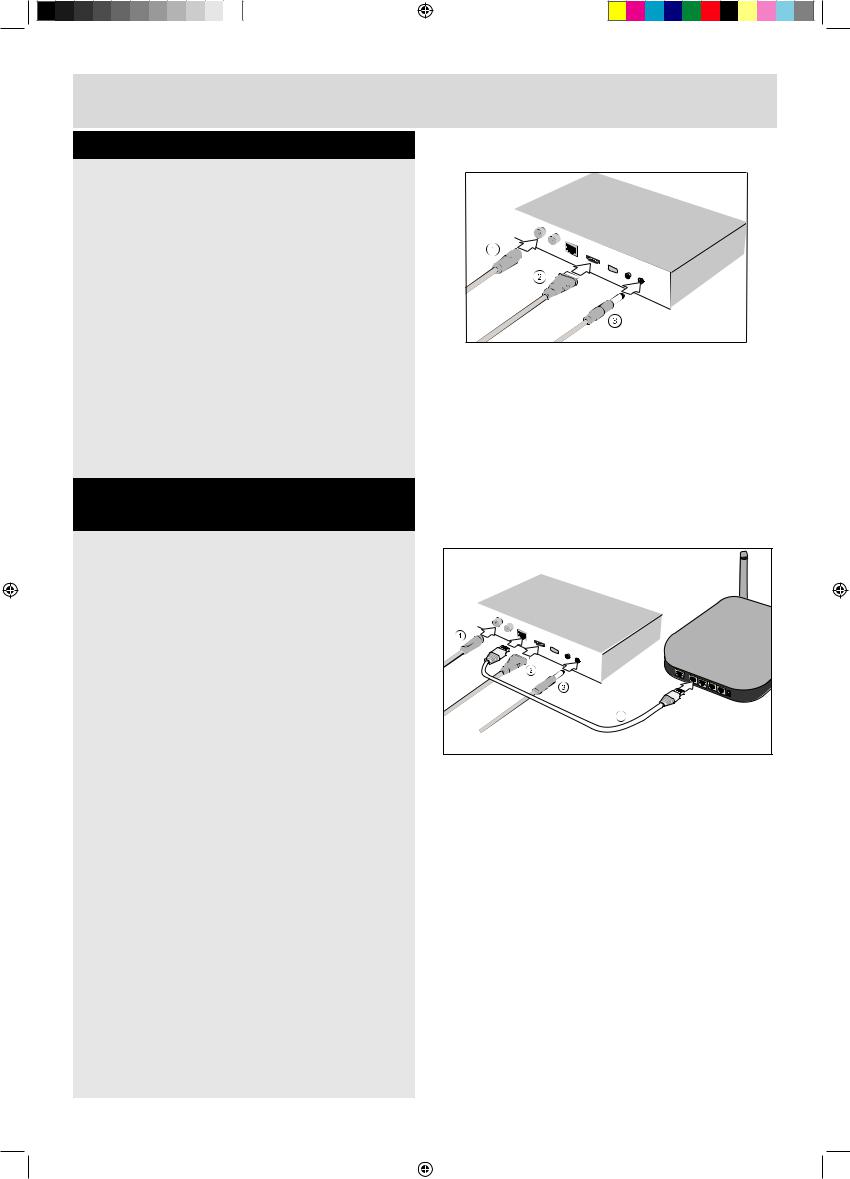
Connecting your digital box to your TV
Your digital box connects to your TV via an HDMI connection.
There are three cables to be connected as shown below.
1.Cable 1. Connect the aerial cable between the RF IN socket on your digital box and your external aerial wall socket.
2.Cable 2. (HDMI). Connect the HDMI cable between the HDMI socket on the back of your digital box and an HDMI socket on your HD Ready TV.
3.Cable 3. Connect the power socket on the cable from the power adaptor to the 12V DC IN connection on the back of your digital box.
Connecting your digital box to your broadband router
If you are not ready to complete this stage of the setup at this time, you can skip this step and continue with setting up your digital box. Connecting to the internet enables you to use catch up TV services such as BBC iPlayer.
4.Cables 1, 2 and 3. First follow the set up instructions as shown above.
5.Cable 4. Connect an Ethernet cable (not included) to the NETWORK connection on your digital box. Connect the other end of the Ethernet cable to a free Ethernet socket on the back of your router.
ROUTER |
6 |
For any help concerning set up and use of your digital TV recorder please call the Customer Helpline: 0845 604 0105 |
|
|||
BU102ZRH50 User Guide_v2.indd 6 |
|
|
|
13/06/2013 09:49:13 |
|
|
|
|
|||
|
|
||||
|
|
|
|
|
|
Getting Started
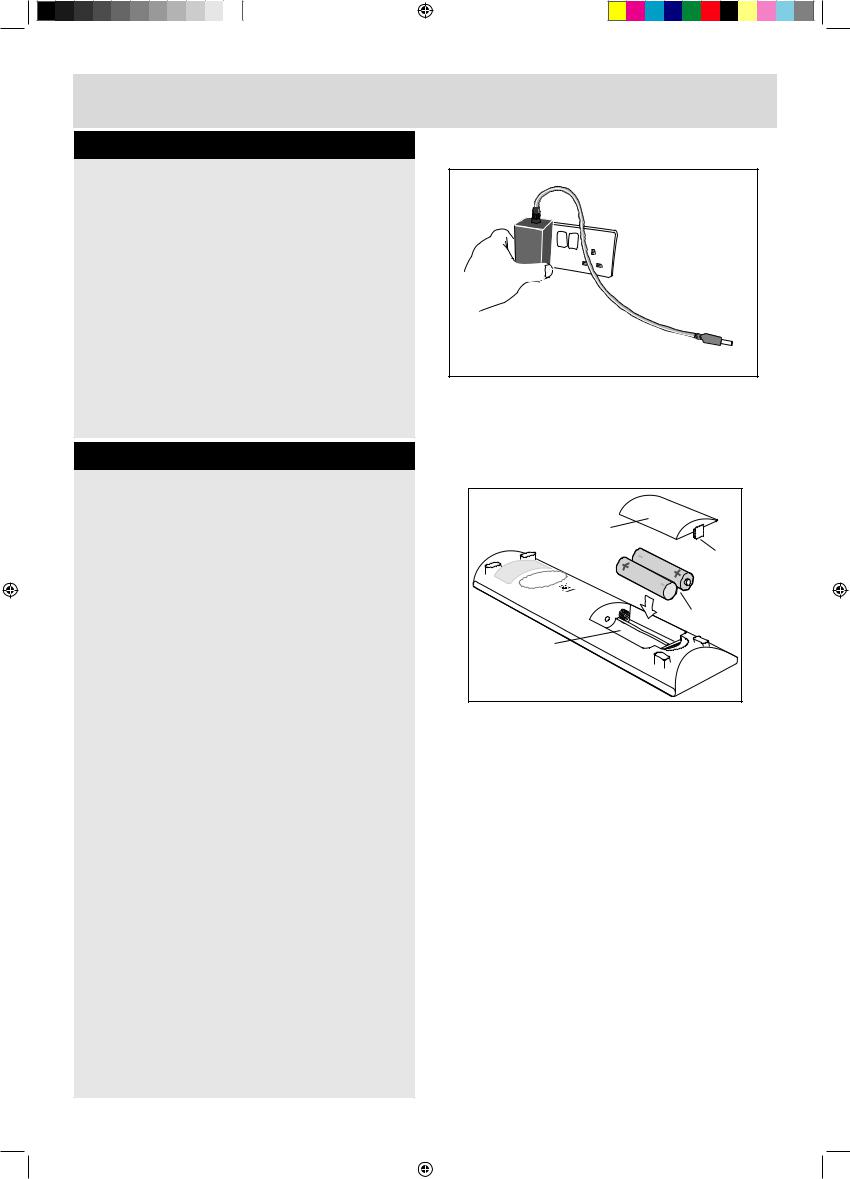
Power Connection
Before connecting the power to the digital box, check that the mains voltage on the rating plate is the same as the voltage in your area. Plug the power connector on the power supply into the 12V DC IN connector on the rear panel of the digital box. Plug the power adapter into the wall socket and switch on the mains power.
PLUG IN YOUR MAINS
TO 12 V DC ADAPTOR 
SWITCHED MAINS OUTLET SOCKET
CONNECT TO THE DC IN CONNECTOR
ON THE DIGITAL BOX REAR PANEL
Remote control - inserting batteries
Remove the battery cover on the back of the remote control, gently push down and pull backwards at the same time.
Insert two AAA/R3 or equivalent type batteries. Ensure the batteries are inserted the correct way and replace the battery cover.
Note: When the remote control is not going to be used for long periods of time, the batteries should be removed. Otherwise the remote control may be damaged, caused by battery leakage and corrosion.
BATTERY |
|
COMPARTMENT |
|
LID |
CLIP |
|
|
|
BATTERIES |
|
TYPE AAA |
BATTERY |
|
COMPARTMENT |
|
fig.4b
For any help concerning set up and use of your digital TV recorder please call the Customer Helpline: 0845 604 0105 |
7 |
|||
BU102ZRH50 User Guide_v2.indd 7 |
|
|
|
13/06/2013 09:49:13 |
|
|
|
||
|
|
|||
|
|
|
|
|
Getting Started
Initial set up
Easy install (recommended)
When you first connect your digital box to a
TV and turn it on, the ‘First Time Installation’ screen will be displayed.
Easy install is the recommended option as it will attempt to find the optimal settings for your
TV and digital box.
‘First Time Installation’ will scan for TV and Radio channels and store the results on the digital box. This process will take approximately 8-10 minutes to complete.
You can press the BACK Button at any time to return to the previous step.
Easy install may not always provide the optimum setting level for your TV. If you know the screen size (aspect ratio) of your display you can set this manually by following the Advanced install set-up process.
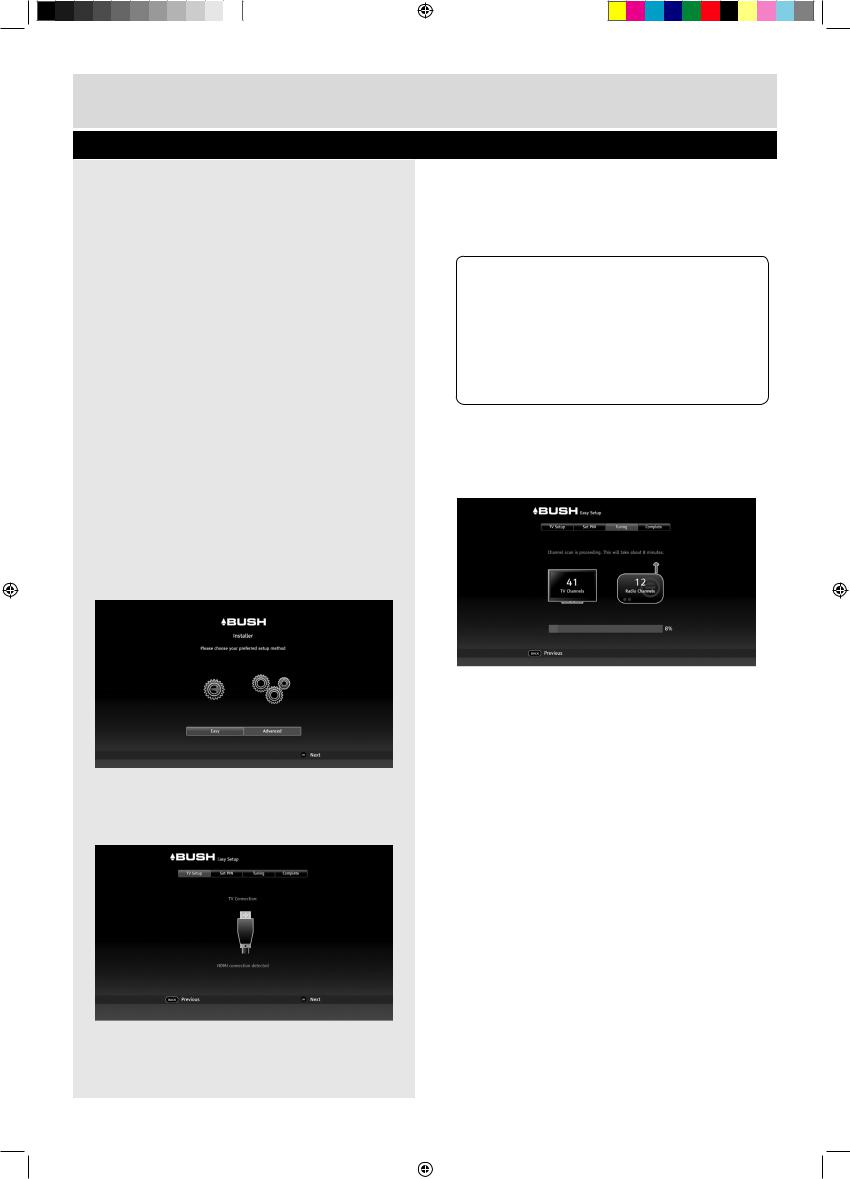
1.The Installer screen will be displayed. If ‘Easy’ is not already selected, press the Button on your remote control to select it.
2.Press the OK Button to begin.
3.The ‘Easy Setup’ screen will be displayed with the ‘TV Setup’ function selected.
4.Press the OK Button.
5.The ‘Set PIN’ function will run. You can choose a new PIN using the number keys
1.(0 to 9) on the remote control. Press OK to confirm your selection, or
2.Press the OK button to skip this stage. The PIN can be set later.
DON’T FORGET! Remember to make a note of your PIN for later use. The default PIN setting is 0000, if you choose to skip the ‘Set PIN’ stage, this will remain the Parental PIN number until changed.
If you change your PIN, write it here:
.......................
3.The ‘Tuning’ function will be selected, showing the number of TV and Radio channels currently stored in the digital box. For a first time install, these will both be 0.
4.Press the OK Button. The system will scan for TV and Radio channels and updates the number of channels found. During this time a progress bar advances until complete (100%). This step takes about 8 min.
5.When scanning has finished, press the OK button. The screen displays ‘Installation complete’.
6.Press the OK Button to begin watching the first
TV channel stored. If there has not been a button press for 15 seconds, the channel will be displayed automatically.
If multiple TV regions are available in your area, you will be prompted to choose a region during the installation process.
8 |
For any help concerning set up and use of your digital TV recorder please call the Customer Helpline: 0845 604 0105 |
|
|||
BU102ZRH50 User Guide_v2.indd 8 |
|
|
|
13/06/2013 09:49:13 |
|
|
|
|
|||
|
|
||||
|
|
|
|
|
|
Getting Started
Initial set up
Advanced install
The Easy install is the recommended installation option.
However you may want to choose the ‘Advanced’ option to manually select the specific aspect ratio or display resolution of your screen.
DON’T FORGET!
You can re-run the install process again at any time.
To carry out an ‘Advanced’ installation:
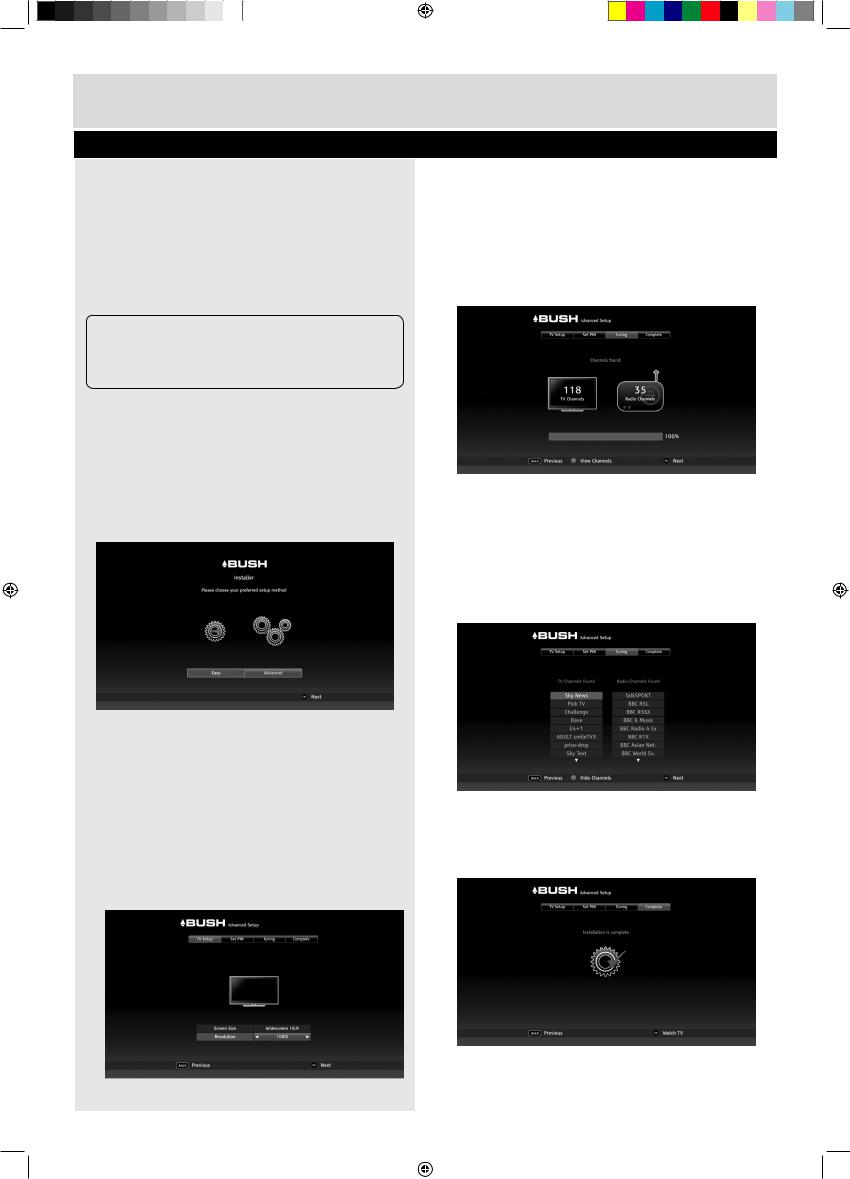
1.If ‘Advanced’ is not selected, press the Button to select it.
2.Press the OK Button. The ‘Advanced Setup’ screen will be displayed with the ‘TV Setup’ function selected. How your digital box is connected to your TV will also be shown.
3.Press the OK Button.
4.Repeatedly press the Button until the screen size (aspect ratio) of your TV appears in the highlighted panel.
5.Press the the Button to highlight the screen resolution panel.
6.Repeatedly press the Button until the resolution of your TV appears in the highlighted panel.
will be selected.
8.Press the OK Button. The PIN can be set later (see ‘Easy’ install in box 5).
9.The ‘Tuning’ function will be selected, showing the number of TV and Radio channels currently stored in the digital box. For a first time install, these will both be 0.
10.Press the OK Button. The system will scan for TV and Radio channels and updates the number of channels found. During this time a progress bar advances until complete (100%).
11.Press the GREEN Button if you want to view the TV and Radio channels found. Press the GREEN Button again to hide the lists.
12. When scanning has finished, press the OK button. The screen displays ‘Installation complete’.
7. Press the OK Button. The ‘Set PIN’ function |
|
|
13. Press the OK button to begin watching the first |
|
|
|
TV channel stored. |
|
|
For any help concerning set up and use of your digital TV recorder please call the Customer Helpline: 0845 604 0105 |
9 |
|||
BU102ZRH50 User Guide_v2.indd 9 |
|
|
|
13/06/2013 09:49:14 |
|
|
|
||
|
|
|
||
|
|
|
|
|
Basic Features
Using your digital box |
Using the guide |
Your digital box has some functions you will use everyday, and others that you only use occasionally.
You can find commonly used functions in this section so you can get your digital box up and running as quickly as possible.
We suggest you read this section carefully, then use other sections when you need extra information or guidance for settings.
Selecting channels
This can be done in several ways:
•Directly from the numerical buttons (0-9) on the remote control
•Using the channel change buttons (P+ and P-) on the remote control.
•Using the Guide
•Using the Channel List
Using the number buttons
1.Enter the channel number using the numerical buttons on the remote control. As they are entered they are displayed in the top right of the screen.
2.To enter ‘51’ for example, enter 5 and then soon after, enter 1.
3.The TV will switch to channel 51.
Using the channel change buttons
1.Press the P+ button to change to the next channel.
2.Press the P- Button to change to the previous channel.
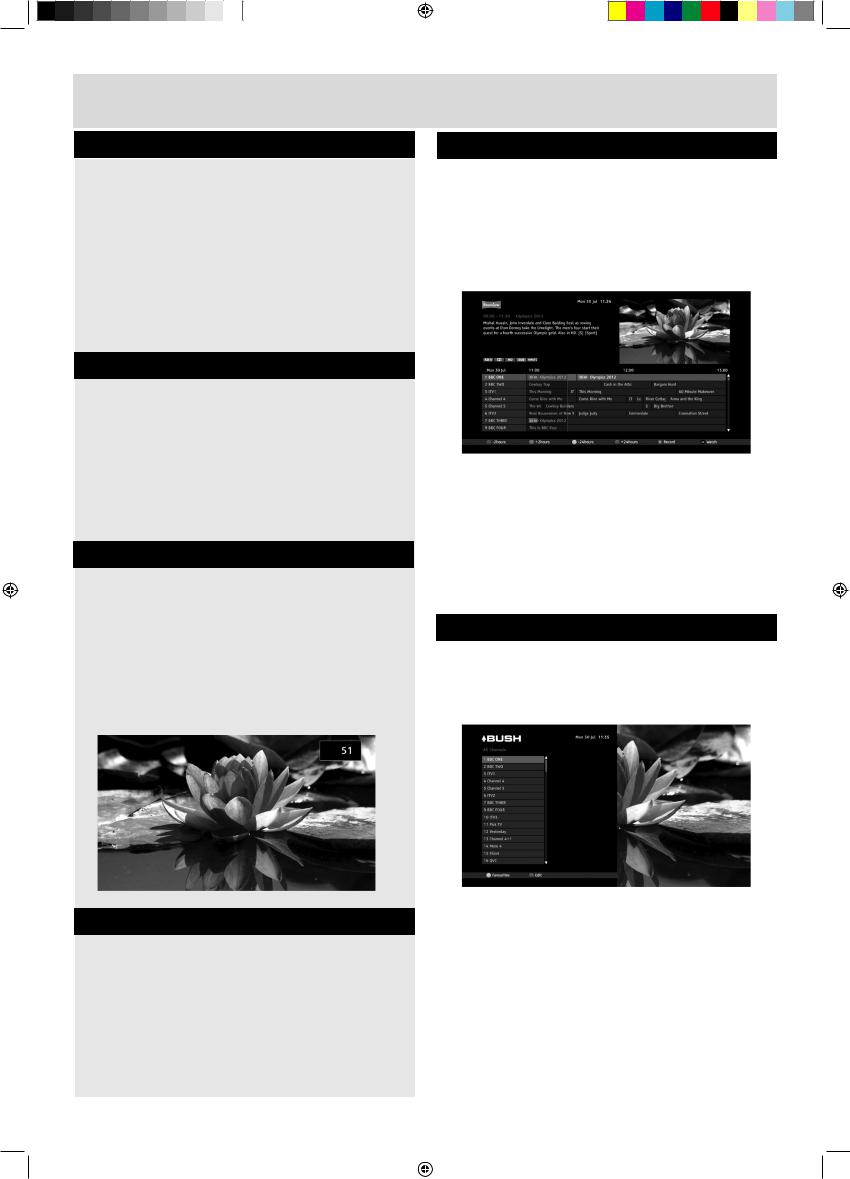
The Guide lets you view information about current and scheduled TV and Radio programmes. Here you can select a programme to watch or listen to.
When you open the Guide, the current channel is displayed at the top of the list with the programme being watched highlighted.
1.Press the GUIDE Button to display the Guide.
2.Use the and Buttons to select a channel to browse.
3.Use the and Buttons to move along the channel row to select the desired programme.
Available options for the programme selected will be displayed as well as a brief description.
Using the channel list
The Channel List contains all the channels found during installation and is displayed in a single column format in numerical order. A total of 16 channels are displayed at a time.
The and Buttons are used to scroll down or up the list respectively to show all channels in the list.
1.Press the CH LIST Button to open the Channel List.
2.Press the and Buttons to select the channel required.
3.Press the OK Button to watch the channel.
4.The Channel List will be removed from the screen and you will be returned to live TV with
10 |
For any help concerning set up and use of your digital TV recorder please call the Customer Helpline: 0845 604 0105 |
|
|||
BU102ZRH50 User Guide_v2.indd 10 |
|
|
|
13/06/2013 09:49:15 |
|
|
|
|
|||
|
|
||||
|
|
|
|
|
|
Basic Features
Using the channel list (continued)
1.The mini information panel displayed along the bottom which will be removed automatically after a set time.
To view additional information about the current programme at this time press the i Button, see ‘i-Button’.
Changing the volume
You can change the volume using the V+ and V- buttons on the remote control.
1.Press the V+ Button to increase the volume.
2.Press the V- Button to decrease the volume.
A symbol will be displayed in the top right of the screen to indicate the volume level is being changed.
Using mute
To turn off the sound:
1.Press the MUTE button on the remote control. The mute symbol will be displayed in the
top right of the screen and the sound will be turned off.
2.To restore the sound at its previous level, press the MUTE Button again.
Pausing live TV
You can pause the TV channel you are watching and resume watching it from the paused position (provided you have not changed to another channel during this time).
You can Fast Forward (up to the current time) and Rewind to any time from the time you started viewing the channel.
The amount you can Rewind can be set with the ‘Timeshift Amount’ option in the ‘Recording’ menu, see page 31.
To pause a live TV programme
1.Press the PAUSE/PLAY Button.
2.The TV picture will freeze.
To resume play of the TV programme
1.Press the PAUSE PLAY Button again to resume playback from the paused time.
To rewind a paused TV programme
1.Repeatedly press the REWIND Button until the desired Rewind speed is displayed in the bottom left of screen. Each press of this button steps through the preset speeds:
x2, x4, x8, x16, x32, x64.
2.Press the PAUSE PLAY Button to resume playback at normal speed. The rewind time relative to live TV will be shown in the bottom left corner.
To fast forward a paused TV programme
1.Repeatedly press the FFWD Button until the desired forward speed is displayed in the bottom left of screen. Each press of this button steps through the preset speeds:
x2, x4, x8, x16, x32, x64.
2.Press the FFWD Button again to resume playback at normal speed.
For any help concerning set up and use of your digital TV recorder please call the Customer Helpline: 0845 604 0105 |
11 |
|||
BU102ZRH50 User Guide_v2.indd 11 |
|
|
|
13/06/2013 09:49:15 |
|
|
|
||
|
|
|||
|
|
|
|
|
 Loading...