


MODELS
OPERATION MANUAL
VACUUM CLEANER
CONTENTS
PAGE
• IMPORTANT SAFETY INSTRUCTIONS .... |
2 |
• PARTS IDENTIFICATION ........................... |
4 |
• SPECIFICATIONS ........................................ |
4 |
• OPERATING INSTRUCTIONS ................... |
6 |
• MAINTENANCE INSTRUCTIONS .............. |
11 |
• REPLACEMENT INSTRUCTIONS ............. |
13 |
• BEFORE REQUESTING SERVICE ........... |
19 |
• DESCRIPTION OF ACCESSORIES .......... |
20 |
• SPANISH DIGEST ....................................... |
21 |
Thank you very much for buying another quality by Brother.
Before using your Brother vacuum cleaner, please read this operation manual carefully to obtain the best use from your vacuum cleaner.

IMPORTANT SAFETY INSTRUCTIONS
When using an electrical vacuum cleaner, basic precautions should always be followed including the following:
Read all instructions carefully before using this vacuum cleaner.
WARNING / To reduce the risk of fire, electric shock, or injury:
1 Do not use outdoors or on wet surfaces.
2 Do not leave vacuum cleaner unattended when plugged in. Unplug from outlet when not in use and before user-servicing.
3 Close supervision is necessary when used by or near children. Do not allow this vacuum to be used as a toy.
4 Use only as described in this manual. Use only manufacturers recommended attachments.
5 Never operate this vacuum cleaner if it has a damaged cord or plug, if it is not working properly, if it has been dropped, damaged, exposed to weather or dropped into water.
Return the vacuum cleaner to a Brother Authorized Servicer in the United States for examination and repair.
6 Do not pull or carry this vacuum cleaner by the power cord. Do not use the power cord as a handle, close a door on the cord, or pull the cord around sharp edges or corners. Keep cord away from heated surfaces.
7 Do not run the vacuum over the cord. Running over the cord may damage the insulation resulting in an electrical short. If the insulation is damaged, immediately remove the plug from the electrical outlet and bring the vacuum to a Brother Authorized Servicer.
8 Never disconnect the plug by pulling on the cord. To disconnect from an outlet, grasp the plug, not the cord.
9 Never operate this vacuum cleaner with any air opening blocked. Keep the air openings free of dust, lint, hair and any other similar material.
10
11
12
Never drop or insert any object into any opening.
Keep hair, face, fingers and loose clothing away from all openings, the agitator and any moving parts.
Do not use this vacuum cleaner to pick up the following objects:
a.flammable objects: lit cigarettes, hot ashes, lit matches or similar materials.
b.sharp objects: razor blades, broken glass, needles, pins, nails or similar materials.
c.very fine dust: plaster, cement, cooking flour, etc...
2

IMPORTANT SAFETY INSTRUCTIONS
13 Never operate this vacuum cleaner without the dirt compartment and filters in place. Empty the dirt compartment before reaching the “Max Fill Line” and clean the filters often.
14
15
16
Before removing the plug from the outlet, turn all controls to the “OFF” position.
Use extra caution when cleaning on stairs.
Never handle plug, cord or vacuum cleaner with wet hands.
17 Never touch the underside of the vacuum cleaner when it is plugged in. The rotating agitator may cause injury.
18
19
20
Do not use in presence of flammable or combustible liquids or fumes.
Do not place heavy objects on the vacuum cleaner.
Do not step on the hose or pull the hose forcibly.
21 Do not pick up objects such as waste paper, plastic sheets, tissue paper or wrappings which may clog the hose and filters. Do not pick up a lot of dust at once. This may clog the filters and rapidly reduce the performance of the vacuum cleaner.
22 Do not expose this vacuum cleaner to high temperatures while operating or during storage.
23
24
25
Store this vacuum cleaner in a dry place.
Use the carrying handle on the back of the body to carry this vacuum cleaner.
Before servicing this vacuum cleaner, allow all parts to cool .
CAUTION: To reduce the risk of electric shock, this vacuum cleaner has a polarized plug (one blade is wider than the other). This
plug will fit in a polarized outlet only one way. If the plug does not fit fully in the outlet, reverse the plug. If it still does not fit, contact a qualified electrician to install the proper outlet. Do not change the plug in any way.
WARNING: This vacuum contains a motor protection system to maximize the motor life. It is designed to shut off to avoid
overheating in case of a blockage or clogged filter. If the protection device is activated, the vacuum stops without turning off the switch. If this happens, turn off the vacuum and unplug the cleaner.
Please empty the dirt compartment, clean the net filter with water and check the main filter. After approximately 30 minutes the motor will have cooled and the vacuum will be ready to use. Operating this vacuum with clogged or dirty filters may cause the vacuum to overheat. Please clean the filters regularly.
SAVE THESE INSTRUCTIONS
This vacuum cleaner is intended for household use only.
3

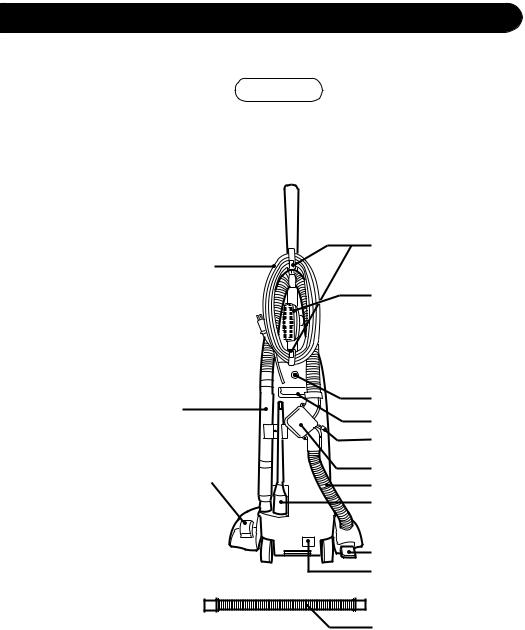
PARTS IDENTIFICATION
FRONT
CT1200 |
CT1500 |
ON/OFF Switch
 Power Cord
|
Dust Body |
|
|
Dirt Compartment |
|
|
Handle |
|
Max Fill Line |
Dirt Compartment |
Max Fill Line |
|
||
|
|
|
|
Exhaust Filter |
|
|
Cover |
Rug/Floor |
|
|
|
Grill |
|
Selector |
|
Head Cover |
|
|
Bumper |
|
|
|
SPECIFICATIONS
FEATURES |
INPUT (Amp) |
HEADLIGHT |
CORD LENGTH (Ft.) |
|
MODEL |
||||
|
|
|
||
CT1200 |
12.0 |
YES |
24 |
|
CT1500 |
12.0 |
YES |
35 |
4
PARTS IDENTIFICATION
REAR
Power Cord
Telescopic
Wand
Rug/Floor
Selector (CT1500only)
Cord Storage
Hooks
Upholstery Tool with
Detachable Brush
Handle Screw
Carrying Handle
Floor/Tools
Selector
Valve System
Suction Hose
Crevice Tool
Foot Pedal Release
Name Plate
Extension Hose
WARNING:
Operate vacuum cleaner only at the voltage specified on the nameplate.
5

OPERATING INSTRUCTIONS
HOW TO ATTACH THE HANDLE TO VACUUM CLEANER
First remove the handle screw. |
|
1 Then insert the base of the handle into |
|
the top of the body of the vacuum |
|
cleaner as shown. (Fig. 1) |
|
Make sure the ON/OFF |
Handle |
switch on the handle is |
|
positioned to the front |
|
of the vacuum cleaner. |
|
Note: |
|
Unit should be un- |
|
plugged and power |
|
switch in the “OFF” |
|
position. |
|
Handle screw |
Fig.1 |
2 Line up the small hole on the handle with the small hole on the rear of the vacuum cleaner and insert the screw. (Fig. 2)
Be sure the screw is tightened securely.
 Handle Handle screw

Fig.2
HOW TO WIND POWER CORD
1 Insert the power cord in the clip located on the upper cord storage hook as shown. (Fig. 3)
Clip
Plug Side
Fig.3
2 Wrap excess cord around the cord storage hooks to prevent dragging and any interference with cleaning. (Fig. 4)
Upper cord storage hook
Fig.4
HOW TO RELEASE POWER CORD
Rotate the upper cord storage hook downward for quick cord release. (Fig. 5)
Upper cord storage hook
Fig.5
6
OPERATING INSTRUCTIONS
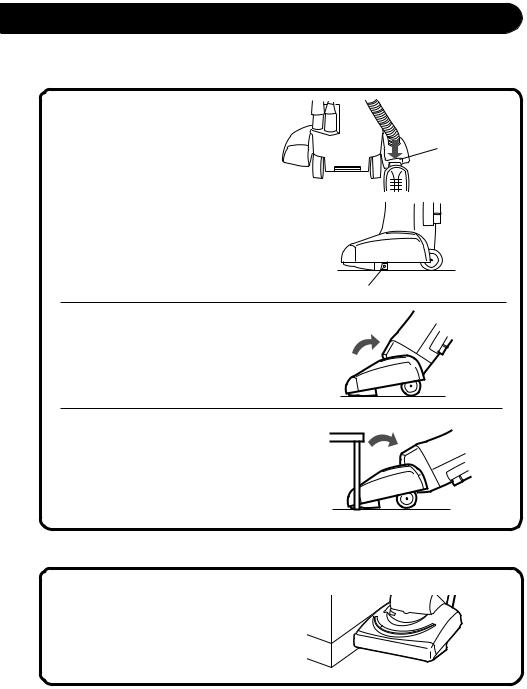
HOW TO ADJUST THE HANDLE
The handle of this vacuum cleaner can be set to any of three positions: Upright, Normal or Parallel.
To release the handle, depress the pedal at the right rear corner of the vacuum cleaner. (Fig. 6)
Upright position
Normally the handle is locked in this position for storage or when using the On Board Tools. By pushing the handle forward until the handle is locked, this vacuum cleaner will stand on its legs and wheels. (Fig. 7)
Pedal
Fig.6
Legs |
Fig.7 |
Normal position
This position is used for normal cleaning. (Fig. 8)
Fig.8
Parallel position
This position is used for cleaning under furniture.
To rotate to the Parallel position, depress the pedal again. (Fig. 9)
Fig.9
EDGE CLEANING
These models have “Edge Cleaning ” for the cleaning of carpet edges near baseboards and stationary furniture. (Fig. 10)
Fig.10
7
OPERATING INSTRUCTIONS
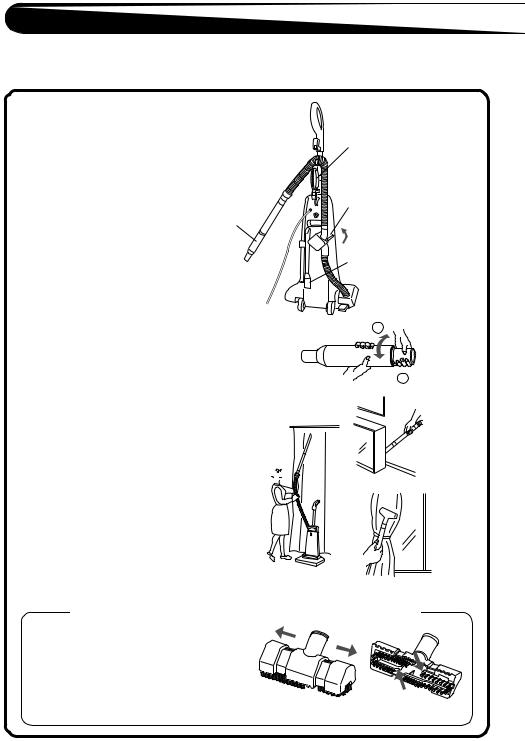
HOW TO USE THE ON BOARD TOOLS
Place the vacuum cleaner in the Upright position.
1 Set the Tools/Floor Selector to the “TOOLS” position.
2 Detach the telescopic wand from the back of the vacuum.
3 Then select the tool best suited for the cleaning task from the descriptions below.
Telescopic wand
Telescopic wand
For reaching ceilings, curtains,etc.(Fig.15) Turn the wand to unlock; wand will turn freely.
Extend the wand to its full length. Then turn the wand to lock.(Fig.12)
Crevice tool
For door tracks, narrow spots, etc.(Fig.13)
Combination Expandable Stair/Floor/Upholstery tool with Detachable Brush.(Fig.16-2)
Use with the brush for covered furniture, table tops, books, lamps, baseboards , etc.
Use without the brush for draperies, mattresses, clothing, carpeted stairs, etc. (Fig.14) 
Combination Expandable Stair/Floor/ Upholstery Tool with Detachable Brush
Floor / Tools Selector
Crevice tool
Fig.11
1
 2
2
Fig.12
Fig.13
|
Fig.15 |
Fig.14 |
Combination Stair/Floor/Upholstery tool with Detachable Brush |
|
|
Pull both ends outward for the Upholstery |
|
|
tool to expand. (Fig.16-1) |
|
|
To return to the original size, push both |
|
|
ends toward the center. |
|
|
To detach the brushes, grasp them on the |
|
|
inside (Fig. 16-2) and pull out toward you. |
|
|
Snap them back in to replace. |
Fig.16-1 |
Fig.16-2 |
|
||
8
 Loading...