


VRM50/60 mnl 6/23/99 ƒ 9/9/99 12:03 PM Page 1
VR-M50 VR-M60
Lynnfield VR™ Series
VRM50/60 mnl 6/23/99 ƒ 9/9/99 12:03 PM Page 2
Specifications |
VR-M60 |
VR-M50 |
|
|
|
Frequency Response (±3dB) |
51–20,000Hz |
59–20,000Hz |
|
|
|
Recommended Amplifier Power |
15–200 watts |
15–150 watts |
|
|
|
Nominal Impedance |
8 ohms |
8 ohms |
|
|
|
Sensitivity [1 watt (2.83v) at 1m] |
90dB |
89dB |
|
|
|
Bass Unit |
61⁄2" (165mm) DCD copolymer |
51⁄4" (135mm) copolymer |
Tweeter |
1" (25mm) black anodized |
1" (25mm) black anodized |
|
aluminum dome |
aluminum dome |
|
|
|
Crossover Frequency |
2700Hz |
3100Hz |
|
|
|
Dimensions (HxWxD) |
113⁄4 x 85⁄16 x 117⁄8" (299 x 212 x 303mm) |
97⁄8 x 71⁄8 x 9" (251 x 181 x 230mm) |
Weight |
17 lbs (8kg) |
12 lbs (5.5kg) |
|
|
|
Finish |
Cherry or black ash wood veneer with |
|
glossy gray top panel |
Cherry or black ash wood veneer with glossy gray top panel
Description
The VR-M50 and VR-M60 are compact, monitor-quality speakers designed to deliver accurate, natural reproduction, with an elegant appearance.
Special care has been taken to optimize the speakers’ components for maximum performance: The bass units utilize die-cast aluminum baskets that keep the critical moving parts in precise alignment for exceptionally accurate response. The cast baskets also conduct heat away from the voice coil, increasing power handling and maximizing output. The woofer cones and surround geometry were designed and optimized with Boston’s Finite Element Analysis (FEA) computer modeling technology, for strong bass and smooth midrange.
High frequencies are handled by Boston’s exclusive 1-inch (25mm) aluminum tweeter with Amplitude Modification Device™ (AMD). This remarkable driver produces an extremely smooth, flat response well beyond the audible range. A die-cast aluminum heatsink attached to the tweeter’s backplate dissipates heat quickly and efficiently, assuring cool, trouble-free operation, even at very high power levels.
The drivers are positioned very closely to each other for smooth, uniform radiation in both the horizontal and vertical planes. Inside the cabinets are heavy ”window-pane” braces to assure strength and rigidity, while minimizing cabinet resonances. The rear-mounted vent is smoothly flared at both ends to reduce port turbulence, and both speakers feature dual gold-plated binding posts, allowing bi-wiring or bi-amping with virtually any cable.
All the drive units are designed at Boston’s Peabody, Massachusetts facility using state-of-the-art computer-design programs, and are built on Boston’s proprietary production lines to an incredible ±1dB—perhaps the industry’s tightest tolerance. Both systems feature MagnaGuard® magnetic shielding for compatibility with home theater systems.
2
VRM50/60 mnl 6/23/99 ƒ 9/9/99 12:03 PM Page 3
How to Connect Your Speakers
Correctly wiring your speakers is important for achieving the best sound quality. Wiring should take just a few minutes, but it’s important to do it carefully, since incorrect wiring (such as reversed connections) can result in a poor soundstage and poor bass.
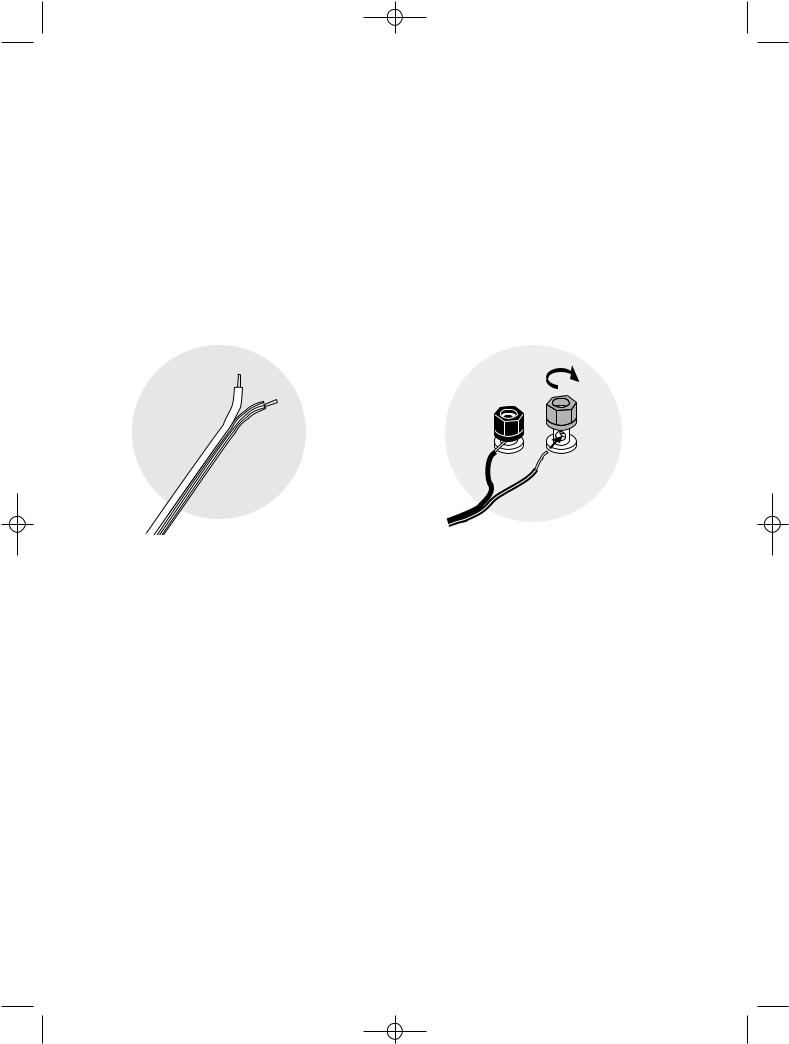
We recommend 18-gauge wire or thicker for runs up to 25 feet (8m), and 16-gauge wire or thicker for longer runs. Separate the first few inches of the wire conductors. Strip off 1⁄2" (12mm) of insulation from the ends of each speaker wire to expose the two conductors and tightly twist the wire strands.
WARNING: To prevent electrical shock hazard, always switch off the amplifier or receiver when making connections to the speaker.
When making all connections, be sure to connect the + (red) on the speaker to the + (red) on the amplifier, and the
– (black) on the speaker to the – (black) on the amplifier.
IMPORTANT: Typically, one side of the wire is smooth. Connect this side to the – (black) connection. The other side has a rib or stripe. Connect this to the
+ (red) connection.
Using the five-way binding posts: The binding posts permit easy connection to banana plugs, spade lugs, and bare wire.
Insert the wire in the hole and tighten.
3
 Loading...