


VPS 210
High-Powered Subwoofer
Español |
Italiano |
Deutsch |
Subwoofer de alta potencia |
Subwoofer ad alta potenza |
Hochleistungs-Subwoofer |
Manual del propietario |
Manuale dell’utente |
Bedienungsanleitung |
Instrucciones de seguridad |
Istruzioni di sicurezza |
Sicherheitshinweise |
Información de cumplimiento |
Informazioni sulla conformità |
Konformitätserklärung |
Français |
Svenska |
Caisson de basse haute |
Högeffektiv subwoofer |
puissance |
Bruksanvisning |
Guide de l’utilisateur |
Säkerhetsanvisningar |
Instructions de sécurité |
Information om |
Informations relatives à la |
överensstämmelse |
conformité |
|
Information Compliance / Instructions Safety / Manual Owner’s
|
|
|
|
|
|
|
|
|
|
|
|
|
|
|
|
|
|
142-003285-1_VPS_OM_Intl.indd 1 |
|
|
9/24/08 4:19:28 PM |
|
|
|
|
|
|
|
|
|
|
|
|||
|
|
|
|
|
|
|
|
|
IMPORTANT SAFETY INSTRUCTIONS
This symbol found on the apparatus indicates hazards arising from dangerous voltages.
This symbol found on the apparatus indicates the user should read all safety statements found in the user manual.
This symbol found on the apparatus indicates double insulation.
1.Read these instructions.
2.Keep these instructions.
3.Heed all warnings.
4.Follow all instructions.
5.Do not use this apparatus near water.
6.Clean only with dry cloth.
7.Do not block any ventilation openings. Install in accordance with the manufacturer’s instructions.
8.Do not install near any heat sources such as radiators, heat registers, stoves, or other apparatus (including amplifiers) that produce heat.
9.Do not defeat the safety purpose of the polarized or grounding type plug. A polarized plug has two blades with one wider than the other. A grounding-type plug has two blades and a third grounding prong. The wide blade or the third prong is provided for your safety. If the provided plug does not fit into your outlet, consult an electrician for replacement of the obsolete outlet.
10.Protect the power cord from being walked on or pinched particularly at plugs, convenience receptacles, and the point where they exit from the apparatus.
11.Only use attachments/accessories specified by the manufacturer.
12.Unplug this apparatus during lightning storms or when unused for long periods of time.
13.Refer all servicing to qualified service personnel. Servicing is required when the apparatus has been damaged in any way, such as power-supply cord or plug is damaged, liquid has been spilled or objects have fallen into the apparatus, the apparatus has been exposed to rain or moisture, does not operate normally, or has been dropped.
14.Maintain a minimum distance of 2” (50mm) around the front, rear, and sides of the apparatus for sufficient ventilation. The ventilation should not be impeded by covering the ventilation openings or placing on or around the apparatus items such as newspapers, table-cloths, curtains, etc.
15.No open flame sources, such as lighted candles, should be placed on the apparatus.
Warning! To reduce the risk of fire or electrical shock, do not expose this apparatus to rain or moisture.
This symbol found on the apparatus indicates that the apparatus must be placed in a separate collection facility for electronic waste and not disposed with household waste.
16.The apparatus shall not be exposed to dripping or splashing. No objects filled with liquids, such as vases, shall be placed on the apparatus.
17.Either the power inlet connector on the rear of the apparatus or the power plug at the wall must remain accessible, to be able to disconnect power from the apparatus.
18.To completely disconnect this apparatus from the AC Mains, disconnect the power supply cord plug from the AC receptacle.
19.The mains plug of the power supply cord shall remain readily operable.
20.The apparatus is suitable for use in tropical and/or moderate climates
American Users:
Note: This equipment has been tested and found to comply with the limits for a Class B digital device, pursuant to part 15 of the FCC Rules. These limits are designed to provide reasonable protection against harmful interference in a residential installation. This equipment generates, uses, and can radiate radio frequency energy and, if not installed and used in accordance with the instructions, may cause harmful interference to radio communications. However, there is no guarantee that interference will not occur in a particular installation. If this equipment does cause harmful interference to radio or television reception, which can be determined by turning the equipment off and on, the user is encouraged to try to correct the interference by one or more of the following measures:
•Reorient or relocate the receiving antenna.
•Increase the separation between the equipment and receiver.
•Connect the equipment into an outlet on a circuit different from that to which the receiver is connected.
•Consult the dealer or an experienced radio/TV technician for help.
Canadian Users
This class B digital apparatus complies with Canadian ICES-003. Cet appareil numérique de classe B est conforme á la norme NMB-003 du Canada.
142-003285-1_VPS_OM_Intl.indd 2 |
|
|
9/24/08 4:19:28 PM |
|
|
Introduction
Thank you for choosing Boston Acoustics. The Boston VPS 210 high-powered subwoofer is part of the VS Series–our best performing, best looking products. When combined with other speakers in the VS Series, the VPS 210 delivers a superb audio/ video and an audio only experience. The high performance 10-inch woofer provides high output performance with superior sonic characteristics and is augmented with a matching passive radiator to enhance low frequency extension in a compact enclosure. A 500-watt RMS (1000 watt Peak) high-current proprietary Class-D amplifier ensures that the drivers have all the power they need to deliver performance that is both clean and impressive. The amplifier also incorporates Boston’s proprietary BassTrac® circuitry which tracks the input signal to prevent it from being driven into audible distortion. The result: tight distortion-free bass at all output levels
The VPS 210 shares the visual appeal of the other VS Series units. The striking piano lacquer finish cabinet and high-gloss furniture-grade cherry end panels cover a cabinet that is so much more than a rectangular box. The structural elements of the cabinet are made of high-frequency-molded MDF which features curved surfaces that reduce internal standing waves and panel resonances. Substantial internal braces enhance the strength of the cabinet to provide an ideal environment for high performance.
Features
•Elegant black lacquer piano finish cabinet
•High-gloss multi-layer furniture-grade cherry end panels
•High-frequency-molded MDF cabinet features curved surfaces, which reduce internal standing waves and panel resonances
•500-watt RMS (1000-watt Peak) high-current proprietary Class-D Amplifier for low distortion and high output
•BassTrac® circuitry for tight distortion-free bass at all output levels
•10”Long-throw woofer with 3”voice coil features cast aluminum frame, Organic Composite Cone Material (OCCM), and rubber surround
•10”OCCM Passive Radiator enhances low frequency extension in a compact enclosure
•Accessible top-mounted Volume, Crossover, Phase, and Power controls for easy setup and adjustments
•Gold-plated Line Level stereo inputs, LFE input, and Pass-through
•Energy Star® qualified
E N G L I S H
Specifications
Frequency Range: |
22 Hz – 150 Hz, ±3dB |
|
|
|
|
Amplifier Power: |
Proprietary class D, 500 watt RMS (1,000 watt peak) |
|
|
|
|
Bass Driver |
10”(254mm) Long throw OCCM woofer with 3”voice coil |
|
|
|
|
Passive Radiator |
10” (254mm) OCCM passive radiator |
|
|
|
|
Dimensions: (H x W x D) |
15 x 137⁄8 x 211⁄4” (381 x 353 x 540mm) |
|
|
|
|
Weight: |
62 lbs (28.2kg) |
|
|
|
|
|
|
Boston Acoustics continually strives to update and improve its products. |
|
|
The specifications and construction details are subject to change without notice. |
|
|
|
|
|
|
Energy Star and the Energy Star logo are registered trademarks of the Environmental Protection Agency, a federal agency of the United States.
3
142-003285-1_VPS_OM_Intl.indd 3 |
|
|
9/24/08 4:19:29 PM |
|
|
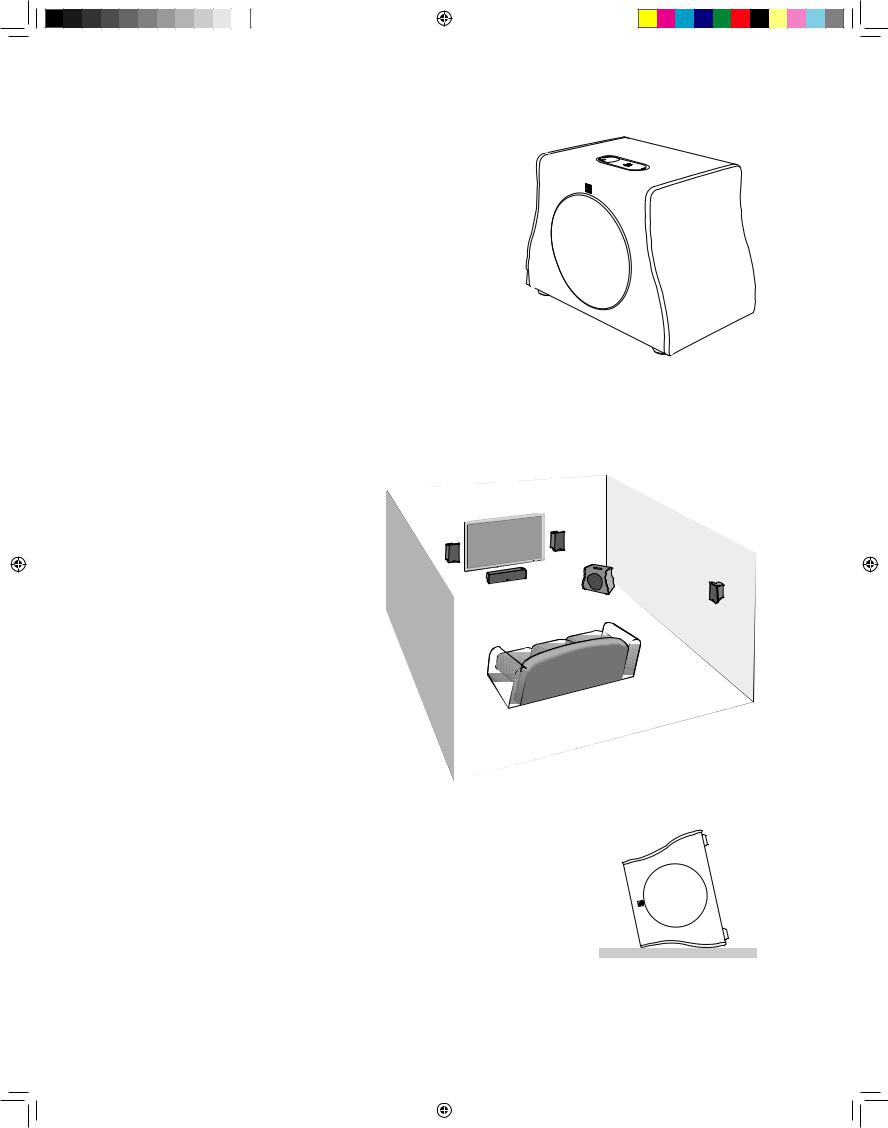
Unpacking the VPS 210
Carefully unpack the subwoofer. If there is any sign of damage from transit, report it immediately to your dealer and/or delivery service. Keep the shipping carton and packing materials for future use. Be sure to keep your purchase receipt in a safe place, as it may be required for warranty purposes.
The high gloss finish of the VPS 210 cabinet is protected during shipment with a clear plastic film. Remove the film by lifting up a corner and carefully pulling it off. Repeat the procedure for all the cabinet surfaces.
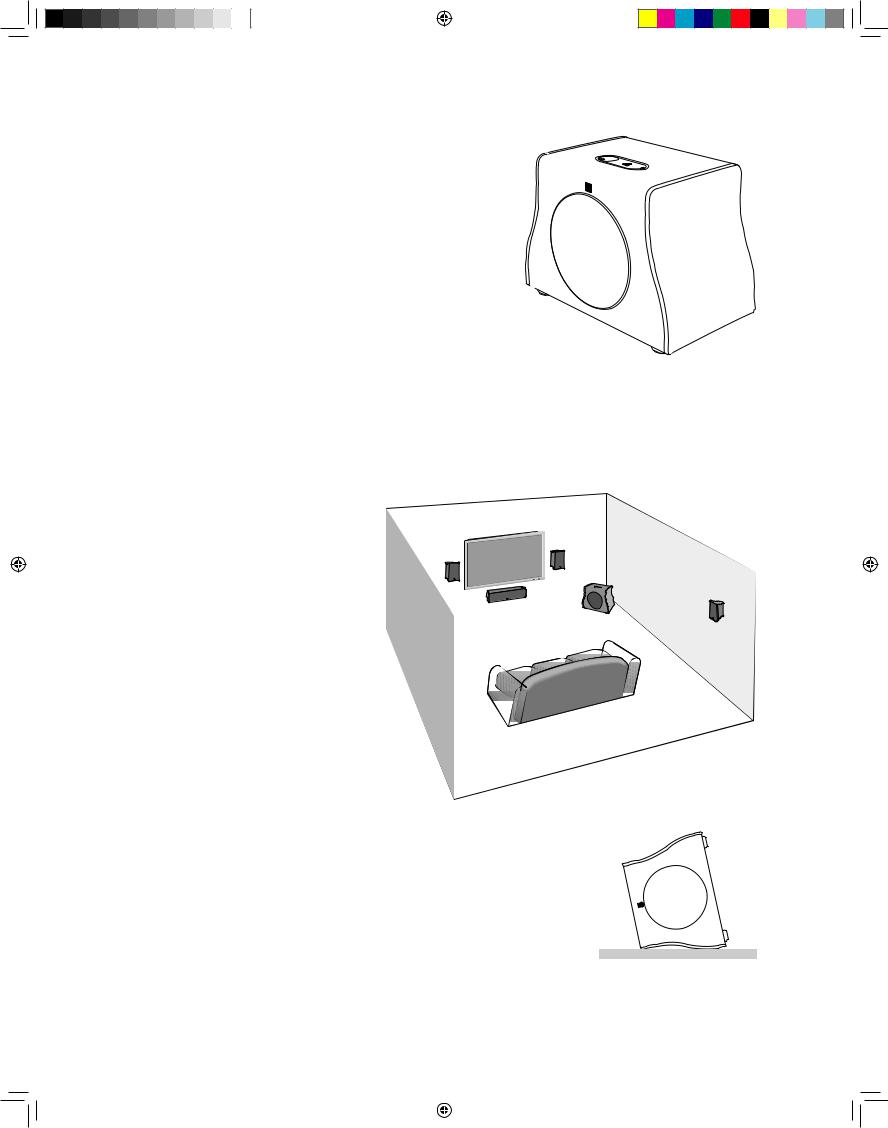
Placement Options
Place the VPS 210 next to a wall or in a corner near your main speakers. The sound is typically best when the subwoofer is within 15 feet (4.5m) of the main speakers. The sharp 24dB/octave crossover roll-off permits placement farther from the main speakers if necessary. Since the ear is unable to localize the low frequencies of the subwoofer, the bass still appears to come from the main speakers. Experimentation is key, however most positions in the room will work well.
The level of bass output from the VPS 210 will vary at different positions in a room. When placed near walls, its loudness is emphasized. Corner placement provides the most bass output. Placement completely away from walls will reduce bass output. Regardless of the natural bass level within the room you will always have the ability to adjust the level of the subwoofer from the built in Volume Control. If at any time you move the subwoofer be sure to check all of your settings.
Position subwoofer
in corner for maximum bass output
Connections
After the VPS 210 is properly placed, you are ready to connect it to your system. The inputs for the VPS 210 are on the underside of the unit. To access them you will need to roll the cabinet onto one of its end panels. Do not lay the unit on its side. Doing so will damage the grilles! The illustration shows the correct position for making connections. To prevent damage to the cabinet do this on a carpeted or other well padded surface.
WARNING: The VPS 210 is heavy – more than 60 lbs! Get someone to help you when moving it around.
4
142-003285-1_VPS_OM_Intl.indd 4 |
|
|
9/24/08 4:19:30 PM |
|
|

NOTE: Power is always supplied to the VPS 210 electronics unless it is unplugged or switched to the off position using the power switch located on the top panel. The auto-on circuitry only activates or deactivates the power amplifier. Make sure your subwoofer and receiver are unplugged when making connections.
Power Connection: Connect the power cord to the power input. Then plug the power cord directly into a wall outlet. Some audio
receivers components provide auxiliary power outlets We suggest that you do not use them. They may not be able to provide the
amount of current or proper isolation required by a power amplifier, such as the one in the VPS 210.
Connecting to a Digital Home Theater
System Using the LFE Input
Digital 5.1, 6.1 and 7.1 home theater electronics |
digital receiver |
|
|
dedicate one channel (the “.1”) to reproduce the |
|
special low-frequency (LFE) information (such as |
|
explosions and thunder) contained in digitally- |
|
encoded soundtracks. |
|
VPS 210 Amp
Select ”subwoofer-yes” from your receiver’s set-up menu. Hooked up this way, the receiver’s amplifier
is relieved of having to reproduce the difficult low bass signals that can drive the receiver into audible distortion. In some cases it can also depend on several other settings within a receiver. We recommend consulting your receiver manual for further assistance in this area.
Use an RCA cable (not included), as shown, to connect your digital receiver’s LFE subwoofer output to the subwoofer. Connect the other end to the LFE input.
Connecting to a Stereo or Dolby® Pro Logic® System
For stereo or Dolby Pro Logic systems use the
“sub out” connection from your receiver to
one of the VPS 210 Line Level inputs marked
“L”and“R”.
use either input
receiver |
VPS 210 Amp
Connecting to Electronics Without a Subwoofer Output
If your system does not have a subwoofer or
LFE output you can connect the VPS 210 to a
preamp output. Use a stereo RCA cable (not included) to connect the preamp outputs to the
Line Level inputs marked“L”and“R”.
VPS 210 Amp
receiver |
Preamp Out |
5
142-003285-1_VPS_OM_Intl.indd 5 |
|
|
9/24/08 4:19:31 PM |
|
|

Pass Thru Output
In some very high performance systems, particularly AV systems, multiple subwoofers may be used. When the VPS 210 is used in such a system the Pass Thru output can be used to supply a signal to a second subwoofer. The signal from this output is not affected by the VPS 210 internal crossover. It is the same as the signal that goes into the inputs.
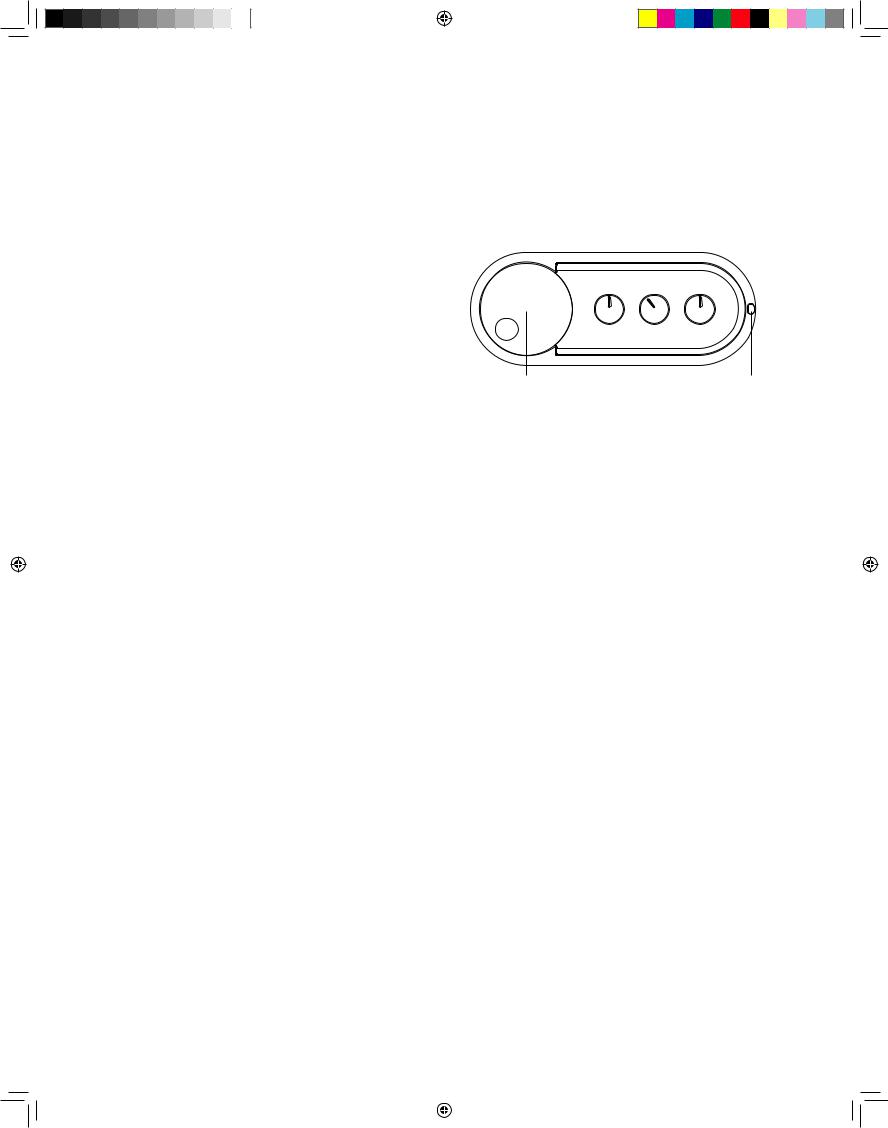
Control Setting and Operation
The VPS 210 controls are located on the top of the cabinet. |
|
|
|
|
The Volume Control is on the left. The other controls are |
|
|
|
|
under a removable cover. To adjust these controls, lift the |
40 |
60 |
0º 180º |
OFF AUTO ON |
tab on the right side of the cover to remove it. |
|
|
|
|
|
30 |
150 |
|
|
Power Off/Auto/On Control and Status Indicator |
CROSSOVER (Hz) |
POLARITY |
POWER MODE |
|
|
|
|
|
|
OFF – Turn the VPS 210 off if you will not be using it. When |
|
|
|
|
the switch is set to “Off” the VPS 210 is Energy Star® quali- |
Volume Control |
|
|
Status Indicator |
fied.
AUTO – The VPS 210 will turn itself on whenever an input signal is detected. If no signal is detected, after several minutes it will automatically switch to Standby mode. When the VPS 210 is in Standby mode it uses very little power.
ON – The VPS 210 is always on.
The Status indicator shows the VPS 210 power mode:
OFF – The subwoofer is off
AMBER – STANDBY (No signal detected, Amp Off )
BLUE – ON (Signal detected, Amp On)
Volume Control
Start with the Volume Control at the 11 o’clock position. If the VPS 210 does not produce sound check the Status Indicator – it should be lit blue. If it is not lit check the AC-line cord, Power switch, and input cables. (Are the connectors on the cables making proper contact? Is the AC-line cord connected to a “live” receptacle. Is the subwoofer in either the Auto or On position?)
Adjusting the Crossover Control
When using the Line Level inputs (not the LFE input) the VPS 210 built-in crossover is engaged. As a starting point, set the Crossover Control about 10Hz higher than the lower limit of your main speakers’ bass response. Fine tune the crossover setting by ear for the smoothest blend with your main speakers. The best setting for the control will depend on the main speaker used in the system, the placement of the speakers, and personal preference.
Once you have set the Crossover Control you may want make additional adjustments to Volume Control setting until the transition from main speakers and the VPS 210 is smooth and the sound is balanced. Bass output should not overpower the main speakers but rather be adjusted so there is a natural blend across the entire musical range.
Polarity Control
Selects regular (0°) or inverted (180°) phase for the VPS 210. Set this switch so the system produces the fullest, most dynamic bass. The effect of phase will be most audible on low-frequency percussion instruments or music with a steady bass line.
6
142-003285-1_VPS_OM_Intl.indd 6 |
|
|
9/24/08 4:19:32 PM |
|
|
Maintenance and Service
The high-gloss finish of the VPS 210 cabinet is made to the standard of high-quality furniture. It should be cared for in the same way. Before you use any cleaning or care products, test a small, inconspicuous part of the cabinet. Be sure the results are what you want before doing a final application.
For day-to-day care, the VPS 210 cabinet may be cleaned using a soft cloth to remove fingerprints or to wipe off dust.
All wiring connections should be inspected and cleaned or remade at least once a year.
In the event that your subwoofer ever needs service, contact your local Boston Acoustics dealer or visit bostonacoustics.com/dealers for a list of dealers in your area.
Limited Warranty
Boston Acoustics warrants to the original purchaser of the VPS 210 subwoofer that it will be free of defects in materials and workmanship in its mechanical parts for a period of 5 years from the date of purchase. The warranty period for the electrical components is 1 year.
Your responsibilities are to install and use the VPS 210 according to the instructions supplied, to provide safe and secure transportation to an authorized Boston Acoustics service representative, and to present proof of purchase in the form of your sales slip when requesting service.
Excluded from this warranty is damage that results from abuse, misuse, improper installation, accidents, shipping, or repairs/ modifications by anyone other than an authorized Boston Acoustics service representative.
This warranty is limited to the Boston Acoustics product and does not cover damage to any associated equipment. This warranty does not cover the cost of removal or reinstallation. This warranty is void if the serial number has been removed or defaced. This warranty gives you specific legal rights, and you may also have other rights which vary from state to state.
If Service Seems Necessary
First, contact the dealer from whom you purchased the product.
Or contact us via e-mail at:
USA and Canada: support@bostona.com
Japan: ba_info@dm-holdings.com.
Asia/Pacific countries: service@dm-singapore.com
We will promptly advise you of what action to take. If it is necessary to return your VPS 210 subwoofer to the factory, please ship it prepaid. After it has been repaired, we will return it freight prepaid in the United States and Canada.
For EU Customers Only
This symbol found on the product indicates that the product must not be disposed of with household waste. Instead, it may be placed in a separate collection facility for electronic waste or returned to a retailer when purchasing similar product. The producer paid to recycle this product. Doing this contributes to reuse and recycling, minimizes adverse effects on the environment and human health and avoids any fines for incorrect disposal.
7
142-003285-1_VPS_OM_Intl.indd 7 |
|
|
9/24/08 4:19:32 PM |
|
|
INSTRUCCIONES DE SEGURIDAD IMPORTANTES
Este símbolo que aparece en el aparato indica peligros derivados de tensiones peligrosas.
Este símbolo que aparece en el aparato indica que el usuario debe leer todos los avisos de seguridad del manual del usuario.
Este símbolo que aparece en el aparato indica doble aislamiento.
1.Lea estas instrucciones.
2.Guarde estas instrucciones.
3.Preste atención a todas las advertencias.
4.Siga todas las instrucciones.
5.No use este aparato cerca de agua.
6.Limpie únicamente con una tela seca.
7.No obstruya las aberturas para ventilación. Instale de acuerdo con las instrucciones del fabricante.
8.No instale cerca de fuentes de calor como radiadores, rejillas de calefacción, estufas u otros aparatos (incluidos amplificadores) que emitan calor.
9.No anule el propósito de seguridad del enchufe polarizado o de puesta a tierra. Un enchufe polarizado tiene dos patas, una más ancha que la otra. Un enchufe de puesta a tierra tiene dos patas y una tercera de puesta a tierra. La pata ancha o la tercera pata es para su seguridad. Si el enchufe provisto no encaja en el toma, consulte a un electricista para reemplazar el toma obsoleto.
10.Proteja el cable de alimentación para que no se pise ni se apriete, especialmente en los enchufes, en los receptáculos, y en el punto donde salen del aparato.
11.Utilice únicamente aditamentos o accesorios especificados por el fabricante.
12.Desenchufe el aparato durante tormentas eléctricas o cuando no se lo utilice durante períodos largos.
13.Todas las actividades de asistencia técnica deben ser realizadas por personal de servicio calificado. Se requiere asistencia técnica cuando el aparato se ha dañado de cualquier manera, por ejemplo por daño del cable de alimentación o del enchufe, derrame de un líquido o caída de objetos en el aparato, exposición del aparato a lluvia o humedad, o mal funcionamiento o caída del aparato.
14.Mantenga una distancia mínima de 2” (50mm) en el frente, la parte posterior y los lados del aparato, para que reciba suficiente ventilación. La ventilación no debe ser impedida cubriendo las aberturas para ventilación ni colocando sobre o alrededor del aparato elementos como periódicos, manteles, cortinas, etc.
15.No se deben colocar fuentes de llama abierta, como velas encendidas, sobre el aparato.
¡Advertencia! Para reducir el riesgo de incendio o choque eléctrico, no exponga el aparato a la lluvia o a la humedad.
Este símbolo que aparece en el aparato indica que el aparato se debe colocar en un punto de recolección separada para desechos electrónicos y no debe ser arrojado junto con los residuos domésticos.
16.El aparato no se debe exponer a goteos ni salpicaduras. No se deben colocar objetos llenos de líquido, como floreros, sobre el aparato.
17.Ya sea el conector de entrada de potencia en la parte posterior del aparato o el enchufe de la pared debe permanecer accesible, para poder desconectar la potencia del aparato.
18.Para desconectar el aparato por completo de la red de AC, desconecte el cable de alimentación del receptáculo de AC.
19.El enchufe del cable de alimentación debe permanecer listo para funcionar.
20.El aparato es adecuado para el uso en climas tropicales o moderados.
Usuarios estadounidenses:
Nota: Este equipo se ha probado y se ha determinado que cumple con los límites para un dispositivo digital Clase B, de acuerdo con la parte 15 del Reglamento de la FCC. Estos límites fueron diseñados para ofrecer protección razonable contra
la interferencia perjudicial en una instalación residencial. Este equipo genera, usa y puede irradiar energía de radiofrecuencia y, si no se instala y utiliza según las instrucciones, puede ocasionar interferencia perjudicial a las radiocomunicaciones. Sin embargo, no hay garantía de que no se producirá interferencia en una instalación en particular. Si este equipo efectivamente ocasiona interferencia perjudicial a la recepción de radio o televisión, lo que se puede determinar apagando y encendiendo el equipo, se recomienda al usuario intentar corregir la interferencia implementando una o más de las siguientes medidas.
•Reorientar o reubicar la antena receptora.
•Aumentar la separación entre el equipo y el receptor.
•Conectar el equipo a un circuito distinto al que está conectado el receptor.
•Consultar al distribuidor o a un técnico de radio/ televisión.
Usuarios canadienses
Este aparato digital clase B cumple con la norma canadiense ICES-003.
Cet appareil numérique de classe B est conforme á la norme NMB-003 du Canada.
142-003285-1_VPS_OM_Intl.indd 8 |
|
|
9/24/08 4:19:33 PM |
|
|
Introducción
Gracias por elegir Boston Acoustics. El subwoofer de alta potencia Boston VPS 210 es parte de VS Series: nuestros productos de mejor apariencia y funcionamiento. Cuando se combina con otros parlantes de VS Series, el VPS 210 ofrece una magnífica experiencia sólo de audio o de audio y video. El woofer de 10 pulgadas de alto desempeño ofrece un desempeño de
alta potencia con características de sonido superiores y se aumenta con un radiador pasivo compatible para mejorar la amplitud en baja frecuencia en una caja compacta. Un amplificador propio 500-watt RMS (1000-watt de pico) alta corriente Clase-D asegura que los controles cuenten con toda la potencia necesaria para ofrecer un desempeño limpio y a la vez impresionante. El amplificador también incorpora los circuitos BassTrac® propios de Boston, que controlan la señal de entrada para prevenir la distorsión audible. El resultado: bajos libres de distorsión en todos los niveles de salida.
El VPS 210 comparte el atractivo visual de las otras unidades de VS Series. La llamativa terminación de laca del piano y los paneles de extremo en cerezo grado mobiliario de alto brillo cubren un gabinete que es mucho más que una caja rectangular. Los elementos estructurales del gabinete están hechos de MDF moldeado de alta frecuencia que presenta superficies curvadas que reducen las ondas internas y las resonancias en el panel. Abrazaderas internas sustanciales potencian la fuerza del gabinete para brindar un ambiente ideal de un funcionamiento de alto nivel.
Características
•Gabinete acabado en elegante laca negra tipo piano
•Paneles de extremo en cerezo grado mobiliario multi-capas de alto brillo
•Gabinete en MDF moldeado de alta frecuencia con superficies curvadas, que reducen las ondas internas y las resonancias en el panel
•Amplificador propio 500-watt RMS (1000-watt de pico) alta corriente Clase-D para una baja distorsión y alta salida
•Circuitos BassTrac® para bajos libres de distorsión en todos los niveles de salida
•Bafle de bajos de 10”con sección cónica larga con serpentín de voz de 3”con marco de aluminio colado, en material de composita orgánica (OCCM), y recubrimiento de goma
•Radiador pasivo de 10”en OCCM que mejora la amplitud en baja frecuencia en una caja compacta
•Controles accesibles montados en la parte superior para ajuste de volumen, transiciones, fase y potencia para una configuración y ajustes sencillos
•Entradas del estéreo en nivel de línea doradas, entrada LFE y desviación
•Cumple con la norma Energy Star®
E S P A
Ñ
O
L
Especificaciones
Rango de frecuencia: |
22 Hz – 150 Hz, ±3dB |
|
|
Potencia de amplificación: |
RMS propio Clase D 500 watts (1.000 watts pico) |
|
|
Control de bajos |
Bafle de bajos de 10”(254mm) con sección cónica larga en OCCM con |
|
serpentín de voz de 3” |
|
|
Radiador pasivo |
Radiador pasivo 10” (254mm) en OCCM |
|
|
Dimensiones: (Alto x Ancho x Profundidad) |
15 x 137⁄8 x 211⁄4” (381 x 353 x 540mm) |
|
|
Peso: |
62 lbs (28,2kg) |
Boston Acoustics busca continuamente actualizar y mejorar sus productos.
Las especificaciones y detalles de construcción están sujetos a cambios sin previo aviso.
Energy Star y el logo de Energy Star son marcas registradas de la Environmental Protection Agency, un organismo federal de los Estados Unidos.
9
142-003285-1_VPS_OM_Intl.indd 9 |
|
|
9/24/08 4:19:33 PM |
|
|
Desembalaje del VPS 210
Desembale cuidadosamente el subwoofer. Si hay alguna señal de daños debidos al transporte, comuníqueselo inmediatamente a su distribuidor y/o a su servicio de entrega. Conserve el cartón de envío y los materiales de embalaje para una futura utilización. Asegúrese de guardar su recibo de compra en un lugar seguro, ya que puede ser requerido a los efectos de la garantía.
La terminación de alto brillo del gabinete del VPS 210 está protegida durante el envío con una película de plástico de color claro. Retire la película levantando una esquina y tirando cuidadosamente de ella.
Repita el procedimiento para todas las superficies del gabinete.
Opciones de colocación
Coloque el VPS 210 cerca de una pared o en una esquina, cerca de sus parlantes principales. El sonido suele ser el mejor cuando el subwoofer se encuentra a menos de 15 pies (4,5m) de los parlantes principales. La transición de 24dB/octava aguda permite colocarlo más alejado de los parlantes principales, de ser necesario. Debido a que el oído no puede localizar las bajas frecuencias del subwoofer, los bajos parecen provenir de los parlantes principales. La experimentación es clave. Sin embargo, la mayoría de las posiciones en la habitación funcionarán bien.
En nivel de salida de graves del VPS 210 será distinto en cada posición de una habitación. Cuando se coloca cerca de paredes, se enfatiza el alto volumen. Cuando se coloca en una esquina, se logra la mayor salida de graves. Cuando se coloca alejado de las paredes, se reduce la salida de graves. Sin importar el nivel
natural de graves en la habitación, siempre existe la posibilidad de ajustar el nivel del subwoofer desde el Control de Volumen incorporado. Si en cualquier momento traslada el subwoofer, asegúrese de verificar todas las configuraciones.
Coloque el subwoofer en una esquina para la máxima salida de graves
Conexiones
Después de colocar correctamente el VPS 210, ya está listo para conectarlo a su sistema. Las entradas del VPS 210 se encuentran en la parte de abajo de la unidad. Para acceder a ellas, deberá rodar el gabinete sobre uno de sus paneles de extremo. No apoye la unidad de lado. ¡Dañará las rejillas! La ilustración muestra la posición correcta para realizar conexiones. Para evitar daños al gabinete, hágalo sobre una superficie alfombrada u otra bien acolchonada.
ADVERTENCIA: El VPS 210 es pesado: ¡más de 60 libras! Pida ayuda para moverlo.
10
142-003285-1_VPS_OM_Intl.indd 10 |
|
|
9/24/08 4:19:34 PM |
|
|
NOTA: Siempre se suministra potencia al VPS 210 a menos que se desenchufe o se cambie a la posición apagado con el interruptor del panel superior. Los circuitos de encendido automático únicamente activan o desactivan el amplificador de potencia. Asegúrese de que el subwoofer y el receptor estén desenchufados al realizar conexiones.
Conexión de potencia:
Conecte el cable de alimentación a la entrada de potencia. Luego enchufe el cable de alimentación directamente a un toma de pared. Algunos componentes de receptores de audio ofrecen tomas auxiliares. Recomendamos no utilizarlos. Pueden no ofrecer la cantidad de corriente o el aislamiento adecuado requerido por un amplificador de potencia, como el del VPS 210.
Cómo conectar a un sistema de cine en casa digital usando la entrada LFE
Los sistemas de cine en casa digitales 5.1, 6.1 y |
receptor digital |
7.1 dedican un canal (el “.1”) para reproducir la |
|
información de baja frecuencia especial (LFE), como |
|
explosiones y truenos, incluida en bandas sonoras |
|
digitalmente codificadas. |
|
Seleccione ”subwoofer-sí”del menú de configuración de su receptor. Conectado de
esta manera, el amplificador del receptor no tiene la carga de reproducir las difíciles señales de graves bajos que pueden ocasionar la distorsión audible del receptor. En algunos casos, también puede depender de otros ajustes de un receptor. Recomendamos consultar el manual de su receptor.
Use un cable RCA (no incluido), como se muestra, para conectar la salida de subwoofer LFE de su receptor digital al subwoofer. Conecte el otro extremo a la entrada LFE.
Cómo conectar a un sistema estéreo o Dolby® Pro Logic®
Para sistemas estéreo o Dolby Pro Logic, use la conexión “sub out” de su receptor a una
de las entradas en nivel de línea del VPS 210
con indicación“L”y“R”.
Use cualquier entrada
receptor |
VPS 210 Amp
Cómo conectar a un aparato electrónico sin una salida de subwoofer
Si su sistema no tiene una salida LFE o de
subwoofer, puede conectar el VPS 210 a una salida de preamplificador. Use un cable RCA estéreo (no incluido) para conectar las salidas de preamplificador a las entradas en nivel de línea
con indicación“L”y“R”.
VPS 210 Amp
receptor |
Preamp Out |
11
142-003285-1_VPS_OM_Intl.indd 11 |
|
|
9/24/08 4:19:35 PM |
|
|
Salida de desviación
En algunos sistemas de muy alto desempeño, especialmente sistemas de audio-video, se puede utilizar múltiples subwoofers. Cuando el VPS 210 se usa en un sistema de ese tipo, la salida de desviación se puede usar para suministrar una señal a un segundo subwoofer. La señal de esta salida no es afectada por la transición interna del VPS 210. Es igual a la señal que va a las entradas.
Ajuste y operación de los controles
Los controles del VPS 210 se encuentran en la parte superior del gabinete. El Control de Volumen se encuentra a la izquierda. Los demás controles se encuentran debajo de una tapa desmontable. Para ajustar estos controles, levante la lengüeta del lado derecho de la tapa para quitarla.
Control de Apagado/Auto/Encendido e Indicador de Estado
40 |
60 |
0º |
180º |
OFF AUTO ON |
|
|
|
||
30 |
150 |
|
|
|
CROSSOVER (Hz) POLARITY |
POWER MODE |
|||
Control de Volumen Indicador de Estado
APAGADO – Apague el VPS 210 si no lo usará. Cuando el interruptor se encuentra en “Apagado”, el VPS 210 cumple con la norma Energy Star®.
AUTO – El VPS 210 se enciende cada vez que se detecta una señal de entrada. Si no se detecta señal alguna, después de varios minutos cambiará automáticamente al modo de ahorro de energía Standby. Cuando el VPS 210 se encuentra en modo Standby, usa muy poca energía.
ENCENDIDO – El VPS 210 siempre está encendido.
El Indicador de Estado muestra el modo del VPS 210:
APAGADO – El subwoofer está apagado
AMARILLO – STANDBY (no se detecta señal, amplificador apagado)
AZUL – ENCENDIDO (se detecta señal, amplificador encendido)
Control de Volumen
Comience con el Control de Volumen en la posición de las 11 del reloj. Si el VPS 210 no emite sonido, verifique el Indicador de Estado: debería estar encendido de color azul. Si no está encendido, verifique el cable de AC, el interruptor de Potencia, y los cables de entrada. (¿Los conectores de los cables están haciendo contacto correctamente? ¿El cable de AC está conectado a un receptáculo “vivo”? ¿El subwoofer está en la posición Auto o Encendido?)
Ajuste del Control de Transiciones
Al usar las entradas en nivel de línea (no la entrada LFE), se conecta la transición incorporada del VPS 210. Como punto de partida, ajuste el Control de Transiciones aproximadamente 10Hz por sobre el límite inferior de la respuesta de bajos de sus parlantes principales. Realice el ajuste fino de la transición a oído, para lograr la combinación más uniforme con sus parlantes principales. El mejor ajuste del control dependerá del parlante principal usado en el sistema, la ubicación de los parlantes y la preferencia personal.
Una vez ajustado el Control de Transiciones, quizás desee volver a ajustar el Control de Volumen hasta que la transición de los parlantes principales y el VPS 210 sea uniforme y el sonido sea equilibrado. La salida de graves no debe dominar los parlantes principales, sino que se deben ajustar de manera que exista una combinación natural en todo el rango musical.
Control de Polaridad
Selecciona la fase regular (0°) o invertida (180°) para el VPS 210. Ajuste este interruptor para que el sistema produzca los bajos más completos y dinámicos. El efecto de la fase será más audible en los instrumentos de percusión de baja frecuencia o en la música con una línea constante de bajos.
12
142-003285-1_VPS_OM_Intl.indd 12 |
|
|
9/24/08 4:19:36 PM |
|
|
 Loading...