


Features and Benefits of Your New Dryer
ActiveDryt Technology
Moisture and temperature levels are constantly monitored to ensure precise drying results for a wide array of fabrics. Everything from T-shirts to baby blankets comes out warm and soft every time.
Constant monitoring ensures the lowest energy usage possible, cutting consumption by up to 50% per year.
EcoSmartt
EcoSmartt technology utilizes a network of sensors in the Bosch Vision dryer for cycles that conserve the most energy possible while maintaining superior drying performance. By adjusting to how wet the load is and regulating temperature to never over heat, it is no wonder that Bosch offers some of the most efficient dryers in the market.
EcoActiont
This option gives you the ability to reduce energy usage by up to 10%. By selecting this option, temperature is reduced to save resources while the cycle time is slightly extended to ensure proper drying.
DynamicAirt
The Bosch Vision DynamicAirt system features gentle heat and high air volume in the most gentle dryer drum. Only Bosch Vision can offer a one-piece dryer drum with a backshield full of holes to properly distribute air over your laundry, giving you the most gentle and effective drying possible.
Wrinkle BlockR
Sometimes you can't get your laundry right when the buzzer rings. Wrinkle BlockR gives you one hour of intermittent
tumbling, preventing creases from setting in and, ultimately, reducing ironing time.
Stainless Steel Drum
Bosch dryers feature smooth, stainless steel drums for the gentlest of care.
160º Door Hinge
The dryer door opens up to 160º - making it easier to load and unload laundry. Washer and dryer doors also open in opposite directions, so when set up side by side, transferring your damp laundry to the dryer becomes an effortless task.
Quiet Performance
Bosch laundry appliances use brushless motors, suspended pump systems, and special sound-deadening material to keep them exceptionally quiet while in operation. Quiet operation means they can be installed virtually anywhere in the home without causing a disturbance.
Dryer Rack
The dryer rack protects the most delicate fabrics or a pair of tennis shoes, allowing either to dry without tumbling. It is standard on the Premium model and is available as an accessory on all models.
Lint Filter
The dryer lint filter is conveniently located in the appliance housing below the dryer door for easy access. The lint filter's fine mesh filter captures even the smallest lint particles. And to increase drying efficiency, there's also a lint filter LED on the control panel that illuminates should the filter need immediate cleaning.
Steam Cycles
Steam Cycles offered on select models utilize added moisture to help relax fabric, ease wrinkling, and freshen cotton blend laundry items to reduce odor.
2

Table of Contents |
|
Definitions . . . . . . . . . . . . . . . . . . . . . . . . . . . . . . . . . . . . . . . . . . . . . . . . . . . . . . . . . . . . . . . . . . . . . . . . . . . . . . . . . . . . . . . . . . |
4 |
IMPORTANT SAFETY INSTRUCTIONS . . . . . . . . . . . . . . . . . . . . . . . . . . . . . . . . . . . . . . . . . . . . . . . . . . . . . . . . . . . . . . . . . |
5 |
GROUNDING INSTRUCTIONS . . . . . . . . . . . . . . . . . . . . . . . . . . . . . . . . . . . . . . . . . . . . . . . . . . . . . . . . . . . . . . . . . . . . . . . |
6 |
INSTALLATION INSTRUCTIONS . . . . . . . . . . . . . . . . . . . . . . . . . . . . . . . . . . . . . . . . . . . . . . . . . . . . . . . . . . . . . . . . . . . . . . . |
7 |
Introduction . . . . . . . . . . . . . . . . . . . . . . . . . . . . . . . . . . . . . . . . . . . . . . . . . . . . . . . . . . . . . . . . . . . . . . . . . . . . . . . . . . . . . . . |
7 |
Information concerning waste disposal . . . . . . . . . . . . . . . . . . . . . . . . . . . . . . . . . . . . . . . . . . . . . . . . . . . . . . . . . . . . . . . . |
7 |
Before installing the dryer . . . . . . . . . . . . . . . . . . . . . . . . . . . . . . . . . . . . . . . . . . . . . . . . . . . . . . . . . . . . . . . . . . . . . . . . . . . . |
7 |
Checklist for Installation . . . . . . . . . . . . . . . . . . . . . . . . . . . . . . . . . . . . . . . . . . . . . . . . . . . . . . . . . . . . . . . . . . . . . . . . . . . . . |
8 |
Installation Location . . . . . . . . . . . . . . . . . . . . . . . . . . . . . . . . . . . . . . . . . . . . . . . . . . . . . . . . . . . . . . . . . . . . . . . . . . . . . . . . |
8 |
Dryer Dimensions . . . . . . . . . . . . . . . . . . . . . . . . . . . . . . . . . . . . . . . . . . . . . . . . . . . . . . . . . . . . . . . . . . . . . . . . . . . . . . . . . . |
8 |
Door Hinge Reversal . . . . . . . . . . . . . . . . . . . . . . . . . . . . . . . . . . . . . . . . . . . . . . . . . . . . . . . . . . . . . . . . . . . . . . . . . . . . . . . . |
9 |
Installation Types . . . . . . . . . . . . . . . . . . . . . . . . . . . . . . . . . . . . . . . . . . . . . . . . . . . . . . . . . . . . . . . . . . . . . . . . . . . . . . . . . . . |
11 |
Electrical connection . . . . . . . . . . . . . . . . . . . . . . . . . . . . . . . . . . . . . . . . . . . . . . . . . . . . . . . . . . . . . . . . . . . . . . . . . . . . . . . |
14 |
Exhaust air connection . . . . . . . . . . . . . . . . . . . . . . . . . . . . . . . . . . . . . . . . . . . . . . . . . . . . . . . . . . . . . . . . . . . . . . . . . . . . . . |
17 |
Accessories . . . . . . . . . . . . . . . . . . . . . . . . . . . . . . . . . . . . . . . . . . . . . . . . . . . . . . . . . . . . . . . . . . . . . . . . . . . . . . . . . . . . . . . |
19 |
Preparing to transport the dryer @ step by step . . . . . . . . . . . . . . . . . . . . . . . . . . . . . . . . . . . . . . . . . . . . . . . . . . . . . . . . . . |
19 |
OPERATING INSTRUCTIONS . . . . . . . . . . . . . . . . . . . . . . . . . . . . . . . . . . . . . . . . . . . . . . . . . . . . . . . . . . . . . . . . . . . . . . . . . |
20 |
Panel . . . . . . . . . . . . . . . . . . . . . . . . . . . . . . . . . . . . . . . . . . . . . . . . . . . . . . . . . . . . . . . . . . . . . . . . . . . . . . . . . . . . . . . . . . . . |
20 |
Additional Safety information . . . . . . . . . . . . . . . . . . . . . . . . . . . . . . . . . . . . . . . . . . . . . . . . . . . . . . . . . . . . . . . . . . . . . . . . . |
21 |
Protection of the environment . . . . . . . . . . . . . . . . . . . . . . . . . . . . . . . . . . . . . . . . . . . . . . . . . . . . . . . . . . . . . . . . . . . . . . . . . |
21 |
Laundry . . . . . . . . . . . . . . . . . . . . . . . . . . . . . . . . . . . . . . . . . . . . . . . . . . . . . . . . . . . . . . . . . . . . . . . . . . . . . . . . . . . . . . . . . . . . |
21 |
Identification of fabrics . . . . . . . . . . . . . . . . . . . . . . . . . . . . . . . . . . . . . . . . . . . . . . . . . . . . . . . . . . . . . . . . . . . . . . . . . . . . . . |
21 |
Drying tips . . . . . . . . . . . . . . . . . . . . . . . . . . . . . . . . . . . . . . . . . . . . . . . . . . . . . . . . . . . . . . . . . . . . . . . . . . . . . . . . . . . . . . . . |
21 |
Cycle Selection . . . . . . . . . . . . . . . . . . . . . . . . . . . . . . . . . . . . . . . . . . . . . . . . . . . . . . . . . . . . . . . . . . . . . . . . . . . . . . . . . . . . . . |
22 |
Options (Delicates, ECO Action) . . . . . . . . . . . . . . . . . . . . . . . . . . . . . . . . . . . . . . . . . . . . . . . . . . . . . . . . . . . . . . . . . . . . . . |
22 |
Acoustic Signal (800 Series, page 25) . . . . . . . . . . . . . . . . . . . . . . . . . . . . . . . . . . . . . . . . . . . . . . . . . . . . . . . . . . . . . . . . . . |
22 |
LED indicators of cycle sequence . . . . . . . . . . . . . . . . . . . . . . . . . . . . . . . . . . . . . . . . . . . . . . . . . . . . . . . . . . . . . . . . . . . . . |
23 |
Cycle Selection Table . . . . . . . . . . . . . . . . . . . . . . . . . . . . . . . . . . . . . . . . . . . . . . . . . . . . . . . . . . . . . . . . . . . . . . . . . . . . . . . |
24 |
Automatic cycles . . . . . . . . . . . . . . . . . . . . . . . . . . . . . . . . . . . . . . . . . . . . . . . . . . . . . . . . . . . . . . . . . . . . . . . . . . . . . . . . . . . |
24 |
Steam cycles . . . . . . . . . . . . . . . . . . . . . . . . . . . . . . . . . . . . . . . . . . . . . . . . . . . . . . . . . . . . . . . . . . . . . . . . . . . . . . . . . . . . . . |
24 |
Special cycles . . . . . . . . . . . . . . . . . . . . . . . . . . . . . . . . . . . . . . . . . . . . . . . . . . . . . . . . . . . . . . . . . . . . . . . . . . . . . . . . . . . . . |
24 |
Time cycles . . . . . . . . . . . . . . . . . . . . . . . . . . . . . . . . . . . . . . . . . . . . . . . . . . . . . . . . . . . . . . . . . . . . . . . . . . . . . . . . . . . . . . . |
24 |
Additional Options on LCD Menu . . . . . . . . . . . . . . . . . . . . . . . . . . . . . . . . . . . . . . . . . . . . . . . . . . . . . . . . . . . . . . . . . . . . . |
24 |
Operation . . . . . . . . . . . . . . . . . . . . . . . . . . . . . . . . . . . . . . . . . . . . . . . . . . . . . . . . . . . . . . . . . . . . . . . . . . . . . . . . . . . . . . . . . . . |
26 |
Using the dryer . . . . . . . . . . . . . . . . . . . . . . . . . . . . . . . . . . . . . . . . . . . . . . . . . . . . . . . . . . . . . . . . . . . . . . . . . . . . . . . . . . . . |
26 |
Cleaning the lint filter . . . . . . . . . . . . . . . . . . . . . . . . . . . . . . . . . . . . . . . . . . . . . . . . . . . . . . . . . . . . . . . . . . . . . . . . . . . . . . . . |
27 |
Using the dryer rack (Option) . . . . . . . . . . . . . . . . . . . . . . . . . . . . . . . . . . . . . . . . . . . . . . . . . . . . . . . . . . . . . . . . . . . . . . . . . |
28 |
Cleaning and care . . . . . . . . . . . . . . . . . . . . . . . . . . . . . . . . . . . . . . . . . . . . . . . . . . . . . . . . . . . . . . . . . . . . . . . . . . . . . . . . . . . |
29 |
Cleaning the dryer . . . . . . . . . . . . . . . . . . . . . . . . . . . . . . . . . . . . . . . . . . . . . . . . . . . . . . . . . . . . . . . . . . . . . . . . . . . . . . . . . . |
29 |
Cleaning the exhaust duct . . . . . . . . . . . . . . . . . . . . . . . . . . . . . . . . . . . . . . . . . . . . . . . . . . . . . . . . . . . . . . . . . . . . . . . . . . . |
29 |
Cleaning the moisture sensor . . . . . . . . . . . . . . . . . . . . . . . . . . . . . . . . . . . . . . . . . . . . . . . . . . . . . . . . . . . . . . . . . . . . . . . . |
29 |
Cleaning the lint filter housing . . . . . . . . . . . . . . . . . . . . . . . . . . . . . . . . . . . . . . . . . . . . . . . . . . . . . . . . . . . . . . . . . . . . . . . . |
29 |
Cleaning the Steam nozzle . . . . . . . . . . . . . . . . . . . . . . . . . . . . . . . . . . . . . . . . . . . . . . . . . . . . . . . . . . . . . . . . . . . . . . . . . . |
29 |
Change the light bulb . . . . . . . . . . . . . . . . . . . . . . . . . . . . . . . . . . . . . . . . . . . . . . . . . . . . . . . . . . . . . . . . . . . . . . . . . . . . . . . |
29 |
Troubleshooting . . . . . . . . . . . . . . . . . . . . . . . . . . . . . . . . . . . . . . . . . . . . . . . . . . . . . . . . . . . . . . . . . . . . . . . . . . . . . . . . . . . . . |
30 |
SERVICE and REPAIR . . . . . . . . . . . . . . . . . . . . . . . . . . . . . . . . . . . . . . . . . . . . . . . . . . . . . . . . . . . . . . . . . . . . . . . . . . . . . . |
32 |
STATEMENT OF LIMITED PRODUCT WARRANTY . . . . . . . . . . . . . . . . . . . . . . . . . . . . . . . . . . . . . . . . . . . . . . . . . . . . . . |
33 |
3

Congratulations!
Your new clothes dryer is a modern, high quality domestic appliance.
This dryer complies with:
UL 2158/CAN/CSA-C22.2 No. 112 Clothes Dryers
A distinctive feature of your dryer is low energy consumption.
An easy operation philosophy, a variety of customized drying programs, and a solid touch and feel make this appliance a userIfriendly assistant in your household.
Bosch dryers offer the following standard features:
-High-efficiency precision drying system
-Large stainless steel drum with a capacity of up to 17.6 lbs (8 kg)
-Large port hole (16"/406 mm), and door interlock with automatic drum stop function
-Exceptionally quiet operation
-Sensor-controlled auto cycles
-Timed cycles
300 and 500 Series Dryer: 20, 40 and 60 minute cycles
800 Series Dryer: 10 to
150 minutes (in increments of 10 minutes)
-Wrinkle BlockR feature tumbles clothes periodically for up to one hour following drying to help decrease wrinkling
Each dryer which leaves our factory has undergone a thorough performance test and is in full working condition. If you have any questions, especially concerning installation of the dryer - our customer service team will be happy to assist you.
Further information and a selection of our products can be found on our web site:
www.bosch-home.com/us
Information
Please read and follow these operating and installation instructions and all other information enclosed with the dryer.
Models Covered by this User Manual
Definitions
,WARNING
WARNING - This indicates that death or serious injuries may occur as a result of nonIobservance of this warning.
,CAUTION
CAUTIONThis indicates that minor or moderate injuries may occur as a result of nonIobservance of this warning.
NOTICE
NOTICE - This indicates that damage to the appliance or property may occur as a result of nonIobservance of this warning.
iThis symbol is used to draw the
user's attention to important information.
4

d IMPORTANT SAFETY INSTRUCTIONS
,WARNING
The warnings and safety instructions in this manual can not cover all possible risks, conditions and situations that may arise. Use common sense and exercise caution when installing, maintaining and operating this or any other appliance.
,WARNING
To reduce the risk of fire, electric shock, serious injury or death to persons and /or damage when using your dryer, follow basic precautions, including the following.
1.Read all instructions before using the dryer. Bosch dryers are provided with Operating, Care and Installation Instructions.
2.Do not dry articles that have been previously cleaned, washed, soaked or spotted with gasoline, dry cleaning solvents, or other flammable or explosive substances as they give off vapors that could ignite or explode.
To reduce the risk of fire, clothes, cleaning rags, mop heads and the like which have traces of any flammable substance, such as vegetable oil, cooking oil, petroleum-based oils or distillates, waxes, fats, etc., must not be placed in the dryer. These items may contain some flammable substance(s), even after washing, which may smoke or catch fire by themselves.
Do not place items exposed to cooking oils in your dryer. Items contaminated with cooking oils may contribute to a chemical reaction that could cause a laundry load to catch fire.
3.The dryer must only be used for its intended purpose.
4.When children become old enough to operate the appliance, it is the responsibility of the parents or legal guardians to ensure that they are instructed in safe practices by qualified persons.
5.Do not allow children to play on or in the appliance at any time; severe injury or death could result. Children should be kept a safe distance away from appliances at all times. Children should only be permitted within an appliance's vicinity if under close, constant adult supervision.
6.Do not allow children's toys, or other items that might encourage children to climb on the dryer, to be stored on or in the dryer or on shelves or in cabinets or other storage areas adjacent to the dryer.
7.Do not sit or stand on the top of the dryer.
8.Do not allow anyone to climb, lean or hang on any part of the dryer including any protruding components such as the appliance door or a pullout shelf.
9.To reduce the risk of poisoning or chemical burns, keep all cleaning products out of the reach of children.
10.Store all laundry chemicals and aids in a cool dry place according to the manufacturer's instructions. Make sure children cannot reach them. Gasoline, combustible materials and materials that produce flammable vapors, flammable liquids, and substances that pose a fire hazard must not be stored near the dryer.
11.Keep pets away from the dryer.
12.BEFORE THE APPLIANCE IS REMOVED FROM SERVICE OR DISCARDED, REMOVE THE DOOR TO THE DRYING COMPARTMENT.
13.Do not reach into the appliance if the drum is rotating.
14.Do not install or store this appliance where it will be exposed to the weather or the elements, such as water/moisture, dirt, corrosive/salt air, and excessive cold.
15.Do not tamper with the controls.
16.Do not repair or replace any part of the appliance or attempt any service unless specifically recommended in the userImaintenance instructions or in published user repair instructions that you understand and have the skills to carry out.
17.Do not use fabric softeners or products to eliminate static unless recommended by the fabric manufacturer.
18.Do not use heat to dry articles containing foam rubber (may be labeled latex foam) or similarly textured rubberIlike materials. Foam rubber materials can ignite by spontaneous combustion.
19.Do not dry articles containing spunbonded olefin. Spunbonded olefin can melt and can ignite by spontaneous combustion.
20.Check the lint screen before each laundry load and clean as needed. Excess lint buildup can damage the dryer and create a potential fire hazard.
21.Keep area around the exhaust opening and adjacent surrounding areas free from the accumulation of lint, dust and dirt. An obstructed port might reduce the airflow and cause overheating.
22.The interior of the machine and exhaust duct should be cleaned periodically by qualified service personnel.
23.Removing any panel or cover, including the light cover, may expose live electrical circuits.
Always be sure to unplug the dryer from the electrical supply before attempting any service. Disconnect the power cord by grasping the plug, not the cord.
24.To avoid fire hazards, do not use an extension cord, an adapter, or any other non-manufacturer supplied electrical connector or cord, to connect the dryer to the electrical supply. Dryers require substantial amounts of electrical power and must have dedicated electrical outlets.
25.Always check clothing pockets and shake out all laundry items before placing into dryer;
5

inappropriate objects can damage the dryer and certain items like cigarette lighters can pose a fire hazard.
26.To reduce the risk of fire and electrical shock hazards, do not use the dryer if the power cord is frayed or damaged, or if the plugs are loose.
27.Do not operate the dryer if any guards and/or panels have been removed or if any parts are missing or broken.
28.Do not bypass any safety devices.
29.Do not use a plastic or nonImetal flexible duct with this dryer. Plastic or nonImetal flexible duct is a potential fire hazard.
30.Do not operate this dryer until you are sure that the dryer has been installed according to the INSTALLATION INSTRUCTIONS and that installation and electrical grounding are in compliance with all local regulations and/or other applicable regulations and requirements.
31.Failure to install, maintain and/or operate the dryer according to the manufacturer's instructions may result in injury and/or damage.
32.To avoid floor damage and mold growth, do not let spills or splashout to cause standing water around or under the appliance.
33.Make sure that all water connections to the dryer have a shut-off valve that is readily accessible. Close the appliance water shut-off valve(s) at the end of each day of use.
34.Check the fill hose connections on a regular basis to ensure that they are tight and not leaking.
Notes:
AThe IMPORTANT SAFEGUARDS and WARNINGS presented in this manual do not cover all possible conditions that may occur.
Common sense, caution and care must be exercised when installing, maintaining or operating the dryer.
BAlways contact your dealer, distributor, service agent or the manufacturer about any problems or conditions that you do not understand.
CFollow the Safety Information provided in the INSTALLATION INSTRUCTIONS and the OPERATING INSTRUCTIONS.
GROUNDING INSTRUCTIONS
This appliance must be grounded. In the event of malfunction or breakdown, grounding will reduce the risk of electric shock by providing a path of least resistance for the electric current.
For U.S.A.
Your dryer comes without a power supply cord. The power cord must meet the following requirements:
-UL listed in the USA
-240 volt rated (minimum)
-30 amps
-Type SRDT or DRT and marked for use with clothes dryers
-Five feet long (minimum)
,WARNING
Improper connection of the equipment grounding conductor can result in a risk of electric shock.
Check with a qualified electrician or service person if you are in doubt as to whether the dryer is properly grounded.
DO NOT modify the plug provided with the appliance. If it will not fit the outlet, have a proper outlet installed by a qualified electrician.
KEEP THESE INSTRUCTIONS FOR FUTURE REFERENCE.
In case of change of ownership, this manual should be conveyed with the dryer.
SAVE THESE INSTRUCTIONS
6

INSTALLATION INSTRUCTIONS
Introduction
Read these installation instructions completely and carefully. They will save you time and effort and help to ensure optimum dryer performance. Be sure to observe all listed warnings and cautions.
,WARNING
WARNING - Risk of Fire.
-Clothes dryer installation must be performed by a qualified installer.
-Install the clothes dryer according to the manufacturer's instructions and local codes.
-Do not install a clothes dryer with flexible plastic venting materials. If flexible metal (foil type) duct is installed, it must be of a specific type identified by the appliance manufacturer as suitable for clothes dryers. Flexible venting materials are known to collapse, be easily crushed and trap lint. These conditions will obstruct clothes dryer airflow and increase the risk of fire.
-To reduce the risk of severe injury or death, follow all installation instructions.
-SAVE THESE INSTRUCTIONS.
In addition to these instructions the dryer must be installed in accordance with all local codes or, in the absence of a local code:
-In the U.S.A., in accordance with the National Electric Code, ANSI/NFPA70 @ latest edition/State and Municipal codes and/or local codes.
Informationconcerning waste disposal
Disposal of the packaging
,WARNING
Keep children away from the shipping carton and packaging components to avoid risk of suffocation.
All packaging materials are environmentally friendly and can be reused. Please dispose of packaging in an environmentally friendly manner.
Please ask your dealer or inquire at your local authority about the best means of disposal.
Disposal of the old appliance
,WARNING
If the appliance is no longer usable, pull out main plug, cut off power cord and discard with main plug. To prevent children from locking themselves in the appliance, remove the door.
Old appliances are not worthless rubbish! Valuable raw materials can be reclaimed from environmentally friendly recycling.
Please ask your dealer or inquire at your local authority about the best means of disposal.
Before installing the dryer
Before installing the dryer to a previously used ductwork system, make sure the system is clean. Professional ductwork cleaning is recommended annually and also when attaching your dryer to a previously used ductwork system.
Maintaining clean ductwork will reduce drying time and will improve drying performance.
Unpacking the appliance
,CAUTION
The dryer is very heavy. Do not lift it by yourself. Do not lift the appliance by projecting components (e.g. door) @ due to risk of breakage.
NOTICE
Remove the appliance packaging carefully to prevent damage to appliance surfaces and adjacent areas.
Check the dryer for transportation damage. Do not install a dryer which is visibly damaged. If in doubt, contact your dealer.
Supplied components
,CAUTION
The dryer is supplied without a power cord. The power cord
must be connected by a qualifed technician or a licensed electrician.
NOTICE
After removing the packaging, immediately remove any objects from the drum.
7
Installation location
,WARNING
DO NOT install the dryer:
-outdoors
-in an environment with dripping water,
-near flammable materials,
-in rooms which are at risk of frost,
-in rooms which may contain gas or other fuels,
-in cupboards with lockable doors.
The installation room must be well ventilated, otherwise the dryer will operate below optimum performance.
Do not operate the dryer at temperatures above 104°F (40°C) or below 41°F (5°C). Low temperatures affect the automatic program sequence and may prolong the drying times.
The installation surface for the dryer must be clean, level and firm. Do not install the appliance on carpets!
Compensate for uneven floors with the heightIadjustable feet.
The size of the installation area depends on the dimensions of the dryer. Ensure that there is adequate room for the swivel range of the door!
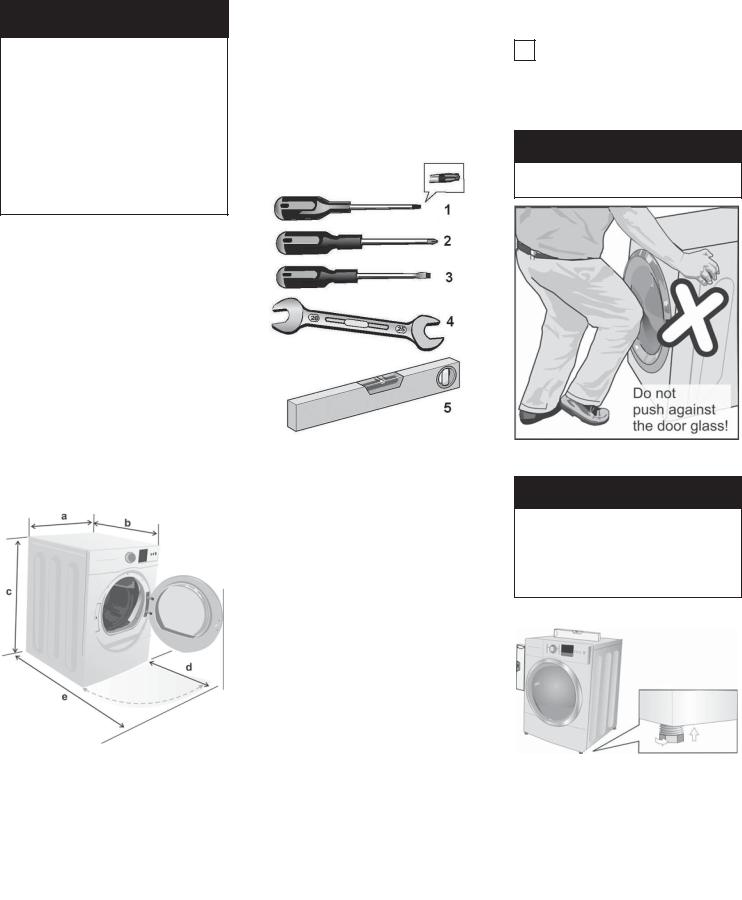
Dryer Dimensions
|
Dimension |
Weight |
|
|
|
|
|
a |
27.0" (68.6 cm) |
125 lbs |
|
b |
31.8" (81.0 cm) |
(56.7 kg) |
|
|
|||
c (min)* |
36.9" (93.6 cm) |
with |
|
packaging |
|||
c |
37.8" (95.9 cm) |
||
143 lbs |
|||
(max)* |
|
(64.8 kg) |
|
d |
22.0" (59.7 cm) |
|
|
|
angle 160° |
|
|
e |
53.9" (136.9 cm) |
|
|
|
|
|
* min=dryer feet all the way in, max=out
Useful Tools
The following tools are helpful during installation:
1.T20 star head screwdriver
2.Philips screwdriver (#2)
3.Flat blade screwdriver
4.Open end wrench 1 in. (25mm)
5.Bubble level
Checklist for Installation
1.Unpack the dryer.
2.Remove all objects from the drum.
3.Check the dryer for visible damage.
4.Position the dryer near the installation location (see page 8).
5.If required, change the door hinge to the left (see page 9).
6.If required, install the side or bottom exhaust air outlet on the dryer (see page 19).
7.Have the power supply cord fitted by a qualified technician or a licensed electrician (see page 14).
8.Check for •Y" connection, short hose and water supply hose included with the dryer packaging (see page 13). (Selected models only).
9.Connect the water supply (selected models only) to the back of the dryer (see page 13 for detailed instructions).
10.Install exhaust ductwork if necessary.
Follow the installation instructions supplied by the appropriate ductwork parts manufacturers (see page 18)
iIf space is very restricted, it is recommended to fit the initial parts of the exhaust duct to the dryer before the dryer is moved to its final installation location.
NOTICE
DO NOT push against the dryer door glass. Risk of breakage!
11. Move the dryer to its final location.
NOTICE
Do not slide dryer across the floor if heightIadjustable feet have been extended. Feet and/or dryer base may be damaged if dryer is slid across floor with heightIadjustable feet extended.
12. Position and then level the dryer.
The dryer should be level with all four feet firmly on the ground. The dryer must not wobble. If the dryer is not level or if it does wobble, the feet must be adjusted. Adjust the heightIadjustable feet using the 1 in. (25mm) wrench until the dryer does not rock and is level, both frontItoIback and sideItoIside.
8
qAfter making preliminary adjustments, press down on each corner of the dryer to make sure the unit does not wobble. If pressing down on a corner causes the dryer to wobble, lower the dryer foot on that corner until the foot touches the floor firmly.
Install the dryer and level it from side to side and front to back. Use a bubble level. Never remove the heightIadjustable feet!
13.Connect the exhaust duct to the exhaust air outlet on the dryer (see page 17).
14.Insert the dryer electrical plug into the wall receptacle (see page 14).
15.Read the operating instructions to understand how your dryer operates. (see page 20).
16.Conduct an appliance test:
q Check that the drum is empty. q Close the dryer door.
qSwitch the dryer to "Extra Dry" and then press the •Start/Pause" button.
qAfter 3-5 minutes press the •Start/Pause" button and open the door.
qIf the interior of the dryer feels warm, the dryer has been connected properly.
Switch the dryer to "OFF".
qIf the dryer does not work, switch the dryer to "OFF". Look in the troubleshooting section (page 30) and find the fault.
Door Hinge Reversal
The door is hinged on the right hand side of the dryer at the factory. The door hinge can be reversed if necessary.
Tools Needed
T20 star head screwdriver
Hinge Reversal Parts
Hinge (with 4 white plastic bushings) Hinge Cover Plate
Door Assembly
Hinge Reversal Procedure
1.Unplug the dryer.
2.Prepare a firm, flat, padded surface to lay the dryer door on while changing the hinge.
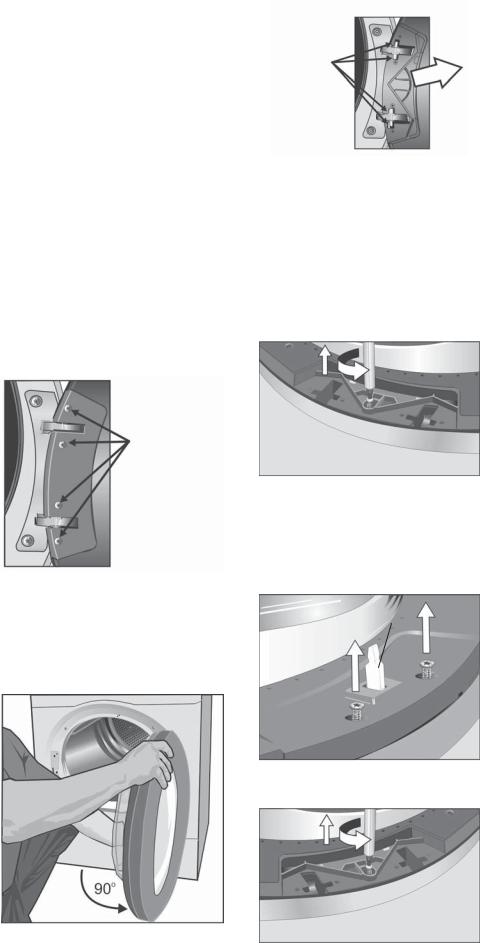
3.Open the dryer door to fully expose the hinge cover.
4.Remove the 4 screws holding the hinge cover in place.
remove four screws
Set the cover aside along with the four screws for later reinstallation.
5.Rotate the door so that it is perpendicular to the dryer front. Slide the door away from the dryer so the hinge pins slide out of the grooves in the dryer door.
check to make sure that all four plastic bushings remain on the hinge pins
Avoid allowing the 4 plastic bushings to fall off the hinge pins. If any of the bushings do fall off, reinstall them on the hinge pins prior to reinstalling the door.
6.Lay the dryer door face down on a firm, flat, padded surface, with the bottom of the door facing towards you.
7.Remove the single screw that was hidden by the hinge cover plate.
8.Remove the two screws holding the striker cover plate in place. Hold the striker while lifting the cover so as to keep the parts together in place and set the assembly aside for later reinstallation.
striker
9.Remove the single screw that was hidden by the striker plate cover.
9

10.Remove the four screws holding the front ring to the door body.
11.Flip the door over so the front ring faces up.
12.Remove the front ring from the dryer door.
had been). Reinstall the striker cover and striker to the new location and securely tighten the two cover screws.
21. Reinsert and tighten the four front ring screws.
15.Rotate the front ring 180 degrees so the door handle is now on the right hand side. The door handle is located on the inside of the front ring. It is a hand-sized indent.
13.The cover glass has a raised glass edge that goes about two-thirds of the way around the glass. Be sure this raised edge faces up towards you. Observe the position of the leading edge of the raised glass handle, marked in the illustration below as (A).
Rotate the cover glass 90 degrees clockwise.
16.Flip the door over so the back faces up.
17.Reassemble the parts, preserving their new alignments.
18.Reinsert the single screw that goes under the hinge cover plate. Tighten the screw securely.
19.Reinsert the single screw that goes under the striker plate. Tighten the screw securely.
22.Remove the two screws holding the plastic cover plate over the left hand hinge mounting position on the dryer housing. Remove the plate and set it aside with the two screws.
23.Remove the two screws holding the metal door hinge to the dryer housing. Remove the hinge from the housing.
14.Note the new position of the cover glass. The leading edge of the raised glass edge should have moved 90 degrees clockwise from its starting point as shown in the illustration below as (A).
20. Rotate the striker cover and striker
180 degrees so the assembly fits to the install area on the opposite side of the door (where the hinge
Right Hand |
to |
Left Hand |
24.Reattach the door hinge to the dryer housing at the left side of the dryer door opening. Tighten both screws completely, making sure they hold the hinge securely.
10
25.The door is now ready to be mounted back on the dryer.
26.Reinstall the dryer door by sliding it onto the hinge pins.
Avoid allowing the four plastic bushings to fall off the hinge pins. If any fall off, reinstall them on the hinge pins prior to reinstalling the dryer door.
reinstall the dryer door
27.Reinstall the hinge cover plate removed in step 4. Insert and tighten the 4 screws holding the hinge cover plate in place.
reinstall four screws and tighten securely
28.Install the plastic cover plate over the original hinge position at the right hand side of the dryer door opening. Insert and tighten the two screws holding the plate in place.
29.Test that the door opens and closes properly. The door should latch securely. The hinge reversal process is complete.
Minimum Distances
Important information concerning minimum distances:
-Depending on the location of the exhaust air connection, an additional minimum distance of 5½ inch (14 cm) must be provided on this side, the side the connection is on, for ducts/brackets (see page 19).
-Benefits of maintaining greater distance (clearances) than the minimum shown include:
Smore air cools the dryer, keeps the dryer from overheating, and improves drying performance.
Sreduction of the risk of mold formation behind the appliance.
Sreduced noise transmission
Sfacilitation of installation and service.
-If the dryer is installed in a small room, the doors of the room must be fitted with vents of the specified minimum size. Refer to the following illustrations of enclosed installations for additional information.
-Allow additional clearance for door, wall and window molding where necessary.
Installation Types
Observe the following minimum clearances between the dryer and adjacent surfaces for all installation types.
Minimum Installation Clearances
A Sides |
0.25 in. (6.4 mm) |
B Top |
0.25 in. (6.4 mm) |
C Rear* |
5.25 in. (13.4 cm) |
D Front |
0.50 in. (12.8 mm) |
* as close to wall as venting or water connection will allow. If installed with a washer, the larger rear clearance for dryer venting is required for the laundry pair.
qUnits are designed so that the dryer can be stacked on top of the washer using one of the stacking kits shown on page 19.
qUnits are designed to allow for under-counter installation See required dimensions in under-
counter installation section on page 12.
Height measurements shown in this section are with the dryer feet at minimum extension (turned in all the way up against the base of the dryer).
Recessed or Closet
Dimensions for installation in a closet or recessed area are shown in the illustration below.
Closet Ventilation Requirements
E |
Top |
48 sq. in. (310 sq. cm) |
F |
Bottom |
24 sq. in. (155 sq. cm) |
Required Installation Space |
||
G Height |
37.25 in. (94.6 cm) |
|
H Width |
27.50 in. (69.9 cm) |
|
I |
Depth |
37.25 in. (94.6 cm) |
Mounted on Pedestal
Dimensions for pedestal mounting installation are shown in the illustration below.
J
Required Installation Space
G |
Height |
52.25 in. (132.7 cm) |
H |
Width |
27.50 in. (69.9 cm) |
I |
Depth |
37.25 in. (94.6 cm) |
J |
Pedestal Ht. |
15.0 in. (38.1 cm) |
11
 Loading...