


ultraSense™ Electric Dryers
Operating, Care and Installation Instructions
Model: WTXD5321US, WTXD5321CN
Please read instructions before using.
Important: Save these instructions.
ultraSense™ Seche-linges Électriques
Notice d’utilisation, de maintenance et d’installation
Modèle: WTXD5321US, WTXD5321CN
Merci de lire les instructions avant utilisation.
Important: Conserver ces instructions.
ultraSense™ Secadores a Eléctrica
Operación, cuidado y instrucciones para la instalación
Modelo: WTXD5321US, WTXD5321CN
Por favor lee los instrucciones antes del uso.
Importante: Guarda esos instrucciones.

Table |
of |
Contents |
|
|
|
|
|
|
||||
Definitions . . . . . . . . . . . . . . . . . . . . . . . . . . . . . . . . . . . . . . . . . . . . . . |
3. . . . . |
|||||||||||
IMPORTANT SAFETY INSTRUCTIONS. . . . . . . . . . . |
. |
. . . . . |
. . . . . . . . . . . . . . . . . |
3. . . . . |
||||||||
GROUNDING INSTRUCTIONS. . . . . . . . . . . . . . . |
. |
. . . . |
. |
. . . . . . . . . . . . . . . . . . . . . . . . . . . . . . |
4. . . . . . |
. . . . |
||||||
INSTALLATION |
INSTRUCTIONS. . . . . . . . . . . . . . |
. . . . . . . . . . . . . . . . . . . . . . . |
5. . . . . |
|||||||||
Introduction . . . . . . . . . . . . . . . . . . . . . . . . . . . . . . . . . . . . . . . . . . . . . . . . . . . . . . . . . . . . . . . . . . . |
5. . . . . . |
. . . . |
||||||||||
Information concerning waste disposal. . . . . . . . . . . |
. |
. . . . . |
. |
. . . . . . . . . . . . . . . . . . . . . . . . . .5. . . . . . |
. . . |
|||||||
Before |
installing |
the dryer. . . . . . . . . . . . . . . . . |
. |
. . . . . |
. |
. . . . . . . . . . . . . . . . . . . . . . . . . . . . . . . .5. . . . . . |
. . . . |
|||||
Electrical |
|
connection . . . . . . . . . . . . . . . . . . . |
. |
. . . . |
. . . . . . . . . . . . . . . . . . . . . . . . . . . . . . . . . . . |
6. . . . . . |
. . . . |
|||||
Exhaust air connection. . . . . . . . . . . . . . . . . . . . . . . . |
. |
. . . . . . . . . . . . . . . . . . . . . . . . . . . . . . . . .6. . . . . . . |
. . . |
|||||||||
Accessories . . . . . . . . . . . . . . . . . . . . . . . . . . . . . . . . . . . . . . . . . . . . . . . . . . . . . . . . . . . . . . . . . . . |
8. . . . . . . |
. . . |
||||||||||
Installation |
p |
step by step. . . . . . . . . . . . . . . . . |
. |
. . . . . |
. |
. . . . . . . . . . . . . . . . . . . . . . . . . . . . . . . .9. . . . . . . |
. . . |
|||||
Check list before using the dryer. . . . . . . . . . . . . . . . . . . . . . . . . . . . . . . . . . . . . . . . . . . . . . . . . .9. . . . . . . |
. . . |
|||||||||||
Preparing to transport the dryer p step by. .step. . . . . . |
. |
. . . . . |
. |
. . . . . . . . . . . . . . . . . . . . . . .9. . . . . . |
||||||||
OPERATING |
INSTRUCTIONS. . . . . . . . . . . . . . . |
. . . . . . . . . . . . . . . . . . . . . . 10. . . . . . |
||||||||||
Your new dryer. . . . . . . . . . . . . . . . . . . . . . . . . . . . . . . . . . . . . . . . . . . . . . . . . . . . . . . . . . . . . . .10. . . . . . . . |
. . . |
|||||||||||
Panel . . . . . . . . . . . . . . . . . . . . . . . . . |
. . . . . . . . . . . . . . . . . . . . . . . . . . . . . . . . . . . . . . . . . . . . . .11. . . . . . |
. . |
||||||||||
Summary |
|
of instructions. . . . . . . . . . . . . . . . . |
. . . . . . . . . . . . . . . . . . . . . . 12. . . . . . |
|||||||||
Safety information. . . . . . . . . . . . . . . . . . . . |
. . . . . . . . . . . . . . . . . . . . . . 13. . . . . |
|||||||||||
Before |
switching |
on the |
dryer. . . . . . . . . . . . . . . |
. |
. . . . . |
. |
. . . . . . . . . . . . . . . . . . . . . . . . . . . . .13. . . . . . . . |
. . . |
||||
Using the dryer. . . . . . . . . . . . . . . . . . . . . . . . . . . . . . . . . . . . . . . . . . . . . . . . . . . . . . . . . . . . . . .13. . . . . . . . |
. . . |
|||||||||||
Protecting the dryer. . . . . . . . . . . . . . . . . . . . . . . . . . . . . . . . . . . . . . . . . . . . . . . . . . . . . . . . . . .13. . . . . . . . |
. . . |
|||||||||||
Protection |
|
of the |
environment. . . . . . . . . . . . . . . |
. . . . . . . . . . . . . . . . . . . . . . 13. . . . . . |
||||||||
Before using the dryer for the first. .time. . . . . . . . . |
. |
. . . . |
. . . . . . . . . . . . . . . . . 13. . . . . |
|||||||||
Temporary |
disconnection |
of the dryer. . . . . . . . . . . |
. |
. . . . . |
. . . . . . . . . . . . . . . . .13. . . . . |
|||||||
Laundry . . . . . . . . . . . . . . . . . . . . . . . . |
. . . . . . . . . . . . . . . . . . . . . . . . . . . . . . . . . . . . . . . . . . . . .13. . . . . . . . |
. |
||||||||||
Identification |
of fabrics. . . . . . . . . . . . . . . . . . |
. |
. . . . . |
. . . . . . . . . . . . . . . . . . . . . . . . . . . . . . . . .13. . . . . . . . |
. . . |
|||||||
Drying tips. . . . . . . . . . . . . . . . . . . . . . . . . . . . . . . . . . . . . . . . . . . . . . . . . . . . . . . . . . . . . . . . . . .13. . . . . . . . |
. . |
|||||||||||
Program |
selection. . . . . . . . . . . . . . . . . . . . |
. . . . . . . . . . . . . . . . . . . . . . 14. . . . . |
||||||||||
Automatic programs. . . . . . . . . . . . . . . . . . . . . . . . . . . . . . . . . . . . . . . . . . . . . . . . . . . . . . . . . . .14. . . . . . . . |
. . . |
|||||||||||
Time programs . . . . . . . . . . . . . . . . . . . . . . . . . . . . . . . . . . . . . . . . . . . . . . . . . . . . . . . . . . . . . . .14. . . . . . . . |
. . . |
|||||||||||
Options . . . . . . . . . . . . . . . . . . . . . . . . |
. |
. . . . . . . . . . . . . . . . . . . . . . . . . . . . . . . . . . . . . . . . . . . .14. . . . . . . . |
. |
|||||||||
Indicator |
of |
program sequence. . . . . . . . . . . . . . . |
. |
. . . . |
. |
. . . . . . . . . . . . . . . . . . . . . . . . . . . . .14. . . . . . . . |
. . . |
|||||
Program selection table. . . . . . . . . . . . . . . . . . . . . . . . . . . . . . . . . . . . . . . .15. . . . .
Operation . . . . . . . . . . . . . . . . . . . . . . . . . . . . . . . . . . . . . . . . . . . . . . . . . . . . . . . . . . . . . . . . . . . .15. . . . . . . . . .
Using the dryer. . . . . . . . . . . . . . . . . . . . . . . . . . . . . . . . . . . . . . . . . . . . . . . . . . . . . . . . . . . . . . .15. . . . . . . . . . .
Using the dryer rack (Optional). . . . . . . . . . . . . . . . . . . . . . . . . . . . . . . . . . . . . . . . . . . . . . . . . .16. . . . . . . . . . .
Cleaning and care. . . . . . . . . . . . . . . . . . . . . . . . . . . . . . . . . . . . . . . . . . 17. . . . .
Cleaning the dryer. . . . . . . . . . . . . . . . . . . . . . . . . . . . . . . . . . . . . . . . . . . . . . . . . . . . . . . . . . . . .17. . . . . . . . . . .
Cleaning the lint filter. . . . . . . . . . . . . . . . . . . . . . . . . . . . . . . . . . . . . . . . . . . . . . . . . . . . . . . . . . .18. . . . . . . . . . .
Cleaning the exhaust duct. . . . . . . . . . . . . . . . . . . . . . . . . . . . . . . . . . . . . . . . . . . . . . . . . . . . . .18. . . . . . . . . . .
Cleaning the moisture sensor. . . . . . . . . . . . . . . . . . . . . . . . . . . . . . . . . . . . . . . . . . . . . . . . . . .18. . . . . . . . . . .
Cleaning the bearing shield. . . . . . . . . . . . . . . . . . . . . . . . . . . . . . . . . . . . . . . . . . . . . . . . . . . . .18. . . . . . . . . . .
Change the light bulb. . . . . . . . . . . . . . . . . . . . . . . . . . . . . . . . . . . . . . . . . . . . . . . . . . . . . . . . . .18. . . . . . . . . . .
Troubleshooting . . . . . . . . . . . . . . . . . . . . . . . . . . . . . . . . . . . . . . . . . . . . . . . . . . . . . . . . . . . . . .19. . . . . . . . . .
SERVICE and REPAIR. . . . . . . . . . . . . . . . . . . . . . . . . . . . . . . . . . . . . . . . . . . . . . . . . . . . . . . . .20. . . . . . . . . . .
STATEMENT OF WARRANTIES SIEMENS CLOTHES DRYERS. . . . . . . . . . . . . . . . . . . . . . . 20. . . . .
Exclusions . . . . . . . . . . . . . . . . . . . . . . . . . . . . . . . . . . . . . . . . . . . . . . . . . . . . . . . . . . . . . . . . . . .20. . . . . . . . . .
2

Congratulations on having selected a |
- |
Exceptionally quiet |
operation |
|
|
|
|
|
|
|
|
|
|
|
|
|
|
|
|
|
|
|
|
|
|
|
|
|
||||||||||||||||||||||||
Siemens |
clothes |
dryer, the |
choice |
of |
- |
Sensor |
controlled |
auto |
cycles |
|
Definitions |
|
|
|
|
|
|
|
|
|
|
|
|
|
||||||||||||||||||||||||||||
those that demand exceptional drying |
|
|
|
|
|
|
|
|
|
|
|
|
|
|
||||||||||||||||||||||||||||||||||||||
- |
Timed |
cycles |
|
|
|
|
|
|
|
|
|
|
|
|
|
|
|
|
|
|
|
|
|
|||||||||||||||||||||||||||||
performance |
and |
care from |
their |
|
|
minutes |
|
|
|
|
|
|
|
|
|
|
|
|
|
|
|
|||||||||||||||||||||||||||||||
clothes |
dryer. |
|
|
|
|
|
|
|
|
|
|
|
20, |
40 |
and 60 |
|
|
|
|
|
|
|
|
|
|
|
|
|
|
|
|
|
|
|
|
|
|
|
|
|
||||||||||||
This |
dryer |
complies |
with |
|
|
|
|
|
Each dryer |
which |
leaves |
our factory |
d |
WARNING |
|
d |
|
|
|
|||||||||||||||||||||||||||||||||
UL 2158/CAN/CSA-C22.2 |
No. |
|
|
|
|
has |
undergone |
a |
thorough |
|
|
|
|
|
|
|
||||||||||||||||||||||||||||||||||||
112-97 |
|
Clothes |
Dryers |
|
|
|
|
|
|
performance test and is in full working |
|
|
|
|
|
|
|
|
|
|
|
|
|
|
|
|
|
|
|
|
|
|
|
|||||||||||||||||||
|
|
|
|
|
|
|
WARNING - |
This |
indicates |
|
that |
|
|
|
||||||||||||||||||||||||||||||||||||||
A distinctive |
feature |
of |
your |
dryer |
|
condition. |
If |
you |
have |
any |
questions |
|
|
|
|
|||||||||||||||||||||||||||||||||||||
is low |
|
|
|
|
|
|
|
|
|
|
|
|
|
death |
or |
serious |
injuries |
may |
|
|
|
|||||||||||||||||||||||||||||||
energy |
consumption. |
|
|
|
|
|
|
|
especially concerning installation of the |
|
|
|
||||||||||||||||||||||||||||||||||||||||
|
|
|
|
|
|
|
occur |
as |
a |
result |
of |
|
|
|
|
|
|
|
|
|
|
|
||||||||||||||||||||||||||||||
An |
easy |
operation philosophy, |
a variety |
dryer - |
our |
customer |
service team |
will |
|
|
|
|
|
|
|
|
|
|
|
|||||||||||||||||||||||||||||||||
be happy to advise you. |
|
|
|
|
nonoobservance |
of |
|
this |
|
warning. |
|
|
|
|||||||||||||||||||||||||||||||||||||||
of customized drying programs and a |
|
|
|
|
|
|
|
|
|
|||||||||||||||||||||||||||||||||||||||||||
Further |
information and |
a |
|
selection |
of |
|
|
|
|
|
|
|
|
|
|
|
|
|
|
|
|
|
|
|
|
|
|
|
||||||||||||||||||||||||
solid touch and feel make this |
|
|
|
|
|
|
|
|
|
|
|
|
|
|
|
|
|
|
|
|
|
|
|
|
|
|||||||||||||||||||||||||||
|
|
|
|
|
|
|
CAUTION |
|
|
|
|
|
|
|
|
|
|
|||||||||||||||||||||||||||||||||||
appliance a userofriendly assistant in |
our products can be found on our webd |
|
|
|
d |
|
|
|||||||||||||||||||||||||||||||||||||||||||||
your |
household. |
|
|
|
|
|
|
|
|
|
site: |
|
|
|
|
|
|
|
|
|
|
|
|
|
|
|
|
|
|
|
|
|
|
|
|
|
|
|
|
|
|
|
|
|
|
|
|
|||||
The Siemens dryer offers the following |
www.siemens-home.com |
|
|
|
|
|
|
|
|
|
|
|
|
|||||||||||||||||||||||||||||||||||||||
|
|
|
|
|
CAUTIONThis indicates that |
|
|
|
||||||||||||||||||||||||||||||||||||||||||||
standard |
features: |
|
|
|
|
|
|
|
|
Information |
|
|
|
|
|
|
|
|
|
|
injuries may occur as a result |
of |
||||||||||||||||||||||||||||||
- |
High |
efficiency precision |
drying |
|
Please read and follow these operating |
nonoobservance |
of |
|
this |
|
warning. |
|
|
|||||||||||||||||||||||||||||||||||||||
|
system |
|
|
|
|
|
|
|
|
|
|
|
and installation instructions and all |
|
|
|
|
|
|
|
|
|
|
|
|
|
|
|
|
|
|
|
|
|
|
|
|
|||||||||||||||
|
|
|
|
|
|
|
|
|
|
|
|
|
|
|
|
|
|
|
|
|
|
|
|
|
|
|
|
|
|
|
|
|
|
|
|
|||||||||||||||||
- |
Large |
6.4 |
cu.ft. |
(181 l) |
stainless |
other information enclosed with the |
|
|
|
|
|
|
CAUTION |
|
|
|
|
|
|
|
|
|
|
|||||||||||||||||||||||||||||
|
steel drum with a capacity up to |
dryer. |
|
|
|
|
|
|
|
|
|
|
|
|
|
|
|
|
|
|
|
|
|
|
|
|
|
|
|
|||||||||||||||||||||||
|
17.6 |
lbs |
(8 |
kg) |
|
|
|
|
|
|
|
|
|
|
|
|
|
|
|
|
|
|
|
|
|
|
|
|
|
|
|
|
|
|
|
|
|
|
|
|
|
|
|
|
|
|
|
|
||||
|
|
|
|
|
|
|
|
|
|
|
|
|
|
|
|
|
|
|
|
|
|
CAUTION - |
This |
indicates |
|
that |
|
|
|
|||||||||||||||||||||||
- |
Large |
port |
|
hole |
(18"/457 |
mm), |
|
|
|
|
|
|
|
|
|
|
|
|
|
|
|
|
|
|
||||||||||||||||||||||||||||
|
|
|
|
|
|
|
|
|
|
|
|
|
|
|
|
damage |
may |
occur |
as |
|
a |
result |
|
|
of |
|||||||||||||||||||||||||||
|
door |
lock |
with automatic |
drum |
|
|
|
|
|
|
|
|
|
|
|
|
|
|
|
|
|
|||||||||||||||||||||||||||||||
|
|
|
|
|
|
|
|
|
|
|
|
|
|
|
|
nonoobservance |
of |
|
this |
|
warning. |
|
|
|
||||||||||||||||||||||||||||
|
stop |
function |
|
|
|
|
|
|
|
|
|
|
|
|
|
|
|
|
|
|
|
|
|
|
|
|
|
|
||||||||||||||||||||||||
|
|
|
|
|
|
|
|
|
|
|
|
|
|
|
|
|
|
|
|
|
|
|
|
|
|
|
|
|
|
|
|
|
|
|
|
|
|
|
|
|
|
|
|
|
|
|||||||
|
|
|
|
|
|
|
|
|
|
|
|
|
|
|
|
|
|
|
|
|
|
|
|
|
|
|
|
|
|
|
|
|
|
|
|
|
|
|
|
|
|
|
|
|
|
|||||||
|
|
|
|
|
|
|
|
|
|
|
|
|
|
|
|
|
|
|
|
|
|
|
|
|
|
|
|
|
|
i |
|
This |
symbol |
is |
used |
to |
draw the |
|||||||||||||||
|
|
|
|
|
|
|
|
|
|
|
|
|
|
|
|
|
|
|
|
|
|
|
|
|
|
|
|
|
|
|
|
user's |
attention |
to |
important |
|
|
|
|
|
|
|||||||||||
|
|
|
|
|
|
|
|
|
|
|
|
|
|
|
|
|
|
|
|
|
|
|
|
|
|
|
|
|
|
|
|
matters. |
|
|
|
|
|
|
|
|
|
|
|
|
|
|
|
|
|
|||
|
|
|
|
|
|
|
|
|
|
|
|
|
|
|
|
|
|
|
|
|
|
|
|
|
|
|||||||||||||||||||||||||||
d IMPORTANT |
SAFETY |
|
INSTRUCTIONS |
|
|
|
|
|
|
|
|
|
|
|
|
|
|
|
|
|
|
|
|
|
||||||||||||||||||||||||||||
|
|
|
|
|
|
|
|
|
|
|
|
|
|
|
|
5. |
Before the appliance is removed |
|
|
of lint, dust and dirt. An obstructed |
||||||||||||||||||||||||||||||||
d |
WARNING |
|
d |
|
|
|
|
|||||||||||||||||||||||||||||||||||||||||||||
|
|
|
|
from service or discarded, remove |
|
|
port might reduce the airflow. |
|
||||||||||||||||||||||||||||||||||||||||||||
|
|
|
|
|
|
|
|
|
|
|
|
|
|
|
|
|
the door to the drying |
|
|
14. |
The |
interior |
of |
the |
machine |
and |
||||||||||||||||||||||||||
|
|
|
|
|
|
|
|
|
|
|
|
|
|
|
|
|
|
|
||||||||||||||||||||||||||||||||||
To reduce the risk of fire, electric |
compartment. |
|
|
|
|
|
|
|
|
|
|
exhaust duct should be cleaned |
||||||||||||||||||||||||||||||||||||||||
shock, serious injury or death to |
6. |
Do |
not |
reach |
into the |
appliance if |
|
|
periodically |
by |
qualified |
|
service |
|
||||||||||||||||||||||||||||||||||||||
persons and /or damage when |
|
the |
drum |
is |
rotating. |
|
|
|
|
|
|
personnel. |
|
|
|
|
|
|
|
|
|
|
|
|
|
|
|
|
||||||||||||||||||||||||
using |
|
your |
dryer, |
follow |
|
basic |
|
7. |
Do |
not |
install |
or |
store |
this |
|
|
15. |
Always |
|
be |
sure |
to unplug |
|
the |
dryer |
|||||||||||||||||||||||||||
precautions, |
including |
the |
|
|
|
|
|
|
|
|
||||||||||||||||||||||||||||||||||||||||||
|
|
|
|
|
appliance where |
it |
will |
be exposed |
|
|
from the electrical |
supply |
before |
|||||||||||||||||||||||||||||||||||||||
following. |
|
|
|
|
|
|
|
|
|
|
|
|
|
|
||||||||||||||||||||||||||||||||||||||
|
|
|
|
|
|
|
|
|
|
|
|
to |
the |
weather. |
|
|
|
|
|
|
|
|
|
attempting |
any |
service. |
|
|
|
|
|
|
|
|
|
|
||||||||||||||||
|
|
|
|
|
|
|
|
|
|
|
|
|
|
|
|
|
|
|
|
|
|
|
|
|
|
|
|
|
|
|
|
|
|
|
|
|||||||||||||||||
|
|
|
|
|
|
|
|
|
|
|
|
|
|
|
|
8. |
Do |
not |
tamper |
with |
|
the controls. |
|
|
Disconnect |
the |
power |
cord |
by |
|
||||||||||||||||||||||
1. |
Read |
all |
instructions |
before |
using |
9. |
Do |
not |
repair or replace any part |
of |
grasping |
the |
plug, |
not |
|
the |
cord. |
|||||||||||||||||||||||||||||||||||
|
the dryer. Siemens dryers are |
|
|
the appliance or attempt any |
|
16. |
Store |
all laundry |
chemicals |
|
and |
|
||||||||||||||||||||||||||||||||||||||||
|
provided with Operating, Care and |
|
service |
unless |
specifically |
|
|
|
|
aids |
in |
a |
cool |
dry |
place |
according |
||||||||||||||||||||||||||||||||||||
|
Installation |
Instructions. |
|
|
|
|
|
|
recommended |
in |
the |
|
|
|
|
|
|
to the |
|
manufaco |
|
|
|
|
|
|
|
|
|
|
|
|
|
|||||||||||||||||||
2. |
Do not dry articles that have been |
useromaintenance |
instructions |
or |
|
|
|
turer's instructions in an area |
|
|||||||||||||||||||||||||||||||||||||||||||
|
previously |
cleaned, washed, |
|
|
|
|
in published user |
repair |
|
|
17. |
where children cannot reach them. |
||||||||||||||||||||||||||||||||||||||||
|
soaked, or spotted with gasoline, |
|
instructions |
that |
you |
|
understand |
|
To |
reduce |
the |
risk |
of |
|
fire, |
clothes, |
||||||||||||||||||||||||||||||||||||
|
dry |
|
cleaning |
solvents, other |
|
|
and |
have |
the |
skills |
to |
carry |
out. |
|
|
cleaning |
rags, |
mop |
heads |
|
and |
the |
||||||||||||||||||||||||||||||
|
flammable, |
or |
explosive |
|
|
|
|
|
10. |
Do not use fabric softeners or |
|
|
|
like which have traces of any |
|
|||||||||||||||||||||||||||||||||||||
|
substances as they give off vapors |
products to eliminate static unless |
|
|
flammable |
substance, |
such |
|
as |
|
||||||||||||||||||||||||||||||||||||||||||
|
that |
could |
ignite |
or |
explode. |
|
|
recommended |
by |
the |
fabric |
|
|
|
|
vegetable oil, cooking |
oil, |
|
|
|
|
|
|
|
|
|||||||||||||||||||||||||||
3. |
Do |
|
not |
allow |
children to |
play |
on |
or |
manufacturer. |
|
|
|
|
|
|
|
|
|
|
petroleum based oils or distillates, |
||||||||||||||||||||||||||||||||
|
with |
the |
appliance. |
Close |
|
|
|
11. |
Do |
not |
use heat |
to |
dry articles |
|
|
waxes, fats, etc., must not be |
|
|||||||||||||||||||||||||||||||||||
|
supervision |
|
of |
children |
is |
|
|
|
|
|
containing |
foam |
rubber |
(may |
be |
|
|
|
placed |
in |
the |
dryer. |
These |
items |
||||||||||||||||||||||||||||
|
|
|
|
|
|
|
|
|
|
may |
contain |
some |
flammable |
|
|
|
|
|
|
|||||||||||||||||||||||||||||||||
|
necessary |
when |
the |
appliance |
is |
|
labeled |
latex |
foam) |
or |
similarly |
|
|
|
|
|
|
|
|
|
||||||||||||||||||||||||||||||||
|
|
|
|
|
substance(s) |
even |
after |
|
washing, |
|
||||||||||||||||||||||||||||||||||||||||||
|
used |
near |
|
children. |
|
|
|
|
|
|
|
textured |
rubberolike |
materials. |
|
|
|
|
|
|||||||||||||||||||||||||||||||||
|
|
|
|
|
|
|
|
|
|
|
|
which |
may |
smoke |
or |
catch |
fire |
by |
||||||||||||||||||||||||||||||||||
4. |
When |
children become |
old |
|
|
|
|
Foam |
rubber |
materials |
can |
ignite |
|
|
||||||||||||||||||||||||||||||||||||||
|
|
|
|
|
|
itself. |
|
|
|
|
|
|
|
|
|
|
|
|
|
|
|
|
|
|
||||||||||||||||||||||||||||
|
enough |
to |
|
operate |
the |
appliance, |
it |
by |
spontaneous |
combustion. |
|
|
|
|
|
|
|
|
|
|
|
|
|
|
|
|
|
|
|
|
|
|
||||||||||||||||||||
|
|
|
|
18. |
Do |
not |
place |
items |
exposed |
|
to |
|
||||||||||||||||||||||||||||||||||||||||
|
is |
the |
legal |
responsibility |
of the |
12. |
Clean |
lint |
screen |
before or |
after |
|
|
|||||||||||||||||||||||||||||||||||||||
|
parents |
or |
|
legal |
guardians |
to |
|
|
each |
load. |
|
|
|
|
|
|
|
|
|
|
|
cooking |
oils |
in |
your |
dryer. |
|
Items |
||||||||||||||||||||||||
|
|
|
|
|
|
|
|
|
|
|
|
|
|
|
contaminated |
with |
cooking |
|
oils |
|
||||||||||||||||||||||||||||||||
|
ensure |
that |
they |
are instructed |
in |
13. |
Keep |
area |
around |
the |
exhaust |
|
|
|
|
|
||||||||||||||||||||||||||||||||||||
|
|
|
|
may |
contribute |
to |
a |
chemical |
|
|||||||||||||||||||||||||||||||||||||||||||
|
safe |
practices by qualified |
|
|
|
|
opening |
and |
adjacent |
|
surrounding |
|
|
|
||||||||||||||||||||||||||||||||||||||
|
|
|
|
|
|
|
|
reaction |
that |
could |
cause |
a |
load to |
|||||||||||||||||||||||||||||||||||||||
|
persons. |
|
|
|
|
|
|
|
|
|
|
|
|
areas |
free |
from |
the |
|
accumulation |
|
|
|||||||||||||||||||||||||||||||
|
|
|
|
|
|
|
|
|
|
|
|
|
|
|
|
catch |
fire. |
|
|
|
|
|
|
|
|
|
|
|
|
|
|
|
|
|||||||||||||||||||
|
|
|
|
|
|
|
|
|
|
|
|
|
|
|
|
|
|
|
|
|
|
|
|
|
|
|
|
|
|
|
|
|
|
|
|
|
|
|
|
|
|
|
|
|
|
|
|
|||||

20. To reduce the risk of fire or |
GROUNDING |
|
|
|
|
|
|
|||||||||||||||||||
electrical shock, DO NOT use an |
|
|
|
|
|
|
||||||||||||||||||||
extension cord or an adapter to |
INSTRUCTIONS |
|
|
|
|
|
||||||||||||||||||||
connect the dryer to the electrical |
This appliance must be grounded. In |
|||||||||||||||||||||||||
power |
supply. |
|
|
|
|
|
|
|
the event of malfunction or breakdown, |
|||||||||||||||||
21. The dryer must only be used for |
groundingits will reduce the risk of electric |
|||||||||||||||||||||||||
intended purpose. |
|
|
|
|
|
shock |
by |
providing |
a |
path |
of least |
|||||||||||||||
22. Always |
|
check |
pockets and |
remove resistance |
for |
the |
electric |
current. |
||||||||||||||||||
any objects. Cigarette lighters are |
For |
U.S.A. |
|
|
|
|
|
|
|
|
||||||||||||||||
particularly |
hazardous. |
|
|
|
|
Your dryer comes without a power |
||||||||||||||||||||
23. Replace |
worn |
out |
power |
cords |
||||||||||||||||||||||
supply cord.The power cord must |
||||||||||||||||||||||||||
and/or |
|
loose |
plugs. |
|
|
|
|
meet |
the |
following |
requirements: |
|||||||||||||||
24. Do |
not |
operate the dryer if any |
- |
UL |
listed |
in |
the |
USA |
|
|
||||||||||||||||
guards |
|
and/or |
panels |
have |
been |
- |
208 |
p 240 |
volt |
rated (minimum) |
||||||||||||||||
removed. |
|
|
|
|
|
|
|
|
||||||||||||||||||
|
|
|
|
|
|
|
|
- |
30 |
|
amps |
|
|
|
|
|
|
|
|
|||||||
25. Do |
not |
operate |
the |
dryer if |
any |
|
|
|
|
|
|
|
|
|
||||||||||||
- |
Type |
SRDT |
or |
DRT (UL 2158) |
||||||||||||||||||||||
parts are missing or broken. |
||||||||||||||||||||||||||
|
|
|
|
|
|
|
|
|
|
|
|
|
|
|||||||||||||
26. Do |
not |
bypass any safety devices. - |
Five |
feet |
long |
(minimum) |
||||||||||||||||||||
27. Do |
not |
use a plastic or nonometalFor |
CANADA |
|
|
|
|
|
|
|
||||||||||||||||
flexible |
|
duct with |
this dryer. |
PlasticThis |
appliance is equipped with a cord |
|||||||||||||||||||||
or nonometal flexible duct are a |
having |
|
an |
equipmentogrounding |
||||||||||||||||||||||
potential fire hazard. |
|
|
|
|
conductor and a grounding plug. |
|||||||||||||||||||||
28. Do |
not |
operate this dryer until youThe |
plug must be plugged into an |
|||||||||||||||||||||||
are |
sure |
that |
the |
dryer |
has been |
appropriate outlet that is properly |
||||||||||||||||||||
installed |
according |
to the |
|
|
installed and grounded in accordance |
|||||||||||||||||||||
INSTALLATION |
INSTRUCTIONS |
with |
all |
local |
codes |
and |
ordinances. |
|||||||||||||||||||
and |
that |
installation and |
grounding |
|
|
|
|
|
|
|
|
|
|
|
|
|
|
|||||||||
d WARNING |
|
d |
||||||||||||||||||||||||
are in compliance with all local |
|
|||||||||||||||||||||||||
regulations |
and/or |
other |
applicable |
|
|
|
|
|
|
|
|
|
|
|
|
|
|
|||||||||
regulations |
and |
requirements. |
Improper |
connection |
of |
the |
|
|||||||||||||||||||
29. Failure |
|
to |
install, |
maintain |
and/or |
equipment grounding |
conductor |
|
||||||||||||||||||
operate |
the dryer |
according |
to |
can result in a risk of electric |
shock. |
|||||||||||||||||||||
the manufaco |
|
|
|
|
|
|
|
Check |
with |
a |
qualified electrician |
or |
||||||||||||||
|
|
|
|
|
|
|
service |
person |
if |
you |
are |
in doubt as |
||||||||||||||
turer's |
instructions |
may |
result in |
|||||||||||||||||||||||
to |
whether |
the |
dryer |
is |
properly |
|||||||||||||||||||||
injury |
and/or damage. |
|
|
|
||||||||||||||||||||||
|
|
|
grounded. |
|
|
|
|
|
|
|
|
|||||||||||||||
30. To |
avoid |
floor |
damage |
and |
mold |
|
|
|
|
|
|
|
|
|||||||||||||
DO |
NOT |
modify |
the |
plug |
provided |
|||||||||||||||||||||
growth, |
do not |
let spills |
or |
|
||||||||||||||||||||||
|
with |
the |
appliance. |
If it will |
not fit the |
|||||||||||||||||||||
splashout |
cause |
standing |
water |
|||||||||||||||||||||||
outlet, |
have |
a proper |
outlet |
installed |
||||||||||||||||||||||
around |
or |
under |
the |
appliance. |
||||||||||||||||||||||
by |
a qualified electrician. |
|
|
|
||||||||||||||||||||||
Notes: |
|
|
|
|
|
|
|
|
|
|
|
|
|
|
||||||||||||
|
|
|
|
|
|
|
|
|
|
|
|
|
|
|
|
|
|
|
|
|
|
|
|
|
||
|
|
|
|
|
|
|
|
|
|
|
KEEP |
THESE |
|
|
|
|
|
|||||||||
A |
The |
IMPORTANT |
|
|
|
|
|
|
|
|
|
|||||||||||||||
|
SAFEGUARDS |
and |
|
|
|
INSTRUCTIONS |
|
FOR |
||||||||||||||||||
|
WARNINGS |
presented |
in this |
|
||||||||||||||||||||||
|
manual do not cover all |
FUTURE |
REFERENCE. |
|||||||||||||||||||||||
|
possible conditions |
that |
may |
In case of change of ownership, |
||||||||||||||||||||||
|
occur. |
|
|
|
|
|
|
|
|
manual should be conveyed with the |
||||||||||||||||
|
Common |
sense, |
caution |
and |
dryer. |
|
|
|
|
|
|
|
|
|
|
|
|
|||||||||
|
care must be exercised when |
|
|
|
|
|
|
|
|
|
|
|
|
|
|
|||||||||||
|
installing, |
maintaining |
or |
|
|
|
|
|
|
|
|
|
|
|
|
|
|
|
||||||||
|
operating |
the |
dryer. |
|
|
|
|
|
|
|
|
|
|
|
|
|
|
|
|
|
||||||
BAlways contact your dealer, distributor, service agent or the manufacturer about any
problems or conditions that you do not understand.
CFollow also the Safety Information in the INSTALLATION INSTRUCTIONS and the OPERATING INSTRUCTIONS.
SAVE THESE INSTRUCTIONS
4
INSTALLATION |
|
INSTRUCTIONS |
|
|
|
|
|
|
|
|
|
|
|
|
|
|
|
|
||||||||||||||||||||||||
Introduction |
|
|
|
|
|
|
|
|
|
Before |
installing |
the dryer |
Do not operate the dryer at |
|
|
|||||||||||||||||||||||||||
|
|
|
|
|
|
|
|
|
|
|
|
|
|
|
|
|
|
|
|
|
|
|
|
|
|
|
|
|
|
|
|
temperatures above 104°F (40°C) and |
|
|||||||||
Read |
these installation instructions |
|
|
Unpacking |
the |
appliance |
|
|
|
below 41°F (5°C). Low temperatures |
|
|||||||||||||||||||||||||||||||
completely and carefully. They will save |
|
|
|
|
|
|
|
|
|
|
|
|
|
|
|
|
affect the automatic program sequence |
|||||||||||||||||||||||||
d |
|
|
|
CAUTION |
|
|
d |
|
|
|||||||||||||||||||||||||||||||||
you time and effort and help to |
ensure |
|
|
|
|
|
|
|
and may prolong the drying times. |
|||||||||||||||||||||||||||||||||
optimum dryer performance. Be sure to |
|
|
|
|
|
|
|
|
|
|
|
|
|
|
|
|
The installation surface for the dryer |
|||||||||||||||||||||||||
observe |
all listed |
|
warnings |
and |
|
|
|
The |
dryer |
is |
very |
heavy. Do not |
|
lift |
must |
be |
clean, |
level |
and |
firm. |
Do |
not |
||||||||||||||||||||
cautions. |
|
|
|
|
|
|
|
|
|
|
|
|
it |
|
|
|
|
|
|
|
|
|
|
|||||||||||||||||||
|
|
|
|
|
|
|
|
|
|
|
by |
yourself. |
Do |
not lift |
the |
appliance install |
the |
appliance |
on |
carpets! |
|
|||||||||||||||||||||
These installation |
instructions |
are |
|
|
the |
|||||||||||||||||||||||||||||||||||||
|
|
by |
projecting |
components (e.g. |
Compensate |
for |
uneven |
floors |
with |
|||||||||||||||||||||||||||||||||
intended for |
use |
by |
qualified |
installers. |
heightoadjustable |
feet. |
|
|
|
|
|
|||||||||||||||||||||||||||||||
door) |
|
p |
due |
to |
risk |
of |
breakage. |
|
|
|
|
|
||||||||||||||||||||||||||||||
In addition to these instructions the |
|
Install |
the |
dryer and level side to side |
||||||||||||||||||||||||||||||||||||||
|
|
|
|
|
|
|
|
|
|
|
|
|
|
|
|
|||||||||||||||||||||||||||
|
|
|
|
|
|
|
|
|
|
|
|
|
|
|
|
|||||||||||||||||||||||||||
dryer must be installed in accordance |
|
|
|
|
|
|
|
|
|
|
|
|
|
|
|
|
and front to back. Use a bubble level. |
|||||||||||||||||||||||||
|
|
|
|
|
CAUTION |
|
|
|
|
|
||||||||||||||||||||||||||||||||
with |
all |
local |
codes |
or, |
in |
the |
absence |
|
|
|
|
|
|
|
|
|
|
Never |
remove the heightoadjustable |
|
||||||||||||||||||||||
of |
a |
local |
code: |
|
|
|
|
|
|
|
|
|
|
|
|
|
|
|
|
|
|
|
|
|
|
|
|
|
feet! |
|
|
|
|
|
|
|
|
|
|
|||
|
|
|
|
|
|
|
|
|
|
|
|
|
|
|
|
|
|
|
|
|
|
|
|
|
|
|
|
|
|
|
|
|
|
|
||||||||
- |
In |
theU.S.A., |
in |
accordance |
with |
Remove |
the |
appliance packaging |
|
The size of the installation area |
|
|||||||||||||||||||||||||||||||
|
the |
National |
Electric |
Code, |
|
|
|
carefully to prevent damage to the |
depends on the dimensions of the |
|||||||||||||||||||||||||||||||||
|
ANSI/NFPA70 |
|
p |
latest |
|
|
|
|
|
surfaces. |
|
|
|
|
|
|
|
|
|
|
|
dryer. Ensure that there is adequate |
||||||||||||||||||||
|
edition/State |
and |
Municipal |
codes |
|
|
|
|
|
|
|
|
|
|
|
|
|
|
|
|
room |
for |
the swivel |
range |
of |
the |
door! |
|||||||||||||||
|
Check |
|
the dryer |
for |
transportation |
|||||||||||||||||||||||||||||||||||||
|
and/or |
local |
codes. |
|
|
|
|
|
|
|
|
|
|
|
|
|
|
|
|
|
|
|||||||||||||||||||||
|
|
|
|
|
|
|
damage. |
Do |
not |
connect |
a |
dryer which |
|
|
|
|
|
|
|
|
|
|
||||||||||||||||||||
- |
In Canada, in |
accordance |
with |
|
the |
|
|
|
|
|
|
|
|
|
|
|||||||||||||||||||||||||||
|
is visibly |
damaged. |
If |
in |
doubt, contact |
|
|
|
|
|
|
|
|
|
|
|||||||||||||||||||||||||||
|
Canadian |
Electric |
Code |
C22.1 |
|
p |
your |
dealer. |
|
|
|
|
|
|
|
|
|
|
|
|
|
|
|
|
|
|
|
|
|
|||||||||||||
|
latest |
edition/Provincial |
and |
|
|
|
|
|
|
|
|
|
|
|
|
|
|
|
|
|
|
|
|
|
|
|
|
|||||||||||||||
|
|
|
|
Supplied |
components |
|
|
|
|
|
|
|
|
|
|
|
|
|
|
|
|
|||||||||||||||||||||
|
Municipal |
codes |
and/or |
local |
|
|
|
|
|
|
|
|
|
|
|
|
|
|
|
|
|
|
||||||||||||||||||||
|
|
|
For |
U.S.A. |
|
|
|
|
|
|
|
|
|
|
|
|
|
|
|
|
|
|
|
|
|
|||||||||||||||||
|
codes. |
|
|
|
|
|
|
|
|
|
|
|
|
|
|
|
|
|
|
|
|
|
|
|
|
|
|
|
|
|
|
|
|
|||||||||
|
|
|
|
|
|
|
|
|
|
|
|
|
|
|
|
|
|
|
|
|
|
|
||||||||||||||||||||
Information |
concerning |
|
|
d |
|
|
|
CAUTION |
|
|
d |
|
|
|
|
|
|
|
|
|
|
|
|
|||||||||||||||||||
waste |
disposal |
|
|
|
|
|
|
|
|
|
|
|
|
|
|
|
|
|
|
|
|
|
|
|
|
|
|
|
|
|
|
|
|
|
||||||||
|
|
|
|
|
|
The |
dryer |
is |
supplied |
without |
|
|
|
|
|
|
|
|
|
|
|
|
|
|||||||||||||||||||
Disposal |
of |
the |
packaging |
|
|
|
|
|
|
|
|
|
|
|
|
|
|
|
||||||||||||||||||||||||
|
|
|
a power |
cord. The power cord |
must |
|
|
|
|
|
|
|
|
|
|
|
||||||||||||||||||||||||||
|
|
|
|
|
|
|
|
|
|
|
|
|
|
|
|
be connected by qualified persons |
|
|
|
|
|
|
|
|
|
|
|
|
||||||||||||||
|
|
|
|
only. |
|
|
|
|
|
|
|
|
|
|
|
|
|
|
|
|
|
|
|
|
|
|
|
|
|
|||||||||||||
d |
WARNING |
d |
|
|
|
|
|
|
|
|
|
|
|
|
|
|
|
|
|
|
|
|
|
|
|
|
|
|
|
|||||||||||||
|
|
|
|
|
|
|
|
|
|
|
|
|
|
|
|
|
|
|
|
|
|
|
|
|
|
|
|
|
||||||||||||||
|
|
|
|
|
|
|
|
|
|
|
|
|
|
|
|
|
|
|
|
|
|
|
|
|
||||||||||||||||||
Keep children away from shipping |
|
|
|
|
|
|
|
CAUTION |
|
|
|
|
|
|
|
|
|
|
|
|
|
|
|
|||||||||||||||||||
carton |
and |
packaging |
components. |
|
|
|
|
|
|
|
|
|
|
|
|
|
|
|
|
|
|
|
|
|
|
|
|
|
|
|
|
|||||||||||
Danger of suffocation |
from |
plastic |
|
After |
|
removing the |
packaging, |
|
|
|
|
|
|
|
|
|
|
|
|
|
||||||||||||||||||||||
foil |
and |
folding |
cartons. |
|
|
|
|
|
|
|
|
|
|
|
|
|
|
|
|
|
|
|||||||||||||||||||||
|
|
|
|
|
immediately |
remove |
any |
objects |
|
|
|
|
|
|
|
|
|
|
|
|
||||||||||||||||||||||
|
|
|
|
|
|
|
|
|
|
|
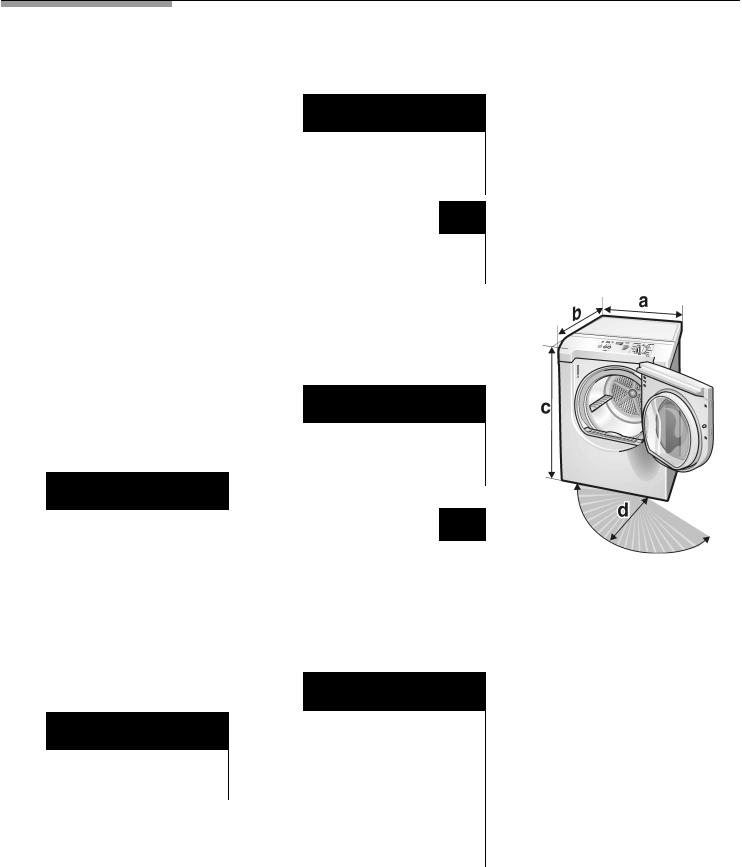
Dimension |
|
Weight |
|
||||||||||||||||||||||||||||
All |
packaging |
materials |
are |
|
|
|
|
|
from |
the |
drum. |
|
|
|
|
|
|
|
|
|
|
|
|
|
|
|||||||||||||||||
|
|
|
|
|
|
|
|
|
|
|
|
|
|
|
|
|
|
|
|
|
|
|
|
|
|
|
|
|
|
|
|
|||||||||||
environmentally friendly and can be |
The dryer is delivered as a complete |
a |
|
|
27.0" |
(686 |
mm) |
|
125 |
lbs |
|
|||||||||||||||||||||||||||||||
reused. |
Please dispose |
of |
packaging inunit. |
The |
operating |
instructions and |
b |
|
|
31.8" |
(808 |
mm) |
|
(56 |
kg) |
|
||||||||||||||||||||||||||
an |
environmentally |
friendly |
manner. |
|
|
supplied |
accessories |
can |
be |
found in |
|
|
|
with |
|
|||||||||||||||||||||||||||
Please |
ask your |
dealer |
or |
inquire |
|
at |
|
|
|
|
|
|
|
|
|
|||||||||||||||||||||||||||
|
the |
drum. |
|
|
|
|
|
|
|
|
|
|
|
c |
|
|
37.2" |
(945 |
mm) |
|
|
|||||||||||||||||||||
|
|
|
|
|
|
|
|
|
|
|
|
|
|
|
packaging |
|
||||||||||||||||||||||||||
your local authority about the current |
Installation |
location |
|
|
|
|
|
|
|
|
|
|
||||||||||||||||||||||||||||||
|
|
|
|
|
|
|
|
|
|
|
|
|
|
|
||||||||||||||||||||||||||||
|
|
|
|
|
|
|
|
|
|
|
|
|
|
143 |
lbs |
|
||||||||||||||||||||||||||
means |
of |
disposal. |
|
|
|
|
|
|
|
|
|
|
|
|
|
|
|
|
|
|
|
|
|
|
|
d |
|
|
19.7" |
(500 |
mm)/ |
|
|
|||||||||
Disposal |
of |
the |
old |
appliance |
d |
WARNING |
|
|
d |
|
|
angle |
|
170 - 180° |
|
(64 |
kg) |
|
||||||||||||||||||||||||
|
|
|
|
|
|
|
|
|||||||||||||||||||||||||||||||||||
|
|
|
|
|
|
|
|
|
|
|
|
|
|
|
|
|
|
|
|
If installing the |
dryer |
in |
a |
closet, |
observ |
|||||||||||||||||
|
|
|
|
|
|
|
|
|
|
|
|
|
|
|
|
|
|
|
|
|
|
|
|
|
|
|
|
|
|
|
|
|||||||||||
|
|
|
|
|
|
|
|
|
|
|
|
|
|
|
|
Do |
not |
install |
the |
dryer: |
|
|
|
|||||||||||||||||||
d |
WARNING |
d |
|
|
|
|
|
the minimum distances according to |
||||||||||||||||||||||||||||||||||
|
|
- |
outdoors |
|
|
|
|
|
|
|
|
|
|
the |
following |
table: |
|
|
|
|
|
|||||||||||||||||||||
|
|
|
|
|
|
|
|
|
|
|
|
|
|
|
|
- |
in |
|
an |
environment |
with |
dripping |
|
Minimum |
Installation |
Clearances |
|
|
||||||||||||||
If |
appliance |
is |
no |
longer |
usable, |
|
pull |
|
|
|||||||||||||||||||||||||||||||||
|
|
water, |
|
|
|
|
|
|
|
|
|
|
|
|
|
|
|
|
|
|
|
|
|
|
||||||||||||||||||
|
|
|
|
|
|
|
|
|
|
|
|
|
|
|
|
|
|
|
Closet |
|
|
|||||||||||||||||||||
out |
main |
plug, |
cut |
off power |
cord |
- |
near |
|
flammable |
materials, |
|
|
|
|
|
|
|
|
|
|
||||||||||||||||||||||
and |
discard |
with |
main |
plug. |
|
|
|
|
|
|
|
|
|
|
|
|
|
|
|
|
||||||||||||||||||||||
|
|
|
|
|
|
Sides |
|
|
|
|
0" |
(O mm) |
|
|||||||||||||||||||||||||||||
|
|
|
|
|
|
|
|
|
|
|
|
|
|
|
|
|
|
|
|
|
|
|
|
|||||||||||||||||||
|
|
|
|
|
|
|
|
|
|
|
|
|
|
|
|
- |
in |
|
rooms which are at risk of |
frost, |
|
|
|
|
|
|
|
|
|
|
||||||||||||
To prevent children from locking |
|
|
- |
in |
|
rooms which may contain |
gas |
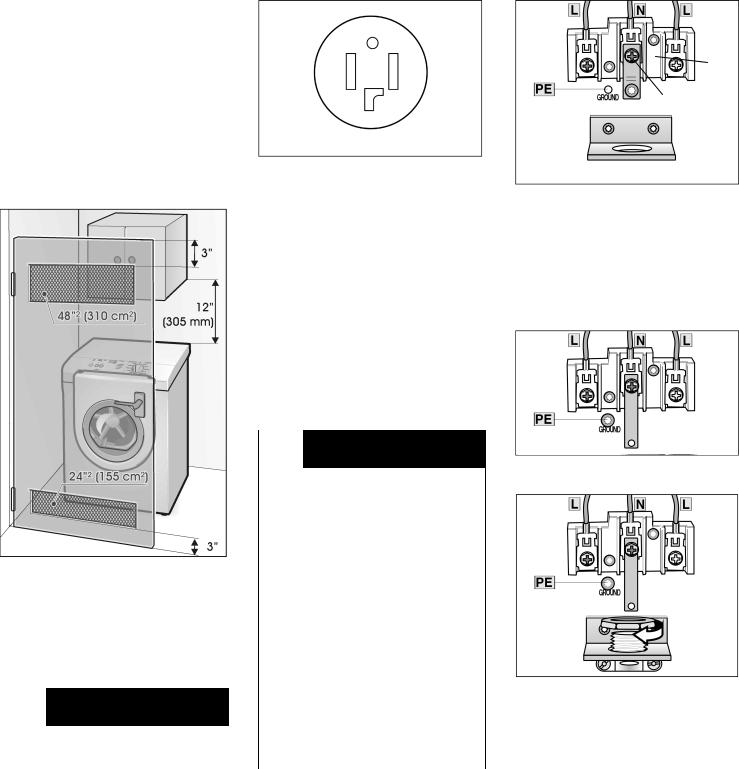
Top |
|
|
|
|
|
12" |
(3O5 mm) |
|
||||||||||||||||||||||||||
themselves in the appliance, remove |
|
or |
|
other |
|
fuels, |
|
|
|
|
|
|
|
|
|
|
|
|
|
|
|
|
|
|
||||||||||||||||||
the |
door. |
|
|
|
|
|
|
|
|
|
|
|
- |
in |
|
cupboards |
with |
lockable doors |
Rear* |
|
|
|
|
0" |
(O mm) |
|
||||||||||||||||
Old appliances are not worthless |
|
|
|
or |
|
in |
alcoves. |
|
|
|
|
|
|
|
|
|
|
|
|
|
|
|
|
|
|
|||||||||||||||||
|
|
|
|
|
|
|
|
|
|
|
*as close to wall as venting will allow |
|||||||||||||||||||||||||||||||
rubbish! Valuable raw materials can be |
|
|
|
|
|
|
|
|
|
|
|
|
|
|
|
|
||||||||||||||||||||||||||
|
|
|
|
|
|
|
|
|
|
|
|
|
|
|
|
|||||||||||||||||||||||||||
reclaimed |
from environmentally |
friendly |
The installation room must be well |
Important |
information |
concerning |
|
|||||||||||||||||||||||||||||||||||
recycling. |
|
|
|
|
|
|
|
|
|
|
|
ventilated, otherwise the dryer will |
minimum |
distances: |
|
|
|
|
|
|||||||||||||||||||||||
Please |
ask your |
dealer |
or |
inquire |
|
at |
operate |
below |
optimum performance. |
- |
Depending |
on the location |
of |
the |
||||||||||||||||||||||||||||
your local authority about the current |
|
|
|
|
|
|
|
|
|
|
|
|
|
|
|
|
|
exhaust |
air |
connection, an |
|
|
||||||||||||||||||||
means |
of |
disposal. |
|
|
|
|
|
|
|
|
|
|
|
|
|
|
|
|
|
|
|
|
|
|
|
|
additional |
minimum distance of |
|
|||||||||||||
5
5½ inch (14 cm) must be provided on this side for pipes/brackets (see page 7).
-Distances above the indicated
minimum |
dimensions |
reduce the |
|
|
|
|
|
|
|
|
|
|
|
1 |
|
||||
risk of mold formation behind the |
|
|
|
|
|
|
|
|
|
|
|
|
|
|
|
|
|
||
appliance. |
|
|
|
|
|
|
|
|
|
|
|
|
|
|
|
|
2 |
|
|
- Additional distances reduce noise |
|
|
|
|
|
|
|
|
|
|
|
|
|
|
|
||||
|
|
|
|
|
|
|
|
|
|
|
|
|
|
|
|
|
|||
transmission. |
|
|
|
|
|
|
|
|
|
|
|
|
|
|
|
|
|
|
|
- Additional |
distances |
facilitate |
|
|
|
|
|
|
|
|
|
|
|
|
|
|
|
|
|
installation |
and service. |
|
|
|
|
|
|
|
|
|
|
|
|
|
3 |
|
|||
|
|
|
|
|
|
|
|
|
|
|
|
||||||||
- If the dryer is installed in a small |
|
|
|
|
|
|
|
|
|
|
|
|
|
|
|
|
|
||
room, the |
doors of the room mustWhen |
installing the receptacle for the |
|
|
|
|
|
|
|
|
|
|
|||||||
be fitted with vents of a specified dryer |
cord, ensure that the power |
|
|
|
|
|
|
|
|
|
|
||||||||
minimum |
size. |
supply |
cord |
is |
accessible |
when |
the |
1 |
- |
terminal |
block |
|
|
|
|
|
|
||
|
|
dryer |
is in the |
installed position. |
|
2 |
- |
grounding |
strap |
|
|
|
|
|
|
||||
|
|
The power cord should only be |
|
|
|
|
|
|
|
||||||||||
|
|
|
|
|
|
|
|
|
|
|
|
|
|||||||
|
|
replaced by |
a qualified person. |
Use a |
3 |
- |
Angle bracket for |
strain relief clamp |
|||||||||||
|
|
4owire |
power |
supply |
cord |
(see |
|
|
2. Loosen the bottom screw of the |
||||||||||
|
|
electrical connection |
U.S.A. |
below). |
|
||||||||||||||
|
|
|
|
grounding strap. |
Place the screw |
||||||||||||||
|
|
For |
U.S.A. |
|
|
|
|
|
|
|
|||||||||
|
|
|
|
|
|
|
|
|
to the GROUND |
location. |
|||||||||
|
|
Your dryer comes without a power |
|
|
Straighten the grounding strap and |
||||||||||||||
|
|
supply |
cord.The power cord must |
|
|
hang loosely. |
|
|
|
|
|
|
|||||||
|
|
meet |
the following requirements: |
|
|
|
|
|
|
|
|
|
|
|
|||||
|
|
- |
UL listed |
in |
the |
USA |
|
|
|
|
|
|
|
|
|
|
|
|
|
- 208 p 240 volt rated (minimum)
-30 amps
- Type SRDT or DRT (UL 2158)
-Five feet long (minimum)
|
|
|
|
|
|
|
|
|
|
|
|
|
d |
WARNING |
|
d |
|
|
|
|
|
|
|
|
|
|
|
|
||||||||
|
|
|
|
|
|
|
|
|
|
|
|
|
|
|
|
|
|
|
|
3. Fix the |
strain |
relief |
clamp |
to the |
||||||||||||
|
|
|
|
|
|
|
|
|
|
|
|
|
Power |
cord |
must |
be connected |
|
by a |
||||||||||||||||||
|
|
|
|
|
|
|
|
|
|
|
|
|
licensed |
electrician |
|
only. |
|
|
|
angle bracket. |
Tighten |
the |
nut. |
|
||||||||||||
|
|
|
|
|
|
|
|
|
|
|
|
|
|
|
|
|
|
|
|
|
|
|
|
|
|
|
||||||||||
|
|
|
|
|
|
|
|
|
|
|
|
|
Use only a U.L. approved |
30 amp |
|
|
|
|
|
|
|
|
|
|
||||||||||||
|
|
|
|
|
|
|
|
|
|
|
|
|
power cord with strain relief clamp - |
|
|
|
|
|
|
|
|
|
|
|||||||||||||
|
|
|
|
|
|
|
|
|
|
|
|
|
note |
manufacturer's |
instructions. |
|
|
|
|
|
|
|
|
|
|
|
|
|||||||||
|
|
|
|
|
|
|
|
|
|
|
|
|
Do |
not |
plug end |
of |
power |
cord into |
|
|
|
|
|
|
|
|
|
|
||||||||
|
|
|
|
|
|
|
|
|
|
|
|
|
a live receptacle before connecting |
|
|
|
|
|
|
|
|
|
|
|||||||||||||
The |
dryer |
door is |
delivered |
with hinges |
|
power cord to appliance terminals |
|
|
|
|
|
|
|
|
|
|
||||||||||||||||||||
on the right. If required, |
the |
door |
|
|
and |
closing |
junction/splitter box |
as |
|
|
|
|
|
|
|
|
|
|
||||||||||||||||||
hinges |
|
|
|
|
|
|
|
|
|
|
|
|
|
|
|
|
|
|
|
|
|
|
|
|||||||||||||
can |
be switched |
to |
the |
left |
side. |
|
|
described |
below. |
|
|
|
|
|
|
|
|
|
|
|
|
|
|
|
|
|
||||||||||
If the door hinges are to be changed |
Do not reuse old power cord. Cord |
|
|
|
|
|
|
|
|
|
|
|||||||||||||||||||||||||
over, |
please |
contact |
your |
dealer or |
our |
must have closed loop or upturned |
|
|
|
|
|
|
|
|
|
|
||||||||||||||||||||
customer |
serviceoteam |
(see page 20) |
end |
wire |
terminating |
connectors. |
|
|
|
|
|
|
|
|
|
|
|
|
||||||||||||||||||
Do not make a sharp bend or crimp |
|
|
|
|
|
|
|
|
|
|
||||||||||||||||||||||||||
|
|
|
|
|
|
|
|
|
|
|
|
|
|
|
|
|
|
|
|
|
|
|
||||||||||||||
Electrical |
connection |
|
|
wiring/conductor |
at |
connections. |
|
|
|
|
|
|
|
|
|
|
|
|
||||||||||||||||||
|
|
Only |
a |
4oconductor |
cord |
shall |
|
|
|
|
|
|
|
|
|
|
|
|
||||||||||||||||||
|
|
|
|
|
|
|
|
|
|
|
|
|
|
|
4. Loosen |
the |
2 screws labeledL and |
|
||||||||||||||||||
|
|
|
|
|
|
|
|
|
|
|
|
|
be used |
when |
the |
appliance |
is |
|
|
|
||||||||||||||||
d |
WARNING |
|
d |
|
|
|
|
|
|
|
||||||||||||||||||||||||||
|
|
|
|
|
installed |
in |
a |
mobile |
home, |
in |
a |
the screw labeledN in the terminal |
||||||||||||||||||||||||
|
|
|
|
|
|
|
|
|
|
|
|
|
recreational vehicle, in a new branch |
block. and the screw of the |
|
|||||||||||||||||||||
Power cord must be connected |
by a |
circuit installation |
or |
an |
area where |
GROUND |
terminal. |
|
|
|
|
|||||||||||||||||||||||||
qualified |
person |
only. |
|
|
|
|
|
|
the |
local |
codes |
do |
not |
permit |
|
|
5. Thread |
the |
4 wire cable through th |
|||||||||||||||||
Connect |
to |
individual Branch |
|
|
|
|
grounding |
through |
the neutral. |
|
|
U.L. strain |
relief |
clamp. |
|
|
||||||||||||||||||||
Circuit. |
|
|
|
|
|
|
|
|
|
Connecting |
4Wwire |
power |
supply |
6. Tighten |
the |
screws |
(2.5 Nm) of |
the |
||||||||||||||||||
Do |
not use |
an |
adapter. |
|
|
|
|
|
U.L. strain |
relief |
clamp |
so |
that |
the |
||||||||||||||||||||||
|
|
|
|
|
cord |
|
|
|
|
|
|
|
|
|
|
|
|
|
||||||||||||||||||
Do |
not |
use |
an |
extension cord. |
|
|
|
|
|
|
|
|
|
|
|
|
|
|
|
|
power |
cord |
cannot |
be |
moved. |
|
||||||||||
|
|
|
|
1. Remove |
the |
screws from |
the |
|
cover |
|
||||||||||||||||||||||||||
Do |
not |
remove |
ground |
prong. |
|
|
|
|
|
7. Attach |
the |
power |
cord |
ground |
|
|||||||||||||||||||||
|
|
|
|
|
|
|
|
|
|
|
|
|
of the |
terminal |
block |
located |
at the |
conductor |
(green) |
to |
the GROUND |
|||||||||||||||
For |
CANADA |
|
|
|
|
|
|
|
|
|||||||||||||||||||||||||||
|
|
|
|
|
|
|
|
top |
rear |
of |
the |
appliance. |
|
|
||||||||||||||||||||||
|
|
|
|
|
|
|
|
|
|
terminal. |
Tighten |
the |
screw |
(2.5 |
|
|||||||||||||||||||||
|
|
|
|
|
|
|
|
|
|
|
|
|
|
|
|
|
|
|
|
|
|
|
|
|
|
|
|
|||||||||
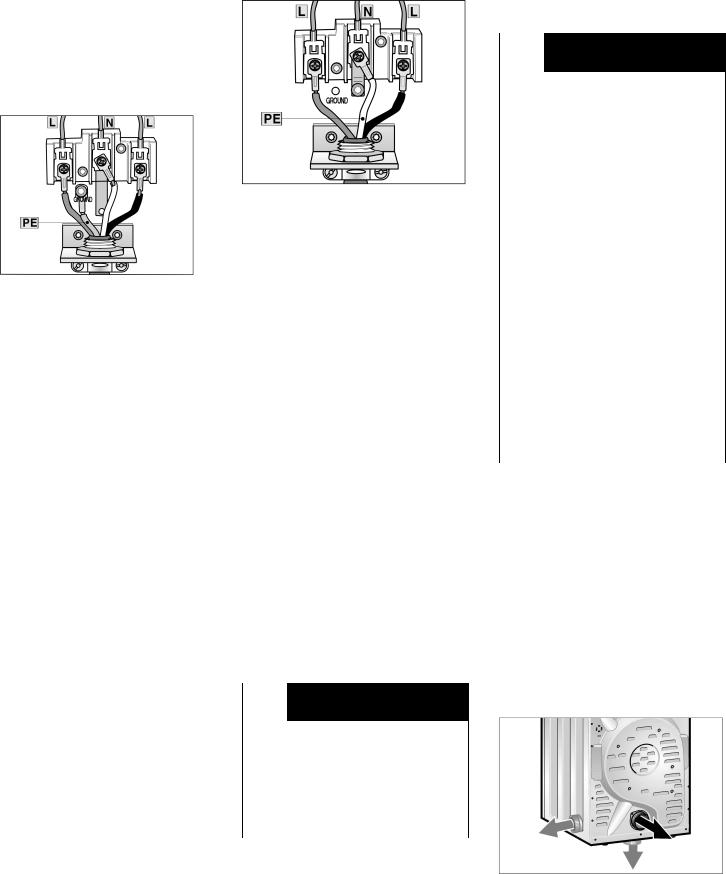
8. |
Attach |
|
the |
2 |
power |
cord |
outer |
|
|
|
|
|
|
|
|
|
|
|
|
|
|
|
|
|
|
Exhaust |
air |
connection |
|
|||||||||||||||||||||
|
|
conductors (red and black) to the 2 |
|
|
|
|
|
|
|
|
|
|
|
|
|
|
|
|
|
|
|
|
|
|
|
|
|
|
|
|
|
|
|
|||||||||||||||||
|
|
terminals labeled L and the |
|
|
|
|
|
|
|
|
|
|
|
|
|
|
|
|
|
|
|
|
|
|
|
|
|
|
|
|
|
|
|
|
|
|
|
|
||||||||||||
|
|
|
|
|
|
|
|
|
|
|
|
|
|
|
|
|
|
|
|
|
d |
WARNING |
d |
|
|
|||||||||||||||||||||||||
|
|
remaining |
power |
cord |
conductor |
|
|
|
|
|
|
|
|
|
|
|
|
|
|
|
|
|
|
|
|
|||||||||||||||||||||||||
|
|
(white) |
|
to |
the |
terminal |
labeled |
N. |
|
|
|
|
|
|
|
|
|
|
|
|
|
|
|
|
|
|
|
|
||||||||||||||||||||||
|
|
|
|
|
|
|
|
|
|
|
|
|
|
|
|
|
|
|
|
|
|
|
|
|
|
|
|
|
|
|
|
|
|
|
|
|
|
|||||||||||||
9. |
Tighten |
all |
3 screws |
(3 |
Nm) so that |
|
|
|
|
|
|
|
|
|
|
|
|
|
|
1. To |
reduce |
the |
risk |
of |
fire, |
this |
drye |
|||||||||||||||||||||||
|
|
the |
power |
conductors |
are |
held |
|
|
|
|
|
|
|
|
|
|
|
|
|
|
|
|
|
|
||||||||||||||||||||||||||
|
|
|
|
|
|
|
|
|
|
|
|
|
|
|
|
|
|
|
|
|
MUST |
BE |
EXHAUSTED |
|
|
|
|
|||||||||||||||||||||||
|
|
securely |
in |
place . |
|
|
|
|
|
|
|
|
|
|
|
|
|
|
|
|
|
|
|
|
|
|
|
|
|
|
|
|
||||||||||||||||||
|
|
|
|
|
|
|
|
|
|
|
|
|
|
|
|
|
|
|
|
|
|
|
|
|
|
OUTDOORS. |
|
|
|
|
|
|
|
|
|
|||||||||||||||
|
|
|
|
|
|
|
|
|
|
|
|
|
|
|
|
|
|
|
|
|
|
|
|
|
|
|
|
|
|
|
|
|
|
|
|
|
|
|
|
|
|
|
||||||||
|
|
|
|
|
|
|
|
|
|
|
|
|
|
|
|
|
|
|
|
|
|
|
|
|
|
|
|
|
|
|
|
|
2. To |
reduce |
the |
risk |
of |
fire, |
do |
not |
||||||||||
|
|
|
|
|
|
|
|
|
|
|
|
|
|
|
|
|
|
|
|
|
|
|
|
|
|
|
|
|
|
|
|
|
|
use |
the |
|
ductwork |
longer |
than |
|
||||||||||
|
|
|
|
|
|
|
|
|
|
|
|
|
|
|
|
|
|
|
|
|
|
|
|
|
|
|
|
|
|
|
|
|
|
recommended. |
|
|
|
|
|
|
|
|
||||||||
|
|
|
|
|
|
|
|
|
|
|
|
|
|
|
|
|
|
|
|
|
|
|
|
|
|
|
|
|
|
|
|
|
3. DO NOT use a plastic or |
|
|
|
||||||||||||||
|
|
|
|
|
|
|
|
|
|
|
|
|
|
|
|
|
9. Check |
|
the |
U.L. |
strain relief |
clamp |
|
nonometal |
duct |
with |
this |
dryer. |
|
|||||||||||||||||||||
|
|
|
|
|
|
|
|
|
|
|
|
|
|
|
|
|
|
4. DO NOT use a duct smaller than |
||||||||||||||||||||||||||||||||
|
|
|
|
|
|
|
|
|
|
|
|
|
|
|
|
|
|
|
to make sure that it is tight and |
|||||||||||||||||||||||||||||||
|
|
|
|
|
|
|
|
|
|
|
|
|
|
|
|
|
|
|
|
inches |
in |
diameter. |
|
|
|
|
|
|
||||||||||||||||||||||
|
|
|
|
|
|
|
|
|
|
|
|
|
|
|
|
|
|
|
cannot |
|
be |
turned. |
|
|
|
|
|
|
5. DO |
NOT |
use exhaust |
hoods with |
||||||||||||||||||
|
|
|
|
|
|
|
|
|
|
|
|
|
|
|
|
|
10. Replace |
|
the |
|
cover |
on |
the terminal |
|||||||||||||||||||||||||||
|
|
|
|
|
|
|
|
|
|
|
|
|
|
|
|
|
|
|
|
magnetic |
latches. |
|
|
|
|
|
|
|
||||||||||||||||||||||
|
|
|
|
|
|
|
|
|
|
|
|
|
|
|
|
|
|
|
block |
and fasten |
in |
place. |
|
|
|
|
|
|
|
|
|
|
|
|||||||||||||||||
|
|
|
|
|
|
|
|
|
|
|
|
|
|
|
|
|
|
|
|
|
|
6. DO |
NOT |
exhaust the dryer into a |
||||||||||||||||||||||||||
|
|
|
|
|
|
|
|
|
|
|
|
|
|
|
|
|
|
|
|
|
|
|
|
|
|
|
|
|
|
|
|
|
||||||||||||||||||
|
|
|
|
|
|
|
|
|
|
|
|
|
|
|
|
|
i |
|
|
|
|
|
|
|
|
|
|
|
|
|
|
|
||||||||||||||||||
10. |
Check |
|
the |
U.L. |
strain |
relief clamp |
|
|
Make |
sure |
that |
the |
U.L. strain |
relief |
chimney, |
|
furnace cold |
air |
duct, |
|
||||||||||||||||||||||||||||||
|
|
|
|
clamp |
is |
outside |
the cover! |
|
|
|
|
attic, crawl space, or any other |
|
|||||||||||||||||||||||||||||||||||||
|
|
to |
make |
sure |
that |
it is tight |
and |
|
|
|
|
|
|
|
|
|
||||||||||||||||||||||||||||||||||
|
|
|
|
Additional |
grounding |
|
procedure |
|
|
ductwork |
used |
for |
venting. |
|
|
|
||||||||||||||||||||||||||||||||||
|
|
cannot |
|
be |
turned. |
|
|
|
|
|
|
|
|
|
7. DO |
NOT |
install |
a |
flexible |
duct |
in a |
|||||||||||||||||||||||||||||
|
|
|
|
|
|
|
|
|
|
|
|
|
|
|
|
|
|
|
|
|
|
|
|
|
|
|||||||||||||||||||||||||
11. |
Replace |
the cover |
on |
the |
terminal |
|
|
|
|
|
|
|
|
|
|
|
|
|
|
|||||||||||||||||||||||||||||||
|
|
|
|
|
|
|
|
|
|
|
|
|
|
|
enclosed |
|
wall, ceiling |
or |
floor. |
|
||||||||||||||||||||||||||||||
|
|
block |
and |
fasten |
in |
place. |
|
- |
|
Some |
local |
regulations |
may |
|
|
|
|
|
|
|||||||||||||||||||||||||||||||
|
|
|
|
|
|
|
8. DO |
NOT |
crush or kink the duct. |
|||||||||||||||||||||||||||||||||||||||||
|
|
|
|
|
|
|
|
|
|
|
|
|
|
|
|
|
|
|
require |
|
a |
separate |
ground. |
In such |
||||||||||||||||||||||||||
i |
|
Make |
sure |
that the U.L. strain relief |
|
|||||||||||||||||||||||||||||||||||||||||||||
|
cases, |
|
the |
required |
accessory |
|
9. Do |
clean |
and inspect |
the |
exhaust |
|||||||||||||||||||||||||||||||||||||||
|
|
clamp is outside the cover! |
|
|
|
|
|
ground wire, clamp and screw |
|
|
system on a regular basis; at least |
|||||||||||||||||||||||||||||||||||||||
The appliance is now ready to be |
|
|
|
|
must be |
purchased |
separately. |
|
|
once |
a |
year. |
|
|
|
|
|
|
|
|
|
|||||||||||||||||||||||||||||
plugged into the 4owire receptacle |
of |
- |
|
Never |
ground |
the |
dryer |
to |
plastic |
10. The |
exhaust |
duct |
must terminate |
|||||||||||||||||||||||||||||||||||||
the |
power |
|
rating. |
|
|
|
|
|
|
|
|
|
|
|
plumbing lines, gas lines or water |
|
in a |
manner |
to |
prevent |
back drafts |
|||||||||||||||||||||||||||||
Connecting |
3Wwire |
power |
supply |
|
|
|
|
|
||||||||||||||||||||||||||||||||||||||||||
|
|
|
|
pipes. |
|
|
|
|
|
|
|
|
|
|
|
|
|
or |
entry |
|
of |
birds |
or |
other |
wildlife. |
|||||||||||||||||||||||||
cord |
|
|
|
|
|
|
|
|
|
|
|
|
|
|
Grounding |
instruction |
|
|
|
|
|
|
|
|
|
|
|
|
|
|
|
|
|
|
|
|
|
|
||||||||||||
|
|
|
|
|
|
|
|
|
|
|
|
|
|
|
|
|
|
|
The |
Siemens |
dryers |
are |
intended to |
be |
||||||||||||||||||||||||||
1. |
Remove the screws |
from |
the |
coverThis |
appliance must |
be |
grounded. |
In |
||||||||||||||||||||||||||||||||||||||||||
vented outdoors. |
To |
prevent |
buildoup |
|||||||||||||||||||||||||||||||||||||||||||||||
|
|
of |
the |
|
terminal block located |
at the |
|
|
|
|
|
|
|
|
|
|
|
|
|
|
||||||||||||||||||||||||||||||
|
|
top |
rear |
of |
the |
appliance. |
|
|
|
|
the event of a malfunction or |
|
|
|
of moisture and accumulation of lint |
|
||||||||||||||||||||||||||||||||||
2. |
|
|
|
|
breakdown, grounding will reduce the |
indoors, as well as to maintain |
|
|
|
|||||||||||||||||||||||||||||||||||||||||
Make |
sure |
that |
there |
is |
|
|
|
|
risk of electric shock by |
providing |
a |
maximum |
drying |
efficiency, |
it |
is |
|
|
|
|||||||||||||||||||||||||||||||
|
|
a grounding |
strap. |
|
|
|
|
|
|
|
path of least resistance for the electricrecommended |
that the |
dryer |
is |
vented |
|||||||||||||||||||||||||||||||||||
3. |
Fix |
the |
strain |
relief |
|
clamp |
to |
the |
|
|
current. |
|
|
|
|
|
|
|
|
|
|
|
|
|
outdoors. |
|
|
|
|
|
|
|
|
|
|
|
|
|
||||||||||||
|
|
angle |
bracket. |
Tighten |
the |
nut. |
|
|
For Canada the dryer comes with a |
Exhaust |
air |
outlet |
on |
the |
dryer |
|||||||||||||||||||||||||||||||||||
4. |
Loosen |
the |
2 |
screws |
labeledL and |
|
|
cord |
which |
has |
|
an |
equipment |
|
|
|
The |
dryer |
is |
delivered |
with an |
exhaust |
||||||||||||||||||||||||||||
|
|
grounding conductor and a grounding |
||||||||||||||||||||||||||||||||||||||||||||||||
|
|
the screw labeledN in the terminal |
|
|
||||||||||||||||||||||||||||||||||||||||||||||
|
|
|
|
plug. The |
plug |
must |
be |
plugged into |
airn |
outlet |
on |
the |
rear |
of |
the |
appliance. |
||||||||||||||||||||||||||||||||||
|
|
block. |
|
|
|
|
|
|
|
|
|
|
|
|
|
appropriate |
|
outlet |
which |
has been |
|
To |
take |
account |
of |
the |
spatial |
|
|
|
||||||||||||||||||||
5. |
Thread |
|
the |
3owire |
cable through |
|
|
|
|
|
|
|
||||||||||||||||||||||||||||||||||||||
|
|
|
properly installed and grounded in |
|
requirements |
and |
an existing |
exhaust |
||||||||||||||||||||||||||||||||||||||||||
|
|
the |
U.L. |
strain relief |
clamp. |
|
|
|
|
|||||||||||||||||||||||||||||||||||||||||
6. |
|
|
|
accordance with all local regulations |
air system, the following connection |
|
||||||||||||||||||||||||||||||||||||||||||||
Tighten |
the |
screws |
|
(2.5 Nm) |
on |
theand |
ordinances. |
|
|
|
|
|
|
|
|
|
options are possible for the exhaust air |
|||||||||||||||||||||||||||||||||
|
|
U.L. strain relief clamp so that the |
|
|
|
|
|
|
|
|
|
|
|
|
|
|
outlet: |
|
|
|
|
|
|
|
|
|
|
|
|
|
|
|||||||||||||||||||
|
|
power |
cord |
cannot |
|
be |
moved. |
|
|
|
|
|
|
|
|
|
|
|
|
|
|
|
|
|
|
- |
on |
right |
|
side |
of the |
appliance, |
|
|||||||||||||||||
7. |
|
|
|
d |
WARNING |
d |
|
|
|
|
||||||||||||||||||||||||||||||||||||||||
Attach |
|
the |
2 |
power |
cord |
outer |
|
|
|
|
- |
on |
the |
underside |
of |
the |
appliance. |
|||||||||||||||||||||||||||||||||
|
|
conductors (red and black) to the |
2 |
|
|
|
|
|
|
|
|
|
|
|
|
|
|
|
|
|
|
|
|
|
|
|
|
|
|
|
|
|
|
|
||||||||||||||||
|
|
terminals labeled L and the |
|
|
|
Improper |
|
connection |
of |
the |
|
|
|
|
|
|
|
|
|
|
|
|
|
|
|
|
|
|
|
|
||||||||||||||||||||
|
|
remaining |
power |
cord |
conductor |
|
|
equipment |
grounding |
conductor |
|
|
|
|
|
|
|
|
|
|
|
|
|
|
|
|
|
|
|
|||||||||||||||||||||
|
|
(white) |
|
to |
the |
terminal |
labeled |
N. |
|
|
may |
result |
in |
electric |
shock. |
|
|
|
|
|
|
|
|
|
|
|
|
|
|
|
|
|
|
|
||||||||||||||||
8. |
Tighten |
all |
3 screws |
(3 |
Nm) so that |
Have |
the |
|
appliance |
checked |
by |
|
|
|
|
|
|
|
|
|
|
|
|
|
|
|
|
|
||||||||||||||||||||||
|
|
the power conductors are held in |
|
|
a qualified |
|
electrician |
or |
service |
|
|
|
|
|
|
|
|
|
|
|
|
|
|
|
|
|
|
|||||||||||||||||||||||
|
|
place |
securely. |
|
|
|
|
|
|
|
|
|
technician |
|
if |
you |
are |
in |
doubt |
as |
|
|
|
|
|
|
|
|
|
|
|
|
|
|
|
|
|
|||||||||||||
|
|
|
|
|
|
|
|
|
|
|
|
|
|
|
|
|
to whether the dryer has been |
|
|
|
|
|
|
|
|
|
|
|
|
|
|
|
|
|
||||||||||||||||
|
|
|
|
|
|
|
|
|
|
|
|
|
|
|
|
|
properly |
grounded. |
|
|
|
|
|
|
|
|
|
|
|
|
|
|
|
|
|
|
|
|
|
|
|
|||||||||
|
|
|
|
|
|
|
|
|
|
|
|
|
|
|
|
|
|
|
|
|
|
|
|
|
|
|
|
|
|
|
|
|
|
2 |
|
|
|
|
|
|
3 |
|
|
|
1 |
|
|
|
|
|
|
|
|
|
|
|
|
|
|
|
|
|
|
|
|
|
|
|
|
|
|
|
|
|
|
|
|
|
|
|
|
|
|
|
|
|
|
|
|
|
|
|
|
|
|
|
|
||||
|
|
|
|
|
|
|
|
|
|
|
|
|
|
|
|
|
|
|
|
|
|
|
|
|
|
|
|
|
|
|
|
|
|
|
|
|
|
|
|
|
|
|
|
|
|
|
|
|
||
|
|
|
|
|
|
|
|
|
|
|
|
|
|
|
|
|
|
|
|
|
|
|
|
|
|
|
|
|
|
|
|
|
1 Y Exhaust air outlet on the rear of the |
|||||||||||||||||
|
|
|
|
|
|
|
|
|
|
|
|
|
|
|
|
|
|
|
|
|
|
|
|
|
|
|
|
|
|
|
|
|
|
appliance |
(standard) |
|
|
|
|
|
|
|
|
|||||||
7
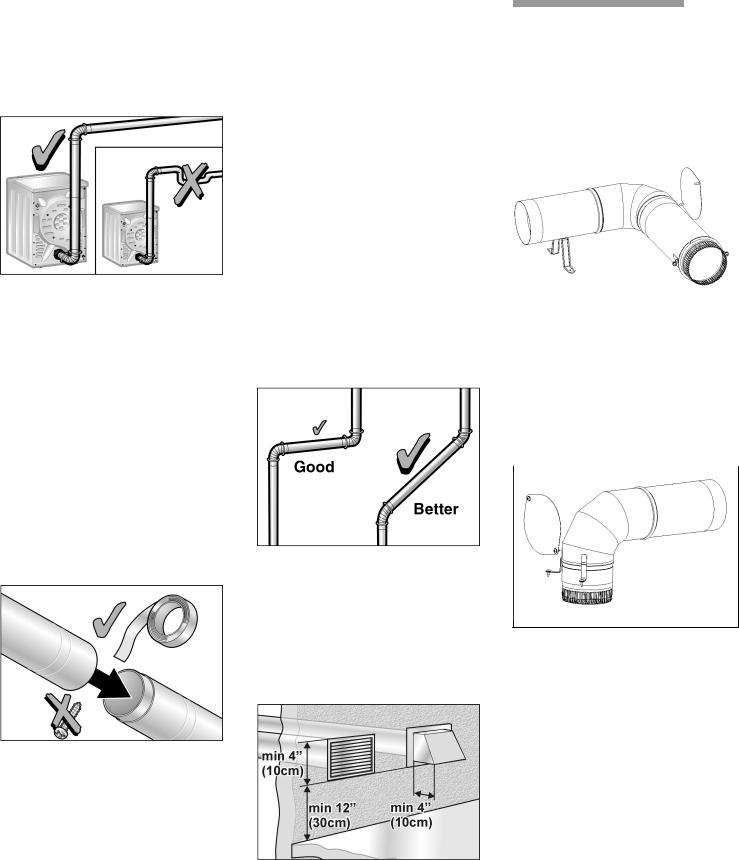
2 |
Y |
Exhaust |
air outlet |
on |
the |
side (optional) Whether |
connecting |
to |
an |
existing |
|
Required |
parts |
|
|
|
|
||||||||||||||||||
3 |
Y |
Exhaust air outlet |
on |
the |
underside of |
|
venting |
system |
or |
a new |
venting |
|
The parts required for the exhaust air |
||||||||||||||||||||||
the |
|
|
|
|
|
|
|
|
|
|
|
|
|
||||||||||||||||||||||
|
|
appliance |
(optional) |
|
|
|
|
|
system, |
make |
|
sure |
that |
all |
ducting |
is |
system |
|
(elbows, |
lines, exhaust air |
|
||||||||||||||
|
|
|
|
|
|
|
clean and |
free |
of |
lint. |
|
|
|
|
|
|
outlets) |
|
are |
not |
included in standard |
||||||||||||||
|
|
|
|
|
|
|
|
|
|
|
The |
|
|
|
|
|
|
|
|
|
|
|
|
|
|
||||||||||
Special exhaust air |
connections must |
|
maximum permitted length for both |
|
|
of |
the |
dryer. |
|
||||||||||||||||||||||||||
|
rigid |
and flexible metal |
duct is |
shown |
delivery |
|
|||||||||||||||||||||||||||||
be obtained from your dealer or part |
|
in |
|
|
|
|
|
|
|
|
|
||||||||||||||||||||||||
supplier |
for |
either |
connection |
type (see the |
table |
below. |
|
|
|
|
|
|
|
|
|
|
|
|
|
|
|
|
|
|
|
||||||||||
page 8). |
exhaust |
kit |
|
|
|
|
Number |
of |
Rigid |
Duct |
Flexible |
Duct |
|
|
Accessories |
|
|
||||||||||||||||||
- |
|
Side |
|
|
|
90° |
Turns |
|
|
|
|
|
|
|
|
|
|
|
|
||||||||||||||||
- |
|
Bottom |
exhaust |
kit |
|
|
|
|
|
|
|
|
|
|
|
|
|
|
|
||||||||||||||||
|
|
|
|
|
or Elbows |
|
|
|
|
|
|
|
|
|
|
|
|
||||||||||||||||||
|
|
|
|
|
|
|
|
|
|
|
|
|
|
|
|
The parts required for the exhaust air |
|||||||||||||||||||
A |
qualified |
technician should |
change |
|
|
|
|
|
|
|
|
|
|
|
|
|
|
|
|||||||||||||||||
|
|
0 |
|
66 |
|
ft. |
|
|
45 |
ft. |
|
|
|
||||||||||||||||||||||
the |
exhaust |
air outlet to the optional |
|
|
|
|
|
|
|
|
|
system can be obtained from customer |
|||||||||||||||||||||||
connection |
location. |
|
|
|
|
|
|
|
|
(2011 |
cm) |
(1372 |
cm) |
|
service or your local dealer. Please |
|
|||||||||||||||||||
Ductwork |
|
|
|
|
|
|
|
|
1 |
|
56 |
ft. |
|
|
36 |
|
ft. |
|
|
|
follow |
the |
installation instructions |
|
|||||||||||
|
|
|
|
|
|
|
|
|
|
|
|
|
|
|
supplied |
by the |
appropriate |
|
|||||||||||||||||
|
|
|
|
|
|
|
|
|
|
|
|
|
|
(1707 |
cm) |
(1097 cm) |
|
|
|||||||||||||||||
|
|
|
|
|
|
|
|
|
|
|
|
|
|
|
manufacturer! |
|
|
|
|
|
|||||||||||||||
|
|
|
|
|
|
|
|
|
|
|
|
2 |
|
48 |
ft. |
|
|
29 |
|
ft. |
|
|
|
Side |
exhaust |
kit |
|
||||||||
|
|
|
|
|
|
|
|
|
|
|
|
|
|
(1463 |
cm) |
(884 cm) |
|
|
|
|
|
|
|
|
|
|
|
|
|||||||
|
|
|
|
|
|
|
|
|
|
|
|
|
|
|
|
|
|
|
|
|
|
|
|
|
|
||||||||||
|
|
|
|
|
|
|
|
|
|
|
|
3 |
|
39 |
ft. |
|
|
22 |
|
ft. |
|
|
|
|
|
|
|
|
|
|
|
|
|
|
|
|
|
|
|
|
|
|
|
|
|
|
|
|
|
(1189 |
cm) |
(671 cm) |
|
|
|
|
|
|
|
|
|
|
|
|
|||||||
|
|
|
|
|
|
|
|
|
|
|
|
4 |
|
30 |
ft. |
|
|
16 |
|
ft. |
|
|
|
|
|
|
|
|
|
|
|
|
|
|
|
|
|
|
|
|
|
|
|
|
|
|
|
|
|
(914 |
cm) |
|
(488 cm) |
|
|
|
|
|
|
|
|
|
|
|
|
||||||
|
|
|
|
|
|
|
|
|
|
|
|
|
|
|
|
|
|
|
|
|
|
|
|
|
|
|
|
|
|
|
|
|
|
|
|
|
|
|
|
|
|
|
|
|
|
|
Note: |
|
|
|
|
|
|
|
|
|
|
|
|
|
|
|
|
|
|
|
|
|
|
|
|
|
|
|
|
|
|
|
|
|
|
|
Side and bottom exhaust installations |
|
|
|
|
|
|
|
|
|
|
|
|||||||||||||
To |
|
ensure optimum |
performance, the |
|
have a |
90° turn |
inside |
the |
dryer. To |
|
|
|
|
|
|
|
|
|
|
|
|||||||||||||||
|
|
determine |
maximum exhaust |
length, |
|
|
|
|
|
|
|
|
|
|
|
|
|||||||||||||||||||
ducting system of |
|
the dryer should beadd |
one 90° |
turn |
to the |
chart. |
|
|
|
|
|
|
|
|
|
|
|
|
|||||||||||||||||
as short as possible with a minimum |
|
More than |
two °90turns |
are |
|
not |
|
|
|
part |
no.WZ20365 |
|
|
|
|
||||||||||||||||||||
number |
of elbows. |
Your dryer will work |
|
|
|
|
For |
best |
performance, |
|
|
|
|
||||||||||||||||||||||
|
|
|
|
|
|
|
|
|
|
|
recommended. |
|
|
|
|
|
|
|
|
|
|
|
|
||||||||||||
best |
when |
the venting system has as |
|
separate |
all turns by at least |
4 ft. |
of Note: |
|
|
|
permitted number of |
90° |
|||||||||||||||||||||||
few |
air |
flow restrictions |
as |
possible. |
|
straight |
duct, |
including |
distance |
|
The |
maximum |
|||||||||||||||||||||||
Exhaust ducting which is longer than |
|
|
elbows |
|
(including |
this side exhaust |
kit) |
||||||||||||||||||||||||||||
|
between |
last |
turn |
and |
exhaust |
hood. |
|
||||||||||||||||||||||||||||
recommended may extend drying time, |
|
|
|
|
|
|
|
|
|
|
|
|
|
|
|
is four! |
|
|
|
|
|
|
|
||||||||||||
cause lint to accumulate and affect |
|
|
|
|
|
|
|
|
|
|
|
|
|
|
|
|
|
|
|
|
|
|
|
|
|
|
|||||||||
|
|
|
|
|
|
|
|
|
|
|
|
|
|
|
i |
|
Special |
tool |
for cutting the hole in |
||||||||||||||||
dryer performance and dryer lifeotime. |
|
|
|
|
|
|
|
|
|
|
|
|
|
|
|
|
|||||||||||||||||||
Fouroinch (approx. 100 mm) diameter |
|
|
|
|
|
|
|
|
|
|
|
|
|
|
|
|
|
prepared side panel is required. |
|
||||||||||||||||
ducting should be used. Use either |
|
|
|
|
|
|
|
|
|
|
|
|
|
|
|
|
|
Contact |
local |
dealer! |
|
||||||||||||||
rigid metal or flexible metal ducting |
|
|
|
|
|
|
|
|
|
|
|
|
|
|
|
Bottom |
exhaust kit |
|
|||||||||||||||||
material. |
|
|
|
|
|
|
|
|
|
|
|
|
|
|
|
|
|
|
|
|
|
|
|
|
|
|
|
|
|
|
|
|
|
||
|
|
|
|
|
|
|
|
|
|
|
|
|
|
|
|
|
|
|
|
|
|
|
|
|
|
|
|
|
|
|
|
|
|||
DO |
NOTuse |
plastic |
or |
nonometal duct |
|
|
|
|
|
|
|
|
|
|
|
|
|
|
|
|
|
|
|
|
|
|
|
|
|
|
|||||
with this dryer.
DO NOT assemble the ductwork with screws or fasteners that extend into the duct. They will serve as an accumulation point for lint.
Joints should be secured with aluminum tape.
All joints should |
be tight to avoid leaks |
The male end of each duct section |
|
must point away |
from the dryer. |
8
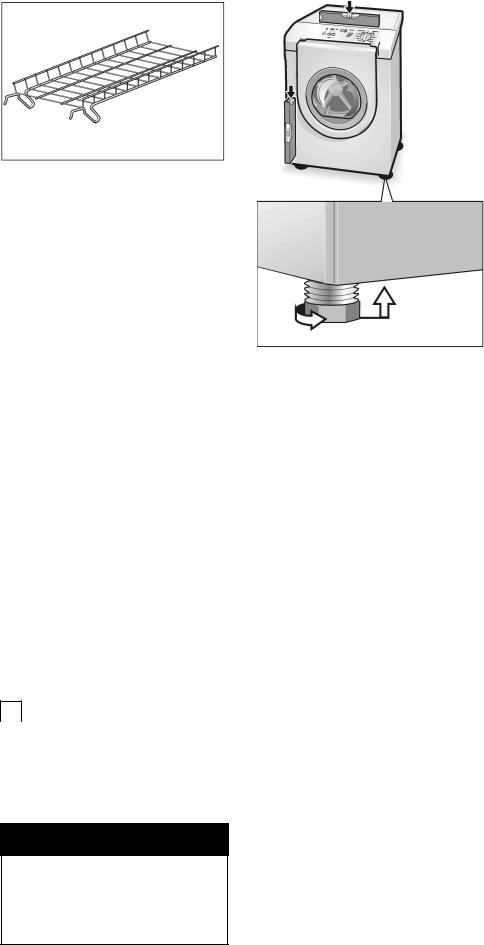
Dryer rack |
10. Position and then level the .dryer |
part no.WZ20390
Use the dryer rack to dry washable woolen textiles (e.g. sweaters) and shoes.
Left hinge kit
part no.WZ20360
The door catch can be reversed if necessary. The door is hinged on the right at the factory.
Pedestal Mounting
If mounting the dryer on the Siemens pedestal (accessory no.
WZ 20395) follow the instructions supplied with the pedestal.
Installation |
X step by step |
||
1. |
Unpack |
the |
dryer. |
2. |
Remove |
all |
objects from the drum. |
3.Check the dryer for visible damage.
4.Position the dryer near the installation location.
5. If |
required, change the door hinges |
to |
the left (see page 6). |
6.If required, have customer service install the exhaust air outlet on the
dryer |
(see |
page 7). |
7. Have |
the |
power supply cord fitted |
by an authorized technician (see |
||
page |
6). |
|
8.Install exhaust duct if necessary. Follow the installation instructions supplied by the appropriate manufacturer!
iIf space is very restricted, it is
|
recommended to |
fit |
the initial |
parts |
||
|
of the exhaust duct to the dryer |
|||||
|
before the dryer |
is |
moved |
to |
its |
|
|
final |
installation location. |
|
|
||
9. Move |
the dryer |
to |
its final |
location |
||
|
and |
align. |
|
|
|
|
|
|
|
|
|
|
|
|
6. |
If the |
dryer does not work, switch |
|||||||
|
|
|
|
|
|
|
|
|
the |
dryer |
to |
"off". |
|
|
|||
|
|
|
|
|
|
|
|
|
Look in |
the |
troubleshooting |
|
|||||
The |
dryer should be |
level |
with all |
|
section |
(page |
40) of |
the |
|
||||||||
four feet firmly on the ground. The |
OPERATING |
INSTRUCTIONS |
and |
||||||||||||||
dryer |
must |
not |
wobble. If the |
dryer |
|
find |
the |
fault. |
|
|
|
||||||
is not level |
or |
if it |
does |
wobble, |
the |
|
|
|
to |
transport |
the |
||||||
feet must be adjusted. Adjust the |
Preparing |
||||||||||||||||
heightoadjustable |
feet |
until |
the |
dryer |
X |
step |
by step |
|
|||||||||
dryer |
does |
not |
rock |
and |
is |
level, |
1. |
Rotate |
the program |
selector |
|
||||||
both |
frontotooback and |
|
|
|
|||||||||||||
|
|
|
to "off". |
|
|
|
|
|
|||||||||
sideotooside. |
|
|
|
|
|
|
|
|
|
|
|
||||||
|
|
|
|
|
2. |
Pull |
out |
the |
power |
supply |
plug. |
||||||
11. Connect |
the exhaust |
duct |
to |
the |
|||||||||||||
3. |
Disconnect the |
exhaust duct from |
|||||||||||||||
exhaust |
air |
outlet on |
the |
dryer. |
|
the |
exhaust |
air outlet on the dryer. |
|||||||||
12. Insert |
plug |
into |
the |
wall receptacle. 4. Place |
any accessories in the drum. |
||||||||||||
|
|
|
|
|
|
|
|
5. |
Close |
the door and secure with |
|||||||
|
|
|
|
|
|
|
|
|
adhesive |
tape. |
|
|
|
||||
|
|
|
|
|
|
|
|
6. |
Screw |
the heightoadjustable |
feet of |
||||||
|
|
|
|
|
|
|
|
|
the dryer into the housing to |
||||||||
|
|
|
|
|
|
|
|
|
prevent them from being damaged |
||||||||
|
|
|
|
|
|
|
|
|
during |
transportation. |
|
|
|||||
CAUTION
Do not slide dryer across the floor if heightoadjustable feet have been extended. Feet and/or dryer base may be damaged if dryer is slid across floor with heightoadjustable
feet extended.
9
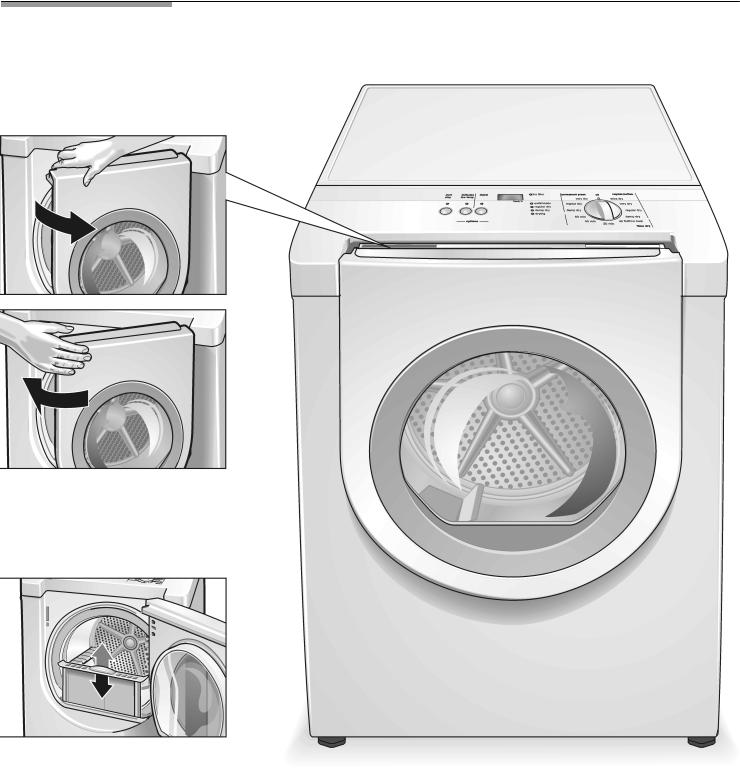
OPERATING INSTRUCTIONS
Your new dryer
Open the door .... (colored marking)
....and close the door.
Lint filter
10
Panel
start/stop button |
|
|
Buttons for options(in addition to the program if |
||
Starts, interrupts and ends the drying |
process. |
required). See page 14. |
|||
|
|
|
|
delicates low temp. |
|
|
|
|
|
Press for |
temperatureosensitive textiles |
|
|
|
|
(e.g. acrylic |
fibers). The temperature of the drying |
|
|
|
|
process is reduced, the drying time is extended |
|
|
|
|
|
correspondingly. |
|
|
|
|
|
signal |
|
|
|
|
|
An acoustic signal indicates the end of the |
|
|
|
|
|
program. |
|
Display
Indicates the estimated remaining time of programs.
Indicator light (LED)
Serves as a reminder to clean the lint filter.
|
Program |
selector |
|
|
Selects a program. See page 14 |
||
|
Can be |
rotated in |
both direction |
|
To switch off the dryer, rotate t |
||
|
program |
selector to |
"off". |
Indicator |
lights (LED) |
|
|
Indicate the current state of |
|
|
|
the drying |
process. |
|
|
11

Summary of instructions
Selecting a program |
Using |
the |
dryer rack |
|
(Option, |
see |
page 8) |
d |
CAUTION |
d |
|
|
|
|
|
|
|
||
Before using your dryer read |
and |
||||
follow |
all |
installation and |
|
|
|
operating |
instructions. |
|
|
|
|
|
|
|
Choose an option |
||
Preparing the dryer |
|
|
|||
iCheck the lint filter. The filter
should be cleaned before and after every drying process.
...and start the dryer. Switch off the dryer
12

|
|
|
|
|
|
|
|
|
|
|
|
|
|
|
|
Do |
not |
lean or |
sit |
on |
the |
door. |
5. Wipe |
the inside of the drum with |
|
||||||||||||||||||
Safety |
information |
|
Risk |
of |
dryer |
|
tipping |
over! |
|
|
|
damp cloth. |
|
|
|
|
|
|
|
|
|
||||||||||||||||||||||
|
Do not store or use solvent detergent |
6. Conduct |
an |
appliance |
test, |
see |
|
||||||||||||||||||||||||||||||||||||
|
boosters |
or stain |
remover |
in |
the |
|
vicinity |
page |
9. |
|
|
|
|
|
|
|
|
|
|
||||||||||||||||||||||||
|
|
|
|
|
|
|
|
|
|
|
|
|
|
|
|
of |
the dryer. |
|
|
|
|
|
|
|
|
|
7. If the dryer |
does not |
work, |
switch |
|||||||||||||
|
|
|
|
|
|
|
|
|
|
|
|
|
|
|
|
The |
dryer |
could |
be |
damaged. |
|
|
|||||||||||||||||||||
|
|
|
|
|
|
|
|
|
|
|
|
|
|
|
|
|
|
|
the dryer |
to |
|
"off". |
|
|
|
|
|
|
|||||||||||||||
d |
WARNING |
|
d |
|
|
|
|
|
|
|
|
|
|
|
|||||||||||||||||||||||||||||
|
|
|
Do |
not |
lift |
the |
|
dryer by |
projecting |
|
|
|
|
|
|
|
|
||||||||||||||||||||||||||
|
|
|
|
|
Look |
in |
the |
troubleshooting |
|
|
|
||||||||||||||||||||||||||||||||
|
|
|
components. |
|
|
|
|
|
|
|
|
|
|
|
|
|
|||||||||||||||||||||||||||
|
|
|
|
|
|
|
|
|
|
|
|
|
section |
(page |
19) of |
the |
operating |
||||||||||||||||||||||||||
|
|
|
|
|
|
|
|
|
|
|
|
|
|
|
|
Risk |
of |
breakage! |
|
|
|
|
|
|
|
||||||||||||||||||
Always |
follow |
the |
IMPORTANT |
|
|
|
|
|
|
|
|
|
instructions and |
find |
the |
fault. |
|
||||||||||||||||||||||||||
|
|
|
|
|
|
|
|
|
|
|
|
|
|
|
|
|
|
||||||||||||||||||||||||||
SAFETY |
INSTRUCTIONS |
|
|
|
|
|
|
|
|
|
|
|
|
|
|
|
|
|
|
|
|
|
|
|
|
|
|
|
|
|
|
|
|
|
|||||||||
|
|
|
|
|
|
|
|
|
|
|
|
|
|
|
|
|
|
|
|
|
|
|
|
|
|
|
|
|
|
|
|
|
|||||||||||
(see |
page |
3). |
|
|
|
|
|
|
|
|
|
Protection |
of the |
Temporary |
|
|
|
|
|
|
|||||||||||||||||||||||
|
|
|
|
|
|
|
|
|
|
|
|
|
|
|
|
|
|
|
|
|
|
||||||||||||||||||||||
|
|
|
|
|
|
|
|
|
|
|
|
|
|
|
|
|
|
|
|
|
|||||||||||||||||||||||
|
|
|
|
|
|
|
|
|
|
|
|
|
|
|
|
|
|
|
|
|
|||||||||||||||||||||||
d |
WARNING |
|
d |
|
|
environment |
|
|
|
|
|
disconnection |
|
of |
|
||||||||||||||||||||||||||||
TO |
AVOID |
HAZARD! |
|
|
|
|
|
Tips |
on |
saving |
energy |
|
|
|
|
|
the |
dryer |
|
|
|
|
|
|
|
||||||||||||||||||
EXPLOSION |
|
|
|
|
|
To save energy, money and time, |
|
|
|
|
|
|
|
||||||||||||||||||||||||||||||
Keep flammable |
materials |
and |
|
|
Operate |
your |
dryer |
only |
when you are |
||||||||||||||||||||||||||||||||||
vapors, |
|
such as gasoline, away |
from Siemens |
recommends the |
following: |
at home. If you intend going on |
|
||||||||||||||||||||||||||||||||||||
the |
dryer. |
|
|
|
|
|
|
|
|
|
|
- |
|
Drain |
the |
laundry |
thoroughly! |
vacation |
or |
are |
not |
using |
your |
dryer |
fo |
||||||||||||||||||
Do |
not |
|
dry anything that has ever |
|
|
|
Before drying, spin the laundry |
an extended period of time, you |
|
||||||||||||||||||||||||||||||||||
had anything flammable on it (even |
|
|
|
thoroughly |
in |
the washing |
|
|
should: |
|
|
|
|
|
|
|
|
|
|
|
|
||||||||||||||||||||||
after |
washing). |
|
|
|
|
|
|
|
|
|
|
|
machine. Use the highest possible |
1. Turn |
off |
the |
|
circuit breaker. |
|
|
|
||||||||||||||||||||||
Do |
not |
|
dry anything that has ever |
|
|
|
spin |
speed |
|
for |
the |
type |
of |
laundry! 2. Pull |
out the power supply plug if |
|
|||||||||||||||||||||||||||
had any type of oil on it (including |
|
|
|
Higher spin speeds reduce the |
|
possible. |
|
|
|
|
|
|
|
|
|
|
|||||||||||||||||||||||||||
cooking |
|
oils). |
|
|
|
|
|
|
|
|
|
|
|
|
drying time and the energy |
|
|
3. Clean the lint |
filter. |
|
|
|
|
|
|
||||||||||||||||||
Items containing foam, rubber or |
|
|
|
consumption. |
|
|
|
|
|
|
|
|
|
|
|
|
|
|
|
|
|
|
|
|
|
|
|||||||||||||||||
plastic |
must |
be |
dried |
on |
|
|
|
|
- |
|
Use |
optimum |
load! |
|
|
|
|
|
|
|
|
|
|
|
|
|
|
|
|
|
|
||||||||||||
a clothesoline |
or |
by |
|
using |
an |
|
|
|
|
|
|
|
|
|
|
|
|
|
|
|
|
|
|
|
|||||||||||||||||||
|
|
|
|
Use |
maximum |
recommended |
|
|
|
|
|
|
|
|
|
|
|
|
|
|
|
|
|||||||||||||||||||||
air fluff/no |
heatocycle. |
|
|
|
|
|
|
|
|
|
|
|
Laundry |
|
|
|
|
|
|
|
|
|
|||||||||||||||||||||
|
|
|
|
|
|
|
|
|
loads. However, do not exceed |
|
|
|
|
|
|
|
|
|
|||||||||||||||||||||||||
Do not allow items containing |
|
|
|
|
|
|
|
|
|
|
|
|
|||||||||||||||||||||||||||||||
flammable |
materials, |
such |
as |
|
|
|
loads. |
|
|
|
|
|
|
|
|
|
|
Identification |
of fabrics |
|
|
|
|||||||||||||||||||||
lighters, to remain in clothes while |
- |
|
Clean |
filter! |
|
|
|
|
|
|
|
|
|
|
|
||||||||||||||||||||||||||||
drying. |
|
|
|
|
|
|
|
|
|
|
|
|
|
|
|
Clean the filter before and after |
Observe the treatment symbols on the |
||||||||||||||||||||||||||
Failure |
|
to |
follow |
these |
|
|
|
|
|
|
|
each |
drying |
process |
|
|
|
|
|
textile labels. They provide valuable |
|
||||||||||||||||||||||
instructions may |
result |
in |
|
|
|
|
|
|
(see page 18). |
|
|
|
|
|
|
|
information |
as well |
as limitations |
about |
|||||||||||||||||||||||
explosion |
or |
fire. |
|
|
|
|
|
|
|
- |
|
Ventilate the |
room! |
|
|
|
|
|
the |
drying |
process. |
|
|
|
|
|
|
|
|||||||||||||||
To |
avoid |
risk |
of |
death |
or |
|
|
|
|
|
|
|
|
|
|
|
|
|
|||||||||||||||||||||||||
|
|
|
During |
the |
drying process provide |
Do |
not dry |
the |
following |
textiles |
|
in the |
|||||||||||||||||||||||||||||||
injury! |
|
|
|
|
|
|
|
|
|
|
|
|
|
|
|
|
|||||||||||||||||||||||||||
|
|
|
|
|
|
|
|
|
|
|
|
|
|
|
an adequate |
supply |
of fresh |
air. |
dryer: |
|
|
|
|
|
|
|
|
|
|
|
|
||||||||||||
|
|
|
|
|
|
|
|
|
|
|
|
|
|
|
|
|
|
|
|
|
|
|
|
|
|
|
|
|
|
||||||||||||||
Use the dryer only in the house or |
the- |
|
Do |
not dry |
unsuitable |
materials! |
- |
Airotight |
textiles |
(e.g. rubberized) |
|
||||||||||||||||||||||||||||||||
garage for drying normal amounts of |
|
|
|
Do not dry rubberized or airotight |
- |
Delicate |
fabrics |
(silk, |
synthetic |
|
|||||||||||||||||||||||||||||||||
laundry for |
the household. |
|
|
|
|
|
|
|
items. |
|
|
|
|
|
|
|
|
|
|
|
curtains) |
|
|
|
|
|
|
|
|
|
|
||||||||||||
Use only for drying textiles which were- |
|
Do |
clean |
and |
inspect |
the |
|
|
|
|
|
|
|
|
|
|
|
|
|
|
|
|
|||||||||||||||||||||
|
|
|
i |
Dry |
woolen |
or |
woolorich |
textiles |
|
||||||||||||||||||||||||||||||||||
washed |
with water. |
|
|
|
|
|
|
|
|
|
|
|
|
|
|
|
|
|
|
|
|
|
|
|
|||||||||||||||||||
|
|
|
|
|
|
|
|
|
|
|
|
|
|
|
|
|
|
exhaust system |
on |
|
a |
regular |
|
with |
dryer rack |
only! |
|
|
|
|
|
|
|||||||||||
Before |
switching |
on the |
|
|
|
basis! |
|
|
|
|
|
|
|
|
|
|
|
|
|
|
|
|
|
||||||||||||||||||||
|
|
|
|
|
|
|
|
|
|
|
|
|
|
|
|
|
|
|
|
|
|
|
|
|
|
|
|||||||||||||||||
|
|
|
Blockages |
may |
extend drying |
i |
Use |
the time program •air fluff/no |
|
||||||||||||||||||||||||||||||||||
dryer |
|
|
|
|
|
|
|
|
|
|
|
|
|
|
|
|
|||||||||||||||||||||||||||
|
|
|
|
|
|
|
|
|
|
|
|
|
|
|
time. |
|
|
|
|
|
|
|
|
|
|
|
|
heat" to dry articles containing |
|
||||||||||||||
Install |
the |
dryer in |
accordance with the |
|
|
|
|
|
|
|
|
|
|
|
|
|
|
|
foam |
rubber |
or |
similarly textured |
|
||||||||||||||||||||
|
|
|
|
|
|
|
|
|
|
|
|
|
|
|
rubberolike materials. |
|
|
|
|
|
|
||||||||||||||||||||||
installation |
instructions |
(from |
page 5). |
|
Before |
using |
the |
|
|
|
|
|
|
|
|||||||||||||||||||||||||||||
|
Drying |
tips |
|
|
|
|
|
|
|
|
|
||||||||||||||||||||||||||||||||
Do not use a dryer which is visibly |
|
|
|
|
|
|
|
|
|
|
|||||||||||||||||||||||||||||||||
damaged. If in doubt, contact your |
|
dryer |
for |
the |
first |
In principle, the following applies to all |
|||||||||||||||||||||||||||||||||||||
dealer. |
|
|
|
|
|
|
|
|
|
|
|
|
|
drying programs: |
|
|
|
|
|
|
|
|
|
||||||||||||||||||||
Using |
|
the |
dryer |
|
|
|
|
|
|
time |
|
|
|
|
|
|
|
|
|
|
|
- |
To ensure a uniform drying result, |
|
|||||||||||||||||||
|
|
|
|
|
|
|
|
|
|
|
|
|
|
|
|
|
|
|
sort the laundry according to fabric |
||||||||||||||||||||||||
Do not leave children unsupervised |
|
Before you |
use |
the |
dryer |
for the first |
|
type |
and |
drying |
program. |
|
|
|
|
||||||||||||||||||||||||||||
|
- |
Fasten |
zippers, |
hooks |
and eyes. |
|
|||||||||||||||||||||||||||||||||||||
near |
the |
|
dryer. |
|
|
|
|
|
|
|
|
|
time: |
|
|
|
|
|
|
|
|
|
|
|
|
||||||||||||||||||
Keep pets away from the dryer. Before |
1. Read these |
operating |
instructions |
|
Fasten |
loose |
|
belts, apron strings, |
|
||||||||||||||||||||||||||||||||||
closing the |
door, |
check |
the |
contents |
of |
|
carefully. |
|
|
|
|
|
|
|
|
|
|
etc. |
|
|
|
|
|
|
|
|
|
|
|
|
|||||||||||||
the drum. |
|
|
|
|
|
|
|
|
|
|
|
|
2. Check |
that |
|
the |
supply voltage |
- |
Do not |
overdry |
easyocare |
laundry |
p |
||||||||||||||||||||
Remove all objects from pockets. |
|
|
|
corresponds |
with the |
voltage |
|
|
|
risk of wrinkling! Leave laundry to |
|
||||||||||||||||||||||||||||||||
Lighters |
are |
particularly |
hazardous. |
|
|
|
specifications |
on |
the |
|
rating plate of |
dry in |
the air. |
|
|
|
|
|
|
|
|||||||||||||||||||||||
Risk |
of |
|
explosion! |
|
|
|
|
|
|
|
|
|
|
the |
dryer, |
see picture |
page |
20 |
- |
Do not iron laundry immediately |
|
||||||||||||||||||||||
Switch off the dryer at the end of the |
3. Remove all |
|
objects |
from |
the |
|
drum. |
|
|||||||||||||||||||||||||||||||||||
|
|
|
after |
drying. |
Place the |
laundry in |
a |
||||||||||||||||||||||||||||||||||||
program. |
|
|
|
|
|
|
|
|
|
|
|
|
|
|
4. Check |
the |
dryer |
for |
visible |
|
|
|
pile for a short while. Residual |
|
|||||||||||||||||||
|
|
|
|
|
|
|
|
|
|
|
|
|
|
|
|
|
|
|
|
|
|||||||||||||||||||||||
Protecting |
the |
|
dryer |
|
|
|
|
|
|
damage. If |
damages |
|
found |
|
|
|
moisture |
will |
then be |
|
distributed |
|
|||||||||||||||||||||
|
|
|
|
|
|
|
contact |
your |
dealer. |
|
|
|
|
|
|
uniformly. |
|
|
|
|
|
|
|
|
|
|
|||||||||||||||||
|
|
|
|
|
|
|
|
|
|
|
|
|
|
|
|
|
|
|
|
|
|
|
|
|
|
|
|
|
|
|
|
|
|
||||||||||
13
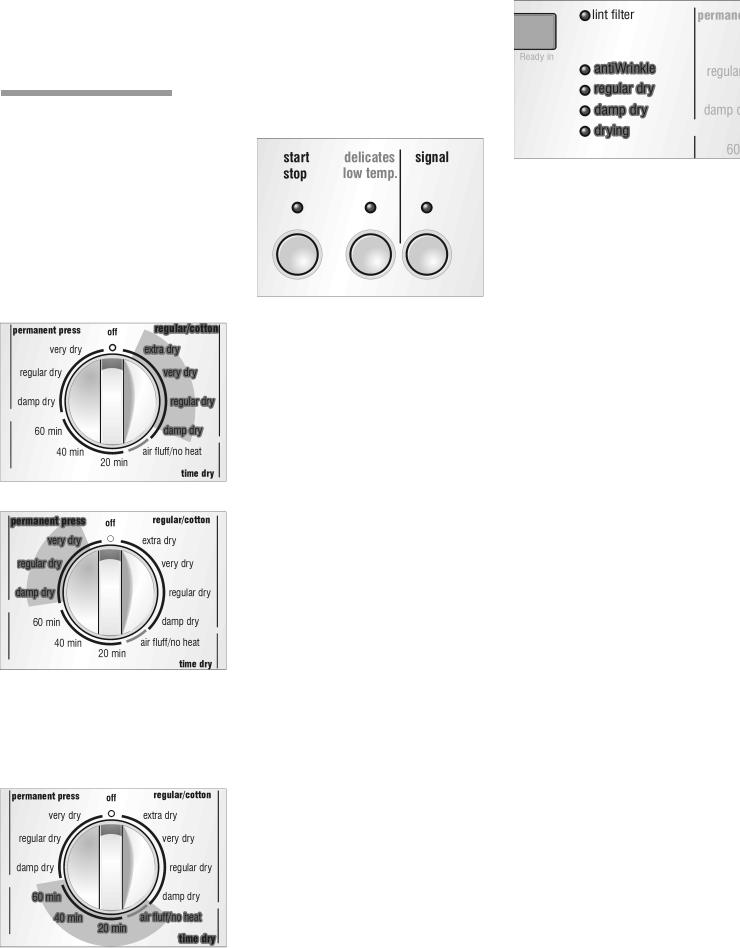
- Knitted |
textiles |
(e.g. |
Toshirts, |
Time |
programs |
run |
for a |
specific |
time |
||||
cotton jersey laundry) often shrink |
(20, 40, |
60 |
minutes). |
|
|
||||||||
when |
dried for |
the |
first time. Do |
In |
the |
"air |
fluff/no |
heat" |
stage the |
dryer |
|||
not use the "very dry/extra dry" |
runs on ambient air without a heat |
||||||||||||
program. |
|
|
|
supply |
for 20 |
minutes. |
|
|
|||||
|
|
|
|
|
i |
Dry |
woolen |
or |
wool-rich textiles |
||||
|
|
|
|
|
|
with |
dryer |
rack |
only! |
|
|
||
|
|
|
|
|
|
|
|
||||||
Options
additional options.
Select the required drying program
from |
the program table according to |
the |
examples (see page 15). |
Automatic programs
There are automatic programs for
different types of |
textiles. |
(regular/cotton or permanent press). |
|
regular/Cotton |
delicates low temp. |
i |
If the |
indicator |
light |
•antiWrinkle" |
|
|
illuminates |
when |
the |
program |
|
|
selector |
is |
in off-Position - turn off |
||
|
the circuit breaker and call for |
||||
|
customer |
service! |
|
||
|
Press the "delicates low |
temp." |
button |
|||||||
|
for |
temperature sensitive |
textiles. |
|
|
|||||
|
Observe the care information or |
|
|
|||||||
|
symbols on the textiles. The |
|
|
|||||||
|
temperature of the drying process is |
|||||||||
|
reduced, the drying time is extended. |
|||||||||
|
signal |
|
|
|
|
|
|
|||
|
Your dryer |
outputs different |
signals, if |
|||||||
|
the "signal" button is pressed. |
|
|
|||||||
|
|
|
|
|
|
|
|
|||
|
signal |
Type |
|
|
|
|
||||
|
|
|
|
|
|
|
|
|||
permanent press |
start |
|
Short tone |
|
|
|
||||
End |
|
|
Sequence |
of |
short |
|
|
|||
|
|
|
|
|
||||||
|
|
|
|
|
tones |
|
|
|
|
|
|
MalXoperation |
|
Sequence |
of |
long |
tones |
||||
|
Warning of |
|
Sequence |
of |
long |
tones |
||||
|
malfunction |
|
|
|
|
|
|
|||
|
|
|
|
|
|
|
|
|
||
|
|
|
|
|
|
|
|
|
||
|
i |
|
The signal |
|
|
|
|
|
||
|
|
|
•Warning of |
malfunction" is |
active |
|||||
|
|
|
in any |
case. |
|
|
|
|
||
The program sequence of automatic |
Indicator |
of |
program |
|
|
|||||
|
|
|
|
|
|
|
|
|
||
programs is controlled via sensors. Thesequence |
|
|
|
|
|
|||||
duration of the program depends on |
The |
dryer uses |
an electronic scanning |
|||||||
|
||||||||||
the measured degree of moisture in the |
|
|
|
|
|
|
|
|||
laundry and on the selected degree ofsystem for all programs except the time |
||||||||||
dryness (e.g. damp dry or extra dry). |
programs . |
A moisture sensor |
|
|
||||||
continuously |
checks the |
moisture in the |
||||||||
|
||||||||||
Time programs
laundry. Drying ends automatically as
soon |
as the selected degree of dryness |
|
has |
been |
reached. |
The |
drum |
continues to rotate at |
specific intervals for one hour to prevent creasing.
The current degree of drying and the level reached during the program sequence is indicated via indicator lights (drying, damp dry, regular dry, antiWrinkle).
14
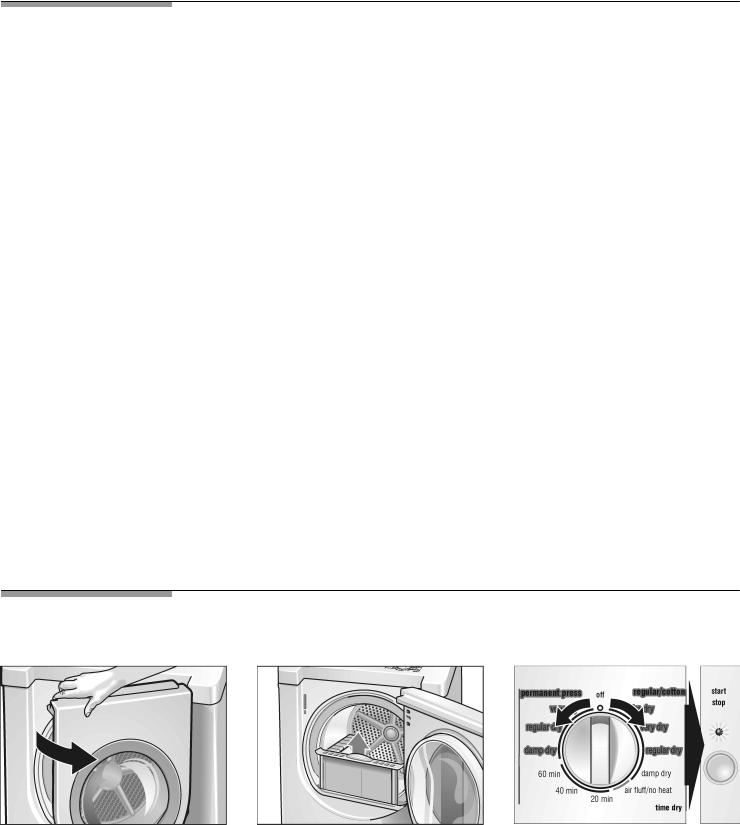
Program |
|
selection |
|
table |
|
|
|
|
|
|
|
|
|
|
|
|
|
|
|
|
|
||||||||||||||||||
|
|
|
|
|
|
|
|
|
|
|
|
|
|
|
|
|
|
|
|
|
|
|
|
|
|
|
|
|
|
|
|
|
|
||||||
Automatic |
programs |
|
|
|
|
|
|
|
|
|
|
|
|
|
|
|
|
|
|
|
|
|
|
|
|
|
|
|
|
|
|
|
|
||||||
For cottons and coloreds made of cotton |
or |
linen. |
|
|
|
|
|
|
|
|
|
|
|
|
|
|
•regular/cotton" |
||||||||||||||||||||||
Press |
•delicates |
|
low |
temp." |
button |
for |
temperatureXsensitive |
textiles. |
|
|
|
|
|
|
|
|
|
Automatic |
program |
||||||||||||||||||||
|
|
|
|
|
|
|
|
|
|
|
|
|
|
|
|
|
|
|
|
|
|
|
|
|
|
|
|
|
|
|
|
|
|
|
|
|
|
||
|
|
|
|
|
|
|
|
|
|
|
|
|
|
|
|
|
|
|
|
|
|
|
|
|
|
For |
laundry, |
|
|
|
|
|
|
|
|
|
|
||
Bed |
linen, |
table |
|
linen, |
towels |
|
|
|
|
|
|
|
|
|
|
|
|
|
which |
is |
to |
be |
ironed |
|
|
damp |
dry |
|
|||||||||||
|
|
|
|
|
|
|
|
|
|
|
|
|
|
|
|
|
|
|
|
|
|
|
|
|
|
|
|
|
|||||||||||
Bed |
linen |
and |
table |
linen, towels, TXshirts, sports shirts, overalls |
|
|
|
|
|||||||||||||||||||||||||||||||
|
|
|
|
|
|
|
|
|
|
|
|
|
|
|
|||||||||||||||||||||||||
|
|
|
|
|
|
|
|
|
|
|
|
|
|
|
|
|
|
|
|
||||||||||||||||||||
TXshirts, sports shirts, dresses, trousers, |
overalls, |
underwear |
|
|
|
|
|
|
|
|
|
|
|
|
|
|
|
|
|
||||||||||||||||||||
|
|
|
|
|
|
|
|
|
|
|
|
|
|
|
|
|
|
|
|
|
|||||||||||||||||||
Terry |
towels, |
kitchen |
towels, |
hand |
towels, |
bed |
linen, |
underwear, |
|
cottonwhich |
is |
not |
to |
be |
ironed |
|
|
regular |
dry |
|
|||||||||||||||||||
socks |
|
|
|
|
|
|
|
|
|
|
|
|
|
|
|
|
|
|
|
|
|
|
|
|
|
|
|
|
|
|
|
|
|
|
|
|
|
|
|
|
|
|
|
|
|
|
|
|
|
|
|
|
|
|
|
|
|
|
|
|
|||||||||||||||||||
Terry |
towels, |
kitchen |
towels, |
hand |
towels, |
bed |
linen, |
underwear, |
|
cottonwhich |
is |
not |
to |
be |
ironed, |
thick |
very |
dry |
|
|
|||||||||||||||||||
socks |
|
|
|
|
|
|
|
|
|
|
|
|
|
|
|
|
|
|
|
|
|
|
|
|
multiXply |
|
|
|
|
|
|
|
|
|
|
|
|||
|
|
|
|
|
|
|
|
|
|
|
|
|
|
|
|
|
|
|
|
|
|
|
|
|
|
|
|||||||||||||
Terry |
bathrobes |
|
and |
terry |
bed |
linen, |
|
|
|
|
|
|
|
|
|
|
which |
is |
particularly |
thick |
or |
|
extra |
dry |
|
|
|||||||||||||
|
|
|
|
|
|
|
|
|
|
|
|
|
|
|
|
|
|
|
|
|
|
|
|
|
|
multiXply |
|
|
|
|
|
|
|
|
|
|
|
||
|
|
|
|
|
|
|
|
|
|
|
|
|
|
|
|||||||||||||||||||||||||
EasyXcare |
(dripXdry) laundry |
made |
of |
synthetic and |
blended |
fabric, |
|
cotton |
e.g. polyester |
|
|
|
•permanent |
press" |
|||||||||||||||||||||||||
Press |
the |
•delicates |
low |
temp." |
button |
|
for |
very |
temperatureXsensitive textiles. |
|
|
|
|
|
|
Automatic |
program |
||||||||||||||||||||||
|
|
|
|
|
|
|
|
|
|
|
|
|
|
|
|
|
|
|
|
|
|
|
|
|
|
|
|
|
|
|
|
|
|
|
|
|
|
||
|
|
|
|
|
|
|
|
|
|
|
|
|
|
|
|
|
|
|
|
|
|
|
|
|
|
For |
laundry, |
|
|
|
|
|
|
|
|
|
|
||
|
|
|
|
|
|||||||||||||||||||||||||||||||||||
Trousers, dresses, skirts, shirts, blouses, leggings, sports clothing |
withwhich is |
not to be ironed or |
onlydamp dry |
|
|||||||||||||||||||||||||||||||||||
syntheticXrich |
fibers, |
lingerie |
|
|
|
|
|
|
|
|
|
|
|
|
|
|
lightly |
ironed |
|
|
|
|
|
|
|
|
|
|
|||||||||||
|
|
|
|
|
|
|
|
|
|
|
|
|
|
|
|
|
|
|
|
|
|
|
|
|
|
|
|
|
|||||||||||
Shirts, |
blouses, |
|
sports |
clothing |
|
|
|
|
|
|
|
|
|
|
|
|
|
which |
is |
not |
to |
be |
ironed |
|
|
regular |
dry |
|
|||||||||||
|
|
|
|
|
|
|
|
|
|
|
|
|
|
|
|
|
|
|
|
|
|
|
|||||||||||||||||
Bed |
linen |
and |
table |
linen, |
track |
suits, |
comforters, |
blankets |
|
|
|
which |
is |
not |
to |
be |
ironed, |
thick |
very |
dry |
|
|
|||||||||||||||||
|
|
|
|
|
|
|
|
|
|
|
|
|
|
|
|
|
|
|
|
|
|
|
|
|
|
multiXply |
|
|
|
|
|
|
|
|
|
|
|
||
|
|
|
|
|
|
|
|
|
|
|
|
|
|
|
|
|
|
|
|
|
|
|
|
|
|
|
|
|
|
|
|
|
|
||||||
Time |
programs |
|
|
|
|
|
|
|
|
|
|
|
|
|
|
|
|
|
|
|
|
|
|
|
|
|
|
|
|
|
•time |
dry" |
|
||||||
PreXdried |
textiles |
with |
low |
moisture |
content, |
individual |
small |
items, |
e.g. |
|
bath |
towels, bathing suits, |
dish cloths. |
|
|||||||||||||||||||||||||
For |
the |
smallest |
loading |
condition |
from |
0.22 |
lb |
Y |
0.44 lb |
(i. |
e. |
one |
small |
towel), for |
this |
a |
time |
dry |
program should |
||||||||||||||||||||
be |
selected |
|
|
|
|
|
|
|
|
|
|
|
|
|
|
|
|
|
|
|
|
|
|
|
|
|
|
|
|
|
|
|
|
|
|
|
|||
Press |
the |
•delicates |
low |
temp." |
button |
|
for |
temperatureXsensitive |
textiles |
options. |
|
|
|
|
|
|
|
|
|
|
|||||||||||||||||||
- |
Cottons |
and |
|
coloreds |
made |
of |
cotton |
or |
linen. |
|
|
|
|
|
|
|
|
|
|
|
|
|
|
20, |
40, |
60 |
min |
||||||||||||
- |
TemperatureXsensitive |
textiles. |
|
|
|
|
|
|
|
|
|
|
|
|
|
|
|
|
|
|
|
|
|
|
20, |
40, |
60 |
min |
|||||||||||
|
|
|
|
|
|
|
|
|
|
|
|
|
|||||||||||||||||||||||||||
Freshening |
or |
airing |
little |
worn |
items |
of |
clothing and drying of extreme sensitive |
textiles. |
|
|
air fluff/no |
heat |
|||||||||||||||||||||||||||
For |
all |
textile |
types |
inclusive |
foam |
rubber |
(e.g. pillows, stuffed toys), plastic |
(e.g. |
shower curtains, |
table |
clothes), |
||||||||||||||||||||||||||||
rubber |
(e.g. backed |
rugs), |
sheer |
nylon, |
polypropylene. |
|
|
|
|
|
|
|
|
|
|
|
|
|
|
|
|
|
|
||||||||||||||||
|
|
|
|
|
|
|
|
|
|
|
|
|
|
|
|
|
|
|
|
|
|
|
|
|
|
|
|
|
|
|
|
|
|
|
|
|
|
|
|
Operation
Using the dryer
1. Open the door. |
2. Check lint |
filter. |
|
|
|
The |
filter |
should |
be cleaned after |
|
and |
before every drying process. |
||
|
Cleaning the filter reduces the |
|||
|
drying time and |
saves energy. |
||
3.Rotate program selector to the desired program.
Select the program which corresponds to the laundry in the dryer from the program selection table (see page 15). The dryer light turns on inside the drum.
15
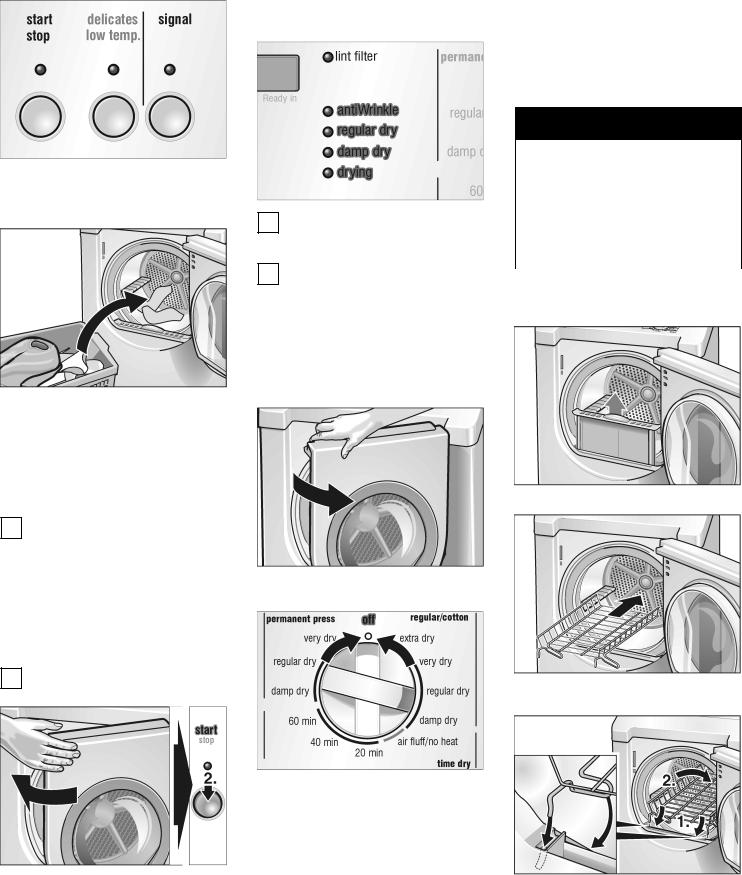
|
|
|
|
|
|
Using |
the |
dryer rack |
|
|
i |
The |
•start/stop" indicator light |
i |
The program starts with |
an |
|
||||
|
starts |
flashing. |
|
acoustic |
signal (if set). |
|
(Option, |
see |
page 8) |
|
|
|
|
If a standard program has been |
Use the |
dryer rack to dry washable |
|||||
|
|
|
selected, the |
indicator lights |
indicate |
|||||
|
|
|
the |
progress |
of the program |
sequence.woolen textiles (e.g. sweaters) and |
|
|||
|
|
|
|
|
|
|
shoes. The dryer rack remains |
|
||
|
|
|
|
|
|
|
stationary while the drum rotates. |
|
||
|
|
|
|
|
|
|
Damp wool should not be moved, |
as i |
||
|
|
|
|
|
|
|
has a tendency to matt. Drying shoes |
|||
|
|
|
|
|
|
|
without a |
rack could damage the |
drum. |
|
CAUTION
4.If required, select the •option" by pressing the button.
The "options" are explained on page 14.
5. Place laundry in the empty drum. Put each piece of laundry into the machine separately.
i
i
|
|
|
|
|
|
Dry |
only |
one |
|
item |
of clothing |
or |
one |
|||
|
|
|
|
|
|
pair |
of |
shoes |
|
- maximal |
dry |
load |
||||
|
|
|
|
|
|
2.2 lbs |
(1 |
kg)! |
The |
|
laundry must |
|||||
|
|
|
|
|
|
have been spun! Only dry |
|
|
||||||||
|
|
|
|
|
|
prewashed shoes! The laundry must |
||||||||||
At program |
end |
an |
acoustic signal |
not |
touch |
the |
drum! It could jam and |
|||||||||
be |
damaged. |
|
After |
using |
the |
dryer |
||||||||||
is emitted (if set) and the |
LED |
rack, take |
it |
out of |
the |
dryer |
|
|
||||||||
•antiWrinkle" |
illuminates. |
|
immediately. |
|
|
|
|
|
|
|
||||||
When the |
drying |
process |
is |
|
|
|
|
|
|
|
|
|
|
|
||
Inserting |
the |
|
dryer |
rack |
|
|
||||||||||
complete |
(program or |
selected |
|
|
|
|||||||||||
1. Open |
the |
dryer |
door. |
|
|
|
||||||||||
time program ended), the drum |
|
|
|
|||||||||||||
2. Check |
that |
|
the |
drum |
is empty. |
|||||||||||
rotates at |
specific intervals |
for |
|
|||||||||||||
1 hour. |
|
|
|
|
|
|
|
|
|
|
|
|
|
|
|
|
This prevent the laundry from |
|
|
|
|
|
|
|
|
|
|
|
|||||
creasing. |
The laundry |
remains |
|
|
|
|
|
|
|
|
|
|
|
|||
loose and |
|
fluffy |
until |
it is |
removed |
|
|
|
|
|
|
|
|
|
|
|
The laundry should be removed |
|
|
|
|
|
|
|
|
|
|
|
|||||
before this |
time |
has |
elapsed. |
|
|
|
|
|
|
|
|
|
|
|
||
For best results the |
laundry |
to be |
|
dried must be sorted according to |
|||
type of laundry |
and |
desired |
degree |
of drying. For further information |
|||
see page 13. |
|
|
3. Remove the lint filter. |
iObserve drying symbols of the
laundry manufacturer. If drying woolen clothing and shoes, see the information on page 16.
Ensure |
that there |
is |
only |
laundry in |
the 8. |
Open |
the |
door. |
||
drum. |
Check |
that |
all |
items are |
9. |
Take |
the |
laundry out of the dryer. |
||
completely |
in |
the |
drum. |
|
|
|
|
|
||
6. Close |
the |
door. |
|
|
|
|
|
|
||
The •start/stop" indicator |
light |
|
|
|
|
|||||
continues |
flashing. |
|
|
|
|
|
|
|
||
i If the door has not been closed properly, the dryer will not start.
7. Press the start• /stop" button. The •start/stop" indicator light illuminates.
10. Rotate the program selector to •off".
The dryer light goes out.
11.Clean the filter.
The filter should be cleaned after each drying process. Cleaning the filter reduces the drying time and saves energy.
12.Close the door.
4. Lift |
the dryer rack horizontally into |
the |
drum. |
16
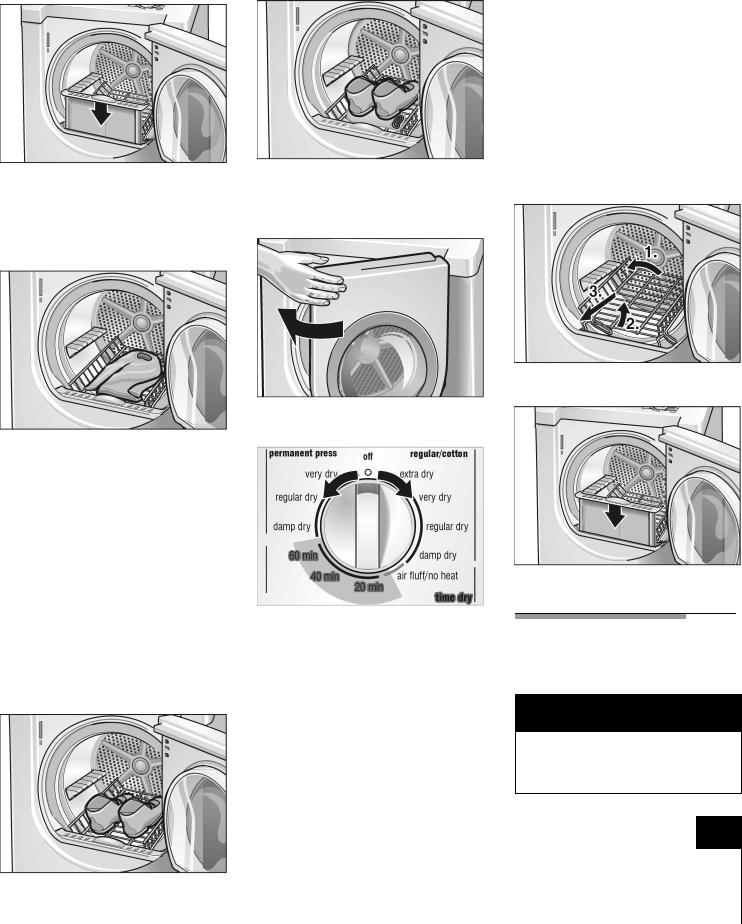
5. Place the dryer rack so that the
catches are |
inserted at the front in |
the locating |
holes. |
6. Insert |
the lint |
filter. |
|
The |
lint |
filter must be inserted flush |
|
with |
the |
drum |
edge! |
Drying laundry items on the dryer rack
q Directly |
on |
the |
dryer |
rack |
2. Press |
the start• |
/stop" |
button. |
The |
|||||
or |
|
|
|
|
•start/stop" |
indicator |
light |
|
||||||
|
|
|
|
illuminates. |
|
|
|
|
|
|
|
|||
|
|
|
|
|
|
|
|
|
|
|
|
|||
|
|
|
|
|
3. If the item of clothing still contains |
|||||||||
|
|
|
|
|
residual |
moisture |
after |
the |
|
|||||
|
|
|
|
|
indicated drying |
time: |
|
|
||||||
|
|
|
|
|
q Fold the item of |
clothing |
so that |
|||||||
|
|
|
|
|
the damp parts are on the |
|||||||||
|
|
|
|
|
outside. |
|
|
|
|
|
|
|
||
|
|
|
|
|
q Restart the program and reduce |
|||||||||
|
|
|
|
|
the |
drying |
duration |
depending |
||||||
|
|
|
|
|
on the degree of residual |
|||||||||
|
|
|
|
|
moisture. |
|
|
|
|
|
|
|
||
|
|
|
|
|
4. After |
drying, |
spread |
out the |
||||||
q Roll up |
a |
towel |
and |
place the |
laundry |
at |
air |
for approx. |
15 min. |
|||||
(shoes |
for |
approx. |
30 min.). |
|||||||||||
heels |
of |
the shoes |
on |
the towel. 5. Remove the lint filter. |
This will |
ensure a |
more |
uniform |
|
drying |
result. |
|
|
|
1. Fold laundry to fit the dryer rack.
3. Close the door.
Choose a time program
2.Place laundry loosely on the basket. Do not crush! Laundry must not touch the drum! Do not allow items to hang over the dryer rack!
3.Close the door.
4. Follow directions for time program on next page.
Drying |
shoes |
on |
the |
dryer |
rack: |
|
|
|
|
|
|
|
|
||
1. Prepare shoes. |
|
|
|
|
|
|
|
|
|
|
|
||||
q Clean shoes to prevent the drum |
|
|
|
|
|
|
|
||||||||
from becoming |
soiled. |
|
1. Rotate |
program selector |
to |
•time |
|||||||||
|
|
|
|
|
|
|
|||||||||
q If preparing sports shoes, |
extend |
|
dry/.... |
min.". |
|
|
|
|
|||||||
the |
tongue. |
|
|
|
- |
Select |
the drying time |
from |
the |
||||||
q Loosen |
or |
remove shoeolaces. |
|
following |
table according to |
the |
|||||||||
|
laundry |
|
type. |
|
|
|
|
||||||||
|
|
|
|
|
|
|
|
|
|
|
|
|
|||
q Remove |
insoles |
and |
heel pads. |
|
|
|
|
|
|
|
|
||||
Laundry type |
Required |
drying |
time |
||||||||||||
|
|
|
|
|
|
|
|||||||||
|
|
|
|
|
|
|
|
|
|
|
|
||||
|
|
|
|
|
|
|
Thin woolen pullover 80 min. |
|
|
|
|
||||
|
|
|
|
|
|
|
(approx. 0,8lbs/350 g)(e.g. 60 + 20 |
min) |
|||||||
|
|
|
|
|
|
|
Thick |
woolen |
|
pullover 90-120 |
min. |
|
|
||
|
|
|
|
|
|
|
(approx. 1,9lbs/850 g)(e.g. 60 |
+ |
40 |
min) |
|||||
6.Take the dryer rack out of the drum.
7. Reoinsert the lint filter.
Cleaning and care
Cleaning the dryer
d WARNING d
TO AVOID RISK
OF EXPLOSION!
Never use solvents or highly flammable liquids for cleaning.
|
|
Skirt |
|
60-90 |
min. |
|
|
|
|
|||
|
|
|
|
|
|
|
|
|
|
|||
|
|
Trousers |
60-90 |
min. |
|
CAUTION |
|
|
|
|||
|
|
Small |
items |
30 |
min. |
|
|
|
|
|
|
|
|
|
|
|
|
|
|
|
|
||||
|
|
|
|
Incorrect cleaning may damage the |
||||||||
|
|
(e.g. |
gloves) |
|
|
|
|
|||||
|
|
Shoes |
|
30 |
min. |
|
|
dryer. Do not spray with a |
water jet. |
|||
2. |
Place shoes on the rack. |
|
|
|
Do not |
use scouring agents |
or |
|||||
|
|
|
|
|
|
allopurpose cleaners. Do not use |
||||||
|
|
|
|
|
|
|
|
|||||
|
|
|
|
|
|
|
|
steam |
cleaners. |
|
|
|
|
|
|
|
|
|
|
|
|
|
|
|
|
17
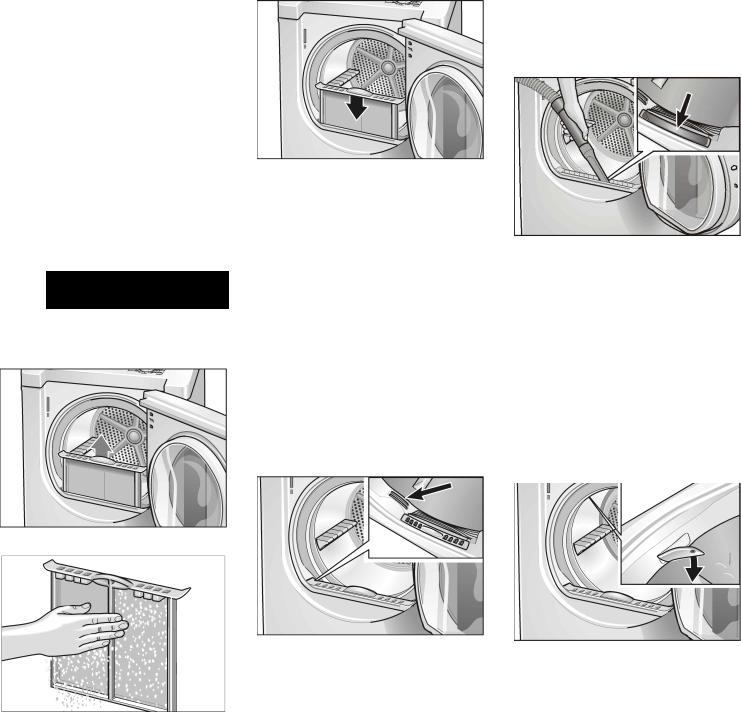
Wipe |
the |
housing and fascia with a soft |
cloth and soapy water only. |
||
Wipe |
the |
drum, door seal and inside of |
the door |
with a damp cloth only. |
|
Cleaning |
the |
lint |
filter |
|
|
|
|
|||
A dirty filter extends the drying time and |
|
|
||||||||
increases |
energy |
consumption. |
|
|
|
|
||||
The |
filter |
should |
be |
cleaned before |
and |
|
|
|
||
after |
each drying process. |
|
|
|
|
|||||
If a warning signal and an E01 warning |
|
|
|
|||||||
message are emitted during a drying |
5. Insert |
the |
filter. |
|||||||
program, |
clean |
the |
filter |
immediately |
|
|||||
and |
check |
the |
exhaust |
duct. |
|
6. Close |
the |
door. |
||
Cleaning the bearing shield
Over time, fluff from the drying process collects in the bearing shield.
i |
The |
program interrupts |
|
Cleaning |
the |
exhaust |
duct |
|
|
|
|
|
|
|
|
||||||||||
|
automatically. |
|
|
Inspect |
and |
clean |
the |
exhaust |
ducting |
|
|
|
|
|
|
|
|
||||||||
1. Switch |
off |
the dryer. Program |
This fluff can be easily |
removed using |
|||||||||||||||||||||
at |
least |
once a |
year |
to |
prevent |
||||||||||||||||||||
|
selector |
to •off". |
|
|
clogging. |
A |
partially |
clogged exhaust |
your |
vacuum cleaner, at |
least once |
a |
|||||||||||||
d |
|
CAUTION |
d |
can |
lengthen |
the |
drying |
time. |
|
month. |
|
|
|
|
|
|
|||||||||
|
q |
Turn |
off |
the |
circuit |
breaker |
|
Change |
the |
light |
bulb |
|
|||||||||||||
|
|
|
|
|
|
|
|
up q |
Pull |
out |
power |
supply plug |
|
|
|||||||||||
The inside |
of the |
door |
heats |
|
|
||||||||||||||||||||
|
The |
dryer |
light |
turns |
on |
inside the |
dru |
||||||||||||||||||
during |
the |
drying |
process. |
q |
Disconnect the |
duct |
from the |
||||||||||||||||||
when you |
open |
|
the |
door. |
|
||||||||||||||||||||
|
|
|
|
|
|
|
|
|
dryer. |
|
|
|
|
|
|
|
|
||||||||
|
|
|
|
|
|
|
|
|
|
|
|
|
|
|
|
|
|||||||||
2. Open |
the |
door. |
|
|
|
|
|
|
|
|
|
To |
change |
the |
light |
bulb: |
|
||||||||
|
|
q |
Vacuum |
and |
reconnect the |
duct. |
|
||||||||||||||||||
|
|
|
|
|
|
|
|
q |
Set program |
selector |
to •off". |
|
|||||||||||||
Cleaning the moisture sensor
q Turn off the circuit breaker. q Pull out power supply plug.
q |
Open the door and locate the |
light |
The moisture sensor has to be cleaned |
bulb on the upper left side of |
the |
because a fine layer of transparent |
||
buildup is deposited on the sensors. |
seal. |
|
3. Remove the lint filter.
|
This deposit can easily be removed by |
Loosen the screw of the cover and |
||||||||||
|
wiping |
the |
sensors |
(the |
two bars next q |
|||||||
|
to the |
lint |
filter) |
with |
a |
cloth |
and a little |
open |
the |
cover. |
||
|
white |
vinegar. |
|
|
|
q |
Turn |
bulb |
counterclockwise. |
|||
|
Use white |
vinegar |
only! |
|
|
|||||||
|
|
|
|
Replace the bulb with a new |
||||||||
|
Clean |
the |
moisture |
sensor |
once |
a |
||||||
4. Remove |
appliance |
bulb |
only (obtainable |
|||||||||
lint by stroking your hand month. |
|
|
|
|
|
|
||||||
|
|
|
|
|
|
through parts |
department). |
|||||
over the |
filter. |
|
|
|
|
|
|
|||||
|
|
|
|
|
|
|
|
|
|
|||
The |
filter should be lightly |
scrubbed |
twice |
a year with warm soapy water. |
|
The |
filter is cleaned when |
it no longer |
holds water. The filter must be dried thoroughly before being replaced.
q Replace the cover and secure with the screw.
qPlug in dryer or reconnect power supply.
18

Troubleshooting
|
|
|
|
|
|
|
|
|
|
|
|
|
|
|
|
|
|
Before calling the customer service, |
|
|
|
1. Set |
program |
selector |
to |
•off". |
||||||||||||||||||||||
|
d |
WARNING! |
d |
|
|
|
|
|
|
|
||||||||||||||||||||||||||||||||||||||
|
|
|
|
|
check whether you can rectify the |
fault |
2. Turn |
off |
the |
circuit |
breaker. |
|||||||||||||||||||||||||||||||||||||
|
|
|
|
|
|
|
|
|
|
|
|
|
|
|
|
|
|
yourself |
by |
means |
of |
the following |
|
|
|
3. Pull the mains plug out of the |
||||||||||||||||||||||
|
TO AVOID RISK OF ELECTRICAL |
|
|
|
table. |
|
|
|
|
|
|
|
|
|
|
|
|
|
|
|
|
|||||||||||||||||||||||||||
|
|
|
|
|
|
|
|
|
|
|
|
|
|
|
|
|
|
|
|
|
socket. |
|
|
|
|
|
|
|
|
|||||||||||||||||||
|
SHOCK |
|
! |
HAZARD! |
|
|
|
|
|
|
If |
a |
fault |
cannot |
be |
rectified |
or |
a repair |
4. Call |
customer |
service |
|
|
|
||||||||||||||||||||||||
|
EXPLOSION |
|
|
|
|
|
|
is |
required: |
|
|
|
|
|
|
|
|
|
|
|
|
|
(see page 20). |
|
|
|
|
|
|
|||||||||||||||||||
|
Repairs |
or |
replacement of parts |
|
may |
|
|
|
|
|
|
|
|
|
|
|
|
|
|
|
|
|
|
|
|
|
|
|
|
|
||||||||||||||||||
|
|
|
|
|
|
|
|
|
|
|
|
|
|
|
|
|
|
|
|
|
|
|
|
|
|
|
|
|
|
|
|
|
||||||||||||||||
|
be carried out by authorized |
|
|
|
|
|
|
|
|
|
|
|
|
|
|
|
|
|
|
|
|
|
|
|
|
|
|
|
|
|
|
|
|
|
|
|
|
|||||||||||
|
technicians |
only. |
|
|
|
|
|
|
|
|
|
|
|
|
|
|
|
|
|
|
|
|
|
|
|
|
|
|
|
|
|
|
|
|
|
|
|
|
|
|
|
|||||||
|
|
|
|
|
|
|
|
|
|
|
|
|
|
|
|
|
|
|
|
|
|
|
|
|
|
|
|
|
|
|
|
|
|
|
|
|
|
|||||||||||
|
|
|
|
|
|
|
|
|
|
|
|
|
|
|
|
|
|
|
|
|
|
|
|
|
|
|
|
|
|
|
|
|
|
|
|
|||||||||||||
|
Problem |
|
|
|
|
|
|
|
|
Possible |
cause |
|
|
|
|
|
|
|
|
|
|
|
|
Remedial |
action |
|
|
|
|
|
|
|
|
|
|
|||||||||||||
|
|
|
|
|
|
|
|
|
|
|
|
|
|
|
|
|
|
|
|
|
|
|||||||||||||||||||||||||||
|
Dryer |
|
does |
not |
start. |
|
|
|
Main |
|
plug |
not inserted at all or not inserted |
|
correcInsertly.main plug correctly. |
|
|
|
|
|
|
|
|||||||||||||||||||||||||||
|
|
|
|
|
|
|
|
|
|
|
|
|
|
|
|
|
|
|
|
|
|
|
|
|
|
|
|
|
|
|
|
|
||||||||||||||||
|
•start/stop" |
|
indicator |
light |
does |
not |
A |
fuse |
of |
power |
supply |
has |
tripped. |
|
|
Replace/switch |
on |
fuse. |
|
|
|
|
|
|
|
|
||||||||||||||||||||||
|
|
|
|
|
|
|
|
|
|
|
|
|
|
|
|
|
|
|
|
|
|
|
|
|
|
|
|
|
|
|
|
|
|
|
|
|
|
|||||||||||
|
illuminate. |
|
|
|
|
|
|
|
|
•start/stop" |
button |
not |
pressed. |
|
|
|
|
|
Press |
•start/stop" |
button. |
|
|
|
|
|
|
|
||||||||||||||||||||
|
|
|
|
|
|
|
|
|
|
|
|
|
No |
program |
selected. |
|
|
|
|
|
|
|
|
|
Select |
program. |
|
|
|
|
|
|
|
|
|
|
||||||||||||
|
|
|
|
|
|
|
|
|
|
|
|
|
|
|
|
|
|
|
|
|
|
|
|
|
|
|
|
|
|
|
|
|
|
|
|
|
|
|
|
|
|
|||||||
|
|
|
|
|
|
|
|
|
|
|
|
|
Door |
|
not |
closed. |
|
|
|
|
|
|
|
|
|
|
|
Close |
door. |
|
|
|
|
|
|
|
|
|
|
|
|
|||||||
|
|
|
|
|
|
|
|
|
|
|
|
|
|
|
|
|
|
|
|
|
|
|
|
|
|
|
|
|
|
|||||||||||||||||||
|
|
|
|
|
|
|
|
|
|
|
|
|
Ambient |
temperature |
below |
°41F/5 °C. |
|
|
|
Increase |
room |
temperature. |
|
|
|
|
|
|
|
|||||||||||||||||||
|
Program has been |
interrupted. |
|
Lint |
|
filter |
dirty. |
|
|
|
|
|
|
|
|
|
|
|
|
Clean filter as described on page 18. |
|
|
|
|||||||||||||||||||||||||
|
A warning |
signal |
|
is |
emitted and |
the |
|
|
|
|
|
|
|
|
|
|
|
|
|
|
|
|
|
|
|
Switch |
|
off/switch |
on |
again. |
|
|
|
|
|
|
|
|||||||||||
|
display |
shows E:01• ". |
|
|
|
|
|
|
|
|
|
|
|
|
|
|
|
|
|
|
|
|||||||||||||||||||||||||||
|
|
|
|
|
Exhaust |
air |
duct |
|
is |
blocked |
|
or |
|
too |
long. |
|
|
Clean exhaust air duct. Reduce exhaust air duct |
to |
|||||||||||||||||||||||||||||
|
|
|
|
|
|
|
|
|
|
|
|
|
|
|
|
|
|
|
|
|
|
|
|
|
|
|
|
|
|
|
|
maximum length as described on page 8. |
|
|
||||||||||||||
|
|
|
|
|
|
|
|
|
|
|
|
|
|
|
|
|
|
|
|
|
|
|
|
|
|
|
|
|
|
|
|
Switch |
|
off/switch |
on |
again. |
|
|
|
|
|
|
|
|||||
|
|
|
|
|
|
|
|
|
|
|
|
|
|
|
|
|
|
|
|
|
|
|
|
|
|
|
|
|
|
|
|
|
|
|||||||||||||||
|
|
|
|
|
|
|
|
|
|
|
|
|
Fault |
|
in |
program |
sequence |
or |
malfunction. |
|
|
Switch |
|
off |
dryer, |
leave |
to |
cool |
down |
for |
30 |
min, |
||||||||||||||||
|
|
|
|
|
|
|
|
|
|
|
|
|
|
|
|
|
|
|
|
|
|
|
|
|
|
|
|
|
|
|
|
switch |
on |
again. |
|
|
|
|
|
|
|
|
|
|
||||
|
|
|
|
|
|
|
|
|
|
|
|
|
|
|
|
|
|
|
|
|
|
|
|
|
|
|
|
|
|
|
|
Restart |
|
program. |
|
|
|
|
|
|
|
|
|
|
||||
|
|
|
|
|
|
|
|
|
|
|
|
|
|
|
|
|
|
|
|
|
|
|
|
|
|
|||||||||||||||||||||||
|
|
|
|
|
|
|
|
|
|
|
|
|
The |
|
room/cabinet |
is |
not |
adequately |
ventilated. |
|
|
Provide an adequate supply of fresh air. |
|
|
|
|||||||||||||||||||||||
|
|
|
|
|
|
|
|
|
|
|
|
|
|
|
|
|
|
|
|
|
|
|
|
|
|
|
|
|
|
|
|
Switch |
|
off/switch |
on |
again. |
|
|
|
|
|
|
|
|||||
|
|
|
|
|
|
|
|
|
|
|
|
|
|
|
|
|
|
|
|
|
|
|
|
|
|
|
|
|
|
|
|
|||||||||||||||||
|
Drum |
|
light |
|
does |
not function. |
|
No |
program |
selected. |
|
|
|
|
|
|
|
|
|
Select |
program. |
|
|
|
|
|
|
|
|
|
|
|||||||||||||||||
|
|
|
|
|
|
|
|
|
|
|
|
|
|
|
|
|
|
|
|
|
|
|
|
|||||||||||||||||||||||||
|
|
|
|
|
|
|
|
|
|
|
|
|
Light |
|
bulb |
defective, light bulb burned out. |
|
|
Change light bulb, see page 18. |
|
|
|
|
|||||||||||||||||||||||||
|
|
|
|
|
|
|
|
|
|
|
|
|
|
|
|
|
|
|
|
|
|
|
|
|
|
|
|
|
|
|
|
|
|
|
|
|
|
|||||||||||
|
|
|
|
|
|
|
|
|
|
|
|
|
No |
power |
supply. |
|
|
|
|
|
|
|
|
|
|
|
Guarantee |
power |
supply. |
|
|
|
|
|
|
|
|
|||||||||||
|
|
|
|
|
|
|
|
|
|
|
|
|
|
|
|
|
|
|
|
|
|
|
|
|
|
|
|
|
|
|
|
|
|
|
|
|||||||||||||
|
|
|
|
|
|
|
|
|
|
|
|
|
Light |
|
bulb |
is loose. |
|
|
|
|
|
|
|
|
|
|
Tighten |
|
light |
bulb. |
Remove |
and reinstall |
the |
cover as |
||||||||||||||
|
|
|
|
|
|
|
|
|
|
|
|
|
|
|
|
|
|
|
|
|
|
|
|
|
|
|
|
|
|
|
|
directed |
on |
page |
24. |
|
|
|
|
|
|
|
|
|||||
|
|
|
|
|
|
|
|
|
|
|
|
|
|
|
|
|
|
|
|
|
|
|
|
|
|
|
|
|||||||||||||||||||||
|
•start/stop" |
|
indicator |
light |
does |
not |
Fault |
|
in |
program |
sequence |
or |
malfunction. |
|
|
Switch |
|
off |
dryer, |
leave |
to |
cool |
down |
for |
30 |
m |
||||||||||||||||||||||
|
illuminate. |
•antiWrinkle" |
indicator |
|
|
|
|
|
|
|
|
|
|
|
|
|
|
|
|
|
|
|
|
switch |
on |
again. |
|
|
|
|
|
|
|
|
|
|
||||||||||||
|
lights. |
|
|
|
|
|
|
|
|
|
|
|
|
|
|
|
|
|
|
|
|
|
|
|
|
|
|
|
|
|
Restart |
|
program. |
|
|
|
|
|
|
|
|
|
|
|||||
|
The display shows000• ". |
|
|
|
|
|
|
|
|
|
|
|
|
|
|
|
|
|
|
|
|
|
|
|
|
|
|
|
|
|
|
|
|
|
|
|
|
|
|
|
||||||||
|
|
|
|
|
|
|
|
|
|
|
|
|
|
|
|
|
|
|
|
|
|
|||||||||||||||||||||||||||
|
Degree |
of |
drying |
has |
not |
been |
rea |
Moisture |
sensor |
dirty. |
|
|
|
|
|
|
|
|
|
Clean moisture sensor as described on page 18. |
||||||||||||||||||||||||||||
|
or the drying time is too long. |
|
|
|
|
|
|
|
|
|
|
|
|
|
|
|
|
|
|
|
|
Switch |
|
off/switch |
on |
again. |
|
|
|
|
|
|
|
|||||||||||||||
|
Display |
may |
indicate•E:03". |
|
|
|
|
|
|
|
|
|
|
|
|
|
|
|
|
|
|
|
|
|
|
|||||||||||||||||||||||
|
|
|
Exhaust |
air |
duct |
is |
blocked |
|
or |
|
too |
long. |
|
|
Clean |
exhaust |
air |
extraction. |
Reduce |
exhaust |
air duct |
|||||||||||||||||||||||||||
|
|
|
|
|
|
|
|
|
|
|
|
|
|
|
|
|
|
|
|
|
|
|
|
|
|
|
|
|
|
|
|
to maximum length as described on page 8. |
|
|
||||||||||||||
|
|
|
|
|
|
|
|
|
|
|
|
|
|
|
|
|
|
|
|
|
|
|
|
|
|
|
|
|
|
|
|
Switch |
|
off/switch |
on |
again. |
|
|
|
|
|
|
|
|||||
|
|
|
|
|
|
|
|
|
|
|
|
|
|
|
|
|
|
|
|
|
|
|
|
|
|
|
|
|
|
|
|
|
||||||||||||||||
|
|
|
|
|
|
|
|
|
|
|
|
|
Lint |
|
filter |
dirty. |
|
|
|
|
|
|
|
|
|
|
|
|
Clean filter as described on page 18. |
|
|
|
||||||||||||||||
|
|
|
|
|
|
|
|
|
|
|
|
|
|
|
|
|
|
|
|
|
|
|
|
|
|
|
|
|
|
|
|
Switch |
|
off/switch |
on |
again. |
|
|
|
|
|
|
|
|||||
|
|
|
|
|
|
|
|
|
|
|
|
|
|
|
|
|
|
|
|
|
|
|
|
|
|
|
|
|||||||||||||||||||||
|
|
|
|
|
|
|
|
|
|
|
|
|
Laundry |
was |
too |
wet. |
|
|
|
|
|
|
|
|
Spin laundry at higher speed in the washing |
|
|
|||||||||||||||||||||
|
|
|
|
|
|
|
|
|
|
|
|
|
|
|
|
|
|
|
|
|
|
|
|
|
|
|
|
|
|
|
|
machine. Switch off/switch on again. |
|
|
|
|
||||||||||||
|
|
|
|
|
|
|
|
|
|
|
|
|
|
|
|
|
|
|
|
|
|
|
|
|
|
|
|
|||||||||||||||||||||
|
|
|
|
|
|
|
|
|
|
|
|
|
Unsuitable |
program |
selected. |
|
|
|
|
|
|
|
Select |
program |
with |
aid of the program selection |
||||||||||||||||||||||
|
|
|
|
|
|
|
|
|
|
|
|
|
|
|
|
|
|
|
|
|
|
|
|
|
|
|
|
|
|
|
|
table (see page 15). Switch off/switch on again. |
||||||||||||||||
|
|
|
|
|
|
|
|
|
|
|
|
|
|
|
|
|
|
|
|
|
|
|
|
|
|
|
||||||||||||||||||||||
|
|
|
|
|
|
|
|
|
|
|
|
|
Maximum |
drying |
|
time |
was |
exceeded. |
|
|
Clean lint filter (see page 18). |
|
|
|
|
|
||||||||||||||||||||||
|
|
|
|
|
|
|
|
|
|
|
|
|
|
|
|
|
|
|
|
|
|
|
|
|
|
|
|
|
|
|
|
Check |
exhaust |
air extraction. |
|
|
|
|
|
|
||||||||
|
|
|
|
|
|
|
|
|
|
|
|
|
|
|
|
|
|
|
|
|
|
|
|
|
|
|
|
|
|
|
|
Spin laundry at a higher speed in your |
washer. |
|||||||||||||||
|
|
|
|
|
|
|
|
|
|
|
|
|
|
|
|
|
|
|
|
|
|
|
|
|
|
|
|
|
|
|
||||||||||||||||||
|
|
|
|
|
|
|
|
|
|
|
|
|
Motor limit |
temperature |
was |
exceeded. |
|
|
Switch |
|
off |
dryer, |
leave |
to |
cool |
down |
for |
30 |
min. |
|||||||||||||||||||
|
|
|
|
|
|
|
|
|
|
|
|
|
|
|
|
|
|
|
|
|
|
|
|
|
|
|
|
|
|
|
|
Switch |
|
on |
again. |
Start |
program. |
|
|
|
|
|
||||||
|
|
|
|
|
|
|
|
|
|
|
|
|
|
|
|
|
|
|
|
|
|
|
|
|
|
|
|
|||||||||||||||||||||
|
Lint |
filter |
LED |
is |
blinking |
after |
lint |
filterBlinking |
of |
lint |
filter |
|
LED isnot |
|
an |
indication |
of |
|
Noa |
action |
required. |
Light |
will |
stop |
blinking. |
|
|
|||||||||||||||||||||
|
has |
been |
cleaned |
|
|
|
|
problem. |
|
It |
is |
used |
only |
as |
a |
reminder. |
|
|
|
|
|
|
|
|
|
|
|
|
|
|
|
|
|
|
|
|||||||||||||
|
|
|
|
|
|
|
|
|
|
|
|
|
|
|
|
|
|
|
|
|
|
|
|
|
|
|
|
|
|
|
|
|
|
|
|
|
|
|
|
|
|
|
|
|
|
|
|
|
19
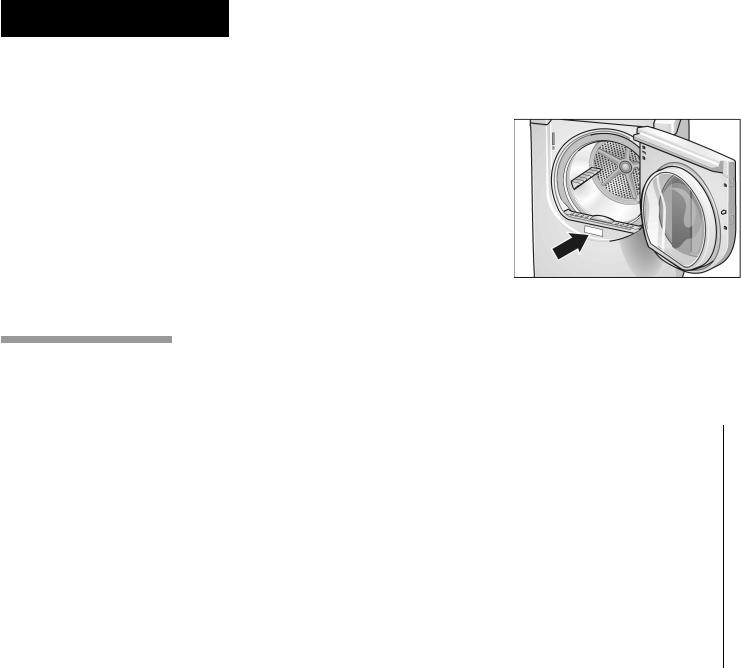
|
SERVICE |
|
and |
|
REPAIR |
|
|
|
If you are having a problem with your- |
Date |
of |
Original |
Purchase |
|
|
|
|
||||||||||||||||||||||||
|
|
|
|
|
|
|
|
|
|
|
|
|
|
|
|
|
Siemens dryer |
and are not pleased with- |
Date |
Problem |
Originated |
|
|
|
|
|
|||||||||||||||
|
d |
|
CAUTION |
d |
|
|
|
the |
service you |
have received: |
|
|
- |
Explanation of |
Problem |
|
|
|
|
|
|||||||||||||||||||||
|
|
|
|
|
- |
First, |
please |
contact your |
installer |
|
Also, if writing, please be sure to |
||||||||||||||||||||||||||||||
|
|
|
|
|
|
|
|
|
|
|
|
|
|
|
|
|
|
or the Siemens Authorized Service |
|
include a daytime telephone number |
|||||||||||||||||||||
|
CAUTION - Label all wires prior |
to |
|
|
|||||||||||||||||||||||||||||||||||||
|
|
Contractor |
in |
your area and |
|
|
and |
a copy |
of the |
sales invoice. |
|
|
|||||||||||||||||||||||||||||
|
disconnection |
when |
servicing |
|
|
|
|
explain to them why you are not |
|
You |
|
will |
find |
the |
model |
number and |
|||||||||||||||||||||||||
|
controls. |
Wiring |
errors can cause |
|
|
|
|
|
|||||||||||||||||||||||||||||||||
|
|
|
|
satisfied. This will usually |
correct |
|
|
serial |
number |
information |
on |
the |
rating |
||||||||||||||||||||||||||||
|
improper |
and |
dangerous |
operation. |
|
|
|
the problem. |
|
|
|
|
|
||||||||||||||||||||||||||||
|
|
|
|
|
|
|
|
plate |
located |
on |
the |
inside |
of |
the front |
|||||||||||||||||||||||||||
|
verify proper |
operation after |
|
|
|
|
|
|
|
|
|
||||||||||||||||||||||||||||||
|
|
|
|
- |
If |
after working with |
your |
installer |
|
panel. |
|
|
|
|
|
|
|
|
|
|
|
||||||||||||||||||||
|
servicing. |
|
|
|
|
|
|
|
|
|
|
|
|
|
|
|
|
|
|
|
|
|
|
||||||||||||||||||
|
|
|
|
|
|
|
|
|
|
|
|
or |
service |
person the |
problem still |
|
|
|
|
|
|
|
|
|
|
|
|
|
|
||||||||||||
|
|
|
|
|
|
|
|
|
|
|
|
|
|
|
|
|
|
|
|
|
|
|
|
|
|
|
|
|
|
|
|
||||||||||
|
The Siemens dryers require no special |
|
has not been resolved to your |
|
|
|
|
|
|
|
|
|
|
|
|
|
|
|
|
||||||||||||||||||||||
|
|
satisfaction, please let us know by |
|
|
|
|
|
|
|
|
|
|
|
|
|
||||||||||||||||||||||||||
|
care other than the care and cleaning |
|
either writing to us at, |
|
|
|
|
|
|
|
|
|
|
|
|
|
|
|
|
|
|||||||||||||||||||||
|
noted |
above. |
|
|
|
|
|
|
|
|
|
|
BSH |
Home |
Appliances |
|
|
|
|
|
|
|
|
|
|
|
|
|
|
|
|
|
|||||||||
|
i |
|
If |
you |
are |
having a problem |
with |
|
5551 |
McFadden Avenue |
|
|
|
|
|
|
|
|
|
|
|
|
|
|
|
|
|
||||||||||||||
|
|
|
your dryer, before calling for |
|
|
|
|
Huntington |
Beach, CA 92649 |
|
|
|
|
|
|
|
|
|
|
|
|
|
|
|
|
||||||||||||||||
|
|
|
|
|
|
|
|
|
|
|
|
|
|
|
|
|
|
|
|
|
|
|
|||||||||||||||||||
|
|
|
service please refer to |
Table |
on |
or, |
calling |
us |
at |
|
|
|
|
|
|
|
|
|
|
|
|
|
|
|
|
|
|
|
|||||||||||||
|
|
|
page |
|
40, |
following. |
|
|
|
|
|
|
|
|
|
|
|
|
|
|
|
|
|
|
|
|
|
|
|
||||||||||||
|
|
|
|
|
|
|
|
|
|
1W866W447W4363. |
|
|
|
|
|
|
|
|
|
|
|
|
|
|
|
|
|
||||||||||||||
|
If service becomes necessary, contact |
|
|
|
|
|
|
|
|
|
|
|
|
|
|
|
|
|
|
|
|||||||||||||||||||||
|
your dealer or installer or an authorizedPlease be sure |
to include, if |
writing, |
|
|
|
|
|
|
|
|
|
|
|
|
|
|
|
|||||||||||||||||||||||
|
service center. |
Do |
not attempt to |
|
|
repairhave available, |
if |
calling, |
the |
following |
|
|
|
|
|
|
|
|
|
|
|
|
|
|
|
||||||||||||||||
|
the appliance yourself. Any work |
|
|
|
information: |
|
|
|
|
|
|
|
|
|
|
|
|
|
|
|
|
|
|
|
|
|
|||||||||||||||
|
performed |
by |
unauthorized |
personnel |
- |
Model |
Number |
|
|
|
|
|
|
|
|
|
|
|
|
|
|
|
|
|
|
||||||||||||||||
|
may |
void |
the |
warranty. |
|
|
|
|
- |
Serial |
Number |
|
|
|
|
|
|
|
|
|
|
|
|
|
|
|
|
|
|
||||||||||||
|
|
|
|
|
|||||||||||||||||||||||||||||||||||||
|
STATEMENT OF WARRANTIES SIEMENS CLOTHES DRYERS |
||||||||||||||||||||||||||||||||||||||||
|
The warranties provided by BSH HomeSiemens Clothes dryers sold to the firstcenters in the United States |
or Canada. |
|||||||||||||||||||||||||||||||||||||||
|
Appliances |
(``Siemens'') in |
this |
|
|
|
using purchaser by Siemens or its |
|
|
The Warranties provided herein are not |
|||||||||||||||||||||||||||||||
|
Statement of Warranties apply only to |
authorized |
dealers, retailers or |
service |
|
transferable. |
|
|
|
|
|
|
|
|
|
||||||||||||||||||||||||||
|
|
|
|
|
|
|
|
|
|
|
|
|
|
|
|
|
|
|
|
|
|
|
|
|
|
|
|
|
|
|
|||||||||||
|
LENGTH OF |
WARRANTY |
|
|
|
|
|
|
|
|
|
|
SCOPE OF |
WARRANTY |
|
|
|
|
|
|
|
|
|
|
|
|
|
|
|
|
|||||||||||
|
|
|
|
|
|
|
|
|
|
|
|
|
|
||||||||||||||||||||||||||||
|
1 Year Full Limited Warranty |
|
|
|
|
|
|
|
|
|
Siemens will repair or replace, |
free of charge, any component |
part that is |
||||||||||||||||||||||||||||
|
From |
Date |
|
of |
Installation* |
|
|
|
|
|
|
|
|
|
|
proven defective under conditions of normal home use, labor and |
|
|
|
||||||||||||||||||||||
|
|
|
|
|
|
|
|
|
|
|
|
|
|
|
|
|
|
|
|
|
|
shipping costs included. |
Warranty |
repair |
service |
must be |
performed |
|
|
by |
|||||||||||
|
|
|
|
|
|
|
|
|
|
|
|
|
|
|
|
|
|
|
|
|
|
an authorized Siemens Service Center. |
|
|
|
|
|
|
|
|
|
|
|||||||||
|
|
|
|
|
|
|
|
|
|
|
|
|
|
|
|
|
|
|
|||||||||||||||||||||||
|
2 |
Year Limited |
Warranty |
|
|
|
|
|
|
|
|
|
|
Siemens will provide replacement parts, free of charge, for any |
|
|
|
|
|||||||||||||||||||||||
|
From |
Date |
|
of |
Installation* |
|
|
|
|
|
|
|
|
|
|
component part that is proven |
defective |
under conditions |
of |
normal |
|
home |
|||||||||||||||||||
|
|
|
|
|
|
|
|
|
|
|
|
|
|
|
|
|
|
|
|
|
|
use, shipping costs included, labor charges excluded. |
|
|
|
|
|
|
|||||||||||||
|
|
|
|
|
|
|
|
|
|
|
|
|
|
|
|
|
|
|
|||||||||||||||||||||||
|
2 Year Limited Warranty on Electronics |
|
|
|
|
|
|
|
|
Siemens will repair or replace, |
free |
of |
charge, |
any |
microprocessor |
|
or |
||||||||||||||||||||||||
|
From |
Date |
|
of |
Installation* |
|
|
|
|
|
|
|
|
|
|
printed circuit board that |
is proven defective under |
conditions of normal |
|||||||||||||||||||||||
|
|
|
|
|
|
|
|
|
|
|
|
|
|
|
|
|
|
|
|
|
|
home use from the date |
|
of original installation, labor charges excluded. |
|||||||||||||||||
|
|
|
|
|
|
|
|
|
|
|
|
|
|||||||||||||||||||||||||||||
|
2 Year Limited Warranty on Motor |
|
|
|
|
|
|
|
|
Siemens will repair or replace, |
free of charge, any motor or component |
||||||||||||||||||||||||||||||
|
From |
Date |
|
of |
Installation* |
|
|
|
|
|
|
|
|
|
|
part of the motor that is |
|
proven |
defective |
under conditions |
of |
normal |
|||||||||||||||||||
|
|
|
|
|
|
|
|
|
|
|
|
|
|
|
|
|
|
|
|
|
|
home use from the date |
|
of original |
installation, |
labor charges |
excluded. |
||||||||||||||
|
|
|
|
|
|
|
|
|
|
|
|
|
|
||||||||||||||||||||||||||||
|
* Date of installation shall refer to the earlier |
of |
the |
date the |
|
clothes dryer is |
installed |
or ten |
business days after |
the |
delivery |
|
date. |
||||||||||||||||||||||||||||
|
|
|
|
|
|
|
|
|
|
|
|
|
|
|
|
|
|
|
|
|
|
|
|
|
|
|
|
|
|
|
|
|
|
|
|||||||
|
Exclusions |
|
|
|
|
|
|
|
|
|
|
|
|
|
|
|
|
|
|
|
|
|
|
|
|
|
|
|
|
|
|
|
|
|
|||||||
|
This warranty does not cover service |
incurred in the repair or replacement |
|
ofTO |
OBTAIN |
WARRANTY |
SERVICE, |
||||||||||||||||||||||||||||||||||
|
calls |
or |
repairs to |
correct |
the installationany |
clothes dryer after a |
period of |
oneCONTACT |
THE NEAREST |
SIEMENS |
|||||||||||||||||||||||||||||||
|
of the clothes dryer, to provide |
|
|
|
year from date of installation shall not AUTHORIZED SERVICE CENTER OR |
||||||||||||||||||||||||||||||||||||
|
instructions on the use of your clothesbe covered by |
|
this warranty. |
|
|
|
CALL |
1o866o447o4363, OR WRITE |
|
TO: |
|||||||||||||||||||||||||||||||
|
dryer, |
to |
|
replace |
house fuses or |
correct |
|
|
|
|
|
|
|
|
|
|
|
|
|
|
|
|
|
|
|
|
|
|
|
|
|||||||||||
|
|
|
|
|
|
|
|
|
|
|
|
|
|
|
|
|
Any and all replaced and/or repaired |
|
|
|
|
|
|
|
|
|
|
|
|
|
|
|
|||||||||
|
plumbing or the electric wiring in |
|
|
your parts shall assume the identity of the |
|
BSH |
HOME |
APPLIANCES |
CORP., |
|
|
||||||||||||||||||||||||||||||
|
home or to repair any clothes dryer |
original for purposes of the applicable |
|
5551 |
MCFADDEN |
AVENUE |
|
|
|
|
|
||||||||||||||||||||||||||||||
|
that's |
use |
was |
in |
a |
manner other |
than |
|
|
|
|
|
|
|
|
|
|
HUNTINGTON |
BEACH |
|
|
|
|
|
|
||||||||||||||||
|
what |
is |
normal |
and |
customary for |
|
warranty period. TO THE EXTENT |
|
|
CA |
92649. |
|
|
|
|
|
|
|
|
|
|
||||||||||||||||||||
|
home |
|
|
|
|
|
LAW, THIS |
|
|
|
|
|
|
|
|
|
|
|
|
|
|||||||||||||||||||||
|
use. In addition, the warranties |
|
|
|
PERMITTED BY |
|
|
|
|
|
|
|
|
|
|
|
|
|
|
|
|
|
|||||||||||||||||||
|
|
|
|
WARRANTY IS IN LIEU OF ALL OTHER |
|
|
|
|
|
|
|
|
|
|
|
|
|
||||||||||||||||||||||||
|
provided |
in this |
Statement |
exclude |
any EXPRESS |
AND |
|
IMPLIED |
|
|
|
|
BE SURE TO PROVIDE YOUR |
|
|
|
|
||||||||||||||||||||||||
|
defects or damage arising from |
|
|
|
WARRANTIES, |
INCLUDING |
THE |
|
|
CLOTHES |
DRYER'S |
MODEL, |
SERIAL |
||||||||||||||||||||||||||||
|
accident, |
alteration, |
misuse, |
abuse, |
|
IMPLIED WARRANTIES OF |
|
|
|
NUMBER, |
PURCHASE DATE |
AND |
|
|
|||||||||||||||||||||||||||
|
improper |
installation, |
unauthorized |
|
|
|
MERCHANTABILITY AND FITNESS |
|
|
THE |
|
SELLER'S NAME, |
|
|
|
|
|
|
|||||||||||||||||||||||
 Loading...