


Contents
A-Z
Owner's Manual for
Vehicle
The Ultimate Driving
Machine
THE BMW Z4.
OWNER'S MANUAL.
Online Edition for Part no. 01 40 2 609 184 - 09 11 500

Z4 sDrive28i
Z4 sDrive35i
Z4 sDrive35is
Owner's Manual for Vehicle
Thank you for choosing a BMW.
Themorefamiliaryouarewithyourvehicle,thebettercontrolyou will have on the road. We therefore strongly suggest:
Read this Owner's Manual before starting off in your new BMW. It contains important information on vehicle operation that will help you make full use of the technical features available in your BMW. The manual also contains information designed to en hance operating reliability and road safety, and to contribute to maintaining the value of your BMW.
Supplementary information can be found in the additional bro chures in the onboard literature.
We wish you a safe and enjoyable drive. BMW AG
Online Edition for Part no. 01 40 2 609 184 - 09 11 500
© 2011 Bayerische Motoren Werke Aktiengesellschaft
Munich, Germany
Reprinting, including excerpts, only with the written consent of BMW AG, Munich.
US English VIII/11, 09 11 500
Printed on environmentally friendly paper, bleached without chlorine, suitable for recycling.
Online Edition for Part no. 01 40 2 609 184 - 09 11 500
Contents
The fastest way to find information on a partic ular topic or item is by using the index, refer to page 208.
6Notes
At a glance
12 Cockpit
Controls
20 Opening and closing
36 Adjusting
43 Transporting children safely
45 Driving
60 Displays
68 Lamps
73 Safety
81 Driving stability control systems
85 Driving comfort
89 Climate
96 Interior equipment
103 Storage compartments
Driving tips
108 Things to remember when driving
Entertainment
116 Professional Radio
Communication
134 Telephone
145 ConnectedDrive
Mobility
152 Refueling
154Fuel
155Wheels and tires
163Engine compartment
168Maintenance
170Replacing components
176Breakdown assistance
182Care
186Indicator/warning lamps
Reference
202 Technical data
208 Everything from A to Z
Online Edition for Part no. 01 40 2 609 184 - 09 11 500

Notes
Notes
Using this Owner's Manual
The fastest way to find information on a partic ular topic is by using the index.
An initial overview of the vehicle is provided in the first chapter.
Additional sources of information
Should you have any questions, your service center will be glad to advise you at any time.
Information on BMW, e.g., on technology, is available on the Internet: bmwusa.com
scribes and depicts equipment that may not be contained in your vehicle because of the se lectedspecialequipmentorcountryversion,for example.
Thisalsoappliestosafety-relatedfunctionsand systems.
Foroptionsandequipmentnotdescribedinthis Owner's Manual, please refer to the Supple mentary Owner's Manuals.
On right-hand drive vehicles, some controls are arranged differently than shown in the illustra tions.
Symbols
 Indicates precautions that must be followed precisely in order to avoid the possibility of per sonal injury and serious damage to the vehicle.
◄ Marks the end of a specific item of informa tion.
"..." Identifies radio display texts used to select individual functions.
›...‹ Verbal instructions to use with the voice ac tivation system.
››...‹‹ Identifies the answers generated by the voice activation system.
 Referstomeasuresthatcanbetakentohelp protect the environment.
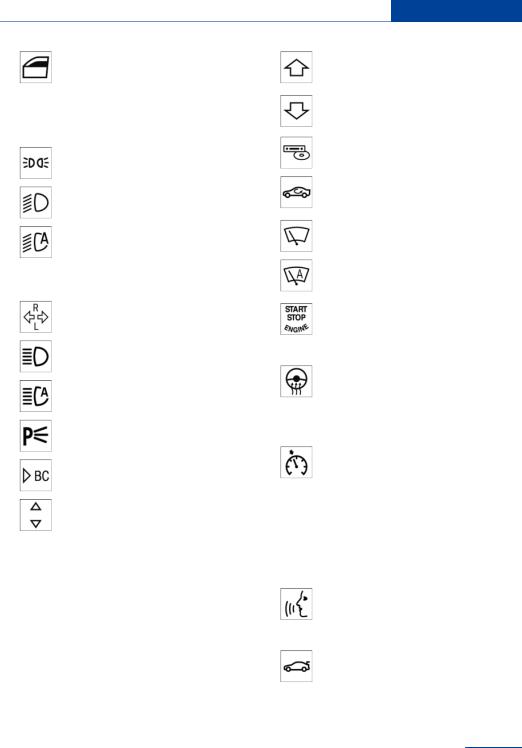
Symbols on vehicle components
 Indicates that you should consult the rele vant section of this Owner's Manual for infor mation on a particular part or assembly.
Vehicle equipment
This Owner's Manual describes all models, all series equipment, as well as country-specific andspecialequipmentofferedinthemodelser ies.Therefore, this Owner's Manual also de
StatusofthisOwner'sManual at time of printing
Themanufacturerofyourvehiclepursuesapol icy of constant development that is conceived to ensure that our vehicles continue to embody the highest quality and safety standards. In rare cases, therefore, the features described in this Owner's Manual may differ from those in your vehicle.
Updates made after the editorial deadline
Anyupdatesmadeaftertheeditorialdeadlinefor the Owner's Manuals are located in the appen dixoftheprintedquickreferenceforthevehicle.
For your own safety
Maintenance and repairs
Advanced technology, e.g., the use of modern materialsandhigh-performanceelectronics,re quires suitable maintenance and repair meth ods.
Therefore, have this work performed only by a BMW center or a workshop that works accord
6
Online Edition for Part no. 01 40 2 609 184 - 09 11 500

|
Notes |
|
|
ing to BMW repair procedures with appropri |
California Proposition 65 Warning |
||
ately trained personnel. |
California laws require us to state the following |
||
If this work is not carried out properly, there is |
warning: |
||
the danger of subsequent damage and related |
Engineexhaustandawidevarietyofautomobile |
||
safety hazards. |
components and parts, including components |
||
Parts and accessories |
foundintheinteriorfurnishingsinavehicle,con |
||
tainoremitchemicalsknowntotheStateofCal |
|||
For your own safety, use genuine parts and ac |
iforniatocausecancerandbirthdefectsandre |
||
cessories approved by BMW. When you pur |
productive harm. In addition, certain fluids |
||
chase accessories tested and approved by |
contained in vehicles and certain products of |
||
BMW and Genuine BMW Parts, you simultane |
component wear contain or emit chemicals |
||
ouslyacquiretheassurancethattheyhavebeen |
knowntotheStateofCaliforniatocausecancer |
||
thoroughly tested by BMW to ensure optimum |
and birth defects or other reproductive harm. |
||
performance when installed on your vehicle. |
Batteryposts,terminalsandrelatedaccessories |
||
BMW warrants these parts to be free from de |
contain lead and lead compounds. Wash your |
||
fectsinmaterialandworkmanship.BMWwillnot |
hands after handling. Used engine oil contains |
||
acceptanyliabilityfordamageresultingfromin |
chemicalsthathavecausedcancerinlaboratory |
||
stallationofpartsandaccessoriesnotapproved |
animals. Always protect your skin by washing |
||
byBMW.BMWcannottesteveryproductmade |
thoroughly with soap and water. |
||
byothermanufacturerstoverifyifitcanbeused |
Service and warranty |
||
on a BMW safely and without risk to either the |
|||
vehicle, its operation, or its occupants. Genuine |
We recommend that you read this publication |
||
BMW Parts, BMW Accessories and other prod |
thoroughly. Your vehicle is covered by the fol |
||
ucts approved by BMW, together with profes |
lowing warranties: |
||
sionaladviceonusingtheseitems,areavailable |
New Vehicle Limited Warranty |
||
fromallBMWcenters.Installationandoperation |
Rust Perforation Limited Warranty |
||
of non-BMW approved accessories such as |
FederalEmissionsSystemDefectWarranty |
||
alarms, radios, amplifiers, radar detectors, |
|||
wheels, suspension components, brake dust |
Federal Emissions Performance Warranty |
||
shields, telephones, including operation of any |
CaliforniaEmissionControlSystemLimited |
||
mobile phone from within the vehicle without |
|||
Warranty |
|||
using an externally mounted antenna, or trans |
|||
Detailed information about these warranties is |
|||
ceiver equipment, for instance, CBs, walkie- |
listed in the Service and Warranty Information |
||
talkies, ham radios or similar accessories, may |
|||
Booklet for US models or in the Warranty and |
|||
cause extensive damage to the vehicle, com |
|||
Service Guide Booklet for Canadian models. |
|||
promise its safety, interfere with the vehicle's |
|||
Your vehicle has been specifically adapted and |
|||
electrical system or affect the validity of the |
|||
BMW Limited Warranty. See your BMW center |
designed to meet the particular operating con |
||
for additional information. Maintenance, re |
ditions and homologation requirements in your |
||
placement, or repair of the emission control de |
countryandcontinentalregioninordertodeliver |
||
vicesandsystemsmaybeperformedbyanyau |
the full driving pleasure while the vehicle is op |
||
tomotive repair establishment or individual |
eratedunderthoseconditions.Ifyouwishtoop |
||
using any certified automotive part. |
erate your vehicle in another country or region, |
||
|
you may be required to adapt your vehicle to |
||
|
meet different prevailing operating conditions |
||
|
and homologation requirements. You should |
||
7
Online Edition for Part no. 01 40 2 609 184 - 09 11 500

 Notes
Notes
also be aware of any applicable warranty limita tionsorexclusionsforsuchcountryorregion.In such case, please contact Customer Relations for further information.
Maintenance
Maintainthevehicleregularlytosustaintheroad safety, operational reliability and the New Vehi cle Limited Warranty.
Specifications for required maintenance meas ures:
BMW Maintenance system
Service and Warranty Information Booklet for US models
Warranty and Service Guide Booklet for Canadian models
If the vehicle is not maintained according to these specifications, this could result in serious damagetothevehicle.Suchdamageisnotcov ered by the BMW New Vehicle Limited War ranty.
To contact NHTSA, you may call the Vehicle Safety Hotline toll-free at 1-888-327-4236 (TTY:1-800-424-9153);gotohttp://www.safe rcar.gov;orwriteto:Administrator,NHTSA,400 Seventh Street, SW., Washington, DC 20590. Youcanalsoobtainotherinformationaboutmo tor vehicle safety from http://www.safercar.gov
For Canadian customers
Canadian customers who wish to report a safety-relateddefecttoTransportCanada,De fect Investigations and Recalls, may telephone the toll-free hotline 1-800-333-0510. You can also obtain other information about motor vehi cle safety from http://www.tc.gc.ca/roadsafety.
Reporting safety defects
For US customers
The following only applies to vehicles owned and operated in the US.
If you believe that your vehicle has a defect which could cause a crash or could cause injury ordeath,youshouldimmediatelyinformtheNa tional Highway Traffic Safety Administration NHTSA, in addition to notifying BMW of North America, LLC, P.O. Box 1227, Westwood, New Jersey 07675-1227, Telephone 1-800-831-1117.
If NHTSA receives similar complaints, it may openaninvestigation,andifitfindsthatasafety defect exists in a group of vehicles, it may order a recall and remedy campaign.
However, NHTSA cannot become involved in individual problems between you, your dealer, or BMW of North America, LLC.
8
Online Edition for Part no. 01 40 2 609 184 - 09 11 500

Notes 
9
Online Edition for Part no. 01 40 2 609 184 - 09 11 500

Online Edition for Part no. 01 40 2 609 184 - 09 11 500
At a glance
These overviews of buttons, switches and displays are intended to familiarize you with your vehicle. You will also become quickly acquainted with the available control concepts and options.
Online Edition for Part no. 01 40 2 609 184 - 09 11 500
At a glance Cockpit
Cockpit
Vehicle equipment
This chapter describes all series equipment as well as country-specific and special equipment offered for this model series.Therefore, it also
describes equipment that may not be found in your vehicle, for instance due to the selected special equipment or the country version. This alsoappliestosafety-relatedfunctionsandsys tems.
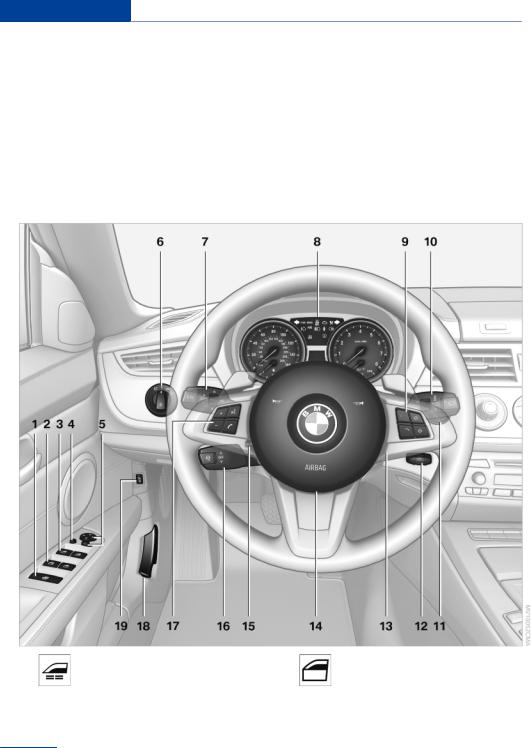
All around the steering wheel
1 |
Opening and closing windows |
2 |
Opening and closing rear win |
|
jointly 32 |
|
dows 32 |
12
Online Edition for Part no. 01 40 2 609 184 - 09 11 500
Cockpit At a glance
3Opening and closing front win dows 32
4Exterior mirrors, folding in and out 40
5Adjust the exterior mirrors, Automatic Curb Monitor 40
6 |
Parking lamps 68 |
|
Low beams 68 |
|
Automatic headlamp con |
|
trol 69 |
|
Adaptive light control 70 |
|
High-beam Assistant 71 |
7 |
Turn signal 50 |
High beams, head lamp flasher 70
High-beam Assistant 71
Roadside parking lamps 70
Computer 62
Settings and information about the vehicle 62
8Instrument cluster 14
9Buttons on the steering wheel
|
Change the radio station |
|
Select a music track |
|
Leaf through the phone book and |
|
through lists with stored phone |
|
numbers |
|
Next entertainment source |
|
Recirculated air mode 94 |
10 |
Windshield wipers 51 |
|
Rain sensor 51 |
11Start/stop the engine and switch the ignition on/off 45
12Ignition lock 45
13 |
Steering wheel heating 42 |
14Horn, the entire surface
15Adjust the steering wheel 42
16 |
Cruise control 85 |
17Buttons on the steering wheel  Telephone 134
  Volume
Voice operation of the tele phone 141
18 |
Releasing the hood 164 |
19 |
Open the trunk lid 27 |
13
Online Edition for Part no. 01 40 2 609 184 - 09 11 500
At a glance Cockpit
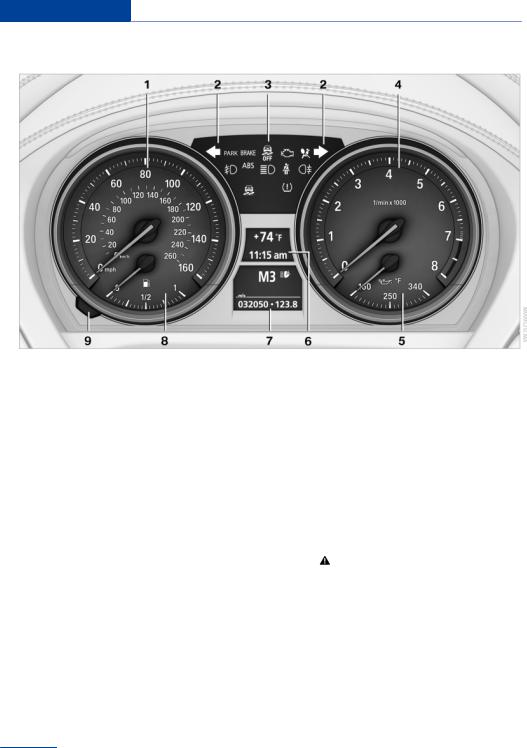
Instrument cluster
1 |
Speedometer |
|
Computer 62 |
||
2 |
Indicator lamps for turn signals |
|
Date of next scheduled service, and re |
||
3 |
Indicator/warning lamps 15 |
|
maining distance to be driven 65 |
||
4 |
Tachometer 61 |
|
Odometer and trip odometer 60 |
||
5 |
Engine oil temperature 61 |
|
Programs for Dynamic Driving Con |
||
6 |
Display for |
|
trol 82 |
||
|
High-beam Assistant 71 |
||||
|
|
Clock 60 |
|||
|
Initializing the Flat Tire Monitor 75 |
||||
|
|
External temperature 60 |
|||
|
Resetting Tire Pressure Monitor 78 |
||||
|
|
Indicator/warning lamps 15 |
|||
|
Checking engine oil level 164 |
||||
|
|
Cruise control 85 |
|||
|
|
Settings and information 62 |
|||
7 |
Display for |
||||
|
Check Control message |
||||
|
Gear display, 8-gear Sport automatic |
||||
|
|
present 66 |
|||
|
|
transmission 55 |
|
||
|
|
8 Fuel gauge 61 |
|||
|
Gear display for 7-gear Sport automatic |
||||
|
|
transmission with dual clutch 55 |
9 Resetting the trip odometer 60 |
||
14
Online Edition for Part no. 01 40 2 609 184 - 09 11 500

|
Cockpit |
At a glance |
Indicator/warning lamps |
The indicator and warning lamps can light up in |
|
Instrument cluster |
a variety of combinations and colors. |
|
Several of the lamps are checked for proper |
||
|
functioningwhentheengineisstartedortheig |
|
|
nition is switched on, and light up briefly. |
|
|
What to do in case of a malfunction |
|
|
A list of all indicator and warning lamps, as well |
|
|
asnotesonpossiblecausesofmalfunctionsand |
|
|
on how to respond, refer to page 186. |
|
All around the center console
1 |
Hazard warning system 176 |
5 |
Seat heating 38 |
2 |
Central locking system 26 |
|
|
3 |
Air conditioner 90 |
|
PDC Park Distance Control 87 |
|
Automatic climate control 92 |
|
|
4 |
Professional Radio 116 |
|
Close the retractable hard |
|
|
|
top 33 |
15
Online Edition for Part no. 01 40 2 609 184 - 09 11 500
At a glance Cockpit
Open the retractable hard |
6 |
Parking brake 49 |
top 33 |
7 |
Buttons for Dynamic Driving Control 82 |
Deactivate the Automatic Engine
Start/Stop Function 47
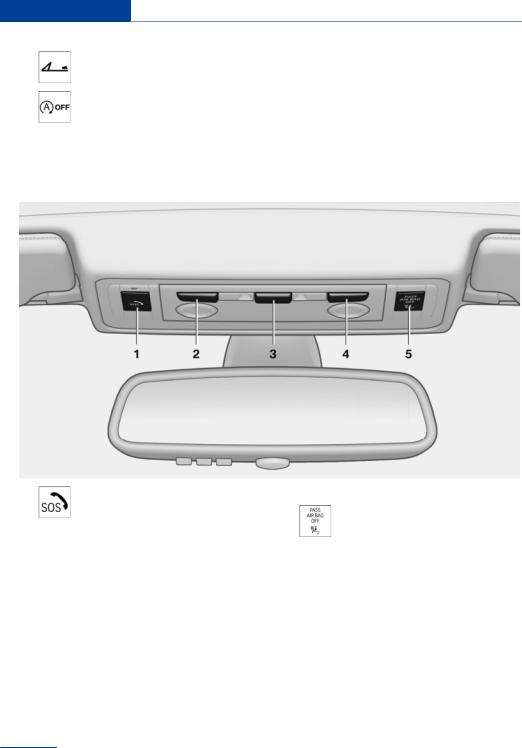
All around the headliner
1 |
Emergency Request 176 |
4 |
Reading lamp 72 |
|
|
5 |
Indicator lamp, front passenger |
2 |
Reading lamp 72 |
|
airbag 74 |
|
|
3Interior lamps 72
16
Online Edition for Part no. 01 40 2 609 184 - 09 11 500

Cockpit At a glance
17
Online Edition for Part no. 01 40 2 609 184 - 09 11 500
Online Edition for Part no. 01 40 2 609 184 - 09 11 500

Controls
This chapter is intended to provide you with information that will give you complete control of yourvehicle.Allfeaturesandaccessoriesthatare useful for driving and your safety, comfort and convenience are described here.
Online Edition for Part no. 01 40 2 609 184 - 09 11 500
Controls Opening and closing
Opening and closing
Vehicle equipment
This chapter describes all series equipment as well as country-specific and special equipment offered for this model series.Therefore, it also describes equipment that may not be found in your vehicle, for instance due to the selected special equipment or the country version. This alsoappliestosafety-relatedfunctionsandsys tems.
The settings called up and implemented when thevehicleisunlockeddependonwhichremote control is used to unlock the vehicle, refer to Personal Profile.
In addition, information about service require ments is stored in the remote control, Service data in the remote control, refer to page 168.
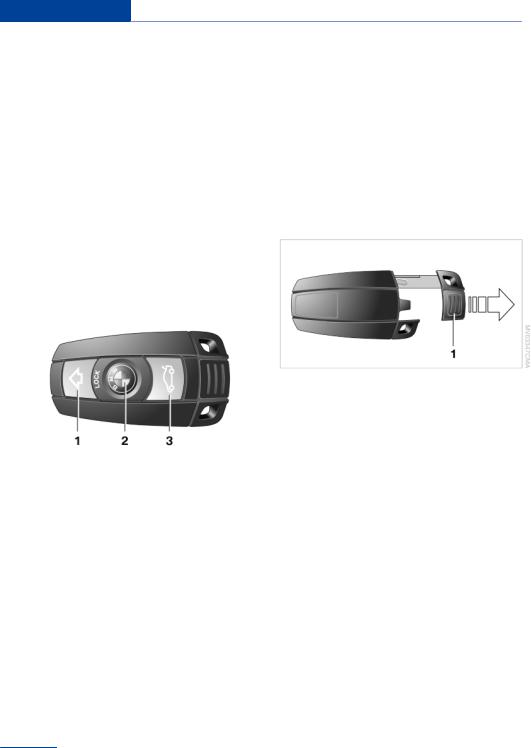
Integrated key
Remote control
Buttons on the remote control
1 Unlocking
2Locking
3Opening the trunk lid
General information
Thevehicleissuppliedwithtworemotecontrols with keys.
Each remote control contains a rechargeable battery that is automatically recharged when it isintheignitionlockwhilethecarisbeingdriven. Useeachremotecontrolatleasttwiceayearfor longerroadtripsinordertomaintainthebatter ies' charge status.
In vehicles equipped with Comfort Access, the remote control contains a replaceable battery, refer to page 30.
Press button 1 and pull out the key.
The integrated key fits the following locks:
Glove compartment, refer to page 103.
Driver's door, refer to page 25.
New remote controls
You can obtain new remote controls from your service center.
Loss of the remote controls
Lost remote controls can be blocked by your service center.
Personal Profile
The concept
You can set several of your vehicle's functions to suit your personal needs and preferences.
The settings are automatically saved in the profile currently activated.
20
Online Edition for Part no. 01 40 2 609 184 - 09 11 500
Opening and closing Controls
The remote control used is detected when thevehicleisunlockedandthestoredprofile is called up.
Your personal settings will be recognized and called up again even if the vehicle has beenusedinthemeantimebysomeoneelse with another remote control.
Theindividualsettingsarestoredforamaximum of four remote controls. They are stored for two remote controls if Comfort Access is in use.
Personal Profile settings
The following functions and settings can be stored in a profile.
More information on the settings can be found under:
Response of the central locking system when the car is being unlocked, refer to page 22.
Automatic locking of the vehicle, refer to page 26.
Automatic retrieval of the driver's seat and exterior mirror positions after unlocking, re fer to page 24.
Triple turn signal activation, refer to page 50.
Settings for the display in the instrument cluster:
12h/24h clock format, refer to page 63.
Date format, refer to page 63.
Units of measure for fuel consumption, distance covered/remaining distances, and temperature, refer to page 63.
Light settings:
Headlamp courtesy delay feature, refer to page 68.
Daytime running lights, refer to page 69.
High-beam Assistant, refer to page 71.
Automatic climate control: AUTO program, coolingfunction,andautomaticrecirculated air control activated/deactivated, tempera ture, air flow rate, and air distribution, refer to page 92.
Entertainment:
Audio volume, Professional Radio, refer to page 118.
Central locking system
The concept
The central locking system becomes active when the driver's door is closed.
The system simultaneously engages and re leases the locks on the following:
Doors.
Trunk lid.
Fuel filler flap.
Center armrest.
Operating from the outside
Via the remote control.
Via the driver's door lock.
In cars with Comfort Access, via the door handles on the driver's and front passenger sides.
The following takes place simultaneously when locking/unlocking the vehicle via the remote control:
The welcome lamps, interior lamps and courtesy lamps are switched on and off.
The alarm systemis armed or disarmed, re fer to page 30.
21
Online Edition for Part no. 01 40 2 609 184 - 09 11 500
Controls Opening and closing
Operating from the inside |
Thesettingisstoredfortheremotecontrolcur |
|
|
rently in use. |
|
|
Operating principle, refer to page 62. |
|
|
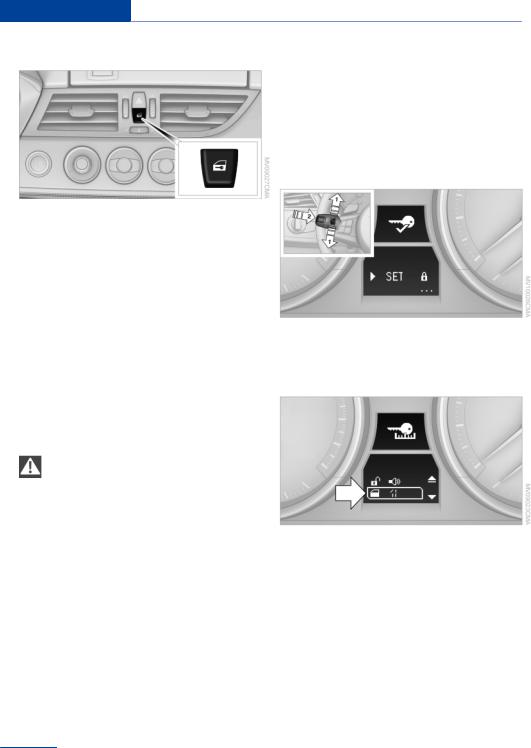
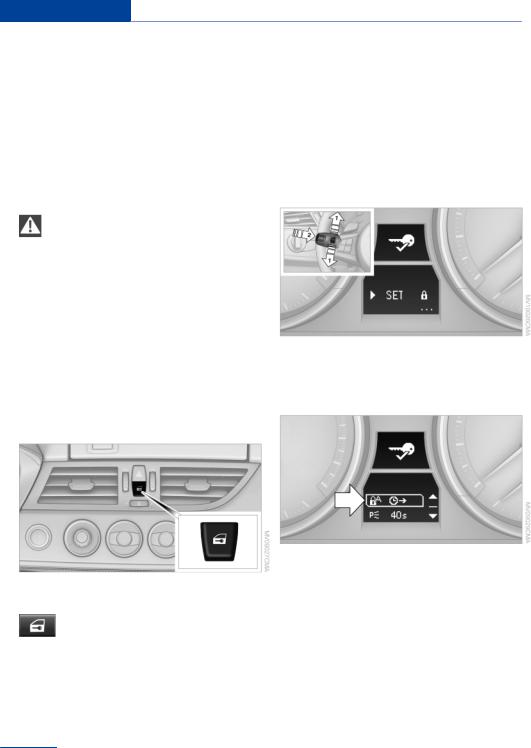
1. |
Switch on the ignition, refer to page 45. |
|
2. |
Lightly push button 1 in the turn indicator |
|
|
leverupordownrepeatedlyuntilthesymbol |
|
|
appears in the display, accompanied by the |
|
|
word "SET". |
Via the button for the central locking system.
If the vehicle is locked from the inside, the fuel filler flap remains unlocked.
If an accident of a certain severity occurs, the central locking system unlocks automatically.
The hazard warning system and interior lamps come on.
Openingandclosing:fromthe outside
Using the remote control
General information
Take the remote control with you
People or animals left unattended in a parked vehicle can lock the doors from the in side. Always take the remote control with you when leaving the vehicle so that the vehicle can then be opened from the outside.
Conditionsforoperatingtheretractablehardtop using the remote control:
The doors and trunk lid are closed.
The cargo area partition is folded down and engaged on both sides, refer to page 34.
Unlocking
 Press the button. The vehicle is unlocked.
You can set how the vehicle is to be unlocked.
3.Press button 2.
4.Lightly push button 1 in the turn indicator lever down repeatedly until the symbol ap pears in the display.
5.Press button 2.
6.Use button 1 to select one of the following:

 Only the driver's door and the fuel filler flap are unlocked. Pressing again unlocks the entire vehicle.

 The entire vehicle is unlocked.
7.Press button 2.
22
Online Edition for Part no. 01 40 2 609 184 - 09 11 500

|
Opening and closing |
Controls |
|
Convenient opening: Windows and hardtop |
Switching on the interior lamps and |
||
When you are close to the vehicle, the remote |
courtesy lamps |
||
controlforComfortAccesscanbeusedtoopen |
Press the button on the remote control |
||
the retractable hardtop. |
with the vehicle locked. |
||
Press and hold the button on the remote |
Unlocking the trunk lid |
||
control. |
|||
The windows and the retractable hardtop are |
Press the button on the remote control for |
||
opened if the doors are closed. |
approx. one second. |
||
Hold the button down. When you are close |
Duringopening,thetrunklidpivotsbackandup. |
||
to the vehicle, the windows move up after the |
Ensure that adequate clearance is available be |
||
hardtop is opened. |
fore opening. |
||
Monitor the opening process |
To avoid locking yourself out of the vehicle, do |
||
Monitor the opening process to ensure |
notplacetheremotecontrolintothecargoarea. |
||
Apreviouslylockedtrunklidislockedagainafter |
|||
that no one becomes trapped; otherwise, inju |
|||
closing. |
|||
ries may result. Releasing the button interrupts |
|||
the opening process. |
Before and after each trip, check that the trunk |
||
|
lid has not been inadvertently unlocked. |
||
Locking
 Pressthebuttonontheremotecontrol. Locking from the outside
Do not lock the vehicle from the outside if there are people in it, as the vehicle cannot be unlocked from inside without special knowl edge.
Convenient closing
When you are close to the vehicle, the remote controlforComfortAccesscanbeusedtoclose the retractable hardtop and the windows.
 Pressandholdthebuttonontheremote control.
The retractable hardtop and the windows are closed.
Monitor the closing process
Monitortheclosingprocesstoensurethat no one becomes trapped.
Releasing the button stops the motion.
Convenient loading
When you are close to the vehicle, the remote control for Comfort Access can be used to par tially tilt the open hardtop for more convenient loading of the trunk.
1. Briefly press the button on the remote control.
Pressagainwithinonesecondandholduntil the retractable hardtop stops in an inter mediate position. The trunk lid opens slightly.
2.Openthetrunklid,pressthecargoareapar tition upward and stow the cargo in the cargo area.
3.Press down the cargo area partition until it engages on both sides and close the trunk lid.
4. Press the button on the remote control foranextendedperiodtofoldtheretractable hardtop back in.
23
Online Edition for Part no. 01 40 2 609 184 - 09 11 500
Controls Opening and closing
Confirmation signals from the vehicle |
|
|
The function is deactivated. |
||
Operating principle, refer to page 62. |
7. |
Press button 2. |
|||
1. Switch on the ignition, refer to page 45. |
|
The setting is stored. |
|||
2. Lightly push button 1 in the turn indicator |
Retrieving the seat and mirror settings |
||||
leverupordownrepeatedlyuntilthesymbol |
|||||
appears in the display, accompanied by the |
The driver's seat and exterior mirror positions |
||||
word "SET". |
used last are stored for the remote control cur |
||||
|
|
rently in use. |
|||
|
|
When the vehicle is being unlocked, these po |
|||
|
|
sitions are automatically retrieved if the setting |
|||
|
|
is activated. |
|||
|
|
|
|
Keep the footwell behind the driver's seat |
|
|
|
|
|
clear |
|
|
|
WhenthisPersonalProfilefunctionisused,first |
|||
|
|
make sure that the footwell behind the driver's |
|||
|
|
seat is free of obstacles. Failure to do so could |
|||
3. Press button 2. |
result in damage to the objects if the seat were |
||||
4. Lightly push button 1 in the turn indicator |
to move rearward. |
||||
|
|
|
|||
leverdownrepeatedlyuntilthedesiredsym |
The adjustment procedure is interrupted: |
||||
bol appears in the display. |
|
When a seat position switch is pressed. |
|||
|
Confirmationsignalduringunlocking |
||||
|
When a button of the seat and mirror mem |
||||
|
Confirmation signal during locking |
|
ory is pressed briefly. |
||
|
|
Operating principle, refer to page 62. |
|||
|
|
1. |
Lightly push button 1 in the turn indicator |
||
|
|
|
leverupordownrepeatedlyuntilthesymbol |
||
|
|
|
appears in the display, accompanied by the |
||
|
|
|
word "SET". |
||
5. |
Press button 2. |
|
|
6. |
Use button 1 to select one of the following: |
|
|
|
|
The hazard warning system flashes |
|
|
|
during unlocking/locking. |
|
|
|
An acoustic signal sounds during |
2. Press button 2. |
|
|
unlocking/locking. |
|
 The hazard warning system lights up and an acoustic signal sounds during unlocking/locking.
24
Online Edition for Part no. 01 40 2 609 184 - 09 11 500

Opening and closing Controls
3.Lightly push button 1 in the turn indicator lever down repeatedly until the symbol ap pears in the display.
4.Press button 2.
5.Use button 1 to select one of the following:
 Call-upwhenthevehicleisunlocked.
 Call-up when the driver's door is opened.
 Switch off the automatic function.
6.Press button 2. The setting is stored.
Malfunctions
Commissionregulations.Operationisgoverned by the following:
FCC ID:
LX8766S
LX8766E
LX8CAS
Compliance statement:
This device complies with part 15 of the FCC Rules. Operation is subject to the following two conditions:
This device may not cause harmful interfer ence, and
thisdevicemustacceptanyinterferencere ceived, including interference that may cause undesired operation.
Any unauthorized modifications or changes to these devices could void the user's authority to operate this equipment.
Using the door lock
Localradiowavesmayinterferewiththeremote control.
In this case, unlock and lock the car at the door lock with the integrated key.
In vehicles without an alarm system or Comfort |
|
|
Access, only the driver's door can be unlocked |
|
|
and locked using the integrated key in the door |
|
|
lock. |
Locking from the outside |
|
If the car can no longer be locked with a remote |
Do not lock the vehicle from the outside if |
|
control, the battery in the remote control is dis |
there are people in it, as the vehicle cannot be |
|
charged. Use the remote control during an ex |
unlocked from inside without special knowl |
|
tended drive in order to recharge the battery, |
edge. |
|
refer to page 20. |
Remove the key before pulling the door |
|
The remote control for Comfort Access con |
||
handle |
||
tainsabatterythatmayneedtobereplaced,re |
||
Before pulling the outside door handle, remove |
||
fer to page 30. |
||
|
thekeytoavoiddamagingthepaintworkandthe |
|
For US owners only |
key. |
The transmitter and receiver units comply with part 15 of the FCC/Federal Communication
25
Online Edition for Part no. 01 40 2 609 184 - 09 11 500
Controls Opening and closing
Convenient operation Automatic locking
InvehicleswithanalarmsystemorComfortAc cess, the windows and retractable hardtop can also be operated via the door lock.
Opening/closing
With the door closed, turn the key to the unlock or lock position and hold it there.
Turning the key back to the original position stops the motion.
Monitor the closing process
Duringeveryclosingprocedure,andwhen opening the retractable hardtop, watch the process and ensure that no one becomes trap ped; otherwise, injuries may occur.
Manual operation
Ifanelectricalmalfunctionoccurs,unlockorlock the driver's door using the integrated key in the door lock.
Openingandclosing:fromthe inside
Locking and unlocking
Press the button.
The doors and the trunk lid are locked orunlockedwhenthefrontdoorsareclosed,but they are not secured against theft.
The fuel filler flap remains unlocked.
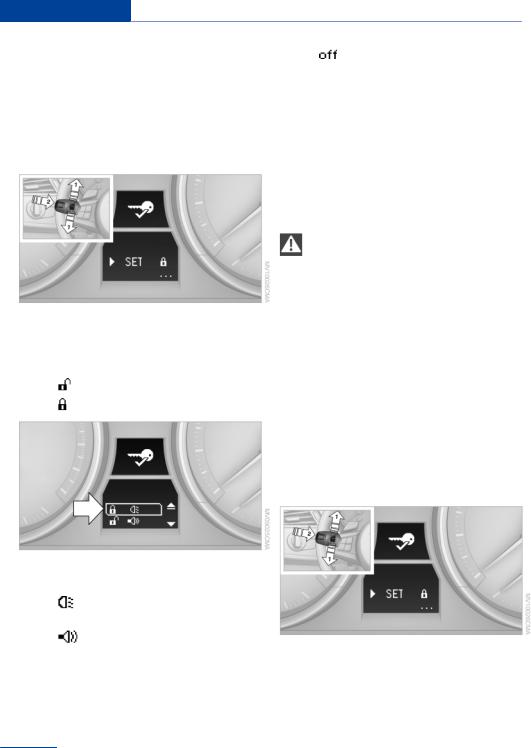
Thesettingisstoredfortheremotecontrolcur rently in use.
Operating principle, refer to page 62.
1.Switch on the ignition, refer to page 45.
2.Lightly push button 1 in the turn indicator leverupordownrepeatedlyuntilthesymbol appears in the display, accompanied by the word "SET".
3.Press button 2.
4.Lightly push button 1 in the turn indicator lever down repeatedly until the symbol ap pears in the display.
5.Press button 2.
6.Use button 1 to select one of the following:
 The vehicle locks automatically afterashortperiodoftimeifadoorisnot opened.
 The vehicle locks automatically after you drive away.
 Thevehiclelocksautomaticallyaf ter a short period of time if a door is not opened or after you drive away.
26
Online Edition for Part no. 01 40 2 609 184 - 09 11 500

|
Opening and closing |
Controls |
|
Thecentrallockingsystemremains Opening from the inside |
|
|
unlocked. |
|
7. Press button 2.
Unlocking and opening doors
Pressthebutton.Thedoorsareun locked. To open, pull the door han
dle above the armrest.
Pull the door handle above the armrest twice:thedoorisunlockedthefirsttimeand opened the second time.
Locking
Press the button. The doors are locked.
Press the lock button of a door. To prevent youfrombeinglockedout,theopeneddriv er's door cannot be locked using the lock button.
Take the remote control with you
People or animals left unattended in a parked vehicle can lock the doors from the in side. Always take the remote control with you when leaving the vehicle so that the vehicle can then be opened from the outside.
Trunk lid
Note the opening height of the trunk lid
During opening, the trunk lid pivots back andup.Ensurethatthereissufficientclearance when the trunk lid opens; otherwise, damage may result.
Press the button.
The trunk lid opens unless it has been
locked.
Opening from the outside
Press on the top half of the BMW emblem.
 Press the button on the remote control for approx. one second.
The trunk lid can be opened.
Closing
Recessed grips in the interior trim of the trunk lid make it easier to pull down the lid.
27
Online Edition for Part no. 01 40 2 609 184 - 09 11 500
Controls Opening and closing
Danger of pinching |
|
The vehicle cannot be unlocked or locked |
Make sure that the closing path of the |
|
again for approx. the next two seconds. |
trunklidisclear;otherwise,injuriesmayresult. |
|
Theenginecanonlybestartediftheremote |
Press the trunk lid down lightly. |
|
control is inside the vehicle. |
|
|
It is closed automatically.
Emergency unlocking
Pull the lever in the cargo area.
The trunk lid unlocks.
Comfort Access
The concept
The vehicle can be accessed without activating the remote control.
All you need to do is to have the remote control with you, e.g., in your jacket pocket.
The vehicle automatically detects the remote control when it is nearby or in the passenger compartment.
Comfort Access supports the following func tions:
Unlocking/locking of the vehicle.
Convenient closing.
Convenient opening
Unlocking of the trunk lid separately.
Starting the engine.
Functional requirement
Tolockthevehicle,theremotecontrolmust be located outside of the vehicle.
Comparison to the standard remote control
The specified functions can be controlled by pressing the button or via Comfort Access.
If you notice a brief delay while opening or clos ingthewindowsorretractablehardtop,thesys tem is checking whether a remote control is in side the vehicle. Repeat the opening or closing procedure, if necessary.
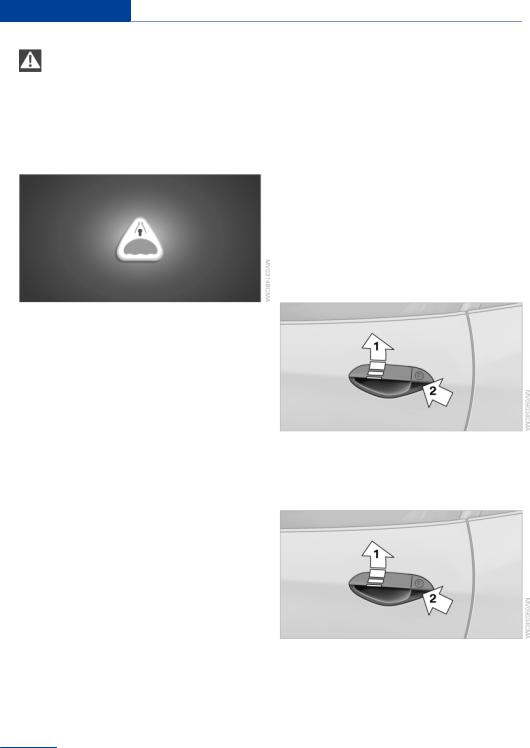
Unlocking
Pullthehandleup,arrow1.Thiscorrespondsto pressing the  button.
Locking
Press on the surface, arrow 2.
This corresponds to pressing the  but ton.
To save battery power, ensure that the ignition and all electronic systems and/or power con
28
Online Edition for Part no. 01 40 2 609 184 - 09 11 500
Opening and closing Controls
sumers are switched off before locking the ve hicle.
Window and convertible top operation
With the ignition in the radio ready state or be yond, the windows and the convertible top can be opened and closed when a remote control is located inside the vehicle.
Unlocking the trunk lid separately
Press on the top half of the BMW emblem. This corresponds to pressing the  button.
If a remote control accidentally left in the trunk is detected in the locked vehicle, then the trunk lid opens again. The hazard warning system flashes and an acoustic signal sounds.
Switching on the radio ready state
Pressing the Start/Stop button switches on the radio ready state, refer to page 45.
Do not depress the brake or the clutch; other wise, the engine will start.
Starting the engine
Theenginecanbestartedortheignitioncanbe switchedonwhenaremotecontrolisinsidethe vehicle. It is not necessary to insert a remote control into the ignition lock, refer to page 45.
Switching off the engine in cars with Sport automatic transmission
When the engine is switched off, transmission position P is engaged automatically unless N is engaged and the remote control is inserted in the ignition lock.
Driving into an automatic car wash with a Sport automatic transmission
To make it possible for the vehicle to roll, such as in an automatic car wash, follow the instruc tions in Car washes, refer to page 182.
Malfunction
TheComfortAccessfunctionscanbedisturbed bylocalradiowaves,suchasbyamobilephone intheimmediatevicinityoftheremotecontrolor when a mobile phone is being charged in the vehicle.
Ifthisoccurs,openorclosethevehicleusingthe buttons on the remote control or use the integrated key in the door lock.
To start the engine afterward, insert the remote control into the ignition switch.
Warning lamps
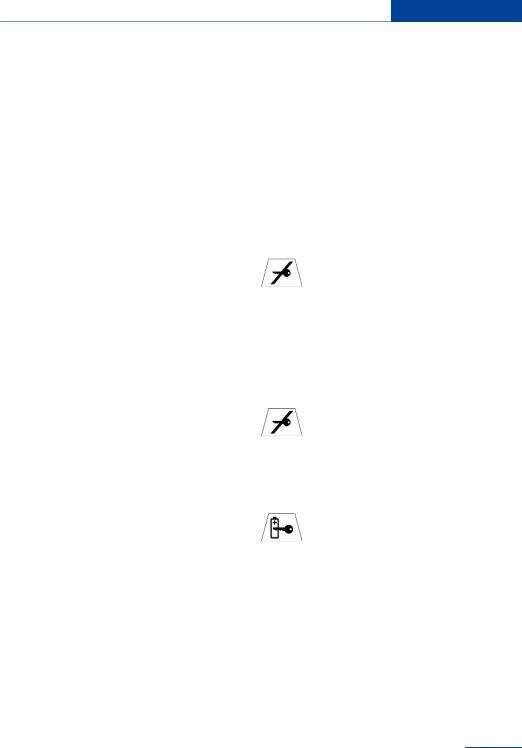
The warning lamp in the instrument cluster lights up when you attempt to starttheengine:the enginecannotbe
started.
Theremotecontrolisnotinsidethevehicleoris malfunctioning. Take the remote control with youinsidethevehicleorhaveitchecked.Ifnec essary, insert another remote control into the ignition switch.
The warning lamp in the instrument cluster lights up while the engine is running: the remote control is no lon
ger inside the vehicle.
After the engine is switched off, the engine can only be restarted within approx. 10 seconds.
The indicator lamp in the instrument cluster lights up: replace the remote control battery.
29
Online Edition for Part no. 01 40 2 609 184 - 09 11 500
Controls Opening and closing
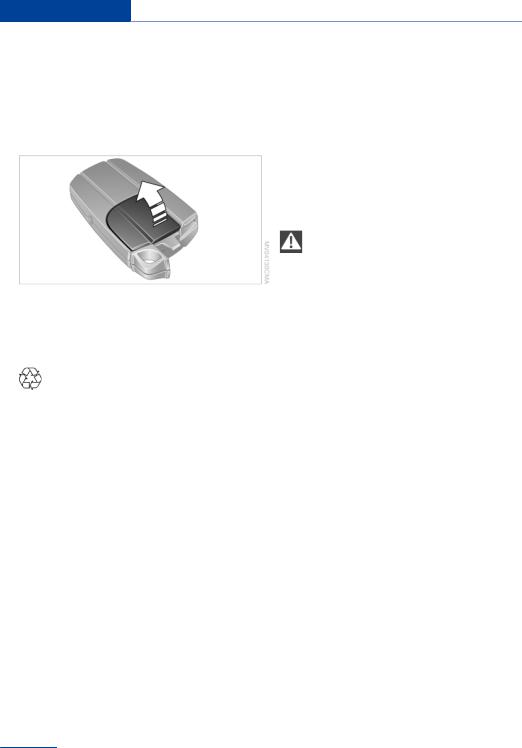
Replacing the battery |
Arming and disarming the alarm |
The remote control for Comfort Access con |
system |
tainsabatterythatwillneedtobereplacedfrom |
Whenyoulockorunlockthevehicle,eitherwith |
time to time. |
theremotecontroloratthedoorlock,thealarm |
1. Take the integrated key out of the remote |
system is armed or disarmed at the same time. |
|
|
control, refer to page 20. |
Trunk lid and armed alarm system |
|
2.Remove the cover.
3.Insert a battery of the same type with the positive side facing upwards.
4.Press the cover closed.
Return used battery to a recycling collec tion point or to your service center.
Alarm system
The concept
The vehicle alarm system responds to:
Opening of a door, the hood or the trunk lid.
Movements in the vehicle: interior motion sensor, refer to page 31.
When the car's inclination changes, for in stanceifanattemptismadetojackitupand steal the wheels or to raise it prior to towing away.
Interruptions in battery voltage.
The alarm system signals unauthorized entry attempts for a short time by means of:
By sounding an acoustic alarm.
Byswitchingonthehazardwarningsystem.
By flashing the high beams.
The trunk lid can be opened using the remote control, even if the alarm system is armed.
 Press the button on the remote control for approx. one second.
Note the opening height of the trunk lid
During opening, the trunk lid pivots back andup.Ensurethatthereissufficientclearance when the trunk lid opens; otherwise, damage may result.
Afterthelidisclosed,itislockedandmonitored again by the alarm system.
Panic mode
You can trigger the alarm system if you find yourself in a dangerous situation.
 Pressthebuttonontheremotecontrolforat least three seconds.
To switch off the alarm: press any button.
Switching off the alarm
Unlockthevehicleusingtheremotecontrol, refer to page 22.
Inserttheremotecontrolallthewayintothe ignition lock.
30
Online Edition for Part no. 01 40 2 609 184 - 09 11 500
 Loading...