

Page 1

Dodeca
™
Stainer
Instruction Manual
Catalog Numbers
165-3400
165-3401
For Technical Service Call Your Local Bio-Rad Office or in the U.S. Call 1-800-4BIORAD (1-800-424-6723)
Page 2

Table of Contents
Page
Safety
Section 1 Product Introduction.....................................................................1
1.1 Overview.....................................................................................................1
1.2 Size Availability...........................................................................................2
Section 2 Unpacking and Assembly.............................................................4
2.1 Unpacking the Unit .....................................................................................4
2.2 Unit Assembly ............................................................................................5
2.3 Components and Accessories ...................................................................6
Section 3 Operation........................................................................................9
3.1 Preparation .................................................................................................9
3.2 Dodeca Stainer Setup ................................................................................9
3.3 Transferring Gels to the Staining Trays .....................................................9
3.4 Staining Tray and Shaking Rack Assembly.............................................10
3.5 Placing the Shaking Rack into the Solution Tank....................................11
3.6 Filling the Solution Tank ...........................................................................12
3.7 Starting the Staining Procedure ...............................................................12
3.8 Draining the Solution Tank.......................................................................12
3.9 Unit Disassembly......................................................................................13
Section 4 Gel Handling and Storage ..........................................................13
4.1 Gel Handling.............................................................................................13
4.2 Gel Storage ..............................................................................................13
Section 5 Stain Solution Compatibility and Protocols.............................14
5.1 Bio-Safe Colloidal Coomassie Stain ........................................................14
5.2 SYPRO Ruby Protein Gel Stain...............................................................15
5.3 Dodeca Silver Stain Kit ............................................................................15
Section 6 Maintenance and Chemical Compatibility................................16
Section 7 Troubleshooting...........................................................................18
Appendix A Specifications ..............................................................................20
Appendix B Warranty and Ordering Information ..........................................21
Copyright © (2003) Bio-Rad Laboratories, Inc. All rights reserved.
Page 3
Safety
Caution/Warning
The shaking motion of the Dodeca stainer is controlled by the shaker motor
attached to the lid. The shaker motor is powered by an external 12V DC regulated
power adapter with universal input (included). The shaker motor control unit that
switches on the power to the shaker motor and controls the shaker speed contains
a 0.5 A type-T fuse.
The Dodeca stainers have passed tests for operation at temperatures between
ambient and 40° C, with relative humidity between 0 and 95% non-condensing.
Operating the Dodeca stainer outside these conditions is not recommended by
Bio-Rad and will void the warranty.
The following guidelines should be observed and followed when using a Dodeca
stainer.
1. Always connect the Dodeca stainer power adapter to a 3-prong, grounded AC
outlet, using the 3-prong AC power cord provided with the Dodeca stainer.
2. Do not operate the Dodeca stainer in extreme humidity (>95%) or where
condensation can short the internal electrical circuits of the shaker motor and
shaker motor control unit.
3. Disconnect the power adapter from the power outlet when not in use.
4. Do not remove the lid prior to turning off the power switch located on the shaker
motor control unit. This may result in damage to the components.
5. Do not detach the shaker motor from lid prior to turning off the power switch
located on the shaker motor control unit.
6. Keep all the electrical components dry, and to protect the electrical components
store them attached to the lid in the appropriate recessed areas.
Important
This instrument is intended for laboratory use only.
Bio-Rad’s Dodeca stainers are designed and certified to meet IEC 61010-1
1
safety standards. Certified products are safe to use when operated in accordance
with the instruction manual.
This instrument should not be modified or altered in any way. Alteration of this
instrument will void the manufacturer’s warranty, void the IEC 61010-1 certification,
and create a potential safety hazard for the user.
Bio-Rad is not responsible for any injury or damage caused by the use of this
instrument for purposes other than those for which it is intended, or by modifications
of the instrument not performed by Bio-Rad or an authorized agent.
1
IEC 61010-1 is an internationally accepted safety standard for laboratory instruments.
!
Page 4

Section 1
Product Introduction
1.1 Overview
The Dodeca™ Stainer is a high-throughput gel staining device designed primarily
for large format 2-D polyacrylamide gels. The Dodeca stainer comes in two sizes,
large and small. Each size accommodates up to 12 gels (for gel size compatibility
see Tables 1A and 1B). By processing up to 12 gels, the Dodeca stainers match the
capacity of the PROTEAN IEF cell for first dimension isoelectric focusing and the
PROTEAN Plus Dodeca cell for second dimension separation to help streamline the
2-D gel electrophoresis workflow.
The Dodeca stainers have an integrated shaking mechanism (patent pending),
therefore no external shaking device is needed. The shaker motor, attached to the
lid, causes the shaking rack to oscillate. This oscillating motion results in equally
efficient staining of all twelve gels in the shaking rack. A shaker control unit, which
sits on the lid, contains the power switch and controls the oscillating speed.
The staining trays hold the gels in place during staining to prevent breakage.
Various tray configurations are available to provide the best fit for the selected gel
size (see Tables 1A and 1B). These trays are also used to transport gels throughout the laboratory. The stained gel easily slides off the open side of the staining
tray onto an imager or spot cutter platform.
The shaking rack holds up to 12 staining trays as a single unit for easy handling.
Built-in handles make it easy to place the shaking rack inside the solution tank. The
various staining solutions are added via the reagent access door built into the lid.
Reagent removal is achieved via two drain ports incorporated at the base of the
solution tank.
Fig. 1 A. Large Dodeca Stainer.
1
Page 5

2
1.2 Size Availability
The Dodeca stainer is available in two sizes to primarily optimize the staining
reagent volumes, and also to eliminate gel breakage due to excessive or constricted
movement. Each tank size has a dedicated shaking rack and staining trays with
optional tray attachments to accommodate various gel sizes.
Select the correct Dodeca stainer and staining tray size/configuration, and
determine if the tray attachments are needed from the table below.
Table 1 A. Gel Size Compatibility
Large Dodeca Stainer
Bio-Rad's Dodeca Stainer and Maximum
Second-dimension Staining Tray Number of gels
Gel Types Gel size (W x L) size/configuration accommodated
PROTEAN Plus 25.6 x 23 cm Large 12 (1 per tray)
precast gels
PROTEAN Plus 25 x 20.5 cm Large 12 (1 per tray)
handcast gels (each staining tray
(using the Hinged requires one tray
Spacer Plates) attachment2)
Small Dodeca Stainer
Bio-Rad's Dodeca Stainer and Maximum
Second-dimension Staining Tray Number of gels
Gel Types Gel size (W x L) size/configuration accommodated
PROTEAN Plus 20 x 20.5 cm Small 12 (1 per tray)
handcast gels
(using the
Hinged Spacer
Plates)
PROTEAN II XL 18.5 x 20 cm
precast or 18.3 x 19.3 cm
handcast gels
PROTEAN II xi 16 x 20 cm
precast or handcast 16 x 16 cm
gels
Criterion precast and 13.3 x 8.7 cm Small 24 (2 per tray)
handcast gels (each staining tray
requires one tray
attachment)
2
The tray attachments are included with catalog numbers 165-3400 (large) and 165-3401 (small). They are also
available to order separately, see the ordering information in Appendix B, page 19.
Page 6
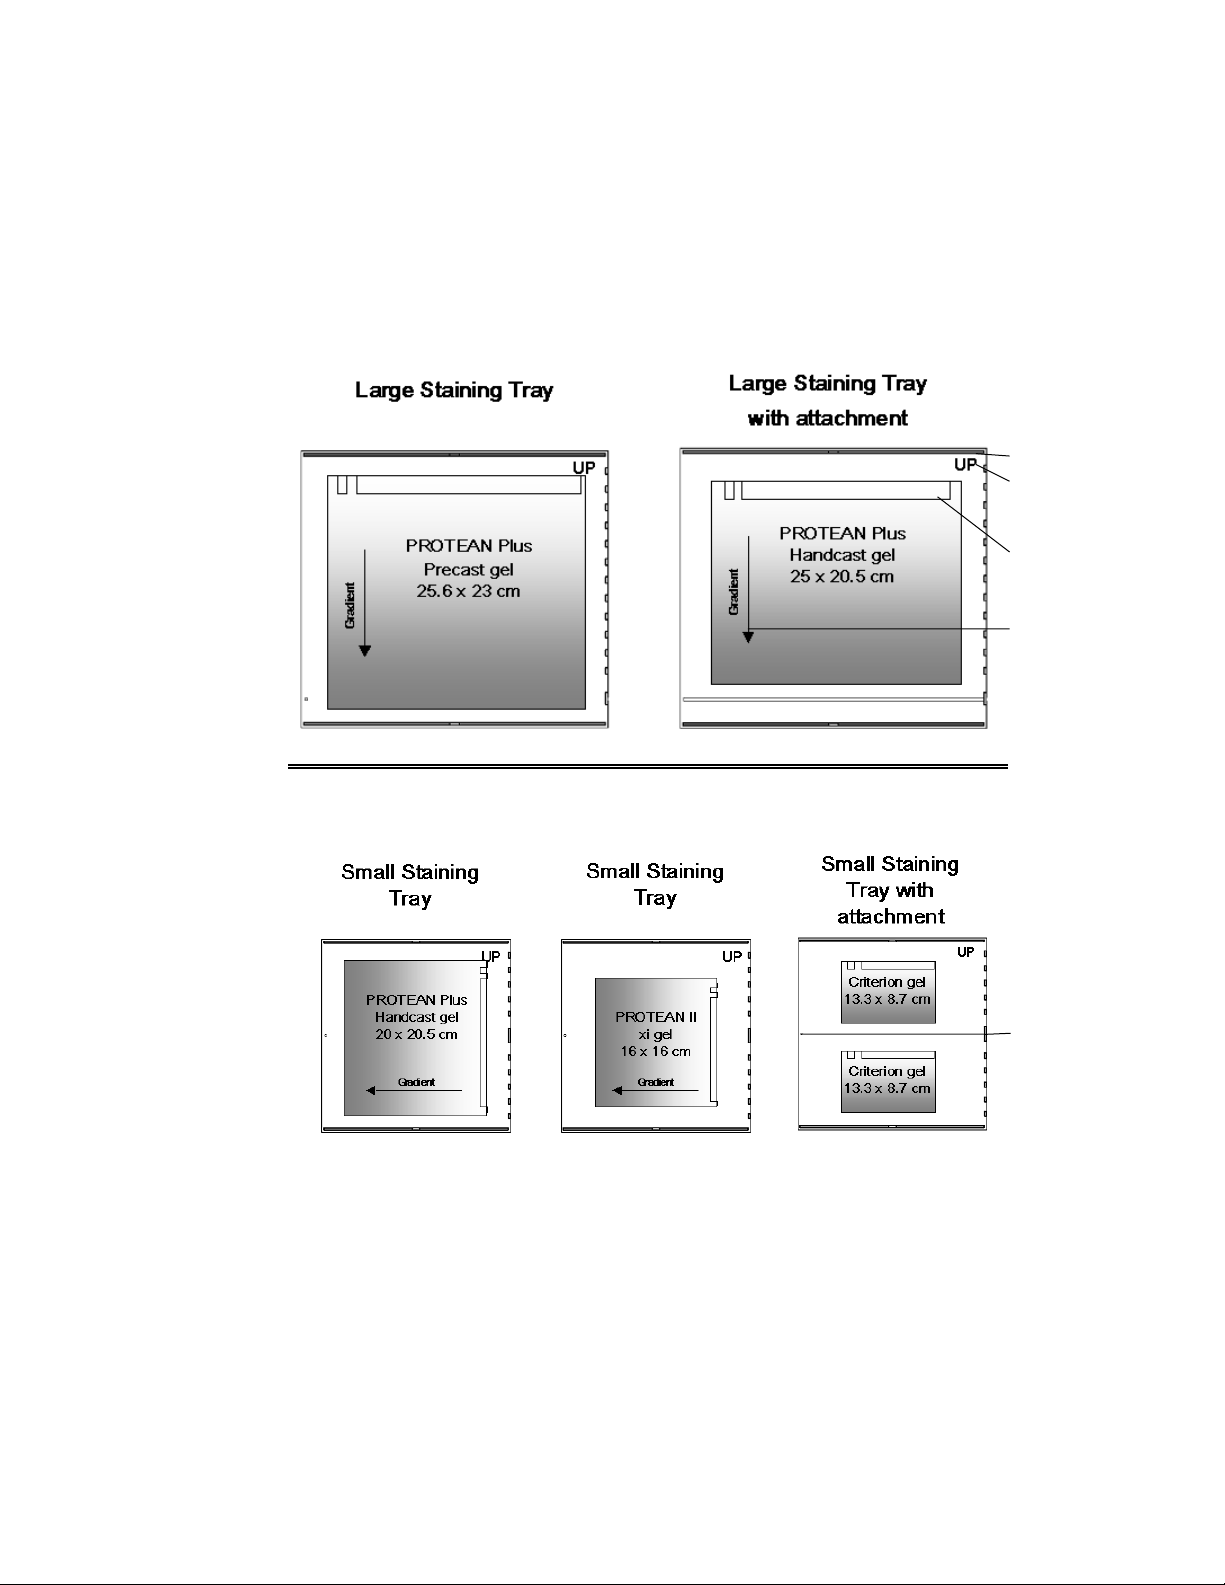
Table 1 B. Gel/Tray Orientation
The following illustrations indicate the proper orientation to place the gels on
the staining trays. The illustration also shows the proper tray configuration for each
gel size as detailed in Table 1A.
Large Dodeca Stainer
Small Dodeca Stainer
Illustration Labels.
A. The "UP" label, molded into the staining trays, helps to properly orient the gels
on the trays and to stack the trays correctly in the shaking rack.
B. Tray attachment (see page 5 for detailed description).
C. IPG-well to load the ReadyStrip™ IPG strip.
D. Arrow indicates the direction of the gradient gel, from low %T down to high %T.
3
B
B
A
C
D
Page 7
Section 2
Unpacking and Assembly
2.1 Unpacking the Unit
When you receive the Dodeca stainer, carefully inspect the container for any
damage that may have occurred during shipping. Severe damage to the container
may indicate damage to the Dodeca stainer itself. If you suspect damage to the
unit contact Bio-Rad Laboratories (1-800-4BIO-RAD) or your local Bio-Rad office.
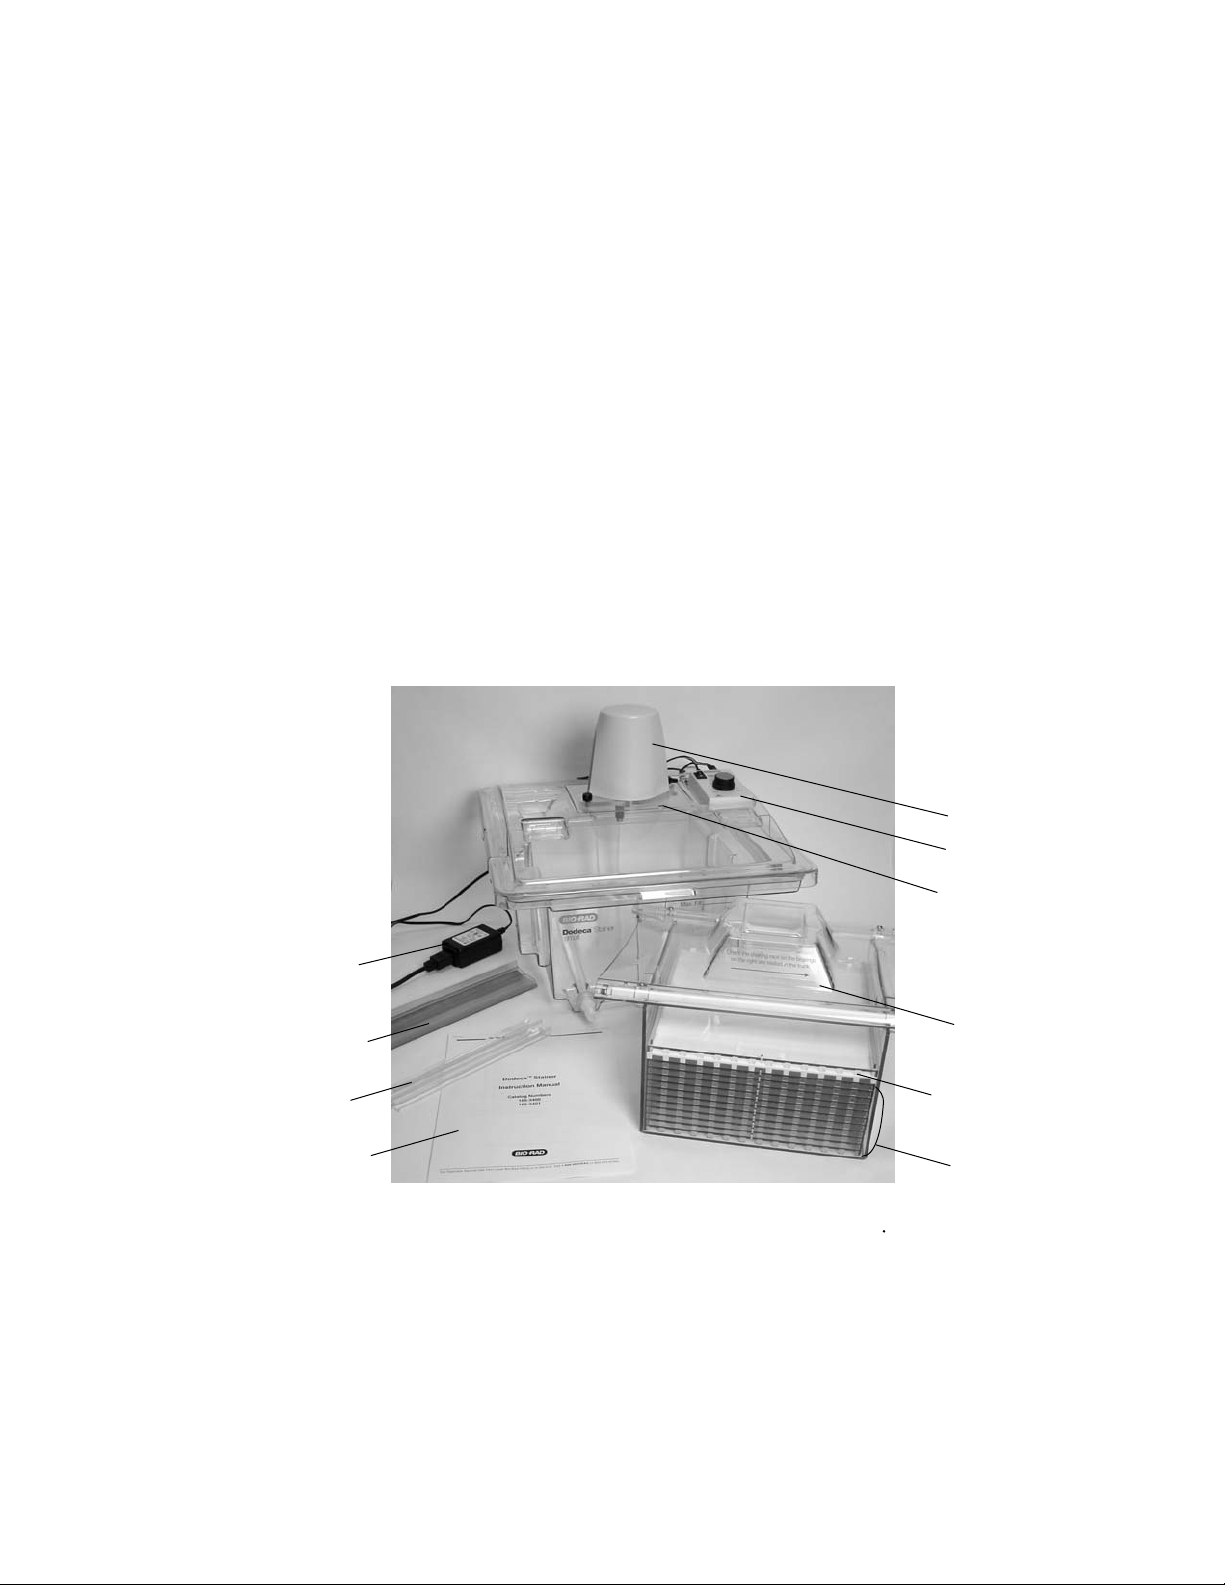
Contents include:
• Solution Tank, qty 1 • Shaker Motor, qty 1
• Shaking Rack, qty 1 • Power adapter and cord, qty 1
• Translucent Staining Trays, qty 12 • Gel Clip, qty 1
• White Development Tray, qty 1 • Instruction Manual
• Tray attachments, qty 12 • Warranty card
• Lid, qty • Declaration of conformity
• Shaker Control Unit (with cord to attach to the shaker motor), qty 1
Fig. 2.1 A. Small Dodeca stainer with the contents included in catalog #165-3401.
4
Shaker Control Unit
Shaker Motor
Shaking Rack
Power Adapter
Tray Attachments
Instruction Manual
Gel Clip
White
Development Tray
Translucent
Staining Trays
Lid
Page 8

2.2 Unit Assembly
2.2.1 Prior to assembly and use, wash the Dodeca stainer components (solution
tank, staining trays, and shaking rack) with a non-scratch pad and mild detergent followed by a complete rinse with distilled water. For additional maintenance guidelines and chemical compatibility information see section 6,
pages 14-15.
2.2.2 Place the Dodeca stainer on a level surface in a convenient location and
near a grounded electrical outlet. Position the Dodeca stainer so that the drain
ports in the solution tank are accessible. Proper location and position of the
tank is important, since once the tank is filled and in operation it should not
be moved.
2.2.3 Attach the shaker motor to the lid, by tightening the black thumbscrews.
Position the shaker motor so the small hook at the bottom and the plug
inlet at the top are facing the opposite direction from the reagent access
door.
2.2.4 Assembling the drainage system.
a. Remove the stopcocks and tubing from the bag.
b. Attach the ends of the short piece of tubing to the drain port fittings at
the base of the solution tank.
c. Add the white clamps over the short piece of tubing and drain port
fitting. Tighten the clamp to ensure a complete seal to prevent leaks.
Note: It may be easier to use pliers to tighten the white clamps.
d. Ensure the long piece of tubing reaches your desired receptacle/
reservoir.
e. Make sure the stopcocks are in the closed position prior to pouring in
any solutions.
5
Page 9

2.3 Components and Accessories
The Dodeca Stainer components can be separated into two categories,
mechanical and electrical components.
2.3.1 Mechanical Components
Staining Trays
There are thirteen (13) stackable, staining
trays that hold the gels during the staining
process. The "UP" label is used to properly
orient the gels on the trays and align the
trays while stacking. Twelve of the thirteen
trays are clear to observe the gel motion
during staining. One staining tray is white to
hold the top gel to monitor the final
development, which is especially important
for silver staining. The staining trays are
also used to transport the stained gels
throughout the laboratory.
Tray Attachments
The tray attachments are narrow strips of
plastic that connect to the staining trays.
They confine the gel to an appropriate area
of the tray, according to its size, to prevent
excessive movement and breakage. See
Tables 1A and 1B (pages 2 and 3,
respectively) for details and illustrations of
when to use the tray attachments.
Shaking Rack
The shaking rack holds up to 13 stacked
staining trays. The "UP" label on the bottom
of the shaking rack aligns with the "UP" label
on the staining trays. The trays are securely
held in place via a restraining bar. The
restraining bar is lowered and locked to hold
the staining trays in position during the
staining process. The shaking rack holds the
trays at a slight angle to improve reagent
flow and remove air bubbles. The shaking
rack is suspended in the tank via the
stainless steel wheels (bearings). The metal
wheels are placed inside a track (channel) on one side in the solution tank. This
allows the shaking rack to gently glide side to side when the shaker is turned on.
The shaking rack also has built-in handles for placing it in and out of the solution
tank.
6
Fig. 2.3.1 A. Staining trays stacked
with the maximum number (13).
Fig. 2.3.1 B. Close-up of a Criterion
tray attachment on a small staining
tray.
White
Development Tray
Translucent
Staining Trays
"UP" label
(in the corner)
Criterion Tray
Attachment
Built-in
Handles
Metal Wheels
(Bearings)
T-knobs
Restraining
Bar
"UP" label
(on the bottom)
Fig. 2.3.1 C. Shaking rack holding a
stack of staining trays.
Page 10

Solution Tank
The solution tank is available in
two sizes, large and small. Each
holds a dedicated shaking rack
and staining trays. The tank has
two built-in drain ports for rapid
reagent removal.
Note: It is recommended to
position the drain ports towards a
convenient receptacle to facilitate
solution drainage.
Lid
The lid contains the shaker motor,
shaker control unit, and the
reagent access door. The reagent
access door is used to easily pour
staining solutions into the solution
tank.
2.3.2 Electrical Components
Caution: Make sure the electrical components remain dry during reagent
exchange, operation, and cleaning to prevent any damage to the components and
potential danger to the user.
Shaker Motor
The shaker motor, attached to the
lid, interlocks with the suspended
shaking rack and works to oscillate
the shaking rack. The patentpending shaking motion is gentle
to protect gels from breaking.
Shaker Control Unit
The shaker control unit, positioned
in a recessed area in the lid,
contains the power switch and
controls the oscillating speed of
the shaking rack (via a control
knob). An external transformer
supplies power to the system.
7
Fig. 2.3.1 D. Solution tank.
Fig. 2.3.1 E. Lid with the shaker motor installed
and the shaker control unit seated in the
recessed area.
Fig. 2.3.2 A. Shaker motor.
Fig. 2.3.2 B. Shaker control unit.
Track
Drain ports
Shaker Motor
Shaker
Control Unit
Reagent
Access Door
Shaker Motor
Power Switch
Control Knob
Page 11

2.3.3 Accessories
The Dodeca stainer accessories add further convenience to working with large
format gels. Gel Clip
The gel clip facilitates large format gel handling and eliminates gel breakage by minimizing direct hands-on gel manipulation. The gel clip gently,
but securely, clamps along one entire edge of a gel, distributing the weight
evenly so that the gel can be easily lifted without tearing. The gel clip is
used to transfer a gel from a glass plate to a staining tray. Once the gel is
stained, the gel clip can be used to transfer the gel from the staining tray to
an imager or spot cutter
platform. The gel clip can be used with any gel size.
Fig. 2.3.3 A. The Gel Clip. Fig. 2.3.3 B. Clamping Fig. 2.3.3 C. Lifting the Fig. 2.3.3 D. Transferring
onto a PROTEAN gel off the glass the gel to a large
Plus precast gel plate. staining tray.
(25.6 X 23 cm).
Storage Boxes
The storage boxes are available for
storing gels, while placed on the
staining trays. The storage boxes
accommodate up to 4 gels (on the
staining trays) plus one additional tray
to hold the top gel in position. Two
sizes are available to hold the
appropriate staining tray size.
8
Fig. 2.3.3 E. Large and small storage boxes
shown with 5 staining trays stacked inside.
Page 12

Section 3
Operation
3.1 Preparation
3.1.1 Introduction
Load the appropriate amount of sample per gel according to the sensitivity of the
stain. For silver stain, all the gels processed should contain approximately the
same amount of protein load, to prevent over or under development. Development
time is dependent on the amount of protein loaded per gel and it is stopped
simultaneously for the entire stack of gels in the Dodeca stainer.
3.1.2 Reagent Solutions
Refer to the stain instruction manual for detailed reagent preparation.
Note: Keep in mind that reagent and water quality are key factors to obtain optimal
staining results.
The large Dodeca stainer requires 10 liters of solutions and the small Dodeca
stainer requires 7 liters. The working volume of solutions prepared may be adjusted
according to the number of trays used. Refer to Table 5A, page 13, for solution
volumes calculations.
3.2 Dodeca Stainer Setup
3.2.1 Determine the staining tray configuration needed for your gel size from
Table 1A. Gel Size Compatibility.
3.2.2 Ensure the Dodeca stainer is properly cleaned before use. See Section 5
Maintenance.
3.3 Transferring Gels to the Staining Trays
3.3.1 Open the gel cassette and detach the gel from the spacers and IPG strip
(for 2-D gels) by sliding the green gel releaser tool (catalog #165-3320), razor
blade, or equivalent along the entire length of each spacer.
Note: Gels that are not completely released from the spacer can easily
tear.
Fig. 3.3.1 A. Detaching the gel from the spacers
using the gel releaser tool.
9
Page 13

3.3.2 Prewet the staining tray with a small amount of distilled water to help prevent
the gel from sticking to the tray surface.
3.3.3 Use the gel clip to lift the gel off the glass plate and transfer it to the staining
tray.
a. Wet the gel clip and borders of the gel with distilled water to prevent
the gel from sticking to the gel clip.
b. Slide the lower edge of the gel clip under the gel. Position the gel clip
about 1.5 cm under the gel for complete contact with the high friction
grip of the upper edge of the gel clip.
Note: Gradient gels are weaker at the top of the gel since it is made of
lower %T. To prevent tearing, lift gels using the side or bottom edge.
When lifting the gel from the bottom it may be easiest to position the
bottom side of the gel away from you and grip the gel clip using two
hands and slide it towards you under the gel.
c. Lift the gel slowly off the glass plate and place onto the staining trays
as illustrated in Table 1B. Gel size and tray selection determine the
gel orientation.
Note: Orient the tray so the "UP" label is properly positioned prior to
transferring (see Table 1B).
Note: Gel orientation is important. During the staining process the gel
will swell in size and extra space should be available to accommodate
the expansion without constricting the gel. Gradient gels show
increased swelling from low to high %T. This results in a trapezoidal
shaped gel that can rotate and lodge in the tray if not positioned
correctly.
3.4 Staining Tray and Shaking Rack Assembly
3.4.1 Stack the staining trays in the same orientation, aligning the "UP" labels on
each tray. The staining trays can be positioned inside the shaking rack one
by one or as an entire stack of trays.
a. First stack the translucent trays
(up to 11) with gels.
Note: A minimum of four gels is
recommended when silver staining.
b. Then place the white development
tray with gel on top of the stack.
c. Finally, place the cover tray
(translucent tray without a gel) on
top of the white tray to prevent the
top gel from floating around.
Fig. 3.4.1A. Properly stacked staining
trays.
10
Cover Tray
White
Development Tray
Translucent Staining
Trays stacked
(11 are shown)
Page 14

3.4.2 Lower the restraining bar into the semicircular notches on both sides of the
top tray to secure the stack of staining trays. Tighten the black T-knobs on
the side of the shaking rack to lock the restraining bar in place. This
prevents the stack of trays from sliding out of the shaking rack.
Fig. 3.4.2 A. Lowering the restraining bar into position.
3.5 Placing the Shaking Rack into the Solution Tank
3.5.1 Use the built-in handles to place the shaking rack into the solution tank.
Orient the shaking rack according to the label on top of the rack. This will
properly orient the angle of the shaking rack and accurately align the metal
wheels (bearings).
3.5.2 Place the lid on the solution tank with the reagent access door facing front,
making sure the shaker motor on the lid engages in the slot on the shaking
rack as the lid is lowered.
3.5.3 Connect the electrical components.
a. Connect the shaker motor to the shaker control unit.
b. Place the shaker control unit in the designated recessed area on the
lid.
c. Connect the shaker control unit to the power adapter.
d. Make sure the power is switched off and the speed setting is at zero.
e. Plug the power adapter into the wall outlet.
Fig. 3.5.3 A. Connecting the electrical components.
11
a.
b.
c.
d.
e.
Page 15

3.6 Filling the Solution Tank
3.6.1 Make sure the drain ports (stopcocks) are closed.
3.6.2 Open the reagent access door and add the reagent.
Note: Pour the reagents against the wall of the staining tank to avoid
excess splashing.
3.6.3 Add reagent until it reaches 0.5 cm above the top cover tray.
3.7 Starting the Staining Procedure
3.7.1 Turn the power switch on the shaker control unit on.
3.7.2 Slowly increase the speed until the gels move freely. See Table 3.7A for
recommended speed settings by gel type and size.
Important: Acrylamide gels may temporarily adhere to the staining trays
during the first few minutes of the first staining step. It is recommended to
increase the speed from 6–10 for a short while, to facilitate the release of the
gels. Do not leave the gels unattended during this time. After the gels have
been freed from the trays, slow down the speed to the recommended
setting for the rest of the process to prevent gel damage.
Note: Switch the power to the shaker motor OFF whenever solutions are
being exchanged.
Table 3.7 A. Recommended speed settings according to
gel size and type.
The shaker speed should be adjusted according to gel size and number of
gels, to achieve optimum results. The ideal shaking speed should move all gels
synchronously from side to side, while remaining gentle enough not to damage the
acrylamide matrix.
Staining No. of Trays Shaker Control
Process Gel Size (excludes cover tray) Unit Setting
Standard Processing Large format* 1–6 trays 3–4
(less than 6 hrs) 7–12 trays 4–5
Criterion* 1–6 trays 4–5
7–12 trays 5–6
Overnight Incubation 1–12 trays 1–2
* Large format includes gel sizes 16 x 16 cm up to 25.6 x 23 cm. Criterion gels are sized 13.3 x 8.7 cm.
3.8 Draining the Solution Tank
3.8.1 Connect tubing to the drain ports (stopcocks).
3.8.2 Place the tubing in an appropriately sized reservoir or sink. To achieve
maximum draining speed, use both drain ports and place the reservoir
3–4 feet below the Dodeca stainer.
3.8.3 Open the drain ports (stopcocks) to begin draining the reagent from the
tank.
12
Page 16

3.9 Unit Disassembly
3.9.1 Turn off the power switch and disconnect the power cord.
3.9.2 Drain the solution tank.
3.9.3 Remove the lid.
3.9.4 Remove the shaking rack.
3.9.5 Release the restraining bar.
3.9.6 Remove the staining trays with gels.
3.9.7 Wash the Dodeca stainer components according to the maintenance
guidelines in Section 6.
Section 4
Gel Handling and Storage
Eliminating direct handling of fragile acrylamide gels throughout the staining
process is possible by following the gel handling and storage procedures below.
4.1 Gel Handling
a. Use the gel clip to remove the gel from the glass plates and transfer it to
the staining tray.
Note: The staining tray can be used as a tool to transport gels around the
laboratory.
b. Transfer the gel onto an imager or spot cutter platform by sliding it off the
staining tray or using the gel clip to lift the gel. There must be sufficient
water underneath the gel so it can slide freely.
c. Use the gel clip to transfer the gel back onto the staining tray.
Note: If numerous spots are cut out of the gel, the integrity of the gel may
be compromised. It may be difficult to lift the gel using the gel clip. The
best method for lifting a gel once a lot of spots (200 or more) have been
removed is to use the spot cutter gel cutting sheet that is already under the
gel or slide a separation sheet (used for handcasting gels) under the gel to
lift it up.
4.2 Gel Storage
a. Up to 4 gels (on the staining trays) plus one additional tray to hold the top gel in
position can be placed in the appropriate storage box.
b. Fill the storage box with storage solution (usually distilled water) to cover
the gels completely. See chemical compatibility, Section 6, for incompatible
solutions.
c. Place the lid on the storage box.
Note: The storage box can be placed in the refrigerator (4°C) if desired.
13
Page 17

Section 5
Stain Solution Compatibility and Protocols
The Dodeca stainers are compatible with Bio-Safe colloidal G-250 Coomassie
Blue stain, Coomassie Brilliant Blue R-250 stain, SYPRO Ruby protein gel stain,
and the NEW mass spectroscopy compatible Dodeca Silver Stain kit.
The Dodeca stainers are compatible with Bio-Rad's Dodeca Silver Stain kit and
the original Silver Stain kit (catalog #161-0443, based on Merril's protocol). However,
the Dodeca Silver Stain kit is recommended over the original Silver Stain kit because
it has been optimized to reduce background when used with the Dodeca stainers. In
addition, the volume of the Dodeca Silver Stain kit was designed to better accommodate
the throughput capacity of the Dodeca stainers. A minimum of four gels is recommended
when silver staining using the Dodeca stainers.
Important: The Dodeca stainers are NOT compatible with the Bio-Rad Silver
Stain Plus kit chemistry (catalog #161-0449).
Note: It is recommended to have dedicated instruments for fluorescent and
Coomassie based processes to prevent cross contamination. Residual Coomassie
stain in the system quenches the fluorescent signal causing weak or no detection.
Table 5 A. Solution Volume Calculations
*
Dodeca Stainer and Volume calculations for
Staining tray sizes using less than 12 trays Volume for 12 trays
Small (500 ml x No. of trays) + 1L 7L
Large (750 ml x No. of trays) + 1.5L 10L
Sample calculations:
If you are staining 8 gels (on 8 trays) in the small Dodeca stainer, the total solution
volume would be calculated as follows: (500 ml x 8) + 1L = 5 liters
If you are staining 5 gels (on 5 trays) in the large Dodeca stainer, the total solution
volume would be calculated as follows: (750 ml x 5) + 1.5L = 5.25 liters
* The cover tray is not counted when calculating working solution volumes.
Below are brief protocols. Please see the individual stain instruction manuals for
detailed protocols and staining component descriptions.
5.1 Bio-Safe Colloidal Coomassie Stain
No. of
Step Solution(s) Time Cycles
1. Fix 40% Methanol 30 minutes–overnight 1
10% Acetic acid
2. Stain Bio-Safe 1 hour–overnight 1
3. Destain H2O 30 minutes 2 or 3
14
Page 18

5.2 SYPRO Ruby Protein Gel Stain
No. of
Step Solution(s) Time Cycles
1. Fix 40% Methanol 30 minutes–overnight 1
10% Acetic acid
2. Stain SYPRO Ruby 3 hours to overnight 1
3. Rinse* 10% Methanol 30–60 minutes 1
7% Acetic acid
4. Rinse H2O 30–60 minutes 1
* This rinse step is recommended to minimize background fluorescence and to prevent excessive gel swelling.
5.3 Dodeca Silver Stain Kit
The Dodeca Silver Stain kit is specifically formulated for ease-of-use with the
Dodeca stainer. This silver stain kit reduces clean up time by minimizing silver
deposits on the Dodeca stainer (compared to the Bio-Rad Silver Stain kit). In
addition, stained protein samples are amenable to mass spectrometry protein
identification analysis without further sample modification. See the Dodeca Silver
Stain kit instruction manual (part #411-0150) for detailed instructions on how to
prepare solutions.
Note: A minimum of four gels is recommended when silver staining using the
Dodeca stainers.
No. of
Step Solution(s) Time Cycles
1. Fixing 40% Ethanol 30 min–overnight 1
10% Acetic acid
2. Sensitizing Sensitizer Concentrate 30 min 1
Background Reducer Concentrate
3. Rinsing H2O 10 min 3
4. Staining Silver Reagent Concentrate 20–30 min 1
5. Rinsing H2O 1 min 1
6. Developing Development Buffer Concentrate 10–30 min (variable) 1
Background Reducer Concentrate
Image Developer Concentrate
7. Stop/ Storage 5% Acetic Acid 10 min–overnight 1
8. Rinsing H2O 10 minutes 1
15
Page 19

Section 6
Maintenance and Chemical Compatibility
Maintenance
To clean the components of the Dodeca stainer, follow the instructions below.
The Dodeca stainer components are not dishwasher compatible.
Cleaning the Solution Tank, Staining Trays, and Shaking Rack
After each run, wash the solution tank, staining trays, and shaking rack
thoroughly with a non-scratch pad and mild detergent (Bio-Rad Cleaning
Concentrate diluted to the recommended working concentration, catalog #161-0722)
followed by a complete rinse with distilled water.
Note: For optimum results with fluorescent and silver staining, it is essential to
maintain clean components. These stains are more susceptible to contaminants in
the solution tank than Coomassie based stains. Residual Coomassie Brilliant Blue
quenches the fluorescent signal. Protein or metallic contaminants will catalyze nonspecific formation of metallic silver. Users may choose to utilize separate Dodeca
stainers for each stain used in the laboratory.
If more stringent cleaning is needed, use the reagents listed below. We
recommend performing a 5 minute rinse followed by a thorough rinse with distilled
water. Avoid exposing the stainer to these chemicals for a prolonged amount of
time.
• 2% Bleach (0.1% Sodium hypochlorite)
• 70% Ethanol
• 20% Hydrogen peroxide
• 50% w/v (7.8M) Nitric acid
Cleaning the Lid
First, remove the shaker motor and the shaker control unit from the lid. Then,
wash using a non-scratching pad and a mild detergent followed by a complete
rinse with distilled water.
16
Page 20

Please see the chemical compatibility section below for incompatible chemicals.
Chemical Compatibility
The Dodeca stainer components and storage boxes are NOT compatible with
the following chemicals. Use of these chemicals voids all warranties.
• > 20% Acetic acid • > 50% (7.8 M) Nitric acid
• Ammonium hydroxide • > 20% Sulfuric acid
• Dimethyl formamide • Silicone oil
• Dimethylsulfoxide (DMSO) • > 15% Sodium hydroxide
• Ethyl acetate • Trichloroacetic acid
• >25% Hydrochloric acid • Ketones (Acetone, etc.)
• Aromatic hydrocarbons (Toluene, Benzene, etc.)
• Chlorinated solvents (Carbon tetrachloride, Ethylene chloride, etc.)
Call 1-800-4-BIORAD or your local Bio-Rad representative for technical
information regarding additional chemical compatibility of the Dodeca stainers with
various other laboratory reagents.
17
Page 21

Section 7
Troubleshooting
General Troubleshooting
Problem Cause Solution
1. Uneven stain, a. Staining tray is too a. Select the proper tray
and/or large for the gel size. and tray attachments, if
gel breakage Gels will rotate during needed, for your gel
staining and can get size (see Table 1A)
lodged in a diagonal
position. Position the gel correctly
on the staining tray (see
Or, the staining Table 1B)
tray is too small for the
gel size. The gel size Don't increase the
after swelling exceeds shaking speed beyond
the staining tray the recommended
dimensions and the gel speed setting for more
will lodge in the tray than a few minutes (see
Table 3.7A)
Note: Gradient gels
show increased swelling For overnight
from low to high %T. This incubations always
results in a trapezoidal decrease speed to #3
shaped gel that can
rotate and lodge in the
tray if not positioned
correctly
2. Uneven stain a. Gels sticking to tray a. Add a small amount of
surface deionized water onto
the tray before loading
the gel
Release the gels by
increasing the speed
(6–10) on the shaker
control unit for a few
minutes. As soon as all
the gels are loose,
return to the recommended
speed setting (see
Table 3.7A)
3. Top gel stained a. Insufficient amount of a. Fill the tank with reagent
unevenly, damaged, reagent in the tank until it reaches 0.5 cm
or dried out above the top cover tray
4. The solution tank is a. The drain ports are a. Prior to use, make sure
not draining blocked the drain ports are
unblocked to ensure
proper draining
5. The shaker motor a. The black T-knobs are a. Tighten the black T-knobs
seems loose and is loose that hold the shaker
rocking too much on motor on top of the lid
top of the lid
6. The shaking rack a. The solution tank is not a. Drain the staining
(with trays inside) drained. solutions from the tank
is difficult to remove prior to removing the
from the tank. shaking rack.
18
Page 22

Silver Stain Troubleshooting
Problem Cause Solution
7. Dark background a. Low quality reagents a. Contaminants will
or contaminated catalyze non-specific
water formation of metallic
silver. Use high purity
reagents and deionized
water
b. Over development b. Monitor the development
of the gel step carefully and stop
quickly by draining
through both drain ports
(stopcocks). Then
quickly add the stop
solution through the
reagent access door of
the lid. The drain/fill
cycle should be no
longer than 3 minutes
c. Overloaded protein c. Adjust the protein sample
sample load so it is appropriate
for this detection
method
d. Incorrect preparation d. Refer to the silver stain
of silver stain instruction manual,
solutions paying special attention
to the image developer
concentrate amounts
8. Poor sensitivity a. Inactive reagents or a. Use the silver stain kit
inaccurate dilution or components within their
incorrect incubation recommended shelf life
times
Confirm solution
preparation and
incubation times are
correct. Pay special
attention to the amount
of image developer
concentrate
b. Low protein sample b. Adjust the protein sample
load load so it is appropriate
for this detection
method
Sypro Ruby Troubleshooting
Problem Cause Solution
9. Weak or no a. Residual Coomassie a. Clean the Dodeca stainer
fluorescent signal stain in the system thoroughly before
inhibits the fluorescent switching from
signal Coomassie based stain
to fluorescent stains
b. Low protein sample b. Adjust the protein sample
load load so it is appropriate
for this detection method
19
Page 23

Appendix A
Dodeca Stainer and Accessories Specifications
Dimensions Dimensions
(W x D x H, cm) (W x D x H, cm)
Large Small Material
Overall Dodeca stainer741.3 x 46.2 x 38.9 41.3 x 46.2 x 38.9 Various (see below)
Weight 9.1 kg 7.5 kg
Number of gels
8
Up to 12 large format Up to 12 large format
Up to 24 Criterion
Shaker Device Built-in Shaker Motor Built-in Shaker Motor
Maximum staining
solution volume 10 liters 7 liters
Components
Staining Trays
Translucent
Trays 27.5 x 30.7 x 1.4 23.6 x 24 x 1.4 Polyethylene
Terephthalate G
Copolymer (PETG)
White
Development
tray 27.5 x 30.7 x 1.4 23.6 x 24 x 1.4 PETG
Tray
attachments 0.3 x 30.3 x 0.5 0.3 x 23.2 x 0.5 PETG, translucent
Shaking Rack
Rack 30.7 x 35.8 x 22.7 23.7 x 35.8 x 22.7 PETG, translucent
Bearings Diameter: 1.59 cm 1.59 cm SV30 Stainless Steel
Length: 0.5 cm 0.5 cm
Solution Tank
Tank 32.1 x 37.9 x 22.1 28.6 x 30.9 x 22.1 PETG, translucent
Drain Fittings Diameter: 2.9 cm 2.9 cm Polypropylene
Length: 3.2 cm 3.2 cm
Lid
Overall 41.3 x 46.2 x 6.8 41.3 x 46.2 x 6.8 PETG, translucent
Motor case 8.9 x 16.3 x 11.6 8.9 x 16.3 x 11.6 Acrylonitrile butadine
styrene/Polycarbonate
(ABS/PC), cadet gray
Hinges for
reagent
access door Acrylic, translucent
Accessories
Gel Clip
Overall 5.5 x 25 x 3 5.5 x 25 x 3 Polyvinyl chloride
(PVC), translucent
Spring Stainless Steel
Hinge Polyurethane
Storage Box 29.5 x 32.5 x 7.0 25.7 x 25.7 x 7.0 PETG
7
The overall width and depth are determined by the lid dimensions.
8
A minimum of 4 gels is recommended when silver staining.
20
Page 24

Appendix B
Warranty and Ordering Information
Warranty
The Dodeca stainer components are warranted for 1 year against defects in
materials and workmanship. If any defects should occur during this warranty period,
Bio-Rad Laboratories will replace the defective parts without charge. However, the
following defects are specifically excluded:
• Defects caused by improper operation.
• Repairs or modifications performed by anyone other than Bio-Rad Laboratories
or their authorized agent.
• Damage caused by accidental misuse.
• Damage caused by disaster.
• Common replacement parts including platinum wire and power cables.
• Damage caused by the use of organic solvents, please see Section 6 (pg. 14–15)
for incompatible chemicals that will void all warranties if used.
For inquiries or to request repair service, contact your local Bio-Rad office
Warranty Information
Model
Catalog Number
Date of Delivery
Serial Number
Invoice Number
Purchase Order Number
Ordering Information
Catalog
Number Description
Dodeca Stainer
165-3400 Dodeca Stainer, Large, 100-240 V, includes 13 trays (12 translucent
and 1 white), 12 tray attachments, shaking rack, solution tank, lid
with shaker, shaker control unit, one gel clip, and instructions
165-3401 Dodeca Stainer, Small, 100-240 V, includes 13 trays (12 translucent
and 1 white), 12 Criterion tray attachments, shaking rack, solution
tank, lid with shaker, shaker control unit, one gel clip, and instructions
Dodeca Stainer Accessories
165-3414 Gel Clip, 1
165-3429 Storage Box, Large, holds up to 4 gels with large staining trays, 1
165-3430 Storage Box, Small, holds up to 4 gels with large staining trays, 1
21
Page 25

Catalog
Number Description
Dodeca Stainer Replacement Parts
165-3415 Dodeca Stainer Tray, Large, replacement, 2 pack
165-3416 Dodeca Stainer Tray, Small, replacement, 2 pack
165-3417 Dodeca Stainer Tray attachment, Large, fits on large trays,
required for PROTEAN Plus 25 cm handcast gels, 2 pack
165-3418 Dodeca Stainer Criterion Tray attachment, fits on small trays,
required for Criterion gels, 2 pack
165-3419 Dodeca Stainer White Development Tray, Large, 1
165-3420 Dodeca Stainer White Development Tray, Small, 1
165-3421 Dodeca Stainer Shaking Rack, Large, replacement, 1
165-3422 Dodeca Stainer Shaking Rack, Small, replacement, 1
165-3423 Dodeca Stainer Solution Tank, Large, replacement, 1
165-3424 Dodeca Stainer Solution Tank, Small, replacement, 1
165-3425 Dodeca Stainer Lid with Shaker Motor, 100-240 V, replacement,
fits both tank sizes
165-3426 Dodeca Stainer Lid without Shaker Motor, replacement, fits both
tank sizes
165-3427 Dodeca Stainer Shaker Motor, 100-240 V, replacement
165-3428 Dodeca Stainer Shaker control unit, replacement
Dodeca Stainer and Stains
165-3403 Dodeca Stainer and Dodeca Silver Stain Kit, Large, 100-240 V,
includes one large Dodeca stainer (165-3400) and one Dodeca
silver stain kit for the large tank (161-0480), instructions
165-3404 Dodeca Stainer and Dodeca Silver Stain Kit, Small, 100-240 V,
includes one small Dodeca stainer (165-3401) and one Dodeca
silver stain kit for the small tank (161-0481), instructions
165-3405 Dodeca Stainer and Bio-Safe Coomassie Stain, Large, 100-240 V
165-3406 Dodeca Stainer and Bio-Safe Coomassie Stain, Small, 100-240 V
165-3407 Dodeca Stainer and SYPRO Ruby Stain, Large, 100-240 V
165-3408 Dodeca Stainer and SYPRO Ruby Stain, Small, 100-240 V
22
Page 26

S
cience
p
aboratories Ma
ce
a
a
ada
C
a
dFrance
089 318 8
7
, Fx.
089 318 8
g
a
ael
orea
1
oland
g
Swede
8
2
US/EG
A
Bio-R
ad
.
4006228 Rev A
Laboratories, Inc
Life
Grou
ulletin 0000
Web sitewww.bio-rad.com Bio-Rad L
Also in: AustraliaPh. 02 9914 2800, Fx. 02 9914 2889 Austri
zil Ph. 55 21 507 6191 Can
Br
Czech Republic Ph. (420) 2-4141 0532 Fx. (420) 2-4143 1642 Denmark
Finlan
Kong Ph. 852-2789-3300, Fx. 852-2789-1257 Indi
Hon
Isr
Ph. 03 951 4127, Fx. 03 951 4129 Japan Ph. 03-5811-6270, Fx. 03-5811-6272
Ph. 82-2-3473-4460, Fx. 82-2-3472-7003 Latin AmericaPh. 305-894-5950, Fx. 305-894-5960 MexicoPh. 52 5 534 2552 to 54, Fx. 52 5 524 597
K
The NetherlandsPh. 0318-540666, Fx. 0318-542216 New ZealandPh. 64-9-4152280, Fx. 64-9-443 3097 Norway Ph. 47-23-38-41-30, Fx. 47-23-38-41-39
P
Ph. (48) 22-8126 672, Fx. (48) 22-8126 682 Portugal
apore Ph. 65-2729877, Fx. 65-2734835 South Africa 00 27 11 4428508, Fx. 00 27 11 4428525Spain Ph. 34 91 590 5200, Fx. 34 91 590 5211
Sin
n Ph. 46 (0)8-55 51 27 00, Fx. 46 (0)8-55 51 27 80 SwitzerlandPh. 061 717-9555, Fx. 061 717-9550 United Kingdom Ph. 0800-181134, Fx. 01442-25911
Rev
in Offi
hin
Belgium Ph. 09-385 55 11, Fx. 09-385 65 54
4-17
iaPh. 7 095 721 1404, Fx. 7 095 721 1412
00-000 0000 Sig 040
4-123
 Loading...