


iDect_V2i_IFU_master.book Page 1 Thursday, March 27, 2008 2:54 PM
USER GUIDE
iDECT V2i System
DIGITAL CORDLESS
TELEPHONE & ANSWERING MACHINE
THIS EQUIPMENT IS NOT DESIGNED FOR MAKING EMERGENCY TELEPHONE CALLS WHEN THE POWER FAILS. ALTERNATIVE ARRANGEMENTS SHOULD BE MADE FOR ACCESS TO DIAL EMERGENCY SERVICES.
Ver. 4, Feb 08 (BTP) |
|
|
Before operating this set, |
|
|
please read these instructions carefully. |
|
|
|
|
|
|
|
|
|
|
|
|
|

iDect_V2i_IFU_master.book Page 1 Thursday, March 27, 2008 2:54 PM
Important note — emergency calls
The iDECT V2i is not designed for making emergency calls if the mains power fails. So you should make alternative arrangements for access to Emergency Services.
(This means that you should also have a basic phone, that does not need mains power, connected to your line so that you can make calls during a power failure.)
If you need help …
The Help Line is available from 9.00 am to 5.00 pm, Monday to Friday, on
0845 345 9677
Calls are charged at Local Call rate.
Unpacking your iDECT V2i system
In the box are:
■the cordless handset (up to four, depending on which iDECT V2i system you’ve bought)
■the base unit
■two batteries and a battery compartment cover for each handset
■a telephone line cable for the base unit
■a mains power lead and adapter for the base unit
■up to three charger pods, each with a separate mains power lead and adapter, for multi-handset systems
Keep the packaging materials in a safe place in case you later need to transport the unit. Keep your sales (till) receipt, which is your guarantee.
Before you can use the handset to make calls you’ll need to fit and fully charge the batteries, as described on pages 7 and 8. Please read the notes on page 4 before you install the base unit.

iDect_V2i_IFU_master.book Page 1 Thursday, March 27, 2008 2:54 PM
Where to find it
MMENU/OK/MUTE button
Press to start using Menu functions
Press while reviewing Redial or Caller Display records: to enter sub-menu.
When editing or using Menu functions, press to confirm your selection.
Press during a call to mute the mouthpiece so the person on the other end can’t hear you.
oPhone On/SPEAKERPHONE button
Press to begin or answer a call.
Press to switch the speakerphone on and off.
uUP/Caller Display (CID) button
Press during a call to increase the volume in the earpiece or speakerphone.
Press while using Menu functions to move up through the options.
Press during Standby to show the list of Caller Display* records.
*KEYPAD LOCK button
Press and hold during Standby to lock or unlock the keypad.
OLast Number Redial button
Press to open a list of the last 10 phone numbers you called.
VHANDSET LOCATOR (PAGE) button
Press to make all registered handsets ring (this is useful if you've forgotten where you put a handset).
HANDSET CHARGING light
|
The navigation |
U |
UP |
|
|
buttons |
u |
|
|
|
In the instructions, these |
|
||
|
buttons are represented |
d |
|
|
|
by arrows, as shown |
D |
|
|
|
here. |
DOWN |
||
|
|
|
|
|
|
|
|
|
|
|
|
|
|
|
|
|
|
|
|
BBACK/R (Recall)/C (Delete) button
Press while using Menu functions, to cancel what you’re doing and return the display to Standby mode.
Press to use the Recall function. You may need the Recall function during a call if your iDECT V2i is connected to a PBX, or if you use BT’s Select Services.
When editing, press to delete a digit or character entered.
fHANG UP/ON–OFF button
Press to end a call.
Press and hold for more than 3 seconds to turn the handset off, and press to turn the handset on.
 dDOWN/Phonebook button
Press during a call to turn down the volume in the earpiece or speakerphone. Press while using Menu functions to move down through the options.
Press during Standby to open the Phonebook.
#Ringer off/Pause button
Press and hold during Standby to turn the handset ringer on or off.
Press and hold while dialling to insert a pause (you might need this on a PBX).
Press while entering phonebook names to switch between upper and lower case.
IINT (Intercom) button
Press to inititate an internal call (if you have more than one handset).
Press during a call to hold the line and page another handset or toggle between an external and internal call. Press and hold to start a conference call.
IN USE light
This comes on when you have a connection to the telephone line, and flashes when you have new Caller Display* records or the base is paging or in registration mode.
* To subscribe to network features like Caller Display and Call Waiting, simply call your network service provider (the company that supplies your line). You don’t need to do anything special on your iDECT V2i phone to set these features up.
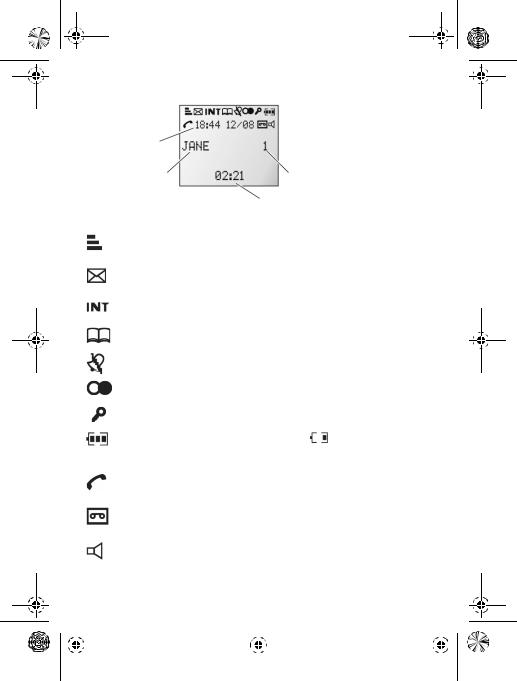
iDect_IFU_00_Symbols on the display.fm Page 1 Monday, March 31, 2008 2:53 PM
Symbols on the display
The time and date
The handset’s name
(the default is HANDSET)
The handset’s number (may be 2, 3 or 4 if you have more than one handset on your iDECT V2i system)
Call Duration.
|
|
|
|
What the symbols mean |
|
|
|
|
|||
|
|
|
Signal |
This flashes while the handset is trying to establish a link to the |
|
|
|||||
|
|
|
level |
base unit. If it flashes while you’re on a call, move closer to |
|
|
|||||
|
|
|
|
the base unit. |
|
|
|
|
|||
|
|
|
Voice Mail |
Flashes when a new voice mail is received. (This is a caller |
|
|
|||||
|
|
|
|
display service and is not usually available from UK network |
|
|
|||||
|
|
|
|
providers.) |
|
|
|
|
|||
|
|
|
Intercom call |
Flashes while your handset is ringing for an intercom call, and |
|
|
|||||
|
|
|
|
comes on steadily when the call is connected. |
|
|
|||||
|
|
|
|
|
|
|
|
|
|
|
|
|
|
|
Memory/ |
Appears when you're in the Phonebook list or menu options. |
|
|
|||||
|
|
|
store |
|
|
|
|
|
|
|
|
|
|
|
Ringer |
Appears when the ringer volume is set to zero. |
|
|
|||||
|
|
|
Silenced |
|
|
|
|
|
|
|
|
|
|
|
|
|
|
|
|
|
|
|
|
|
|
|
Redialling |
Appears when you are in the Last Number Redial list or menu |
|
|
|||||
|
|
|
|
options. |
|
|
|
|
|||
|
|
|
|
|
|
|
|
|
|
|
|
|
|
|
Keypad Lock |
Appears when the keypad is locked. |
|
|
|
|
|||
|
|
|
|
|
|
|
|
|
|
|
|
|
|
|
Battery |
When this shows ‘nearly empty’ |
, put the handset on the |
|
|
||||
|
|
|
charge |
base unit or charger pod to charge the batteries. |
|
|
|||||
|
|
|
|
|
|
||||||
|
|
|
|
While the batteries are being charged, the symbol blinks. |
|
|
|||||
|
|
|
|
|
|
|
|
|
|
|
|
|
|
|
Phone |
Appears when you have a connection to the outside line. |
|
|
|||||
|
|
|
|
Flashes when there’s an incoming call to be answered |
|
|
|||||
|
|
|
|
(even if the ringer is turned off). |
|
|
|
|
|||
|
|
|
|
|
|
|
|
|
|
|
|
|
|
|
TAM |
Appears when the answering machine function is on. Flashes |
|
|
|||||
|
|
|
|
when a new message is received. (The display also shows “X |
|
|
|||||
|
|
|
|
New Msg.”) |
|
|
|
|
|||
|
|
|
|
|
|
|
|
|
|
||
|
|
|
Speakerphone Appears when the speakerphone is turned on. |
|
|
||||||
|
Help Line: 0845 345 9677 (Local Call rate) |
1 |
|
|
|||||||
|
|
|
|
|
|
|
|
|
|
|
|
|
|
|
|
|
|
|
|
|
|
|
|
|
|
|
|
|
|
|
|
|
|
|
|

iDect_V2i_IFU_master.book Page 2 Thursday, March 27, 2008 2:54 PM
Contents
Read these notes first |
4 |
Choosing a site for the base unit and |
|
charger pod |
4 |
Radio signals between handset and |
|
base unit |
4 |
Mains power connection |
4 |
If you have a Broadband line |
5 |
Installation and set-up |
6 |
|
|
Before you start |
9 |
|
|
Electrical safety |
9 |
Interference |
9 |
‘Out of range’ warning |
9 |
Switching on and off |
10 |
|
|
To lock the keypad |
10 |
Your handset’s name |
11 |
|
|
To change the name |
11 |
Date and time |
12 |
|
|
Ringer volume and melody |
13 |
|
|
Making and answering calls |
15 |
|
|
Using the speakerphone |
15 |
To make a call |
15 |
To answer a call |
15 |
To end a call |
15 |
Earpiece volume |
16 |
To mute the mouthpiece |
16 |
Last Number Redial (LNR) |
16 |
To store a Redial number in the |
|
Phonebook |
17 |
To delete a redial number |
18 |
To delete all redial numbers |
18 |
Using the Phonebook |
19 |
To store a new number |
19 |
To call a stored number |
20 |
To edit a Phonebook entry |
20 |
To delete a Phonebook entry |
21 |
To delete all Phonebook entries |
21 |
Caller Display |
22 |
To check Caller Display records |
23 |
To return a call |
23 |
To store a Caller Display number in the
Phonebook |
23 |
To delete a caller display record |
24 |
To delete all caller display records |
24 |
Using a multi-handset system |
25 |
|
|
To make an intercom call |
25 |
To end an intercom call |
25 |
To answer an intercom call |
26 |
To transfer a call |
26 |
To toggle between two calls |
27 |
To set up a three-way conference |
27 |
To end the conference |
27 |
New Call tone |
28 |
To page all handsets from the base |
|
unit |
28 |
Answering machine setup |
29 |
|
|
The telephone answering modes |
29 |
To change answering mode |
29 |
The outgoing message |
30 |
To record a new outgoing message |
30 |
Setting the ring delay |
31 |
Call Screening |
32 |
To switch call screening on or off |
32 |
2

iDect_V2i_IFU_master.book Page 3 Thursday, March 27, 2008 2:54 PM
Answering machine operation |
33 |
Turn the answering machine on or |
|
off |
33 |
Message Playback |
34 |
To playback recorded messages |
34 |
To record a memo |
35 |
Remote operation |
36 |
To activate remote control |
36 |
To play messages remotely |
37 |
Custom settings |
41 |
|
|
Earpiece volume |
41 |
Key beep |
42 |
Display language |
43 |
Recall time |
44 |
The master PIN |
45 |
Using reset |
46 |
Default settings |
47 |
Troubleshooting |
48 |
Cleaning and care |
53 |
|
|
EC Declaration of Conformity |
53 |
|
|
Guarantee and service |
54 |
|
|
Technical details |
55 |
Registering new handsets |
56 |
|
|
To register a new handset |
56 |
Registration failed? |
57 |
To de-register a handset |
57 |
To register to a different brand of base |
|
unit |
58 |
Index |
59 |
|
|
Connection and conditions for use
You can connect your iDECT V2i to a direct exchange line (DEL) — a line connected to a local exchange, with its own phone number; to an extension socket connected to a DEL; or to an extension on an approved compatible PBX. Do not connect the iDECT V2i as an extension to a payphone.
The ringer equivalence numbers (RENs) of all instruments (phones, fax machines, etc.) connected to an exchange line must not add up to more than 4 — otherwise, one or more of them may not ring and/or answer calls correctly. The iDECT V2i has a REN of 1, and most other telephones have a REN of 1 unless marked otherwise.
|
Help Line: 0845 345 9677 (Local Call rate) |
3 |
|
||||
|
|
|
|
|
|
|
|
|
|
|
|
|
|
|
|
|
|
|
|
|
|
|
|

iDect_V2i_IFU_master.book Page 4 Thursday, March 27, 2008 2:54 PM
Read these notes first
Choosing a site for the base unit and charger pod
Radio signals between handset and base unit
Mains power connection
The base unit and charger pod(s) should be placed on a level surface, in a position where:
■the mains adapter plug will reach an easily accessible 230-V AC switched mains supply socket — never try to lengthen the mains power cable
■the base unit’s telephone line cable will reach your telephone line socket or extension socket (the charger pod does not have a telephone line connection)
■it is not close to another telephone — this can cause radio interference
■it is not close to a sink, bath or shower, or anywhere else where it might get wet
■it is not close to other electrical equipment — fridges, washing machines, microwave ovens, fluorescent lights TVs etc.
To use your handset and base unit together, you must be able to establish a radio link between them. Be aware that:
■Any large metal object — like a refrigerator, a mirror or a filing cabinet — between the handset and the base unit may block the radio signal.
■Other solid structures, like walls, may reduce the signal strength.
IMPORTANT — The iDECT V2i base unit and charger pod must be used with the mains adapter supplied with the unit. Using any other adapter will result in noncompliance with EN60950, and will invalidate any approval given to this apparatus.
Make sure mains power to the base unit stays switched on. The iDECT V2i needs electrical power for normal operation; not just for charging the batteries.
4

iDect_V2i_IFU_master.book Page 5 Thursday, March 27, 2008 2:54 PM
Read these notes first
If you have a If you connect your telephone to a line with a broadband Broadband line connection, you will need to insert a micro-filter between
the telephone and the telephone line; otherwise you may
get interference between the telephone and the broadband, which could cause problems.
TELEPHONE WALL
SOCKET
MICROFILTER
In a home with broadband, every telephone must have a micro-filter connected, not just the one at the telephone point that your modem is connected to. If you need more broadband micro-filters, contact your broadband supplier.
|
Help Line: 0845 345 9677 (Local Call rate) |
5 |
|
||||
|
|
|
|
|
|
|
|
|
|
|
|
|
|
|
|
|
|
|
|
|
|
|
|

iDect_V2i_IFU_master.book Page 6 Thursday, March 27, 2008 2:54 PM
Installation and set-up
1Choose a suitable
site for the base unit
See page 4
2Connect the
mains power lead and the telephone line
cord into the back of the
base unit Use the telephone line cord supplied with your
iDECT V2i —
do not use any other telephone line cord
3Plug the mains adapter
into a 230 V AC, 50 Hz mains socket, with the switch on the socket set to OFF
See the note on page 4
4If you have one or more charger pods …
Plug the mains adapter into a 230 V AC,
50 Hz mains socket, with the switch on the socket set to OFF
5 Switch on at the mains socket(s)
6

iDect_V2i_IFU_master.book Page 7 Thursday, March 27, 2008 2:54 PM
Installation and set-up
6 Fit a battery pack in each handset
A. Remove the battery compartment cover by pressing down on the top of the cover and sliding it down.
B. Plug the battery connector into the socket at the top of the battery compartment.
C. Place the battery in the compartment
D. Fit the battery compartment cover, sliding it into place and pressing firmly to make sure it is secure
Always use the battery pack supplied — never use any other kind of batteries in the handset.
Make sure the battery compartment door is securely in place. If you have problems fitting the batteries,
contact the Help Line on 0845 345 9677.
|
Help Line: 0845 345 9677 (Local Call rate) |
7 |
|
||||
|
|
|
|
|
|
|
|
|
|
|
|
|
|
|
|
|
|
|
|
|
|
|
|
iDect_V2i_IFU_master.book Page 8 Thursday, March 27, 2008 2:54 PM
Installation and set-up
7Charge the batteries for 15 hours
Before you use the handset for the first time, it’s important to charge the batteries fully.
The handset ‘beeps’ when it’s correctly placed on the charging cradle.
Leave the handset on the charging cradle for 15 hours.
8 Connect the base unit to the telephone line
The ‘battery charge level’ symbol blinks
Switch off power at the mains socket
Insert the telephone line plug into the socket as shown
Switch mains power back on
Make sure the mains socket is switched on if you want to use the phone — it will not work without electrical power
Use the plug to raise the shutter before pushing it into the socket
NOTE: the charger pod does not have a connection to the telephone line.
8

iDect_V2i_IFU_master.book Page 9 Thursday, March 27, 2008 2:54 PM
Before you start
Electrical safety
Interference
‘Out of range’ warning
■DON’T let the base unit or charger pod get wet. Electrical equipment can cause serious injury if used while you are wet or standing in water.
■If the base unit or charger pod ever falls into water, DON’T retrieve it until you have unplugged the power lead from the mains and the telephone line plug from the telephone socket (base unit only); then pull it out by the unplugged cables.
■NEVER use your iDECT V2i outdoors during a thunderstorm — unplug the base unit from the telephone line and the mains socket when there are storms in your area. Damage caused by lightning is not covered by the guarantee.
If the sound quality gets worse as you move around
while on a call, this is probably caused by interference between the handset and the base unit, perhaps because you are too near to another phone or other electrical equipment.
Move to a different position to clear the interference. If you do not move, your call may be cut off.
Radio interference in the environment may occasionally cause a short break in the link between the handset and the base unit while you are on a call. The ‘signal level’ symbol on the handset’s display may flash until the link is restored.
If you hear a warning tone during a call, and/or the sound in the earpiece becomes faint or distorted, you may be going out of range of the base unit. Move nearer to the base unit within 20 seconds, until the tone stops. Otherwise, your call may be cut off.
|
Help Line: 0845 345 9677 (Local Call rate) |
9 |
|
||||
|
|
|
|
|
|
|
|
|
|
|
|
|
|
|
|
|
|
|
|
|
|
|
|

iDect_V2i_IFU_master.book Page 10 Thursday, March 27, 2008 2:54 PM
Switching on and off
To switch the handset on and off
!
!
Notes
To lock the |
! |
keypad |
|
|
! |
|
|
Note |
|
10
To switch the handset off (in case you need to save battery power when the handset is away from the base unit):
fPress the HANG UP button and hold it for more than 2 seconds
! The display goes blank.
To switch the handset back on:
fBriefly press the HANG UP button, or replace the handset on the base unit or charger pod
! The display shows Searching.... and then when it detects the base unit it will return to standby mode.
■When the handset is switched off, it can’t be used for making calls, including emergency calls.
■When the handset is switched off, it won’t ring for incoming calls, but the base unit will ring. To answer a call when the handset is switched off, you need to switch it back on. It may take a few moments for the handset to re-establish a radio link with the base unit.
*Press the LOCK/* button and hold it for 2 second
! The display shows  and Keys Locked
To unlock the keypad:
*Press the LOCK/* button and hold it for 2 seconds or replace the handset on cradle.
■Incoming calls can still be answered normally even if the keypad is locked.

iDect_V2i_IFU_master.book Page 11 Thursday, March 27, 2008 2:54 PM
Your handset’s name
Before you start to use your iDECT V2i handset, especially if you have a multi-handset system, you’ll probably want to personalise the display with your name. The name can have up to 12 characters (including spaces).
To change |
1 |
M |
the name |
|
|
2 d
3 M
4 d
5 M
6 B
7 .
8 M
9 f
Press the MENU/OK button
! Display shows Main Menu > Phonebook
Press the Dbutton TWICE
!Display shows Main Menu > Personal Set
Press the MENU/OK button
!Display shows Personal Set > Handset Tones
Press the Dbutton ONCE
!Display shows Personal Set > Handset Name
Press the MENU/OK button
!The display shows Enter Name and the current name, or a blank line if the default name has not been changed.
If necessary press the BACK button to delete characters from the current name.
Key in your chosen name (see page 19 for how to enter letters).
When you’ve finished, press the MENU/OK button
Press the HANG UP button to go back to standby mode
|
Help Line: 0845 345 9677 (Local Call rate) |
11 |
|
||||
|
|
|
|
|
|
|
|
|
|
|
|
|
|
|
|
|
|
|
|
|
|
|
|

iDect_V2i_IFU_master.book Page 12 Thursday, March 27, 2008 2:54 PM
Date and time
To set the date and time:
1 M Press the MENU/OK button
! Display shows Main Menu > Phonebook
2 d Press the Dbutton ONCE
! Display shows Main Menu > Set Date/Time
3 M Press the MENU/OK button
! Display shows 00:00 01/01 > Set Date/Time, with the first digit of the time flashing.
4 M
5 M
6 f
Key in the time and date in the format HH:MM DD/MM then press the MENU/OK button
Remember to use the 24-hour clock and to include any 0s (zeroes) - for example, 9:30 am is
09:30; 6:05 pm is 18:05. Press the MENU/OK button
! Any other handsets that have been registered will be automatically updated.
Press the HANG UP button to go back to standby mode
12

iDect_V2i_IFU_master.book Page 13 Thursday, March 27, 2008 2:54 PM
|
|
Ringer volume and melody |
|
|
M Press the MENU/OK button |
Handset |
1 |
|
ringer |
|
! Display shows Main Menu > Phonebook |
|
2 |
d Press the Dbutton TWICE |
|
|
! Display shows Main Menu > Personal Set |
|
3 |
M Press the MENU/OK button |
|
|
! Display shows Personal Set > Handset Tones |
|
4 |
M Press the MENU/OK button |
|
|
! Display shows Handset Tones > Ring Volume |
|
5 |
M Press the MENU/OK button |
|
|
! The display shows the current volume, and |
|
|
the handset rings at that volume. |
|
6 |
: Use the Uor Dbutton to adjust the volume |
|
|
level between Low, Medium, High or Silence |
|
7 |
M Press the MENU/OK button to select the new |
|
|
level |
|
|
! Display shows Handset Tones > Ring Volume |
|
8 |
d Press the Dbutton |
! Display shows Handset Tones > Ring Melody
MPress the MENU/OK button
! The display shows the current melody, and the handset rings with that melody.
9 : Press the Uor Dbutton to play the melodies. When you reach the one you want (there are ten
Mdifferent melodies), press the MENU/OK button to select it
! The display shows Handset Tones > Ring Melody
10 f Press the HANG UP button to go back to standby mode
|
Help Line: 0845 345 9677 (Local Call rate) |
13 |
|
||||
|
|
|
|
|
|
|
|
|
|
|
|
|
|
|
|
|
|
|
|
|
|
|
|

iDect_V2i_IFU_master.book Page 14 Thursday, March 27, 2008 2:54 PM
Ringer volume and melody
Base unit ringer
14
1 |
M Press the MENU/OK button |
|
! Display shows Main Menu > Phonebook |
2 |
d Press the Dbutton TWICE |
|
! Display shows Main Menu > Personal Set |
3 |
M Press the MENU/OK button |
|
! Display shows Personal Set > Handset Tones |
4 |
d Press the Dbutton THREE times |
|
! Display shows Personal Set > BaseTone |
5 |
M Press the MENU/OK button |
|
! Display shows BaseTone > BS Ring Vol |
6 |
M Press the MENU/OK button |
|
! The display shows the current volume, and |
|
the base rings at that volume. |
7 |
: Use the Uor Dbutton to adjust the volume |
|
level between Ring Vol Low, Ring Vol Med, Ring Vol |
|
High or Silence |
8 |
M Press the MENU/OK button to select the new level |
|
! Display shows BaseTone > BS Ring Vol |
9 |
d Press the Dbutton |
M! Display shows BaseTone > BS Ring Mel
Press the MENU/OK button
! The display shows the current melody, and the base rings with that melody.
10 : Press the Uor Dbutton to play the melodies. When you reach the one you want (there are
Mthree different melodies), press the MENU/OK button to select it
! The display shows BaseTone > BS Ring Mel
11 f Press the HANG UP button to go back to standby mode

iDect_V2i_IFU_master.book Page 15 Thursday, March 27, 2008 2:54 PM
|
Making and answering calls |
|
|
|
The speakerphone lets you hear calls without holding |
Using the |
|
|
speakerphone |
|
the handset to your ear. |
|
|
You can switch between speakerphone and earpiece |
omode during calls at any time by pressing the PHONE button. The display will show the speakerphone icon.
To make a |
1 |
. |
Key in the telephone number |
call |
|
B |
If you make a mistake, press the BACK button |
|
|
to clear digits one by one from the display. |
|
|
2 |
o |
Press the PHONE button. The display shows |
|
|
|
Calling and the number being dialled. |
|
|
|
(You can dial the number after you press the |
|
|
|
PHONE button to get Dial tone first if you |
|
|
|
prefer, but you can’t correct any mistakes if you |
|
|
|
do it this way.) |
|
|
When there’s an incoming call, the base unit and |
|
To answer a |
|
||
call |
|
handset ring (unless the ringers are turned off). If you |
|
|
|
subscribe to Caller Display (see page 22) the caller’s |
|
|
|
number or name may appear on the display; otherwise, |
|
|
|
the display shows External CALL. |
|
|
|
Press PHONE button to answer the incoming call. |
|
|
|
f Press the HANG UP button so that the IN USE |
|
To end a call |
! |
||
|
|
|
light on the base unit goes out |
!Or just replace the handset on the base unit
! The display shows Call Ended and the duration of the call for 5 seconds.
|
Help Line: 0845 345 9677 (Local Call rate) |
15 |
|
||||
|
|
|
|
|
|
|
|
|
|
|
|
|
|
|
|
|
|
|
|
|
|
|
|

|
|
|
|
|
|
|
|
|
|
iDect_V2i_IFU_master.book |
Page 16 Thursday, March 27, 2008 2:54 PM |
|
|||
|
|
Making and answering calls |
|
|
|
||
|
|
|
|
During a call, to adjust the volume in the |
|||
|
|
Earpiece |
|
||||
|
|
volume |
earpiece or speakerphone: |
||||
! : Press the Uor Dbutton
There are three volume levels. After you end the call, the volume will stay at the level you’ve set.
To mute the mouthpiece
! M
Last Number 1 |
O |
Redial (LNR) |
|
2 |
: |
3 |
o |
|
|
16
During a call, to mute the mouthpiece so the person on the other end can’t hear you:
Press the MENU/OK button. The display shows Mute On.
To un-mute the mouthpiece, press the MENU/OK button again.
Press the REDIAL button
! Display shows Redial and the last number dialled
Press the Uor Dbuttons to choose the number from the last 10 numbers dialled Press the PHONE button to dial the number
 Loading...