


 Loading...
C103X/C123X Series
Digital Camera User
Manual
Welcome

Copyright
Copyright 2009 by BenQ Corporation. All rights reserved. No part of this publication may be reproduced, transmitted, transcribed, stored in a retrieval system or translated into any language or computer language, in any form or by any means, electronic, mechanical, magnetic, optical, chemical, manual or otherwise, without the prior written permission of this company.
Disclaimer
BenQ Corporation makes no representations or warranties, either expressed or implied, with respect to the contents hereof and specifically disclaims any warranties, merchantability or fitness for any particular purpose. Further, BenQ Corporation reserves the right to revise this publication and to make changes from time to time in the contents hereof without obligation of this company to notify any person of such revision or changes.
All other logos, products, or company names mentioned in this manual may be the registered trademarks or copyrights of their respective companies, and are used for informational purposes only.
Disposal of Waste Electrical and Electronic Equipment by users in private households in the European Union.
This symbol on the product or on the packaging indicates that this can not be disposed of as household waste. You must dispose of your waste equipment by handing it over to the applicable take-back scheme for the recycling of electrical and electronic equipment. For more information about recycling of this equipment, please contact your city office, the shop where you purchased the equipment or your household waste disposal service. The recycling of materials will help to conserve natural resources and ensure that it is recycled in a manner that protects human health and environment.
CE Regulatory Notice
Hereby, BenQ Corp. declares under our responsibility that the product is in conformity with the requirements set out in the Council Directive on the Approximation of the Laws of the Member States relating, Electromagnetic Compatibility Directives (2004/108/EC) and Low Voltage Directive (2006/95/EC).
A “Declaration of Conformity” in accordance with the above Directives has been made and is available from BenQ Corp. upon request.
FCC Statement
This equipment has been tested and found to comply with the limits for a Class B digital device, pursuant to Part 15 of the FCC Rules. These limits are designed to provide reasonable protection against harmful interference in a residential installation. This equipment generates, uses and can radiate radio frequency energy and, if not installed and used in accordance with the instructions, may cause harmful interference to radio communications. However, there is no guarantee that interference will not occur in a particular installation. If this equipment does cause harmful interference to radio or television reception, which can be determined by turning the equipment off and on, the user is encouraged to try to correct the interference by one or more of the following measures:
•Reorient or relocate the receiving antenna.
•Increase the separation between the equipment and receiver.
•Connect the equipment into an outlet on a circuit different from that to which the receiver is connected.
•Consult the dealer or an experienced radio/TV technician for help.
This device complies with Part 15 of the FCC Rules. Operation is subject to the following two conditions: (1) This device may not cause harmful interference, and (2) this device must accept any interference received, including interference that may cause undesired operation.
FCC Caution: Any changes or modifications not expressly approved by the party responsible for compliance could void the user's authority to operate this equipment.

Safety warning and notice
Before operating the camera, please make sure that you read and fully understand the content in this section. If you ignore and violate all safety warning notices indicated in this section, the camera warranty may be void. Meanwhile, not only the camera but also you and all other people and things around you may be severely damaged, injured, or even placed in danger of death.
For your safety
•Keep the camera and its accessories out of the reach of babies, toddlers, and children. In particular, small parts such as memory cards and batteries could be easily dismantled and swallowed by them.
•Use only the original accessories to avoid possible risks to health and property, and thus meet all related legal regulations.
•Do not dismantle the camera under any circumstances.
•When using the flash, do not go too close to human eyes (particularly for babies, toddlers, and children) or animal eyes. Otherwise, when the flash fires, the light may cause damage to human eyes or irritate animals.
•Batteries could explode, for instance. All batteries can cause property damage, injury or burns if a conductive material such as jewelry, keys or beaded chains touch exposed terminals. The material may complete an electrical circuit and become quite hot. Exercise care in handling any battery, particularly when placing it inside your pocket, purse, or other container with metal objects. Do not dispose of batteries in fire as they may explode.
•To prevent electric shock, do not attempt to disassemble or repair your camera by yourself.
•Some camera models accept non-rechargeable batteries. When using these batteries, do not charge them. Otherwise, dangers such as explosion and fire may occur.
Warranty
•Warranty is void if damage or system failure occurred due to outside factors such as collision, fire, flood, dirt, sewage, earthquake, and other force majeure events as well as incorrect usage of electricity or use of non-original accessories.
•It is the sole responsibility of the user if problems (such as data loss and system failure) occurred due to non-factory installed software, parts, and/or non-original accessories.
•Do not change the camera. Any changes to the camera invalidate the warranty.
Taking care of your camera
•Always keep the camera in the accompanying leather case or pouch for better protection against splashes, dust, and collision.
•The only way of replacing the batteries and the memory card is to open the battery cover and memory card cover.
•Dispose of unwanted batteries and cameras as permitted by the laws in your countries.
•Water may cause a fire or electric shock. Therefore, store your camera in a dry place.
•If your camera becomes wet, wipe it with a dry cloth as soon as possible.
•Salt or seawater may cause severe camera damage.
•Do not drop, knock, or shake the camera. A rude behavior of using the camera may damage the internal electronic circuit board, deform the lens shape, or make the lens unretractable.
•Do not use harsh chemicals, cleaning solvents, or strong detergents to clean the camera.
•Finger grease may be left on the camera lens and will result in unclear images or videos. To avoid this problem, be sure to clean the camera lens before taking pictures or recording videos. You should also clean the camera lens on a regular basis.
•If the lens is dirty, use a lens brush or soft cloth to clean the lens.
•Do not touch the lens with your fingers.

•If a foreign substance or water gets in your camera, please turn the power off immediately and disconnect the batteries. Next, remove the foreign substance or water and send it to the maintenance center.
•Whenever there is data in the internal memory or the external memory card, you should make a backup copy to a computer or disc. So, you can have a backup solution if data loss occurs.
•If the lens cannot retract into the camera, please replace the batteries first (usually this is because of drained batteries). Then the lens should retract automatically. If the lens still cannot retract, please contact your dealer.
•Under no circumstances should you push the lens back manually as this may damage the camera.
•All original accessories are designed only for use with this camera model you purchased. Do not use these accessories with other camera models or cameras of other brands to avoid unpredictable danger or damage.
•Before initial use of a memory card, always use the camera to format the card first.
•Remember to slide the write-protect tab (if available) to the unlock position. Otherwise, all data (if any) on the memory card is protected and the card cannot be edited or formatted.
Operating environment
•Do not use or store your camera in the environments listed below:
•Direct sunlight
•Dusty places
•Next to an air conditioner, electric heater or other heat sources
•In a closed car that is in direct sunlight
•Unstable locations
•Do not use your camera outdoors when it is raining or snowing.
•Do not use your camera in or near water.
•The camera operating temperature is between 0 and 40 degrees Celsius. It is normal for the operating time to be shortened when the temperature is low.
•The capacity of your camera batteries will reduce each time it is charged/emptied.
•Storage at too high or low temperatures will also result in a gradual capacity loss. As a result, the operating time of your camera may be considerably reduced.
•It is normal for the camera to become warm during operation, because the camera casing can conduct heat.

Do not hold the camera by excessive force. Plus, be sure to protect the camera from strong impacts.
If the batteries suddenly depleted and caused the lens fail to retract, please carefully protect the lens to avoid collision and insert batteries with full power ASAP.
Keep your camera away from sharp objects and avoid collision.
To avoid accidental falling, please attach the hand strap to the camera and always hold the camera by keeping the hand strap around your wrist.
When the camera is not in use, always turn the power off and make sure the lens has retracted successfully before storing the camera in its case. If you do not intend to use the camera for a long time, please remove the batteries
from the camera and store the batteries carefully.
When the camera is not in use, please place it in a steady place. Plus, always keep your camera away from pressure or any other similar environment (for example, in a pant pocket) to avoid possible damage.

|
Table of Contents |
|
Table of Contents |
|
|
Touring the camera ......................................................................... |
1 |
English |
Camera .............................................................................................................. |
1 |
|
Checking the package contents ........................................................................ |
1 |
|
Front view and bottom view ................................................................................... |
1 |
|
Preparing the camera for use .......................................................... |
3 |
|
Using multifunctional buttons ......................................................................... |
3 |
Using an SD card .............................................................................................. |
4 |
Initial setting .................................................................................... |
5 |
Setting language ................................................................................................ |
5 |
Setting date and time ........................................................................................ |
5 |
Operating the camera ...................................................................... |
6 |
Capture mode .................................................................................. |
7 |
More capture options in FUNC menu ............................................................ |
8 |
Flash mode ........................................................................................................ |
9 |
Face Tracking .................................................................................................... |
9 |
Focus mode ..................................................................................................... |
10 |
Image size ........................................................................................................ |
10 |
Image quality ................................................................................................... |
11 |
Setting EV ........................................................................................................ |
11 |
White Balance ................................................................................................. |
11 |
ISO ................................................................................................................... |
12 |
AE metering ..................................................................................................... |
13 |
Effect ................................................................................................................ |
13 |
Shooting mode ................................................................................................ |
14 |
Aperture Priority ............................................................................................. |
16 |
Shutter Priority ............................................................................................... |
16 |
Manual mode .................................................................................................. |
16 |
Drive mode ...................................................................................................... |
17 |
Auto Exposure Bracketing (AEB) .................................................................. |
17 |
AF area ............................................................................................................. |
18 |
AF Assist Lamp ................................................................................................ |
18 |
Setting sharpness, saturation and contrast .................................................... |
18 |
Digital Zoom ................................................................................................... |
18 |
Date Stamp ...................................................................................................... |
19 |
Instant Review ................................................................................................. |
19 |
Smart Scene ..................................................................................................... |
19 |

|
Table of Contents |
|
|
Blink Detector ................................................................................................. |
19 |
|
Love Portrait .................................................................................................... |
20 |
|
Pre-composition .............................................................................................. |
20 |
English |
Movie Record mode settings .......................................................................... |
20 |
|
Smile Catch ...................................................................................................... |
20 |
|
Battery status ................................................................................................... |
21 |
|
Other settings ................................................................................. |
22 |
|
Playback mode ............................................................................... |
24 |
Options for playback and editing ................................................................... |
25 |
Enlarging an image ................................................................................................. |
25 |
Rotating an image ................................................................................................... |
25 |
Viewing multiple files at a time ............................................................................. |
25 |
Playing back video clips ......................................................................................... |
25 |
Adjusting the playback volume ............................................................................. |
26 |
Slideshow ................................................................................................................ |
26 |
Deleting files ........................................................................................................... |
27 |
Protecting files ........................................................................................................ |
27 |
Red-eye Removal .................................................................................................... |
27 |
Voice memo ............................................................................................................ |
27 |
Photo Effect ............................................................................................................ |
28 |
Trimming ................................................................................................................ |
28 |
Resizing ................................................................................................................... |
29 |
Startup image .......................................................................................................... |
29 |
DPOF ...................................................................................................................... |
29 |
Working with computer and AV system ...................................... |
30 |
Bundled software ............................................................................................. |
30 |
Connecting the camera to a computer ........................................................... |
30 |
Connecting the camera to an AV system ....................................................... |
30 |
Printing images ................................................................................................ |
30 |
Printing with PictBridge ........................................................................................ |
30 |
Troubleshooting and service information ................................... |
32 |
Technical support ........................................................................................... |
33 |
Specifications ................................................................................. |
34 |
|
Touring the camera 1 |
|
|
Touring the camera |
|
|
|
Checking the package contents |
|
English |
|
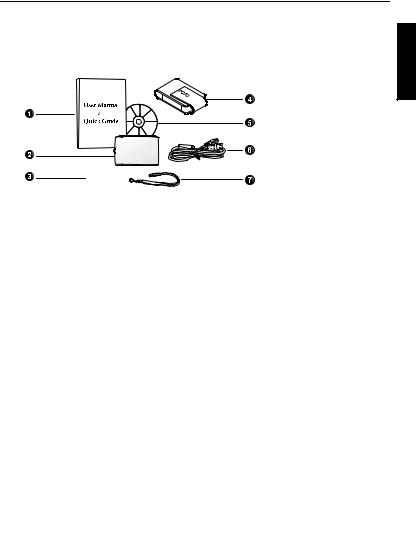
Carefully unpack your kit box and ensure that you have the following items. |
|||
|
|||
1. |
User Manual or |
|
|
|
Quick Guide |
|
|
2. |
Digital camera |
|
|
3. |
Non-rechargeable |
|
|
|
AA Alkaline |
|
|
|
batteries |
|
|
4. |
Leather case |
|
|
5. |
Software & User |
|
|
|
Manual CD |
|
|
6. |
USB cable |
|
|
7. |
Hand strap |
|
|
•All pictures, screen captures, and icons used in this manual are for illustration only. Actual and available products, accessories, as well as their appearance may vary depending on sales region.
•If any items are missing or damaged, contact your dealer.
•Save the packaging for future shipment or storage.
Camera
Front view and bottom view
1. Shutter button
2. S.S.F. (Super Shake-Free) button
3. Power button
4. Speaker
5. Flash
6. AF Assist Lamp / Self-timer LED indicator
7. USB / AV port
8. Lens
9. Microphone
10. Battery cover
11. Memory card cover
12. Tripod mount
2 |
Touring the camera |
|
|
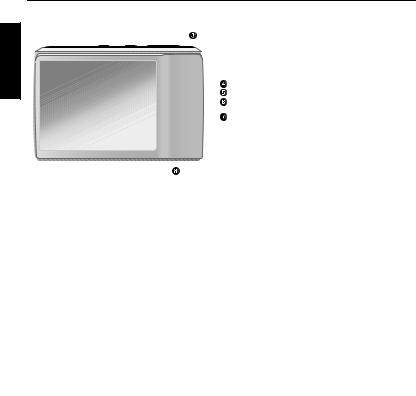
Rear view. |
|
|
|
|
1. |
LCD display |
|
English |
2. |
W (Wide) |
- Zoom-out, turn off the |
|
Shooting mode description, or enter the |
||
|
|
||
|
|
thumbnail view (Playback mode) |
|
|
3. |
T (Tele) |
- Zoom-in or turn on the |
|
|
Shooting mode description |
|
4. |
Playback mode button |
- Toggle |
|
between Capture and Playback modes |
|
5. |
Status LED |
|
6. |
Strap eyelet |
|
7. |
Multifunctional buttons (including a |
|
|
4-way control and a |
button) |
8. |
MENU button |
or return to the |
|
previous menu |
|
9. |
FUNC / Delete button |
- |
|
|
Activate FUNC menu (Capture mode) or |
|
|
delete photos (Playback mode) |
|
|
|
Indicator |
State |
Description |
|
|
|
Status LED |
No light |
The digital camera is off. |
|
|
|
|
Solid green |
The digital camera is ready to capture images. |
|
|
|
|
Blinking green |
The digital camera is powering on and cannot focus |
|
|
or capture video clips, or is in the power-saving |
|
|
mode. |
|
|
The flash is charging, or the USB communication/ |
|
|
transfer is in progress. |
|
|
|
Self-timer LED |
Blinking red |
The self-timer function is activated. |
|
|
|
•It is normal for the camera to become warm during operation, because the camera casing can conduct heat.
•The LCD display on this camera is manufactured with sophisticated technology, and more than 99.99% of the pixels on the LCD display meet standard specifications. Yet, it is possible that less than 0.01% of the pixels on the LCD display may have some light spots or show unusual colors. This is normal and does not indicate display malfunction, nor will this affect the pictures you take with the camera.
•The LCD monitor looks darker in strong sunlight or bright light. This is not a malfunction.
•To prevent your images from being blurred while pressing the shutter button, always hold the camera steady. This is especially important when you are shooting under low lighting conditions, under which your camera may reduce the shutter speed to ensure your images are properly exposed.
|
|
Preparing the camera for use |
3 |
|
Preparing the camera for use |
|
|||
Use only the specified batteries for the camera, and always turn off the camera before |
|
|||
removing the batteries. |
|
|
English |
|
A |
To install the batteries: |
|||
|
||||
|
1. |
Open the battery cover (A). |
|
|
|
2. |
Insert the batteries in the correct direction by |
|
|
B |
|
matching the + - label on the battery cover (B). |
|
|
3. |
Push the batteries all the way down. |
|
||
|
4. |
Close the battery cover (D). |
|
|
C |
To remove the batteries: |
1. Open the battery cover.
2. Pull the batteries out (C).
3. Close the battery cover (D).
D
Using multifunctional buttons
You can choose camera settings by pressing the 4-way control or the  button.
1.Left/Focus:
•Scrolls left in menus.
•Toggles between different focus modes.
2. Up:
• Scrolls up in menus.
• Turns on/off Face Tracking. See "Face Tracking" on page 9 for details.
• Rotates an image. See "Rotating an image" on page 25 for details.
3. Right/Flash:
• Scrolls right in menus.
•Selects a flash mode.
4.Down:
•Scrolls down in menus.
5. : Confirms a chosen setting.

|
4 |
Preparing the camera for use |
|
|
Using an SD card |
|
|
|
The camera comes with internal memory for storing captured images, video clips, or audio |
||
English |
files. You can also add an SD card to store more files. |
||
|
1. |
Make sure the camera is turned off. |
|
|
|
To install an SD card: |
|
|
|
2. |
Open the memory card cover. |
|
|
3. |
Insert an SD card in the correct direction. |
|
|
4. |
Close the memory card cover. |
|
|
To remove an SD card: |
|
|
|
1. |
Make sure the camera is turned off. |
|
|
2. |
Open the memory card cover. |
|
|
3. |
Lightly press the edge of the memory card to eject. |
|
|
4. |
Close the memory card cover. |
 Before initial use of an SD card, press
  >
>  > Manage Memory >
  /
/  >
>
 Format >
  > Yes to format the card first.

|
|
|
|
|
|
Initial setting |
5 |
Initial setting |
|
|
|
|
|||
You will be prompted to set up the language and the date and time when the camera is |
|
||||||
turned on for the first time. |
|
|
|
English |
|||
Setting language |
|
|
|
|
|||
Selects the language version shown on the screen. |
|
|
|
|
|||
To select a language: |
|
|
|
|
|||
1. |
Press |
> |
. (Step 1 is needed only after the |
|
|
|
|
|
initial setting is done.) |
|
|
|
|
|
|
2. |
Press |
or |
to locate |
, |
SET OK |
MENU |
|
and then press  or
or  .
.
3.Press  ,
,  ,
,  , or
, or  to locate the language you want.
4.Press  to set the language.
Setting date and time
When first time using the camera or the batteries has been removed from the camera for a long time, you need to set the date and time. They are used to record when a file was captured.
To set date and time:
SET OK |
MENU |
1.Press  >
>  . (Step 1 is needed only after the initial setting is done.)
2.Press  or
or  to locate Date/Time, and then press
  or
or  .
.
3.Press  or
or  to select date and time and date format. Press
  or
or  to move to another column as needed.
4.Press  to set the date and time.
Loading...