


 Loading...
 DC C1060/C850
Digital Camera
User Manual
Welcome

Copyright
Copyright 2008 by BenQ Corporation. All rights reserved. No part of this publication may be reproduced, transmitted, transcribed, stored in a retrieval system or translated into any language or computer language, in any form or by any means, electronic, mechanical, magnetic, optical, chemical, manual or otherwise, without the prior written permission of this company.
Disclaimer
BenQ Corporation makes no representations or warranties, either expressed or implied, with respect to the contents hereof and specifically disclaims any warranties, merchantability or fitness for any particular purpose. Further, BenQ Corporation reserves the right to revise this publication and to make changes from time to time in the contents hereof without obligation of this company to notify any person of such revision or changes.
All other logos, products, or company names mentioned in this manual may be the registered trademarks or copyrights of their respective companies, and are used for informational purposes only.
Disposal of Waste Electrical and Electronic Equipment by users in private households in the European Union.
This symbol on the product or on the packaging indicates that this can not be disposed of as household waste. You must dispose of your waste equipment by handing it over to the applicable take-back scheme for the recycling of electrical and electronic equipment.
For more information about recycling of this equipment, please contact your city office, the shop where you purchased the equipment or your household waste disposal service. The recycling of materials will help to conserve natural resources and ensure that it is recycled in a manner that protects human health and environment.
CE Regulatory Notice
Hereby, BenQ Corp. declares under our responsibility that the product is in conformity with the requirements set out in the Council Directive on the Approximation of the Laws of the Member States relating, Electromagnetic Compatibility Directives (2004/108/EC) and Low Voltage Directive (2006/95/EC).
A "Declaration of Conformity" in accordance with the above Directives has been made and is available from BenQ Corp. upon request.
FCC Statement
This equipment has been tested and found to comply with the limits for a Class B digital device, pursuant to Part 15 of the FCC Rules. These limits are designed to provide reasonable protection against harmful interference in a residential installation. This equipment generates, uses and can radiate radio frequency energy and, if not installed and used in accordance with the instructions, may cause harmful interference to radio communications. However, there is no guarantee that interference will not occur in a particular installation. If this equipment does cause harmful interference to radio or television reception, which can be determined by turning the equipment off
and on, the user is encouraged to try to correct the interference by one or more of the following measures:
•Reorient or relocate the receiving antenna.
•Increase the separation between the equipment and receiver.
•Connect the equipment into an outlet on a circuit different from that to which the receiver is connected.
•Consult the dealer or an experienced radio/TV technician for help.
This device complies with Part 15 of the FCC Rules. Operation is subject to the following two conditions: (1) This device may not cause harmful interference, and (2) this device must accept any interference received, including interference that may cause undesired operation.
FCC Caution: Any changes or modifications not expressly approved by the party responsible for compliance could void the user's authority to operate this equipment.
Taking care of your camera
•Do not use your camera in the following environmental range: temperature below 0°C or above 40°C.
•Do not use or store your camera in the environments listed below:
•Direct sunlight
•Highly humid or dusty places
•Next to an air conditioner, electric heater or other heat sources
•In a closed car that is in direct sunlight
•Unstable locations
•If your camera becomes wet, wipe it with a dry cloth as soon as possible.
•Salt or seawater may cause severe camera damage.
•Do not use solvents, such as alcohol, to clean your camera.
•If the lens is dirty, use a lens brush or soft cloth to clean the lens. Do not touch the lens with your fingers.
•To prevent electric shock, do not attempt to disassemble or repair your camera by yourself.
•Water may cause a fire or electric shock. Therefore, store your camera in a dry place.
•Do not use your camera outdoors when it is raining or snowing.
•Do not use your camera in or near water.
•If a foreign substance or water gets in your camera, please turn the power off immediately and remove the batteries. Remove the foreign substance or water, and send it to the maintenance center.
•Transfer the data to the computer as soon as possible to avoid losing your images or video clips.

Table of Contents
1. Touring Your Camera.............................................................. |
1 |
||
1.1 |
Checking the package contents............................................. |
1 |
|
1.2 |
Camera components .......................................................... |
2 |
|
|
1.2.1 |
Front view .......................................................... |
2 |
|
1.2.2 |
Rear view............................................................. |
2 |
|
1.2.3 |
LED indicators ..................................................... |
3 |
2. Preparing Your Camera for Use ............................................... |
4 |
||
2.1 |
Installing the batteries......................................................... |
4 |
|
2.2 |
Inserting and removing an SD memory card........................... |
4 |
|
3. Using the Camera .................................................................... |
6 |
||
3.1 |
Navigator ......................................................................... |
6 |
|
3.2 |
LCD monitor information (capture mode) ............................ |
6 |
|
3.3 |
Getting started................................................................... |
7 |
|
|
3.3.1 Turning the power on / off ..................................... |
7 |
|
|
3.3.2 Choosing the screen language ................................. |
7 |
|
|
3.3.3 Setting the date and time ........................................ |
7 |
|
|
3.3.4 |
Capture mode ...................................................... |
7 |
|
3.3.4.1 Getting started with capturing images ................ |
7 |
|
|
3.3.5 |
Using the flash...................................................... |
8 |
|
3.3.6 Using the drive mode............................................. |
8 |
|
|
3.3.7 Using the zoom function........................................ |
9 |
|
3.4 |
Menu options.................................................................. |
10 |
|
|
3.4.1 |
Changing the mode ............................................. |
10 |
|
3.4.1.1 Switching between capture and playback modes |
10 |
|
|
3.4.1.2 Selecting the scene mode ............................... |
10 |
|
|
3.4.2 |
Using the menus................................................. |
11 |
|
3.4.2.1 Capture menu list (still image)........................ |
11 |
|
|
3.4.2.2 Capture menu list (movie) ............................. |
12 |
|
|
3.4.3 |
Setup menu ....................................................... |
13 |
|
3.4.3.1 Setup menu list ............................................ |
13 |
|
3.5 |
Capturing movie clips....................................................... |
15 |
|
3.6 |
Capturing audio clips ....................................................... |
15 |
|
3.7 |
Other capturing functions ................................................. |
16 |
|
|
3.7.1 |
Setting the quality ............................................... |
16 |
English
Table of Contents |
i |

English
|
3.7.2 |
Setting the metering ............................................ |
16 |
|
3.7.3 |
Setting the white balance ...................................... |
16 |
|
3.7.4 |
Setting the ISO ................................................... |
17 |
|
3.7.5 |
Setting the EV compensation ................................ |
17 |
|
3.7.6 |
Setting the AEB .................................................. |
17 |
|
3.7.7 |
Setting the highlight ............................................ |
17 |
|
3.7.8 |
Setting the sharpness ........................................... |
17 |
|
3.7.9 |
Setting the photo effect ........................................ |
18 |
|
3.7.10 |
Setting the date stamp.......................................... |
18 |
|
3.7.11 |
Setting S.S.F. (Stabilizer) ...................................... |
18 |
|
3.7.12 |
Setting face tracking ............................................ |
18 |
|
3.7.13 |
Setting photo frame............................................. |
18 |
|
3.7.14 |
Setting P/Av/Tv/M (PASM; for C1060 only) ............ |
19 |
|
3.7.15 |
Setting Av/Tv/M (for C850 program mode only)...... |
19 |
|
3.7.16 Using Smile Catch............................................... |
19 |
|
3.8 |
Playback......................................................................... |
|
20 |
|
3.8.1 |
Playing back images............................................. |
20 |
|
3.8.2 |
Playing back movie clips ...................................... |
20 |
|
3.8.3 |
Magnifying & trimming still images ....................... |
20 |
|
3.8.4 |
Viewing in thumbnail .......................................... |
21 |
|
3.8.5 |
Playing a slideshow ............................................. |
21 |
|
3.8.6 |
Deleting a single file or all files .............................. |
21 |
|
3.8.7 |
Deleting multiple files.......................................... |
22 |
|
3.8.8 |
Setting the DPOF for printing ............................... |
22 |
|
3.8.9 |
Other playback functions ..................................... |
23 |
4. PC Dependent Features ......................................................... |
24 |
||
4.1 |
Bundled software ............................................................. |
24 |
|
4.2 Transferring files to your computer..................................... |
24 |
||
|
4.2.1 |
Step 1: Connect the digital camera to your computer |
24 |
|
4.2.2 |
Step 2: Download images or video clips .................. |
25 |
5. Troubleshooting.................................................................... |
26 |
||
6. Specifications |
........................................................................ |
28 |
|
7. Service Information ............................................................... |
30 |
||
ii Table of Contents

 Touring Your Camera
1.1Checking the package contents
Carefully unpack your kit box and ensure that you have the following items.
1. |
Quick Guide / |
|
User Manual |
2. |
Digital camera |
3. |
USB cable |
4. |
Non-rechargeable AA |
LENS |
batteries |
5. |
Hand strap |
6. |
Software and user |
|
manual CD |
7. |
Pouch |
8. |
AV cable |
•All pictures, screen captures, and icons used in this manual are for illustration only. Actual and available products, accessories, as well as their appearance may vary depending on sales region.
•If any of the items are missing or appear to be damaged, contact your dealer. Save the packaging in case you need to ship your camera for service.
•All electronic accessories (such as USB, AV cable, and battery) are designed to work with this BenQ digital camera model only. Do not use them with other digital camera models to avoid possible damage.
English
Touring Your Camera |
1 |
English
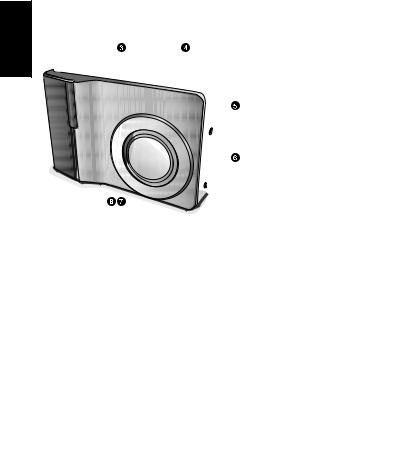
1.2Camera components
1.2.1 Front view
C1060 DC
DC
C1060
|
|
ICAL |
ZO |
|
|
|
PT |
|
|
|
X |
O |
|
OM |
|
|
|
E |
|
3 |
|
|
|
L |
|
|
|
N |
|
|
|
|
|
S |
|
|
f |
|
|
|
|
= |
|
|
|
|
6. |
|
|
|
|
2 |
|
|
|
|
-1 |
|
|
|
|
8.6 |
mm F=2.8-5.2 |
|
|
|
|
||
1.Shutter button
2.Built-in flash
3.Power button
4.Speaker
5.PC (USB) / AV Out terminal
6.Lens
7.Microphone
8.Self-timer LED
•If your BenQ camera’s lens remains extended after an involuntary shutdown, simply replace the batteries with new ones and restart your camera. Never force the lens inwards since this action will damage the camera and void the BenQ Warranty.
1.2.2 Rear view
1.LCD monitor
2.W
Zoom-out or thumbnail
3.T Zoom-in
4.Strap eyelet
5.Capture or Playback mode
6.Menu
7.Status LED
8.Navigator -- four-way control and OK
9.Scene mode
10.Av/Tv/M:
•Toggles between P, Av, Tv, M on C1060
(Av, Tv, M on C850) in the capture mode.
•Deletes images and videos in the playback mode.
2 Touring Your Camera

1.2.3 LED indicators
Indicator |
State |
Description |
|
|
|
|
|
|
No light |
The digital camera is off. |
|
|
|
|
|
|
Solid green |
The digital camera is ready to capture images. |
|
|
|
|
|
Status LED |
Blinking |
The digital camera is powering on and cannot focus or |
|
green |
capture video clips, or is in the power-saving mode. |
||
|
|||
|
|
The camera/flash is charging, or the USB |
|
|
|
communication/transfer is in progress. |
|
|
|
|
|
Self-timer LED |
Blinking red |
The self-timer function is activated. |
|
|
|
|
•It is normal for the camera to become warm during operation, because camera casing can conduct heat.
•The LCD display on this camera is manufactured with sophisticated technology, and more than 99.99% of the pixels on the LCD display meet standard specifications. Yet, it is possible that less than 0.01% of the pixels on the LCD display may have some light spots or show unusual colors. This is normal and does not indicate display malfunction, nor will this affect the pictures you take with the camera.
English
Touring Your Camera |
3 |
English
Preparing Your Camera for Use
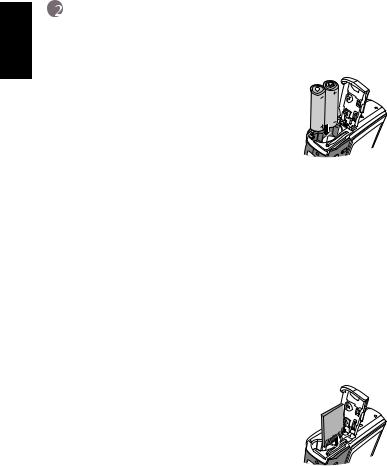
2.1Installing the batteries
You can use two AA batteries to power up the camera. Make sure that the power of the digital camera is off before removing the batteries.
To insert the batteries:
1. Make sure the camera is turned off.
2. Open the battery cover.
3. Insert the batteries in the correct direction as shown in the illustration.
4. Close the battery cover. To remove the batteries:
1.Make sure the camera is turned off.
2.Hold the camera with the battery cover facing upward, and then open the battery cover.
3.Remove the batteries.
 • High-capacity (such as 2500 mAh) rechargeable batteries are recommended.
•Carbon-zinc batteries are not recommended.
•Remove the batteries from the camera if you do not intend to use the camera for a long time.
•If the lens cannot retract into the camera, please replace the batteries first (usually this is
because of drained batteries). Then the lens should retract automatically. (Under no circumstances should you push the lens back manually as this may damage the camera.) If the lens still cannot retract, please contact your dealer.
•The AA batteries that came with the camera are not rechargeable.
2.2Inserting and removing an SD memory card
The camera is equipped with internal memory, allowing you to record video clips and capture images. You can also expand the memory capacity by using an optional SD (Secure Digital) memory card to store more files.
1.Always make sure the camera is turned off before 

 inserting or removing a memory card.

2.Insert an SD memory card in the correct 
 direction as shown in the illustration.
3.Close the battery / SD memory card cover.
To remove the SD memory card, make sure the camera is turned off. Press lightly on the edge of the memory card and it will eject.
4 Preparing Your Camera for Use
• Be sure to format the SD memory card with this camera before the initial use. |
|
• To prevent valuable data from being accidentally erased from an SD memory card, you |
English |
1 GB, 2GB, 4GB, 6GB, 8GB and 16GB SDHC. The camera is compatible with SD memory |
|
can slide the write-protect tab (on the side of the SD memory card) to “LOCK”. |
|
• To save, edit, or erase data on an SD memory card, you must unlock the card. |
|
• SD memory card in the following sizes are supported: 64 MB, 128 MB, 256 MB, 512 MB, |
|
cards manufactured by Panasonic, Toshiba, and Sandisk. Please contact your local |
|
dealer for purchase information. |
|
Unlocked: You can use both capture |
Locked: You can use the playback mode |
and playback modes. |
only. |
Preparing Your Camera for Use |
5 |
Loading...