

Page 1

AV8OR ACE
1
Data Windows (User Configurable)
2
Arrow always points to North (Double
tap selects North Up or Track Up)
3
Main Map Window
4
Aircraft Symbol
5
Soft Keys
6
Fast Page Access Area
7
Title Window
8
Current Range Window
9
Status Window
10
Smart Profile Window (On/Off)
Bendix King by Honeywell Pag e 3
AV8OR ACE Quick Reference Guide
Bendix King by Honeywell Page 2
AV8OR ACE Quick Reference Guide
Bendix King by Honeywell Page 1
AV8OR ACE Quick Reference Guide
Bendix King by Honeywell Page 4
AV8OR ACE Quick Reference Guide
Bendix King by Honeywell Page 5
AV8OR ACE Quick Reference Guide
TM
Quick Reference Guide
1. SD CARD Slot – Make sure the correct SD card is
inserted into the S D C A R D Slot.
2. VOLUME – Rotate the VOLUME knob counter-
clockwise to increase the volume and clockwise to
decrease the volume.
3. POWER – Press and hold the POWER button for
two seconds to turn on. Hold POWER button for
one second to put in Sleep Mode. Hold POWER
button for three seconds to turn off.
Note: Sleep Mode will drain the battery.
4. RESET – Press the RESET button on the back of
the case to reboot the sy s t e m.
5. ZOOM IN/ZOOM OUT – Press the “+” or “–“ side of
the ZOOM IN/ZOOM OUT hard key to enlarge or
decrease the current view on the screen.
6. DIRECT TO – Press the DIRECT TO hard key to
create a course to the selected destination.
7. VIEW – Press the VIEW hard key to change the
screen to predefined views or pages.
8. MENU – Press the MENU hard key at any time to
return to the Main Menu page.
MAIN MENU
1. Tap the Portrait/Landscape icon to switch between
Portrait and Landscape modes for GO fly program.
2. Tap the GO fly soft key for Aviation mode
3. Tap the GO drive soft key for Automotive Mode.
4. Tap on t he Settings soft key to view the GPS
Status, adjust the Backlight, view the System Info,
and adjust the Bluetooth settings or to go into
Initial Setup mode. Refer to the user guide to
configure the initial setup options.
5. Tap the Multimedia soft key to listen to music, view
a movie, look at photos or view an E-Book.
Note: Setting power save modes or the backlight to
dimmer values will increase battery life.
AVIATION MAP PAGE
Basic Usage
Touch and drag finger or stylus on the screen to move
the map. Tap on an item on the map to bring up the
MORE INFO soft key for additional information about the
item. Tap on the soft keys (5) to navigate through the
menus.
Note: Certain aviation application lists can be scrolled by
“dragging” the menu list.
MAP PAGE TIPS
Changing the Map V i e w
1. Tap the VIEWS hard key to toggle different views.
Smart Profile View
1. Tap the MAP VIEW soft key.
2. Tap the VERT PROFILE soft key to turn the vertical
profile on or off.
3. Tap the SAVE & EXIT soft key.
Changing the Map Orientation
1. Double tap the North pointer arrow (2) to change
between North Up and Track Up mode.
Changing the Map Options
1. Tap the M A P VIEW soft key.
2. Tap the MAP SETUP soft key.
3. On the Map System Setup pages, highlight the
data field and tap EDIT soft key to view options.
4. Highlight the option and tap SELECT soft key.
5. Tap the SAVE & EXIT soft key when finished.
Changing the Data W i n d o w s
1. From the MAP page, tap the MAIN MENU soft key,
and then tap the SETTINGS soft key.
2. Highlight the Data Field Setup option and then tap
the SELECT soft key.
3. Tap the Data Field location on the left side you wish
to change.(9 spots are available to use).
4. Tap on a field in the Select Data Field Ty p e list to
move it to the spot you selected in step 3. Tap the
SAVE & EXIT soft key to save changes.
Finding the Nearest Location
1. Tap the N E AR E S T soft key to show the Nearest
Database Selection page.
2. Tap one of the Nearest categories and then tap the
SELECT soft key to show the locations.
3. Highlight the selected location and tap the MORE
INFO softkey or tap the D-> hard key to create a
course from your present location.
MAP PAGE - DIRECT TO
Create a Direct To Course from Map
1. Tap on the desired destination on the map. For
multiple options, select the destination from the list.
2. Press the D-> hard key to create a Direct To course
from your present location.
Create a Direct To Course with Keyboard
1. Press the D-> hard key.
2. Use the virtual keyboard to enter the Airport
Identifier, Name or Location.
3. Tap the Enter soft key when finished to show
details of the waypoint selected.
4. Tap the OK soft key to create a Direct To course
from your present location.
Recenter Aircraft when Direct To Enabled
1. Press the D-> hard key to show the keyboard with
the current Direct To location already entered.
2. Tap the Enter soft key to create a new Direct To
course from your present location.
Bypass Waypoint with Flight Plan Active
1. Tap the D-> hard key to show the active flight plan.
2. Highlight the new Direct To waypoint (Wpt).
3. Tap D-> hard key to make the selected Wpt the
next Wpt in the flight plan. When Wpt is reached,
the flight plan sequences to the next Wpt in the
flight plan.
E n t e r N e w W a ypoint - Flight Plan Active
1. Tap the D-> hard key to show the active flight plan.
2. Tap the KEYBD ENTRY soft key to enter the new
Direct To Wpt using the virtual keyboard.
3. Selecting Enter suspends the active flight plan and
enables the Direct To function.
Page 2
1
Turn Preview field
2
Main Map
3
Map Scale (Only in 2D mode)
4
2D / 3D soft key
5
Detour soft key
6
Cursor soft key
7
Menu soft key
8
Status Field (Soft key to Quick Menu)
9
Trip Data Field
Bendix King by Honeywell Page 6
AV8OR ACE Quick Reference Guide
Bendix King by Honeywell Pa ge 8
AV8OR ACE Quick Reference Guide
Bendix King by Honeywell Page 10
AV8OR ACE Quick Reference Guide
Bendix King by Honeywell Page 9
AV8OR ACE Quick Reference Guide
Bendix King by Honeywell P ag e 7
AV8OR ACE Quick Reference Guide
FLIGHT PLANNING
Create a Flight Plan (Data View)
1. On the aviation Main Menu, tap the Flight Plan
soft key and then highlight the NEW FLIGHT PLAN
line and tap the NEW FPLAN soft key.
2. Tap on the INSERT soft key to open the virtual
keyboard page.
3. Enter an IDENT, Name, Location or Airway.
4. Tap on the Enter soft key
5. Tap on the OK soft key to enter the selected
waypoint into the flight plan.
6. Repeat steps 2 to 5 for additional waypoints.
7. Tap on the SAVE & EXIT soft key to create the
flight plan.
8. Select the flight plan just entered.
9. Tap on the FLY FPLAN soft key to activate the
flight plan.
.
Create a Flight Plan (Map View)
1. On the aviation Main Menu, tap the Flight Plan
soft key and then highlight the NEW FLIGHT PLAN
line and tap the NEW FPLAN soft key.
2. Tap on the MAP VIEW soft key.
3. Pan through map with finger or stylus to locate and
tap on the first waypoint.
4. Tap on the INSERT WPT soft key.
5. Repeat steps 3 and 4 for additional waypoints.
6. When complete, tap on the CLEAR PTR soft key.
7. Tap on the SAVE & EXIT soft key.
8. Select the flight plan just entered.
9. Tap on the FLY FPLAN soft key to activate the
flight plan.
XM WEATHER (Optional)
1. On the Aviation Main Menu, tap on the W E A T H E R
soft key to show XM weather. You must have the
XM receiver installed properly and an active
subscription before weather can be shown on the
Weather page.
2. Tap on the CHOOSE PRODUCT soft key to select
the type of weather product that shows on the
Weather page.
Note: Until current XM data has been received from the
XM receiver, a caution message will be displayed on the
weather page. Assuming good signal strength a
complete set of XM weather data will be received every
12 minutes. The initial data displayed is dependent upon
where in that 12 minute cycle the data was received.
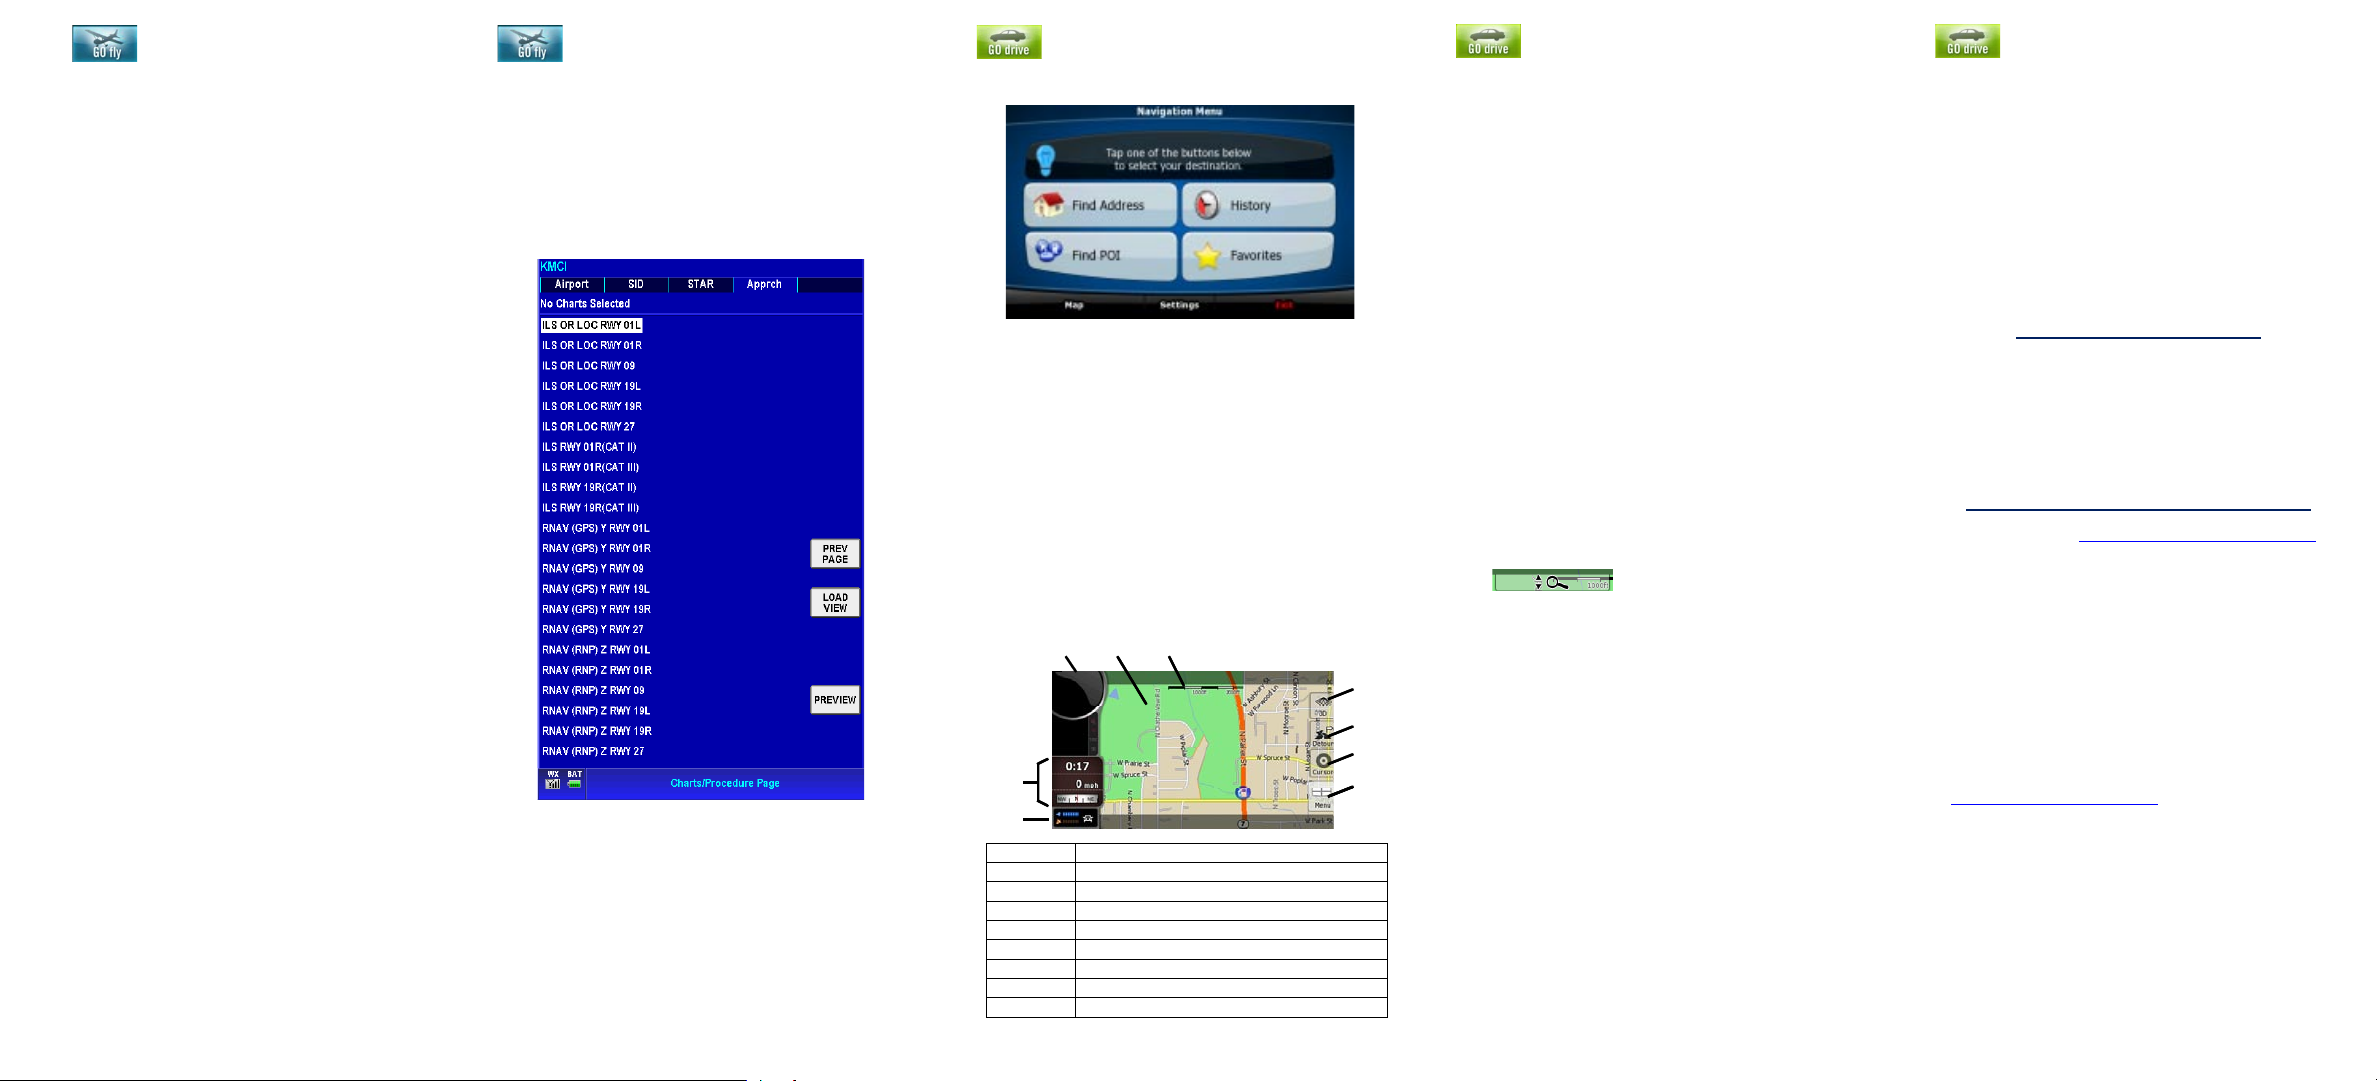
CHARTS AND
PROCEDURES
To display the Charts page, tap an Airport icon on the
MAP page . Then tap the MORE INFO soft key.
Shortcut: If the airport is displayed in a DEST WPT or
WPT Data Window, tap on the Data Window twice to
display the Airport MORE INFO screen.
Tap the C H A R T soft key to show the Charts/Procedure
Page for the selected airport.
Tap the Airport tab to show an airport diagram.
Tap the SID tab to show SIDs for the selected airport.
Tap the S T A R tab to show STARs for the selected
airport.
Tap the A p p r c h tab to show Instrument approaches for
the selected airport.
Tap the selected airport identifier (KMCI in above figure)
and then tap the EDIT soft key to change the
Charts/Procedure Page to a different airport. Highlight a
procedure or airport diagram and tap the LOAD VIEW
soft key to add the selection to the VIEW hard key.
AUTOMOTIVE
Go Drive Main Menu
• Tap on the Find Address soft key to find your
destination and start navigating.
• Tap on the Find POI soft key to find Points Of
Interest.
• Tap on the H i s t o r y soft key to show a listing of t he
points previously visited.
• Tap on the Favorites soft key to view a listing of
the user’s favorite places.
• Tap on the Map soft key to show the map page.
• Tap on the Settings soft key to change the settings
for Go Drive or to change between Simple and
Advanced Navigation modes.
• Tap on the Exit soft key to close the automotive
mode and return to the Main Menu.
CONTROLS AND INDICATIONS
AUTOMOTIVE MAP TIPS
Selection of a Destination
1. Pan to and then tap the point on the screen where
you would like to go.
2. Tap on the Cursor soft key (6) to activate the
cursor.
3. Tap on the Navigate To soft key to navigate from
your current position to the selected point.
To Find a Point of Interest (POI)
1. Tap on the Menu soft key (7).
2. Tap on the Find POI soft key.
3. Tap on one of the categories.
4. Tap on the Search soft key to display the virtual
keyboard page.
5. Enter the POI name and tap on the Done soft key.
6. Select the POI from the list.
7. Tap on the Select soft key to view the POI.
8. Tap on the Navigate To soft key to start navigation.
(From an active route)
To Find an Address
1. Press the DIRECT TO hard key (item 6 on page 1)
to go to the Find Address page.
To Zoom In/Out on the Map
1. Tap on the Map Scale (3) or double tap anywhere
on the map (2) to show the Magnifying Glass.
2. Tap on the Magnifying Glass soft key
3. Use the Plus and Minus soft keys on the left side
of the page to zoom in and out or press the “+” or “–
“ side of the ZOOM IN/ZOOM OUT hard key (item 5
on page 1).
To Tilt the Map
1. If in 2D mode, tap the 3D soft key (4).
2. Tap on the Map Scale (3) or double tap anywhere
on the map (2) to show the Magnifying Glass.
3. Tap on the Magnifying Glass soft key.
4. Tap the Up Arrow to tilt up, the D ow n arrow to tilt
down, the Left arrow to pan left and the Right
arrow to pan right.
AUTOMOTIVE MAP TIPS
Tap the Magnifying Glass soft key to disable zooming
or tilting.
Manual change between Day/Night Mode
1. Tap on the Status field (8).
2. Tap on the Half Moon soft key.
To View Speedometer/Trip Computer
1. Tap on the Trip Data field (9) to see an enhanced
speedometer and data.
2. Tap on the Trip Computer soft key to see current
trip data.
Advanced Mode Features
• From the Main Menu, tap on the Settings soft key
to change to Advanced Mode.
• Trip Data fields are configurable.
• Trip Computer is available thru the Status Field.
• Multi-point routes can be created.
• Traffic Message Channel (TMC) is available
• See User manual for complete details.
Frequency Asked Questions (FAQs)
For FAQ’s go to 0Hhttp://www.bendixking.com/av8or
Proprietary Notice
This document and the information disclosed herein are
proprietary data of Honeywell, Inc. Neither this document nor the
information contained herein shall be reproduced without the
written authorization of Honeywell Inc. Notice – Freedom of
Information Act (5 USC 552)
This document contains Technical Data and is being exported
under General License GTDU. No validated export license is
required. E.A.R. Section 779.4 (b): ECCN 7E994; Schedule B
Number 4901.99.0050; License Exception TSU
Customer support, i n the US & Can ada, please call 1-877-7122386, all other countries 1-913-712-2613, or send an email to
Bendix.King@honeywell.com or you may go the web site
at 1Hhttp://www.bendixking.com/av8or
Document is not under Distribution control.
Pub D200904000016 July 2009.
© 2009 Honeywell International Inc. All rights reserved
23500 West 105th Street, Olathe, KS 66061
.
 Loading...