


Hood |
|
|
|
|
||
User manual |
|
|
|
|||
HCA92640BH |
HCA62640B |
|
|
|||
HCA92640WH |
HCA62640BH |
|
||||
HCA62640W |
HCA62540B |
|
|
|||
HCA62640WH |
HCA92540B |
|
|
|||
EN |
DE |
ES |
FR |
PL |
NL |
CZ |
IT |
SL |
SK |
UA |
RU |
RO ET |
|
LT |
LV |
|
|
|
|
|
01M-8848793200-4917-04 |
|
|
|
|||
Please read this user manual first!
Dear Customer,
Thank you for preferring a Beko product. We hope that you get the best results from your product which has been manufactured with high quality and state-of-the-art technology. Therefore, please read this entire user manual and all other accompanying documents carefully before using the product and keep it as a reference for future use. If you handover the product to someone else, give the user manual as well. Follow all warnings and information in the user manual.
Rememberthat this usermanualisalso applicablefor severalothermodels.Differences between models will be identified in the manual.
Explanation of symbols
Throughout this user manual the following symbols are used:
C Important information or useful hints about usage.
A Warning for hazardous situations with regard to life and property.
B Warning for electric shock.
This product was manufactured using the latest technology in environmentally friendly conditions.
Complies with the WEEE Directive. 
 Does not contain PCB.

CONTENTS
ENGLISH |
04-18 |
DEUTSCH |
19-35 |
ESPAÑOL |
36-52 |
FRANÇAIS |
53-69 |
POLSKI |
70-86 |
NEDERLANDS |
87-103 |
ČESKY |
104-119 |
ITALIANO |
120-135 |
SLOVENŠČINA |
136-151 |
SLOVENSKÝ |
152-168 |
УКРАЇНСЬКИЙ |
169-185 |
РУССКИЙ |
186-202 |
ROMÂNĂ |
203-218 |
EESTI |
219-234 |
LIETUVIŲ K |
235-250 |
LATVIJAS |
251-267 |
Hood / User Manual |
3 / EN |
|
|

1Important instructions for safety and environment
This section contains safety instructions that will help protect from risk of personal injury or property damage. All warranties will become void if you do not follow these instructions.
1.1 General safety
•• Always have the installation and repairing procedures carried out by the Authorised Service Agent. Manufacturer shall not be held responsible for damages arising from procedures carried out by unauthorised persons.
•• This appliance is not intended for use by persons (including children) with reduced physical, sensory or mental capabilities, or lack of experience and knowledge. Children should be supervised to ensure that they do not play with the appliance.
1.1.1 Electrical safety
•• Disconnect the product from the mains during installation, maintenance, cleaning and repairing procedures.
•• If the power cable is damaged, it must be replaced by the manufacturer, after sales service or a similarly qualified person (preferably an electrician) or someone designated by the importer in order to avoid possible risks.
•• Operating voltage is 220 to 240 volts.
•• If the appliance has a failure, it should not be operated unless it is repaired by the Authorised Service Agent. There is the risk of electric shock!
•• Do not route power cable close to hobs. Otherwise power cable may cause fire since it melts down easily.
•• Never plug the hood before installation is completed.
•• In order to obtain the best performance, external conductor must not be longer than 4 m. It must not contain more than 2 perpendicular (90°) angles and its diameter must be min. ø120 mm.
•• Disconnect the appliance before any intervention to the internal parts of the appliance.
4 / EN |
Hood / User Manual |
|
|

1Important instructions for safety and environment
1.1.2 Product safety
•• You can use a pipe with a diameter of 120 mm or 150 mm on the flue connection of the hood.
•• Do not make connections to the flues connected with stoves, exhaust shafts or flues with rising flames. Observe the rules set by authorities on the discharge of exhaust air.
•• The height between the lower surface of the hood and upper surface of the stove/oven should not be less than 65 cm.
•• Do not operate the hood without aluminumfiltersanddonotremove the filters while it is operated.
•• Never touch the hood's lamp after they operated for a long time. Hot lamps may burn your hand.
•• Avoid big flames beneath the product. Otherwise, particles on oil filter may ignite and lead to a fire.
•• Turn on the hobs after placing pans or pots on it. Otherwise, rising temperature may deform certain parts of your product.
•• Turn off the hobs before taking away pans or pots.
•• Avoid inflammable materials under the hood.
•• Oil may ignite while frying foods. Therefore, be careful about cloths and curtains.
•• Never leave the cooker unattended when frying foods; otherwise boiled oil may cause fire.
•• There is the risk of fire if your hood is not cleaned in the specified periods.
•• Be extremely careful and wear gloves when cleaning the hood.
•• We advise you to operate the appliance a few minutes before starting to cook in order to increase the suction power. Thus, you shall have a continuous and stable suction power when the vapors arises.
•• Operate your hood for 15 minutes more after the end of cooking or frying in order to remove smell cooking vapour in the kitchen.
•• When the hood is in use, especially together with gas cookers, make sure that environment is ventilated with clean air.
•• Pay attention not to connect the appliance to the flues used by non-electrical devices. (E.g.: Heater flue).
Hood / User Manual |
5 / EN |
|
|
1Important instructions for safety and environment
•• When a non-electrical device is concurrently used in the same room together with the hood, the negative pressure in the room must be maximum 0.4 mbar in order to prevent hood from sucking other device's exhaust into the room.
1.1.3 Children's safety
•• Packaging materials are dangerous to children. Keep packaging materials in a safe place out of reach of children.
•• Electrical appliances are dangerous to children. Keep children away from the product. Do not allow children play with the appliance.
1.2 Intended use
•• This appliance is intended for domestic use. It is not suitable for commercial use and it must not be used out of its intended use.
•• The manufacturer shall not be liable for any damage caused by improper use or handling.
•• The period required for the availability of spare parts for the correct operation of the appliance is 10 years.
1.3 Compliance with WEEE regulation and disposal of the waste product
 This product does not contain harmful
and forbidden materials described in the
"Directive on the Restriction of the Use

 of Certain Hazardous Substances in Waste Electrical and Electronic Equipment" (WEEE) issued by the T.R. Ministry of
Environment and Urbanization.
Complies with the WEEE Directive.
This product has been manufactured with high quality parts and materials which can be reused and are suitable for recycling. Therefore, do not dispose the product with normal domestic waste at the end of its service life. Take it to a collection point for the recycling of electrical and electronic equipment. Please consult your local authorities to learn the nearest collection point. Help protect the environment and natural resources by recycling used products.
1.4 Package information
The product package is made of recyclable material as per the National Legislation. Do not dispose of the package waste together with the household
waste or other waste and deliver them to the package collection points indicated by the local authority.
6 / EN |
Hood / User Manual |
|
|
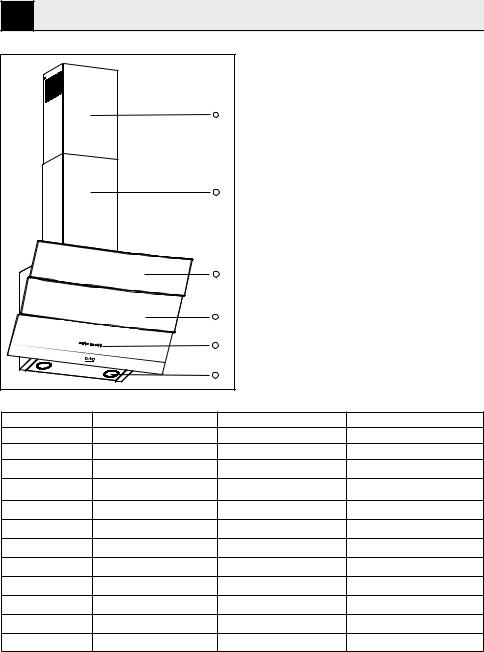
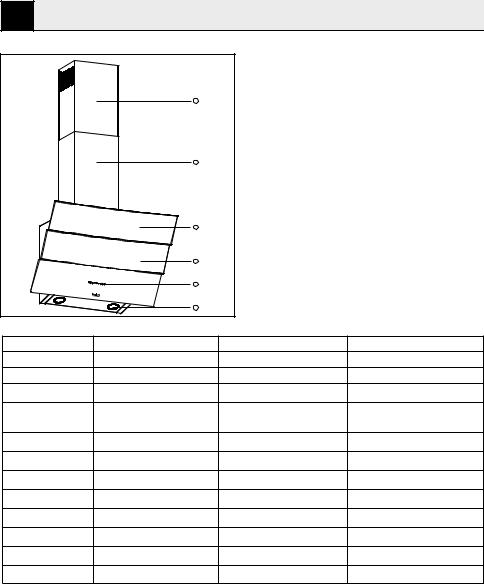
2Technical specifıcations of your appliance
1.Internal flue
2.External flue
3.Glass cover
4.Filter (under the glass cover)
15. Control panel
6.Illumination
2
|
|
3 |
|
|
|
|
4 |
|
|
|
|
5 |
|
|
|
|
6 |
(Figure 1) |
|
|
|
|
|
|
|
HCA 92640 BH |
|
HCA 92640 WH |
HCA 62640 W |
Width |
896 mm |
|
896 mm |
596 mm |
Depth |
393 mm |
|
393 mm |
386 mm |
Height |
750 mm / 1130 mm |
|
750 mm / 1130 mm |
750 mm /1080 mm |
Supply voltage |
220 – 240 V, 50 Hz |
|
220 – 240 V, 50 Hz |
220 – 240 V, 50 Hz |
Control |
With 3 levels |
|
With 3 levels |
With 3 levels |
Lamp power |
2 x 3 W |
|
2 x 3 W |
2 x 3 W |
Air outlet pipe |
120 / 150 mm |
|
120 / 150 mm |
120 / 150 mm |
Capacity |
577 m³/h |
|
577 m³/h |
537 m³/h |
Motor power |
1 x 210 W |
|
1 x 210 W |
1 x 210 W |
Total power |
316 W |
|
316 W |
316 W |
Net weight |
13 kg |
|
13 kg |
10,4 kg |
Colour |
Black |
|
White |
White |
Values stated on the product labels or in the documentation accompanying it are obtained in laboratory conditions in accordance with relevant standards. These values may vary depending on operational and environmental conditions of the product.
Hood / User Manual |
7 / EN |
|
|

2 Technical specifıcations of your appliance
|
HCA 62640 WH |
HCA 62640 B |
HCA 62640 BH |
Width |
596 mm |
596 mm |
596 mm |
Depth |
386 mm |
386 mm |
386 mm |
Height |
750 mm /1080 mm |
750 mm /1080 mm |
750 mm /1080 mm |
Supply voltage |
220 – 240 V, 50 Hz |
220 – 240 V, 50 Hz |
220 – 240 V, 50 Hz |
Control |
With 3 levels |
With 3 levels |
With 3 levels |
Lamp power |
2 x 3 W |
2 x 3 W |
2 x 3 W |
Air outlet pipe |
120 / 150 mm |
120 / 150 mm |
120 / 150 mm |
Capacity |
537 m³/h |
537 m³/h |
537 m³/h |
Motor power |
1 x 210 W |
1 x 210 W |
1 x 210 W |
Total power |
316 W |
316 W |
316 W |
Net weight |
10,4 kg |
10,4 kg |
10,4 kg |
Colour |
White |
White |
Black |
8 / EN |
Hood / User Manual |
|
|
3 Installing your appliance
Please consult the nearest Authorised Service Agent for the installation of your hood.
*Preparation of location and electrical installation for the product is under customer’s responsibility.
Caution!
A Remove the protective film (if any) on the hood and flue surface after the installation.
|
2 |
|
0 |
|
26 |
25 |
|
|
20 |
|
|
|
|
|
|
|
80 |
|
|
|
400 |
|
|
Max:1130 |
20 |
|
|
Min:750 |
400 |
|
|
|
|
|
365 |
|
350 |
|
|
|
393 |
|
896 |
|
|
|
Distance between lower surface of the hood and upper surface of the hob should be at least
65 cm.
Have a qualified electrician make the electrical connection.
Install your appliance so that you can reach the power connection (plug, outlet) easily after installation.
Dimensions are given in mm.
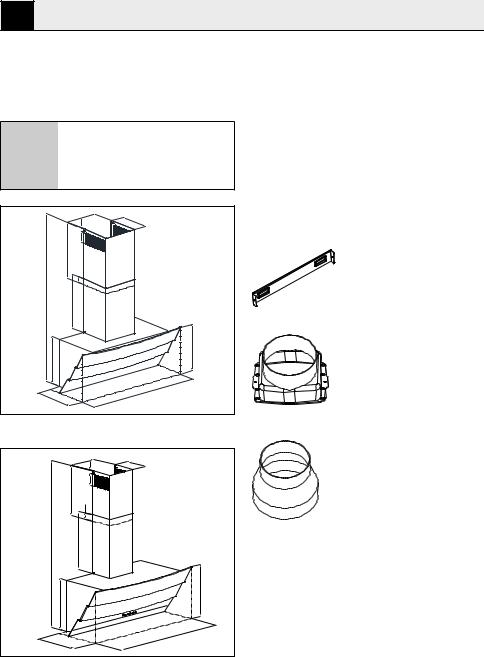
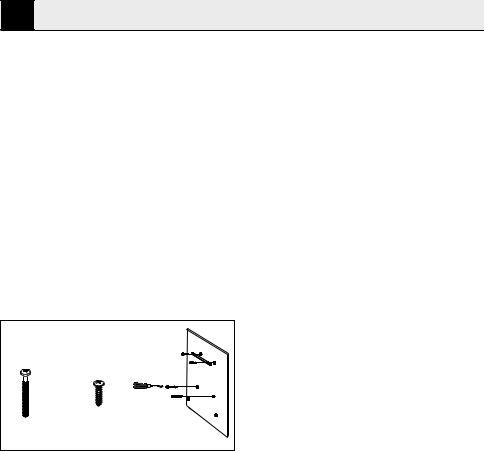
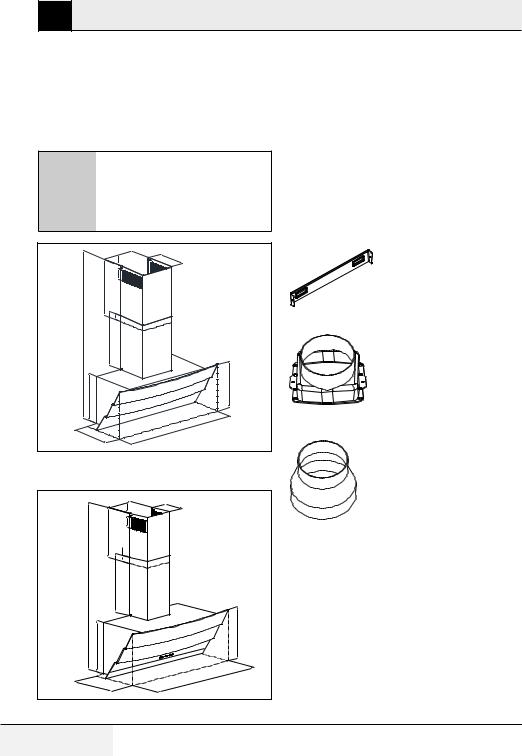
3.1 Installation accessories
1 x flue connection plate
1 x Ø150 mm plastic flue
(Figure 3b)
|
211 |
264 |
|
24 |
|
|
80 |
|
|
350 |
|
|
20 |
|
Max:1080 |
400 |
|
Min:750 |
|
|
|
|
365 |
|
350 |
|
|
386 |
596 |
|
|
1 x Ø120/150 mm plastic flue adapter
Hood / User Manual |
9 / EN |
|
|
3 Installing your appliance
Information required for the preparation of the installation place for your hood is given below.
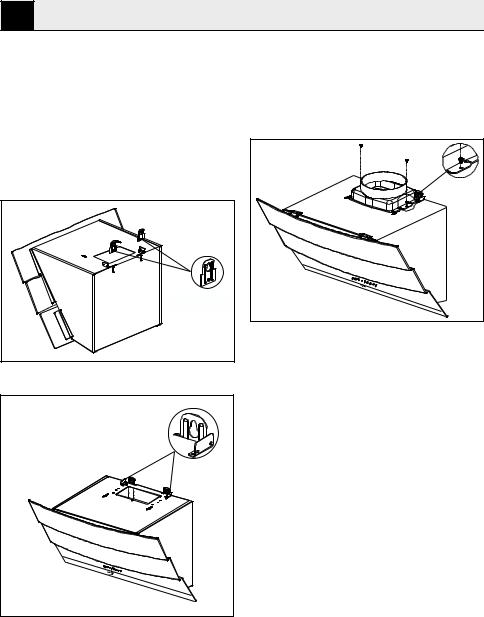
3.2 Installing the hood onto the wall
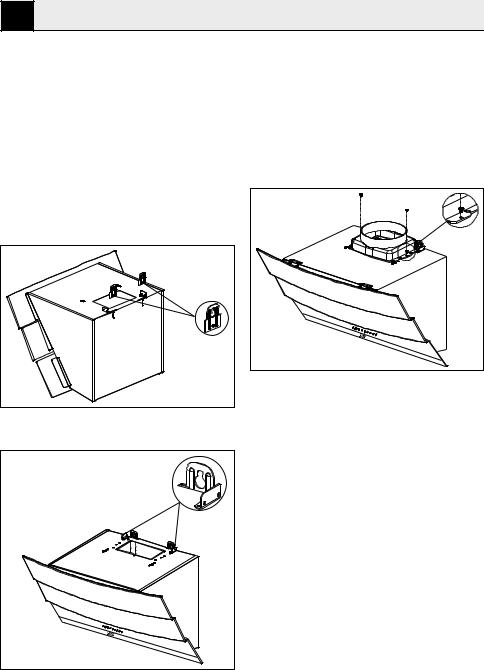
To install the hood onto the wall, loosen the screws of hanger plates on the motor housing and pull the plates upwards. Then, tighten the screws of the hanger plates. (Figure 3a).
Hanger plate |
(Figure 3a)
Externe |
External flue connection plate |
Kaminschachtanschlussplatte |
(Figure 3b)
Secure the Ø 150 mm plastic flue adapter onto the top of the body with 3.5x9.5 screw included in installation accessories (Figure 4).
If you will use Ø 120 mm flue pipe, install Ø 120 mm flue adapter onto it.
(Figure 4)
10 / EN |
Hood / User Manual |
|
|
3 Installing your appliance
3.2.1 Boring the hanger holes
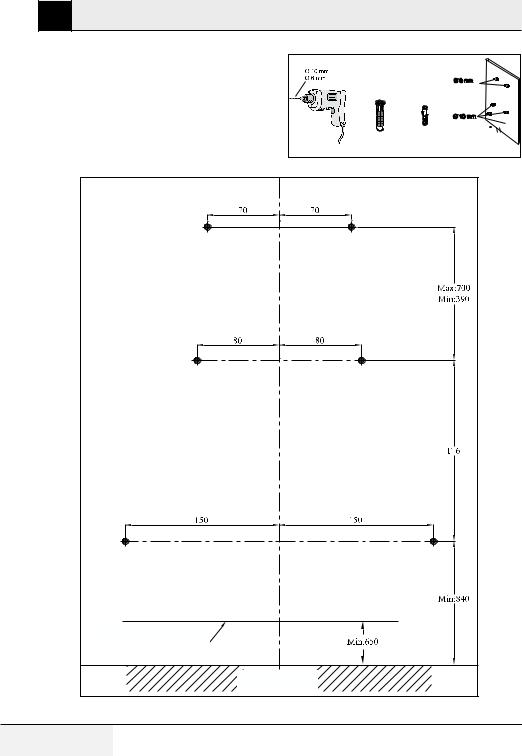
Affix the installation template onto the installation place of the hood. Drill the points market with (X,Y) (Figure 5) using a Ø 10 mm bit and points market with (Z) (Figure 5) using a Ø 6 mm bit.
Z
Y
X
10 mm plastic |
6 mm plastic |
wall plug |
wall plug |
Z
Y
 X
X
Z |
Y


X


Bottom surface of the appliance 


 COOKING ZONE


(Figure 5)
Hood / User Manual |
11 / EN |
|
|
3 Installing your appliance
3.2.2 Hammering the wall plugs
Hammer Ø 10 mm wall plugs (X,Y) into the holes drilled for hanger screws. Hammer 2 x Ø 6 mm wall plugs (Z) into the holes drilled with a Ø6 mm bit for the external flue connection plate.
(Figure 5)
3.2.3 Installing the hanger screws
Install 5.5x60 hanger screws into the Ø 10 mm wall plugs (Y) you have hammered into the wall. There must be a gap of 5 mm between the screw head and the wall. (Figure 6)
Connect the internal flue connection plate to the 6 mm wall plugs (Z) on the wall using Ø 3.9x22 screws. (Figure 6)
Z
Z
Y
X Y
X
5.5 x 60 Cross- |
3.9 x 22 Cross-head |
head screw |
screw |
(Figure 6)
3.2.4 Hanging the hood onto the wall
•• Hang the hood onto the screws you have installed into the Y holes.
•• Open the side suction window of the hood by pulling it towards yourself. Install the 5.5x60 screws through the X holes located inside in order to secure the appliance.
12 / EN |
Hood / User Manual |
|
|
3 Installing your appliance
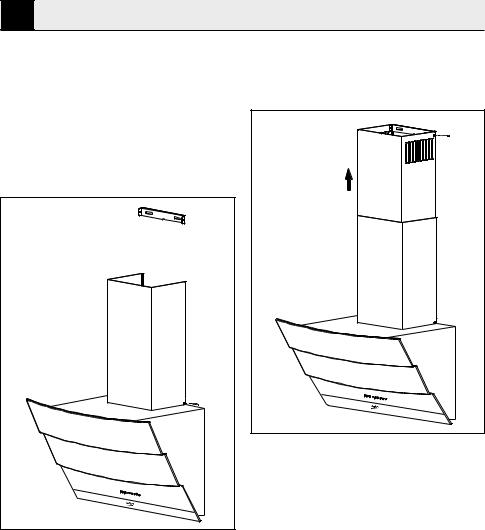
3.3 Installing the hood flue
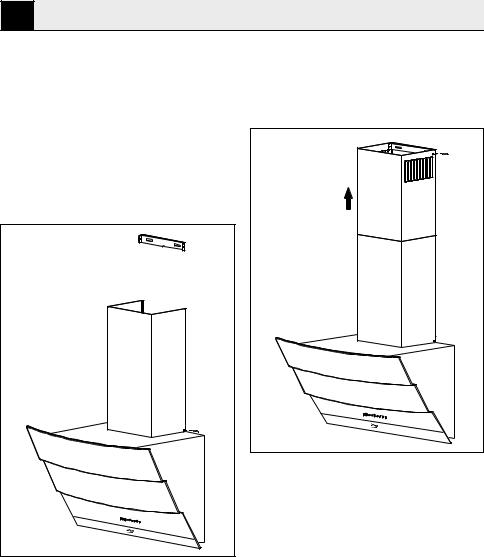
Disconnect the product from mains supply before starting flue installation. Fit the sheet metal flue parts around the body.
Screw the external flue to the external flue connection plates located on the motor housing.
(Figure 3b / 7)
E |
F |
|
Extend and screw the internal flue from its outer edges onto the flue connection plate which was secured to the wall (Figure 8).
E |
F |
|
(Figure 8)
(Figure 7)
Hood / User Manual |
13 / EN |
|
|
3 Installing your appliance
3.4.1 Using with flue connection
•• The vapour is removed via flue pipe which is secured to the connection head on the hood.
•• Diameter of the flue pipe should be equal to the diameter of connection ring. To allow the air be removed easily out of the room in horizontal arrangements, the pipe should be slightly tilted upwards (approximately 10°).
3.4.2 Using without flue connection
•• Air is filtered by the carbon filter and returned to the room. Carbon filter is used when there is no flue in the house.
•• ıf the hood will be used without flue connection remove the diverters inside the flue adapter.
•• Remove the aluminum filter. To install the carbon filter, center the carbon filter on the plastic part on both sides of the fan body, and secure it on the tabs. Secure the filter by turning the tabs to right or left.
•• Install the aluminum filter.
3.5 Flue connection:
Place adapter supplied together with the hood into the ventilation hole located on the top section of the hood. Procure a pipe with a diameter of 120/150 mm. Connect one end of the pipe to the adapter and the other end to the flue.
Make sure that these two connections are secure enough
so that they will not dislocate when the hood is operated in max. speed. Check that the flaps inside flue are functional when tightened with the clamp. Fit the flue connection pipe onto the adapter. If you fit the flue connection pipe inside the adapter, air suction will not occur since the flaps that prevent air backflow will remain closed.
It is not advisable to make connections to the flues connected with stoves or exhaust shafts. Do not make connections to such flues.
Pipe connection must be as short as possible and have minimum number of elbows.
A:Flue outlet pipe
B:Flaps that prevent backflow
C:Plastic flue
3.5.1 Backflow prevention system (N-RV)
When the hood is operated, flaps are closed in order to prevent possible odours and dust from entering into the ambient from outside.
|
|
|
|
|
|
Correct |
Not correct |
|
|
|
|
|
|
|
|
|
|
|
|
(Figure 9)
14 / EN |
Hood / User Manual |
|
|
4 Operating your appliance
A B C D
(Figure 9)
(A): Light On / Off key (B): 1st level key
(C): 2nd level key (D): 3rd level key
4.1 Digital electronic control with 3 levels
(A)Light On/Off Key: You can illuminate the cooking area by pressing this key.
(B)key: You can start your hood at speed level 1 by pressing this key.
When you press this key again to switch off the appliance, speed level indication on the display disappears.
(C) key: You can start your hood at speed level 2 by pressing this key.
When you press this key again to switch off the appliance, speed level indication on the display disappears.
(D) key: You can start your hood at speed level 3 by pressing this key.
When you press this key again to switch off the appliance, speed level indication on the display disappears.
Auto-stop in 15 min.:
This appliance is equipped with an Auto-Stop function which allows the appliance to ventilate the room for an additional period of time in order to remove the unpleasant odour and vapour in the room after the cooking is over. Appliance stops automatically after a certain period of time.
To enable the Auto-stop function, press any of the speed level keys (B, C, D) on the control for longer than 2 seconds. A timer with 15 minutes will be activated.
If you press the same speed level key while the Auto-stop function is enabled, function will be disabled and the appliance will stop.
If you select a different speed level this function will be disabled.
If you want your appliance to stop automatically, you must enable the Auto-stop function again.
Periodical cleaning of metal filters:
Filters must be cleaned at about every 60 hours of operation or 4 weeks depending on the frequency of usage.
Hood / User Manual |
15 / EN |
|
|

4Operating your appliance
4.2Energy efficient usage:
•• When operating the hood, adjust the speed level according to the odour and vapour intensity in order to prevent unnecessary power consumption.
•• Use low speeds in normal conditions (1-2), and high speed (3) when smell and vapors are intensified.
•• Lights on the hood are intended for illuminating the cooking zone.
Using them to illuminate the ambient/kitchen will result with unnecessary power consumption and inadequate illumination.
4.3 Operating the hood:
•• Hood is equipped with a motor having various speed settings.
•• For a better performance, we advise you to use low speeds in normal conditions, and high speeds when smell and vapors are intensified.
•• You can start the hood by pressing the desired speed level key (B,C,D).
•• You can illuminate the cooking area by pressing the light key. (A)
16 / EN |
Hood / User Manual |
|
|
5 Cleaning and maintenance
Prior to cleaning and maintenance, unplug the appliance or turn the main switch off or loosen the fuse that supplies the hood.
5.1 Aluminum filter
This filter captures oil particles in the air. You are recommended to clean your filter every month under normal usage conditions. First remove the aluminum filters for this process. Wash the filters with liquid detergent and rinse them with water and install them back after they get dry. Aluminum filters may get discolored as they are washed; this is normal and you don't need to change your filter.
5.1.1 Removing the aluminum filters
1.Push the aluminum filter lock forward.
2.Then, slightly lower it and pull forward. Otherwise, you may bend the filter. (Figure 10) After the aluminum filter is washed and dried, reinstall the filter to its slot by applying above steps in reverse order.
Carbon filter (Using without flue)
This filter removes the cooking odours. If it is not possible to use a flue, it purifies the air which is circulated inside the kitchen. Carbon filter of your appliance will get clogged in time depending on the frequency of use, style of cooking and regular cleaning of the aluminum filters.
Caution!
A Carbonwashed.filter should never be
You may obtain carbon filters from Beko Authorised Service Agents.
5.2.1 Replacing the carbon filter
•• Remove the aluminum filters. (Figure 10)
•• To remove carbon filter, turn the tabs counterclockwise and release the filter. (Figure 11)
•• Install the new carbon filter.
•• Install the aluminum filters.
(Figure 10)
Note:
You can also wash aluminum filters in dishwasher.
(Figure 11)
Anti-odor filters contain charcoal (active carbon).
They must be changed with periods of approximately 6 months.
Regardless of using a carbon filter or not, aluminum filters must always be installed.
Do not operate your appliance without the aluminum filter in place. Using with carbon filter will decrease suction performance of the appliance.
Hood / User Manual |
17 / EN |
|
|
5 Cleaning and maintenance
5.3 Cleaning
Particularly do not neglect to clean your hood immediately after you have made frying.
Use a soft cloth soaked with liquid detergent to clean the outer surface of your hood.
Never use abrasive or scratching materials for cleaning.
You may use the cleaning agents commercially available for persistent grease etc. by following the warnings on the product. In order not the scratch the brushed steel body, wipe in the same direction with the bush trace.
Do not use cleaning agents containing hydrochloric acid, bleach or abrasive powders in order to maintain the surface quality of your product. Use a cloth dampened in soapy water or special stainless steel cleaning spray for stainless steel steel surfaces. Remove the protective foil on the appliance.
Caution!
A You may cause a fire if you do not follow the instructions on the cleaning and replacement of the filters of your hood.
If you need to transport the appliance:
•• Keep the original packaging of the appliance. Transport the appliance with its original package, and follow the transport markings on the original package.
If you do not have the original package:
•• Do not place any objects on the hood.
•• Protect the outer surface from impacts.
•• Pack the appliance so that it would not be damaged during transport.
5.4 Replacing the lamps
Disconnect the hood from the mains supply.
This appliance is equipped with 3 W halogen lamps.
To replace the halogen lamps, press the lamp downwards from the rear section of the lamp holder to release the lamp. Then turn it counterclockwise by 1/4 tour and remove it.
Perform the above steps in reverse order to fit the new lamps.
Note:
You may procure lamps from Authorised Service Agents.
18 / EN |
Hood / User Manual |
|
|
Bitte lesen Sie zuerst diese Anleitung!
Werter Kunde,
Danke, dass Sie sich für ein Produkt der Marke Beko entschieden haben. Wir hoffen, dass Sie mit diesem Produkt, das mit den höchsten Qualitätsanforderungen und der modernsten Technologie hergestellt wurde, beste Ergebnisse erzielen. Bitte lesen Sie diesegesamteBedienungsanleitungundalleanderenBegleitdokumenteaufmerksam, bevor Sie das Produkt verwenden; bewahren Sie sie zum künftigen Nachschlagen sicher auf. Wenn Sie das Produkt an einen Dritten weitergeben, händigen Sie bitte auch diese Anleitung aus. Befolgen Sie alle Warnhinweise und Informationen in dieser Anleitung.
Bitte denken Sie daran, dass diese Anleitung auch für einige andere Modelle erstellt wurde. Auf Unterschiede zwischen verschiedenen Modellen wird in dieser Anleitung hingewiesen.
Erklärung der Symbole
In dieser Anleitung werden die folgenden Symbole verwendet:
C Wichtige Informationen oder nützliche Tipps in Bezug auf die Verwendung.
A Warnung vor Situationen, die
Personenund Sachschäden zur
Folge haben können.
B Warnung vor Stromschlägen.
Dieses Produkt wurde mit der modernsten Technologie und unter umweltfreundlichen Bedingungen hergestellt.
Das Gerät erfüllt die Vorgaben der |
PCB-frei |
WEEE Richtlinie. |
|

1Wichtige Sicherheitsund Umweltanweisungen
Dieser Abschnitt erklärt Sicherheitsanweisungen, die beim Schutz vor Personenund Sachschäden helfen. Jegliche Garantien erlöschen, falls Sie diese Anweisungen nicht befolgen.
1.1 Allgemeine Sicherheit
•• Lassen Sie Installationsund Reparaturarbeiten immer von autorisierten Serviceagenten durchführen. Der Hersteller übernimmt keine Haftung für Schäden in Folge von Arbeitsschritten, die von unautorisierten Personen vorgenommen wurden.
•• Dieses Gerät darf nicht von Personen (einschließlich Kindern) benutzt werden, die unter körperlichen oder geistigen Einschränkungen leiden oder denen es an der nötigen Erfahrung im Umgang mit solchen Geräten mangelt. Kinder sollten soweit beaufsichtigt werden, dass sie nicht mit dem Gerät spielen.
1.1.1 Elektrische Sicherheit
•• Trennen Sie das Produkt während Installations-, Wartungs-, Reinigungsund Reparaturarbeiten von der Stromversorgung.
•• Falls das Netzkabel beschädigt ist, muss es zur Vermeidung möglicher Gefahren vom Hersteller, Kundendienst oder einer ähnlich qualifizierten Person (idealerweise einem Elektriker) bzw. einer vom Importeur beauftragten Person ersetzt werden.
•• Die Betriebsspannung beträgt 220 bis 240 Volt.
•• Falls das Gerät einen Fehler aufweist, darf es erst nach Reparatur durch den autorisierten Kundendienst wieder in Betrieb genommen werden. Es besteht Stromschlaggefahr!
•• Netzkabel nicht in der Nähe von Kochfeldern verlegen. Andernfalls kann das Netzkabel einen Brand verursachen, da es leicht schmilzt.
•• Dunstabzugshaube niemals vor Abschluss der Installation an die Stromversorgung anschließen.
•• Zur Erzielung optimaler Leistung darf der Abzug nicht länger als 4 m sein.
20 / DE |
Dunstabzugshaube / Bedienungsanleitung |
|
|
1Wichtige Sicherheitsund Umweltanweisungen
Er darf nicht mehr als 2 rechtwinklige (90 °) Biegungen enthalten; sein Durchmesser muss mindestens 120 mm betragen.
•• Trennen Sie das Gerät vor jeglicher Handhabung der internen Teilen des Gerätes von der Stromversorgung.
1.1.2 Produktsicherheit
•• Sie können ein Rohr mit einem Durchmesser von 120 oder 150 mm am Abluftanschluss der Dunstabzugshaube verwenden.
•• Keine Verbindungen zu Schächten herstellen, die mit Öfen, Abluftschächten oder Kaminen mit aufsteigenden Flammen verbunden sind. Beachten Sie behördliche Richtlinien zur Ableitung von Abluft.
•• Der Abstand zwischen Unterkante der Dunstabzugshaube und Oberfläche des Ofens/Backofens darf nicht weniger als 65 cm betragen.
•• Dunstabzugshaube nicht ohne Aluminiumfilter betreiben; Filter nicht entfernen, während die Dunstabzugshaube in Betrieb ist.
•• Lampe der Dunstabzugshaube niemals berühren, wenn sich das Gerät bereits längere Zeit in Betrieb befindet Die Lampen können heiß sein und Verbrennungen verursachen.
•• Vermeiden Sie hohe Flammen unter dem Produkt. Andernfalls kann sich im Aluminiumfilter gesammelte Partikel entzünden und einen Brand verursachen.
•• Schalten Sie Kochfelder erst ein, nachdem Sie Kochgeschirr darauf gestellt haben. Andernfalls kann die steigende Temperatur bestimmte Teile Ihres Produktes verformen.
•• Schalten Sie die Kochfelder ab, bevor Sie das Kochgeschirr herunternehmen.
•• Vermeiden Sie entflammbare Materialien unter der Dunstabzugshaube.
•• Öl kann sich beim Braten entzünden. Achten Sie daher besonders auf Kleidung und Vorhänge.
•• Lassen Sie das Kochgerät niemals unbeaufsichtigt, während Sie braten; erhitztes Öl kann Feuer fangen.
Dunstabzugshaube / Bedienungsanleitung |
21 / DE |
|
|

1Wichtige Sicherheitsund Umweltanweisungen
•• Falls die Dunstabzugshaube nicht in den angegebenen Intervallen gereinigt wird, besteht Brandgefahr.
•• Seien Sie bei der Reinigung der Dunstabzugshaube extrem vorsichtig, tragen Sie Handschuhe.
•• Zur Steigerung der Saugleistung empfehlen wir Ihnen, das Gerät einige Minuten vor Beginn des Kochens oder Bratens in Betrieb zu nehmen. Dadurch erhalten Sie eine kontinuierliche und stabile Saugleistung, sobald Küchendünste entstehen.
•• Dunstabzugshaube nach Abschluss des Kochens oder Bratens 15 Minuten weiterlaufen lassen, damit Küchendünste entfernt werden.
•• Achten Sie bei Benutzung der Dunstabzugshaube – insbesondere in Verbindung mit Gasherden
– auf eine ausreichende Frischluftzufuhr.
•• Achten Sie darauf, das Gerät nicht an Abzugsschächte anzuschließen, die von nicht elektrischen Geräten verwendet werden. (Bsp.: Heizungsschacht).
•• Wenn ein nicht elektrisch betriebenes Gerät gleichzeitig gemeinsam mit der Dunstabzugshaube in einer Umgebung verwendet wird, darf der Unterdruck im Raum maximal 0,4 mbar betragen, damit die Dunstabzugshaube die Abluft des anderen Gerätes nicht in den Raum saugt.
1.1.3 Sicherheit von Kindern
•• Verpackungsmaterialien können für Kinder gefährlich sein. Bewahren Sie Verpackungsmaterialien an einem sicheren Ort außerhalb der Reichweite von Kindern auf.
•• Elektrische Geräte können für Kinder gefährlich sein. Halten Sie Kinder stets vom Produkt fern. Verbieten Sie Kindern, mit dem Gerät zu spielen.
1.2 Zweckmäßiger Gebrauch
•• Dieses Gerät ist für den privaten Gebrauch bestimmt. Es eignet sich nicht zum kommerziellen Einsatz und darf nicht zweckentfremdet verwendet werden.
22 / DE |
Dunstabzugshaube / Bedienungsanleitung |
|
|
1Wichtige Sicherheitsund Umweltanweisungen
•• Der Hersteller haftet nicht für Schäden aufgrund von unsachgemäßer Benutzung oder Handhabung.
•• Die Betriebslebenszeit des Gerätes beträgt 10 Jahre. Dies ist der Verfügbarkeitszeitraum von Ersatzteilen, damit das Produkt richtig funktioniert.
1.3 Konformität mit WEEERichtlinie und Entsorgung von Altgeräten
 Dieses Produkt enthält keine der in der
vom türkischen Ministerium für Umwelt
und Urbanisierung ausgestellten
 Richtlinie zur Beschränkung der Verwendung bestimmter gefährlicher Stoffe in Elektround Elektronikgeräten (WEEE)
beschriebenen gefährlichen oder verbotenen Materialien.
Das Gerät erfüllt die Vorgaben der WEEERichtlinie.
Dieses Produkt wurde aus hochwertigen Teilen und Materialien hergestellt, die wiederverwendet werden können und zum Recycling geeignet sind. Deshalb darf das Gerät am Ende seiner Einsatzzeit nicht mit dem normalen Hausmüll entsorgt werden.
Geben Sie das Gerät bei einer Sammelstelle für das Recycling von elektrischen und elektronischen Geräten ab. Bitte informieren Sie sich bei Ihren örtlichen Behörden nach Sammelstellen in Ihrer Nähe. Durch das Recycling von Altgeräten helfen Sie beim Schutz von Umwelt und natürlichen Rohstoffen.
1.4 Informationen zur Verpackung
Die Produktverpackung besteht gemäß  der nationalen Gesetzgebung aus recyc- Ni-MH lingfähigen Materialien. Entsorgen Sie Verpackungsabfälle nicht gemeinsam mit dem Hausmüll oder anderen Abfällen; bringen
Sie sie zu von der örtlichen Behörde ausgewiesenen Verpackungssammelstellen.
Dunstabzugshaube / Bedienungsanleitung |
23 / DE |
|
|
2Technische Daten des Gerätes
1.Internes Rohr
2.Externes Rohr
3.Glasabdeckung
14. Filter (unter der Glasabdeckung)
5.Bedienfeld
6.Beleuchtung
2
|
3 |
|
|
|
4 |
|
|
|
5 |
|
|
|
6 |
(Abbildung 1) |
|
|
HCA 92640 BH |
HCA 92640 WH |
HCA 62640 W |
Breite |
896 mm |
896 mm |
596 mm |
Tiefe |
393 mm |
393 mm |
386 mm |
Höhe |
750 mm / 1130 mm |
750 mm / 1130 mm |
750 mm /1080 mm |
Betriebsspannung |
220 – 240 V Wechselspan- |
220 – 240 V Wechselspan- |
220 – 240 V Wechselspan- |
nung, 50 Hz |
nung, 50 Hz |
nung, 50 Hz |
|
Steuerung |
Mit 3 Stufen |
Mit 3 Stufen |
Mit 3 Stufen |
Lampenleistung |
2 x 3 W |
2 x 3 W |
2 x 3 W |
Abluftrohr |
120 / 150 mm |
120 / 150 mm |
120 / 150 mm |
Kapazität |
577 m³/h |
577 m³/h |
537 m³/h |
Motorleistung |
1 x 210 W |
1 x 210 W |
1 x 210 W |
Gesamtleistung |
316 W |
316 W |
316 W |
Nettogewicht |
13 kg |
13 kg |
10,4 kg |
Farbe |
Schwarz |
Weiß |
Weiß |
Die an Produktetiketten oder in der mitgelieferten Dokumentation angegebenen Werte werden unter Laborbedingungen unter Einhaltung relevanter Standards ermittelt. Diese Werte können je nach Einsatzumgebung und Nutzungsweise des Gerätes variieren.
24 / DE |
Dunstabzugshaube / Bedienungsanleitung |
|
|

2 Technische Daten des Gerätes
|
HCA 62640 WH |
HCA 62640 B |
HCA 62640 BH |
Breite |
596 mm |
596 mm |
596 mm |
Tiefe |
386 mm |
386 mm |
386 mm |
Höhe |
750 mm /1080 mm |
750 mm /1080 mm |
750 mm /1080 mm |
Betriebsspannung |
220 – 240 V Wechselspan- |
220 – 240 V Wechselspan- |
220 – 240 V Wechsels- |
nung, 50 Hz |
nung, 50 Hz |
pannung, 50 Hz |
|
Steuerung |
Mit 3 Stufen |
Mit 3 Stufen |
Mit 3 Stufen |
Lampenleistung |
2 x 3 W |
2 x 3 W |
2 x 3 W |
Abluftrohr |
120 / 150 mm |
120 / 150 mm |
120 / 150 mm |
Kapazität |
537 m³/h |
537 m³/h |
537 m³/h |
Motorleistung |
1 x 210 W |
1 x 210 W |
1 x 210 W |
Gesamtleistung |
316 W |
316 W |
316 W |
Nettogewicht |
10,4 kg |
10,4 kg |
10,4 kg |
Farbe |
Weiß |
Weiß |
Schwarz |
Dunstabzugshaube / Bedienungsanleitung |
25 / DE |
|
|
3 Gerät installieren
Zur Installation der Dunstabzugshaube wenden Sie sich bitte an das nächstgelegene autorisierte Kundencenter.
*Vorbereitung von Installationsort sowie Elektroinstallation des Produktes liegen in der Verantwortung des Kunden.
Achtung!
A Nach der Installation Schutzfolie (sofern vorhanden) von Dunstabzugshaube und Abluftrohr entfernen.
Der Abstand zwischen der Unterseite der Haube und der Oberseite des Herds sollte mindestens 65 cm betragen.
Der elektrische Anschluss sollte von einem qualifizierten Elektriker durchgeführt werden.
Installieren Sie Ihr Gerät so, dass der elektrische Anschluss (Stecker, Steckdose) nach der Installation leicht zugänglich ist.
Alle Abmessungen sind in mm angegeben.
3.1 Installationszubehör
|
262 |
25 |
0 |
|
20 |
|
|
|
80 |
|
|
|
400 |
|
|
Max:1130 |
20 |
|
|
Min:750 |
400 |
|
|
|
|
|
365 |
|
350 |
|
|
|
393 |
|
896 |
|
|
|
(Abbildung 2)
|
211 |
264 |
|
24 |
|
|
80 |
|
|
350 |
|
|
20 |
|
Max:1080 |
400 |
|
Min:750 |
|
|
|
|
365 |
|
350 |
|
|
386 |
596 |
|
|
|
26 / DE |
|
|
1 x Abzugsanschlussplatte
1 x Kunststoffabzug (Ø 150 mm)
1 x Kunststoffabzugadapter (Ø 120/150 mm)
Dunstabzugshaube / Bedienungsanleitung
3 Gerät installieren
Nachstehend finden Sie die zur Vorbereitung des Installationsstandortes benötigten Informationen.
3.2 Dunstabzugshaube an der Wand installieren
Zum Installieren der Dunstabzugshaube an der Wand die Schrauben der Halteplatten am Motorgehäuse lösen und die Platten nach oben ziehen. Anschließend die Schrauben der Halteplatten festziehen. (Abbildung 3a).
Halteplatte |
(Abbildung 3a)
Externe |
Kaminschachtanschlussplatte |
(Abbildung 3b)
Befestigen Sie den Kunststoffrohradapter mit einem Durchmesser von 150 mm mit Schrauben (3,5 x 9,5) aus dem Installationszubehör an der Oberseite des Gehäuses (Abbildung 4).
Falls Sie das Abzugsrohr mit einem Durchmesser von 120 mm verwenden, installieren Sie den 120-mm-Rohradapter daran.
(Abbildung 4)
Dunstabzugshaube / Bedienungsanleitung |
27 / DE |
|
|
3 Gerät installieren
3.2.1 Löcher bohren
Bringen Sie die Installationsschablone am Installationsort der Dunstabzugshaube an. Bohren Sie an den mit (X,Y) (Abbildung 5) markierten Punkten mit einem 10-mm-Bohrer und an den mit (Z) (Abbildung 5) markierten Punkten mit einem 6-mm-Bohrer.
Z
Z
Y
X Y
Y

 X
X
10-mm-

 6-mm-
6-mm-

 Kunststoffdübel Kunststoffdübel
|
Z |
|
Y |
X |
|
Unterseite des Gerätes |
|
|
Garbereich |
(Abbildung 5) |
|
28 / DE |
Dunstabzugshaube / Bedienungsanleitung |

3 Gerät installieren
3.2.2 Dübel einsetzen
Schlagen Sie die 10-mm-Dübel (X, Y) mit einem Hammer in die für die Halteschrauben gebohrten Löcher. Schlagen Sie zwei 6-mm-Dübel
(Z) mit einem Hammer in die für die externe Kaminschachtanschlussplatte mit einem 6-mm- Bohrer gebohrten Löcher. (Abbildung 5)
3.2.3 Halteschrauben installieren
Drehen Sie die Halteschrauben (5,5 x 60) in die 10-mm-Dübeln (Y), die Sie mit einem Hammer in die Wand geschlagen haben. Zwischen Schraubkopf und Wand muss ein Abstand von 5 mm eingehalten werden. (Abbildung 6)
Befestigen Sie die interne Kaminschachtanschlussplatte mit Schrauben (Ø 3,9 x 22) an den 6-mm-Dübeln (Z) in der Wand.
(Abbildung 6)
3.2.4 Dunstabzugshaube an die Wand hängen
•• Hängen Sie die Dunstabzugshaube in die Schrauben ein, die Sie in den Y-Löchern installiert haben.
•• Öffnen Sie das seitliche Saugfenster der Dunstabzugshaube, indem Sie es zu sich ziehen. Installieren Sie die Schrauben (5,5 x 60) zur Befestigung des Gerätes in den Löchern X an der Innenseite.
Z
Z
Y
X Y
X
Kreuzschraube |
Kreuzschraube |
5,5 x 60 |
3,9 x 22 |
(Abbildung 6)
Dunstabzugshaube / Bedienungsanleitung |
29 / DE |
|
|
3 Gerät installieren
3.3 Abzugsschacht installieren
Trennen Sie das Produkt vor dem Kaminschachtanschluss von der Stromversorgung. Bringen Sie die Blechabzugsteile rund um das Gehäuse an.
Schrauben Sie den externen Abzugsschacht an die externen Kaminschachtanschlussplatten am Motorgehäuse. (Abbildung 3b / 7)
E |
F |
|
(Abbildung 7)
Verlängern und Schrauben Sie den internen Abzugsschacht von seinen Außenkanten an die Kaminschachtanschlussplatte, die an der Wand befestigt wurde (Abbildung 8).
E |
F |
|
(Abbildung 8)
30 / DE |
Dunstabzugshaube / Bedienungsanleitung |
|
|
 Loading...