


No Frost |
GNE 35715 S |
|
GNE 35715 W |

Contents
 Technical specifications of your refrigerator
 Prior to operating your refrigerator
Why No-Frost? ............................................. |
5 |
Safety precautions›....................................... |
6 |
Installing Your Refrigerator........................... |
7 |
Operating your refrigerator ........................... |
14 |
 Using your refrigerator
Using the accessories .................................. |
18 |
Placing the food............................................ |
24 |
Things to be done for saving energy ............ |
25 |
Changing the illumination lamp .................... |
23 |
 Deep-Freeze information
 Cleaning your refrigerator
 Service
>4
>5
>15
>25
>26
>26
1 EN
The Refrigerator |
|
|
|
|
|
|
1 |
|
2 |
|
|
|
|
|
|
|
12 |
3 |
|
|
|
|
|
4 |
|
|
|
|
13 |
|
|
|
|
|
|
|
|
|
|
|
14 |
5 |
|
|
|
|
|
|
|
|
|
|
15 |
7 |
|
|
|
|
|
|
|
|
|
|
16 |
6 |
|
|
|
|
15 |
|
|
|
|
|
|
|
|
|
|
|
13 |
6 |
|
|
|
|
|
|
|
|
|
|
21 |
|
|
|
|
|
22 |
6 |
|
|
|
|
|
|
|
|
|
|
12 |
8 |
|
|
|
|
|
|
|
|
|
|
21 |
|
|
|
|
|
22 |
8 |
|
|
|
|
|
|
|
|
|
|
19 |
|
|
|
|
|
18 |
23 |
9 |
20 |
17 10 |
11 |
23 |
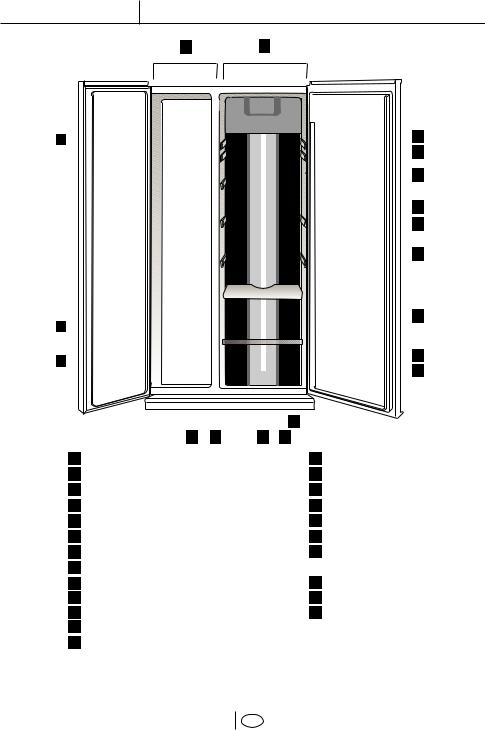
1 |
Freezer compartment |
14 |
Egg holder |
2 |
Fridge compartment |
15 |
Fridge Compartment door racks |
3 |
Fresh Freeze compartment |
16 |
Fridge Compartment interior light |
4 |
Ice container |
17 |
Snack tray |
5 |
Freezer Compartment interior light |
18 |
Crisper compartment |
6 |
Freezer Compartment glass shelves |
19 |
Crisper or Chiller Compartment |
7 |
Ice duct lid |
20 |
Crisper or Chiller Compartment |
8 |
Freezer compartment drawers |
|
adjustment bolt |
9 |
Ventilation lid |
21 |
Bottle holder |
10 |
Humidity adjustment slider |
22 |
Bottle shelves |
11 |
Crisper cover |
23 |
Adjustable front legs |
12Butter and cheese lid
13Fridge Compartment glass shelves
•Figures that take place in this instruction manual are schematic and may not correspond exactly with your product. If the subject parts are not included in the product you have purchased, then it is valid for other models.
2 EN

The Refrigerator
MAIN BOARD COVER: NEVER REMOVE THIS COVER

 Power mains cable
Icematic water supply p
Water pipe cover
Cold water mains inlet v
REAR COVER: NEVER REMOVE THIS COVER
3 EN

1 Technical specifications of your refrigerator
Product Category |
Refrigerator/deep-freeze for domestic use |
||||
|
|
|
|
|
|
Energy Class |
|
A |
|
|
|
|
|
|
|
|
|
Annual Energy Consumption |
|
|
(Actual consumption varies depending on |
||
(kWh/year) |
529 |
where and how the appliance is used) |
|||
|
|
||||
|
|
|
|
|
|
Fridge Compartment Volume (Net-lt) |
383 |
|
|
||
|
|
|
|
|
|
Frozen Food Compartment Volume |
|
|
|
|
|
(Net-lt) |
146 |
|
|
||
|
|
|
|
||
|
|
|
|
|
|
Star Class |
|
|
|
|
|
|
|
|
|
||
|
|
|
|
|
|
Two Star Compartment (lt) |
6 |
|
|
||
|
|
|
|
|
|
Cooling System |
|
NO-FROST |
|||
|
|
||||
|
|
|
|
|
|
Temperature Increasing Time (hour) |
8 |
(Power failure safety; it is recommended not to consume the food |
|||
in freezer compartment after this period.) |
|||||
|
|
|
|||
|
|
|
|
|
|
Freezing Capacity (kg/24 hours) |
13 |
|
|
||
|
|
|
|
|
|
Climate Class |
|
SN |
|
|
|
|
|
|
|
|
|
Noise Level (dB(A)) |
46 |
|
|
||
|
|
|
|
|
|
Total Net Volume (lt) |
535 |
|
|
||
|
|
|
|
|
|
(H) Height (cm) |
177.5 |
|
|
||
|
|
|
|
|
|
(W) Width (cm) |
92.5 |
|
|
||
|
|
|
|
|
|
(D) Depth (cm) |
74 |
|
|
||
|
|
|
|
|
|
Weight (kg) |
124 |
|
|
||
|
|
|
|
|
|
Electric Supply (V/Hz) |
230/50 |
|
|
||
|
|
|
|
|
|
Total Power (W) |
180 |
|
|
||
|
|
|
|
|
|
•Technical specifications can be changed to increase the product quality without being subject to prior notice.
•Values stated on the markings on the product or in the printed materials supplied with the product are the values obtained in laboratory in accordance with relevant standards. Such values may vary depending on the usage of the product and the ambient conditions.
•You can find the information about the cabin size of the refrigerator in section “Installing your refrigerator”.
4 EN
2 Prior to operating your refrigerator
• Please remember that the manufacturer shall not be held liable if the information given in the instruction manual is not observed. This product is designed for domestic use.
Prior to operating your refrigerator, please read the instruction manual carefully that includes important information such as installation, usage and maintenance of your product.
Things to be done
•Your refrigerator should be installed at least 30 cm away from heat sources such as hobs, ovens, central heater and stoves and at least 5 cm in away from electrical ovens and should not be located under direct sunlight.
•The ambient temperature of the room where you install your refrigerator should at least be 10°C. Operating your refrigerator under cooler conditions than this is not recommended with regard to its efficiency.
•Please care to keep the inside of your refrigerator clean.
•If two refrigerators are to be installed side by side, there should be at least 2 cm distance between them.
•Your refrigerator must run smoothly without any vibration. To ensure this, maintain the balance of your refrigerator on the floor by turning the adjustable front legs clockwise or counterclockwise. This should be done before the food is placed in the refrigerator.
•When you operate your refrigerator for the first time, please observe the following
instructions during the initial six hours.
-Temperature adjustment button should not be turned off.
-The door should not be opened frequently.
-It must be operated empty without any food in it.
-Do not unplug your refrigerator; if a power failure occurs out of your control, please see the warnings in section “Things to be done before calling the authorized service”.
•Original packaging and foam materials should be kept for future transportations or moving.
Points to be Considered when Transporting the Product:
1. Your refrigerator must be emptied and cleaned prior to any transportation.
2.Shelves, accessories, crisper and etc. in your refrigerator must be fastened securely by adhesive tape against any jolt before repackaging.
3.Packaging must be tied with thick tapes and strong ropes and the rules of transportation printed on the package must be followed.
Why No-Frost?
Please remember…
Every recycled material is an indispensable source for the nature and for our national resources.
If you wish to contribute to recycling the packaging materials, you can get further information from the environmental bodies or local authorities.
•No-Frost refrigerators are quite different from other refrigerators with respect to their operating principles. In normal fridges, the humidity that rushes into the refrigerator and the humidity brought by the food causes ice formation in the freezer compartment. This ice is melted and cleaned with certain intervals.
•However, in No-frost refrigerators no ice or snow formation occurs inside the usable areas of the refrigerator.
•No-Frost refrigerators also show very different characteristics from other refrigerators with respect to their cooling systems. A No-Frost refrigerator provides equal cooling down of all the food in it thanks to the cool air being circulated in it continuously.
•Therefore, your No-Frost refrigerator provides you a great comfort in usage.
5 EN

Safety precautions
This product, included in the newest product line is particularly environment friendly. Your product is equipped with a natural cooling system (R600a) which does not contain CFC and HFC gases. This gas is flammable. Therefore, pay attention to not damaging the cooling system and piping during usage and transportation. In the event of damage, do not dispose the product in fire; keep your product away from potential fire sources that can cause the product catch a fire and ventilate the room in which the unit is placed.
• When you want to dispose/scrap the product, we recommend you to consult the authorized service in order to learn the required information and authorized bodies.
• Do not damage the cooling circuit.
•Do not use any electrical tools other than those recommended by the manufacturer inside the food storage compartments of the product.
•Consult your authorized service for all your questions and problems related to the refrigerator. Do not intervene or let someone intervene to the refrigerator without notifying the authorized services.
•Do not eat cone ice cream and ice cubes immediately after you take them out of the freezer compartment! (This may cause frostbite in your mouth.)
•Do not put bottled and canned liquid beverages in the freezer compartment. Otherwise, these may burst.
•Do not touch frozen food by hand; they may stick to your hand.
•Vapor and vaporized cleaning materials should never be used in cleaning and defrosting processes of your refrigerator. In such cases, the vapor might get in contact with the electrical parts and cause short circuit or electric shock.
•Never use the parts on your refrigerator such as kick plate or door as a means of support or step.
•Do not use electrical devices inside the refrigerator.
•Do not operate a damaged refrigerator. Consult your service if you have any doubts.
•Do not damage the parts, where the refrigerant is circulating, with drilling or cutting tools. The refrigerant that might blow out when the gas channels of the evaporator, pipe extensions or surface coatings are punctured may cause skin irritations and eye injuries.
•Do not cover or block the ventilation holes
on your refrigerator with any material.
• Only authorized service personnel may
make any repair on electrical appliances. Repairs performed by incompetent persons may create a risk for the user.
•In case of any failure or during a maintenance or repair work, disconnect your refrigerator's mains supply by either turning off the relevant fuse or unplugging your appliance.
•Be careful not to pull from the cable when pulling the plug out.
•Electrical safety of your refrigerator shall be guaranteed only if the earth system in your house complies with standards.
•Do not allow children play with your refrigerator. They might harm themselves and the refrigerator. (E.g. do not allow them hang from the door.)
•Place the beverage with higher proofs tightly closed and vertically.
•Flammable items or products that contain flammable gases (e.g. spray) as well as the explosive materials should never be kept in the appliance.
•Do not use mechanical devices or other means to accelerate the defrosting process, others than those recommended by the manufacturer.
•Moving parts such as blades in a housing at the ice outlet of the dispenser and in cube ice compartment, must not be touched to avoid injury.
This appliance is not intended for use by persons (including children) with reduced physical, sensory or mental capabilities, or lack of experience and knowledge, unless they have been given supervision or instruction concerning use of the appliance by a person responsible for their safety.
Children should be supervised to ensure that they do not play with the appliance.
Electrical Safety
This product is designed for indoor use. It is not appropriate to use it outdoor even if the place is covered with a roof.
Exposing the product to rain, snow, sun and wind is dangerous with respect to electrical safety.
If the connection cable is damaged, it must be changed by the manufacturer or customer services in order to avoid potential risks to you.
6 EN

Placing and Assembly of Your Refrigerator
Caution: Never plug the refrigerator in to the wall outlet during installation. Otherwise, risk of death or serious injury may arise.
If the entrance door of the room where the refrigerator will be installed is not wide enough for the refrigerator to pass through, than call the authorized service to have them remove the doors of your refrigerator and pass it sideways through the door.
1.Install your refrigerator to a place that allows ease of use.
2.Keep your refrigerator away from heat
Usage area measures
sources, humid places and direct sunlight.
3.There must be appropriate air ventilation around your refrigerator in order to achieve an efficient operation. If the refrigerator is to be placed in a recess in the wall, there must be at least 5 cm distance with the ceiling and at least 5 cm with the wall.
If the floor is covered with a carpet, your product must be elevated 2.5 cm from the floor.
4.Place your refrigerator on an even floor surface to prevent jolts.
5.Do not keep your refrigerator in ambient temperatures under 10°C.
Following figure shows the required place to allow you use your refrigerator most efficiently.
74 cm
117 cm
92.5
154 cm
7 EN
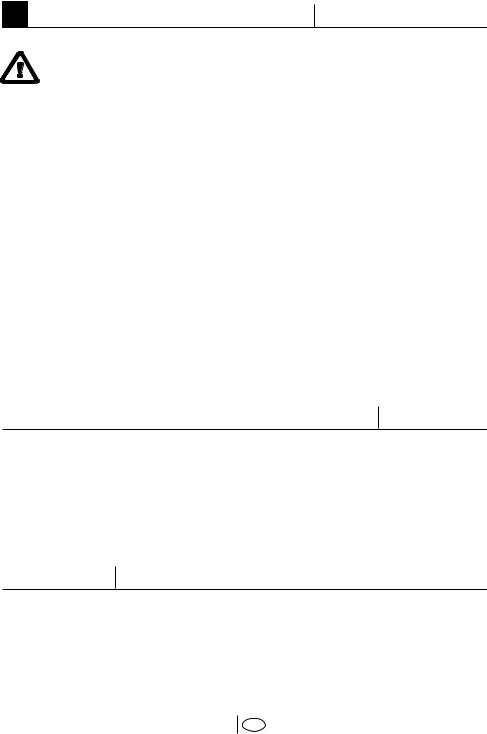
Floor balance adjustment |
Door height adjustment |
|
|
|
|
|
|
|
If your refrigerator is not level, you can level it by turning the front feet as illustrated in the figure below. (See. Figure A) The corner where the leg exists is lowered when you turn in the direction of black arrow and raised when you turn in the opposite direction. Taking help from someone to slightly lift the refrigerator will facilitate this process.
In case there is a problem with the alignment of the doors, with respect to each other, they may be aligned by ascension vertically in the order given below. Ensure that door shelves are empty when adjusting the door height.
1. Remove the lower ventilation door by unscrewing its screws, as shown in the figure below. (See. Figure B)
(Figure A)
 4
4
1 |
2 |
3 |
(Figure B)
8 EN

2. Loosen the three screws of the hinges of the lower door, which you wish to escalate, with the help of a screwdriver as shown in the figure below. (Do not remove completely)
(See. Figure C)
(Figure C)
• If the freezer compartment door is lower than the fridge compartment door, bring them to the same level by turning the turning the elevation screw on the freezer compartment side in the direction of arrow using a M6 Allen wrench as illustrated in Figure D.
• If the freezer compartment door is higher than the fridge compartment door, bring them to the same level by turning the elevation screw on the freezer compartment side in the direction of arrow using a M6 Allen wrench as illustrated in Figure D.
After bringing the doors to the same level by elevating the front part with the aid of the elevation screws, doors of the refrigerator shall close properly. If the doors do not close properly, this might adversely affect the efficiency of the refrigerator.
Allen Wrench (M6)
(Figure D)
9 EN
Installation Requirements |
|
In order to operate the automatic ice |
|
maker/dispenser and chilled water dispenser, |
|
your appliance needs to be plumbed into the |
|
cold mains water supply in your house via a |
|
standard 1/2 “ valve fitting. In case this valve |
|
is not present or in case you are not sure, |
1 |
|
|
consult a qualified plumber. |
2 |
|
|
* First of all, make sure that the parts on the |
|
side are shipped with the device. |
|
1. 5-meter long water pipe (1/4 inch in |
|
diameter) |
|
2. Cold mains water valve with mesh filter |
|
(Tap Adapter) |
|
|
3 |
3. 3 pieces of pipe clips (In case required to |
|
secure the water pipe) |
|
4. Water Filter to be fitted to the bracket |
5 |
|
|
inside the fridge compartment. |
4 |
5. Nut for connection of the water pipe to the |
|
rear of the appliance |
|
Connection to the Cold Mains |
|
Please follow the instructions below. |
|
MAKE SURE THAT STANDARD 1/2” |
Water Tube |
|
|
VALVE FITTING FED BY COLD MAINS |
|
WATER SUPPLY IS AVAILABLE AND |
|
IS TURNED OFF FULLY. |
|
Connection of the Water Pipe to the |
|
Refrigerator |
Water Tube |
|
|
1. After assembling the nut on the water |
Nut |
|
|
pipe, insert the water pipe to the refrigerator |
|
inlet valve by pressing downwards firmly. |
|
2. Fix nut as seen in the opposite figure, by |
|
|
2 |
squeezing by hand on the refrigerator inlet |
|
valve. |
|
Note: You should not need to tighten the |
|
nut with a tool to achieve water tight |
|
assembly. In case of a leak use a spanner |
|
or a pair of pliers to tighten the nut. |
|
|
Valve |
10 |
EN |
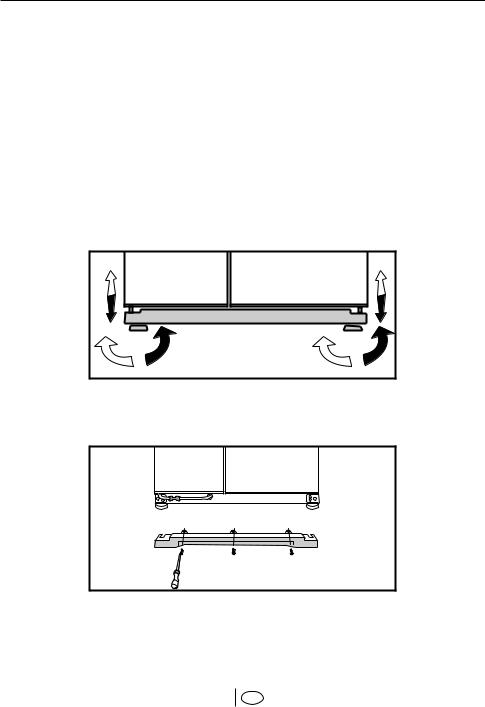
Connection of the Water Pipe to the Cold Water Mains Line
1.Separate the nut from the tap adaptor.
(Figure A)
2.As shown in the figure, assemble the tap adaptor to 1/2” valve fitting (Figure B)
3.As shown in the figure, after inserting the water pipe to the nut, install it to the tap adaptor and insert to the tap as shown in the figure. (Figure C)
4.Tighten the nut manually. In case of a leak use a spanner or a pair of pliers to tighten the nut.
Caution: Secure the water pipe to suitable points by means of the pipe clips supplied to avoid any damage or displacement or accidental disconnection.
Caution: After turning on the water valve, make sure that there is no leakage at both connection points of the water pipe. In case of a leak, turn off the valve immediately and tighten all joints again using a spanner or a pair of pliers.
Mesh Filter |
Main Cold Water Line |
|
Tap
Adaptor
Feed
Valve
Nut
Tap Adaptor
Figure A |
Figure B |
|
Tap
Adaptor
Nut
Water Tube
Figure C
11 EN

Water Filter |
|
|
|
Water Pipe |
Water Pipe |
By-pass Cover |
Bypass Cover |
Filter |
|
||
|
|
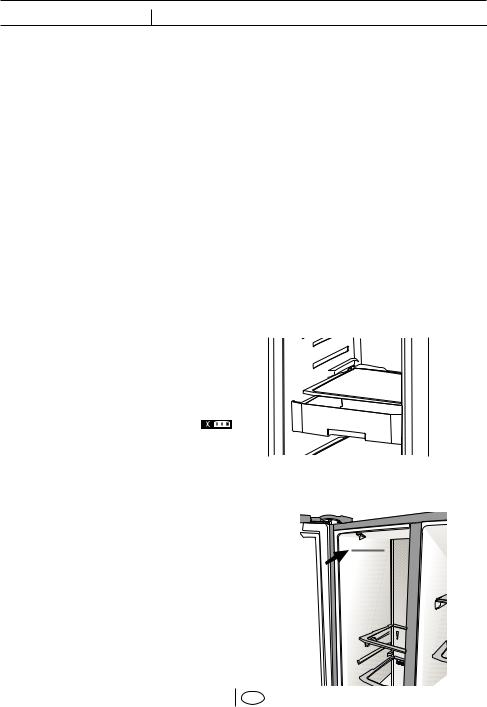
To fit the water filter follow the instructions below referring to figures supplied:
1.Take out the upper salad crisper in the fridge as shown in the figure below.
2.Unscrew the water filter by-pass cover. Caution: Make sure that the Ice off mode is active before taking out the by-pass cover.
Note: It is normal that a few drops of water drip after the cover has been taken out.
3.After removing the red cover on the head of the water filter, install it as shown in the figure below.
4.Press Ice Off button on the display again to exit from this mode.
Water filter should be replaced every 6 months. Water filter replacement warning will
appear on the screen after about 6 months. The warning light will remain on for about 15 days before it starts to flash. Once the filter has been replaced, this warning light can be cancelled by pressing the Eco Extra button on the display for 5 seconds.
The water filter must be removed as shown in the figure when it is going to be replaced or when it will no longer be used. Make sure that the Ice off mode is active before removing the water filter.
If you do not want to use the water filter, warning light should be cancelled. To do this, “Freezer Set” and “Water/Ice Type Selection” buttons must be pressed simultaneously for 2 seconds. Filter warning will flash for 5 times when pressed in this way and the warning will be cancelled. Filter warning will flash for 10 times when the same buttons are pressed
1 |
|
REMOVE |
LOCK |
2 |
|
3 |
12 |
EN |
|

for 2 seconds and the warning will be reactivated.
Caution: Water filter is for cleaning some foreign particles in the water. It does not purify water from microorganisms.
Caution: Ice off button must always be pressed during replacement of the water filter or installing the bypass cover.
REMOVE |
Water Reservoir |
|
If you wish to disassemble the water reservoir |
|
from the refrigerator for cleaning the vicinity |
|
of the water reservoir follow the instructions |
|
below; |
|
• Remove the 2 screws by using a cross |
|
headed screwdriver as shown in the figure. |
|
• Gently hold and remove the water reservoir |
|
as shown in the figure. |
|
Caution: |
|
Never remove the bolts, assembled to the |
|
water reservoir. |
Water Reservoir |
|
Ice/Water Dispenser Prior to First Use
•Water mains pressure must not be below 1 bar.
•Water mains pressure must not be over 8 bars.
•Pumps must be used in case the water
mains pressure drops below 1 bar.
•Water system of the refrigerator must be connected to the cold water line. It must not be connected to hot water line.
•Do not forget to remove the ice channel cover from its location before using Ice Dispenser.
•In case you see condensation on the dispenser (water drops) or in case you connect your device to the water mains, make sure that the anti-condensation switch is pressed. (See Page 15) Anti-Condensation button is pressed as a factory setting.
•Dispenser will not work when the door of the freezer compartment is open. Make sure that the door is closed for the operation of the dispenser.
•No water may be obtained in the initial operation of the refrigerator. This is caused by the air in the system. To discharge air from the system, press Dispenser latch for periods
13 EN

of 1 minute until water comes from the |
8 bars for the operation of Ice/water Dispenser |
||||
Dispenser. Water flow may be irregular in the |
smoothly. For this, check that 1 glass of water |
||||
beginning. Irregular water flow will be |
(100 cc) |
can be filled |
in 10 seconds. |
||
normalized after the air in the system is |
|
|
|
|
|
discharged. |
• The first 10 glasses of water should not be |
||||
|
|
consumed. |
|
||
• When the refirigerator is run for the first |
|
|
|
|
|
time, Water Dispenser choice will be selected |
• 12 hours must pass to obtain ice from the |
||||
automatically. However, approximately 12 |
Ice Dispenser for the first time. In case not |
||||
hours must pass before cold water can be |
enough ice is present in the ice dispenser, |
||||
obtained. |
ice may not be obtained from ice dispenser. |
||||
• Water mains pressure must be between 1- |
• Approximately the first 30 cubes of ice to be |
||||
|
|
obtained from the ice dispenser must not be |
|||
Operating your refrigerator |
|
used. |
|
|
|
|
|
|
|
|
|
|
|
|
|
||
Before you start using the fridge/freezer check |
8. |
When the compartments reach the |
|||
that: |
desired temperatures fans will stop. |
||||
|
|
9. Especially pay special attention to prevent |
|||
1. The feet have been adjusted so that the |
the foodstuffs, in particular, small pieces, |
||||
product stands level. |
such as rice, peas and beans from running |
||||
2. The interior is dry and air can circulate |
into the fan protectors and air flow ducts. |
||||
freely at the rear. |
These may cause clogging of the cooling |
||||
3. Clean the interior as recommended under |
system and a decrease in the efficiency of |
||||
"CLEANING AND CARE." |
the device. |
|
|||
4. Plug the refrigerator into the power mains |
10. |
The factory set temperature is +4°C for |
|||
outlet. |
fridge compartment and -18°C for freezer |
||||
• When the door is open the respective |
compartment. |
|
|||
interior light will come on. |
11. The compressor will start running |
||||
5. You will hear a noise as the compressor |
approximately 5 minutes after the refrigerator |
||||
starts up. The liquid and gases sealed within |
is plugged in to protect the electronic |
||||
the refrigeration system may also give rise |
components of your appliance. After startup |
||||
to noise, even if the compressor is not running |
of |
the |
compressor, |
compartment |
|
or not which is quite normal. |
temperatures will reach to the setup |
||||
Due to the operation of fans inside the |
temperatures in 24 hours depending on the |
||||
appliance, overall noise level is slightly |
ambient temperature and load status of your |
||||
higher in comparison to non-frost free |
refrigerator. |
|
|||
appliances. This is quite normal and is |
12. Pay attention to the following points during |
||||
not a fault. |
the |
first |
24 hours of |
the operation: |
|
6. Front edges of the refrigerator may feel |
|
-Do not open the doors frequently. |
|||
warm. This is normal. These areas are |
|
-Do not overload your refrigerator. |
|||
designed to be warm to avoid condensation. |
|
-Do not put hot food. |
|
||
7. Do not fill the interiors of the refrigerator |
|
|
|
|
|
in initial operation. Wait until the correct storage temperature has been reached. (See page 16)
14 EN

3 Using your refrigerator
Setting Buttons and Temperature Control
Control buttons allow you to make the settings of your refrigerator easily and without opening the doors. Thus, heat loss is avoided.
Freezer Set button |
|
|
|
Fridge Set/ Vacation button |
||
|
|
|
|
|
|
|
Fresh |
Quick Cool |
Freeze |
button |
Button |
|
Eco |
|
Extra |
Ioniser / Key lock |
Button |
button |
Water Dispenser light |
Ice-off button |
button |
|
|
Ice / Water selection button |
|
Anti-condensation switch |
Water Dispenser Lights |
|
|
Economy Mode indicator |
|
|
|
Freezer Compartment Temperature |
|
|
|
High Temperature/ Error |
|
|
|
|
|
indicator |
|
|
|
Warning indicator |
|
|
|
|
|
Freezer Door Open indicator |
|
|
|
Key Lock indicator |
Freezer Temperature Setting indicator |
|
Fridge Temperature indicator |
||
|
|
Fridge Temperature Setting indicator |
||
|
|
Freezer Door |
Filter indicator |
|
|
|
|
|
|
|
|
Open indicator |
||
|
|
|
|
Vacation indicator |
-24 °C |
|
|
|
2 °C |
-22 °C |
|
|
|
4 °C |
-20 °C |
|
|
|
6 °C |
-18 °C |
|
|
|
8 °C |
Water indicator |
Ionizer |
Quick Cool indicator |
||
|
|
|||
|
|
indicator |
|
|
Eco Extra indicator |
Ice Cube |
Crash Ice indicator |
||
Fresh Freeze indicator |
Ice Off indicator |
15 EN
Fridge/Freezer Door Open Indicator:
Fridge/Freezer Door Open Indicator is activated either fridge or freezer door is open. If the door remains opened for 60 sec, buzzer is on to alarm. If any button on display is pressed buzzer will be off even if the door is not closed.
Freezer |
Fridge |
|
Compartment |
Compartment |
Explanations |
Adjustment |
Adjustment |
|
|
|
|
-18°C |
4°C |
This is the normal recommended setting. |
|
|
|
-20,-22 or -24°C |
4°C |
These settings are recommended when the ambient |
|
|
temperature exceeds 30°C. |
|
|
|
Fresh freeze |
|
Use this when you wish to freeze your food or make ice in a |
Display will show |
4°C |
short time. Your refrigerator will return to its previous mode |
-27°C |
|
when the process is over. |
|
|
|
-18°C or colder |
2°C |
If you think that your fridge compartment is not cold enough |
|
|
because of the hot conditions or frequent opening and closing |
|
|
of the door. |
|
|
|
-18°C or colder |
Quick cool |
You can use it when your fridge compartment is overloaded |
|
||
|
|
|
|
Display will |
or if you wish to cool down your food rapidly. |
|
|
|
|
show +1°C |
|
|
|
|
Making the Fridge Compartment Temperature Adjustment 


Fridge temperature can be set at one of the following temperatures : 8,6,4 and 2°C Press the button to change. The temperature will decrease by 2°C. Everytime you press the button, it will go down and then around to the highest setting. Release at the desired
temperature and the new set temperature will be stored.
If you think that your food is colder than you desired, you can adjust the temperature setting of fridge compartment to 6 or 8.
Making the Freezer Compartment Temperature Adjustment (SET)
Freezer temperature can be set at one of the following temperatures : -18,-20,-22 and -24°C
Press the button to change. The temperature will decrease by 2°C. Everytime you press
Fresh Freeze Function
the button, temperature will go down and then return to the highest setting. Release at the desired temperature and the new set temperature will be stored.
When you press “Fresh Freeze" button, the compressor will run for about 24 hours. Fresh Freeze indicator will glow and freezer compartment temperature settings will switch to -27°C whilst the Fresh Freeze is active. To cancel this function press Fresh Freeze button again. Fresh Freeze indicator will turn off and return to its normal settings. Fresh
Freeze will cancel itself automatically after about 24 hours if you do not cancel it.
If you want to freeze large amounts of fresh food, press the fresh freeze button 24 hours before putting the food into the freezer compartment.
16 EN

Quick Cool Function
When you press “Quick Cool” button, the temperature of the compartment will be colder than the adjusted values. This function can be used for food placed in the fridge compartment and required to be cooled down rapidly.
After pressing the Quick Cool button, Quick Cool indicator will glow and fridge
Vacation Button


compartment temperature setting will switch to 1°C whilst the Quick Cool is active. To cancel this function press Quick Cool button again. Quick Cool indicator will turn off and return to its normal settings. Quick Cool function will cancel itself automatically in case you do not cancel it.
In case the fridge compartment will not be used for a long time, the usage of the fridge compartment may be cancelled by pressing on the “Set” Button. By this way, the refrigerator may operate more economically.
Press on Vacation Button for 2 seconds to activate this function. When this function is active, the door of the fridge compartment must be kept closed and no food must be left in the fridge compartment.
Special Economy Function (Auto Eco)
When “Auto Eco” button is pressed, Special Economy Function will be activated. If the door of the fridge compartment is kept closed for a long time when this function is selected,
Ion+ Button (Ioniser)
the fridge compartment will switch to a more economic operation mode to safe electricity automatically. When the “Auto Eco” button is pressed again, this function is deactivated.
Ionizing in the refrigerator is carried out Press this button if you request extra ions. automatically.
Key Lock Button (Ioniser)
The key lock is activated when this button is pressed for 3 seconds and all buttons and the dispenser latch will not work. If you want
Water Dispenser Illumination (Light)
to deactivite key lock press again for 3 seconds.
When the “Light” button is pressed, the water dispenser lamp will light up and it will go off when the button is pressed again. This
illumination will also light up when the water dispenser latch is pressed, and it will go off delayed when the latch is released.
Water/Ice Type Selection (Dispenser Mode)
With “Dispenser Mode” button, either one of “water” or “ice cube” or “crushed ice” options is selected.
17 EN
Using the accessories
Ice/Water Dispenser |
|
|
With its three different functions, the dispenser |
|
|
efficiently meets your cold water, cube ice |
Note: |
|
|
|
|
and crushed ice needs without having to open |
• Water or ice can be dispensed for a |
|
|
|
|
the door of the refrigerator. It is a continuous |
maximum of 60 seconds at each use. |
|
|
|
|
cold water and ice source without adding |
• When the freezer door is open, the dispenser |
|
|
|
|
water. User friendly control panel provides |
will not work. |
|
the following dispensing functions: |
|
|
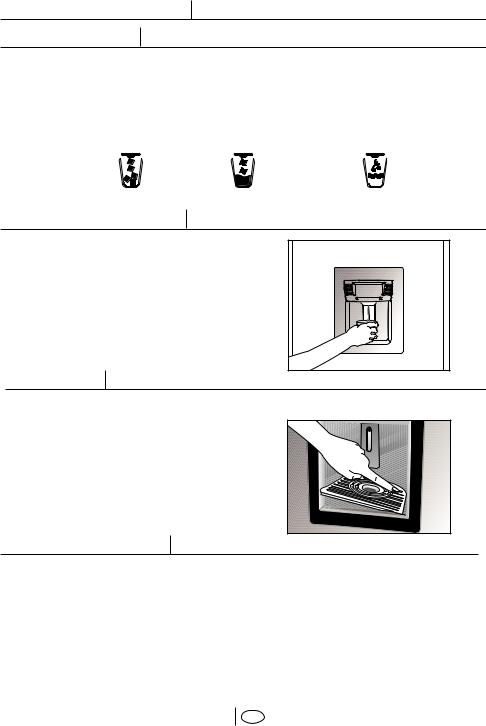
Ice Cube |
Crushed Ice |
Cold Water |
|
||
Using the Water Dispenser
Warnings
* It is normal for the first few glasses of water taken from the dispenser to be warm. * In cases where the water dispenser has not been used frequently, sufficient amount of water must be drained from the dispenser to get fresh water.
Spillage Tray
Water drops that drip during use, accumulates in the spillage tray. Remove the spillage tray by pressing down in the right corner. You can remove the water with a sponge or a soft cloth.
Using the Ice Dispenser
Please note, first ice cubes will not be ready before 12 hours after switching on the appliance.
In case you do not need ice, such as during winter or in case you are on vacation, turn on Ice Off function.
Ice device produces approximately 110 cubes of ice in 24 hours and this amount may change according to the frequency of opening of doors,
refrigerator settings and power outage. Produced ice may be obtained from the dispenser as cube ice or crushed ice.
It is normal to get crushed ice from the dispenser in a longer time than in getting the ice cubes and also flowing of some crushed ice before the ice cubes drop if crushed ice option had been selected
Change in the smell or taste of the ice or sticky
18 EN
cubes and a decrease in the form of ice is normal in case ice is not obtained from dispenser for a long time or in case of power outages. If this is the case, the ice in the icebox must be controlled and the icebox should be emptied and cleaned thoroughly.
Warnings
•No ice must be added to the ice dispenser compartment. This may adversely affect the ice supply or crushing the ice.
•It is normal to have a couple of ice cubes stuck together in the icebank.
•Moving parts such as blades in a housing at the ice outlet of the dispenser must not be touched to avoid injury.
•Never use sharp objects to break the ice in the icebox. This may cause damage on the icebox.
•Food stuff should never be placed into the icebank for quick cooling purposes.
•In case you see condensation on the dispenser (water drops) or in case you connect your device to the water mains, make sure that the anti-condensation switch is pressed. (See Page 15) Anti-Condensation button is pressed as a factory setting.
•When the ice container is to be removed for any reason, first of all Ice Off Button must be pressed.
Ice Off
To stop ice formation, “Ice Off” button is pressed. When ice off is selected, no water will be taken into the Icematic. However, already existing ice can be taken from the dispenser. To restart ice formation, “ice off” button must be pressed again.
Caution: If you do not use the ice dispenser, do not forget to put ice duct cover into the ring inside of the freezer door. (See. Page 2)
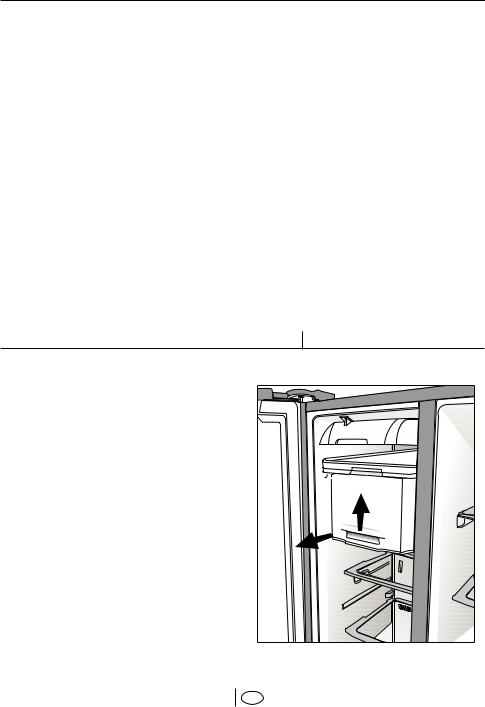
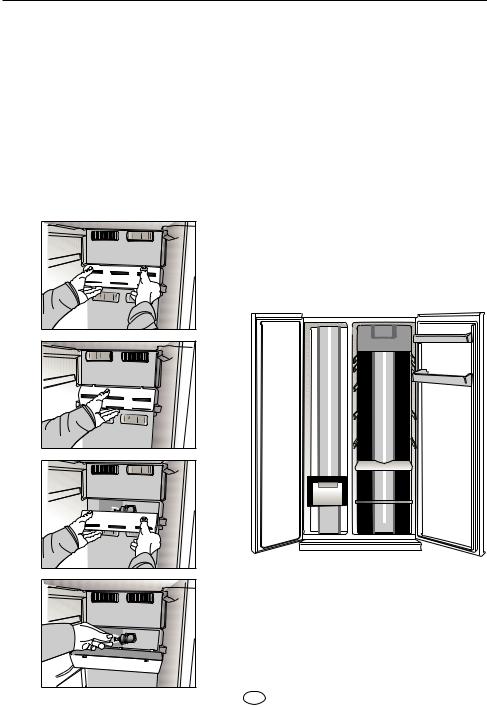
Cleaning the Icebox and the Water Dispenser
Follow the procedure and warnings below to clean the icebox:
•Remove the Icebox by lifting first and then pulling towards yourself as shown in the diagram.
•Empty the ice in the Icebox if any. To take out the stuck ice, use objects that are not sharp to avoid any damage on the Icebox.
•Pay attention that the inside of the Icebox is not wet/damp before placing it back to its housing.
•If you want to get ice from the ice dispenser after placing theicebox back to its housing and closing the freezer door, exit from ice off mode by pressing the ice off button again.
•Do not touch moving parts like the knife in the Icebox
19
1. Lift |
2. Pull |
EN |
Humidity control in the crisper
Humidity level can be adjusted by sliding the humidity adjustment slider to the right or left.
•If you want to maintain humidity in this compartment, set the humidity adjustment slider to the closed position. (Left)
•If you want to eliminate humidity in this compartment, set the humidity adjustment slider to the open position. (Right)
Sliding Shelves
Sliding shelves can be pulled by about 10 cm to easily reach the food placed at the rear of the shelf in the side fridge compartment and also for easier cleaning.
Snack Tray
Snack Tray can be used to store small items that you frequently use. Please take extra care not to damage the Snack Tray when you take it out of the fridge and place it back in the fridge gently.
Ioniser
It is in the air channel of refrigerator back side of the crisper. With ionizing the air, airborne bacteria and the bad smell originated from these bacteria will be reduced.
Bacteria
Ion
20 EN
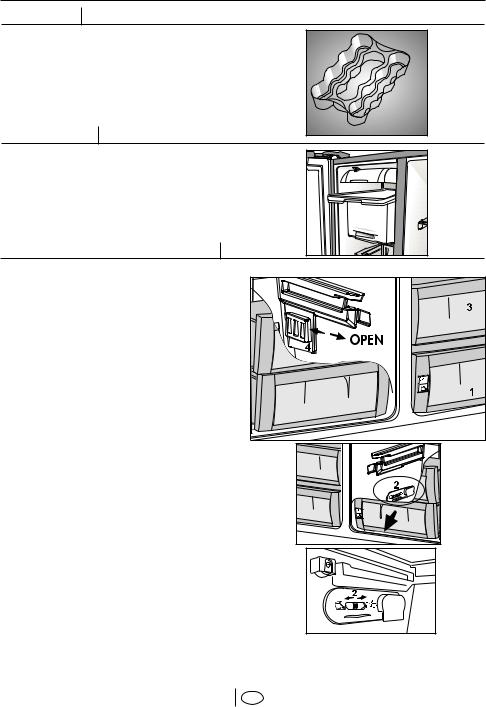
Egg Holder
You can install the egg holder to the desired door or body shelf.
Never store the egg holder in the freezer compartment
Fresh Freeze
This compartment freezes your food quickly and preserves their tastes and nutritional values.
Crisper and Chiller Compartment
Crisper or Chiller (0°C i. e. zero degree centigrade compartment (1)
• The drawer at the bottom of the fridge compartment can be converted into a salad crisper or a Chiller Compartment.
• The Chiller Compartment will keep the temperature below the temperature in the fridge compartment around 0°C and so, meat or fish can be kept fresher for longer.
Chiller Compartment is also ideal for the storage of ready cooked chilled food.
Important:
• Vegetables and fruits may freeze if the adjustment slider (2) is kept at Chiller Compartment position. Therefore, check the position of the slider (2) before storing food.
• In ambient temperatures at 10°C or lower, green leaf vegetables and other easily frozen salad should be removed from this compartment (1) and placed into the upper crisper compartment. (3)
• Do not swap the position of these drawers and make sure that the position adjustment slider is set at the desired position i.e. salad crisper or Chiller Compartment.
• In ambient temperatures at above 28°C, if the compartment (1) is desired to use colder, the adjustment slider (4) into the freezer can be converted to open position. Be sure the adjustment slider (4) into the freezer is in close position when the ambient temperature is at
28°C or lower. |
21 EN |
|
Freezing Fresh Food
• It must be preferred to wrap or cover the |
specifications of your refrigerator.) |
|||||||||
food before placing them in the refrigerator. |
• Periods given in the information about deep |
|||||||||
• Hot food must cool down to the room |
freeze must be obeyed for storage times. |
|||||||||
temperature before putting them in the |
• Frozen food must be used promptly after |
|||||||||
refrigerator. |
they are thawed and they should never be re- |
|||||||||
• The foodstuff that you want to freeze must |
frozen. |
|||||||||
be fresh and in good quality. |
• Please observe the following instructions |
|||||||||
• Foodstuff must be divided into portions |
to obtain the best results. |
|||||||||
according to the family's daily or meal based |
• Do not freeze too large quantites of food |
|||||||||
consumption needs. |
at once one time. The quality of the food is |
|||||||||
• Foodstuff must be packaged in an airtight |
best preserved when it is frozen right through |
|||||||||
manner to prevent them from drying even if |
to the core as quickly as possible. |
|||||||||
they are going to be kept for a short time. |
• Do not exceed the freezing capacity of your |
|||||||||
• Materials to be used for packaging must |
appliance in 24 h which is 13 kg. |
|||||||||
be tear-proof and resistant to cold, humidity, |
• Placing warm food into the freezer |
|||||||||
odor, oils and acids and they must also be |
compartment causes the refrigeration |
|||||||||
airtight. Moreover, they must be well closed |
compressor to operate continuously until the |
|||||||||
and they must be made from easy-to-use |
food is frozen solid. This can temporarily lead |
|||||||||
materials that are suitable for deep freeze |
to excessive cooling of the refrigeration |
|||||||||
usage. |
compartment. |
|||||||||
• Food to be frozen must be put in the freezer |
• You may place the fresh food to be frozen |
|||||||||
compartment. (They should not be allowed to |
in any place you like in the freezer. However, |
|||||||||
come in contact with the previously frozen |
we recommend you to use quick freeze |
|||||||||
items to prevent their partial thawing. Freezing |
compartment for fastest freezing. |
|||||||||
|
|
|
|
|
|
|
|
|
|
|
capacity of our product is given in the technical |
• |
Take special care not to mix already frozen |
||||||||
|
|
|
food |
and fresh food. |
||||||
|
|
|||||||||
Recommendation for Preservation of Frozen Food |
|
|||||||||
|
|
|
||||||||
• Prepacked commercially frozen food |
becomes two star section. Use this volume |
|||||||||
should be stored in accordance with the frozen |
only for short-term storage of food. |
|||||||||
food manufacturer's instructions for a |
|
|
|
|
|
|
|
|
|
|
( 4 star) frozen food storage compartment. |
|
|
|
|
|
|
|
|
||
|
|
|
|
|
|
|
|
|||
• To ensure that the high quality achieved |
Defrosting |
|||||||||
|
|
|
|
|
|
|
|
|
|
|
by the frozen food manufacturer and the food |
The fridge and freezer compartments defrost |
|||||||||
retailer is maintained, the following should be |
automatically. |
|||||||||
remembered: |
|
|
|
|
|
|
|
|
||
1. Put packets in the freezer as quickly as |
|
|
|
|
|
|
|
|
||
possible after purchase. |
|
|
|
|
|
|
|
|
||
2. Ensure that contents are labelled and dated. |
|
|
|
|
|
|
|
|
||
3. Do not exceed "Use By", "Best Before" |
|
|
|
|
|
|
|
|
||
dates on the packaging. |
|
|
|
|
|
|
|
|
||
If there is a power failure do not open the |
|
|
|
|
|
|
|
|
||
freezer door. Even if the power failure lasts |
|
|
|
|
|
|
|
|
||
up to 8 hours, frozen food will not be affected. |
|
|
|
|
|
|
|
|
||
In case the failure lasts longer, the food must |
|
|
|
|
|
|
|
|
||
be checked and when necessary, must be |
|
|
|
|
|
|
|
|
||
consumed immediately or must be frozen |
|
|
|
|
|
|
|
|
||
after cooked. |
|
|
|
|
|
|
|
|
||
* If you remove freezer compartment drawer |
|
|
|
|
|
|
|
|
||
and icebox to increase the volume, section |
|
|
|
|
|
|
|
|
||
over the line shown in the figure below |
|
|
|
|
|
|
|
|
||
|
|
|
|
|
|
|
|
|
|
|
22 EN
Replacing the Interior Light Bulb
Should the light fail to work, proceed as follows:
1.Switch off at the socket outlet and pull out the mains plug.
• Remove all shelves and drawers for easy access.
2.Use a flat tipped screwdriver to gently remove the light diffuser cover by inserting the blade to prise off each side. Take care not to damage the plastic cover and inner liner.
3.First check that the bulb hasn't worked loose by ensuring that it is screwed securely in the holder. Replace the plug and switch on. If the bulb works, replace the light cover by inserting the rear lug and pushing up to locate the front two lugs.
4.If the light still fails to work, switch off at the socket outlet and pull out the mains plug. Replace the bulb with a new 15 watt (max) screw cap E14 (SES) bulb.
5.Carefully dispose of the burnt-out light bulb immediately.
Replacement light bulb can easily be obtained from a good local electrical or DIY store.
23 EN

|
|
Snack tray |
|
|
|
|
Breakfast stuff, delicatessen |
|
|
|
|
|
|
Freezer compartment |
Various frozen food such as meat, fish, ice cream, vegetables and etc. |
|
|
|
|
|
|
shelves |
|
|
|
|
|
|
|
Freezer |
Store the food such as meat, chicken, fish and etc. after wrapping with thin |
|
|
compartment drawer |
cellophane. |
|
|
|
|
|
|
|
|
|
|
Butter & Cheese |
Dairy products such as milk, butter, cheese |
|
|
|
|
|
|
section |
|
24 |
|
|
|
|
Egg holder |
Egg |
|
|
|
||
EN |
|
|
|
|
Fridge compartment |
Food in pans, plates, closed containers |
|
|
|
|
|
|
|
shelves |
|
|
|
|
|
|
|
Fridge compartment |
Small and packaged food or drinks (such as milk, fruit juice and beer) |
|
|
|
|
|
|
door shelves |
|
|
|
|
|
|
|
Crisper |
Vegetables and fruits |
|
|
|
|
|
|
|
Vegetables, fruits, meat and raw fish to be thawed |
|
|
Crisper / chiller |
The cycle slider should be adjusted as required. |
|
|
|
|
|
|
compartment |
Check the cycle slider before placing your food. |
|
|
|
|
|
|
|
|
food the Placing
Things to be done for saving energy
1. Do not keep the doors of your refrigerator open for a long time.
2. Do not put hot food or drinks in your refrigerator.
3. Do not overload your refrigerator so that the air circulation inside of it is not prevented.
4. Do not install your refrigerator under direct sunlight or near heat emitting appliances such as oven, dishwasher or radiator.
5. Pay attention to keep your food in closed containers.
4 Deep-Freeze information
Food must be frozen as rapidly as possible when they are put in a refrigerator in order to keep them in good quality.
The TSE norm requires (according to certain measurement conditions) the refrigerator to freeze 4.5 kg of foodstuff at 32°C ambient temperature to -18°C or lower within 24 hours for every 100-liters of freezer volume.
It is possible to keep the food for a long time only at -18°C or lower temperatures. You can keep the freshness of food for many months (at -18°C or lower temperatures in the deep freeze).
WARNING! 
•The foodstuff that you want to freeze must be in good quality.
•Foodstuff must be divided into portions according to the family's daily or meal based consumption needs.
•Foodstuff must be packaged in an airtight manner to prevent them from drying even if they are going to be kept for a short time.
Materials necessary for packaging:
•Cold resistant adhesive tape
•Self adhesive label
•Rubber rings
•Pen
Materials to be used for packaging the foodstuff must be tear-proof and resistant to cold, humidity, odor, oils and acids. Foodstuff to be frozen should not be allowed to come in contact with the previously frozen items to prevent their partial thawing.
You can check the freezing capacity of your refrigerator from “Technical Specifications” section in Part 1.
Always follow the values in the tables for storage periods.
Frozen food must be used immediately after they are thawed and they should never be re-frozen.
25 EN

5 Cleaning your refrigerator
Warning!!! |
|
|
Never use gasoline, |
|
|
benzene or similar |
|
A |
|
|
S |
substances for cleaning |
NZ‹N |
ETON |
|
||
|
E |
T |
|
B |
NER |
|
|
|
|
|
‹ |
purposes.
We recommend that you
switch off the appliance at the socket outlet and pull out the mains plug before cleaning.
•Never use any sharp abrasive instrument, soap, household cleaner, detergent and wax polish for cleaning.
•Use luke warm water to clean the cabinet of the appliance and wipe it dry.
•Use a damp cloth wrung out in a solution of one teaspoon of bicarbonate of soda to one pint of water to clean the interior and wipe it dry.
•Make sure that no water enters the lamp housing and other electrical items.
•If the appliance is not going to be used for a long period of time switch it off, remove all food, clean it and leave the door ajar.
•Vacuum-clean the dusts on the appliance once a year.
•Check door seals regularly to ensure they are clean and free from food particles.
•Removal of door tray
•To remove door racks, remove all the
contents and then simply push the door rack
upwards from the base.
•To remove a freezer drawer, pull it as far as possible, and then tilt it upwards, and then pull it out completely.
•Especially pay special attention to prevent the foodstuffs, in particular, small pieces, such as rice, peas and beans from running into the fan protectors and air flow ducts. These may cause clogging of the cooling system and a decrease in the efficiency of the device.
Protection of plastic surfaces
Do not put liquid oils or oil-cooked meals in your refrigerator in unsealed containers as they damage the plastic surfaces of your refrigerator. In case of spilling or smearing oil on the plastic surfaces, clean and rinse the relevant part of the surface at once with warm water.
Specially Treated Doors
Genuine stainless steel doors have been specially treated to enhance and maintain the elegant appearance of the material. To ensure you can preserve and maintain this, we recommend that you regularly wipe the doors, in an up and down motion with a soft, dry and clean piece of kitchen roll. For further information, please contact Beko Customer Services.
6 Service
Things to be done before calling the authorized service
Please check the following points before calling the service.
?
°C
- / +
1.Is the refrigerator properly plugged in?
2.Has the fuse of the socket which the refrigerator is connected to or the main fuse blown out?
3.Are the temperature adjustments correctly made?
|
Important note: Protective |
! |
thermic of the compressor |
will blow out during sudden |
|
power failures or plug-out |
|
|
plug-ins as the refrigerant |
pressure in the cooling system of the |
|
refrigerator has not been balanced |
|
yet. Your ref rigera tor w ill sta rt |
|
r u n n i n g |
a p p rox i m a te ly a fte r 6 |
minutes. Please call the service if your refrigerator does not startup at the end of this period.
26 EN

Please review this list before calling the service. It might save you time and money. This list includes frequent complaints that are not arising from defective workmanship or material usage.
|
|
Complaint |
Possible Reason |
Solution |
|
|
|
|
|
|
|
Freezing of the food in the |
* This is normal if the adjustment slider is at |
* Switching the adjustment slider to the crisper position. |
|
|
* Moving the vegetables from this compartment to the upper |
||
|
|
|
Chiller Compartment (0ºC) position. Ambient |
|
|
|
bottom drawer (crisper / |
|
|
|
|
|
crisper. |
|
|
|
|
temperature is very low (around or lower than |
|
|
|
Chiller. |
|
|
|
|
10 ºC) |
* Icing up on the outer surfaces of foodstuff such as meat is |
|
|
|
|
|
|
|
|
|
|
normal. |
|
|
|
|
|
|
|
Condensation on the side wall |
* Very cold ambient conditions. |
* Switching the thermostat to a colder degree. (2 °C) |
|
|
|
||
|
|
|
|
|
|
|
of the fridge compartment. |
* Frequent opening an closing of the door. |
* Decreasing the time the door left open or using it less frequently. |
|
|
|
|
|
|
|
|
* Highly humid ambient conditions. |
* Covering the food stored in open containers with a suitable |
|
|
|
|
|
|
|
|
* Storage of food containing liquid in open |
material. |
|
|
|
|
|
|
|
|
containers. |
* Wipe the condensation using a dry cloth and check if it persists. |
|
|
|
|
|
|
|
|
* Leaving the door ajar. |
|
27 |
|
|
|
|
|
|
Compressor is not running |
The fridge is in defrost cycle. |
This is normal for a full-automatically defrosting refrigerator. |
|
|
|||
EN |
|
|||
|
|
Defrosting cycle occurs periodically. |
||
|
|
|
|
|
|
|
|
The appliance is not plugged into the socket. |
Be sure that the plug is properly fit into the socket. |
|
|
|
|
|
|
|
|
|
|
|
|
|
There is a power failure. |
Call your electricity supplier. |
|
|
|
|
|
|
|
The fridge is running |
Your new refrigerator may be wider than the |
This is quite normal. Large refrigerators operate for a longer |
|
|
frequently or for a long time. |
previous one. |
period of time. |
|
|
|
||
|
|
|
|
|
|
|
|
The ambient room temperature may be high. |
This is quite normal. |
|
|
|
|
|
|
|
|
|
|
|
|
|
The refrigerator might have been plugged in recently |
Cooling down of the refrigerator completely may last for a couple |
|
|
|
or might have been loaded with food. |
of hours longer. |
|
|
|
|
|
|
|
|
Large amounts of hot food might have been |
Hot food causes longer running of the refrigerator until |
|
|
|
put in the refrigerator recently. |
they reach the safe storage temperature. |
|
|
|
|
|
|
|
|
Doors might have been opened frequently or left |
The warm air that has entered into the refrigerator causes the |
|
|
|
|
|
|
|
|
ajar for a long time. |
refrigerator to run for longer periods. Open the doors less frequently. |
|
|
|
|
|
|
|
|
|
|
|
|
|
Freezer or fridge compartment door might have |
Check doors close fully. |
|
|
|
|
|
|
|
|
been left ajar. |
|
|
|
|
|
|

|
|
Complaint |
Possible Reason |
Solution |
|
|
|
|
|
|
|
The fridge is running |
The refrigerator is adjusted to a very low |
Adjust the refrigerator temperature to a warmer degree and wait |
|
|
temperature. |
until the temperature is achieved. |
|
|
|
frequently or for a long time. |
||
|
|
|
Door seal of the fridge or freezer may be soiled, |
Clean or replace the seal. Damaged/broken seal causes the |
|
|
|
|
|
|
|
|
worn out, broken or not properly seated. |
refrigerator to run for a longer period of time in order to maintain |
|
|
|
|
|
|
|
|
|
the current temperature. |
|
|
|
|
|
|
|
Having very low temperatures |
|
|
|
|
|
|
|
|
|
Freezer temperature is very low |
|
|
|
|
while the fridge temperature is |
The freezer temperature is adjusted to a very low |
Adjust the freezer temperature to a warmer degree and |
|
|
sufficient. |
temperature. |
check. |
|
|
|
|
|
|
|
|
|
|
|
|
Fridge temperature is very low |
The fridge temperature is adjusted to a very |
Adjust the fridge temperature to a warmer degree and check. |
|
|
|
||
|
|
while the freezer temperature is |
low temperature. |
|
|
|
sufficient. |
|
|
|
|
|
|
|
|
|
Food kept in the refrigerator |
The fridge temperature is adjusted to a very |
Adjust the fridge temperature to a warmer degree and check. |
|
|
compartment trays freezes. |
low temperature. |
|
28 |
|
|
|
|
|
Meat kept in the Chiller |
The meats must be kept just below the freezing |
Formation of ice crystals is normal because of the water contant |
|
|
|
compartment freezes. |
point of water to have them retain their freshness |
in the meat. |
|
|
|
||
|
|
|
for a long time. |
|
EN |
|
|
|
|
|
|
|
|
|
|
Having very high |
|
|
|
|
|
temperatures. |
|
|
|
|
|
|
|
|
|
Temperature in the fridge or |
The fridge temperature is adjusted to a very |
Change the temperature of the fridge or freezer until the fridge |
|
|
freezer is very high. |
high degree. |
or freezer temperature reaches to a sufficient level. |
|
|
|
|
|
|
|
|
The fridge temperature is adjusted to a very high degree. Fridge |
Change the temperature of the fridge or freezer until the fridge |
|
|
|
adjustment has an effect on the temperature of the freezer. |
or freezer temperature reaches to a sufficient level. |
|
|
|
|
|
|
|
|
Doors might have been opened frequently or left |
Warm air rushes into the fridge or freezer when the doors are |
|
|
|
ajar for a long time. |
opened. Open the doors less frequently. |
|
|
|
|
|
|
|
|
The door might be left ajar. |
Close the door completely. |
|
|
|
|
|
|
|
|
|
|
|
|
|
Large amounts of hot food might have been put |
Wait until the fridge or freezer reaches the desired temperature. |
|
|
|
|
|
|
|
|
in the refrigerator recently. |
|
|
|
|
|
|
|
|
|
The refrigerator might have been plugged in |
Cooling down of the refrigerator completely takes time because |
|
|
|
recently. |
of the size. |
|
|
|
|
|
|
|
Fridge temperature is very high |
|
|
|
|
while the freezer temperature is |
The fridge temperature is adjusted to a very cold |
Adjust the fridge to a warmer temperature. |
|
|
at sufficient level. |
degree. |
|
|
|
|
|
|
|
|
|
|
|
 Loading...