


Hood |
|
|
User Manual |
|
|
HCA62620B |
HCA62620WH |
|
HCA62620BH |
|
|
EN PL FR |
DE |
CS |
01M-8892023200-4019-01 |
|
|
01M-8892153200-4019-01 |
|
|
01M-8892163200-4019-01 |
|
|

Please read this manual first!
Dear Customers!
Thank you for preferring a Beko product. We hope that you get the best results from your product which has been manufactured with high quality and state-of- the-art technology. Therefore, please read this entire user manual and all other accompanying documents carefully before using the product and keep it as a reference for future use. If you handover the product to someone else, give the user manual as well. Follow all warnings and information in the user manual.
Remember that this user manual is also applicable for several other models. Differences between the models are explicitly described in the manual.
Meanings of the Symbols
Following symbols are used in the various section of this manual:
C Important information and useful hints about usage.
A WARNING: Warnings for dangerous situations concerning the safety of life and property.
B Warning for electric shock.
This product has been manufactured in environmental friendly modern plants without giving any harm to the nature.
This appliance conforms to |
It does not contain PCB. |
the WEEE regulation. |
|

CONTENTS
ENGLISH |
04-14 |
|
|
POLSKI |
15-26 |
|
|
FRANÇAIS |
27-38 |
DEUTSCH |
39-50 |
|
|
ČESKY |
51-62 |
|
|
|
|
|
Hood / User Manual |
3 / EN |
|
|
|
|

1Important safety and environmental instructions
This section contains safety instructions that will help protect from risk of personal injury or property damage. Failure to follow these instructions invalidates the granted warranty.
1.1 General safety
•• This Operation Manual shall be maintained, in order to be able to use it in every further moment.
•• The device may be used by the children in the age of at least 8 years, and by the persons with limited physical, mental abilities, or by persons with a lack of experience in device operation, provided that the due supervision or training in terms of the safe device operation was ensured, in order to make clear all the related risks.
•• Read this Operation Manual attentively, as it contains the detailed information regarding the installation, assembly and maintenance of the hood.
•• The hood appearance may differ from the hood presented at drawings in this Manual, however all recommendations regarding the operation, maintenance and assembly of the hood remain unchanged.
•• Do not make any electrical or mechanical changes in the hood construction.
•• Do not connect the device to power before finishing the assembly.
•• Any assembly or maintenance operations shall be performed in the protective gloves.
•• Do not use the hood without the correctly installed filter.
•• The assembly non-complying with this Operation Manual, may causetheelectricalshockdanger.
•• Do not use the open flame under the kitchen hood.
•• The meals cooked on the fat base shall be constantly controlled, as overheated fat may flame out easily.
4 / EN |
Hood / User Manual |
|
|

1Important safety and environmental instructions
•• The air sucked by the hood may not be withdrawn into the chimney channel used for extraction of the combustion gases from gas or other fuel devices (does not apply to the closed circuit hoods).
•• If any other non-electric devices are used in the house besides the hood (for example, liquid fuel furnaces, blowthrough heaters, boilers), the sufficient ventilation of air (air supply) shall be ensured.
•• Do not disconnect the plug from the socket drawing the power cable.
•• The power cable may not touch the hot surface.
•• Do not start the device if the power cable is damaged.
•• The replacement of the damaged power cable may be performed by the manufacturer; the service maintenance shall be performed by the qualified technician.
•• The hood shall be cleaned both inside and outside, at least monthly, or every 35 hours of hoodoperation.Eachtime,before the hood cleaning, the hood shall be disconnected from the power (disconnect the power cable plug or turn off the safety levers).
•• The children shall not play with the device.
•• The children without the supervision shall not perform the device cleaning and maintenance.
•• The device is market according to European Union Directive 2002/96/EU, about the electric and electronic equipment (WEEE). Ensuring the correct disposal of the device, you will help to limit the risks of a negative impact over the environment and health.
•• The accessible parts may become hot in course of the cooking range operation. The use of screws or other fastening elements with violation of the Manual requirements, may cause the electrical shock.
|
|
|
Hood / User Manual |
5 / EN |
|
|
|
|

1Important safety and environmental instructions
Compliance with the WEEE Directive and Disposing of the Waste Product:
This product complies with EU WEEE Directive (2012/19/EU). This product bears a classification symbol for waste electrical and electronic equipment (WEEE).
 This symbol indicates that this
product shall not be disposed with


 other household wastes at the end of its service life. Used device must be returned to offical
collection point for recycling of electrical and electronic devices. To find these collection systems please contact to your local authorities or retailer where the product was puchased. Each household performs important role in recovering and recycling of old appliance. Appropriate disposal of used appliance helps prevent potential negative consequences for the environment and human health.
Compliance with RoHS Directive
The product you have purchased complies with EU RoHS Directive (2015/863/EU). It does not contain harmful and prohibited materials specified in the Directive.
Package information
Packaging materials of the product are manufactured from recyclable materials in accordance with our National Environment
Regulations. Do not dispose of the packaging materials together with the domestic or other wastes. Take them to the packaging material collection points designated by the local authorities.
6 / EN |
Hood / User Manual |
|
|
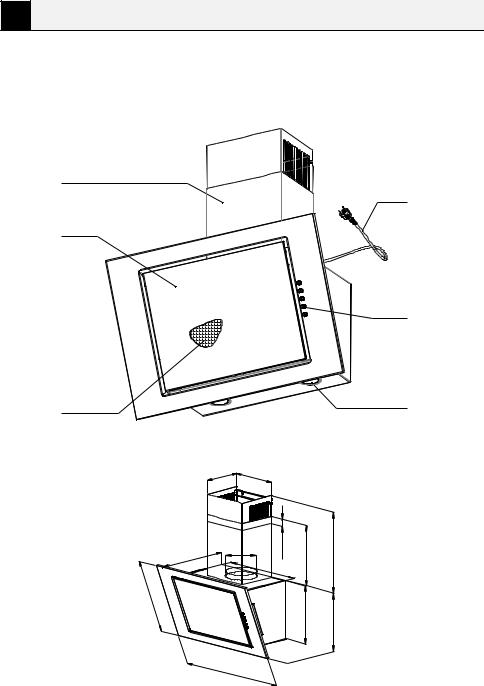
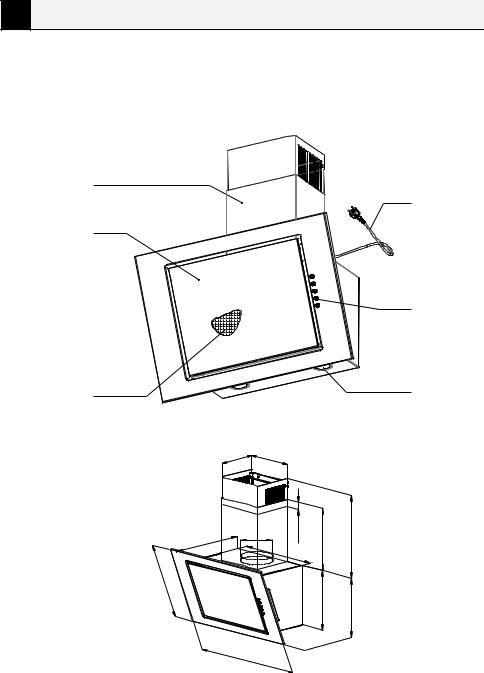
2 Technical specifications
Technical data contained in this manual and labels attached to the hood were obtained from measurements and calculations in accordance with the requirements of EU Regulation No. 65/2014 and 66/2014.
Chimney |
|
body |
Power |
|
cabel |
Mechanical control
Aluminium |
Lighting |
grease filter |
|
|
Fig.1 General view of the range hood |
198
236
360 |
O150 |
min:20 |
300 |
min:415max:680 |
|
|
|
||
|
430 |
|
|
|
|
|
|
|
405
290 |
330 |
596
Fig.2
|
|
|
Hood / User Manual |
7 / EN |
|
|
|
|
3 Operation
3.1 Hood operation
The hood is intended for sucking in the vapours during the meals cooking. The device may work in two modes:
As the extracting hood: the vapours are extracted from the premise through the withdrawal tube. The withdrawal tube is not supplied with the device, and should be acquired separately.
•• The shortest possible vapours evacuatingchannelshallbeused.
•• Use the flue pipe with maximally smooth internal surface (the use of Spiro type pipes is not recommended).
C •• Use the flue channel with as low number of bends as possible (the bending angles shall not exceed 90º).
•• The changes in flue channel sections are not advised (from higher section to lower section, for example the change from Ø150 mm to Ø120 mm).
As the absorber: the vapours are cleaned from fat and odours, before they are returned back to the premise through the grills in the top part of the chimney body. To make the hood work in the absorber mode, install the coal filter
(Fig.10). The coal filter is not included in the standard equipment, and should be acquired separately.
3.2 Hood operation control
The hood is equipped with the mechanical control system.
•• Button “0” – hood fan switched off
•• Button “1” - hood fan switched on, with minimum speed
•• Button “2” - hood fan switched on with medium speed
•• Button “3” - hood fan switched with maximum speed
The higher speed means the higher air circulation.
•• Button switches the light on. To switch the light off, press the button one more time.w
8 / EN |
Hood / User Manual |
|
|
4Installation
4.1Hood installation
|
|
|
•• Check if the purchased device dimensions |
|
B |
The use of screws and fasten- |
|
||
ing elements not specified in the |
|
match to the planned installation place. |
||
|
•• Disassembly and remove (if possible) any fur- |
|||
Operation Manual may cause the |
|
|||
|
electrical shock. |
|
niture remaining in the hood installation area, |
|
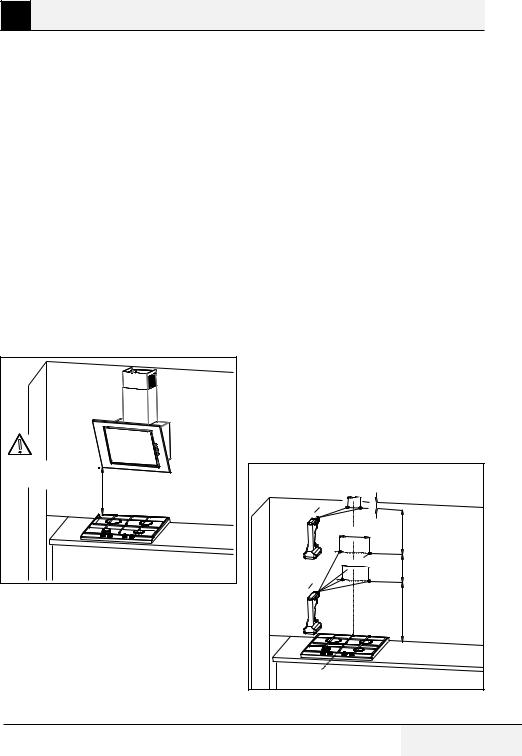
The minimum distance of hood hanging between |
|
in order to ensure the easy access to ceiling or |
||
wall, where the hood shall be mounted. If it is |
||||
the surface of kitchenware placement over the |
||||
not possible, protect the furniture elements |
||||
cooking range (gas, electric range), and lowest |
||||
remaining in the adjacent area. |
||||
part of the hood (Fig.3) shall amount at least 65 |
||||
•• Check, if there is a socket near the mounting |
||||
cm for electric cooking ranges and at least 65 cm |
||||
for gas cooking ranges. Should the cooking range |
area, and control if the hood may be connected |
|||
operation manual provide the higher distance for |
to the ventilation channel for vapours evacu- |
|||
hood installation, such higher distance require- |
ation. |
|||
ment shall be maintained. The installation of the |
•• Check if there are no cables (electrical, hydrau- |
|||
hood and chimney body is shown at the figures |
lic, etc.) in places in which the drilling will be |
|||
(Fig.4 - Fig.9). The hood is equipped with the fix- |
performed. |
|||
ing pins matching to the most part of walls and |
•• Prepare the following tools: tape ruler, pen- |
|||
ceilings. In course of the assembly, observe the |
cil, drill / electric screwdriver, drilling tool Ø8, |
|||
common rules for air exhaust from the premises. |
screwdriver, builder’s level. |
|||
|
Assembly operation: |
|||
|
1. Define the axis of cooking range, and project |
|||
|
it onto the wall, where the hood will be |
|||
|
mounted. Sign all characteristic points of hood |
|||
|
fastening.Make the openings with the drill. |
|||
|
(Fig. 4) |
|
|
|
Gas cooking ranges L ≥ 65cm |
|
|
|
|
Electrical cooking ranges L ≥ 65cm |
|
156mm |
|
|
L |
|
min:30 |
|
|
|
2 x O8 |
|
max:680mm |
|
|
|
|
|
|
|
|
325mm |
|
|
|
|
325mm |
|
124mm |
|
|
|
|
|
Fig.3 Recommended distances from the cooking |
4 x O8 |
|
|
|
|
|
|
L+170mm |
|
range |
|
|
|
|
|
|
|
|
|
|
Fig.4 Assembly dimensions |
|
||
Hood / User Manual |
|
|
|
9 / EN |

4 Installation
2.Into the openings, insert the screw plugs. In two openings marked with A screw also the screws (leaving 7 mm of screw length outside the screw plug, Fig.5).
A |
2 x O8 x 40mm |
|
4.Open the hood cover and remove the fat filter (Fig.7).


 2
2
2 x O5 x 45mm
4 x O8 x 40mm
1 
7mm
Fig.5 Screw plugs assembly
3.Screw the chimney body fastening element, hang the hood on two untightened screws (Fig. 6).
Fig.6 Hood hanging |
Fig.7 Aluminium fat filter removing
5.Place the level on the hood body. Rotating the element marked with A, adjust the hood level according the level’s indications, and then tighten two screws previously screwed partially and screw in two remaining screws (Fig. 8).
A |
2 x O5 x 45mm |
Fig.8 Range hood positioning |
10 / EN |
Hood / User Manual |
|
|
4 Installation
Place the chimney body on the hood body. Then, draw delicately the hood part signed with B upwards, until it becomes possible to screw it to the fastening element previously attached to the wall (Fig. 9).
2 x O3,9x9,5
B
A

 B
B
A
Be especialy attentive while sliding the chimney body
Fig.9 Chimney body assembly
This assembly operation shall be C performed very carefully, in order to avoid the scratching of chimney
body and hood itself.
4.2 Electrical connections
The network voltage shall correspond to the voltage indicated at the plate placed inside the hood. If the hood is equipped with a plug, insert it into the socket complying with the applicable requirements, and located in the easily accessible place. If the hood is not equipped with a plug, the hood installations shall be performed by a person having the required authorizations (such as electrician).
|
|
|
Hood / User Manual |
11 / EN |
|
|
|
|
5 Cleaning and maintenance
5.1 Cleaning
•• Particularly do not neglect to clean your hood immediately after you have made frying.
•• Use a soft cloth soaked with liquid detergent to clean the outer surface of your hood.
•• Never use abrasive or scratching materials for cleaning.
•• You may use the cleaning agents commercially available for persistent grease etc. by following the warnings on the product. In order not the scratch the brushed steel body, wipe in the same direction with the bush trace.
•• Do not use cleaning agents containing hydrochloric acid, bleach or abrasive powders in order to maintain the surface quality of your product. Use a cloth dampened in soapy water or special stainless steel cleaning spray for stainless steel steel surfaces. Remove the protective foil on the appliance.
Caution! You may cause a fire if you A do not follow the instructions on the cleaning and replacement of
the filters of your hood.
5.2 Fat filter
The hood is equipped with aluminium filter stopping the particles of fat emitted in course of cooking. To remove the filter, move the clamps in the direction of arrows (Fig.7). The filter shall be cleaned manually by its immersion into the water with dish washing liquid for approx. 15 minutes, under the temperature equal to 40-50ºC. After 15 minutes, wash and accurately rinse the filter. The filter must be dry before its installation in the hood. It is also possible to wash the filter in the dish washing machines. In course of washing, the filter colour may change, which does not influence its filtering characteristics. The failure to clean the filter regularly reduces the hood performance, and may cause the fire. The filter shall be cleaned at least every 35 hours of hood operation.
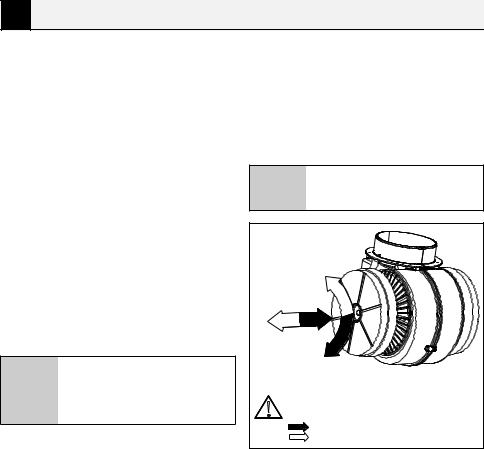
5.3 Coal filter
The hood may be equipped with the coal filter. The coal filter is used when the hood is not connected to ventilation duct only. The filter shall be installed on the fan body, like it is shown in the drawing (Fig.10). The coal filter shall be replaced every 6 months.
C Do not wash or regenerate the coal filter.
|
1 |
|
2 |
|
1 |
|
2 |
Mark |
filter installation |
Mark |
filter removal |
Fig.10 Coal filter replacement
12 / EN |
Hood / User Manual |
|
|
5 Cleaning and maintenance
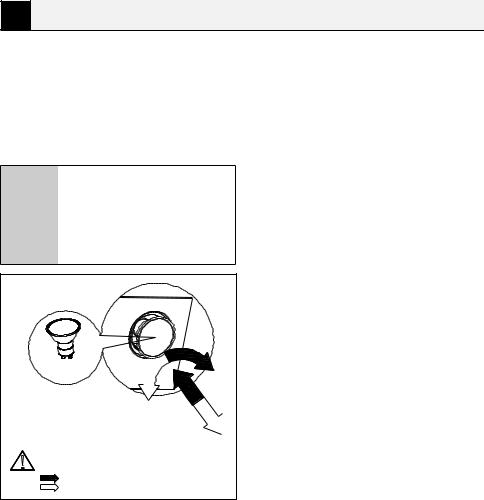
5.4 Light replacement
Before starting any works related to the light replacement, switch off the power. If the hood was previously turned on, wait previously until the lams become cold, and then start their replacement. The lamp replacement is illustrated in Fig. 11.
•• Before the replacement of lamps, switch the hood power off.
C •• Do not touch the lamps when they are hot.
•• Be attentive not to touch the lamp installed with hands.
GU10 |
1 |
2 |
|
1 |
|
2 
Mark |
lamp installation |
Mark |
lamp removal |
Fig.11 Lights replacement |
|
5.5 How to reduce the cooking impact to the environment
•• In order to reduce the energy consumption, cook in the kitchenware under the cover.
•• The hood aluminium filters shall be kept clean (the recommended time of work of aluminium filter between its cleaning: max. 35h of hood operation).
•• The ventilation ducts shall not be blocked.
•• The fan operation speed during the cooking shall be always set on minimum level which allows to withdraw the vapours considering the actual cooking intensiveness.
If you need to transport the appliance:
•• Keep the original packaging of the appliance. Transport the appliance with its original package, and follow the transport markings on the original package.
If you do not have the original package:
•• Do not place any objects on the hood.
•• Protect the outer surface from impacts.
•• Pack the appliance so that it would not be damaged during transport.
|
|
|
Hood / User Manual |
13 / EN |
|
|
|
|
6 |
|
Troubleshooting |
|
|
|
|
|
||
Symptoms |
Cause |
Repairing method |
||
During hood operation, the pulsating |
After 35 hours of operation the hood |
Press and hold for about 8 sec. “-” on |
||
letter „F” is displayed. |
indicates the need for cleaning or |
the touch control. The filter should be |
||
|
|
|
replacing the grease filter. |
washed in the dishwasher or replace |
|
|
|
|
with a new one. |
|
|
|
||
The display shows only the symbol |
The touch control has been locked |
To disable the lock, press and hold for |
||
“-.” (minus and dot in the right bottom |
– this feature facilitates the hood |
about 10 sec the field with the symbol |
||
corner), the hood does not respond |
cleaning. |
of switching on. |
||
to disabling. |
|
|
||
No symbol is shown on the display, |
The touch control is probably sus- |
Disconnect the hood from the power |
||
the hood does not respond to pres- |
pended. |
supply for about 15 sec. and switch it |
||
sing the control fields. |
|
on again. |
||
The display shows the symbol of one |
The touch control is probably |
Disconnect the hood from the power |
||
of the gears; the hood does not res- |
suspended |
supply for about 15 sec. and switch it |
||
pond to pressing the control fields. |
|
on again. |
||
The hood turbine disconnects after |
The automatic time switch of the |
To deactivate the time switch, press |
||
15 min of operation, the display |
touch control has been activated. |
and hold for about 10 sec the symbol |
||
shows a pulsating digit i.e. “1.” (cur- |
|
„+”or disable the hood. |
||
rent gear number and dot in the right |
|
|
||
bottom corner). |
|
|
||
On fourth gear the digit “4” is pulsa- |
The hood is equipped with a turbo |
The turbo gear shall be used only with |
||
ting on the display, after 5min the |
mode, which automatically switches |
intensive cooking. |
||
gear is changed into third. |
over into third gear after 5 min of |
|
||
|
|
|
operation to save energy. |
|
The hood can be operated only with |
The battery of the remote control is |
Replace the battery with a new one. |
||
use of the control panel, it does not |
empty or the distance is too long. |
|
||
respond to the remote control. |
|
|
||
The hood has very poor vapor |
Probably cause is dirty filters. |
The grease filter must be cleaned in the |
||
suction. |
|
|
dishwasher or replace with a new one. |
|
|
|
|
|
The carbon filter (if present) must be |
|
|
|
|
replaced with a new one. |
One or more light points do not |
Defective halogen/ LED bulb. |
The light bulb needs to be replaced |
||
operate. |
|
|
with a new, compatible with the symbol |
|
|
|
|
|
specified in the instruction manual for |
|
|
|
|
the cooker hood. |
The hood generated excessive noise |
This may be caused by an incorrect |
The hood must be mounted to a wall or |
||
and vibration. |
installation of the hood to the wall |
cabinet by using all the points provided |
||
|
|
|
or kitchen cabinets. Not all provided |
for by the manufacturer. After adjusting |
|
|
|
screws have been used or screws are |
the position of the hood horizontally |
|
|
|
loosely fitted leaving clearance. |
and vertically, tighten all mounting |
|
|
|
|
screws. |
* applies to hoods with touch control.
If the recommendations above do not solve the problem, contact an authorized home appliances service entitled to repair. Under no circumstances is the hood user entitled to independent repair. A list of service points is included in the warranty card and the website.
14 / EN |
Hood / User Manual |
|
|
Proszęnajpierwprzeczytaćtęinstrukcjęobsługi!
Drodzy Klienci,
DziękujemyzawybórwyrobumarkiBeko.Mamynadzieję,żewyróbten,wyprodukowany przyużyciuwysokiejjakościnajnowszejtechnologii,okażesięwnajwyższymstopniu zadowalający.Dlategoproszęprzedjegoużyciemuważnieprzeczytaćcałątęinstrukcję obsługi i towarzyszące jej dokumenty i zachować ją do wglądu na przyszłość. Przy przekazaniutegowyrobukomuśinnemu,proszęoddaćmutakżetęinstrukcję.Proszę przestrzegaćwszystkichostrzeżeńiinformacjiztejinstrukcjiobsługi.
Proszę pamiętać, że instrukcja ta odnosi się także do kilku innych modeli. Różnice pomiędzynimisąwyraźnieopisanewtejinstrukcji.
Znaczeniesymboli
Wniniejszejinstrukcjistosujesięnastępującesymbole:
C Ważne informacje i przydatne wskazówki dotycząceużytkowania.
A OSTRZEŻENIEOstrzeżeniadotyczącesytuacji zagrażających bezpieczeństwu, życiu i mieniu.
B Ostrzeżenieprzedporażeniemprądem.
Urządzeniezostałowyprodukowanewnowoczesnych,bezpiecznychdlaśrodowiskazakładachbezwpływunaprzyrodę.
Urządzeniejestzgodnezdyrektywą |
Niezawierabifenyli |
WEEE. |
polichlorowanych(PCB). |

Ważneinstrukcjedotyczące 1 bezpieczeństwaiochrony
środowiskanaturalnego
Rozdział ten zawiera instrukcje zachowania bezpieczeństwa, które pomogą chronić się przed zagrożeniem obrażeniami ciała lub szkodami w mieniu. Nieprzestrzeganie tych instrukcji unieważnia udzielonągwarancję.
1.1Bezpieczeństwo
Zasady ogólne
•• Niniejsząinstrukcjęobsługinależy zachować, aby móc z niej skorzystaćwkażdejchwili.
•• Niniejszy sprzęt może być użytkowany przez dzieci w wieku co najmniej 8 lat i przez osoby o obni-
żonych możliwościachfizycznych, umysłowych i osoby o braku doświadczenia i znajomości sprzętu, jeżelizapewnionyzostanienadzór lubinstruktażodnośnieużytkowania sprzętu w bezpieczny sposób, takabyzwiązaneztymzagrożenia byłyzrozumiałe.
•• Należy zapoznać się z treścią niniejszej instrukcji obsługi, która zawiera dokładne informacje dotyczące instalacji, montażu i konserwacji okapu.
•• Okap może różnić się pod względem wyglądu od okapu przedstawionego na rysunkach w niniejszej instrukcji, ale zalecenia dotyczące obsługi, konserwacji i montażu okapupozostająniezmienione.
•• Nienależydokonywaćzmianelektrycznych czy mechanicznych w okapie.
•• Nie należy podłączać urządzenia do sieci przed ukończeniem montażu.
•• Wszelkie czynności montażowe i konserwacyjnenależywykonywać wrękawicachochronnych.
•• Nienależyużywaćokapubezprawidłowozamontowanegofiltra.
•• Montaż niezgodny z niniejszą instrukcjąobsługimożepowodować zagrożenie porażeniemelektrycznym.
•• Podokapemkuchennymniewolno używaćotwartegoognia.
•• Posiłki przygotowywane na bazie tłuszczupowinnybyćstalenadzorowane, gdyż przegrzany tłuszcz możesięłatwozapalić.
16 / PL

Ważneinstrukcjedotyczące 1 bezpieczeństwaiochrony
środowiskanaturalnego
•• Zasysane powietrze przez okap nie może być odprowadzane do kanałukominowego służącegodo odprowadzania spalin z urządzeń spalających gaz lub inne paliwo (niedotyczytookapówzobiegiem zamkniętym).
•• Jeżeliwgospodarstwiedomowym opróczokapu,eksploatujesięinne urządzenia o zasilaniu nieelektrycznym (np. piece na paliwa ciekłe,grzejnikiprzepływowe,termy) należy zadbać o wystarczającą wentylację pomieszczeń (dopływ powietrza).
•• Nie należy wyciągać wtyczki z gniazda sieciowego pociągając za przewódzasilający.
•• Przewódzasilającyniemożedotykaćgorącejpowierzchni.
•• Nienależyuruchamiaćurządzenia, jeśliprzewódzasilającyjestuszkodzony.
•• Wymiana uszkodzonego przewoduzasilającegomożebyćwykonanawyłącznieprzezproducenta, serwis lub wykwalifikowanego specjalistę.
•• Okappowinienbyćczyszczonyzarównowewnątrzjakinazewnątrz przynajmniejrazwmiesiąculubco 35 godzin pracy okapu. Każdorazowo przed czyszczeniem okapu, zasilanie okapu musi być odłączone(należywyjąćwtyczkęzasilającąlubwyłączyćbezpieczniki).
•• Dzieci nie mogą bawić się sprzętem.
•• Dzieci bez nadzoru nie mogą wykonywać czyszczenia i konserwacji.
•• Dostępne części mogą być gorące w czasie pracy kuchenki.
•• Niezgodne z instrukcją zastosowanie śrub lub elementów mocujących może grozić porażeniem prądemelektrycznym.
|
|
|
Okap / Instrukcja obsługi |
17 / PL |
|
|
|
|
Ważne instrukcje dotyczące 1 bezpieczeńs twa i ochrony
środowiska naturalnego
Zgodność z dyrektywą WEEE i usuwanie odpadów:
Niniejszy wyrób jest zgodny z dyrektywą Parlamentu Europejskiego i Rady (2012/19/WE). Wyrób ten oznaczony jest symbolem klasyfikacji zużytych urządzeń elektrycznych i elektronicznych (WEEE). Ten symbol oznacza, że sprzęt nie  może być umieszczany łącznie z
innymi odpadami gospodarstwa
domowego po okresie jego użytkowan-
ia. Zużyte urządzenie należy oddać do
specjalnego punktu zbiórki
zużytego sprzętu elektrycznego i elektronicznego w celu utylizacji. Aby uzyskać informacje o punktach zbiórki w swojej okolicy należy skontaktować się z lokalnymi władzami lub punktem sprzedaży tego produktu. Gospodarstwo domowe spełnia ważną rolę w przyczynianiu się do ponownego użycia i odzysku zużytego sprzętu. Odpowiednie postępowanie ze zużytym sprzętem zapobiega potencjalnym negatywnym konsekwencjom dla środowiska naturalnego i ludzkiego zdrowia.
Zgodność z dyrektywą RoHS:
Niniejszy wyrób jest zgodny z dyrektywą Parlamentu Europejskiego i Rady RoHS (Ograniczenie użycia substancji niebezpiecznych) (2011/65/ WE). Nie zawiera szkodliwych i zakazanych materiałów, podanych w tej dyrektywie.
Informacje o opakowaniu
Opakowanie tego wyrobu wykonano z materiałów nadających się do recyklingu, zgodnie z naszym ustawodawstwem krajowym. Nie wyrzucaj materia-
łów opakowaniowych do śmieci wraz z innymi odpadkami domowymi. Oddaj je w jednym z wyznaczonych przez władze lokalne punktów zbiórki materiałów opakowaniowych.
18 / PL
2 Danetechniczne
Dane techniczne zawarte w niniejszej instrukcji obsługiorazna dołączonychdookapu etykietach zostały uzyskane poprzez wykonanie pomiarów i obliczeń zgodnie z wymogami rozporządzenia UE nr 65/2014 oraz 66/2014.
Osłona |
|
kominowa |
Przewód |
Klapa |
zasilajacy |
|
|
uchylna |
|
|
Sterowanie |
|
mechan- |
|
iczne |
Filtr |
Oświetlenie |
przeciwtłuszczowy |
|
aluminiowy |
Rys.1 Rysunek pogldowy okapu kuchennego |
|
198
236
360 |
O150 |
min:20 |
300 |
min:415max:680 |
|
|
|
||
|
430 |
|
|
|
|
|
|
|
405
290 |
330 |
596
Rys.2 Rysunek gabarytowy
|
|
|
Okap / Instrukcja obsługi |
19 / PL |
|
|
|
|
 Loading...