


Dishwasher

Dear customer,
Please read carefully right through this instruction booklet before installing or operating your dishwasher. The following instructions should prevent the risk of personal injury and/or damage to the appliance.
Please keep these documents in a safe place for later reference.
This operating manual has been written for several different machines, and some of the features mentioned here may not apply to your particular model.
Symbols and legend
Following symbols are included in the user manual:
Important information and tips about usage.
Warning for hazardous situations with respect to security of life and property.
Warning for electrical voltage and shock hazard.

TABLE OF CONTENTS
1 Getting To Know Your |
|
|
5 Program Selection and |
|
|
Machine |
3 |
|
Operating Your Machine |
17 |
|
View of the Machine |
3 |
|
Button and Button Descriptions |
18 |
|
|
|
|
Program Selection |
18 |
|
|
|
|
Adding Functions to the Program |
19 |
|
2 Safety Instructions |
4 |
||||
Before Installation |
4 |
|
Program Steps Follow-up |
19 |
|
Before First Use |
4 |
|
Canceling a Program |
19 |
|
Child Safety |
4 |
|
Changing a Program |
19 |
|
Technical Specifications |
4 |
|
Programming the Delayed Start |
20 |
|
For daily operation |
5 |
|
Salt Indicator |
20 |
|
Problems |
5 |
|
Rinse Aid Indicator |
20 |
|
What should not be washed in your |
|
|
Rinse Aid Indicator Setting |
21 |
|
dishwasher |
5 |
|
Starting Your Machine |
21 |
|
|
|
|
|
|
|
|
|
|
6 How to clean your |
|
|
3 Directions for Assembly |
6 |
|
|||
Safety notes for installation |
6 |
|
dishwasher |
24 |
|
Installing Your Dishwasher |
6 |
|
|
Cleaning the filters |
24 |
Water connection |
7 |
|
Cleaning the spray arms |
25 |
|
Connect water inlet hose |
7 |
|
|
|
|
Water drainage |
8 |
|
|
7 Troubleshooting: |
26 |
Electrical connection |
8 |
|
What to do if the dishwasher will |
|
|
Disposal |
8 |
|
not run |
26 |
|
|
|
|
The cleaning results are |
|
|
4 Using Your Dishwasher |
9 |
|
unsatisfactory |
26 |
|
Filling the dishwasher salt |
9 |
|
Service |
32 |
|
When operating for the first time: |
10 |
|
|
|
|
Filling the Rinse Aid Dispenser |
11 |
|
|
|
|
Filling the Detergent Dispenser |
11 |
|
|
|
|
Detergent |
12 |
|
|
|
|
Multipurpose Detergents |
13 |
|
|
|
|
Loading the dishwasher |
13 |
|
|
|
|
Suggestions for loading the |
|
|
|
|
|
dishwasher |
14 |
|
|
|
|
Loading suggestions |
15 |
|
|
|
|

1 Getting To Know Your Machine
View of the Machine
1.Upper dish basket with shelf
2.Guide rail for the upper dish basket
3.Salt container
4.Cutlery basket
5.Detergent dispenser
6.Door
7.Control panel
8.Filters
9.Lower sprayer arm
10.Lower basket
11.Upper sprayer arm
12.Housing (depends on the model)
13.Turbo fan heat drying system (depends on the model)
3 GB

Technical Specifications
Permitted water pressure: 0,3 –10 bar (= 3 – 100 N/cm² = 0,01-1,0Mpa)
Electrical connection: 220-240 Volts, 10 Amps (see type plate)
Output: 1900-2200 W
Heat output: 1800 W
This device corresponds to the following EU directives: 2006/95/EC: Low Voltage
Directive
2004/108/EC: EMV Directive
DIN EN 50242: Electrical dishwasher for home use Testing procedures for practical service conditions
Because we continually strive to
improve our products, we may change our specifications and designs without prior notice.
Note for Testing Institutes
The necessary information for performance testing will be provided upon request. The request can be done by e-mail through:
dishwasher@standardloading.com
Please do not forget to write the model code and stock code information of the appliance besides your contact information in the e-mail. The model code and stock code information can be found on the rating label, which is placed on the side of the door.
2 Safety Instructions
Before Installation
Check the appliance for transit damage. Never install or use damaged machines. If in doubt, contact your supplier.


 Before First Use
• See Notes for Installation on page 6.
• Have the grounding system installed by a qualified electrician. The manufacturer cannot be held liable for any damage caused by operating the appliance without proper grounding.
• Before operating the system, please check that the information on the type plate corresponds to the information on your power supply.
• The dishwasher must be disconnected from the mains during installation.
4
•The appliance must not be connected to the mains using an extension cable. Extension cables do not provide the necessary safety (e.g. danger of overheating).
•Always use the original plug delivered with the appliance.
•The plug must be freely accessible after the appliance has been installed.


 Child Safety
• Do not allow children to play with the appliance.
• Dishwasher detergents are caustic and may cause injury to the eyes, mouth and throat. Please note the safety instructions provided by the manufacturers of the detergents.
• Never leave children unsupervised while the appliance is open, as
GB

the appliance may still contain detergent leftovers.
•The water in the dishwasher is not drinking water. Danger of caustic injuries.
•Always place long and sharp/ pointed objects (e.g. serving forks, bread knives) into the cutlery basket with the pointed end down or flat on the upper basket to avoid possible injuries.


 For daily operation
• Use your appliance only for the following domestic uses: Washing household dishes.
• Do not use chemical solvents in the appliance; there is a danger of explosion.
• This appliance is not intended for use by persons (including children) with reduced physical, sensory
or mental capabilities, or lack of experience and knowledge, unless they have been given supervision or instruction concerning use
of the appliance by a person responsible for their safety.
• Do not sit or stand on the opened door or place other objects on it. The appliance may tip over.
• Do not open the door while the appliance is running, as hot water or steam may escape.
• Do not leave the door open – an open door can be a hazard.
• If you need to move your appliance, do it in upright position and hold from the rear side. Tilting the appliance onto its front side may cause the electronic parts in it to get wet and damaged.


 Problems
• Repairs and modifications to the appliance may only be carried out by qualified customer service personel.
• In the event of a problem, or before performing a repair, disconnect the appliance from the mains supply:
- disconnect the appliance by pulling out the mains plug
- shut off the power.
• Do not pull on the cable – pull on the plug. Turn off the water supply tap.
What should not be washed in your dishwasher
•Rust sensitive steel parts
•Cutlery with wooden or horn handles
•Cutlery with mother of pearl or porcelain handles
•Non heat resistant plastic parts
•No glued dish or cutlery parts
•No items made out of copper, tin or aluminium
•Sensitive decorative glasses and porcelain parts
•Lead crystal glasses
•Art and crafted articles
•Aluminium and silver tend to discolour
•Glass and crystal articles may lose their shine over time
•Sponges and dishcloths
 Do not wash items soiled with cigarette ash, candle wax, varnish, paints or chemicals.
 Recommendation: When buying new dishes, note whether they are suitable for the dishwasher. (marked as dishwasher proof)
5 GB

3 Directions for Assembly
Safety notes for installation
Prior to installing and using your appliance, please check it for possible transit damage.
If the appliance is damaged, please contact your supplier.


 Never install or use a damaged appliance.
The following directions must be followed to connect the dishwasher properly.
Before operating your dishwasher, please ensure that the information on the type plate corresponds to the current and voltage of your power supply.


 The appliance may only be connected using a properly grounded socket. Ensure that the appliance is grounded according to regulations. The grounded socket must be easily accessible and close to the appliance.


 Do not use extension cables or multiple adapters, as this can lead to overheating, which can be a fire hazard.


 Hardwiring may only be carried out by a qualified electrician.


 Check the power cable, the water inlet hose and the drainage hose. Damaged parts may only be replaced by customer service personnel or by a qualified electrical service expert.
Installing Your Dishwasher
•Choose a suitable location for your dishwasher. Take care to ensure that the appliance is stable on a level surface.
•Unevenness in the floor can be equalised by adjusting the screw feet. When the appliance is standing correctly, the door can be closed without difficulty.
•Water inlet and drainage hoses must be positioned so that they can move freely without bending or squeezing.
•The appliance may not be installed in a room where the temperature is below 0° Celsius.
6 GB

Water connection
•There are two different types of water inlet hoses:
-Cold water inlet hose (up to 25°C)
-Hot water inlet hose (up to 60°C)please check which one is applicable to your model.
If you are willing to connect your machine to natural
energy resources or to the central hot water supply, first check out whether your water inlet hose type is suitable by checking the temperature values written on the hose. If your hose is not suitable, apply to your authorized service to change the hose.
•The dishwasher may not be connected to open warm water devices or flow-through water heaters.
Permitted water pressure:
Lowest permitted water pressure: 0.3 bars = 3 N/cm² = 30 kPa
When the water pressure is below 1 bar, please contact your technician.
Highest permitted water pressure: 10 bar = 100N/cm² = 1Mpa
When the water pressure is above 10 bars, a pressure reduction valve must be installed (available in trade supply stores).
Connect water inlet hose
Ensure that the water inlet hose is not bent or squeezed. Do not install a used hose set.
Use a screw-on hose connector to connect the water inlet hose to a water
7
tap with a ¾ inch external thread. If required, use a filter insert to filter deposits from the pipes.
Check that the connection does not leak.
 For safety reasons, turn off the tap after every rinse process.
1009 |
AQUASAFE+ (some models) |
The AQUASAFE+ System protects against water damage which may be caused at the water inlet hose.


 Do not immerse the system’s valve box into water; it contains electrical components.


 In case of damage, pull out the power supply plug.


 Do not shorten or lengthen the hose insert as it contains electrical cables and components.


2550
GB
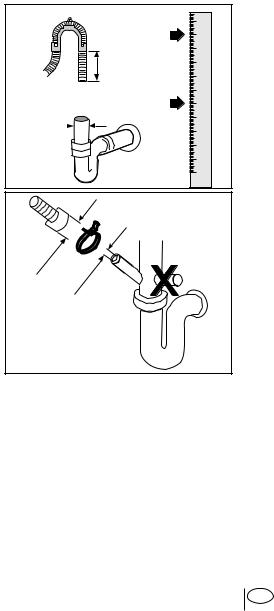
Water drainage
Connecting the drainage hose.
Take care to ensure that the drainage hose is not bent or squeezed.
Check that the drainage hose is firmly seated.
|
<![if ! IE]> <![endif]> |
|
<![if ! IE]> <![endif]> |
| <![if ! IE]> <![endif]> |
<![if ! IE]> <![endif]> |
|
<![if ! IE]> <![endif]> |
|
<![if ! IE]> <![endif]> |
| <![if ! IE]> <![endif]> |
|
|
<![if ! IE]> <![endif]> |
|
<![if ! IE]> <![endif]> |
|
<![if ! IE]> <![endif]> |
|
<![if ! IE]> <![endif]> |
1011 |
|
Extension hoses
If a hose extension is required, a drainage hose of equal quality must be used.
 The maximum length must not exceed 4m. Using a longer hose will produce poorer cleaning results.
Siphon connection
 The drainage height must be between 50 and 100cm above the floor.
Use hose clamps to fasten the drainage hose to the siphon.
Electrical connection
Please refer to the type plate for information on current type, mains voltage, and fuse protection.
The type plate is located on the inside of the door.
The mains plug must be freely accessible after installation.
Power cables and insulated cables must not be accessible (exposed) after installation.
Disposal
Packaging
The packaging and some parts of your appliance are made from recyclable materials. These materials are marked with the recycling symbol and the relevant material type (PE, PS, POM).
Before operating your appliance, remove the packaging material and dispose of it in accordance with regulations.
8 GB


 Packaging materials may be dangerous to children. Reusable substances may be dropped off at your local disposal facilities. You may obtain further information from your local authorities and disposal facilities.
Used appliances –
Environmental notice
This product must not
be disposed of with your regular household waste.
Instead, you need to dispose of the waste equipment by handing it over to a designated collection point for the recycling of waste electrical and electronic equipment. This is
indicated by a symbol to be found on
the product, it’s packaging or in the manual.
Materials used are recyclable according to their labelling. Reuse, recycling of materials and further reutilization of used products are important contributions to protect our environment.
Please ask your local town council for the nearest collection point.


 To avoid possible dangers, disable your waste appliance prior to discarding it. Pull the mains plug and cut the power cord. Disable any door locks.
4 Using Your Dishwasher


 The electricity and water connections of the dishwater must be in compliance with the instructions in this booklet.
Filling the dishwasher salt
 Only use special dishwasher salt in your appliance.The manufacturer is not liable for damage resulting from the use of the wrong type of salt.
Use Diswasher salt only. Moderate or coarse grained and easily soluble salts are recommended. Don’t use table salt, or any other type, these types of salt do not dissolve in water easily and
9
will damage the softening device.
Remove the lower basket from the appliance.
Open the screw-in cap of the salt container by turning it counter clockwise (fig. A,B).
GB

When operating for the first |
|
||
time: |
|||
|
|||
• |
Pour 1 litre of water into the salt |
|
|
|
container (Fig. C). |
|
|
• Pour the salt into the container |
|
||
|
with the aid of the salt funnel |
|
|
|
provided (Fig. D). |
|
|
• Pour in enough salt to fill the |
|
||
|
container. The container holds |
|
|
|
approx. 2 kg. |
|
|
|
|
||
• To speed up the rate of dissolution |
|
||
|
of salt in water, stir it with a spoon. |
|
|
• Close the cap tightly. |
|
||
• Begin a washing program |
|
||
|
immediately after filling the salt |
1012 |
|
|
container. The washing program |
||
|
|
||
|
prevents damage to the appliance |
|
|
|
which may be caused by any |
|
|
|
spilled salt solution. After the |
||
|
first washing cycle, the salt level |
|
|
|
indicator light will go out. |
|
|
|
Depending on the particle sizes of |
|
|
different salt brands in the market, |
|
||
tablet properties and water hardness, |
|
||
dissolution of the salt in water may take |
|
||
a couple of hours. |
|
||
So, the salt indicator continues lighting |
|
||
for a while after filling salt into the |
|||
machine. (For models with a salt |
|
||
indicator) |
|
||
|
10 |
GB |
|
 Loading...