


|
DSA25020 |
|
|
GB |
Instruction for use |
IT |
Istruzioni per l'uso |
D |
Gebrauchsanweisung |
ES |
Instrucciones de uso |
|
|
WARNING!
In order to ensure a normal operation of your refrigerating appliance, which uses a completely environmentally friendly refrigerant the R600a (flammable only under certain conditions) you must observe the following rules:
Do not hinder the free circulation of the air around the appliance.
Do not use mechanical devices in order to accelerate the defrosting, others than the ones recommended by the manufacturer.
Do not destroy the refrigerating circuit.
Do not use electric appliances inside the food keeping compartment, other than those that might have been recommended by the manufacturer.
AVVERTENZA!
Per garantire il funzionamento adeguato dell'elettrodomestico, che utilizza il refrigerante R 600a completamente adatto all'ambiente (infiammabile solo in determinate condizioni), è necessario attenersi alle seguenti regole:
Non ostacolare la libera circolazione dell'aria attorno all'elettrodomestico.
Per accelerare lo sbrinamento non utilizzare dispositivi meccanici diversi da quelli consigliati dal produttore.
Non danneggiare il circuito refrigerante.
Non utilizzare all'interno del comparto del cibo elettrodomestici diversi da quelli consigliati dal produttore.
WARNUNG!
Ihr Gerät verwendet ein umweltverträgliches Kältemittel, R 600a (nur unter bestimmten Umständen brennbar). Um einen einwandfreien Betrieb Ihres Gerätes sicherzustellen, beachten Sie bitte folgende Vorschriften:
Die Luftzirkulation um das Gerät darf nicht behindert sein.
Verwenden Sie außer der vom Hersteller empfohlenen, keine mechanischen Hilfsmittel, um den Abtauprozess zu beschleunigen.
Der Kältemittelkreislauf darf nicht beschädigt werden.
Verwenden Sie im Lebensmittelaufbewahrungsbereich Ihres Gerätes keine elektrischen Geräte, es sei denn,sie sind vom Hersteller empfohlen.
ADVERTENCIA
Con el fin de garantizar un funcionamiento normal de su frigorífico, que utiliza un refrigerante totalmente respetuoso con el medio ambiente, el R 600a (inflamable sólo en ciertas condiciones), se deben observar las pautas siguientes:
No impedir la libre circulación del aire alrededordel electrodoméstico.
Para acelerar el deshielo no se deben utilizar dispositivos mecánicos que no sean aquellos recomendado s por el fabricante.
No destruir el circuito de refrigeración.
No utilizar aparatos eléctricos dentro del compartimento de aviso de alimentos que no sean los que pudiera haber recomendado el fabricante.

GB Index
Safety first /1
Electrical requirements /2 Transportation instructions /2 Installation instructions /2 Getting to know your appliance /3
Suggested arrangement of food in the appliance /3 Temperature control and adjustment /4
Before operating /4 Storing frozen food /4 Freezing fresh food /4 Making ice cubes /5 Defrosting /5
Replacing the interior light bulb /6 Cleaning and care /6 Repositioning the door /6
Do’s and don’ts /7 Trouble – shooting /8 Tehnical data /8
IT Indice
Sicurezza iniziale /9 Requisiti elettrici /10 Istruzioni per il trasporto /10 Istruzioni di installazione /10
Conoscere l’elettrodomestico /11 Suggerimenti sulla disposizione del cibo
nell'elettrodomestico /11
Controllo e regolazione della temperatura /11 Prima della messa in funzione /12 Conservazione di cibo congelato /12 Congelamento di cibo fresco /12 Preparazione dei cubetti di ghiaccio /12 Sbrinamento /12
Sostituzione della lampadina interna /13 Pulizia e manutenzione /13 Riposizionamento dello sportello /14 Cosa fare e cosa non fare /14 Risoluzione dei problemi /15
Date tecnici /15
D Inhalt
Sicherheit an erster Stelle /16 Voraussetzungen für den Elektroanschluss /17 Transportvorschriften /17
Hinweise zur Installation und zum Aufstellungsort /17 Kennenlernen des geräts /18
Vorschläge für das einordnen von Lebensmitteln /18 Einstellung und Regelung der Temperatur /19 Inbetriebnahme /19
Lagerung von Tiefkühlware /20 Einfrieren von frischen Lebensmitteln /20
Lebensmittelsymbole und Gefrierkalender /20 Herstellung von Eiswürfeln /20
Abtauen /20
Auswechseln der Glühlampe für die Innenbeleuchtung /21 Reinigung und Pflege /21
Wechseln des türanschlags /22
Was Sie tun sollten und was auf keinen fall-einige hinweise /22
Massnahmen bei Betriebstırunger /23 Hinweise zu Betriebsgerauschen /23 Technische angaben /24
ES Índice
La seguridad es lo primero /25 Requisitos eléctricos /26 Instrucciones de transporte /26 Instrucciones de instalación /26 Detalles del frigorífico /27
Disposición recomendada de los alimentos en el frigorífico /27
Control y ajuste de la temperatura /28 Antes del funcionamiento /28
Almacenamiento de alimentos congelados /29 Congelación de alimentos frescos /29 Cubitos de hielo /29
Desescarchado /29
Sustitución de la bombilla interior /30 Conservación y limpieza /30 Reposicionamiento de la puerta /30 Prácticas correctas e incorrectas /31 Resolución de problemas /32
Advertencias sobre los ruidos de funcionamiento del aparato /32
Datos técnicos /33

1
2
3 |
4 |
5 |
6 |
|
7

GB |
Instruction for use |
|
|
Congratulations on your choice of a  Quality
Appliance, designed to give you many years of service.
Safety first!
Do not connect your appliance to the electricity supply until all packing and transit protectors have been removed.
•Leave to stand for at least 4 hours before switching on, to allow compressor oil to settle, if transported horizontally.
•If you are discarding an old appliance with a lock or latch fitted to the door, ensure that it is left in a safe condition to prevent the entrapment of children.
•This appliance must only be used for its intended purpose.
•Do not dispose of the appliance on a fire. Your appliance contains non CFC substances in the insulation which are flammable. We suggest you contact your local authority for information on disposal and available facilities.
•We do not recommend use of this appliance in an unheated, cold room. (e.g. garage, conservatory, annex, shed, out-house etc.)
To obtain the best possible performance and trouble free operation from your appliance it is very important to read these instructions carefully. Failure to observe these instructions may invalidate your right to free service during the guarantee period.
Please keep these instructions in a safe place for easy reference.
This appliance is not intended for use by person with reduced physical, sensory or mental capabilities or lack of experience and knowledge unless they have been given supervision or instruction concerning use of the appliance by a person responsible for their safety.
Children should be supervised to ensure that they do not play with the appliance.
1
GB |
Instruction for use |
|
|
Electrical requirements
Before inserting the plug into the wall socket make sure that the voltage and the frequency shown in the rating plate inside the appliance corresponds to your electricity supply.
We recommend that this appliance is connected to the mains supply via a suitably switched and fused socket in a readily accessible position.
Warning! This appliance must be earthed.
Repairs to electrical equipment should only be performed by a qualified technician. Incorrect repairs carried out by an unqualified person are carry risks that may have critical consequences for the user of the appliance.
ATTENTION!
This appliance operates with R 600a which is an environmental friendly but flammable gas. During the transportation and fixing of the product, care must be taken not to damage the cooling system. If the cooling system is damaged and there is a gas leakage from the system, keep the product away from open flame sources and ventilate the room for a while.
WARNING - Do not use mechanical devices or other means to accelerate the defrosting process, others than those recommended by the manufacturer.
WARNING - Do not damage the refrigerant circuit.
WARNING - Do not use electrical appliances inside the food storage compartments of the appliance, unless they are of the type recommended by the manufacturer.
Transportation instructions
1.The appliance should be transported only in an upright position. The packing as supplied must be intact during transportation.
2.If during the transport the appliance, has been positioned horizontally, it must not be operated for at least 4 hours, to allow the system to settle.
3.Failure to comply with the above instructions could result in damage to the appliance, for which the manufacturer will not be held liable.
4.The appliance must be protected against rain, moisture and other atmospheric influences.
Important!
•Care must be taken while cleaning/carrying the appliance not to touch the bottom of the condenser metal wires at the back of the appliance, as this could cause injury to fingers and hands.
•Do not attempt to sit or stand on top of your appliance as it is not designed for such use. You could injure yourself or damage the appliance.
•Make sure that the mains cable is not caught under the appliance during and after moving, as this could damage the cable.
•Do not allow children to play with the appliance or tamper with the controls.
Installation instructions
1.Do not keep your appliance in a room where the temperature is likely to fall below 10 degrees C (50 degrees F) at night and/or especially in winter, as it is designed to operate in ambient temperatures between +10 and +32 degrees C (50 and 90 degrees F). At lower temperatures the appliance may not operate, resulting in a reduction in the storage life of the food.
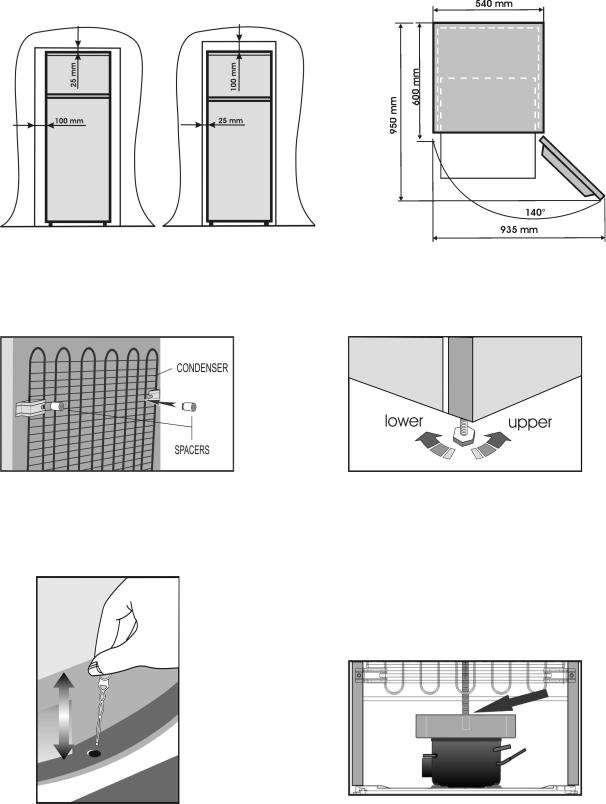
2.Do not place the appliance near cookers or radiators or in direct sunlight, as this will cause extra strain on the appliance's functions. If installed next to a source of heat or freezer, maintain the following minimum side clearances:
From Cookers 30 mm From Radiators 300 mm
From Freezers 25 mm
3.Make sure that sufficient room is provided around the appliance to ensure free air circulation (Item 2).
• Put the back airing lid to the back of your refrigerator to set the distance between the refrigerator and the wall (Item 3).
2
GB |
Instruction for use |
|
|
4.The appliance should be positioned on a smooth surface. The two front feet can be adjusted as required.To ensure that your appliance is standing upright adjust the two front feet by turning clockwise or anticlockwise, until firm contact is secured with the floor. Correct adjustment of feet prevents excessive vibration and noise (Item 4).
5.Refer to "Cleaning and Care" section to prepare your appliance for use.
Getting to know your appliance
(Item 1)
1 - Freezer shelf
2 - Thermostat and lamp housing
3 - Adjustable Cabinet shelves
4 - Wine bottles support
5 - Defrost water collection channel -
Drain tube
6 - Crisper cover
7 - Crisper
8 - Adjustable front feet
9 - Dairy Compartment
10 - Jars shelf
11 - Bottle shelf
Suggested arrangement of food in the appliance
Guidelines for obtaining optimum storage and hygiene:
1.The fridge compartment is for the shortterm storage of fresh food and drinks.
2.The freezer compartment is  rated and suitable for the freezing and storage
of pre-frozen food.
The recommendation for storage as stated on the food packaging should be observed at all times.
3.Dairy products should be stored in the special compartment provided in the door liner.
In order to freeze fresh food it is recommended to pack the products in aluminium or plastic sheet, cool them in the fresh food compartment and store them on the freezer compartment shelf.
It is preferable that the shelf be fixed in the upper side of the freezer compartment.
4.Cooked dishes should be stored in airtight containers.
5.Fresh wrapped produce can be kept on the shelf. Fresh fruit and vegetables should be cleaned and stored in the crispers.
6.Bottles can be kept in the door section.
7.To store raw meat, wrap in polythene bags and place on the lowest shelf. Do not allow to come into contact with cooked food, to avoid contamination. For safety, only store raw meat for two to three days.
8.For maximum efficiency, the removable shelves should not be covered with paper or other materials to allow free circulation of cool air.
9.Do not keep vegetable oil on door shelves. Keep the food packed, wrapped or covered. Allow hot food and beverages to cool before refrigerating. Leftover canned food should not be stored in the can.
10.Fizzy drinks should not be frozen and products such as flavoured water ices should not be consumed too cold.
11.Some fruit and vegetables suffer damage if kept at temperatures near 0°C. Therefore wrap pineapples, melons, cucumbers, tomatoes and similar produce in polythene bags.
12.High-proof alcohol must be stored upright in tightly closed containers. Never store products that contain an inflammable propellant gas (e.g. cream dispensers, spray cans, etc.) or explosive substances. These are an explosion hazard.
3
GB |
Instruction for use |
|
|
Temperature control and adjustment
Operating temperatures are controlled by the thermostat knob and may be set at any position between 1 and 5 (the coldest position).
If the thermostat knob is in position "0" the appliance is off. In this case neither the lamp for inside lighting will light.
The average temperature inside the fridge should be around +5°C (+41°F).
Therefore adjust the thermostat to obtain the desired temperature. Some sections of the fridge may be cooler or warmer (such as salad crisper and top part of the cabinet) which is quite normal. We recommend that you check the temperature periodically with a thermometer to ensure that the cabinet is kept to this temperature. Frequent door openings cause internal temperatures to rise, so it is advisable to close the door as soon as possible after use.
Before operating
Final Check
Before you start using the appliance check that:
1.The feet have been adjusted for perfect levelling.
2.The interior is dry and air can circulate freely at the rear.
3.The interior is clean as recommended under "Cleaning and care.”
4.The plug has been inserted into the wall socket and the electricity is switched on.
When the door is open the interior light will come on.
And note that:
5.You will hear a noise as the compressor starts up. The liquid and gases sealed within the refrigeration system may also make some
(noise), whether the compressor is running or not. This is quite normal.
6.Slight undulation of the top of the cabinet is quite normal due to the manufacturing process used; it is not a defect.
7.We recommend setting the thermostat knob midway and monitor the temperature to ensure the appliance maintains desired storage temperatures (See section Temperature Control and Adjustment).
8.Do not load the appliance immediately it is switched on. Wait until the correct storage temperature has been reached. We recommend checking the temperature with an accurate thermometer (see; Temperature Control and Adjustment).
Storing frozen food
Your freezer is suitable for the long-term storage of commercially frozen foods and also can be used to freeze and store fresh food.
If there is a power failure, do not open the door. Frozen food should not be affected if the failure lasts for less than 12 hrs. If the failure is longer, then the food should be checked and either eaten immediately or cooked and then re-frozen.
Freezing fresh food
Please observe the following instructions to obtain the best results.
Do not freeze too large a quantity at any one time. The quality of the food is best preserved when it is frozen right through to the core as quickly as possible.
Do not exceed the freezing capacity of your appliance in 24 h.
Placing warm food into the freezer compartment causes the refrigeration machine to operate continously until the food is frozen solid. This can temporarily lead to excessive cooling of the refrigeration compartment.
When freezing fresh food, keep the thermostat knob at medium position. Small quantities of food up to 1/2 kg. (1 lb) can be frozen without adjusting the temperature control knob.
Take special care not to mix already frozen food and fresh food.
4
GB |
Instruction for use |
|
|
Making ice cubes
Fill the ice - cube tray 3/4 full with water and place it in the freezer. Loosen frozen trays with a spoon handle or a similar implement; never use sharp-edged objects such as knives or forks.
Defrosting
A) Fridge compartment
The fridge compartment defrosts automatically. The defrost water runs to the drain tube via a collection container at the back of the appliance (Item 5).
During defrosting, water droplets may form at the back of the fridge compartment where a concealed evaporator is located. Some droplets may remain on the liner and refreeze when defrosting is completed. Do not use pointed or sharp-edged objects such as knives or forks to remove the droplets which have refrozen.
If, at any time, the defrost water does not drain from the collection channel, check that no food particles have blocked the drain tube.
The drain tube can be cleared with a pipecleaner or similar implement.
Check that the tube is permanently placed with its end in the collecting tray on the compressor to prevent the water spilling on the electric installation or on the floor (Item 6).
B) Freezer compartment
Defrosting is very straightforward and without mess, thanks to a special defrost collection basin.
Defrost twice a year or when a frost layer of around 7 (1/4") mm has formed. To start the defrosting procedure, switch off the appliance at the socket outlet and pull out the mains plug.
All food should be wrapped in several layers of newspaper and stored in a cool place (e.g. fridge or larder).
Containers of warm water may be placed carefully in the freezer to speed up the defrosting.
Do not use pointed or sharp-edged objects, such as knives or forks to remove the frost.
Never use hairdryers, electrical heaters or other such electrical appliances for defrosting.
Sponge out the defrost water collected in the bottom of the freezer compartment. After defrosting, dry the interior thoroughly. Insert the plug into the wall socket and switch on the electricity supply.
5
GB |
Instruction for use |
|
|
Replacing the interior light bulb
Should the light fail, switch off at the socket outlet and pull out the mains plug.
Then ensure the bulb is screwed securely in the bulb holder. Replace the plug and switch on.
If the light still fails, obtain a replacement E14 screw-cap type 15 Watt (Max) bulb from your local electrical store and then fit it.
Carefully dispose of the burnt-out light bulb immediately.
Cleaning and care
1.We recommend that you switch off the appliance at the socket outlet and pull out the mains plug before cleaning.
2.Never use any sharp instruments or abrasive substances, soap, household cleaner, detergent or wax polish for cleaning.
3.Use luke warm water to clean the cabinet of the appliance and wipe it dry.
4.Use a damp cloth wrung out in a solution of one teaspoon of bicarbonate of soda to one pint of water to clean the interior and wipe it dry.
5.Make sure that no water enters the temperature control box.
6.If the appliance is not going to be used for a long period of time, switch it off, remove all food, clean it and leave the door ajar.
7.We recommend that you polish the metal parts of the product (i.e. door exterior, cabinet sides) with a silicone wax (car polish) to protect the high quality paint finish.
8.Any dust that gathers on the condenser, which is located at the back of the appliance, should be removed once a year with a vacuum cleaner.
9.Check door seals regularly to ensure they areclean and free from food particles.
10. Never:
•Clean the appliance with unsuitable material; eg petroleum based products.
•Subject it to high temperatures in any way,
•Scour, rub etc., with abrasive material. 11. Removal of dairy cover and door tray :
•To remove the dairy cover, first lift the cover up by about an inch and pull it off from the side where there is an opening on the cover.
•To remove a door tray, remove all the contents and then simply push the door tray upwards from the base.
12. Make sure that the special plastic container at the back of the appliance which collects defrost water is clean at all times. If you want to remove the tray to clean it, follow the instructions below:
•Switch off at the socket outlet and pull out the mains plug
•Gently uncrimp the stud on the compressor, using a pair of pliers, so that the tray can be removed
•Lift it up.
•Clean and wipe it dry
•Reassemble, reversing the sequence and operations
13. Large accumulation of ice will impair the performance of the freezer.
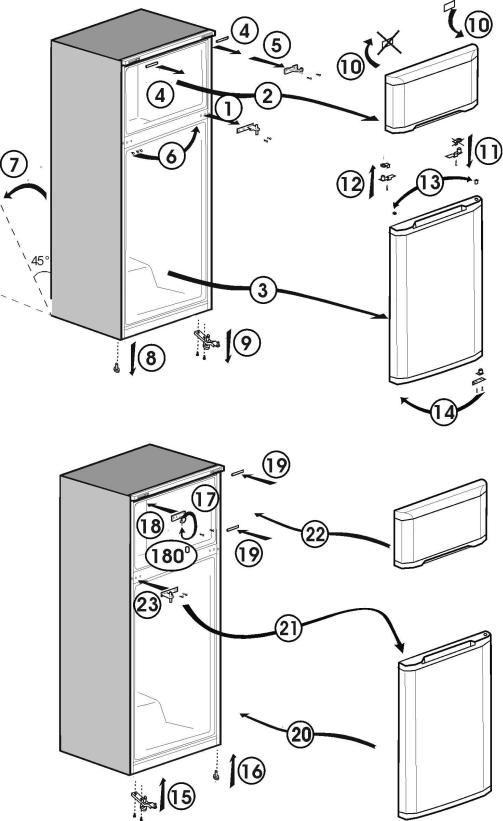
Repositioning the door
Proceed in numerical order (Item 7).
6
 Loading...