

Page 1

Documentation
BK9055 and BK9105
Bus Coupler for Ethernet/IP
Version:
Date:
2.0.0
2019-04-12
Page 2

Page 3

Table of contents
Table of contents
1 Foreword ....................................................................................................................................................5
1.1 Notes on the documentation..............................................................................................................5
1.2 Safety instructions .............................................................................................................................6
1.3 Documentation issue status ..............................................................................................................7
2 Product overview.......................................................................................................................................8
2.1 BK9055 - Introduction........................................................................................................................8
2.2 BK9105 - Introduction........................................................................................................................9
2.3 Technical data .................................................................................................................................10
2.4 The Beckhoff Bus Terminal system.................................................................................................10
2.5 Ethernet ...........................................................................................................................................12
3 Mounting and wiring................................................................................................................................14
3.1 Dimensions......................................................................................................................................14
3.2 Installation on mounting rails ...........................................................................................................15
3.3 Power supply, potential groups .......................................................................................................16
3.4 ATEX - Special conditions (standard temperature range) ...............................................................18
3.5 ATEX - Special conditions (extended temperature range) ..............................................................19
3.6 ATEX Documentation ......................................................................................................................20
4 Parametrization and commissioning.....................................................................................................21
4.1 Start-up behaviour of the Bus Coupler ............................................................................................21
4.2 Parameterization of the Bus Coupler using DIP Switches* .............................................................21
4.3 Network classes ..............................................................................................................................22
4.4 IP address .......................................................................................................................................23
4.4.1 Configuration with KS2000 .............................................................................................. 23
4.4.2 Address Configuration via ARP ....................................................................................... 24
4.4.3 Address configuration via BootP server........................................................................... 25
4.4.4 Setting the address using a DHCP server ....................................................................... 29
4.4.5 Subnet mask.................................................................................................................... 29
4.4.6 Testing the IP address..................................................................................................... 30
4.4.7 Reading the MAC-ID........................................................................................................ 30
4.5 Configuration ...................................................................................................................................31
4.5.1 Mapping ........................................................................................................................... 31
4.5.2 EthernetIP Tag Wizard .................................................................................................... 33
4.5.3 Export to Rockwell ........................................................................................................... 44
5 Error handling and diagnosis.................................................................................................................50
5.1 Diagnostic LEDs ..............................................................................................................................50
6 Appendix ..................................................................................................................................................54
6.1 First Steps........................................................................................................................................54
6.2 First Steps - Example ......................................................................................................................58
6.3 General operating conditions...........................................................................................................64
6.4 Test Standards for Device Testing ..................................................................................................66
6.5 Bibliography.....................................................................................................................................66
6.6 List of Abbreviations ........................................................................................................................66
6.7 Support and Service USA................................................................................................................67
BK9055 and BK9105 3Version: 2.0.0
Page 4

Table of contents
6.8 Support and Service ........................................................................................................................68
BK9055 and BK91054 Version: 2.0.0
Page 5

Foreword
1 Foreword
1.1 Notes on the documentation
Intended audience
This description is only intended for the use of trained specialists in control and automation engineering who
are familiar with the applicable national standards.
It is essential that the documentation and the following notes and explanations are followed when installing
and commissioning these components.
It is the duty of the technical personnel to use the documentation published at the respective time of each
installation and commissioning.
The responsible staff must ensure that the application or use of the products described satisfy all the
requirements for safety, including all the relevant laws, regulations, guidelines and standards.
Disclaimer
The documentation has been prepared with care. The products described are, however, constantly under
development.
We reserve the right to revise and change the documentation at any time and without prior announcement.
No claims for the modification of products that have already been supplied may be made on the basis of the
data, diagrams and descriptions in this documentation.
Trademarks
Beckhoff®, TwinCAT®, EtherCAT®, EtherCATP®, SafetyoverEtherCAT®, TwinSAFE®, XFC® and XTS® are
registered trademarks of and licensed by Beckhoff Automation GmbH.
Other designations used in this publication may be trademarks whose use by third parties for their own
purposes could violate the rights of the owners.
Patent Pending
The EtherCAT Technology is covered, including but not limited to the following patent applications and
patents: EP1590927, EP1789857, DE102004044764, DE102007017835 with corresponding applications or
registrations in various other countries.
The TwinCAT Technology is covered, including but not limited to the following patent applications and
patents: EP0851348, US6167425 with corresponding applications or registrations in various other countries.
EtherCAT® is registered trademark and patented technology, licensed by Beckhoff Automation GmbH,
Germany.
Copyright
© Beckhoff Automation GmbH & Co. KG, Germany.
The reproduction, distribution and utilization of this document as well as the communication of its contents to
others without express authorization are prohibited.
Offenders will be held liable for the payment of damages. All rights reserved in the event of the grant of a
patent, utility model or design.
BK9055 and BK9105 5Version: 2.0.0
Page 6

Foreword
1.2 Safety instructions
Safety regulations
Please note the following safety instructions and explanations!
Product-specific safety instructions can be found on following pages or in the areas mounting, wiring,
commissioning etc.
Exclusion of liability
All the components are supplied in particular hardware and software configurations appropriate for the
application. Modifications to hardware or software configurations other than those described in the
documentation are not permitted, and nullify the liability of Beckhoff Automation GmbH & Co. KG.
Personnel qualification
This description is only intended for trained specialists in control, automation and drive engineering who are
familiar with the applicable national standards.
Description of instructions
In this documentation the following instructions are used.
These instructions must be read carefully and followed without fail!
DANGER
Serious risk of injury!
Failure to follow this safety instruction directly endangers the life and health of persons.
WARNING
Risk of injury!
Failure to follow this safety instruction endangers the life and health of persons.
CAUTION
Personal injuries!
Failure to follow this safety instruction can lead to injuries to persons.
NOTE
Damage to environment/equipment or data loss
Failure to follow this instruction can lead to environmental damage, equipment damage or data loss.
Tip or pointer
This symbol indicates information that contributes to better understanding.
BK9055 and BK91056 Version: 2.0.0
Page 7
1.3 Documentation issue status
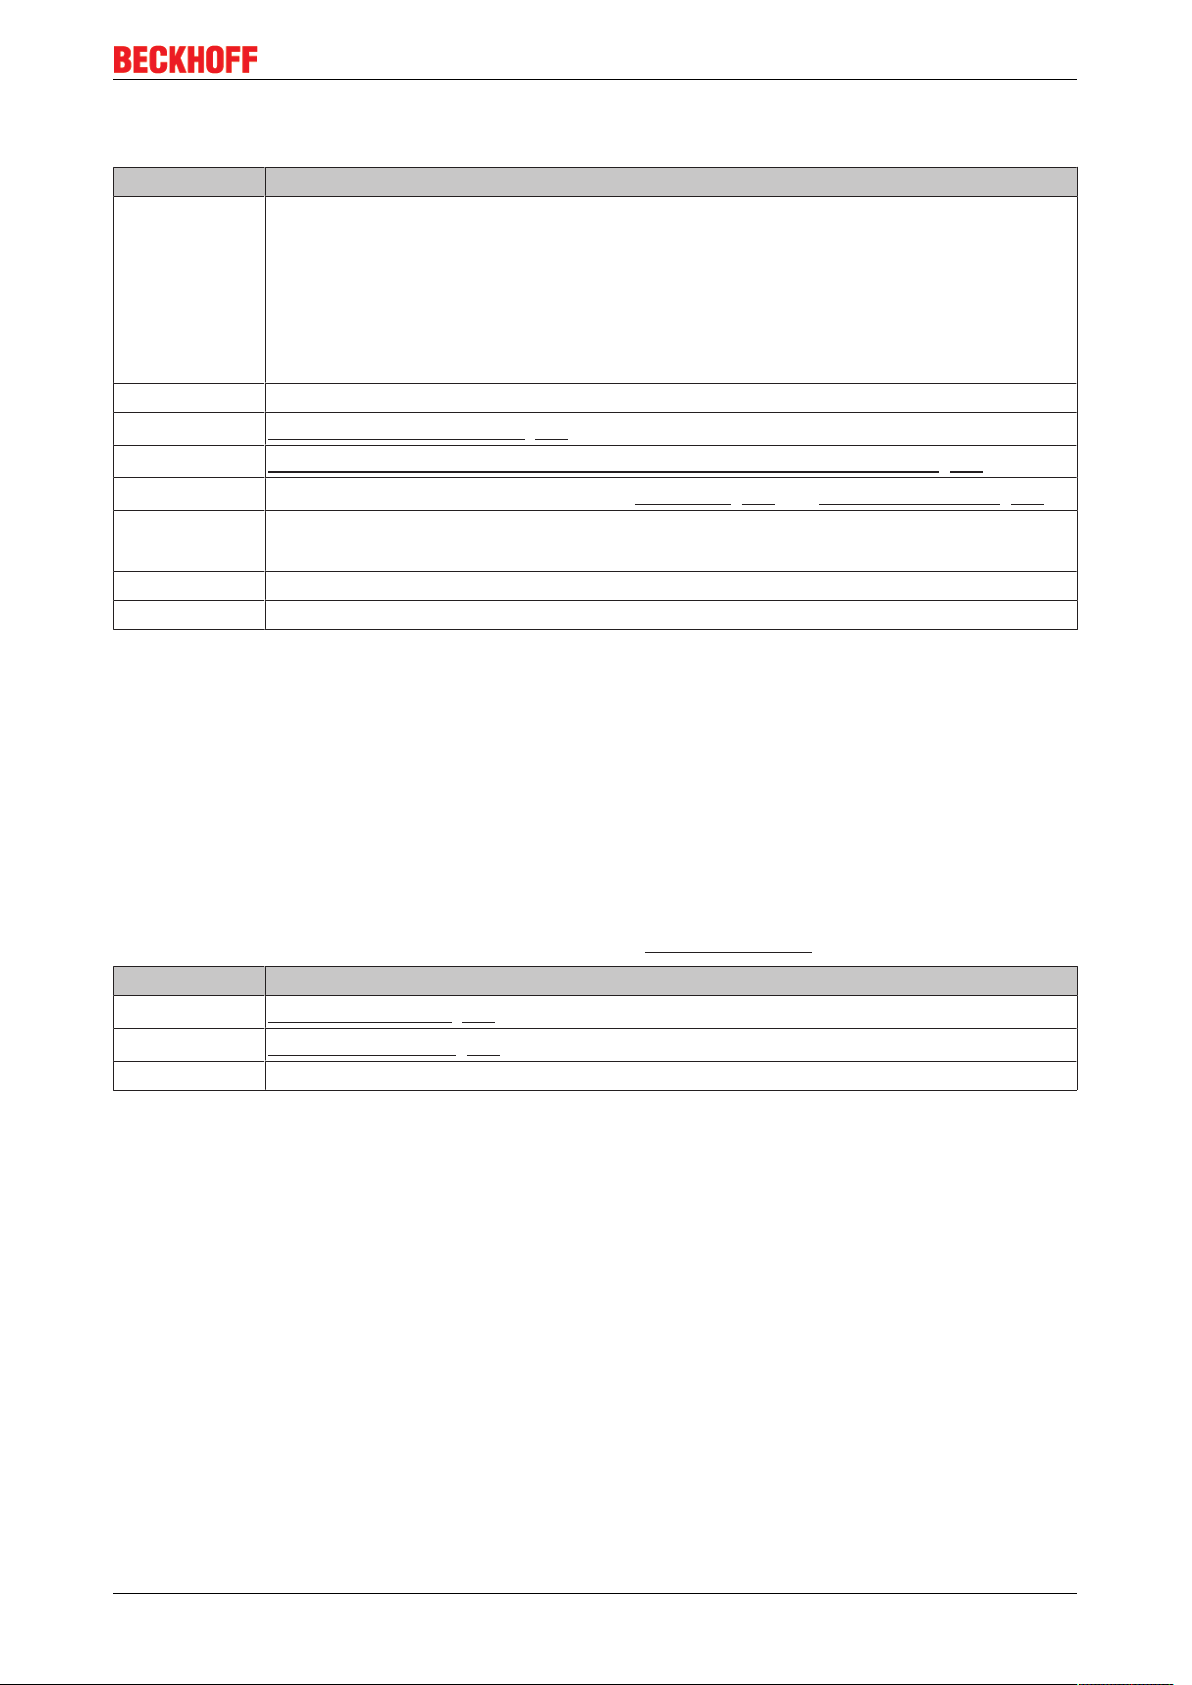
Version Modifications
2.0.0 Migration
Update Technical data
ATEX notes added
Update chapter Addressing via Beckhoff BootP Server
Update chapter Error handling and diagnosis
Update structure
1.3.0 BK9055 added
1.2.3
1.2.2
1.2.1
1.2.0 • configuration chapter updated
1.1.0 internal version
1.0.0 HTML documentation; valid as from firmware B3
New: EthernetIP Tag Wizard [}44]
New: Update from the mapping calculator and export to Rockwell software [}44]
Note about data types added to chapters first steps [}54] and mapping calculator [}33]
• mapping calculator added
Foreword
Firmware notes
BK9105
Determine which firmware was fitted when the Bus Coupler left the factory by checking the adhesive label
underneath the bus coupler (see the fifth and sixth figures of the production number).
Example:
3200B2020000
The firmware in this example is B2.
In order to update your firmware, you require the KS2000 configuration software and the serial cable
included with that software. You will find the firmware under www.beckhoff.com.
Firmware Description
B5
B3
B2 First release
DIP-Switch Settings [}21]
New: K-Bus Counter [}31]
BK9055 and BK9105 7Version: 2.0.0
Page 8
Product overview
2 Product overview
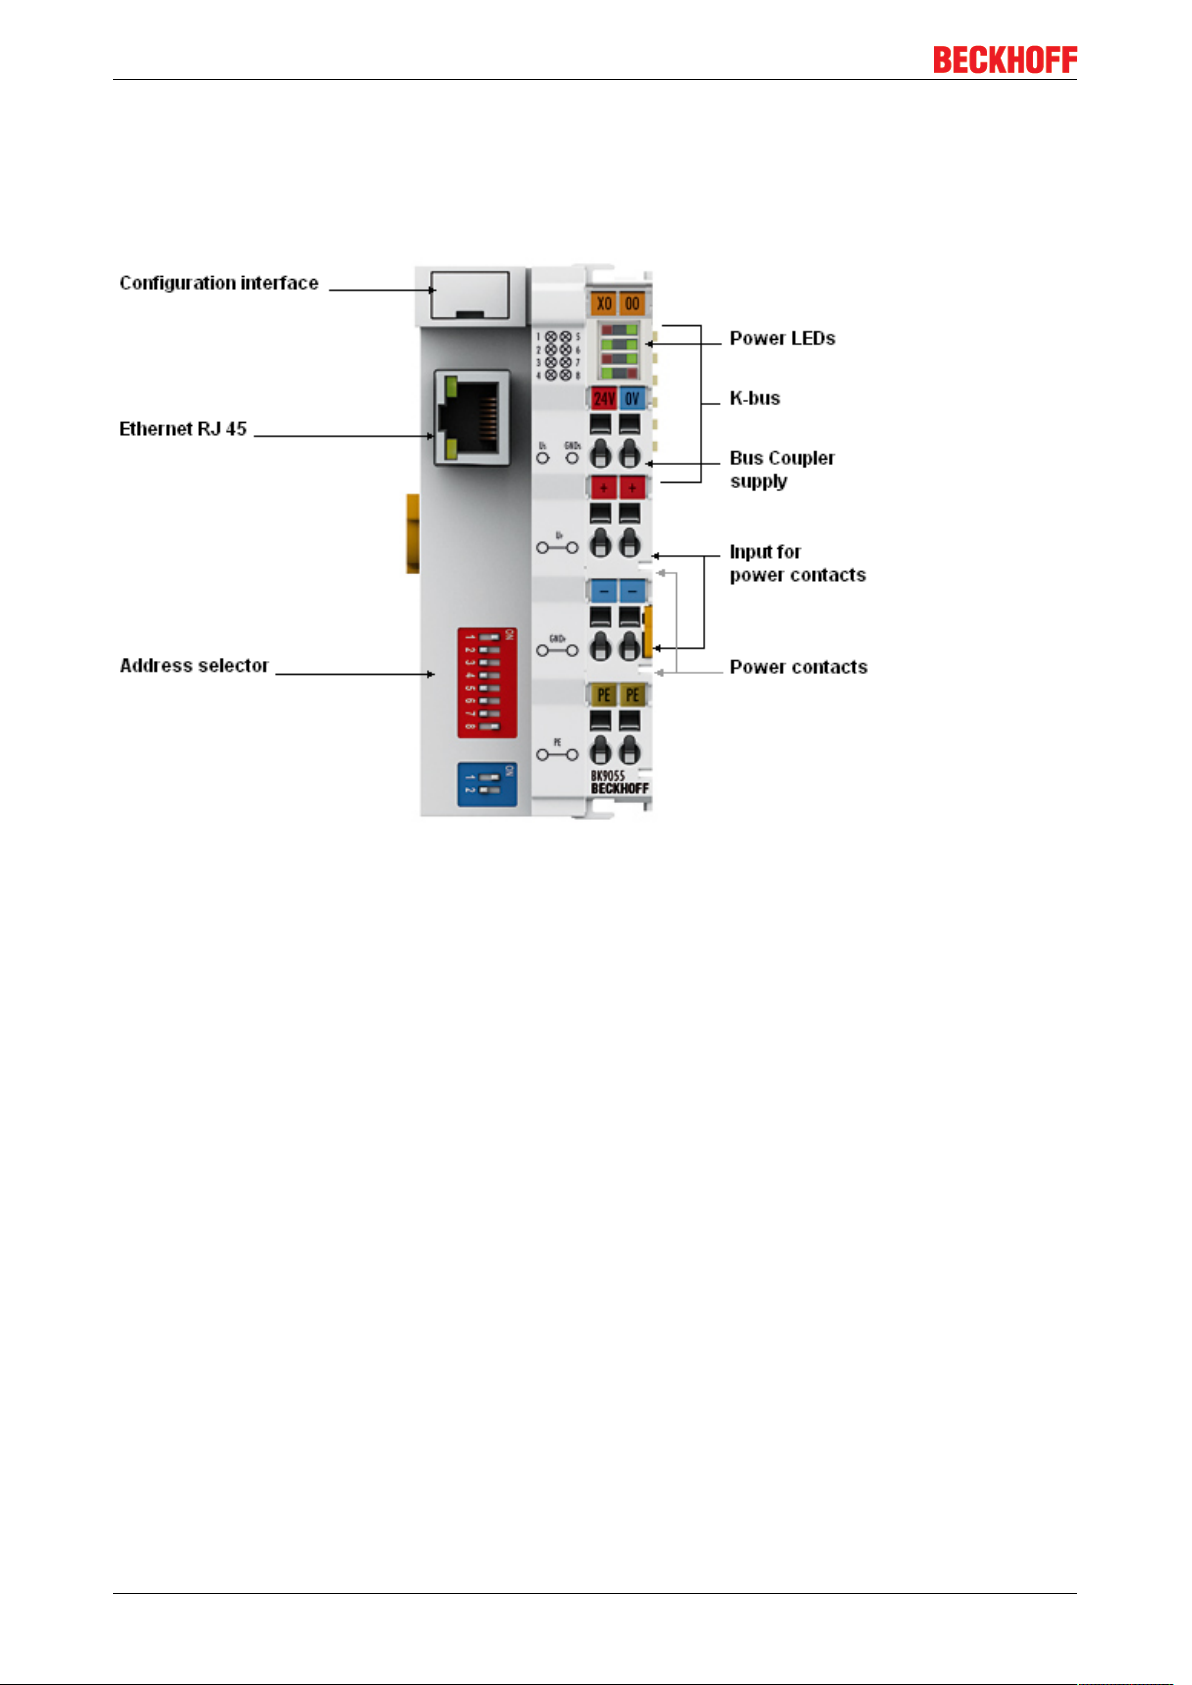
2.1 BK9055 - Introduction
Fig.1: BK9055
The Compact BK9055 Bus Coupler connects EtherNet/IP with the modular, extendable electronic terminal
blocks. One unit consists of one Bus Coupler, any number from 1to 64 terminals (255 with K-bus extension)
and one end terminal.
The Bus Coupler recognizes the terminals to which it is connected, and performs the assignment of the
inputs and outputs to the words of the process image automatically. The BK9055 Bus Coupler supports
10Mbit/s and 100Mbit/s Ethernet. Connection is through normal RJ45 connectors. The IP address is set on
the DIP switch (offset to a freely selectable start address). In networks with DHCP (a service for the
allocation of the logical IP address to the physical node address [MAC-ID]) the Bus Coupler obtains its IP
address from the DHCP server.
Ethernet/IP is the Industrial Ethernet standard of ODVA (Open DeviceNet Vendor Association). Ethernet/IP
is based on Ethernet TCP/IP and UDP/IP – IP stands for Industrial Protocol. Essentially, the CIP (Common
Industrial Protocol) used in ControlNet and DeviceNet was ported to Ethernet TCP/IP and UDP/IP.
Complex signal processing for analog I/Os, position measurement …
The BK9000 and BK9050 Bus Couplers support the operation of all Bus Terminal types.
The analog and multi-functional Bus Terminals can be adapted to each specific application using the
KS2000 configuration set. Depending on the type, the analog Bus Terminals' registers contain temperature
ranges, gain values and linearization characteristics. With the KS2000, the required parameters can be set
on a PC. The Bus Terminals store settings permanently and in a fail-safe manner.
Optionally, the Bus Terminals can also be controlled by the control system. Via function blocks (FBs), the
programmable logic controller (PLC) or the Industrial PC (IPC) handles configuration of the complete
periphery during the start-up phase. If required, the controller can upload the decentrally created
configuration data in order to centrally manage and store this data. Therefore, new adjustments are not
necessary in the event of replacement of a Bus Terminal. The controller carries out the desired setting
automatically after switching on.
BK9055 and BK91058 Version: 2.0.0
Page 9
2.2 BK9105 - Introduction
Product overview
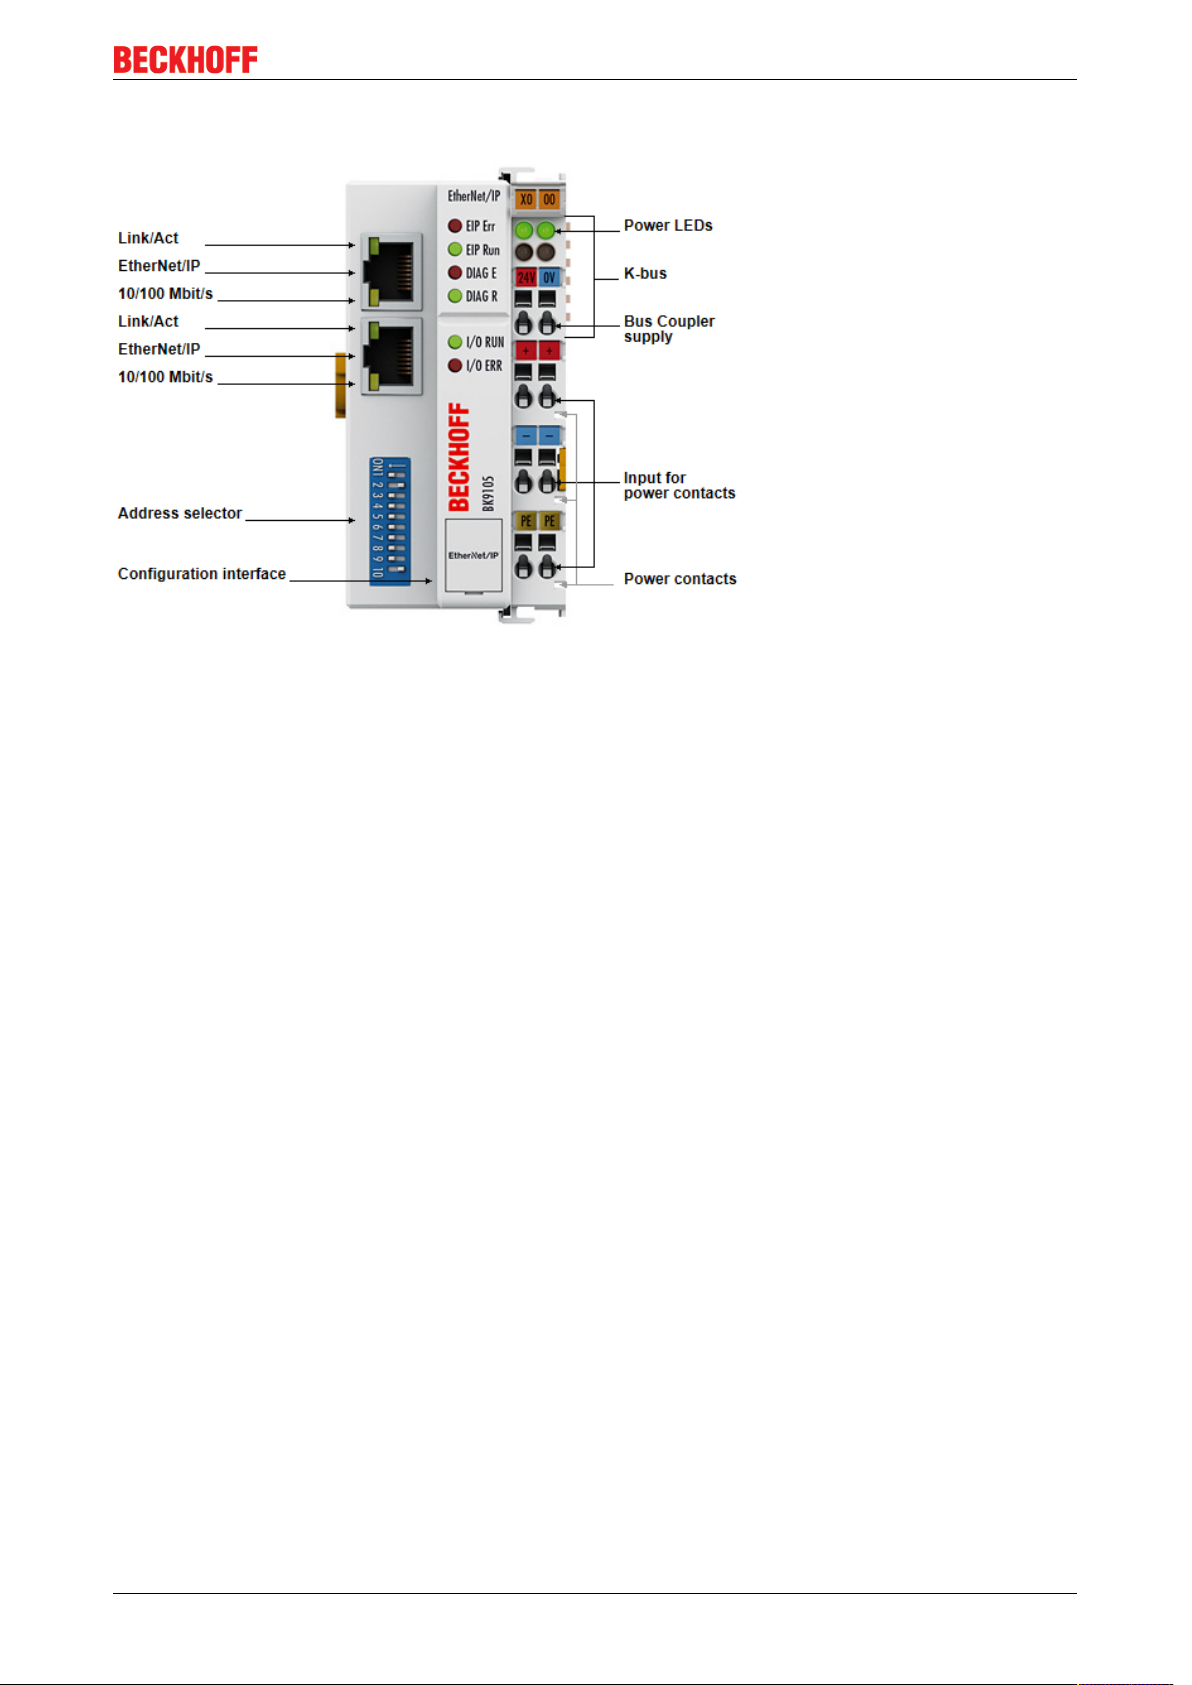
Fig.2: BK9105
The BK9105 Bus Coupler connects EtherNet/IP with the modular, extendable electronic terminal blocks. One
unit consists of one Bus Coupler, any number from 1 to 64 terminals (255 with K-bus extension) and one end
terminal.
The Bus Coupler recognizes the terminals to which it is connected, and performs the assignment of the
inputs and outputs to the words of the process image automatically. The BK9105 Bus Coupler supports
10Mbit/s and 100Mbit/s Ethernet. Connection is through normal RJ 45 connectors. The IP address is set on
the DIP switch (offset to a freely selectable start address). In networks with DHCP (a service for the
allocation of the logical IP address to the physical node address [MAC-ID]) the Bus Coupler obtains its IP
address from the DHCP server.
The BK9105 contains a 3-port switch. Two ports operate external on RJ 45 connectors and can be utilized.
The I/O stations can thus be configured with a line topology, instead of the classic star topology. In many
applications this significantly reduces the wiring effort and the cabling costs. The maximum distance between
two couplers is 100m. Up to 20 BK9105 Bus Couplers are cascadable, so that a maximum line length of
2km can be achieved.
Ethernet/IP is the Industrial Ethernet standard of ODVA (Open DeviceNet Vendor Association). Ethernet/IP
is based on Ethernet TCP/IP and UDP/IP – IP stands for Industrial Protocol. Essentially, the CIP (Common
Industrial Protocol) used in ControlNet and DeviceNet was ported to Ethernet TCP/IP and UDP/IP.
Complex signal processing for analog I/Os, position measurement …
The BK9105 Bus Coupler supports the operation of all Bus Terminal types.
The analog and multi-functional Bus Terminals can be adapted to each specific application using the
KS2000 configuration set. Depending on the type, the analog Bus Terminals' registers contain temperature
ranges, gain values and linearization characteristics. With the KS2000, the required parameters can be set
on a PC. The Bus Terminals store settings permanently and in a fail-safe manner.
Optionally, the Bus Terminals can also be controlled by the control system. Via function blocks (FBs), the
programmable logic controller (PLC) or the Industrial PC (IPC) handle configuration of the complete
periphery during the start-up phase. If required, the controller can upload the decentrally created
configuration data in order to centrally manage and store this data. Therefore, new adjustments are not
necessary in the event of replacement of a Bus Terminal. The controller carries out the desired setting
automatically after switching on.
BK9055 and BK9105 9Version: 2.0.0
Page 10

Product overview
2.3 Technical data
Technical data BK9055 BK9105
Number of Bus Terminals 64 (255 with K-Bus extension) 64
Digital peripheral signals 3,936 Inputs/Outputs
Analog peripheral signals 122 Inputs/Outputs
Protocol EtherNet/IP
Configuration possibility Via the KS2000 configuration software or the controller (TwinCAT)
Maximum number of bytes 492bytes of input and 492bytes of output data
Bus connection 1 x RJ45 2 x RJ45 (2 Port Switch)
Power supply 24VDC (-15%/+20%)
Input current 70mA + (total K-Bus current)/4, 500mA max.
Starting current app. 2.5 x continuous current
Recommended fuse ≤ 10A
K-Bus power supply up to 1750mA
Power contact voltage max. 24V
Power contact current load max. 10A
Dielectric strength 500V (power contact / supply voltage / fieldbus)
Weight app. 100g app. 170g
Assembly on 35mm mounting rail according to EN 60715
Permissible ambient temperature
(operation)
Permissible ambient temperature
(storage)
Permissible relative humidity 95%, no condensation
Vibration / shock resistance conforms to EN60068-2-6/ EN60068-2-27
EMC resistance burst / ESD conforms to EN61000-6-2/ EN61000-6-4
Installation position variable
Protection class IP20
Approvals
0°C ... +55°C -25°C ... +60°C
-25 °C ... +85°C -40 °C ... +85°C
CE, UL, ATEX [}18] CE, UL, ATEX [}19], GL
DC
System
System data EtherNet/IP
Number of I/O modules only limited by the IP address space
Number of I/O points depending on the controller
Data transfer medium twisted pair copper cable, 4 x 2, shielded, category 5 (100Mbit/s),
category 3 (10Mbit/s)
Distance between modules 100m
Data transfer rate 10/100Mbit/s
Topology BK9055: star wiring
BK9105: line or star wiring
Cascading up to 20 BK9105 or max. line length 2km
2.4 The Beckhoff Bus Terminal system
Up to 256 Bus Terminals, with 1 to 16I/O channels per signal form
The Bus Terminal system is the universal interface between a fieldbus system and the sensor / actuator
level. A unit consists of a Bus Coupler as the head station, and up to 64 electronic series terminals, the last
one being an end terminal. Up to 255 Bus Terminals can be connected via the K-bus extension. For each
BK9055 and BK910510 Version: 2.0.0
Page 11

Product overview
technical signal form, terminals are available with one, two, four or eight I/O channels, which can be mixed
as required. All the terminal types have the same mechanical construction, so that difficulties of planning and
design are minimized. The height and depth match the dimensions of compact terminal boxes.
Decentralised wiring of each I/O level
Fieldbus technology allows more compact forms of controller to be used. The I/O level does not have to be
brought to the controller. The sensors and actuators can be wired decentrally, using minimum cable lengths.
The controller can be installed at any location within the plant.
Industrial PCs as controllers
The use of an Industrial PC as the controller means that the operating and observing element can be
implemented in the controller's hardware. The controller can therefore be located at an operating panel, in a
control room, or at some similar place. The Bus Terminals form the decentralised input/output level of the
controller in the control cabinet and the subsidiary terminal boxes. The power sector of the plant is also
controlled over the bus system in addition to the sensor/actuator level. The Bus Terminal replaces the
conventional series terminal as the wiring level in the control cabinet. The control cabinet can have smaller
dimensions.
Bus Couplers for all usual bus systems
The Beckhoff Bus Terminal system unites the advantages of a bus system with the possibilities of the
compact series terminal. Bus Terminals can be driven within all the usual bus systems, thus reducing the
controller parts count. The Bus Terminals then behave like conventional connections for that bus system. All
the performance features of the particular bus system are supported.
Mounting on standardized mounting rails
The installation is standardized thanks to the simple and space-saving mounting on a standardized mounting
rail (EN60715, 35mm) and the direct wiring of actuators and sensors, without cross connections between
the terminals. The consistent labelling scheme also contributes.
The small physical size and the great flexibility of the Bus Terminal system allow it to be used wherever a
series terminal is also used. Every type of connection, such as analog, digital, serial or the direct connection
of sensors can be implemented.
Modularity
The modular assembly of the terminal strip with Bus Terminals of various functions limits the number of
unused channels to a maximum of one per function. The presence of two channels in one terminal is the
optimum compromise of unused channels and the cost of each channel. The possibility of electrical isolation
through potential feed terminals also helps to keep the number of unused channels low.
Display of the channel state
The integrated LEDs show the state of the channel at a location close to the sensors and actuators.
K-bus
The K-bus is the data path within a terminal strip. The K-bus is led through from the Bus Coupler through all
the terminals via six contacts on the terminals' side walls. The end terminal terminates the K-bus. The user
does not have to learn anything about the function of the K-bus or about the internal workings of the
terminals and the Bus Coupler. Many software tools that can be supplied make project planning,
configuration and operation easy.
Potential feed terminals for isolated groups
The operating voltage is passed on to following terminals via three power contacts. You can divide the
terminal strip into arbitrary isolated groups by means of potential feed terminals. The potential feed terminals
play no part in the control of the terminals, and can be inserted at any locations within the terminal strip.
BK9055 and BK9105 11Version: 2.0.0
Page 12

Product overview
Up to 64Bus Terminals can be used in a terminal block, with optional K-bus extension for up to 256Bus
Terminals. This count does include potential feed terminals, but not the end terminal.
Bus Couplers for various fieldbus systems
Various Bus Couplers can be used to couple the electronic terminal strip quickly and easily to different
fieldbus systems. It is also possible to convert to another fieldbus system at a later time. The Bus Coupler
performs all the monitoring and control tasks that are necessary for operation of the connected Bus
Terminals. The operation and configuration of the Bus Terminals is carried out exclusively by the Bus
Coupler. Nevertheless, the parameters that have been set are stored in each Bus Terminal, and are retained
in the event of voltage drop-out. Fieldbus, K-bus and I/O level are electrically isolated.
If the exchange of data over the fieldbus is prone to errors or fails for a period of time, register contents (such
as counter states) are retained, digital outputs are cleared, and analog outputs take a value that can be
configured for each output when commissioning. The default setting for analog outputs is 0 V or 0 mA. Digital
outputs return in the inactive state. The timeout periods for the Bus Couplers correspond to the usual
settings for the fieldbus system. When converting to a different bus system it is necessary to bear in mind the
need to change the timeout periods if the bus cycle time is longer.
The interfaces
A Bus Coupler has six different methods of connection. These interfaces are designed as plug connectors
and as spring-loaded terminals.
2.5 Ethernet
Ethernet was originally developed by DEC, Intel and XEROX (as the "DIX" standard) for passing data
between office devices. The term nowadays generally refers to the IEEE802.3 CSMA/CD specification,
published in 1985. Because of the high acceptance around the world this technology is available everywhere
and is very economical. This means that it is easy to make connections to existing networks.
There are now a number of quite different transmission media: coaxial cable (10Base5), optical fiber
(10BaseF) or twisted pairs (10BaseT) with screen (STP) or without screen (UTP). Using Ethernet, different
topologies can be built such as ring, line or star.
Ethernet transmits Ethernet packets from a sender to one or more receivers. This transmission takes place
without acknowledgement, and without the repetition of lost packets. To achieve reliable data
communication, there are protocols, such as TCP/IP, that can run on top of Ethernet.
Basic principles
The Internet Protocol (IP)
The internet protocol (IP) forms the basis of this data communication. IP transports data packets from one
device to another; the devices can be in the same network, or in different networks. IP here looks after the
address management (finding and assigning MAC-IDs), segmentation and routing. Like the Ethernet
protocol, IP does not guarantee that the data is transported - data packets can be lost, or their sequence can
be changed.
TCP/IP was developed to provide standardised, reliable data exchange between any numbers of different
networks. TCP/IP was developed to provide standardised, reliable data exchange between any numbers of
different networks. Although the term is often used as if it were a single concept, a number of protocols are
layered together: e.g. IP, TCP, UDP, ARP and ICMP.
Transmission Control Protocol (TCP)
The Transmission Control Protocol (TCP) which runs on top of IP is a connection-oriented transport protocol.
It includes error detection and handling mechanisms. Lost telegrams are repeated.
BK9055 and BK910512 Version: 2.0.0
Page 13

Product overview
User Datagram Protocol (UDP)
UDP is connectionless transport protocol. It provides no control mechanism when exchanging data between
sender and receiver. This results in a higher processing speed than, for example, TCP. Checking whether or
not the telegram has arrived must be carried out by the higher-level protocol.
Internet Control Message Protocol (ICMP)
It is used by end devices, to exchange information about the current status of the internet protocol.
Address Resolution Protocol (ARP)
Performs conversion between the IP addresses and MAC addresses.
BootP
The BootP protocol allows the TCP/IP address to be set or altered, by addressing the network device with its
MAC-ID.
BK9055 and BK9105 13Version: 2.0.0
Page 14
Mounting and wiring
3 Mounting and wiring
3.1 Dimensions
The system of the Beckhoff Bus Terminals is characterized by low physical volume and high modularity.
When planning a project it must be assumed that at least one Bus Coupler and a number of Bus Terminals
will be used. The mechanical dimensions of the Bus Couplers are independent of the fieldbus system.
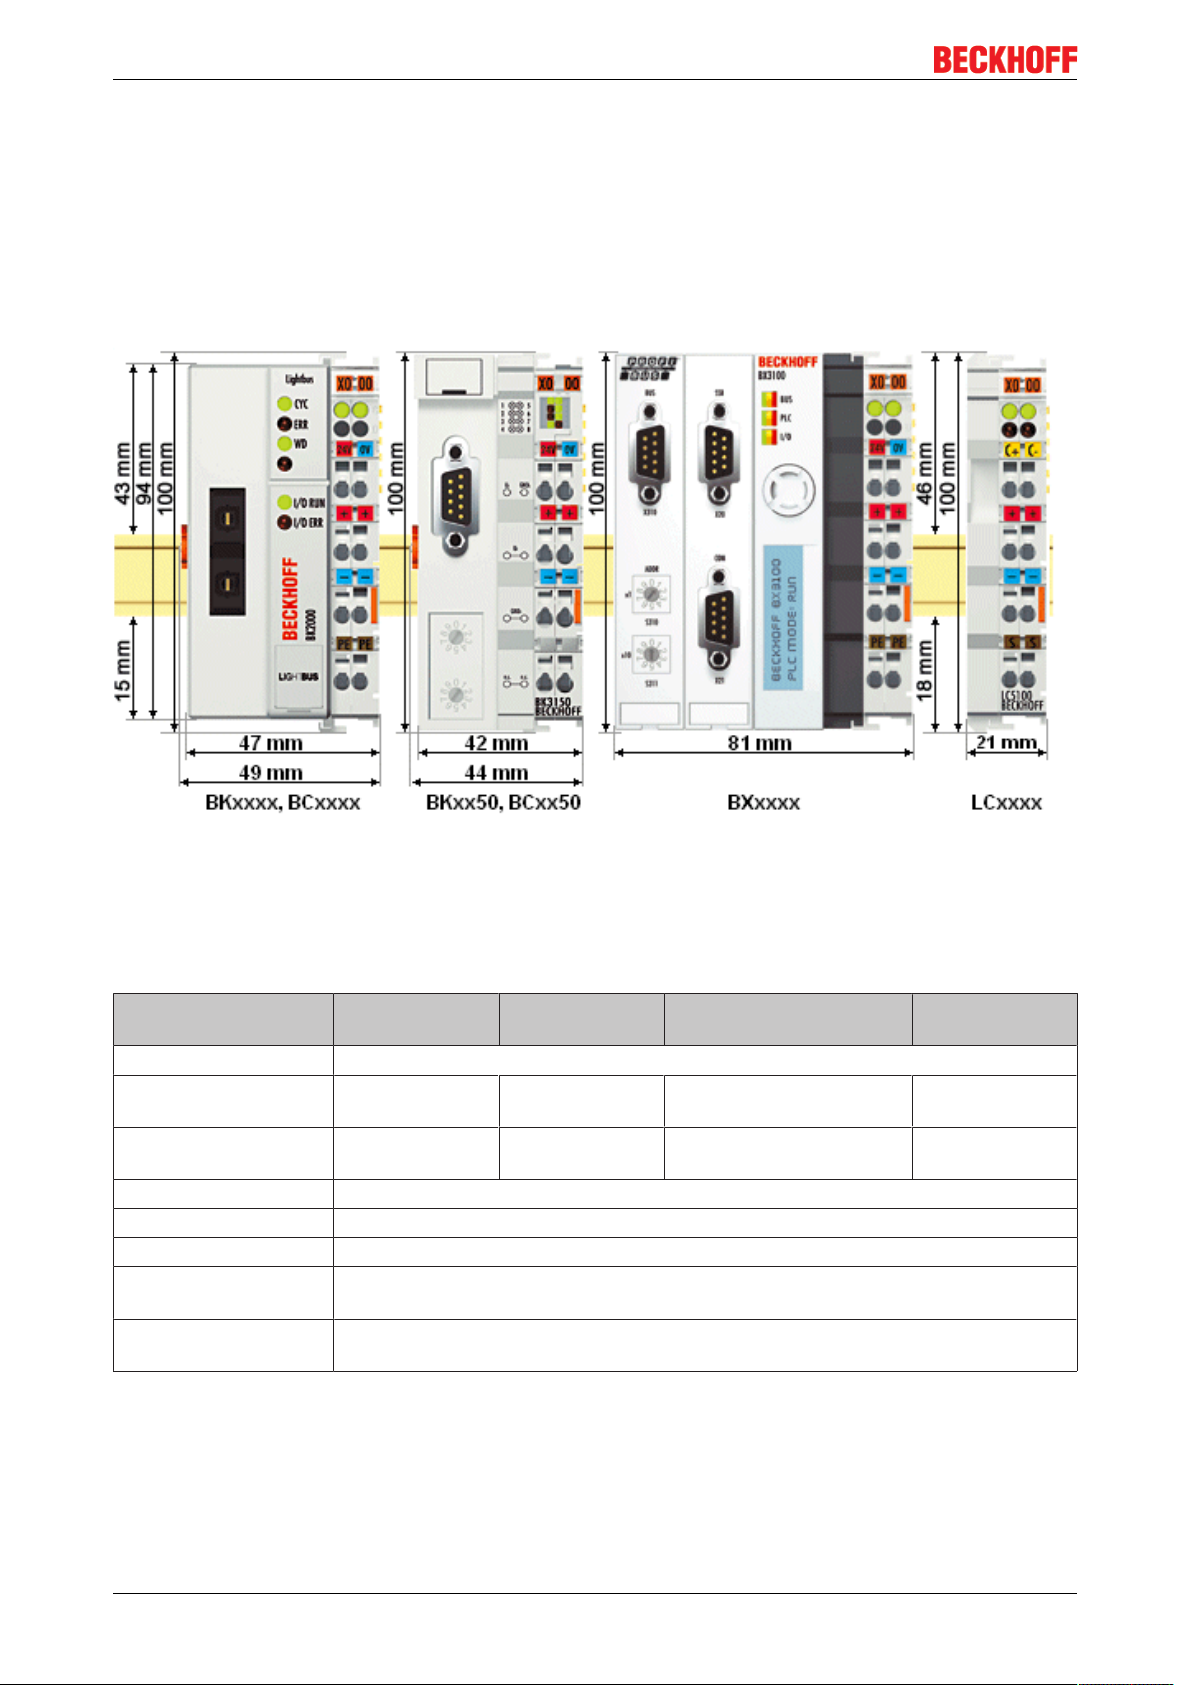
Fig.3: Dimensions
The total width in practical cases is composed of the width of the Bus Coupler, the KL9010 Bus End
Terminal and the width of the bus terminals in use. Depending on function, the Bus Terminals are 12 or
24mm wide. The front wiring increases the total height of 68 mm by about 5 to 10mm, depending on the
wire thickness.
Mechanical data BKxxxx
BCxxxx
Design form compact terminal housing with signal LED
Material Polyamide
(PA 6.6)
Dimensions (W x H x D) 49 x 100 x 68mm 44 x 100 x 68mm 81 (BX8000 61) x 100 x
Mounting on 35 mm C-rail in accordance with EN 60715 with latching
Stackable by Double groove-tongue connection
Labelling Standard terminal block labelling
Vibration/shock
resistance
EMC immunity/
emission
conforms to EN 60068-2-6 / EN 60068-2-27
conforms to EN 61000-6-2 / EN 61000-6-4
BKxx50
BCxx50
Polyamide
(PA 6.6)
BXxxxx LCxxxx
Polycarbonate Polyamide
(PA 6.6)
21 x 100 x 68mm
89mm
BK9055 and BK910514 Version: 2.0.0
Page 15

Mounting and wiring
Connection technology BKxxxx
BCxxxx
Wiring Cage Clamp® spring-loaded system
Connection cross-section 0.08mm² ... 2.5 mm², stranded, solid wire, 28-14 AWG
Fieldbus connection depending on fieldbus spring-loaded terminals
Power contacts 3 spring contacts
Current loading IMAXX 10 A (125 A short circuit)
Rated voltage 24V
DC
BKxx50
BCxx50
BXxxxx LCxxxx
3.2 Installation on mounting rails
WARNING
Risk of injury through electric shock and damage to the device!
Bring the Bus Terminals system into a safe, de-energized state before starting mounting, disassembly or
wiring of the Bus Terminals.
Mounting
The Bus Couplers and Bus Terminals are attached to commercially available 35mm mounting rails (DIN rail
according to EN60715) by applying slight pressure:
1. First attach the Fieldbus Coupler to the mounting rail.
2. The Bus Terminals are now attached on the right-hand side of the fieldbus Coupler. Join the components with slot and key and push the terminals against the mounting rail, until the lock clicks onto the
mounting rail.
If the terminals are clipped onto the mounting rail first and then pushed together without tongue and
groove, the connection will not be operational! When correctly assembled, no significant gap should
be visible between the housings.
Fixing of mounting rails
The locking mechanism of the terminals and couplers extends to the profile of the mounting rail. At
the installation, the locking mechanism of the components must not come into conflict with the fixing
bolts of the mounting rail. To mount the mounting rails with a height of 7.5mm under the terminals
and couplers, you should use flat mounting connections (e.g. countersunk screws or blind rivets).
Disassembly
Each terminal is secured by a lock on the mounting rail, which must be released for disassembly:
1. Carefully pull the orange-colored lug approximately 1cm out of the terminal to be disassembled, until
it protrudes loosely. The lock with the mounting rail is now released for this terminal, and the terminal
can be pulled from the mounting rail without excessive force.
2. Grasp the released terminal with thumb and index finger simultaneous at the upper and lower grooved
housing surfaces and pull the terminal away from the mounting rail.
Connections within a Bus Terminal block
The electric connections between the Bus Coupler and the Bus Terminals are automatically realized by
joining the components:
• The six spring contacts of the K-Bus/E-Bus deal with the transfer of the data and the supply of the Bus
Terminal electronics.
• The power contacts deal with the supply for the field electronics and thus represent a supply rail within
the Bus Terminal block. The power contacts are supplied via terminals on the Bus Coupler.
BK9055 and BK9105 15Version: 2.0.0
Page 16
Mounting and wiring
Power contacts
During the design of a Bus Terminal block, the pin assignment of the individual Bus Terminals must
be taken account of, since some types (e.g. analog Bus Terminals or digital 4-channel Bus Terminals) do not or not fully loop through the power contacts. Power Feed Terminals (KL91xx, KL92xx
and EL91xx, EL92xx) interrupt the power contacts and thus represent the start of a new supply rail.
PE power contact
The power contact labelled PE can be used as a protective earth. For safety reasons this contact mates first
when plugging together, and can ground short-circuit currents of up to 125A.
NOTE
Risk of damage to the device
Note that, for reasons of electromagnetic compatibility, the PE contacts are capacitatively coupled to the
mounting rail. This may lead to incorrect results during insulation testing or to damage on the terminal (e.g.
disruptive discharge to the PE line during insulation testing of a consumer with a nominal voltage of 230V).
For insulation testing, disconnect the PE supply line at the Bus Coupler or the Power Feed Terminal! In order to decouple further feed points for testing, these Power Feed Terminals can be released and pulled at
least 10mm from the group of terminals.
WARNING
Risk of electric shock!
The PE power contact must not be used for other potentials!
Wiring
Up to eight connections enable the connection of solid or finely stranded cables to the Bus Terminals. The
terminals are implemented in spring force technology. Connect the cables as follows:
1. Open a spring-loaded terminal by slightly pushing with a screwdriver or a rod into the square opening
above the terminal.
2. The wire can now be inserted into the round terminal opening without any force.
3. The terminal closes automatically when the pressure is released, holding the wire safely and permanently.
Shielding
Analog sensors and actuators should always be connected with shielded, pair-wise twisted cables.
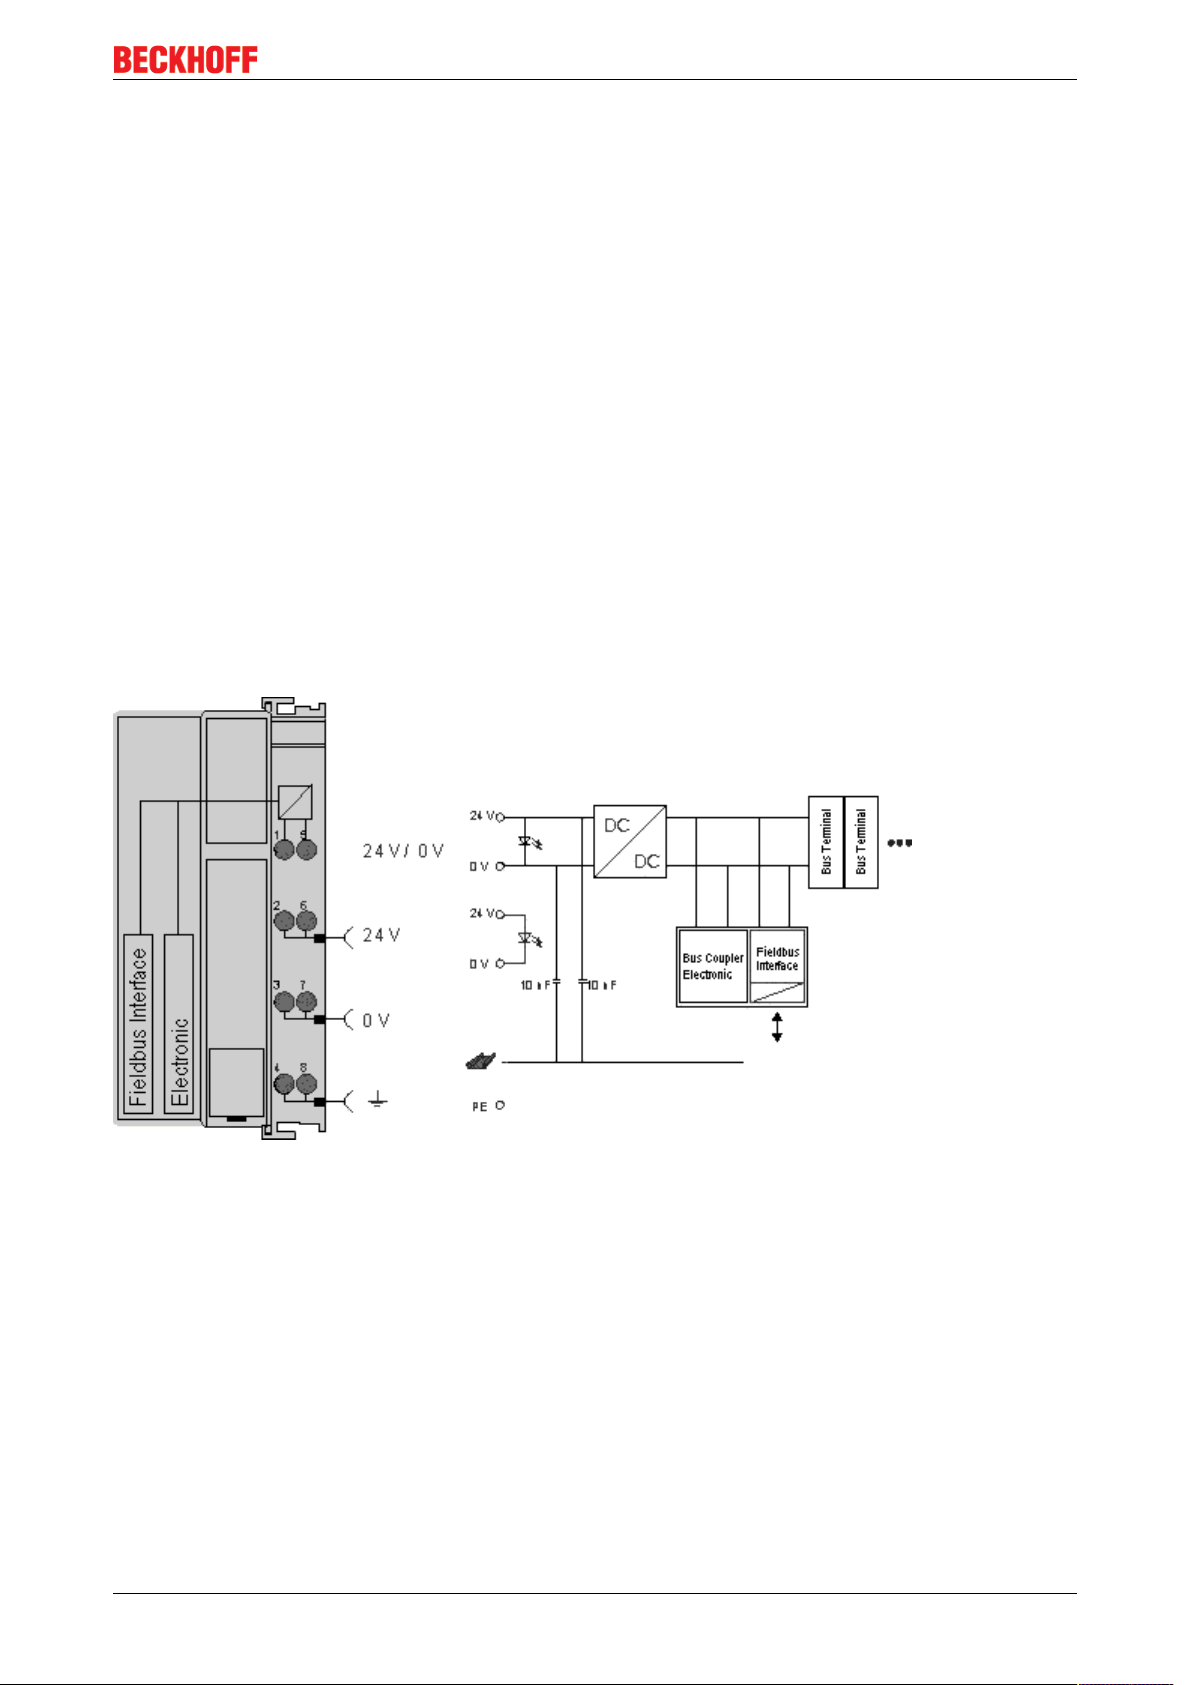
3.3 Power supply, potential groups
Power supply for the Bus Coupler
The Bus Couplers require a 24 VDC supply for their operation. The connection is made by means of the upper
spring-loaded terminals labelled 24V and 0V. The supply voltage feeds the Bus Coupler electronics and,
over the K-Bus/E-Bus, the Bus Terminals. The power supply for the Bus Coupler electronics and that of the
K-Bus/E-Bus are electrically separated from the potential of the field level.
Power supply for the power contacts
The bottom six connections with spring-loaded terminals can be used to feed the supply for the peripherals.
The spring-loaded terminals are joined in pairs to a power contact. The feed for the power contacts has no
connection to the voltage supply for the Bus Coupler. The design of the feed permits voltages of up to 24V.
The assignment in pairs and the electrical connection between feed terminal contacts allows the connection
wires to be looped through to various terminal points. The current drawn from the power contacts must not
exceed 10A for long periods. The current carrying capacity between two spring-loaded terminals is identical
to that of the connecting wires.
BK9055 and BK910516 Version: 2.0.0
Page 17
Mounting and wiring
Power contacts
On the right hand face of the Bus Coupler there are three spring contacts for the power contact connections.
The spring contacts are hidden in slots so that they cannot be accidentally touched. By attaching a Bus
Terminal the blade contacts on the left hand side of the Bus Terminal are connected to the spring contacts.
The tongue and groove guides on the top and bottom of the Bus Coupler and of the Bus Terminals
guarantees that the power contacts mate securely.
Configuration interface (not for BK1250, EK1x00)
The standard Bus Couplers have an RS232 interface at the bottom of the front face. The miniature connector
can be joined to a PC with the aid of a connecting cable and the KS2000 configuration software. The
interface permits the Bus Terminals to be configured, for example adjusting the amplification factors of the
analog channels. The interface can also be used to change the assignments of the bus terminal data to the
process image in the Bus Coupler. The functionality of the configuration interface can also be reached via
the fieldbus using string communication facility.
Electrical isolation
The bus couplers operate by means of three independent potential groups. The supply voltage feeds the KBus/E-Bus electronics in the Bus Coupler and the K-Bus/E-Bus itself in an electrically isolated manner. The
supply voltage is also used to generate the operating voltage for the fieldbus.
Note: All Bus Terminals are electrically isolated from the K-Bus/E-bus. The K-Bus/E-bus is therefore
completely electrically isolated.
Fig.4: Electrical isolation
BK9055 and BK9105 17Version: 2.0.0
Page 18

Mounting and wiring
3.4 ATEX - Special conditions (standard temperature range)
WARNING
Observe the special conditions for the intended use of Beckhoff fieldbus components with
standard temperature range in potentially explosive areas (directive 94/9/EU)!
• The certified components are to be installed in a suitable housing that guarantees a protection class of at
least IP54 in accordance with EN 60529! The environmental conditions during use are thereby to be
taken into account!
• If the temperatures during rated operation are higher than 70°C at the feed-in points of cables, lines or
pipes, or higher than 80°C at the wire branching points, then cables must be selected whose temperature data correspond to the actual measured temperature values!
• Observe the permissible ambient temperature range of 0 to 55°C for the use of Beckhoff fieldbus components standard temperature range in potentially explosive areas!
• Measures must be taken to protect against the rated operating voltage being exceeded by more than
40% due to short-term interference voltages!
• The individual terminals may only be unplugged or removed from the Bus Terminal system if the supply
voltage has been switched off or if a non-explosive atmosphere is ensured!
• The connections of the certified components may only be connected or disconnected if the supply voltage has been switched off or if a non-explosive atmosphere is ensured!
• The fuses of the KL92xx/EL92xx power feed terminals may only be exchanged if the supply voltage has
been switched off or if a non-explosive atmosphere is ensured!
• Address selectors and ID switches may only be adjusted if the supply voltage has been switched off or if
a non-explosive atmosphere is ensured!
Standards
The fundamental health and safety requirements are fulfilled by compliance with the following standards:
• EN 60079-0:2012+A11:2013
• EN 60079-15:2010
Marking
The Beckhoff fieldbus components with standard temperature range certified for potentially explosive areas
bear one of the following markings:
II 3GKEMA 10ATEX0075 X Ex nA IIC T4 GcTa: 0…55°C
or
II 3GKEMA 10ATEX0075 X Ex nC IIC T4 GcTa: 0…55°C
BK9055 and BK910518 Version: 2.0.0
Page 19
Mounting and wiring
3.5 ATEX - Special conditions (extended temperature range)
WARNING
Observe the special conditions for the intended use of Beckhoff fieldbus components with
extended temperature range (ET) in potentially explosive areas (directive 94/9/EU)!
• The certified components are to be installed in a suitable housing that guarantees a protection class of at
least IP54 in accordance with EN 60529! The environmental conditions during use are thereby to be
taken into account!
• If the temperatures during rated operation are higher than 70°C at the feed-in points of cables, lines or
pipes, or higher than 80°C at the wire branching points, then cables must be selected whose temperature data correspond to the actual measured temperature values!
• Observe the permissible ambient temperature range of -25 to 60°C for the use of Beckhoff fieldbus components with extended temperature range (ET) in potentially explosive areas!
• Measures must be taken to protect against the rated operating voltage being exceeded by more than
40% due to short-term interference voltages!
• The individual terminals may only be unplugged or removed from the Bus Terminal system if the supply
voltage has been switched off or if a non-explosive atmosphere is ensured!
• The connections of the certified components may only be connected or disconnected if the supply voltage has been switched off or if a non-explosive atmosphere is ensured!
• The fuses of the KL92xx/EL92xx power feed terminals may only be exchanged if the supply voltage has
been switched off or if a non-explosive atmosphere is ensured!
• Address selectors and ID switches may only be adjusted if the supply voltage has been switched off or if
a non-explosive atmosphere is ensured!
Standards
The fundamental health and safety requirements are fulfilled by compliance with the following standards:
• EN 60079-0:2012+A11:2013
• EN 60079-15:2010
Marking
The Beckhoff fieldbus components with extended temperature range (ET) certified for potentially explosive
areas bear the following marking:
II 3GKEMA 10ATEX0075 X Ex nA IIC T4 GcTa: -25…60°C
or
II 3GKEMA 10ATEX0075 X Ex nC IIC T4 GcTa: -25…60°C
BK9055 and BK9105 19Version: 2.0.0
Page 20

Mounting and wiring
3.6 ATEX Documentation
Notes about operation of the Beckhoff terminal systems in potentially explosive areas (ATEX)
Pay also attention to the continuative documentation
Notes about operation of the Beckhoff terminal systems in potentially explosive areas (ATEX)
that is available in the download area of the Beckhoff homepage http:\\www.beckhoff.com!
BK9055 and BK910520 Version: 2.0.0
Page 21
Parametrization and commissioning
4 Parametrization and commissioning
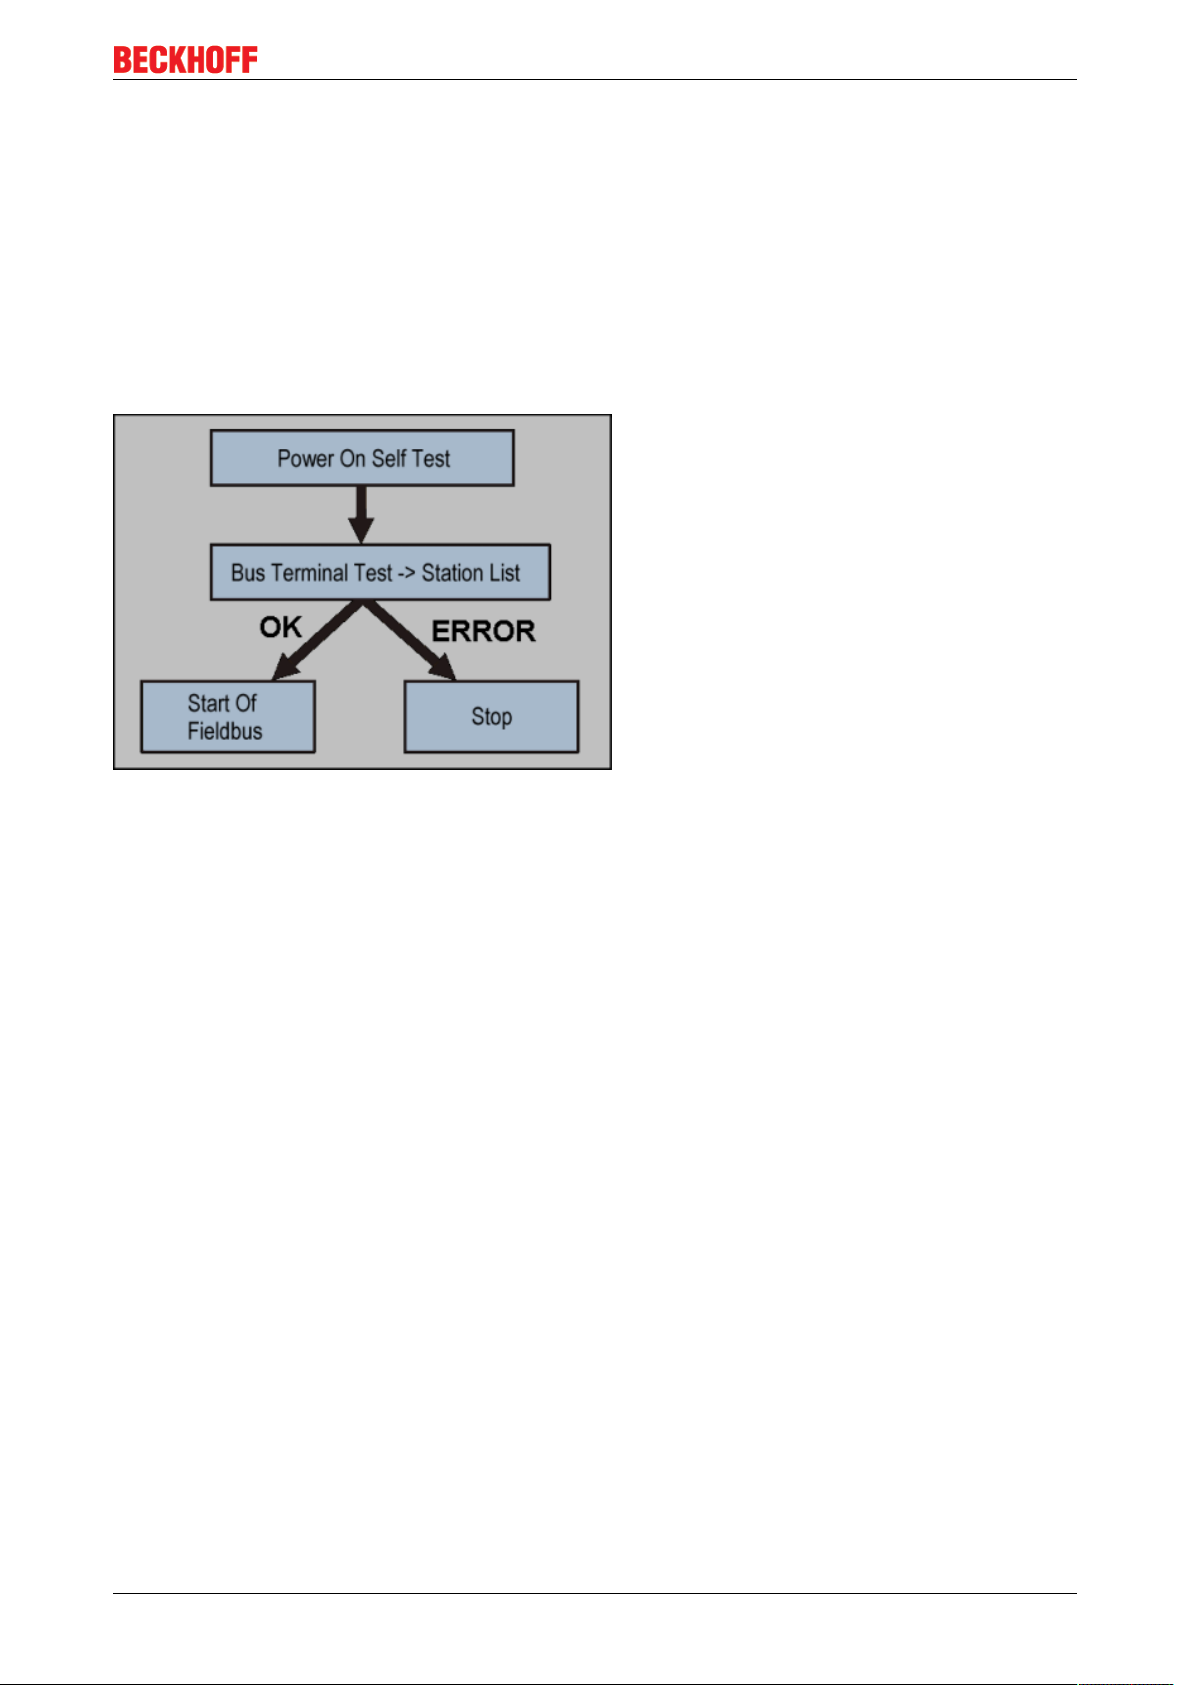
4.1 Start-up behaviour of the Bus Coupler
Immediately after being switched on, the Bus Coupler checks, in the course of a self-test, all the functions of
its components and the communication on the K-bus/E-bus. The red I/O LED blinks while this is happening.
After completion of the self-test, the Bus Coupler starts to test the attached Bus Terminals (the "Bus
Terminal Test"), and reads in the configuration. The Bus Terminal configuration is used to generate an
internal structure list, which is not accessible from outside. In case of an error, the Bus Coupler enters the
Stop state. Once the start-up has completed without error, the Bus Coupler enters the fieldbus start state.
Fig.5: Start-up behaviour of the Bus Coupler
The Bus Coupler can be made to enter the normal operating state by switching it on again once the fault has
been rectified.
4.2 Parameterization of the Bus Coupler using DIP Switches*
*) Firmware version B5 or higher
The following parameterizations can be carried out without using configuration software, with the aid of the
DIP switches and the end terminal (KL9010).
This parameterization mode is only active if only one end terminal (KL9010) is inserted. Otherwise, the
normal settings apply.
Restoring the manufacturer's settings
• Switch off the Bus Coupler, and plug in just the end terminal (KL9010).
• Set all the DIP switches to ON, and switch the Bus Coupler on again.
• Once the default parameters have successfully been set, the Error LED lights, and the I/O Run and I/O
Error LEDs flash alternately.
• You can then switch the Bus Coupler off, connect the Bus Terminals, and continue as usual.
Setting the Ethernet parameters
• Switch off the Bus Coupler, and plug in just the end terminal (KL9010).
• Set all the DIP switches to OFF, and switch the Bus Coupler on again.
• The I/O RUN and I/O Error LEDs light steadily.
• Make the desired setting in accordance with the following table.
BK9055 and BK9105 21Version: 2.0.0
Page 22

Parametrization and commissioning
DIP switch Parameters Selection Setting Comment
1 Baud Rate 10 MBaud OFF (0)
100 MBaud ON (1) Default
2 Auto-Baud-Rate Disable OFF (0)
Enable ON (1) Default
3 Transmission type Half duplex OFF (0)
Full duplex ON (1) Default
• To accept the values, set DIP switch 10 to ON.
By flashing the I/O RUN and I/O ERR LEDs the Bus Coupler indicates that it has accepted the
parameters.
• You can then switch the Bus Coupler off, connect the Bus Terminals, and continue as usual.
4.3 Network classes
Three different network classes are distinguished. They determine how many address bits are reserved for
the network ID and how many for the node number (e.g. for PCs or Bus Couplers). The difference is located
in the first three bits of the IP address.
Network
class
A 7 126 24 16777214
B 14 16382 16 65536
C 21 2097150 8 254
Number of bits for
the network ID
Enables no. of
networks
No. of bits for the
node address
Enables no. of nodes per
network
Unique IP address
An IP address must be unique within the entire connected network!
Fig.6: Network classes
Identical network class
In a communication with another Ethernet devices, the IP address set must have the same network
class. Sample: Your PC has the address 172.16.17.55, which means the coupler must have the address 172.16.xxx.xxx (xxx stands for a number between 0 and 255.0 is usually used by the router/
switch and should therefore remain reserved).
In order to see the PC's own address, the command ipconfig can be entered into a DOS window under
Windows NT/2000/XP.
BK9055 and BK910522 Version: 2.0.0
Page 23

Parametrization and commissioning
4.4 IP address
The IP address can be set using four different procedures, and these will be described in more detail below.
Procedure Explanation Necessary components
KS2000 Addressing using the KS2000 configuration
software and DIP switches
ARP
BootP
Addressing via the ARP table [}24]
Addressing via BootP server [}25]
DHCP Addressing via DHCP server DHCP server
4.4.1 Configuration with KS2000
The KS2000 configuration software (from version 3.2.8) can be used to set the TCP/IP address in a dialog
box, or it can be written directly into the registers. DIP switches 9 and 10 (for BK9050 DIP switches 1 and 2
in blue) should both be OFF (0) before switching on.
Table 100
Register High-Byte Low-Byte
0 IP-Byte 2 IP-Byte 1
1 Not used IP-Byte 3
KS2000 configuration software and KS2000
cable
PC with network
BootP server
Default
Byte Default value (hex) Default value (dec)
1 0xAC 172
2 0x10 16
3 0x11 17
4 (DIP switch) (0 to 255
dec
dec
dec
dec
)
Sample
Fig.7: DIP switch
Switch no. 1 2 3 4 5 6 7 8 9 10
Valence 1 2 4 8 16 32 64 128 - -
In this example ON OFF OFF ON OFF OFF ON ON OFF OFF
Value 1 0 0 8 0 0 64 128 - - Total=201
Software reset
A software reset is required to save changes in the Bus Coupler tables. A hardware reset (power
on/off) is not sufficient!
BK9055 and BK9105 23Version: 2.0.0
Page 24

Parametrization and commissioning
4.4.2 Address Configuration via ARP
An easy method of modifying the IP address is to set the address using the DOS window. It is, however, only
possible to alter addresses within the same network class. The new IP address that has been set remains
stored even after the Bus Coupler has been switched off.
Procedure
• Set DIP switches 9 and 10 to OFF. DIP switches 1-8 then no longer have any address function.
• Open a DOS box on your PC.
• Enter the command "ping <OLD IP address>" to create an entry in the ARP table.
• Read the table with the command "ARP -a".
• Enter "ARP -d <OLD IP address>" to remove the Bus Coupler from the table.
• Use "ARP -s <NEW IP address> <MAC-ID> [}30]" to make an entry manually.
• With "ping -l 123 <NEW IP address>" the new IP address becomes valid.
A short flash from the ERROR LED at the moment of switching on indicates that the Bus Coupler is being
addressed by ARP, and that DIP switches 1-8 give no indication of the address that is set.
Changing the IP address
When the IP address is changed, all the dynamic ARP entries should be cleared. To change the IP
address it is one ping with the length of 123 bytes is permitted for reconfiguration of the IP address
(<ping -l "IP address>) necessary.
Example
1. C:>ping 172.16.17.255
2. C:>arp -a
172.16.17.25500-01-05-00-11-22
3. C:>arp -d 172.16.17.255
4. C:>arp -s 172.16.44.44 00-01-05-00-11-22
5. C:>ping -l 123 172.16.44.44
BK9055 and BK910524 Version: 2.0.0
Page 25

Parametrization and commissioning
4.4.3 Address configuration via BootP server
4.4.3.1 Addressing via Beckhoff BootP Server
BootP Server
Disable all other Ethernet adapter in your “network connections” before you start the BootP Server.
You have then only one Ethernet adapter which you can use for BootP.
Connecting to the BootP Server
BootP server: ftp://ftp.beckhoff.de/software/TwinCAT/TwinCAT2/Unsupported_Utilities/TcBootP_Server/
How to use the BootP server
Use the BootP server with the BK9105 in one of two ways:
1. Statically store an IP address by switching all the dip switches 1-9 to the on position
Fig.8: Beckhoff BootP Server - DIP switch settings for statically stored IP address
When choosing this mode, power cycling the BK9105 with the dip switches set to ON 1-9 will keep the IP
address set by the BootP server. The BootP server does not need to be present after this point.
2. Dynamically set an IP address that is assigned by the BootP by turning on only dip switch 9
Fig.9: Beckhoff BootP Server - DIP switch settings for dynamically set IP address
Be sure to configure the BootP server with the Mac ID of the BK9105 and the desired IP address.
BK9055 and BK9105 25Version: 2.0.0
Page 26

Parametrization and commissioning
Fig.10: Beckhoff BootP server configuration - Start
Then, start the server and reboot the BK9105. After a connection and an IP address are established, the
following time stamp appears:
BK9055 and BK910526 Version: 2.0.0
Page 27

Parametrization and commissioning
Fig.11: Beckhoff BootP server configuration - Time Stamp
Regard dip switch 9 for dynamically set IP address
It is not possible to change dip switches 1 to 9 for a static IP address. They must remain on. If using
the BootP server to assign the address every time the BK9105 is powered on, make sure dip switch
9 is on.
4.4.3.2 Addressing via Rockwell BOOTP/DHCP Server 2.3
IP address save modes
DIP switches 1 to 8 in the ON position
The address assigned by the BootP server is stored, and the BootP service will not be restarted after the
next cold start.
The address can be cleared again by reactivating the manufacturers' settings (using the KS2000 software or
with the DIP switch and end terminal [}27]).
DIP switches 1 to 8 in the OFF position
The IP address assigned by the BootP server is only valid until the Bus Coupler is switched off. The BootP
server must assign a new IP address to the Bus Coupler at the next cold start.
The address is, however, retained through a software reset of the Bus Coupler
Switch the DIP Switch 1 to 8 ON or OFF and DIP 9-10 ON.
BK9055 and BK9105 27Version: 2.0.0
Page 28

Parametrization and commissioning
Take note that the dip switches 1 to 8 no longer hold any addressing capabilities.
The MAC Address begins with 00-01-05-xx-xx-xx (see under the BK9105 to find the MAC address).
Fig.12: Rockwell BOOTP/DHCP Server 2.3 - MAC address
After a successful addressing you can disable the BOOTP addressing.
BK9055 and BK910528 Version: 2.0.0
Page 29

Parametrization and commissioning
Fig.13: Rockwell BOOTP/DHCP Server 2.3 - successful addressing
4.4.4 Setting the address using a DHCP server
To set the address by means of a DHCP server, set DIP switch 9 to OFF (0) and DIP switch 10 to ON (1).
In this state the DHCP service is switched on, and the Bus Coupler is assigned an IP address by the DHCP
server.
The DHCP server must know the MAC ID of the Bus Coupler and should assign the same IP address to this
MAC ID on each startup.
The TCP/IP error LED flashes while the address is being allocated.
4.4.5 Subnet mask
The subnet mask is subject to the control of the network administrator, and specifies the structure of the
subnet.
Small networks without a router do not require a subnet mask. The same is true if you do not use registered
IP numbers. A subnet mask can be used to subdivide the network with the aid of the mask instead of using a
large number of network numbers.
The subnet mask is a 32-bit number:
• Ones in the mask indicate the subnet part of an address space.
• Zeros indicate that part of the address space which is available for the host IDs.
BK9055 and BK9105 29Version: 2.0.0
Page 30

Parametrization and commissioning
Description Binary representation Decimal representation
IP address 10101100.00010000.00010001.11001000 172.16.17.200
Subnet mask 11111111.11111111.00010100.00000000 255.255.20.0
Network ID 10101100.00010000.00010000.00000000 172.16.16.0
Host ID 00000000.00000000.00000001.11001000 0.0.1.200
Standard subnet mask
Address class Standard subnet mask (decimal) Standard subnet mask (hex)
A 255.0.0.0 FF.00.00.00
B 255.255.0.0 FF.FF.00.00
C 255.255.255.0 FF.FF.FF.00
Subnets and host number
Neither subnet 0 nor the subnet consisting only of ones may be used. Neither host number 0 nor
the host number consisting only of ones may be used!
If the IP address is set using the KS2000 configuration software, it is necessary for the subnet mask
also to be changed with the KS2000 configuration software.
If ARP addressing is used, the associated standard subnet mask, based on the IP address, is entered.
Under BootP or DHCP the subnet mask is transmitted also by the server.
4.4.6 Testing the IP address
To test the IP address you can use the Ping command in a Windows prompt.
Fig.14: Testing the IP address using the Ping command
4.4.7 Reading the MAC-ID
Proceed as follows to read the MAC-ID.
• Change the IP address on your PC to 172.16.x.x and the Subnet mask to 255.255.0.0
The IP address when supplied by the manufacturer on the BC9000 and BK9000 is 172.16.17.255 (DIP
switches 1 to 8 are set to ON).
The IP address of the IP67 Fieldbus Boxes are set to 172.16.18.(rotary switch setting).
• Start the DOS Window
• Send a Ping to IP address 172.16.17.xxx
• Read the MAC-ID with arp -a.
BK9055 and BK910530 Version: 2.0.0
Page 31

Parametrization and commissioning
4.5 Configuration
4.5.1 Mapping
Type: ETHERNET-MODULE Generic Ethernet Module
Comm Format: SINT, INT or DINT
Assembly Instance:
• Input: 101Size: 4 x SINT (BYTE) + terminals (2 x INT + terminals or 1 x DINT + terminals)
• Output: 102Size: 4 x SINT (BYTE) + terminals (2 x INT + terminals or 1 x DINT + terminals)
• Configuration: 100Size 0
Mapping rules
Complex terminals* (see documentation terminals)
• Word Alignment
• complex mapping
Comm Format: SINT
Offset Inputs Outputs
0 Status Byte0 Control Byte0
1 Status Byte1 Control Byte1
2 Status Byte2 Control Byte2
3 Status Byte3 Control Byte3
4...x complex terminals* complex terminals*
x...y digital terminals** digital terminals**
*) complex terminals, example KL15xx, KL25xx, KL3xxx, Kl4xxx, KL5xxx, KL6xxx, KL8xxx
**) digital terminals, example KL1xxx, KL2xxx, KM1xxx, KM2xxx
Comm Format: INT
Offset Inputs Outputs
0 Status Word0 Control Word0
1 Status Word1 Control Word1
2...x complex terminals* complex terminals*
x...y digital terminals** digital terminals**
*) complex terminals, example KL15xx, KL25xx, KL3xxx, Kl4xxx, KL5xxx, KL6xxx, KL8xxx
**) digital terminals, example KL1xxx, KL2xxx, KM1xxx, KM2xxx
Comm Format: DINT
Offset Inputs Outputs
0 Status DWord 0 Control DWord 0
1...x complex terminals* complex terminals*
x...y digital terminals** digital terminals**
*) complex terminals, example KL15xx, KL25xx, KL3xxx, Kl4xxx, KL5xxx, KL6xxx, KL8xxx
**) digital terminals, example KL1xxx, KL2xxx, KM1xxx, KM2xxx
BK9055 and BK9105 31Version: 2.0.0
Page 32

Parametrization and commissioning
Mapping terminals
Example 1: (only digital terminals)
Comm Format INT
Size: 3 x Input, 3 x Output
1 x BK9105
2 x KL1002
2 x KL2012
1 x KL9010
Offset Name Inputs Outputs
0 Control/Status Word 0 DeviceName:I.data[0] DeviceName:O.data[0]
1 Control/Status Word 1 DeviceName:I.data[1] DeviceName:O.data[1]
2 digital terminals DeviceName:I.data[2]
(Bit 0..3, 4..15 unused)
Example 2:
Comm Format INT
Size: 7 x Input, 7 x Output
1 x BK9105
1 x KL1408
2 x KL2012
1 x KL3312
1 x KL9010
DeviceName:O.data[2]
(Bit 0..3, 4..15 unused)
Offset Name Inputs Outputs
0 Control/Status Word 0 DeviceName:I.data[0] DeviceName:O.data[0]
1 Control/Status Word 1 DeviceName:I.data[1] DeviceName:O.data[1]
2 KL3312 Channel 0
Control/Status
3 KL3312 Channel 0 DeviceName:I.data[3] (Bit 0..15) DeviceName:O.data[3] (Bit 0..15)
4 KL3312 Channel 1
Control/Status
5 KL3312 Channel 1 DeviceName:I.data[5] (Bit 0..15) DeviceName:O.data[5] (Bit 0..15)
6 digital terminals DeviceName:I.data[6]
BK9105 Control and Status
Status Bits 0 to 31
0 1 2* 3* 4 5 6 7 8 to 15* 16 to 23 24 to 31
K1 - L1 L2 - - - - K-Bus Counter K-Bus Error Code K-Bus Error argument
K1 - if K1 = TRUE, K-Bus error, Error Code bit 16-31 (see K-Bus Error LED [}50])
L1 or L2 active
* Firmware version B3 increment if a K-Bus cycle is ready
DeviceName:I.data[2]
(Bit 0..7, 8..15 unused)
DeviceName:I.data[4]
(Bit 0..7, 8..15 unused)
(Bit 0..7, 8..15 unused)
DeviceName:O.data[2]
(Bit 0..7, 8..15 unused)
DeviceName:O.data[4]
(Bit 0..7, 8..15 unused)
DeviceName:O.data[6]
(Bit 0..3, 4..15 unused)
Control Bits 0 to 31
0 1 2* 3* 4 5 6 7 8 9 10 11 12 13 14 15 16 to 23 24 to 31
K1 R1 L1 L2 - - - - - - - - - - - - - -
K1 - 0->1 rising Trig K-Bus Reset
R1 - 1->0 falling Trig Reboot BK9105
L1 - 1-> Outputs are frozen
L2 - 1-> Leave K-Bus Cycle, if L1 and L2 TRUE then is only L2 active
*) Firmware version B3 necessary
BK9055 and BK910532 Version: 2.0.0
Page 33

Parametrization and commissioning
4.5.2 EthernetIP Tag Wizard
Mapping
The BK9105 can be mapped as short integer (byte), integer (word), or double integer (double word).
In the following description it is mapped as double integer!
Installation
• Download the file EIPTOOL.zip from this CHM-File click on the following Link (https://
infosys.beckhoff.com/content/1033/bk9055_bk9105/Resources/zip/4524990475.zip)
• Extract all the contained files from the ZIP file into a folder (e.g. BK9105helper) on your PC
• Start the EtherNetIPConfigTool.exe
Overview
This application note covers how to use the EthernetIP Tag Wizard. After reading this note you will be able to
build a rack of Beckhoff IO and automatically import it into RSLogix 5000. Not only will the nodes be
automatically created, but the IO will have an exact description in the IO map.
Supporting Documents and References
Put link to BK9105 here, as well as the link to the EIP tool.
Key Concepts
With this tool a user will be able to create the Beckhoff IO Rack, save the IO mapping configuration and
Import that configuration into RSLogix 5000. RSLogix 5000 does not need to be installed on the PC you
have the Tag Wizard on, however it will be convenient.
Procedure
To get started we have to have an RSLogix configuration with a minimum of a processor and Ethernet IP
Master. If you are simply adding a rack to an existing configuration, this process will be the same.
BK9055 and BK9105 33Version: 2.0.0
Page 34

Parametrization and commissioning
Fig.15: EthernetIP Tag Wizard
All one has to do is simply save this configuration as an .L5K file to the desired location. In this example, all
files are saved to the root directory of the Tag Wizard.
BK9055 and BK910534 Version: 2.0.0
Page 35

Parametrization and commissioning
Fig.16: EthernetIP Tag Wizard - Save as type
Once the RSLogix 5000 configuration is saved please minimize and open up the folder where the tag wizard
is stored. In this folder you will find a couple reference files. The EthernetIPMaster.txt is very important. This
is a text file that stores the name that Rockwell gives its scanners. If your scanner is NOT in the list, please
feel free to add it. It is VERY important that the scanner is added just as it appers in your .L5K file.
Fig.17: EthernetIP Tag Wizard - EthernetIPMaster.txt
At this point all one has to do is double click on EtherNetIPConfigTool.exe and it will open. Once open, add
your BK9105 or IL230x-B905 to the configuration.
BK9055 and BK9105 35Version: 2.0.0
Page 36

Parametrization and commissioning
Fig.18: EthernetIP Tag Wizard - EtherNetIPConfigTool
When adding your coupler you will be prompted to enter the correct IP address.
Fig.19: EthernetIP Tag Wizard - Enter IP address
If you select the Field Bus Box IL230X-B905 you will be prompted additionally with the following.
Fig.20: EthernetIP Tag Wizard - Automatic adding Local IO
The software automatically is adding the 230x combo box to your configuration.
At this point you simply add the IO to your configuration in the order that they are left to right on the coupler,
by simply double clicking on the correct terminal.
BK9055 and BK910536 Version: 2.0.0
Page 37

Parametrization and commissioning
Fig.21: EthernetIP Tag Wizard - Adding the IO to cour configuration
Once you have all the IO added in the correct order, you have a couple different selections as to how to save
review or export this data. To review, all one has to do is simply select the coupler you want to review and
then Report>Coupler (Or network [If network is selected only the first coupler will show graphically but the
mapping below is correct])
Fig.22: EthernetIP Tag Wizard - selections
BK9055 and BK9105 37Version: 2.0.0
Page 38

Parametrization and commissioning
Fig.23: EthernetIP Tag Wizard - Mapping
All one has to do at this point to save or export the data is File>Save XML (this saves the configuration to a
XML file, File>Save Network Report (saves so as you can print it for machine documentation)
Save>Configuration (If you want to add to this configuration in the future) and File>Save To L5K file.
Fig.24: EthernetIP Tag Wizard - Save To L5K file
When saving to a L5K file you are prompted to select the correct Ethernet IP master (This list is read from
the text file mentioned earlier).
BK9055 and BK910538 Version: 2.0.0
Page 39

Fig.25: EthernetIP Tag Wizard - choose the correct Ethernet IP master
Parametrization and commissioning
Fig.26: EthernetIP Tag Wizard select the correct Ethernet IP master
Once we have the master selected, then choose OK.
Next you will be prompted to select the correct path to the stored .L5K file, and select Open. Once opened
you will notice an AB.L5K file in the same directory you saved the original L5K file.
Fig.27: EthernetIP Tag Wizard - select the correct path to the stored .L5K file
BK9055 and BK9105 39Version: 2.0.0
Page 40

Parametrization and commissioning
Fig.28: EthernetIP Tag Wizard - ABL5k.L5K
Go back to RSLogix 5000, File>Open>
Fig.29: EthernetIP Tag Wizard - open the L5K file
Select the NEW .L5K file then Import
BK9055 and BK910540 Version: 2.0.0
Page 41

Parametrization and commissioning
Fig.30: EthernetIP Tag Wizard - Safe the Imported Project
Now to check out all of the new IO
BK9055 and BK9105 41Version: 2.0.0
Page 42

Parametrization and commissioning
Fig.31: EthernetIP Tag Wizard - check out all of the new IO
Please note to look in the Controller tags for not only did the software create new module defined tags, it
labeled them accordingly in the Logical order, NOT the physical order.
BK9055 and BK910542 Version: 2.0.0
Page 43

Parametrization and commissioning
Fig.32: EthernetIP Tag Wizard - Controller tags
Coupler Status and Coupler Control
After the import is successful, please see that the Coupler Status and Coupler Control is described
at the bit level. Also the status and control for each complex channel is defined with the HBYTE>Empty LBYTE Status or Ctrl as the upper byte is padded.
BK9055 and BK9105 43Version: 2.0.0
Page 44

Parametrization and commissioning
4.5.3 Export to Rockwell
Create a master Ethernet IP (limitation only master, not Multimaster support)
Fig.33: Export to Rockwell - Create a master Ethernet IP
Save as the project as .L5k format
Fig.34: Export to Rockwell - Save as the project as .L5k format, step 1
BK9055 and BK910544 Version: 2.0.0
Page 45

Parametrization and commissioning
Fig.35: Export to Rockwell - Save as the project as .L5k format, step 2
Create the project with the configurator and export with the push button AB CSV
Fig.36: Export to Rockwell - export with the push button AB CSV
Select the file L5k, which you have generated
BK9055 and BK9105 45Version: 2.0.0
Page 46

Parametrization and commissioning
Fig.37: Export to Rockwell - Select the created file L5k
Open AB's tool, and select open
Fig.38: Export to Rockwell - open the ABL5K.L5K
Select the file ABL5K.L5K (fixed name!)
BK9055 and BK910546 Version: 2.0.0
Page 47

Parametrization and commissioning
Fig.39: Export to Rockwell - Select the file ABL5K.L5K
Save the project as ACD
Fig.40: Export to Rockwell - Save the project as ACD
Read the import configuration, with the comments
BK9055 and BK9105 47Version: 2.0.0
Page 48

Parametrization and commissioning
Fig.41: Export to Rockwell - Read the import configuration
BK9055 and BK910548 Version: 2.0.0
Page 49

Parametrization and commissioning
Fig.42: Export to Rockwell - Read the import configuration with comments
BK9055 and BK9105 49Version: 2.0.0
Page 50

Error handling and diagnosis
5 Error handling and diagnosis
5.1 Diagnostic LEDs
After switching on, the Bus Coupler immediately checks the connected configuration. Error-free start-up is
indicated when the red I/O ERR LED goes out. If the I/O ERR LED blinks, an error in the area of the
terminals is indicated. The error code can be determined from the frequency and number of blinks. This
permits rapid rectification of the error.
The Bus Coupler has two groups of LEDs for the display of status. The upper group with four LEDs indicates
the status of the respective fieldbus. The significance of the fieldbus status LEDs is explained in the
appropriate sections of this manual. It corresponds to the usual fieldbus display.
On the upper right hand side of the Bus Couplers are two more green LEDs that indicate the supply voltage.
The left hand LED indicates the presence of the 24V supply for the Bus Coupler. The right hand LED
indicates the presence of the supply to the power contacts.
Fig.43: BK9105 Diagnostic LEDs
BK9055 and BK910550 Version: 2.0.0
Page 51

Fig.44: BK9055, BK9105 - LEDs
Error handling and diagnosis
LEDs for power supply diagnosis
LED Meaning
LED Us off The power supply voltage Us is not present
on The power supply voltage Us is present
LED Up off The power supply voltage Up (for Power Contacts) is not present
on The power supply voltage Up (for Power Contacts) is present
LEDs at RJ45
LED Meaning
LED Link/Act off No physical connection present
on Physical connection present
flashes Communication available
LED 10/100 Mbit/s
(BK9105 only)
off 10 Mbit/s (if LED Link/Act is shining or flashing)
on 100 Mbit/s
BK9055 and BK9105 51Version: 2.0.0
Page 52

Error handling and diagnosis
LEDs for fieldbus diagnosis
EtherNet/IP Diagnosis EIP E (red) EIP R (green) DIAG E (red) DIAG R (green)
IP Address OK off 0,5s x x
No IP Address (Dip Switch 8,9 -> on) off off x x
Online off on x x
Offline PLC Stop off 0,1s x x
TimeOut 0,5s off x x
IP Address conflict on off x x
Configuration Diagnosis EIP E (red) EIP R (green) DIAG E (red) DIAG R (green)
OK x x off on
In data too less x x Flashing* 1
In data too big x x Flashing* 2
Out data too less x x Flashing* 3
Out data too big x x Flashing* 4
Wrong Assembly Instance x x Flashing* 5
Second Master x x Flashing* 6
*) Bytes are too less (missing) or to big
X: The status of the LED is not relevant for this diagnosis.
Example:
Data Length In too big 5Bytes…
• Start Error Code: Red LED is quickly flashing, green LED is Off
• Red LED is ON, green LED show you the Error Code flashing 2 times (1 Sec)
• Red LED OFF, green LED off
• Red LED flashing 5 times (1 Sec), error argument, green LED off
Fig.45: Example for Error Code and Error Argument
BK9055 and BK910552 Version: 2.0.0
Page 53

LEDs for K-Bus diagnosis
Error handling and diagnosis
Error code Error
Argument
Persistent,
continuous
blinking
1 pulse 0 EEPROM checksum error Set manufacturer’s setting with the KS2000
1 Code buffer overflow Insert fewer Bus Terminals. The programmed
2 Unknown data type Software update required for the Bus Coupler
2 pulses 0 Programmed configuration has
n (n > 0) Table comparison (Bus
3 pulses 0 K-Bus command error • No Bus Terminal inserted
4 pulses 0 K-Bus data error, break behind
n Break behind Bus Terminal n Check whether the Bus End Terminal KL9010 is
5 pulses n K-Bus error in register
6 pulses 0 Error at initialization Exchange Bus Coupler
1 Internal data error Perform a hardware reset on the Bus Coupler
2 DIP switch changed after a
4 DIP switch incorrect for BootP
8 Internal data error Perform a hardware reset on the Bus Coupler
16 Error in IP socket Perform a hardware reset on the Bus Coupler
14 pulses n nth Bus Terminal has the wrong
15 pulses n Number of Bus Terminals is no
16 pulses n Length of the K-Bus data is no
Description Remedy
EMC problems • Check power supply for overvoltage or
undervoltage peaks
• Implement EMC measures
• If a K-Bus error is present, it can be localized by
a restart of the coupler (by switching it off and
then on again)
configuration software
configuration has too many entries in the table
Check programmed configuration for correctness
an incorrect table entry
Incorrect table entry
Terminal n)
• One of the Bus Terminals is defective; halve the
number of Bus Terminals attached and check
whether the error is still present with the
remaining Bus Terminals. Repeat until the
defective Bus Terminal is located.
Check whether the n+1 Bus Terminal is correctly
the Bus Coupler
communication with Bus
Terminal n
software reset
format
longer correct
longer correct
connected; replace if necessary.
connected.
Exchange the nth bus terminal
(switch off and on again)
Perform a hardware reset on the Bus Coupler
(switch off and on again)
Set 1-8 to on or off, see BootP [}25]
(switch off and on again)
(switch off and on again)
Start the Bus Coupler again, and if the error
occurs again then exchange the Bus Terminal
Start the Bus Coupler again. If the error occurs
again, restore the manufacturers setting using the
KS2000 configuration software
Start the Bus Coupler again. If the error occurs
again, restore the manufacturers setting using the
KS2000 configuration software
BK9055 and BK9105 53Version: 2.0.0
Page 54

Appendix
6 Appendix
6.1 First Steps
Mapping
The BK9105 can be mapped as short integer (byte), integer (word), or double integer (double word).
In the following description it is mapped as double integer!
Addressing with the BOOTP/DHCP Server 2.3
Switch the DIP Switch 1 to 8 OFF and DIP 9 to 10 ON.
The MAC Address begins with 00-01-05-xx-xx-xx (see under the BK9105, here you find the MAC address).
Fig.46: First Steps - Addressing - Step 1
After a successful addressing you can disable the BOOTP addressing.
BK9055 and BK910554 Version: 2.0.0
Page 55

Appendix
Fig.47: First Steps - Addressing - Step 2
Open RSLogix 5000 and create a new PLC project
When creating a new project make sure to select the correct controller type and controller settings. In this
example we are using a SoftLogix Virtual Chasis, with the BK9105 (Beckhoff EthernetIP Bus coupler)
Fig.48: First Steps - Create a new PLC project
BK9055 and BK9105 55Version: 2.0.0
Page 56

Appendix
Add Ethernet IP Module
Now you need to add your main communications module. Make sure you know the IP address of the card
that is setup as the EtherNet IP card, that address will have to be set in the module settings along with the
slot the card is in.
Fig.49: First Steps - Add Ethernet IP Module
Add Ethernet IP Box
When adding the BK9105 box you must select the "ETHERNET-MODULE" as it is a generic Ethernet/IP
device and we will configure it to work with our BK9105.
Fig.50: First Steps - Add Ethernet IP Box
Configuring the BK9105 in RSLogix
For the example here we used two KL1012 terminals and two KL2032. With these cards that gave us 2
words total of input and output data. On the properties dialog you will need to change some of the box
settings, please read below for recommendations on settings.
BK9055 and BK910556 Version: 2.0.0
Page 57

• IP Address (Refer to IP Address section of documentation)
• The Assembly Instances will be as follows
◦ Input: 101
◦ Output: 102
◦ Configuration: 100
• Things to keep in mind when entering the data size for I/O
◦ There will always be 4bytes of input and 4bytes of output data that is used for
◦ Digital IO each channel will consume 1bit of process data.
◦ Complex IO please refer to terminal documentation for consumed data size.
Appendix
Fig.51: First Steps - Configure the BK9105 in RSLogix
Working with IO data
Download the code to the controller unit, once you go online you will be able to toggle IO. Keep in mind that
the first DINT is the Status for both the input and output data. At this point if you have the controller in RUN
mode you will be able to toggle inputs and see the value in "bk9105:I.Data[1]" change and you should be
able to update the values in "bk9105:O.Data[1]" and see the outputs change.
Fig.52: First Steps - Work with IO data
BK9055 and BK9105 57Version: 2.0.0
Page 58

Appendix
6.2 First Steps - Example
Mapping
The BK9105 can be mapped as short integer (byte), integer (word), or double integer (double word).
In the following description it is mapped as double integer!
Process Image
The figure below illustrates the hardware of the Beckhoff node in this example.
The process image table (I/O map) is displayed in double word format below the figure.
In order to properly configure the Ethernet Bridge, the process image of the Beckhoff BK9105 node must be
determined. When the coupler is powered up, it automatically addresses the I/O modules of the node. The
data for complex modules (modules using 2 or more bytes) are mapped first in the process image in the
order of their physical position after the coupler. As such, they start at Double word 3. Following this, the
digital modules are grouped into the next available Integer. The bits are arranged in the order of the modules
location. When the number of digital points exceeds 32 (1-double integer), the coupler automatically starts
the next Double Integer.
Note: The modules can be mapped as Byte, Word, or Double Word. The example below maps them as
Double Word, using 2 digital input cards (KL1104, KL1408), 2 digital output cards (KL2134, KL2408), 1 four
channel analog input card (KL3064), 1 two channel analog output card (KL4002), and 1 High speed counter
card (KL5101).
Fig.53: Example of a Bus Terminal Block
Input Process Image
• Double Word0: BK9105 Status
• Double Word1: Channel1 KL3064 (High Word) and Status (Low Word)
BK9055 and BK910558 Version: 2.0.0
Page 59

Appendix
• Double Word2: Channel2 KL3064 (High Word) and Status (Low Word)
• Double Word3: Channel3 KL3064 (High Word) and Status (Low Word)
• Double Word4: Channel4 KL3064 (High Word) and Status (Low Word)
• Double Word5: Channel1 KL4002 (High Word) and Status (Low Word)
• Double Word6: Channel2 KL4002 (High Word) and Status (Low Word)
• Double Word7: Data In(0) (High Word) and Status (Low Word)
• Double Word8: KL1104 bit 16-19, KL14008 bit 20-27 the remainder bits are not used (High Word) and
Data In (1) KL1501(Low Word)
Output Process Image
• Double Word0: BK9105 Control
• Double Word1: Channel1 KL3064 (High Word) and Status (Low Word)
• Double Word2: Channel2 KL3064 (High Word) and Status (Low Word)
• Double Word3: Channel3 KL3064 (High Word) and Status (Low Word)
• Double Word4: Channel4 KL3064 (High Word) and Status (Low Word)
• Double Word5: Channel1 KL4002 (High Word) and Status (Low Word)
• Double Word6: Channel2 KL4002 (High Word) and Status (Low Word)
• Double Word7: Data Out (0) (High Word) and Status (Low Word)
• Double Word8: KL1104 bit 16-19, KL14008 bit 20-27 the remainder bits are not used (High Word) and
Data (1) KL1501(Low Word)
Fig.54: Ethernet Module Sample
BK9055 and BK9105 59Version: 2.0.0
Page 60

Appendix
This is what the Controller Tags should look like. The graphic below illustrates exactly where one would look
to find the Data In (1) KL1501 as well as the third digital output, KL2134 channel3.
Fig.55: KL1501's Data In
BK9055 and BK910560 Version: 2.0.0
Page 61

Appendix
Fig.56: Single bit value of KL2134, channel 3
Open RSLogix 5000 and create a new PLC project
When creating a new project make sure to select the correct controller type and controller settings. This
example uses a SoftLogix Virtual Chasis, with the BK9105 (Beckhoff EthernetIP Bus coupler).
BK9055 and BK9105 61Version: 2.0.0
Page 62

Appendix
Fig.57: Example - Create a new PLC project
Add an Ethernet IP Module
Add the main communications module. Be sure to know the IP address of the card that is setup as the
Ethernet IP card. That address will have to be set in the module settings along with the slot the card is in.
Fig.58: Example - Add an Ethernet IP Module
Add an Ethernet IP Box
When adding the BK9105 box, select the "ETHERNET-MODULE", since it is a generic Ethernet/IP device,
and it will be configured to work with the BK9105.
BK9055 and BK910562 Version: 2.0.0
Page 63

Fig.59: Example - Add an Ethernet IP Box
Appendix
Configuring the BK9105 in RSLogix
The example uses two KL1012 terminals and two KL2032 terminals. These cards gave 2 total words of input
and output data. On the properties dialog, change some of the box settings. Please read the following for
recommendations on settings:
• IP Address (Refer to IP Address section of documentation)
• The Assembly Instances will be as follows:
◦ Input: 101
◦ Output: 102
◦ Configuration: 100
• Things to keep in mind when entering the data size for I/O:
◦ There will always be 4bytes of input and 4bytes of output data used.
◦ Digital IO: Each channel will consume 1bit of process data.
◦ Complex IO: Please refer to terminal documentation for consumed data size.
Fig.60: Example - Configure the BK9105 in RSLogix
BK9055 and BK9105 63Version: 2.0.0
Page 64

Appendix
Working with IO data
Download the code to the controller unit. Go online to toggle IO. Keep in mind that the first DINT is the
Status for both the input and output data. At this point, if the controller is in RUN mode, toggle inputs to see
the value in "bk9105:I.Data[1]" change. One should be able to update the values in "bk9105:O.Data[1]" and
see the outputs change.
Fig.61: Example - Work with IO data
6.3 General operating conditions
The following conditions must be met in order to ensure flawless operation of the fieldbus components.
Environmental conditions
Operation
The components may not be used without additional protection in the following locations:
• in difficult environments, such as where there are corrosive vapors or gases, or high dust levels
• in the presence of high levels of ionizing radiation
Condition Permissible range
Permissible ambient temperature during operation see technical data
Installation position variable
Vibration resistance According to EN60068-2-6
Shock resistance According to EN60068-2-27
EMC resistance According to EN61000-6-2
Emission According to EN61000-6-4
Transport and storage
Condition Permissible range
Permissible ambient temperature during storage -25°C... +85°C
Relative humidity 95 %, no condensation
Free fall up to 1 m in the original packaging
BK9055 and BK910564 Version: 2.0.0
Page 65

Appendix
Protection classes and types
Condition Permissible range
Protection class in accordance with IEC 536 (VDE
0106, Part 1)
A protective conductor connection to the mounting rail is
necessary!
Protection class conforms to IEC 529 IP20 (protection against contact with a standard test
finger)
Protection against foreign objects Less than 12mm in diameter
Protection against water no protection
Component identification
Every supplied component includes an adhesive label providing information about the product's approvals.
For example, on the BK2000:
Fig.62: Sticker with information about the BK2000 Bus Coupler certification
The following information is printed on the label:
Printed item Meaning for this label
Precise product
Lightbus Coupler BK2000
identification
Supply voltage 24 V
DC
Data transfer rate 2.5 Mbit/s
Manufacturer Beckhoff Automation GmbH
CE mark Conformity mark
UL mark Mark for UL approval. UL stands for the Underwriters Laboratories Inc., the
leading certification Organisation for North America, based in the USA.
C = Canada, US = USA, LISTED 22ZA (the test results can be inspected
under this entry)
Production identification From left to right, this sequence of characters indicates the week of production
(2 characters), the year of production (2 characters), the software version (2
characters) and hardware version (2 characters), along with any special
indications (4 characters).
This case therefore is a BK2000
- produced in the 9th calendar week
- in the year 2001
- containing the BF firmware version
- and using the 6th hardware version
- with no special indications
BK9055 and BK9105 65Version: 2.0.0
Page 66

Appendix
6.4 Test Standards for Device Testing
EMC
EN 61000-6-2
EN 61000-6-4
Vibration resistance
EN 60068-2-6 Vibration Testing
EN 60068-2-27/29 Shock Testing
6.5 Bibliography
TCP/IP
TCP/IP (English)
Illustrated, Volume1 The Protocols
by W. Richard Stevens
Publisher: ADDISON-WESLEY Longmann Verlag
TCP/IP (German)
Aufbau und Betrieb eines TCP/IP Netzes (Structure and Operation of a TCP/IP Network)
by Kevin Washburn and Jim Evans
Publisher: ADDISON-WESLEY Longmann Verlag
Modbus/TCP
http://www.modicon.com/
http://www.modbus.org
TwinCAT
Beckhoff Information System
http://infosys.beckhoff.com
6.6 List of Abbreviations
ADS
Automation Device Specification.
IP (20)
Bus Terminal protection class
IPC
Industrial PC
I/O
Inputs and outputs
BK9055 and BK910566 Version: 2.0.0
Page 67

Appendix
K-Bus
Terminal bus
KS2000
Configuration Software for Bus Terminals, Bus Coupler, Bus Terminal Controller, Fieldbus Box Modules and
so on
PE
The PE power contact can be used as a protective earth.
TwinCAT
The Windows Control and Automation Technology
6.7 Support and Service USA
Beckhoff USA offers comprehensive support and service, making available fast and competent assistance
with all questions related to Beckhoff products and system solutions.
• support
• design, programming and commissioning of complex automation systems
• and extensive training program for Beckhoff system components
Requirements
Hotline: +1 (952) 890 0000 or 1 877 TwinCAT
Fax: +1 (952) 890 2888
e-mail: support.usa@beckhoff.com
BK9055 and BK9105 67Version: 2.0.0
Page 68

Appendix
6.8 Support and Service
Beckhoff and their partners around the world offer comprehensive support and service, making available fast
and competent assistance with all questions related to Beckhoff products and system solutions.
Beckhoff's branch offices and representatives
Please contact your Beckhoff branch office or representative for local support and service on Beckhoff
products!
The addresses of Beckhoff's branch offices and representatives round the world can be found on her internet
pages:
http://www.beckhoff.com
You will also find further documentation for Beckhoff components there.
Beckhoff Headquarters
Beckhoff Automation GmbH & Co. KG
Huelshorstweg 20
33415 Verl
Germany
Phone: +49(0)5246/963-0
Fax: +49(0)5246/963-198
e-mail: info@beckhoff.com
Beckhoff Support
Support offers you comprehensive technical assistance, helping you not only with the application of
individual Beckhoff products, but also with other, wide-ranging services:
• support
• design, programming and commissioning of complex automation systems
• and extensive training program for Beckhoff system components
Hotline: +49(0)5246/963-157
Fax: +49(0)5246/963-9157
e-mail: support@beckhoff.com
Beckhoff Service
The Beckhoff Service Center supports you in all matters of after-sales service:
• on-site service
• repair service
• spare parts service
• hotline service
Hotline: +49(0)5246/963-460
Fax: +49(0)5246/963-479
e-mail: service@beckhoff.com
BK9055 and BK910568 Version: 2.0.0
Page 69

Table of figures
Table of figures
Fig. 1 BK9055 ........................................................................................................................................ 8
Fig. 2 BK9105 ........................................................................................................................................ 9
Fig. 3 Dimensions .................................................................................................................................. 14
Fig. 4 Electrical isolation ........................................................................................................................ 17
Fig. 5 Start-up behaviour of the Bus Coupler ........................................................................................ 21
Fig. 6 Network classes........................................................................................................................... 22
Fig. 7 DIP switch.................................................................................................................................... 23
Fig. 8 Beckhoff BootP Server - DIP switch settings for statically stored IP address.............................. 25
Fig. 9 Beckhoff BootP Server - DIP switch settings for dynamically set IP address.............................. 25
Fig. 10 Beckhoff BootP server configuration - Start................................................................................. 26
Fig. 11 Beckhoff BootP server configuration - Time Stamp..................................................................... 27
Fig. 12 Rockwell BOOTP/DHCP Server 2.3 - MAC address ................................................................... 28
Fig. 13 Rockwell BOOTP/DHCP Server 2.3 - successful addressing ..................................................... 29
Fig. 14 Testing the IP address using the Ping command ........................................................................ 30
Fig. 15 EthernetIP Tag Wizard ................................................................................................................ 34
Fig. 16 EthernetIP Tag Wizard - Save as type ........................................................................................ 35
Fig. 17 EthernetIP Tag Wizard - EthernetIPMaster.txt ............................................................................ 35
Fig. 18 EthernetIP Tag Wizard - EtherNetIPConfigTool .......................................................................... 36
Fig. 19 EthernetIP Tag Wizard - Enter IP address .................................................................................. 36
Fig. 20 EthernetIP Tag Wizard - Automatic adding Local IO ................................................................... 36
Fig. 21 EthernetIP Tag Wizard - Adding the IO to cour configuration...................................................... 37
Fig. 22 EthernetIP Tag Wizard - selections ............................................................................................. 37
Fig. 23 EthernetIP Tag Wizard - Mapping ............................................................................................... 38
Fig. 24 EthernetIP Tag Wizard - Save To L5K file................................................................................... 38
Fig. 25 EthernetIP Tag Wizard - choose the correct Ethernet IP master................................................. 39
Fig. 26 EthernetIP Tag Wizard select the correct Ethernet IP master ..................................................... 39
Fig. 27 EthernetIP Tag Wizard - select the correct path to the stored .L5K file....................................... 39
Fig. 28 EthernetIP Tag Wizard - ABL5k.L5K ........................................................................................... 40
Fig. 29 EthernetIP Tag Wizard - open the L5K file .................................................................................. 40
Fig. 30 EthernetIP Tag Wizard - Safe the Imported Project .................................................................... 41
Fig. 31 EthernetIP Tag Wizard - check out all of the new IO................................................................... 42
Fig. 32 EthernetIP Tag Wizard - Controller tags...................................................................................... 43
Fig. 33 Export to Rockwell - Create a master Ethernet IP ....................................................................... 44
Fig. 34 Export to Rockwell - Save as the project as .L5k format, step 1 ................................................. 44
Fig. 35 Export to Rockwell - Save as the project as .L5k format, step 2 ................................................. 45
Fig. 36 Export to Rockwell - export with the push button AB CSV .......................................................... 45
Fig. 37 Export to Rockwell - Select the created file L5k .......................................................................... 46
Fig. 38 Export to Rockwell - open the ABL5K.L5K .................................................................................. 46
Fig. 39 Export to Rockwell - Select the file ABL5K.L5K........................................................................... 47
Fig. 40 Export to Rockwell - Save the project as ACD ............................................................................ 47
Fig. 41 Export to Rockwell - Read the import configuration..................................................................... 48
Fig. 42 Export to Rockwell - Read the import configuration with comments............................................ 49
Fig. 43 BK9105 Diagnostic LEDs ............................................................................................................ 50
Fig. 44 BK9055, BK9105 - LEDs ............................................................................................................. 51
BK9055 and BK9105 69Version: 2.0.0
Page 70

Table of figures
Fig. 45 Example for Error Code and Error Argument .............................................................................. 52
Fig. 46 First Steps - Addressing - Step 1................................................................................................. 54
Fig. 47 First Steps - Addressing - Step 2................................................................................................. 55
Fig. 48 First Steps - Create a new PLC project ....................................................................................... 55
Fig. 49 First Steps - Add Ethernet IP Module .......................................................................................... 56
Fig. 50 First Steps - Add Ethernet IP Box................................................................................................ 56
Fig. 51 First Steps - Configure the BK9105 in RSLogix........................................................................... 57
Fig. 52 First Steps - Work with IO data.................................................................................................... 57
Fig. 53 Example of a Bus Terminal Block................................................................................................ 58
Fig. 54 Ethernet Module Sample ............................................................................................................. 59
Fig. 55 KL1501's Data In ......................................................................................................................... 60
Fig. 56 Single bit value of KL2134, channel 3 ......................................................................................... 61
Fig. 57 Example - Create a new PLC project .......................................................................................... 62
Fig. 58 Example - Add an Ethernet IP Module ........................................................................................ 62
Fig. 59 Example - Add an Ethernet IP Box .............................................................................................. 63
Fig. 60 Example - Configure the BK9105 in RSLogix.............................................................................. 63
Fig. 61 Example - Work with IO data ....................................................................................................... 64
Fig. 62 Sticker with information about the BK2000 Bus Coupler certification.......................................... 65
BK9055 and BK910570 Version: 2.0.0
 Loading...