


 Loading...
I N T R O D U C I N G B E O C O R D V 8 0 0 0 |
1 |
|
The BeoCord V 8000 videotape recorder features all the Bang &
Olufsen qualities: Excellent sound and picture qualities, and simple and straightforward operation.
The BeoCord V 8000 is designed to be used with BeoVision TVs constituting an elegant Bang & Olufsen Video system.
For complete operation of the BeoCord V 8000, use the Beo4 remote control.
The Beo4 remote control integrates remote operation of your BeoVision TV and your BeoCord V 8000 videotape recorder.
User’s Guide

2 |
A B O U T B E O C O R D V 8 0 0 0 |
|
Before you start…
Two user’s guides are enclosed with your BeoCord V 8000. A User’s guide which should be used, if V 8000 is combined with a BeoVision MX TV, and a User’s guide which should be used, if V 8000 is combined with a BeoVision MS TV. Choose the appropriate guide for your system setup. The enclosed Setting-up guide applies to all setups.
This User’s guide explains how to fine tune and preset your BeoCord V 8000 in a setup with an MS TV. It also explains how to operate the various sources and functions, using the Beo4 remote control. Complete operation of BeoCord V 8000 is also available via Beolink 1000.
We recommend that you (or your
Bang & Olufsen dealer) follow the instructions in the Setting-up guide when you set up your BeoCord V
8000. If you connect auxiliary equipment to your system, please refer to the Setting-up guide for instruction.
Apart from explaining how to make the system ready for use, the Settingup guide also includes maintenance instructions.
Note: If you combine your BeoCord V 8000 with the BeoVision 1 TV, please refer to the BeoVision 1 Reference book for information of
how to use V 8000 on a daily basis with the Beo1 remote control, and how to connect V 8000 to BeoVision 1. You can combine BeoCord V 8000 with Bang & Olufsen TVs other than the ones mentioned here, but please refer to the Settingup guide for further information.
C O N T E N T S |
3 |
|
|
|
|
4Using this guide
5Operating BeoCord V 8000
Beo4 remote operation, 5
BeoCord V 8000 close-up operation, 6 Using on-screen menus, 7
8Daily operations
Video playback, 8
10Tuning and presetting
Tuning in stations, 10
TV channel/frequency list, 12 Setting the clock, 13
Setting your options for V 8000, 14
16Recording
Timer recording, 16 Instant recording, 18
20Special video functions
Adjusting the video picture, 20 Selecting sound track, 21
Setting markers on your recordings, 22
23CamCorder
CamCorder playback and recording, 23
24On-screen status displays
26Beolink 1000 remote control
Operating V 8000 with Beolink 1000, 26
28 Overview of on-screen menus
4 |
U S I N G T H I S G U I D E |
|
T U N I N G
Lorem ipsum dolor sit amet.
Consec-tetuer adipiscing elit, sed diam.
Nonummy nibh euismod tincidunt
ut laoreet ...
Ut wisi enim ad dignissum qui.
Blandit praesent luptatum zril de
lenit augue duis dolore te ...
Nulla facillisi. Lorem ipsum dolor sit amet.
Consec-tetuer adipiscing elit, sed
diam feu-gait nulla facilisi...
Nam liber tempor cum soluta te nobis eleifend option.
Congue nihil imper-diet doming.
Wid sit quod mazim place-rat facer possim facilisi. Consectetuer adipiscing elit, sed diam nonummy nibh euismod tincidunt...
Duis dolore te feugait nulla facillisi. Lorem ipsum dolor sit amet, consectetuer adipiscing.
Tune in your TV stations
SETUP
TV
TV SETUP
AUTO TUNING
PROGRAM LIST
TV AUTO TUNING
FREQUENCY 210
Lorem ipsum dolor sit amet, consectetuer adipiscing elit, sed diam nonummy nibh euismod tincidunt ut laoreet dolore magna aliquam erat volupat.
Ut wisi enim ad dignissum qui blandit praesent luptatum zril de lenit augue duis dolore te feugait nulla facillisi.
Lorem ipsum dolor sit amet, consectetuer adipiscing elit, sed diam feugait nulla facilisi.
Nam liber tempor cum soluta te nobis eleifend option congue nihil imperdiet doming id sit quod mazim placerat facer possim facilisi.
Consectetuer adipiscing elit, sed diam nonummy nibh euismod tincidunt.
Duis dolore te feugait nulla facillisi. Lorem ipsum dolor sit amet, consectetuer adipiscing elit, sed diam feugait nulla facilisi. Nonummy nibh euismod tincidunt or sit amet, consectetuer adipiscing elit, sed diam feugait nulla fa.
Duis dolore te feugait nulla facillisi. Lorem ipsum dolor sit amet, consectetuer adipiscing elit, sed diam feugait nulla facilisi. Nonummy nibh euismod tincidunt or sit amet, consectetuer adipiscing elit, sed diam feugait nulla fa.
Tune in your ...
Lorem ipsum dolor sit amet, consectetuer adipiscing elit, sed diam nonummy nibh euismod tincidunt ut laoreet dolore magna aliquam erat volupat.
Ut wisi enim ad dignissum qui blandit praesent luptatum zril de lenit augue duis dolore te feugait nulla facillisi.
Lorem ipsum dolor sit amet, consectetuer adipiscing elit, sed diam feugait nulla facilisi.
Nam liber tempor cum soluta te nobis eleifend option congue nihil imperdiet doming id sit quod mazim placerat facer possim facilisi.
Consectetuer adipiscing elit, sed diam nonummy nibh euismod tincidunt.
Duis dolore te feugait nulla facillisi. Lorem ipsum dolor sit amet, consectetuer adipiscing elit, sed diam feugait nulla facilisi. Nonummy nibh euismod tincidunt or sit amet, consectetuer adipiscing elit, sed diam feugait nulla fa.
Duis dolore te feugait nulla facillisi. Lorem ipsum dolor sit amet, consectetuer adipiscing elit, sed diam feugait nulla facilisi. Nonummy nibh euismod tincidunt or sit amet, consectetuer adipiscing elit, sed diam feugait nulla fa.
SETUP
SAT
SAT SETUP
AUTO TUNING
PROGRAM LIST
SAT AUTO TUNING
FREQUENCY 11.374
Lorem ipsum dolor sit amet.
Consec-tetuer adipiscing elit, sed diam.
Nonummy nibh euismod tincidunt
ut laoreet ...
Ut wisi enim ad dignissum qui.
Blandit praesent luptatum zril de
lenit augue duis dolore te ...
Nulla facillisi. Lorem ipsum dolor sit amet.
Consec-tetuer adipiscing elit, sed
diam feu-gait nulla facilisi...
Nam liber tempor cum soluta te nobis eleifend option.
Congue nihil imper-diet doming.
Wid sit quod mazim place-rat facer possim facilisi. Consectetuer adipiscing elit, sed diam nonummy nibh euismod tincidunt...
Duis dolore te feugait nulla facillisi. Lorem ipsum dolor sit amet, consectetuer adipiscing.
a |
b |
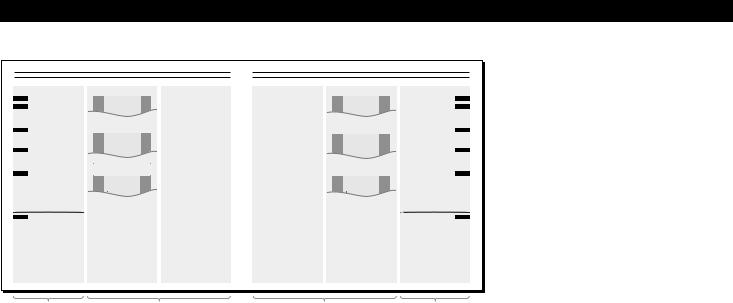
This illustration exemplifies the different types of information, presented in this guide.
The section, marked a, gives you a step-by-step instruction of the operation in question.
Section a includes:
•The buttons you must press to complete the operation. The buttons displayed correspond to the buttons on the Beo4 remote control.
•The captions which give you important information. The captions must be read in order to complete the operation successfully.
b |
a |
The section, marked b, supports the button sequence.
Section b includes:
•The relevant on-screen menus which you call up when you follow the step-by-step button instruction.
•A text which gives you an additional introduction to the operation in question, and provides you with examples of how you could benefit from using the function in question.

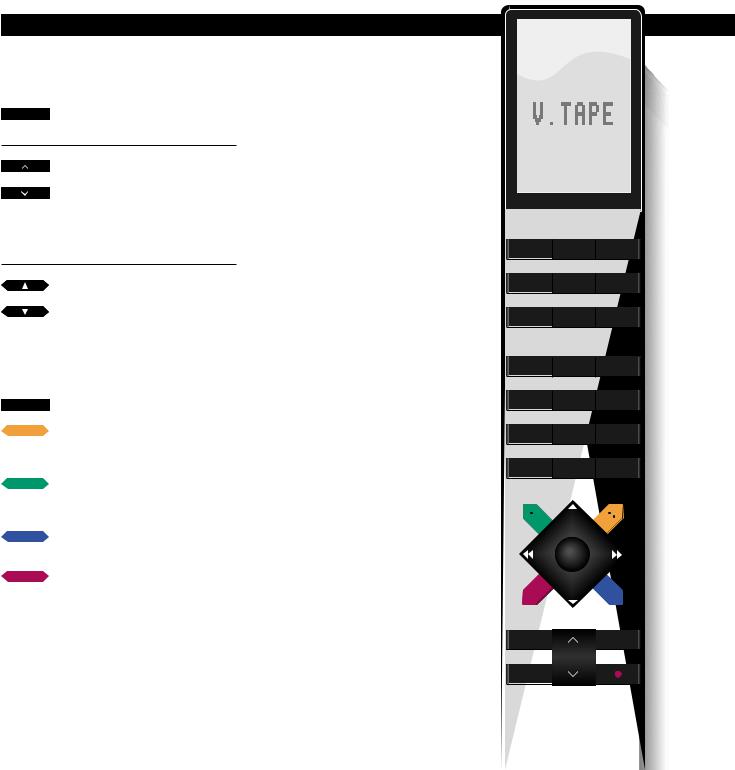
O P E R A T I N G B E O C O R D V 8 0 0 0
Remote operation with Beo4
The Beo4 remote control is the key to all the functions in your BeoCord V 8000 videotape recorder:
•Daily operations are carried out directly via the Beo4 remote control by pressing a single button, or by pressing a few buttons in a straightforward sequence.
•The more advanced functions are also carried out via Beo4, but operation of these functions is guided by the BeoCord's own onscreen menus.
The daily playback functions performed by the BeoCord V 8000 can also be operated via its close-up operation panel (see next page)…
The Beo4 remote control communicates with the BeoCord V 8000 via your Bang & Olufsen BeoVision MS TV.
Standby is indicated by a small red light in the BeoCord V 8000 display on the front of the BeoCord V 8000 when you connect it to the mains.
5
TV |
LIGHT |
RADIO |
SAT |
DVD |
CD |
V TAPE |
RECORD |
A TAPE |
7 |
8 |
9 |
4 |
5 |
6 |
1 |
2 |
3 |
TEXT |
0 |
MENU |
GO
LIST |
EXIT |
STOP |
|
The Beo4 remote control integrates remote operation of your Bang & Olufsen products
6 > Operating BeoCord V 8000
BeoCord V 8000 close-up operation
The five buttons on the front of the BeoCord V 8000 allow you to operate some of the functions available in the BeoCord V 8000…
Note: The Beo4 remote control is a requirement for complete operation of the BeoCord V 8000. Complete operation is, though, also available via a Beolink 1000 remote control, see pages 26-27 for further instruction.
EJECT
Unloads the videotape cassette you have loaded into the BeoCord V 8000.
ss
Press ss to fast rewind a videotape.
PLAY
Switches on the BeoCord V 8000 and starts playing the tape you have loaded.
tt
Press tt to fast forward a videotape.
●
Press briefly to stop playback or recording. Press for more than 3 seconds to switch the BeoCord V 8000 to standby.
TIMER RECORD PDC VPS
EJECT |
PLAY |
Loading a tape
Tapes must be loaded into the compartment just above the close-up operation panel.
Load the cassette so that the small arrow on top of the cassette is visible and points toward the compartment opening. Push the cassette through the door until you feel the mechanism drawing it all the way into the compartment.
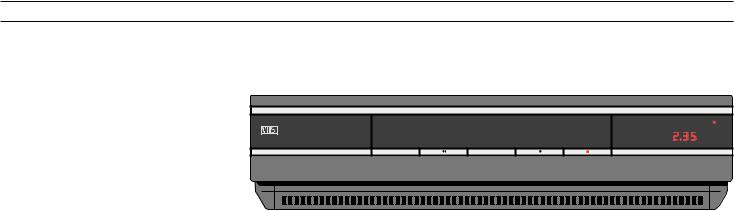
The Display…
TIMER… indicates that a Timer recording has been programmed into the V 8000. If a Timer recording is unable to be executed, it flashes on and off.
RECORD… indicates that a recording has started. When V 8000 is switched to recording pause, it flashes on and off.
PDC… Indicates that the PDC (Program Delivery Control) function is activated – may appear in connection with a Timer recording made via BeoCord’s own menu.
VPS… Indicates that the VPS (Video Programming System) function is activated – may appear in connection with a Timer recording made via BeoCord’s own menu.
● (Standby indicator)…
The red standby indicator appears in the display when the BeoCord V 8000 is switched to standby.
2.35… indicates the counter position on the tape: time used or time left (see pages 14-15 for further information).
During regular playback, winding and recording, the display indicates your current counter position on the tape. Track indication is also available.
Otherwise, the BeoCord V 8000 display acts as a status display and provides you with information about the operation or function currently in progress.
7
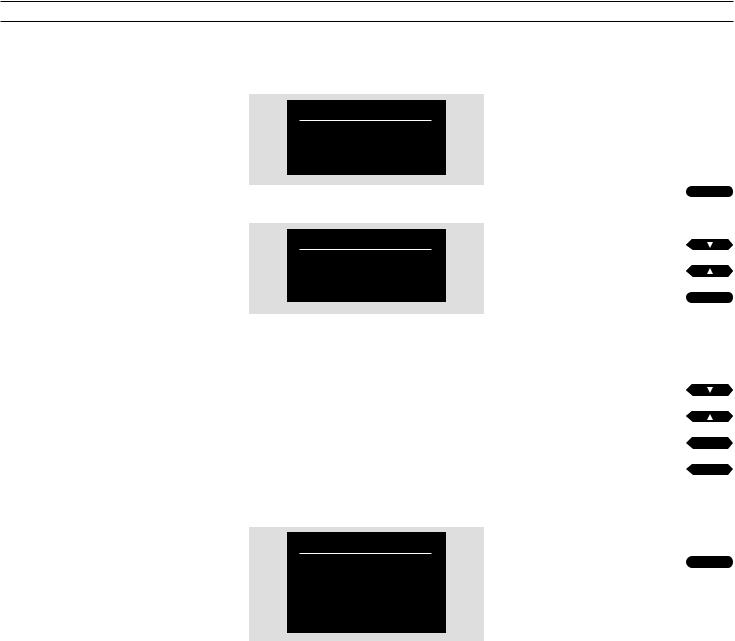
Using BeoCord V 8000 on-screen menus
Operation of the more advanced functions in the BeoCord V 8000 is guided by on-screen menus.
In order to call up the V 8000 main menu, you must first call up the main menu for V.TAPE which appears via your MS TV*. Now you can call up the V 8000 main menu.
The items in the V 8000 main menu gives access to other dedicated menus. Some of the menus, you call up, are menus, in which, you must fill in information.
In such fill-in menus, you move the cursor from item to item. For each item, information can be keyed in or you can browse through the options available for that particular item.
*Note: A main V.TAPE menu is not available on all MS TVs or on other TVs which you combine with V 8000. If this is the case, just press V.TAPE then MENU to call up the V 8000 main menu.
Menu
•V.Tape menu
•Sound
•Picture
The V.Tape main menu
MENU
TIMER RECORD
SETUP
CAMCORDER
Each item in the V 8000 main menu represents another menu/function:
TIMER RECORD… programming a Timer recording (see pages 16-17).
SETUP… Choose to set options for your BeoCord V 8000, adjust the picture, set markers on your recordings, fine tune, set the built-in clock, or tune in a link frequency.
CAMCORDER… Cuts in the signal from a CamCorder, connected to the V 8000 AUX socket. (See page 23)! See the Setting-up guide for further information about connecting auxiliary equipment.
CLOCK
TIME |
20:00 |
DATE |
MON 27 |
MONTH |
APRIL |
YEAR |
1998 |
TEXT |
OFF |
A fill-in menu – the menu for setting the clock
Press to switch on the videotape |
V TAPE |
recorder |
|
Press to call up the main menu for |
|
MENU |
|
V.Tape |
|
The V.Tape main menu appears… |
|
|
then |
Press to select V.Tape menu |
|
The V 8000 main menu appears… |
|
|
then |
Press to select the item you want |
|
|
or |
|
then |
Press to call up the menu |
GO |
The menu in question appears… |
|
|
|
In fill-in menus… |
|
Press to move from item to item in |
|
the menu |
or |
|
then |
Press to reveal the options available |
|
for an item |
or |
|
or |
Press to key in information |
|
|
|
|
through |
Enter the required information, then… |
|
|
|
|
|
Press to store |
GO |
|
or |
Press to leave the menu without |
|
STOP |
|
storing |
|
|
|
Press to leave the menus |
|
EXIT |
|
|
or |
Press e.g. TV |
|
TV |
8 |
D A I L Y O P E R A T I O N S |
|
V TAPE Press to start the videotape recorder – playback starts instantly
Press to raise the volume
or
Press to lower the volume
Press right on the middle to silence the TV speakers – press again to recall the sound
Press to play the next track
Press to play the current track from the beginning – press twice to play the previous track
or
2 |
Key in a specific position and play |
|
the tape from this position (time |
1 |
5used or time left), e.g. 2:15
:Press to cue forward through the tape
Press again to accelerate the speed
or
·Press to cue backwards through the tape
Press again to accelerate the speed
|
Press to play the tape in slow |
|
motion |
or |
Press again to accelerate the speed |
|
Press to play the tape backwards in |
|
slow motion |
|
Press again to accelerate the speed |
|
Continue on the following page… |
Video playback
Use the Beo4 remote control to operate your BeoCord V 8000.
While a tape is playing, you can adjust the volume level in your TV speakers or mute the sound. You can step through the tracks on the tape, or key in an exact counter position. See next page for further information about track step and counter position.
You can, furthermore, cue through the tape forwards or backwards, play the tape in slow motion, or fast forward or rewind the tape.
Unless otherwise instructed, the videotape recorder plays the tape through to the end. The tape is then rewound to the beginning and the BeoCord
V 8000 then stops automatically.
To switch the BeoCord V 8000 off entirely, press the standby button ●.
Note: If the videotape recorder has stopped and is left unused for more than 8 minutes, it switches off automatically.
TV LIGHT RADIO
SAT |
DVD |
CD |
V TAPE |
RECORD |
A TAPE |
7 |
8 |
9 |
4 |
5 |
6 |
1 |
2 |
3 |
TEXT |
0 |
MENU |
GO
LIST |
EXIT |
STOP |
|

9
Please note about Track step…
In order to step through tracks on a tape, it is required that the tape was recorded with the marker function cut in. Please refer to Setting your options for V 8000, pages 14–15, for further instruction.
If the track marker function is cut in, the start of each recording is automatically indicated. If you wish, you can erase these markers and instead set your own markers on your recording. See page 22 for further instruction.
Please note about Counter position… |
Press to fast forward the tape |
tt |
The counter positions can be set to two different |
|
or |
indications, the time used and time left counter |
Press to rewind the tape |
ss |
position indicators. |
|
|
Choose your preferred indication via the V 8000 |
Press to pause the tape with a still |
|
STOP |
||
setup menu and, if necessary, indicate the length |
picture on the screen |
|
of the tape. In most cases, the V 8000 registers the |
|
then |
tape length automatically, though. |
Press STOP again to stop entirely |
|
|
||
Once BeoCord V 8000 has registered the correct |
Press at any time to start/resume |
GO |
length of a tape, the counter instantly adjusts |
playback |
|
itself to the new counter position which is |
|
|
determined by the length of the tape – time used |
|
|
is the default counter position indication. See |
Press to switch to standby |
|
• |
||
Setting your options for V 8000, pages 14-15, for |
|
|
further information. |
|
|
Note: If you are playing back NTSC tapes, and press STOP once, BeoCord V 8000 will stop entirely, there is no pause or still mode. It will not be possible to play an NTSC tape in slow motion – pressing the red and blue button on Beo4, will produce no reaction whatsoever. The counter position will not be displayed in the display, when you are playing back NTSC tapes.

10 |
F I N E T U N I N G A N D P R E S E T T I N G |
|
Switch on BeoCord V 8000 and call up the V 8000 main menu! See page 7 for further
instruction about calling up on-screen menus…
then
Press to select SETUP
then
GO Press to call up the setup menu
The SETUP menu appears…
then
Press until TUNING is selected
then
GO Press to call up the tuning menu
The TUNING menu appears,
FREQUENCY is lit up already…
ttPress to start tuning in a TV station or, use the number keys to key in an exact frequency
(Pressing STOP stops tuning)
|
When a desired TV station is |
|
found… |
then |
|
|
Press to move to the other items in |
or |
the menu |
|
Key in a specific number e.g. a |
0 |
|
through |
Teletext subtitles page number |
|
Press to reveal the options available |
|
|
|
|
|
for an item |
|
Fill in or adjust as required… |
GO |
Press to store your TV station |
|
Press GO to continue tuning… |
Fine tuning stations
MENU
TIMER RECORD
SETUP
CAMCORDER
The V 8000 main menu
SETUP
ADJUST
OPTIONS
MARKER
TUNING
CLOCK
LINK
The setup menu
TUNING
FREQUENCY |
210 |
PROGRAM |
10 |
FINE |
0 |
SUBTITLES |
333 |
SOUND |
STEREO |
The menu for tuning in stations
To tune in TV stations, you must call up the BeoCord V 8000 tuning menu.
When you tune in, make sure that your TV stations are stored on the same program numbers in your V 8000 as they are in your BeoVision MS TV.
59 program numbers are available for you to store TV stations on.
If necessary, you can fine tune the station. You can also assign a station with the Teletext subtitles facility.
On the following page, the items on the menu are explained in detail…
EXIT Press to leave the menus
Loading...