


DL-1707B
Table of contents
 Loading...
DOCUMENT SCANNER
USER’S MANUAL
Regulatory Model Number: DL-1707B
www.avision.com

User’s Manual
Trademarks
Microsoft is a U.S. registered trademark of Microsoft Corporation.
Windows 7, Windows 8, and Windows 10 are either registered
trademarks or trademarks of Microsoft Corporation in the United
States and/or other countries.
®
Energy Star
is a registered trademark of the U.S. government.
IBM, IBM PC are registered trademarks of International Business
Machines Corp.
Other brands and product names herein are trademarks or
registered trademarks of their respective holders.
Copyright
All rights reserved. No part of this publication may be
reproduced, transmitted, transcribed, stored in a retrieval
system, or translated into any language or computer language,
in any form or by any means, electronic, mechanical, magnetic,
optical, chemical, manual, or otherwise, without the prior written
permission of Avision Inc.
Material scanned by this product may be protected by
governmental laws and other regulations, such as copyright
laws, the customer is solely responsible for complying with all
such laws and regulations.
Warranty
The information contained in this document is subject to
change without notice.
Avision makes no warranty of any kind with regard to this
material, including, but not limited to, the implied warranties
of fitness for a particular purpose.
Avision shall not be liable for errors contained herein or for
incidental or consequential damages in connection with the
furnishing, performance, or use of this material.
ii

User’s Manual
Federal Communications Commission (FCC) compliance
information statement
Part 15
This equipment has been tested and found to comply with the
limits for a Class B digital device, pursuant to Part 15 of the FCC
Rules. These limits are designed to provide reasonable
protection against harmful interference in a residential
installation. This equipment generates, uses and can radiate
radio frequency energy and, if not installed and used in
accordance with the instructions, may cause harmful
interference to radio communications.
However, there is no guarantee that interference will not occur
in a particular installation. If this equipment does cause harmful
interference to radio or television reception, which can be
determined by turning the equipment off and on, the user is
encouraged to try to correct the interference by one of the
following measures:
Reorient or relocate the receiving antenna.
Increase the separation between the equipment and
receiver.
Connect the equipment into an outlet on a circuit
different from that to which the receiver is connected.
Consult the dealer or an experienced radio/TV technician
for help.
This device complies with Part 15 of the FCC Rules. Operation is
subject to the following two conditions: (1) This device may not
cause harmful interference, and (2) this device must accept any
interference received, including interference that may cause
undesired operation.
iii

User’s Manual
European Union Regulatory Notice
Products bearing the CE marking comply with the following EU
Directives:
Low Voltage Directive 2014/35/EC
EMC Directive 2014/30/EC
Restriction of the use of certain hazardous substances (RoHS)
Directive 2011/65/EU
CE compliance of this product is valid if powered with the correct
CE-marked AC adapter provide by Avision.
This product satisfies the Class B limits of EN55022, EN55024,
safety requirements of EN 60950 and ROHS requirements of
EN50581.
*This machine is certified as Class 1 LED product.
Disposal of Waste Equipment by Users in Private Union
This symbol on the product or on its packaging indicates that the
product can not be disposed of with your other household waste.
Instead it should be sent to appropriate facilities for recovery
and recycling in an effort to protect human health and the
environment. Fore more information about where you can drop
off your waste equipment for recycling, please contact your local
city office, your household waste disposal service or the shop
where you purchased the product.
iv

®
As an ENERGY STAR
Partner, Avision Inc. has
determined that this product meets the ENERGY
STAR guidelines for energy efficiency.
System Requirements
®
CPU: Intel
Core™ 2 Duo or higher
Memory: 32 bit: 2 GB
64 bit: 4 GB
Optical Drive: DVD-ROM Drive
USB Port: USB port 2.0 (compatible with USB 3.0)
User’s Manual
Compatible
Operating
System:
Microsoft Windows 10 (32 bits/64 bits),
Windows 8 (32 bits/64 bits), Windows 7
v

User’s Manual
Product Safety Guide
Please clearly read all these instructions, and follow all instructions
and warnings before installing and using the device.
The following indications are used in this document to obviate any
chance of accident or damage to you and/or the device.
WARNING
Indicates potentially hazardous situations, which
if instructions are not followed, could result in
death or serious injury.
CAUTION
WARNING
Indicates a potentially hazardous situation
which, if instructions are not followed, may
result in minor or moderate injury or damage to
property.
Use only the AC power adapter that came with your device.
Using any other AC power adapter could cause fire, electrical
shock, or injury.
Use only the AC power cord and USB cable that came with your
device and avoid abrasions, cuts, fraying, crimping, and kinking.
Using any other AC power cord and USB cable could cause fire,
electrical shock, or injury.
Do not place objects on top of the AC power cord, and do not
allow the AC power adapter or the AC power cord to be stepped
on or run over.
Place the device and its AC power adapter near an electrical
outlet where the AC power adapter can easily be unplugged.
If you use an extension cord with the device, make sure that
the total ampere rating of the devices plugged into the
extension cord does not exceed the cord's ampere rating.
Place the device close enough to the computer so that the
interface cable can easily reach between the device and the
computer.
vi

User’s Manual
Do not place or store the device or its AC power adapter:
Outdoors
Near excessive dirt or dust, water, or heat sources
In locations subject to shocks, vibrations, high
temperature or humidity, direct sunlight, strong light
sources, or rapid changes in temperature or humidity
Do not use the device with wet hands.
Never disassemble, modify, or attempt to repair the AC power
adapter, device, or device option by yourself, except as
specifically explained in the device's documentation. This could
cause fire, electrical shock, or injury.
Do not insert objects into any opening, as they may touch
dangerous voltage points or short-out components. Beware of
electrical shock hazards.
Unplug the device and the AC power adapter, and refer
servicing to qualified service personnel under the following
conditions:
The AC power adapter or plug is damaged.
Liquid has entered the device or the AC power adapter.
Object has entered the device or the AC power adapter.
The device or the AC power adapter has been dropped,
or the case has been damaged.
The device or the AC power adapter does not operate
normally (i.e. appearance of smoke, strange smell, odd
noise, etc.), or exhibits a distinct change in performance
Unplug the device and the AC power adapter before cleaning.
vii

User’s Manual
CAUTION:
Do not locate the device on rackety or aslope tables. Do not
locate the device on unstable surface. The device may fall
down and this may result in injury.
Do not place heavy objects on the unit. It may cause
unbalance and the device may fall down. This may result in
injury.
Store the AC Power cord/USB cable bundled out of the reach of
children to avoid the risk of injury.
Keep plastic bags bundled out of the reach of children or throw
them away to avoid the danger of suffocation.
If you are not going to use the device for a long period, unplug
the AC power adapter from the electrical outlet.
viii

User’s Manual
1. Introduction
Congratulations on your purchase of the high speed
document image scanner. With this scanner, you can you
scan your multi-page documents from the auto document
feeder at a rated speed or scan irregular single-page
document from the flatbed.
Before you install and operate the new scanner, please take a
few minutes to read through this manual. It provides proper
instructions for you to unpack, install, operate and maintain
the scanner.
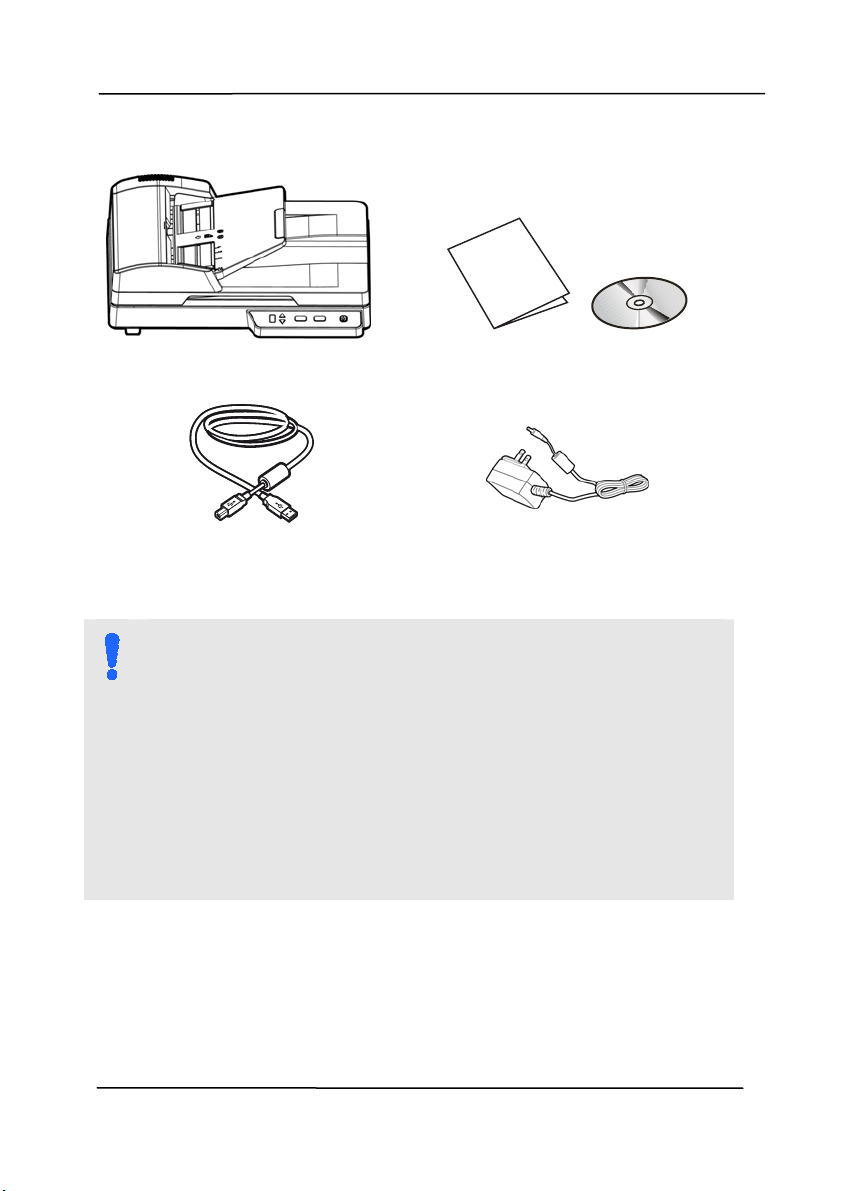
1.1 Package Items
he following figure indicates the package contents. Please
T
check all the items against your checklist. If you do not
receive all the items, please contact your authorized local
dealer immediately.
1-1
User’s Manual
Scanner
USB Cable
Quick Guide/CD
Power Adapter
NOTE:
1. Only use the AC adapter WA-36A24R by APD
included in the machine. Using other AC adapters
may damage the machine and void the warranty.
2. Please unpack the packing carefully, and check the
contents against the checklist. If any items are
missing or damaged, please contact your dealer
immediately.
3. To access more service supports, visit
www.avision.com to register your Avision’s product.
1-2
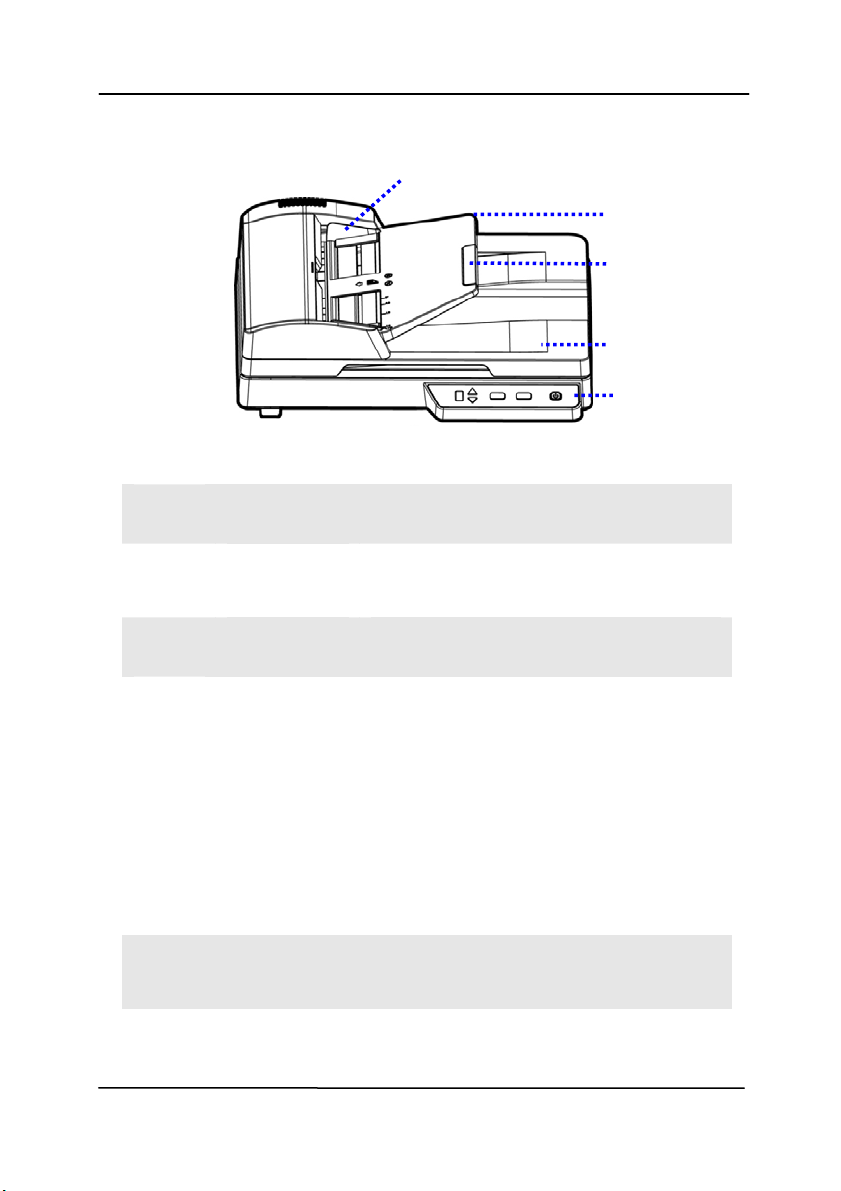
1.2 Front View
TEM NAME DESCRIPTION
I
Load the document onto this part
when scanning document.
Can be pulled out and adjusted to
the size of the document being
scanned.
Open it to place the document on
the glass platen.
LCD screen:
Shows a number indicating a
scan-to destination via the
Up/Down buttons.
The Power Button:
Press to turn on the power.
The Scan Button:
Press to start a scan.
The Cancel Button:
Press to cancel a scanning job
during operation.
Adjusts to the width of the
documents to prevent skewing of
the scanned pages.
ADF Paper
Tray
Extension
Document
Cover
Operation
Panel
Paper
Guides
1
2
3
4
5
User’s Manual
1-3
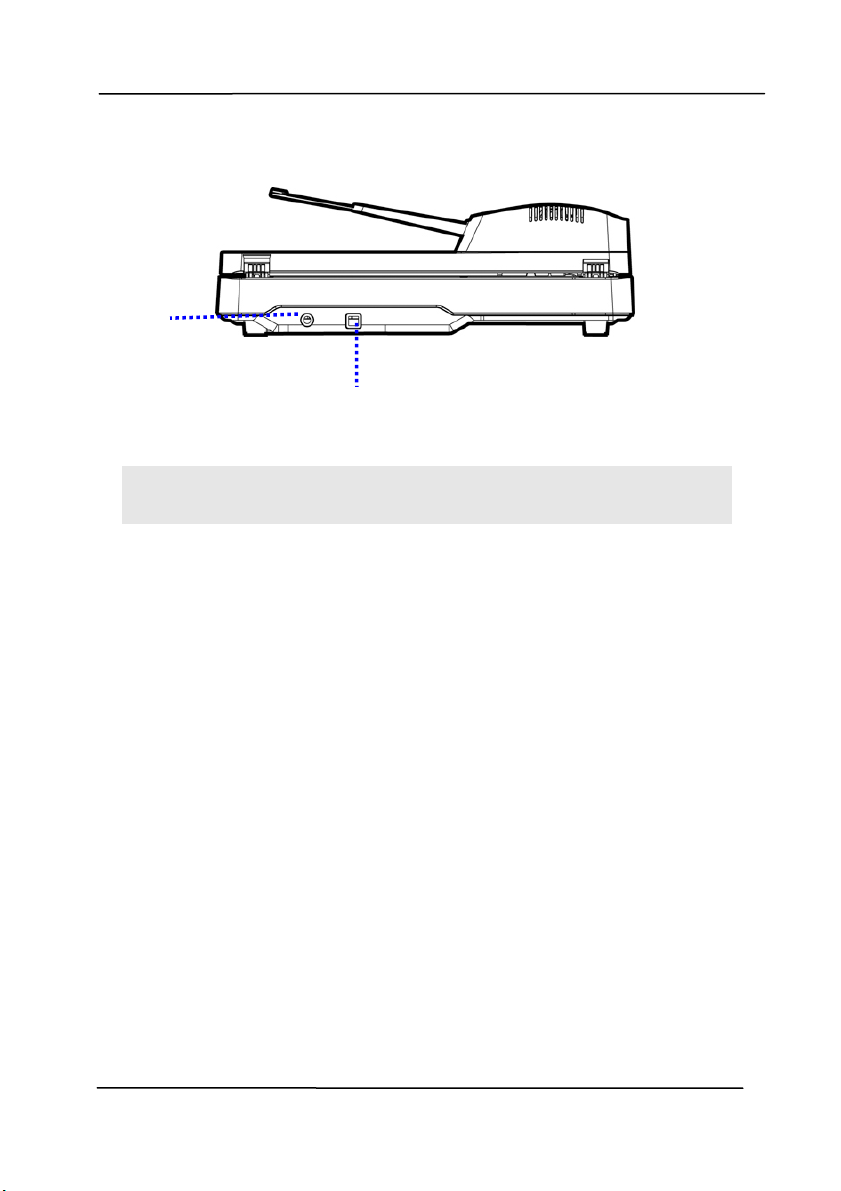
1.3 Rear View
User’s Manual
TEM NAME DESCRIPTION
I
USB Port
Power
Jack
1
2
Connect to your computer.
Connect the AC adapter to the
scanner.
1-4

User’s Manual
2. Scanner Installation
2.1 Precautions
Keep the scanner out of direct sunl
to the sun or excessive heat may cause damage to the
unit.
Do not install the scanner in a humid or dusty place.
Be sure to use the proper AC power source.
Place the scanner securely on an even, flat surface.
Tilted or uneven surfaces may cause mechanical or
paper-feeding problems.
Retain the scanner box and packing materials for
shipping purposes.
ight. Direct exposure
2-1
T
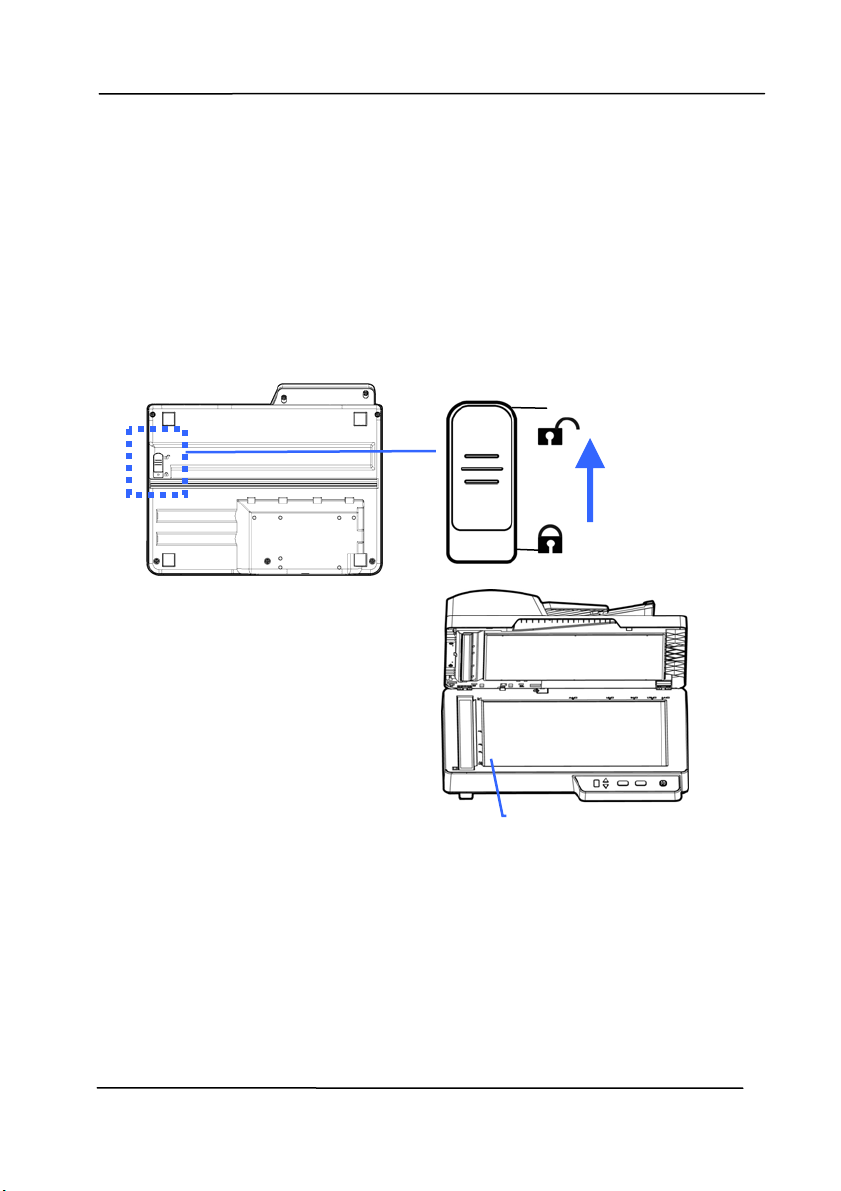
2.2 Unlocking Your Scanner
User’s Manual
The scan uni
t is locked during transport to protect the scanning
mechanism from being damaged. Be sure to unlock the scan
unit before using the machine.
Turn over the machine to
locate the lock switch.
Move the lock switch to the
"unlocked position".
“Unlocked Position”
“Locked Position”
If you need to transport the
machine, please move the
lock switch to the “Locked”
position. Before doing this,
make sure the scan unit at
the end of the glass as
indicated. (If not, please
turn on the machine. When
the scan unit moves to the
end, turn off the machine.)
he scan unit
must be at
this position
before being
locked.
2-2
User’s Manual
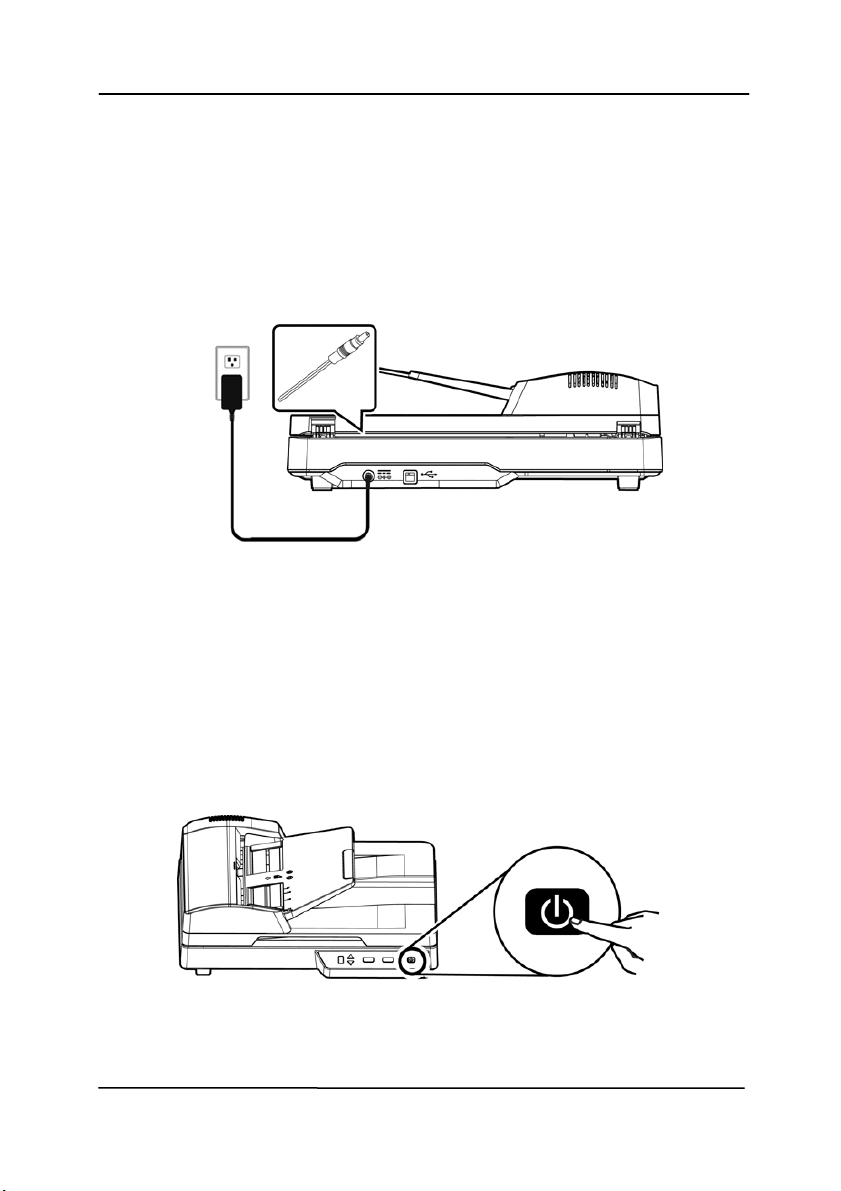
2.3 Connecting to Power
Before connecting, make sure the power switch is off.
Plug the small end of the power adaptor into the power jack of
your scanner. Insert the other end to an appropriate power
outlet.
2.4 Turning on the Power
Press the Power Swi
tch button on the front panel, the Power
LED will flash. When it is finished and ready to scan, the L ED
indicator will stop flashing and become steadily on. To turn
off the scanner, press the Power Switch button for about 3
seconds, the Power LED will be off.
2-3

User’s Manual
2.5 Installing the Scanner Driver
NOTE:
1. To ensure your computer can identify the USB
1. Place the supplied CD-ROM onto your CD-ROM drive.
2. The software installation graphic appears. If not, run
scanner, please install scanner driver first before
connecting the scanner to your computer.
2. The scanner driver contains TWAIN, ISIS and WIA
driver. After the installation of scanner driver is
completed, this scanner allows you to scan via a
TWAIN, ISIS, or a WIA interface. Start your TWAINcompliant image editing software application to
select a TWAIN or WIA user interface or your ISIS
software to select an ISIS user interface. You may
also launch Microsoft’s Scanner and Camera Wizard
to scan via a WIA user interface.
“setup.exe”.
2-4

User’s Manual
Contents on the installation graphic:
Install Scanner Driver: To communicate with your
scanner, you need to install the scanner driver.
Install Button Manager V2: To use the buttons on
the scanner, you need to install Button Manager V2.
To ensure Button Manager V2 works properly, please
FIRST install scanner driver before installing Button
Manager V2.
Install AVScan X: To scan and organize your multi-
page document(s), you can install the software
application to manage them easily and effectively.
View Manual: Click “View Manual” to view or
print the detailed user manual for the scanner and
Button Manager V2 respectively.
3. Click Install Scanner Driver to install the scanner driver
and then click Install Button Manager V2 to install the
Button Manager V2 unto your computer.
2-5
User’s Manual
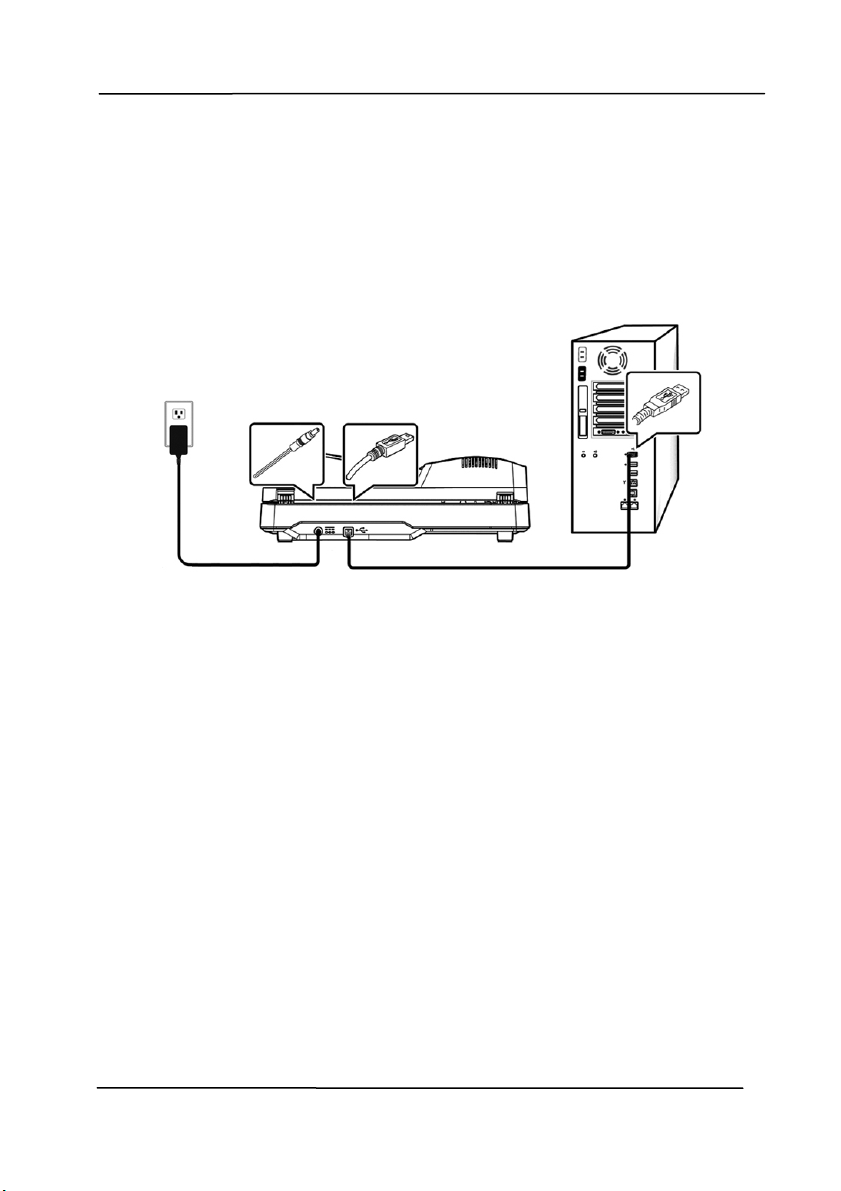
2.6 Connecting to Computer
1. Connect the square end of the USB cable to the USB port of
your scanner. Connect the rectangle end to the USB port at
the rear side of your computer.
2. The computer should detect a new USB device and prompt a
“New Hardware Found” message.
3. By following the on-screen instructions, click the Next
button to continue. When the certification screen appears,
click Continue Anyway to complete the installation.
4. When the Finish dialog is prompted, click the Finish button.
2-6
User’s Manual
3. Completing Your First
Scan
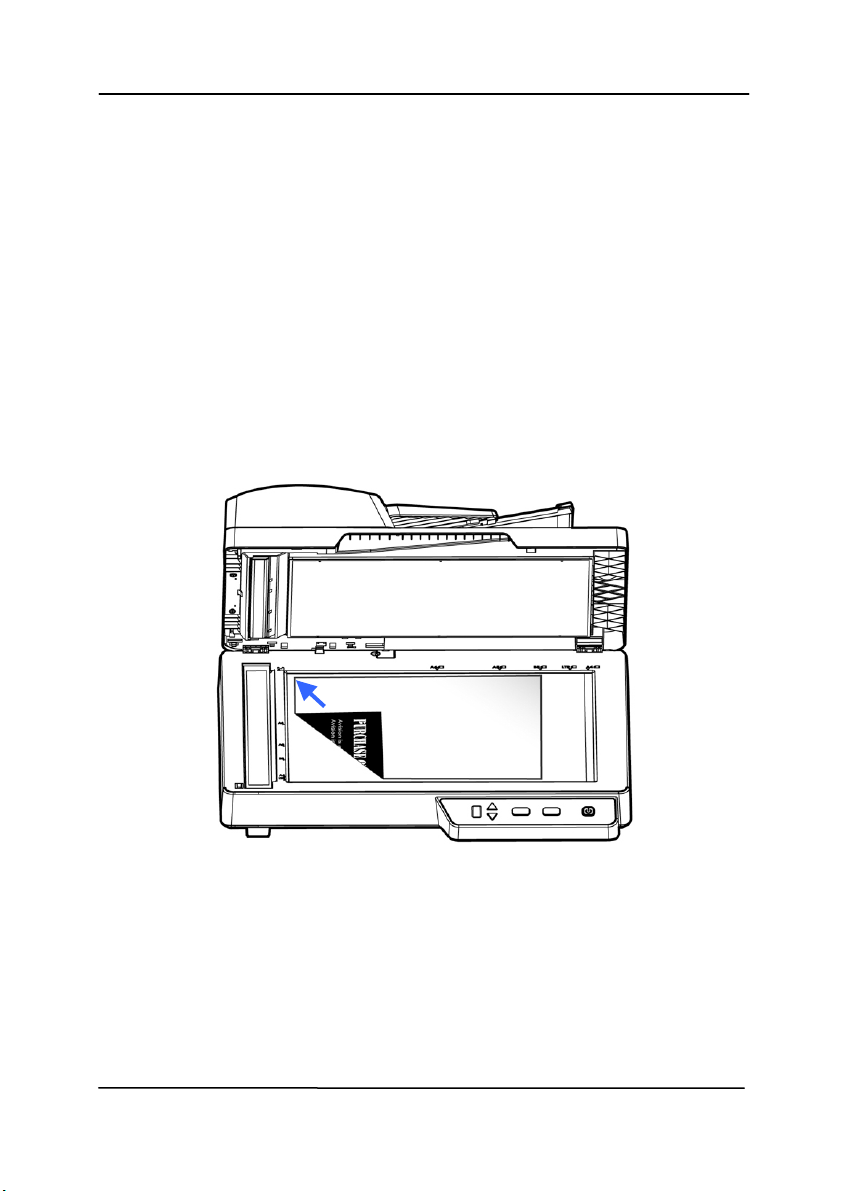
3.1 Placing Your Document on the Flatbed
Open document cover. Place your document FACE DOWN on
the document glass and align the document to the reference
mark as indicated. Close document cover.
3-1

User’s Manual
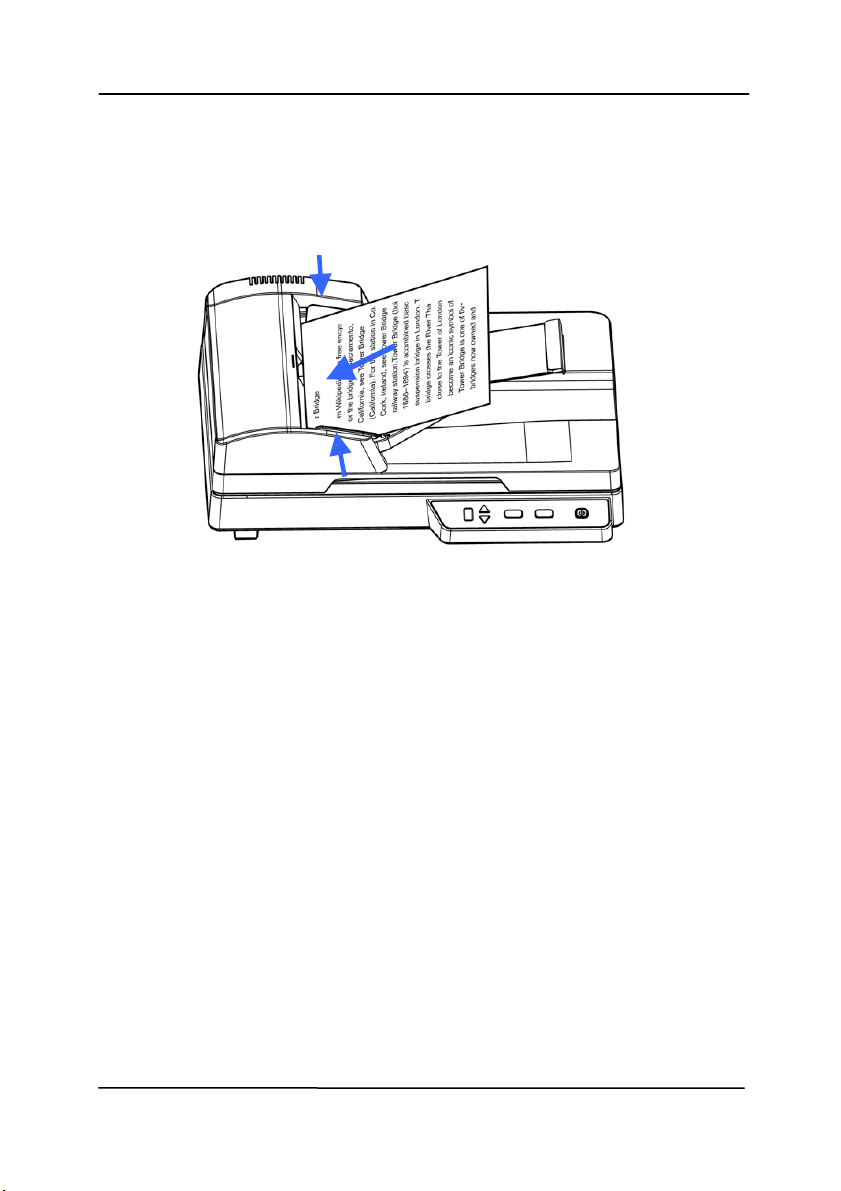
3.2 Loading Your Document in the ADF Paper Tray
3.2.1 Notice on Using the ADF
Before using the ADF, please make sure that your paper meets
he following specifications:
t
Document (s) can range in size from 76.2 x 127 mm (3 x 5
in.) to 216 x 356 mm (8.5 x 14 in.).
2
Document (s) can range in weight from 60 ~ 125 g/m
(16
~ 28 lb.)
Document(s) should be square or rectangular and in good
condition (not fragile or worn).
Document(s) should be free of curl, wrinkle, tears, wet ink,
or punch holes.
Document(s) should be free of staples, paper clips, paper
sticky notes.
3-2
User’s Manual
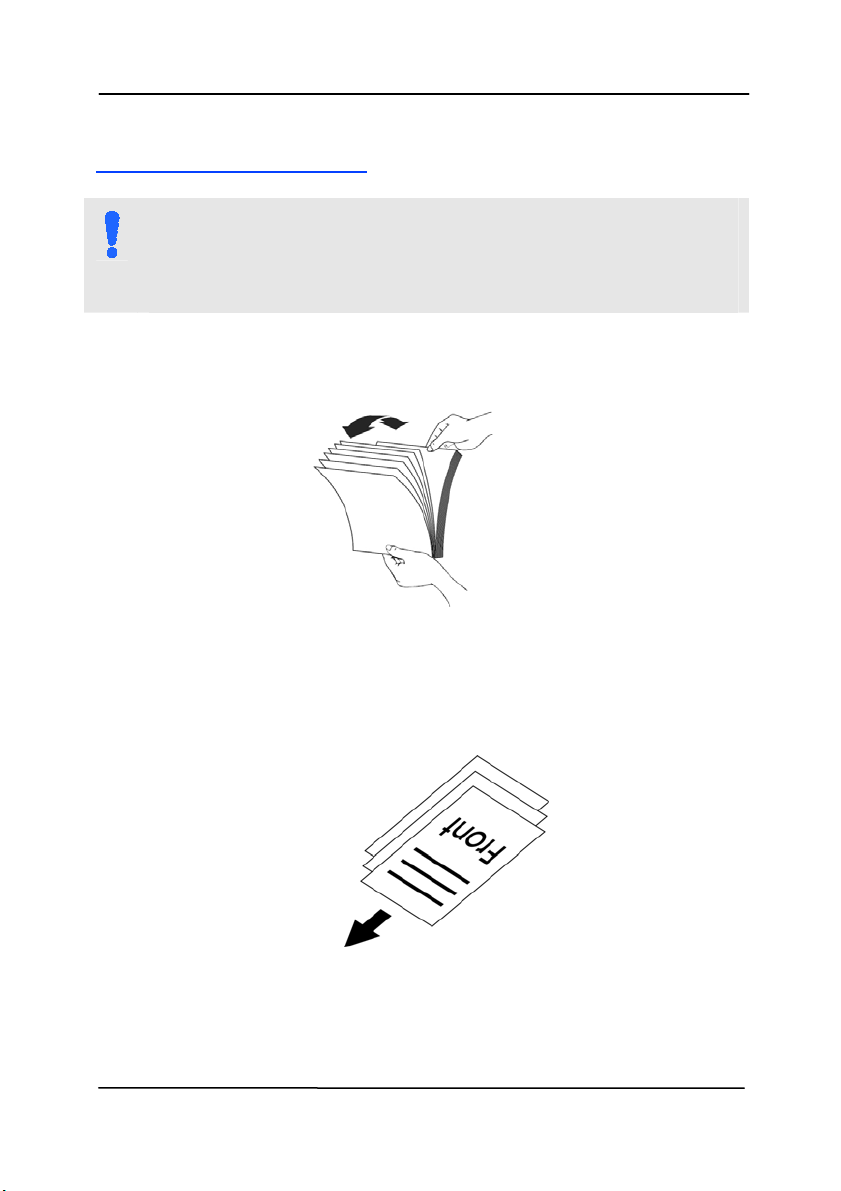
Fanning Your Document
NOTE:
To avoid occasional multi-feeds or paper jams,
please fan your documents and align the top
edges before feeding them into the scanner.
1. Hold both ends of the documents and fan them a few
times.
2. Rotate the documents by 90 degrees and fan them in the
same manner.
3. Align the edges of the documents in a step-like pattern
(see picture below).
Step-like
Scanning
Direction
3-3
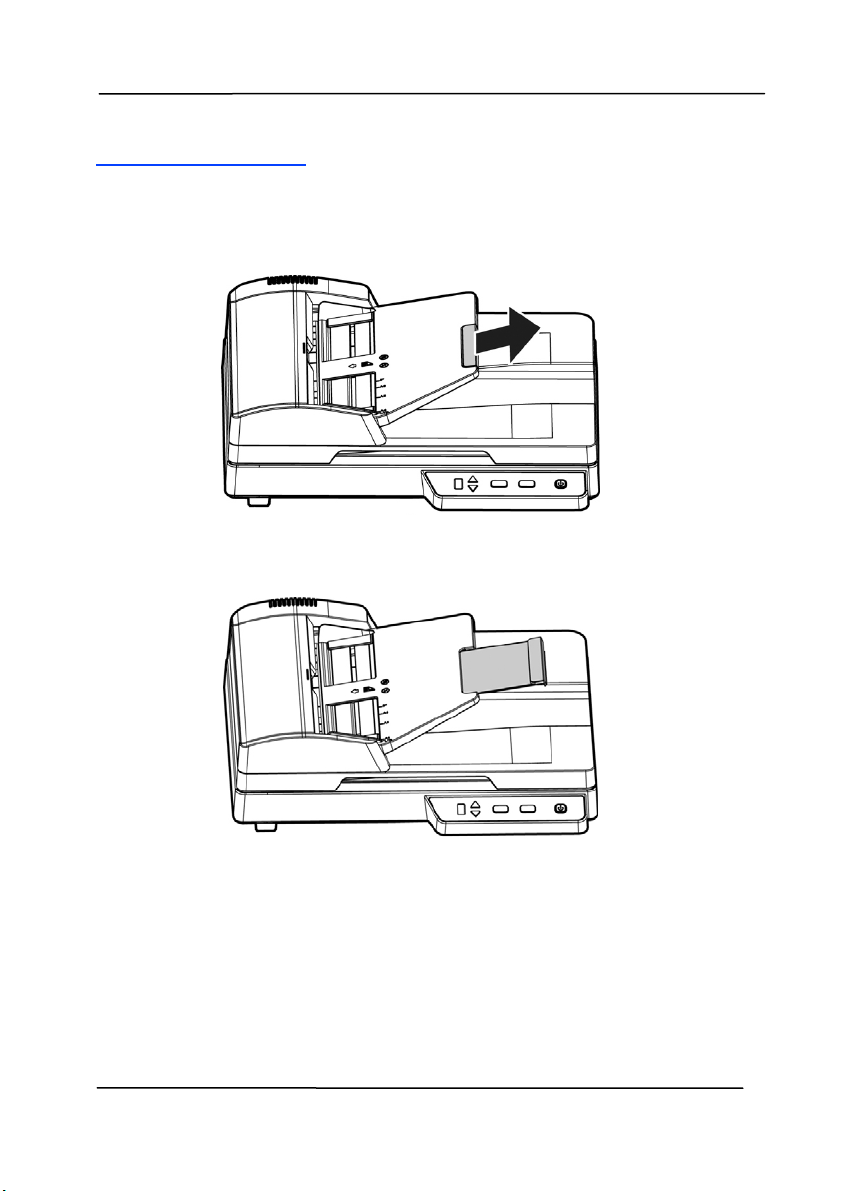
Document Feeding
1. Pull out the extension.
User’s Manual
3-4
User’s Manual
2. Load the stack of document face up with the top of the
pages pointing into the feeder.
3. Verify that the paper guides are aligned with the edges of
the stack.
3-5
User’s Manual
3.3 Verifying Your Scanner Installation
o verify if your scanner installation is correct, Avision provides
T
you a useful test program called Avision Capture Tool. With this
tool, you can perform simple scans and view the captured
images. In addition, it helps you complete your scan at a rated
speed.
The following procedure describes how to verify your scanner
installation. If the installation is not correct, please review the
preceding section to check if the cable connection and scanner
driver have been successfully installed.
Before you begin, be sure the scanner is on.
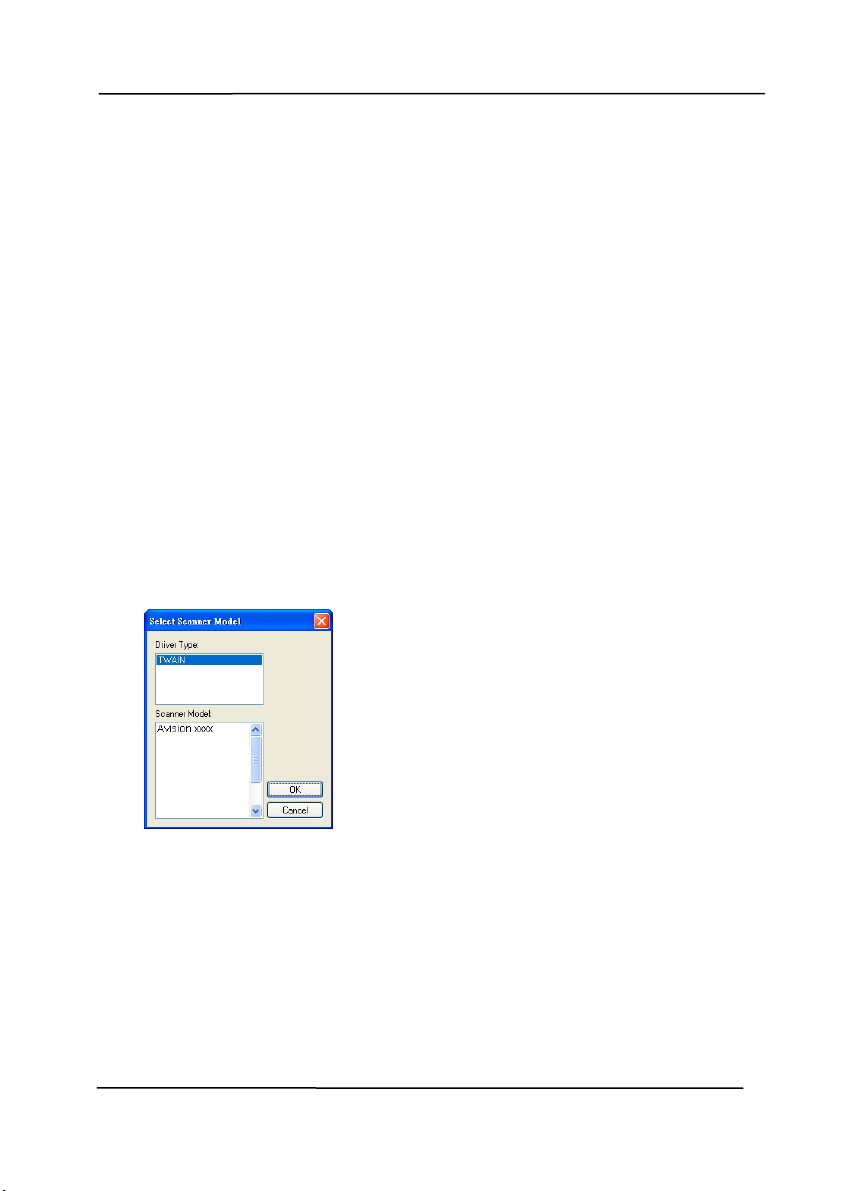
1. Select Start>Programs>Avision xxx Scanner>Avision
Capture Tool. The Select Scanner Model dialog box will be
displayed.
2. Select your driver type and scanner model and click OK.
The following Avision Capture Tool dialog box will be
displayed.
3-6

Setup
Save
Scan
File Format
File Path
User’s Manual
Fit
Page
Actual
Size
3. Choose your desi
red file format from the File Format drop
down list box. (Default is JPEG, other choice in cludes TIFF,
MTIFF, PDF, MPDF, GIF, and BMP.) The supported file
formats vary depending on your scanner model.
4. Type your desired folder name and file name in the File Path
box. (Default is C:\Documents and Settings\User Name\My
Documents\My Scan\Image.)
NOTE:
If you do not wish to save the scanned image, deselect
the Save button since default is Save Enable. In this case,
the thumbnail view will be disabled. And theref ore, after
viewing all the scanned images, only the last one will
remain on the screen.
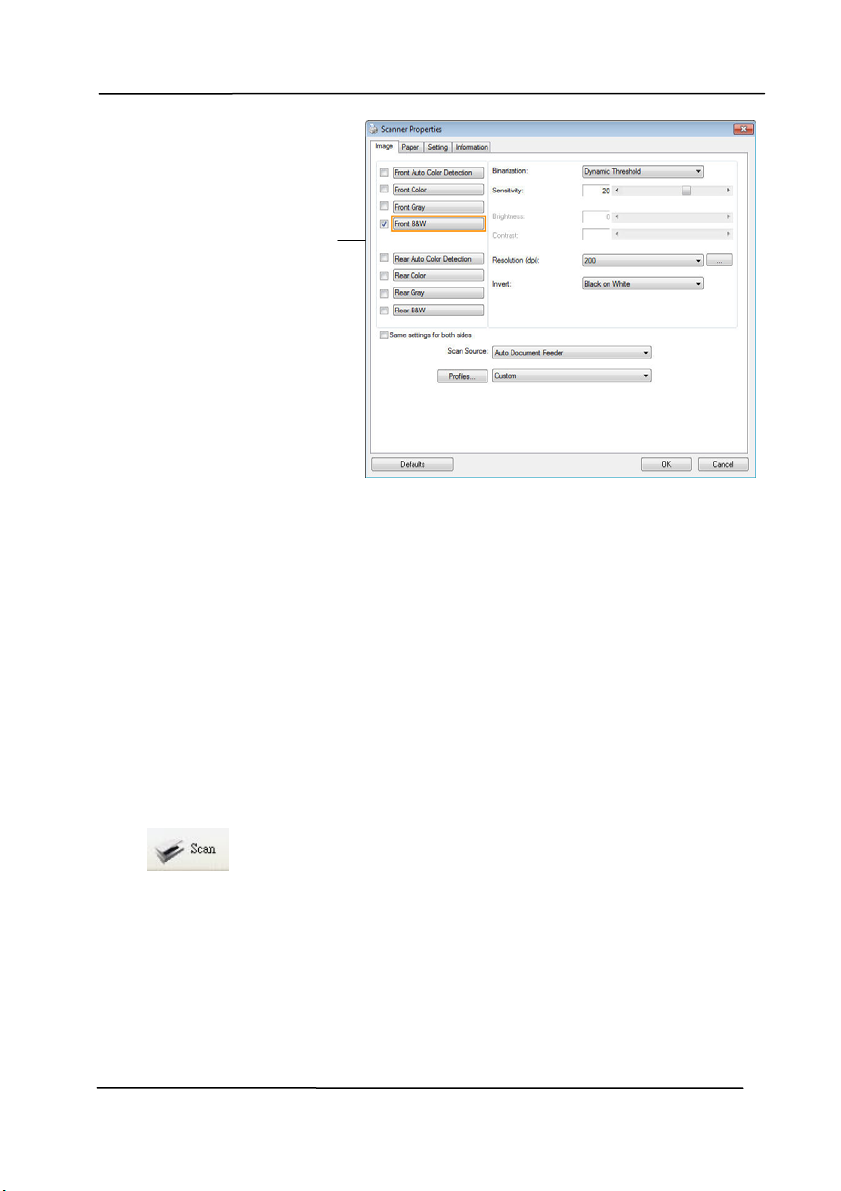
5. Click the Setup button (
) or choose Setup from the
File menu to prompt the Scanner Properties dialog box.
3-7
User’s Manual
Image
Select
ion
Box
6. From the Image Selection Box, choose your desired image
type for your scanned i
mage. (Default is Front B&W) If you
have a duplex scanner, choose Front and Rear to scan both
sides of your document.
7. Click OK to quit the Scanner Properties dialog box. (To
learn more details about the Scanner Properties dialog box,
please see the subsequent chapter, Using the Scanner
Properties Dialog Box.)
8. Place your document face down on the document glass or
face up in the auto document feeder.
9. In the Scan Validation dialog box, click the Scan button
(
) or choose Scan from the File menu.
10. The document will be scanned and displayed in the Scan
Validation screen. After the scanned images have been
displayed, your scanner installation verification is completed.
3-8
User’s Manual
Thumbnail View
Display View
11. You can vi
Size (100%) button (
ew the scanned image in Fit Page (
) from the Viewing toolbars at the
) or Actual
right side.
12. Click the Close box or Quit from the File menu to exit the
Scan Validation Tool.
3-9
User’s Manual
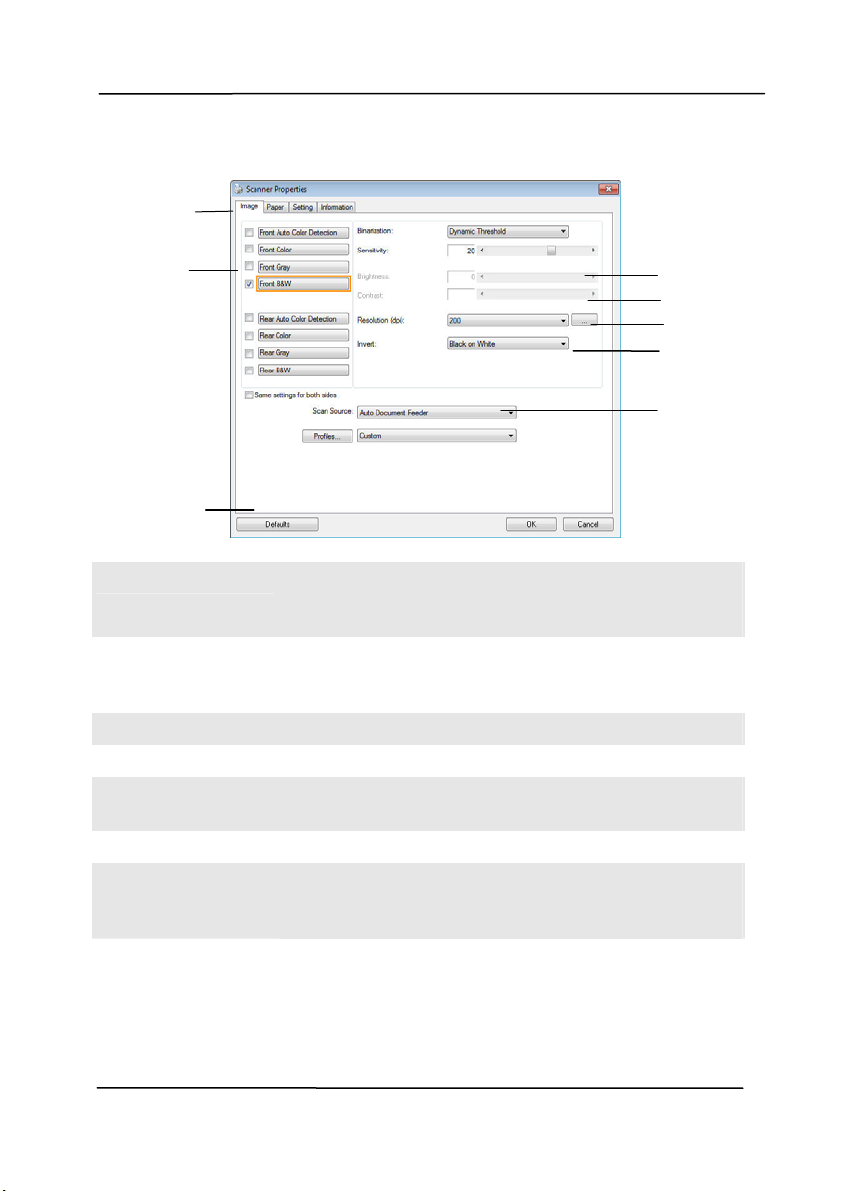
3.4 A Glance of the Scanner Properties Dialog Box
1
2
8
3
4
5
6
7
1. Tab Options Choice: Image, Compression, Color Dropout,
Paper, Multi-Feed Detection, Preview, Options,
Settings, Information.
2. Image
Selection Box
Choose your image type and the side of
document you wish to scan. Options vary
based on type of scanner.
3. Brightness Adjust the brightness level from –100 to +100.
4. Contrast Adjust the contrast level from –100 to +100.
5. Resolution
Determine the quality of the scanned image.
The industry standard is 200 dpi.
6. Invert Reverse the color of your scanned image.
7. Scan Source Choice: Auto Document Feeder, Flatbed,
Flatbed (Book), Automatic (varies due to
different scanner model)
8. Defaults Reset all values on the tabs to the factory
default settings.
.
3-10
User’s Manual
4. Using the Scanner
Properties Dialog Box
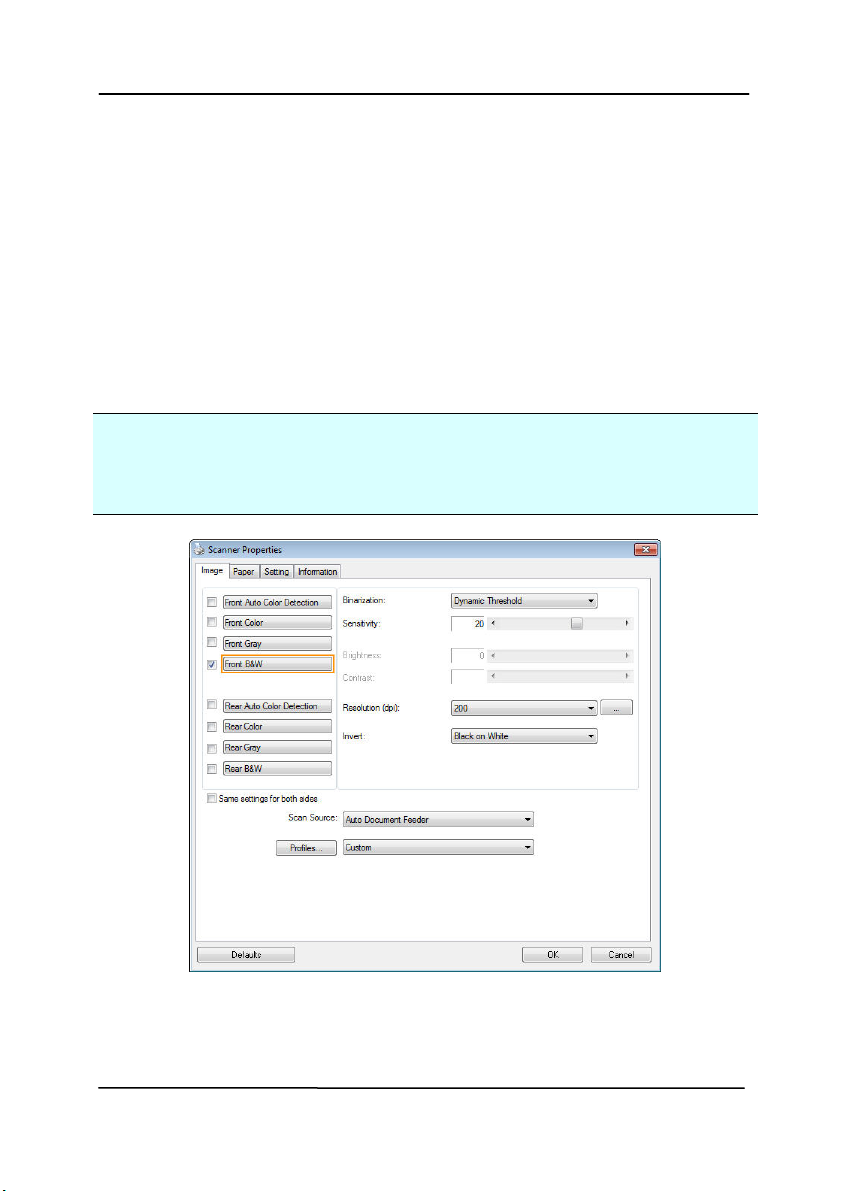
The Scanner Properties dialog box allows you to configure the
scanner’s settings. It consists of several tabbed windows each of
which will be described in this chapter.
Note: In this chapter, all options are available based on a
duplex (double-side) scanner. If you have purchased a simplex
(single-side) scanner, all options are available for single sided
only.
The Scanner Properties dialog box
4-1
User’s Manual
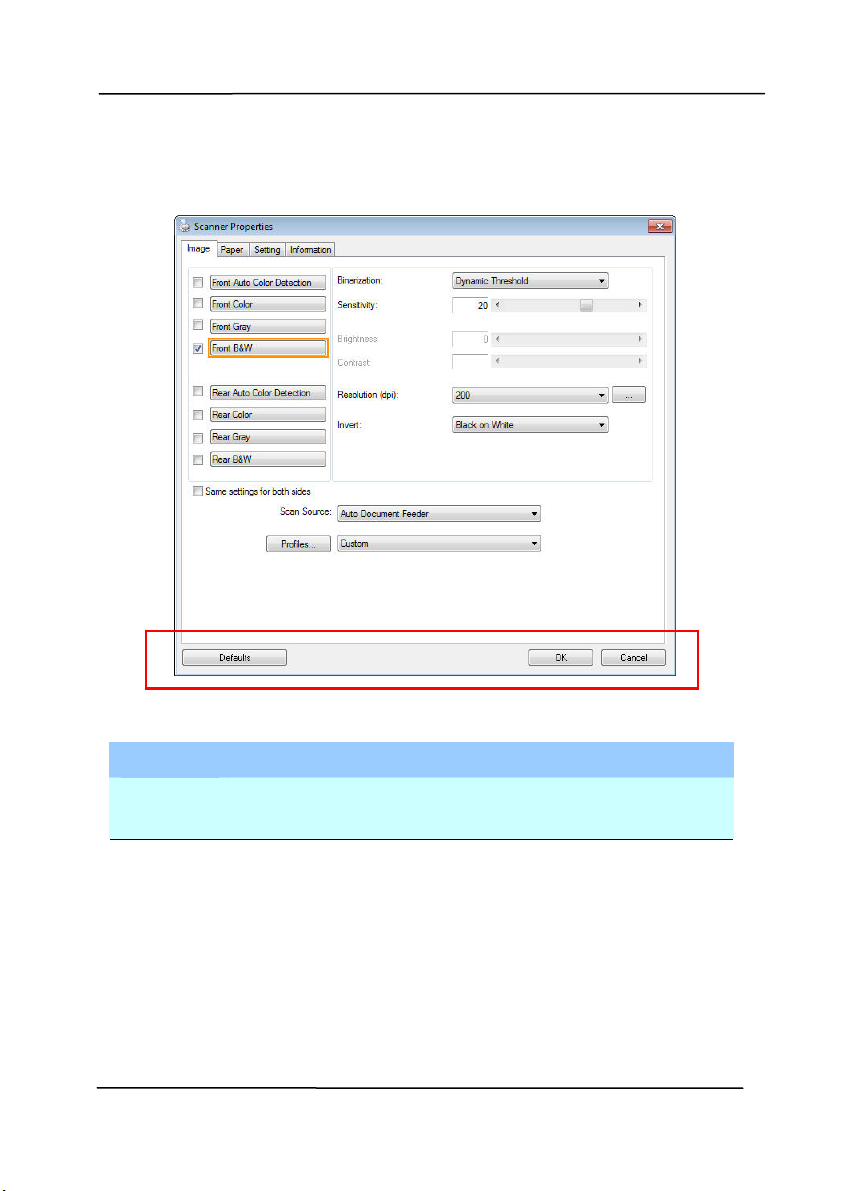
4.1 Buttons on the Scanner Properties Dialog Box
The buttons on the Scanner Properties dialog box
Buttons
Description
Defaults Click the Defaults button, the factory default
settings will be shown on each tab.
Cancel Click the Cancel button to leave the Scanner
Properties dialog box.
4-2
Loading...