


AV3800 / 3600
ADF/Flatbed Desktop Color
Scanner
User's Manual
(D/N: 250-0405-E Rev. 1.0 )

FCC Radio Frequency Interference Statement
This equipment has been tested and found to comply with the limits for a class B digital device, pursuant to Part 15 of the FCC rules. These limits are designed to provide reasonable protection against harmful interference in a residential installation. This equipment generates, uses, and can radiate radio frequency energy and, if not installed and used in accordance with the instruction manual, may cause harmful interference to radio communication. However, there is no guarantee that interference will not occur in a particular installation. If this equipment does cause harmful interference to radio or television reception, which can be determined by turning the equipment off and on, the user is encouraged to try to correct the interference by one or more of the following measures:
*Reorient or relocate the receiving antenna.
*Increase the separation between the equipment and receiver.
*Connect the equipment into an outlet on a circuit different from that to which the receiver is connected.
*Consult the dealer or an experienced radio/TV technician for help.
CAUTION: Any changes or modifications not expressly approved by the manufacture of this device could void the user's authority to operate the equipment.
ii

Safety |
UL, C-UL, TUV/GS,CB |
Regulation |
|
EMI |
FCC Part 15 Subchapter J Class B |
Regulation |
DOC Class B (Canada) |
|
CE, VCCI, C-TICK, BSMI |
|
|
iii

Wichtige Sicherheitshinweise
1.Bitte lesen Sie diese Hinweis sorgfältig durch.
2.Heben Sie diese Anleitung für den späteren Gebrauch auf.
3.Das Gerät ist vor Feuchtigkeit zu schützen.
4.Bei der Aufstellung des Gerätes ist auf sicheren Stand zu achten. Ein Kippen oder Fallen könnte Beschädigungen hervorrufen.
5.Beachten Sie beim Anschluß an das Stronmnetz die Anschlußwerte.
6.Alle Hinweise und Warnungen, die sich am Gerät befinden, sind zu beachten.
7.Wird das Gerät über einen längeren Zeitraum nicht benutzt, sollten Sie es vom Stromnetz trennen. Somit wird im Falle einer Ü berspannung eine Beschädigung vermiden.
8.Ö ffnen Sie niemals das Gerät. Das Gerät dart aus Gründen der elektrischen Sicherheit nur von authorisiertem Servicepersonal geöffnet werden.
9.Wenn folgende Situationen auftreten ist das Gerät vom Stromnetz zu trennen und von einer qualifizierten Servicestelle zu Ü berprüfung.:
a)Flüssigkeit ist in das Gerät eingedrungen.
b)Das Gerät war Feuchtigkeit ausgesetzt.
c)Wenn das Gerät nicht der Bedienungsanleitung entsprechend funktioniert oder Sie mit Hilfe dieser Anleitung keine Verbesserung erzielen.
d)Das Gerät ist gefflen und/odor das Gehäuse ist beschädigt.
e)Wenn das Gerät deutliche Anzeichen eines Defektes aufweist.
iv

Table of Contents
1. |
INTRODUCTION .................................................. |
1-1 |
|
2. |
INSTALLATION ................................................... |
2-1 |
|
|
2.1 |
SHIPPING SWITCH ......................................... |
2-1 |
|
2.1.1 |
unlocking the scanner ........................ |
2-2 |
|
2.1.2 |
locking the Shipping switch .............. |
2-3 |
|
2.2 |
SCSI INTERFACE DEVICE ID........................ |
2-4 |
|
2.3 |
ADF PAPER CHUTE ...................................... |
2-6 |
|
2.4 |
ADF OUTPUT TRAY..................................... |
2-9 |
|
2.5 |
DOCUMENT LOADING................................. |
2-10 |
|
2.6 |
ADF SCANNING ........................................... |
2-11 |
|
2.7 |
CONNECTING THE CABLE.......................... |
2-12 |
3.REQUIREMENTS & SOFTWARE
INSTALLATION ............................................................ |
3-1 |
|
3.1 |
USER INTERFACE OPERATION..................... |
3-1 |
4. USER INTERFACE................................................ |
4-1 |
|
4.1 |
SCAN METHOD............................................... |
4-1 |
4.2 |
DETERMINING YOUR RESOLUTION ............ |
4-2 |
4.3 |
SELECTING A PROPER IMAGE TYPE........... |
4-4 |
4.4 |
ENHANCING YOUR IMAGE ............................ |
4-9 |
4.5 |
CONTRAST .................................................... |
4-10 |
4.6 |
INVERT IMAGE ............................................. |
4-11 |
4.7 |
MIRROR......................................................... |
4-12 |
4.8 |
PREVIEW AUTO-AREA:.............................. |
4-13 |
4.9 |
PAPER SIZE:.................................................. |
4-13 |
4.10 |
UNITS............................................................. |
4-13 |
4.11 |
DESCREEN..................................................... |
4-13 |
4.12 |
SHARPEN....................................................... |
4-14 |
4.13 |
COLOR ADJUSTMENT ................................. |
4-14 |
v

|
4.14 |
AUTO LEVEL................................................ |
4-15 |
|
4.15 |
ADVANCED SETTINGS ................................ |
4-15 |
|
4.16 |
MISCELLANEOUS......................................... |
4-23 |
5. |
ISIS INTERFACE OPERATION......................... |
5-1 |
|
6. |
MAINTAINENCE................................................... |
6-1 |
|
|
6.1 |
CLEANING THE ADF..................................... |
6-1 |
|
6.2 |
CLEANING THE GLASS .................................. |
6-3 |
6.3REPLACING THE ADF SNAP-IN PAD MODULE
6-4
7. |
TROUBLE SHOOTING........................................ |
7-1 |
|
|
7.1 |
QUESTION AND ANSWER............................. |
7-1 |
|
7.2 |
PAPER JAM IN THE ADF.............................. |
7-5 |
8. |
TECHNICAL SERVICE........................................ |
8-1 |
|
9. |
SPECIFICATIONS ................................................ |
9-1 |
|
vi

1. INTRODUCTION
Congratulations on your purchase of AV3800 / 3600 scanner.
Before you install and operate the scanner, please take a few minutes to read through this manual. It provides you with the proper instructions on how to unpack, install, operate and maintain the scanner.
Figure 1-1 shows how the scanner is packed. You can check all items against your “checklist”, included with your scanner.
Adapter/SCSI cable
A
C
B
D
Scanner
Paper
Tray
E-2
EPS
Foam
SCANNER
F
Carton
S/N LABEL
Figure 1-1 Scanner Packing
1-1

2. INSTALLATION
Please unpack the scanner carefully, and check the contents against the checklist. If any items are missing or damaged, please contact your authorized local dealer immediately.
Precautions
∙Keep the scanner out of direct sunlight. Direct exposure to the sun or excessive heat may cause damage to the unit.
∙Do not install the scanner in a humid or dusty place.
∙Use only the AC adapter (SA60-24 made by Sino-American, Inc.) included with the machine. Using other AC adapters may damage the machine and void the warranty.
∙Place the scanner securely on an even, flat surface. Tilted or uneven surfaces may cause mechanical or paper-feeding problems.
∙Retain the scanner box and packing materials for shipping purposes.
2.1SHIPPING SWITCH
The scanner has a shipping switch that locks the carrier mechanism for transportation purposes. This switch must be unlocked before using the scanner.
Before proceeding, turn the power off, disconnect all cables and follow the instructions below to unlock the shipping switch.
2-1
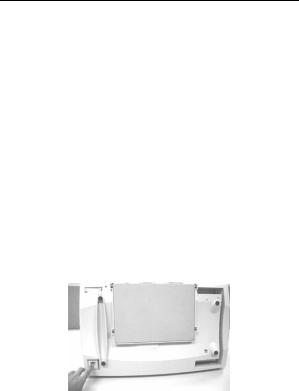
2.1.1UNLOCKING THE SCANNER
i). |
Carefully place the scanner in an upright |
|
position on its front. |
ii). |
Unlock the scanner by moving the lock |
|
switch beneath the scanner to the “Unlock” |
|
position (See Figure 2-1). |
iii). |
Gently place the scanner back to its normal |
|
position. |
Figure 2-1 Unlocking the Shipping switch
2-2

2.1.2LOCKING THE SHIPPING SWITCH
Whenever you need to move the scanner to a new location it is advisable to lock the shipping switch to avoid causing damage to the scanners’ internal mechanism. Please follow the instructions below to lock the shipping switch.
1). Turn off the scanner.
2). Lift the Document cover to reveal the flatbed
glass and scanning unit.
3). Turn on the scanner.
4). Turn off the scanner again while the scanning
unit moved to the end for a few seconds.
5). Place your scanner in an upright position on
its front side.
6). Lock your scanner by moving the lock switch
on the bottom of the scanner to the "Locked
position".
7). Place the scanner back to its normal
position.
2-3
2.2SCSI INTERFACE DEVICE ID
When you have several devices on a SCSI chain, you may need to adjust the SCSI ID selector setting located on the back of the scanner. This setting assigns a specific "device ID" to the scanner. If the assignment conflicts with an existing SCSI device, please select a new ID. (See Figure 2-2)
Note: The factory setting for scanner is ID 6. Usually, ID 0 is assigned to an internal hard disk drive, and ID 7, ID 8 ,and ID 9 are not in actual use.
Using a suitable tool, turn the selector switch until the arrow points to the desired ID number.
2.3 Setting SCSI Terminator
The scanner is equipped with a built-in terminator switch on the rear of the scanner. (See Figure 2-2). The scanner is equipped with a built-in terminator switch on the rear of the scanner. Turn the terminator switch on if the scanner is to be connected to the computer as the only or the last SCSI device. Turn the terminator switch off if the scanner is to be located between the computer and the other SCSI device.
2-4

SCSI ID Selector
SCSI Termination
Switch
OFF 
 ON
ON
Figure 2-2 Adjusting the SCSI ID setting
2-5

2.3ADF PAPER CHUTE
i). |
Lift the paper chute to about 45 degrees. |
ii). |
Pull the paper-chute wire leg down to the |
|
grips on the document cover. |
iii). |
Slightly press the paper chute to snap the |
|
wire leg into the grips on the document |
|
cover. |
iv). |
Pull out the paper chute extension to the |
|
length you want. |
2-6

Pull the Wire
Leg down
Pressing the Paper-
Chute
Figure 2-3 Setting the ADF
2-7

Set up paper chute extension
2-8

2.4 |
ADF OUTPUT TRAY |
i). |
Hold the output paper tray some 30 |
|
degrees aslant as shown in Figure 2-4. |
ii). |
Insert the three protrusions on the output |
|
paper tray to the three slots on the ADF. |
iii). |
Release the paper tray gently. Make sure |
|
the tray is firmly attached to the ADF. |
iv). |
Pull out the output paper tray extension |
|
wire to the desired length. |
|
ADF Output |
|
Tray |
Figure 2-4 Install the ADF Output Paper Tray
2-9

2.5DOCUMENT LOADING
For flatbed scanning
Documents that can not be scanned using the ADF can be placed on the flatbed for scanning. (See Figure 2-5)
i). |
Place the document to be scanned onto the |
|
document glass face down. |
ii). |
Position the document so that the upper- |
|
right corner is aligned with the reference |
|
mark. |
|
Reference |
|
Mark |
Figure 2-5 Place Document on the scanner
2-10

2.6 ADF SCANNING
Multiple documents can be fed automatically using the ADF. Refer to Figure 2-6.
i). |
To prevent occasional paper jam when |
|
automatically feeding multiple documents, |
|
fan the paper before loading. |
ii). |
Lift the balance wire. |
iii). |
Place the documents onto the ADF paper |
|
chute in either paper side (face-down, face- |
|
up), with the leading edge in the auto feeder |
|
entrance. |
Let the balance wire rest on the top of the documents.
iv). Adjust the left and right guides so that they are snug against the sides of the documents.
Balance
Left
Guide
Figure 2-6 Loading Multiple Document
2-11

2.7CONNECTING THE CABLE
i). Turning the Power Off
Depress the side marked “O” to turn the power off.
Connect the power cable and SCSI signal cable as shown in Figure 2-7.
ii). Turning the Power On
Depress the side marked “I” to turn the power on.
The POWER LED will light. If not, please check
the power source.
iii). SCSI Termination
The AV3800 / 3600 comes complete with a built in SCSI terminator. If the scanner is the last device in a SCSI chain, the terminator should be switched on. If the scanner is not the last device, the terminator should be off. The terminator on/off switch is located on the back of the scanner, to the left of the SCSI cable connectors.
2-12
 Loading...