


 Loading...
Network Scanner
User's Manual
Regulatory model: FL-1801H
Avision Inc.
Copyrights and Trademarks
Ethernet is a registered trademark of Xerox Corporation.
Microsoft, Windows 7, Windows 8, and Windows 10 are registered trademarks of Microsoft Corporation in the United States and/or other countries.
Other product names used herein are for identification purposes only and may be trademarks of their respective companies. We disclaim any and all rights to those marks.
Warranty
The information contained in this document(s) is subject to change without notice.
The manufacturer makes no warranty of any kind with regard to this material, including, but not limited to, the implied warranties of fitness for a particular purpose.
The manufacturer shall not be liable for errors contained herein or for incidental or consequential damages in connection with the furnishing, performance, or use of this material.
Safety Information
When using this equipment, the following safety precautions should always be followed.
Safety During Operation
In this manual, the following important symbols are used:
 WARNING:
Indicates potentially hazardous situations, which if instructions are not followed, could result in death or serious injury.
 CAUTION:
Indicates a potentially hazardous situation which, if instructions are not followed, may result in minor or moderate injury or damage to property.
Important:
Indicates operational requirements and restrictions. Please read and follow these instructions to ensure a proper operation and to avoid damage to the machine.
Note:
Indicates further explanation or clarification. Reading this is highly recommended.
 WARNING:
To avoid hazardous electric shock or fire, do not remove any covers or screws other than those specified in this manual.
 CAUTION:
To reduce the risk of fire, use only no.26AWG or larger telecommunication line cord.
Disconnect the power plug by pulling the plug, not the cable.
Do not touch the metal fingers of the ADF pad module. The edges are sharp and touching them may result in injury.
ii

Precautions
Do not install the equipment near heating or air conditioning units.
Do not install the equipment in a humid or dusty place.
Place the equipment securely on an even, flat surface. Tilted or uneven surfaces may cause mechanical or paper-feeding problems.
Retain the box and packing materials for shipping purposes.
Federal Communications Commission (FCC) compliance information statement
Part 15
This equipment has been tested and found to comply with the limits for a Class B digital device, pursuant to Part 15 of the FCC Rules. These limits are designed to provide reasonable protection against harmful interference in a residential installation. This equipment generates, uses and can radiate radio frequency energy and, if not installed and used in accordance with the instructions, may cause harmful interference to radio communications.
However, there is no guarantee that interference will not occur in a particular installation. If this equipment does cause harmful interference to radio or television reception, which can be determined by turning the equipment off and on, the user is encouraged to try to correct the interference by one of the following measures:
Reorient or relocate the receiving antenna.
Increase the separation between the equipment and receiver.
Connect the equipment into an outlet on a circuit different from that to which the receiver is connected.
Consult the dealer or an experienced radio/TV technician for help.
This device complies with Part 15 of the FCC Rules. Operation is subject to the following two conditions: (1) This device may not cause harmful interference, and (2) this device must accept any interference received, including interference that may cause undesired operation.
European Union Regulatory Notice
Products bearing the CE marking comply with the following EU Directives:
Low Voltage Directive 2014/35/EC
EMC Directive 2014/30/EC
Restriction of the use of certain hazardous substances (RoHS) Directive 2011/65/EU
RED (Radio Equipment Directive) (2014/53/EC)
CE compliance of this product is valid if powered with the correct CE-marked AC adapter provide by Avision.
This product satisfies the Class B limits of EN55022, EN55024, safety requirements of EN 60950 and ROHS requirements of EN50581.
*This machine is certified as Class 1 LED product.
iii

*Note the operating temperature for the battery is from -20° to 60° C. And the operating temperature for the product is from 10° to 35° C.
If the operating temperature for the battery is outside the range of -20°~60° C, it may cause cracking, rupturing, bursting, emission of flame or expulsion of molten metal to the outside of the equipment enclosure.
Product Safety Guide
Please clearly read all these instructions, and follow all instructions and warnings before installing and using the device.
The following indications are used in this document to obviate any chance of accident or damage to you and/or the device.
WARNING |
Indicates potentially hazardous situations, which if instructions are not |
|
followed, could result in death or serious injury. |
|
|
CAUTION |
Indicates a potentially hazardous situation which, if instructions are not |
|
followed, may result in minor or moderate injury or damage to property. |
 WARNING
Use only the AC power adapter that came with your device. Using any other AC power adapter could cause fire, electrical shock, or injury.
Use only the AC power cord and USB cable that came with your device and avoid abrasions, cuts, fraying, crimping, and kinking. Using any other AC power cord and USB cable could cause fire, electrical shock, or injury.
Do not place objects on top of the AC power cord, and do not allow the AC power adapter or the AC power cord to be stepped on or run over.
Place the device and its AC power adapter near an electrical outlet where the AC power adapter can easily be unplugged.
If you use an extension cord with the device, make sure that the total ampere rating of the devices plugged into the extension cord does not exceed the cord's ampere rating.
Place the device close enough to the computer so that the interface cable can easily reach between the device and the computer.
Do not place or store the device or its AC power adapter:
Outdoors
Near excessive dirt or dust, water, or heat sources
In locations subject to shocks, vibrations, high temperature or humidity, direct sunlight, strong light sources, or rapid changes in temperature or humidity
Do not use the device with wet hands.
Never disassemble, modify, or attempt to repair the AC power adapter, device, or device option by yourself, except as specifically explained in the device's documentation. This could cause fire, electrical shock, or injury.
Do not insert objects into any opening, as they may touch dangerous voltage points or short-out components. Beware of electrical shock hazards.
Unplug the device and the AC power adapter, and refer servicing to qualified service personnel under the following conditions:
The AC power adapter or plug is damaged.
Liquid has entered the device or the AC power adapter.
Object has entered the device or the AC power adapter.
The device or the AC power adapter has been dropped, or the case has been damaged.
The device or the AC power adapter does not operate normally (i.e. appearance of smoke, strange smell, odd noise, etc.), or exhibits a distinct change in performance
Unplug the device and the AC power adapter before cleaning.
iv

 CAUTION:
Do not attempt to operate the product in temperature outside the range of -20°~60° C. If so, this may cause cracking, rupturing, bursting, emission of flame or expulsion of molten metal to the outside of the equipment enclosure.
Note the the operating temperature for the battery is from -20° to 60° C and the operating temperature for the product is from 10° to 35° C.
Do not locate the device on rackety or aslope tables. Do not locate the device on unstable surface. The device may fall down and this may result in injury.
Do not place heavy objects on the unit. It may cause unbalance and the device may fall down. This may result in injury.
Store the AC Power cord/USB cable bundled out of the reach of children to avoid the risk of injury.
Keep plastic bags bundled out of the reach of children to avoid the danger of suffocation.
If you are not going to use the device for a long period, unplug the AC power adapter from the electrical outlet.
Disposal of Waste Equipment by Users in Private Union
This symbol on the product or on its packaging indicates that the product can not be disposed of with your other household waste. Instead it should be sent to appropriate facilities for recovery and recycling in an effort to protect human health and the environment. Fore more information about where you can drop off your waste equipment for recycling, please contact your local city office, your household waste disposal service or the shop where you purchased the product.
As an ENERGY STAR® Partner, Avision Inc. has determined that this product meets the ENERGY STAR guidelines for energy efficiency.
System Requirements
CPU: |
Intel® Core™ 2 Duo or higher |
Memory: |
32 bit: 2 GB |
|
64 bit: 4 GB |
Optical Drive: |
DVD-ROM Drive |
USB Port: |
USB port 3.1 Gen 1 (compatible with USB 2.0) |
Compatible |
Windows 10 (32 bits/64 bits), Windows 8 (32 bits/64 bits), |
Operating |
Windows 7 |
System: |
|
|
v |

1 Getting Started
Introduction
Thank you for purchasing the network scanner. With the product, you can instantly scan single-sided or double-sided document(s) and deliver the electronic images to various destinations including E-mail addresses, ftp servers, network folders such as FTP, FTPS, FTPES, or cloud servers such as Google Drive, Dropbox, Evernote, OneDrive, or Microsoft SharePoint. In addition, the product also allows you to save the scanned image to an inserted USB flash drive, or the product’s own memory.
If required, the product can be used as a regular scanner through USB or wired network connection to start a scan with your TWAIN-compliant software application and optimize your scanned images with various advanced image enhancement tool. You may refer to Chapter 7 Using the Product As a Regular Scanner in this manual on how to use this function.
Various Scan to Destinations
Scanning and Sending Your Images to an E-mail address:
Connected to an ethernet network and a SMTP server, the product allows you to transmit document(s) to your E-mail as attachment. With a touch of the E-mail key and the selection of your recipients' E-mail addresses, the document(s) is/are first scanned and converted into an image file, and then transmitted to remote recipients within minutes.
Scanning and Sending Your Image to a Cloud server or Network Folder:
The product allows you to send the scanned documents to a server such as Google Drive, Dropbox, Evernote, SharePoint Online or a network folder over intranet with FTP (File Transfer Protocol), FTPS (FTP Secure), FTPES, SharePoint, or SMB (Server Message Block Protocol). This feature off-loads the mail server from handling large attachments.
Scanning and Saving Your Images to a USB Flash Drive:
By plugging a USB flash drive into the USB port of the product, the product allows you to scan your document and save the scanned images to your USB flash drive.
Scanning and Saving Your Images to the Product’s Memory:
By selecting a public folder as a filing destination, the product allows you to scan and save the scanned image in the product’s memory and access the file from the product’s embedded web page.
1
Preview:
Before sending your documents over the network, the product allows you to view a reduced size of the scanned document to verify if the scanned image has been skew, or upside down. If one of the pages is skew, you can delete and rescan that page to save your time.
Scancast:
Scan and broadcast the images respectively to various destinations including a
cloud server, a public folder (the product’s memory), a USB flash drive, E-mail addresses, a file server on the network such as FTP FTPS SMB.
Using Convenient Shortcuts:
By assigning your frequently used settings and scan to destinations as Shortcuts, the product allows you to streamline your workflow and complete your scanning task in just one press of a button.
Easy Customization:
This product makes user customization fast and easy by simply installing a third-party app (short for application) to be run on the product. The new plug-in app allows users to complete the scan tasks according to its own workflow.
2
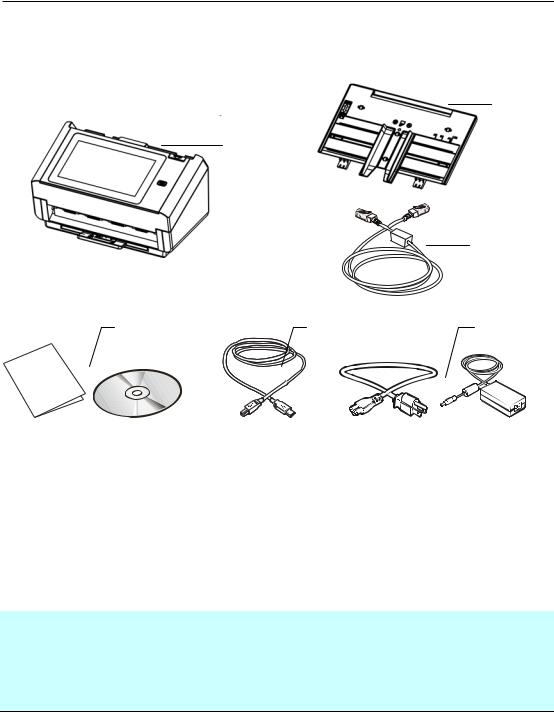
Package Items
2
1
3
3 |
4 |
5 |
1.Scanner Main Unit
2.ADF Paper Tray
3.Ethernet Cable
4.Software CD/Quick Guide
5.USB Cable
6.Power Adapter & Power Cord
Note:
1.Only use the AC adapter DA-48M24 by APD included in the machine. Using other AC adapters may damage the machine and void the warranty.
2.Please unpack the packing carefully, and check the contents against the checklist. If any items are missing or damaged, please contact your dealer immediately.
3
External View
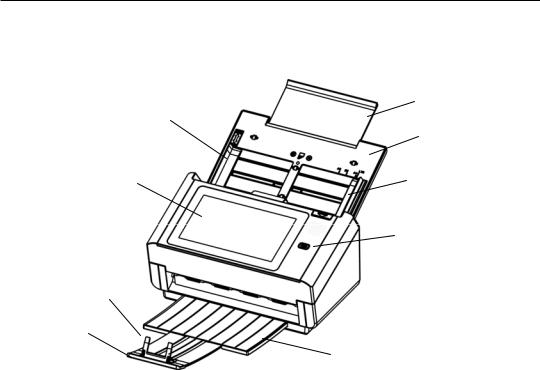
The Front View
|
|
|
Extension |
|
|
Paper Guide |
|
ADF Paper |
|
|
|
|
||
|
|
|
Tray |
|
LCD Touch Panel |
|
Paper Guide |
||
|
|
|
The Power Button |
|
Paper Stopper |
|
|
|
|
|
Extension |
|
|
|
|
|
|
Output Paper Tray |
|
|
|
|
|
|
|
Part Name |
|
Function |
|
|
|
|
|
|
|
Extension |
|
Can be pulled out and adjusted to the size of the |
|
|
|
|
document being scanned. |
|
|
|
|
|
|
|
ADF Paper Tray |
|
Load the document onto this part when scanning |
|
|
|
|
document. |
|
|
|
|
|
|
|
Paper Guides |
|
Adjusts to the width of the documents to prevent |
|
|
|
|
skewing of the scanned pages. |
|
|
|
|
|
|
|
LCD Touch Panel |
|
Operate the scanner through the touch screen. |
|
|
|
|
|
|
|
Power Button |
|
Press to turn on the power. |
|
|
|
|
|
|
|
Output Tray |
|
Open to collect the document after scanned. |
|
|
|
|
|
|
|
Extension |
|
Pull it out. Documents are ejected from the ADF to |
|
|
|
|
the tray. |
|
|
|
|
|
|
|
Paper Stopper |
|
Adjust to the length of the documents to prevent |
|
|
|
|
them from falling apart. |
|
|
|
|
|
|
4
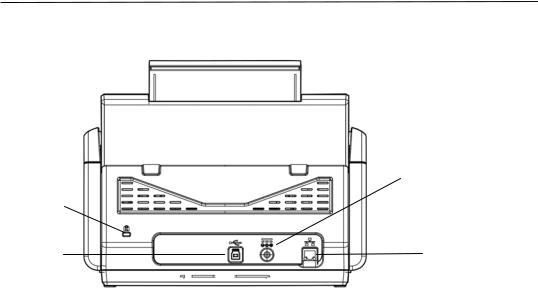
The Rear View
Power
Connector
Kensington
Security Slot
USB Port |
LAN Port |
Part Name |
Function |
|
|
LAN Port |
Connect the scanner to network with a LAN cable. |
|
|
USB Port |
Connect to your computer via the supplied USB |
|
cable to use the device as a regular scanner. |
|
Connect to your computer via the supplied USB |
|
cable to download firmware if required. |
|
|
Power Connector |
Connect the AC adapter to the scanner. |
|
|
Kensington |
Attach to a lock to secure the scanner. |
Security Slot |
|
|
|
5
The Side View
USB Flash
Port
Part Name |
Function |
USB Flash Drive |
Used to insert a USB flash drive. |
|
|
Removable Parts
Reverse Roller
ADF Roller
6

Pre-installation Information
Preinstallation
The product has to be setup properly on your network to perform E-mail and filing functions. The following network parameters have to be set.
Important!
Make a copy of the following table and ask your Network Administrator to complete the information.
|
1. |
DHCP Enable: |
|
|
|
|
|
|
2. |
IP Address: |
. |
. |
. |
|
|
|
3. |
Subnet Mask: |
. |
. |
. |
|
|
|
4. |
Gateway IP: |
. |
. |
. |
|
|
|
5. |
DNS Server: |
. |
. |
. |
|
|
|
6. |
Mail Server: |
. |
. |
. |
|
|
|
7. |
Port # of Mail |
|
|
|
|
|
|
|
|
Server |
|
|
|
|
Explanation of contents: |
|
|
|
||||
|
|
|
|
||||
1. |
*DHCP Enable: |
|
Choose Yes to obtain IP/subnet/gateway/DNS |
||||
|
|
|
|
|
server/WINS server addresses automatically |
||
|
|
|
|
|
from DHCP server. |
||
|
|
|
|
||||
2. |
*IP Address: |
|
The Internet Protocol (IP) address assigned to |
||||
|
|
|
|
|
your machine by your network administrator or |
||
|
|
|
|
|
by DHCP server. |
||
|
|
|
|
||||
3. |
Subnet Mask: |
|
The net mask address assigned by your |
||||
|
|
|
|
|
network administrator or by DHCP server. |
||
|
|
|
|
||||
4. |
Gateway IP: |
|
The gateway IP address assigned by your |
||||
|
|
|
|
|
network administrator or by DHCP server or by |
||
|
|
|
|
|
DHCP server. |
||
|
|
|
|
||||
5. |
*DNS server: |
|
The IP address of DNS server assigned by your |
||||
|
|
|
|
|
network administrator. |
||
|
|
|
|
|
|
|
|
7

Note:
1.DHCP server: With DHCP (Dynamic Host Configuration Protocol), a host can automatically be given a unique IP address each time it connects to a network--making IP address management an easier task for network administrators. If the DHCP server is available from your network, you do not need to enter TCP/IP, subnet mask, gateway, and DNS information. Instead, this information will be automatically given for the product.
2.IP Address: An IP (Internet Protocol) address uniquely identifies a host connection to an IP network. System administrator or network designer assigns the IP address. The IP address consists of two parts, one identifying the network and the one identifying your node. The IP address is usually written as four numbers separated by periods. Each number can be zero to 255. For example, 10.1.30.186 could be an IP address.
3.DNS: Stands for Domain Name System. The DNS server identifies hosts via names instead of IP addresses. If the DNS server is available on your network, you can enter the domain name instead of digits for the IP address.
8
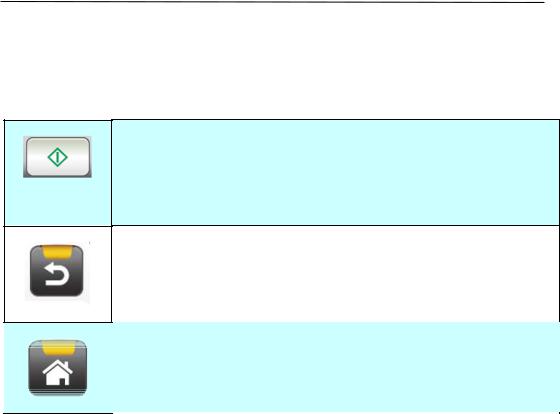
Frequently Used Buttons on the Touch Screen
The following table lists the frequently used buttons and their functions on the touch panel:
The [Start] button:
Choose to start scanning the document and sending the scanned image to E-mail, Public Folder, USB Flash Drive, or other destinations.
The [Back] button:
Choose to leave current screen and return to previously operational screen.
The [Home] button:
Choose to leave current screen and return to the main operational screen.
9

2 Installing Your Machine
This chapter is specifically targeted to the persons who are responsible for the administration of the product. It is recommended that the administrator read this chapter before installing the machine.
Minimum Configuration Requirements
To use the product as a network scanner, the following configuration is required:
To send E-mails from the product:
TCP/IP network
A Mail server
To file document(s) via intranet
FTP, FTPS, FTPES, or SMB protocol environment
10
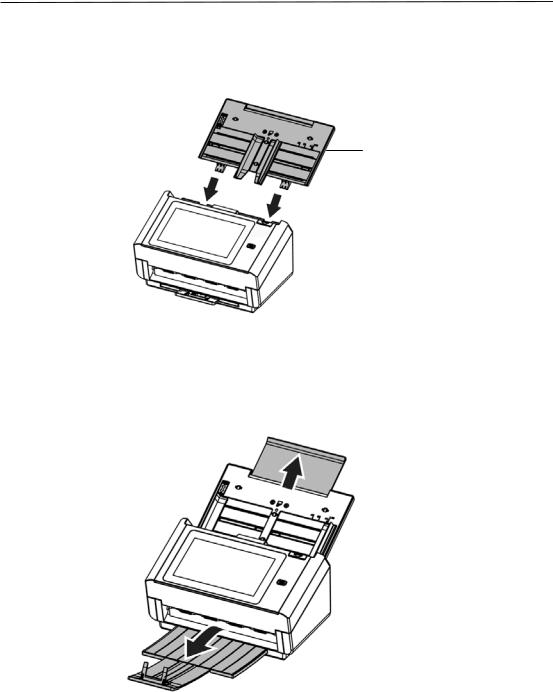
Installing the ADF Paper Tray
1.Hold the ADF Paper Tray and insert two pins to the holes on the top of the scanner as shown.
ADF Paper Tray
2.Pull out the extension to the length of the document.
3.Pull the Output Tray and raise the paper stopper to prevent the paper from falling.
11
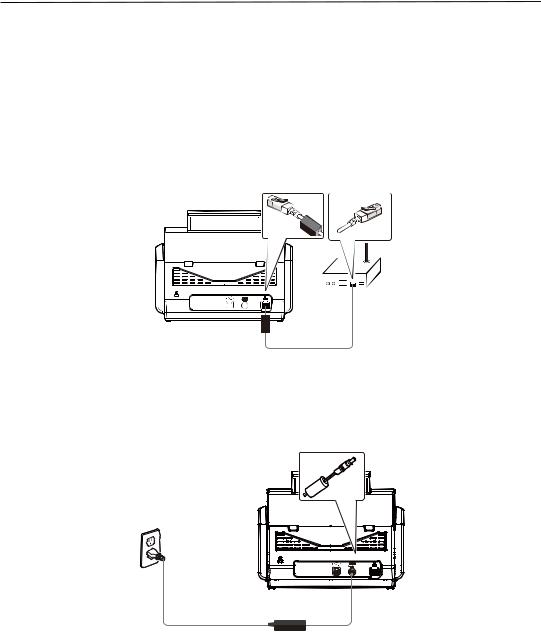
Connecting the Cables
Connecting the Ethernet Cable
1.Connect one end of your Ethernet LAN cable to an available port of your Ethernet Hub.
2.Connect the other end to the port marked  at the back of the product.
Connecting the Power and Turning on the Machine
1.Connect one end of the power cable to the power receptacle of the product.
2.Connect the other end to an appropriate power outlet.
12
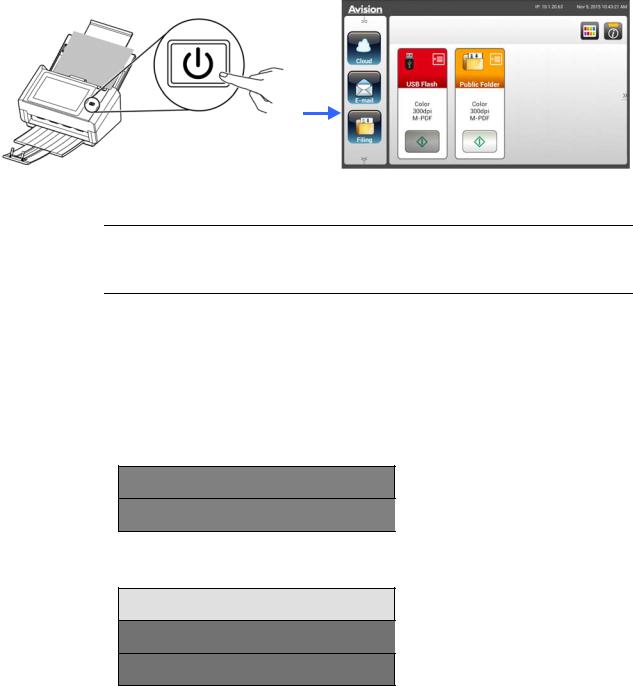
3.Press the [Power] button to turn on the product. The Power LED lights in green and the LCD Touch Panel will be displayed with a Home screen as illustrated.
Note:
If the product will not be used for a long time, press the Power button for 3 seconds to turn off the power. Then unplug the product from the power outlet.
Turning Off the Machine
1.Press the Power button for at least 2 seconds. A Confirmation dialog box appears.
Power off
Reboot
2.Tap [Power off] to turn off the machine or reboot to restart the machine.
Power off
The machine is going to power off.
Cancel OK
3.Tap [OK] to turn off the machine.
13

Selecting Your Language
The product provides various languages on the LCD Touch Panel. Choose your desired language to be displayed on the LCD Touch Panel.
1.Press the [Power] button to turn on the product. The LCD Touch Panel will be prompted with a Home Screen as indicated.
2.On the LCD Touch Panel, tap [Settings]> [Device Management] >[Language] in succession and then choose your desired language. Choice : English, Chinese Traditional, Chinese Simplified, Spanish, Portuguese, Hebrew.
Device
Management
Settings
3.Tap [Save] to save the setting.
14
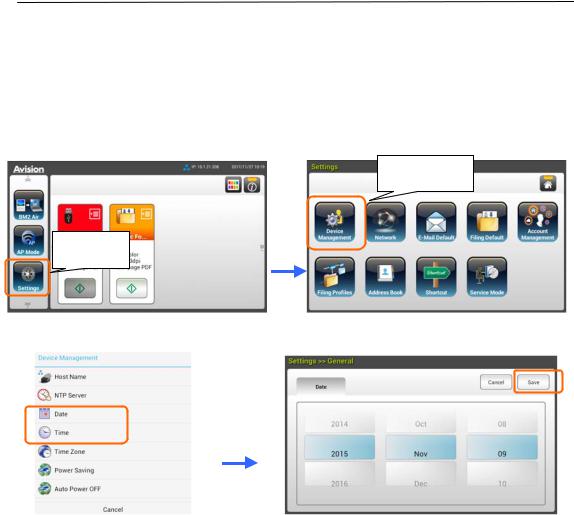
Setting Date and Time
To let the product show current date and time, please set your date and time for the product before using it.
1.On the Home Screen of the LCD Touch Panel, tap [Settings]>[Device Management]>[Date] in succession and then set your current date.
Device
Management
Settings
2.Tap [Save] to save the setting and go back to the previous screen.
3.On the [Device Management] screen, tap [Time] to set your current time.
4.Tap [Save] to save the setting and go back to the previous screen.
15
Specifying the Product’s TCP/IP Address
To let other devices on the network identify the product, you need to set an IP address for the product. Follow these steps to set an IP address:
1.On the Home Screen of the LCD Touch Panel, tap [Settings]>[Network]>[Wired] in succession and then set the IP address for the product.
Network
Settings
-Check [DHCP] if you wish to enable DHCP.
-Check [Static IP] if you wish to specify a static IP address. If [Static IP] is selected, tap the IP Address/Subnet Mask/Gateway IP/DNS Server field respectively to bring up the soft keyboard and then enter the relevant values.
2.Tap [Save] to save the setting and go back to the previous screen.
Note:
If the system administrator has chosen DHCP, then the IP address of TCP/IP, gateway, subnet mask, and DNS server will be automatically given.
When installing the product for the first time, it is recommended that the Administrator retain the default system settings. The settings can be customized at a later date once you are familiar with the operation and functionality.
16
Specifying the Product’s Mail Server
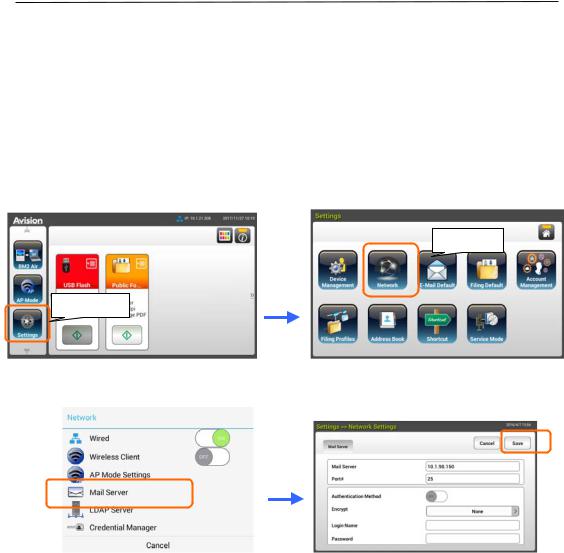
To send the scanned image to a recipient via E-mail, you need first specify your mail server information on the product. Follow these steps to set your mail server:
1.On the Home Screen of the LCD Touch Panel, tap
[Settings]>[Network]>[Mail Server] in succession and then set your mail server information.
Network
Settings
On the Mail server option, enter the IP address and port number of your mail server.
-On the Authentication Method option, tap [ON] to enable it or [OFF] to disable it.
-Tap anywhere respectively on the Login Name/Password/Mail Server/ Port# field to bring up the soft keyboard and then enter the relevant values.
2.Tap [Save] to save the setting and leave the screen.
17
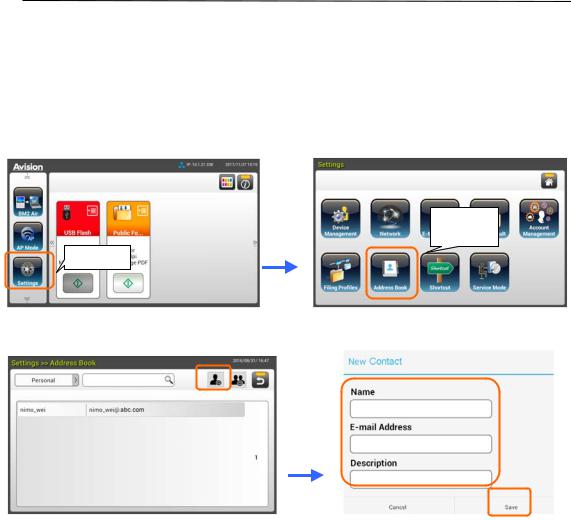
Creating Your Address Book
To save the time in typing the E-mail address, you can create your address book to speed up the process.
1.On the Home Screen of the LCD Touch Panel, tap [Settings]>[Address Book]>[New] in succession and then enter your address information.
Address
Book
Settings
2.Tap [Save] to save the setting and leave the screen.
18
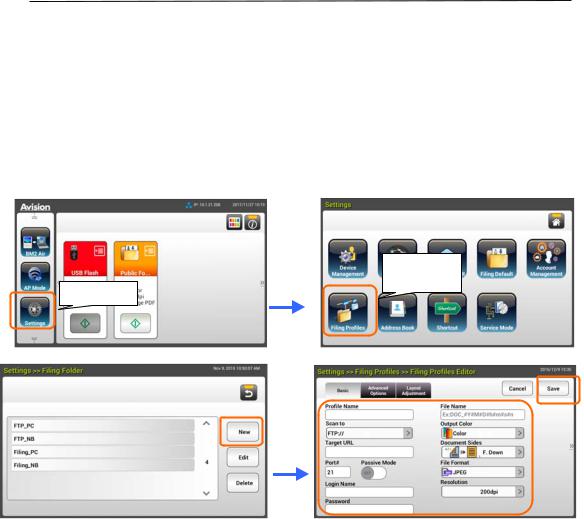
Creating Your Filing Profiles
To store your scanned image to the network folders, you need to first set up a few network folders including FTP, FTPS, FTPES, Public Folder, SharePoint, or SMB to store the images. You may first check with your System Administrator to make sure that you have the privilge to access these network folders.
1.On the Home Screen of the LCD Touch Panel, tap [Settings]>[Filing Profiless]>[New] in succession.
Filing
Profiles
Settings
2.Refer to the following table to create your Filing Profiles. Tap [Save] after the settings have been made satisfactory.
Item |
Description |
Profile Name |
Enter your profile name. |
Scan to |
Choose your [Scan to] destination protocol. |
|
Choice includes * FTP: //, FTPS: //, FTPES://, |
|
SMB: \\, USB, Public Folder, SharePoint. |
|
USB: Store the scanned image to an inserted USB |
|
flash drive. |
|
Public Folder: Store the scanned image to the |
|
memory of the product and then access the image via |
|
the product’s embedded web page. |
|
SMB: Store the scanned image to someone else’s |
|
computer in the network over intranet. |
|
FTP/FTPS/FTPES/SharePoint: Store the scanned |
|
image to the network folder over intranet. |
|
19 |

Target URL |
If FTPS, FTP, FTPES, SMB, or SharePoint is selected, |
|
|
enter the URL address. You can either enter a domain |
|
|
name or an IP address with the directory path. For |
|
|
example, 10.1.20.25/test |
|
Port # |
Enter the port number for the [Scan to] server. |
|
Passive Mode |
Set your FTP connection mode. Choice: On/Off |
|
|
(default: Off). |
|
Login Name |
Enter your login name to use the designated folder. |
|
Password |
Enter your password to use the designated folder. |
|
File Name |
Enter your default file name. |
|
Output Color |
Choose your desired default output color for the |
|
|
scanned image. |
|
|
Choice: *Color, Gray, B/W |
|
Document Side |
Choose your desired default scanning side. |
|
|
Choice: *1-Sided Face Down, 1-Sided Face Up, |
|
|
2-Sided |
|
|
|
|
File Format |
Choose your desired default file format for the |
|
|
scanned image. |
|
|
Choice: JPEG, TIFF (One-Page TIFF), M-TIFF |
|
|
(Multi-Page TIFF), PDF (One-Page PDF), |
|
|
*M-PDF (Multi-Page PDF), Searchable PDF, |
|
|
PDF/A(M-PDF), PNG |
|
Resolution |
The resolution is measured in pixels per inch (ppi) |
|
|
(sometimes referred to as dots per inch or dpi). |
|
|
Higher resolutions result in more detail in the scan, |
|
|
slower scanning and in general, greater file sizes. |
|
|
When OCR (Optical Character Recognition) is to be |
|
|
performed on a scan, 300dpi should be used for most |
|
|
languages except Asian languages. For Asian |
|
|
languages, 400 dpi is recommended. |
|
|
Resolution: 150 dpi |
Resolution: 200 dpi |
|
Note: If you are scanning duplex (two-sided) paper |
|
|
in color mode, the max. resolution is 400 dpi. |
|
|
Choice: 100 dpi, 150 dpi, *200 dpi, 300 dpi, 400 |
|
|
dpi, 600 dpi. |
|
|
|
|
*: Factory default |
|
|
20
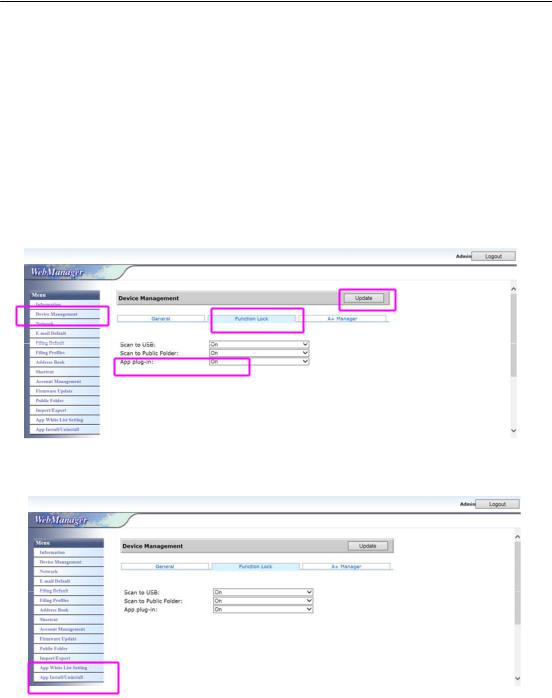
Installing and Launching a Plug-In App
This product makes user customization fast and easy by simply installing a third-party app (short for application) to be run on the product. The new plug-in app allows users to complete the scan tasks according to its own workflow. Follow these steps to install the plug-in app:
1.Open your browser and enter the product’s IP address on the URL address. The product’s embedded web page will be displayed.
2.Login the web page. (default user name and password: admin)
3.Tap [Device Management]>[Function Lock], and turn on the [App plug-in] option. Tap [Update] to complete.
4. The [App White List Setting] and [App Install/Unintall] options will be displayed at the Menu items.
5. Tap [App White List Setting] from the Menu option and then tape [Browse] to select the app name (in .spf file format) to be recognized by the product. Finally, tap [Update] to complete.
21
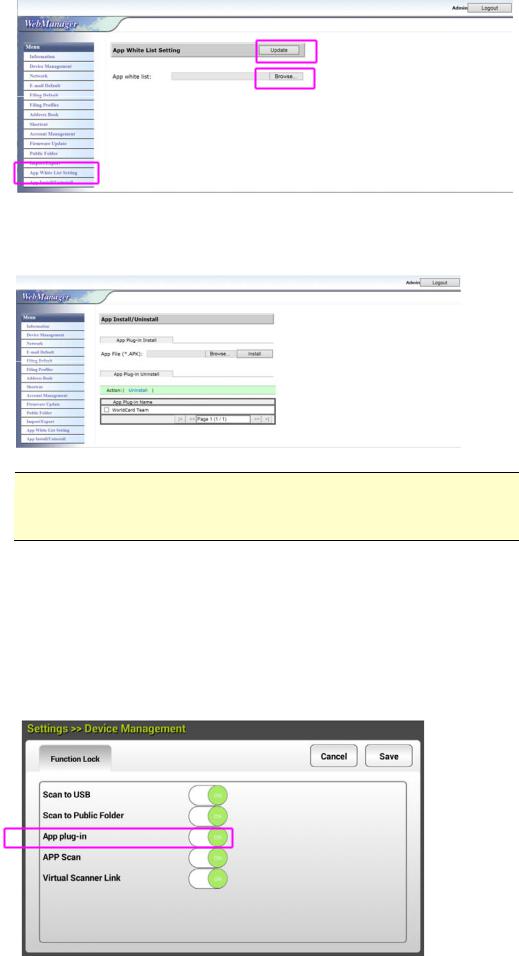
6.Tap [App Install/Uninstall] from the Menu option and then browse the installatio file of your app and then tap [Install]. If successful, the new plug-in app will be displayed in the app list in below.
Note:
If you wish to uninstall the plug-in app, simply select the app name from the list and then tap [Uninstall]. The plug-in app will be uninstalled accordingly.
How to run the plug-in app on the product:
1.Install the plug-in app according to the steps described in the preceding section.
2.On the product’s touch panel, tap [Settings]> [Device Management] > [Function Lock] in succession. Make sure the [App plug-in] is turned
ON.
22
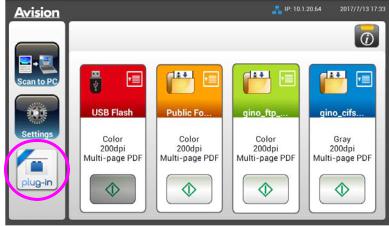
3.Scroll down the menu items on the right and then tap the [plug-in] icon. Launch the app by selecting the name of app.
*Plug-in app: Support Android OS version 4.4 or below.
23

3 Operation
Document Loading Tips
Before using the ADF (Auto Document Feeder), please make sure that your paper meets the following specifications:
Document(s) can range in size from 50 x 50 mm (2 x 2 in.) (A8) to 216 x 356 mm (8.5 x 14 in.) (Legal).
Document(s) can range in weight from 7 to 110 lbs (27 ~ 413 g/m2)
ID cards up to 1.25 mm (0.05 in.) thick
Plastic cards compliant with the ISO7810 ID-1 type
Document(s) should be square or rectangular and in good condition (not fragile or worn).
Document(s) should be free of curl, wrinkle, tears, wet ink, or punch holes.
Document(s) should be free of staples, paper clips, paper sticky notes.
24
Loading Document(s) in the ADF
Fanning Your Document
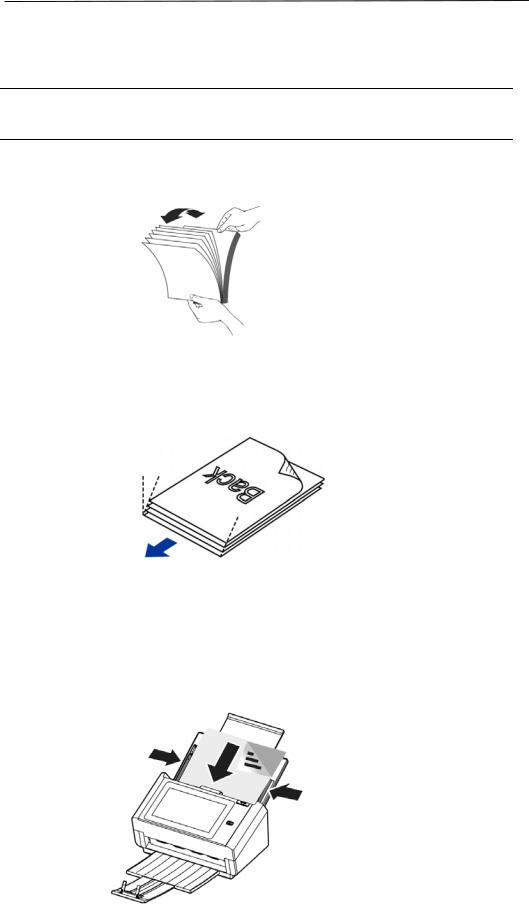
Note: To avoid occasional multi-feeds or paper jams, please fan your documents and align the top edges before feeding them into the scanner.
1.Hold both ends of the documents and fan them a few times.
2.Rotate the documents by 90 degrees and fan them in the same manner.
3.Align the edges of the documents in a step-like pattern (see picture below).
Step-like
Scanning
Direction
Document Feeding
1.Load the stack of document face down with the top of the pages pointing into the feeder.
25
Loading...