


TV DVI Box 1080i

AVerTV DVI Box 1080i
User’s Manual
English
Pусский

FCC NOTICE (Class B)
This device complies with Part 15 of the FCC Rules. Operation is subject to the following two
conditions: (1) this device may not cause harmful interference, and (2) this device must accept
any interference received, including interference that may cause undesired operation.
Federal Communications Commission Statement
NOTE- This equipment has been tested and found to comply with the limits for a Class B digital device,
pursuant to Part 15 of the FCC Rules. These limits are designed to provide reasonable protection against
harmful interference in a residential installation. This equipment generates, uses and can radiate radio
frequency energy and, if not installed and used in accordance with the instructions, may cause harmful
interference to radio communications. However, there is no guarantee that interference will not occur in a
particular installation. If this equipment does cause harmful interference to radio or television reception, which
can be determined by tuning the equipment off and on, the user is encouraged to try to correct the interference
by one or more of the following measures:
‧ Reorient or relocate the receiving antenna.
‧ Increase the separation between the equipment and receiver.
‧ Connect the equipment into an outlet on a circuit different from that to which the receiver is connected.
‧ Consult the dealer or an experienced radio/television technician for help.
CAUTION ON MODIFICATIONS
To comply with the limits for the Class B digital device, pursuant to Part 15 of the FCC Rules, this device must
be installed in computer equipment certified to comply with the Class B limits. All cables used to connect the
computer and peripherals must be shielded and grounded. Operation with non-certified computers or
non-shielded cables may result in interference to radio or television reception.
Changes and modifications not expressly approved by the manufacturer could void the user’s authority to
operate this equipment.
European Community Compliance Statement
Class B
This product is herewith confirmed to comply with the requirements set out in the
Council Directives on the Approximation of the laws of the Member States relating to
Electromagnetic Compatibility Directive 2004/108/EC.
DISCLAIMER
No warranty or representation, either expressed or implied, is made with respect to the contents of this
documentation, its quality, performance, merchantability, or fitness for a particular purpose. Information
presented in this documentation has been carefully checked for reliability; however, no responsibility is
assumed for inaccuracies. The information contained in this documentation is subject to change without notice.
In no event will AVerMedia be liable for direct, indirect, special, incidental, or consequential damages arising
out of the use or inability to use this product or documentation, even if advised of the possibility of such
damages.
TRADEMARKS
AVerMedia is registered trademarks of AVerMedia TECHNOLOGIES, Inc. IBM PC is a registered trademark of
International Business Machines Corporation. Macintosh is a registered trademark of Apple Computer, Inc.
Microsoft is a registered trademark and Windows is a trademark of Microsoft Corporation. All other products or
corporate names mentioned in this documentation are for identification and explanation purposes only, and
may be trademarks or registered trademarks of their respective owners.
COPYRIGHT
© 2008 by AVerMedia TECHNOLOGIES, Inc. All rights reserved. No part of this publication may be reproduced,
transmitted, transcribed, stored in a retrieval system, or translated into any language in any form by any means
without the written permission of AVerMedia TECHNOLOGIES, Inc.
INFORMATION ABOUT WHERE TO DROP OFF YOUR WASTE EQUIPMENT FOR RECYCLING, PLEASE
CONTACT YOUR HOUSEHOLD WASTE DISPOSAL SERVICE OR THE SHOP WHERE YOU PURCHASED
THE PRODUCT.
Safety- Low Voltage Directive 2006/95/EC
THE MARK OF CROSSED-OUT WHEELED BIN INDICATES THAT THIS PRODUCT MUST NOT BE
DISPOSED OF WITH YOUR OTHER HOUSEHOLD WASTE. INSTEAD, YOU NEED TO DISPOSE
OF THE WASTE EQUIPMENT BY HANDING IT OVER TO A DESIGNATED COLLECTION POINT
FOR THE RECYCLING OF WASTE ELECTRICAL AND ELECTRONIC EQUIPMENT. FOR MORE
№ РОСС TW.ME06.B05759
Срок действия с 24.01.2008г по 24.01.2011г
Москва


Table of Content
User’s Manual
Chapter 1 What’s in the Package .......................................... ENG-2
Chapter 2 The Unit Parts........................................................ ENG-3
2.1 Touch Button Control Panel .........................................................ENG-3
2.2 Infrared Sensor............................................................................ENG-3
2.3 Connection Ports.........................................................................ENG-3
Chapter 3 Installation and Setup........................................... ENG-4
3.1 Using the AVerTV DVI Box 1080i.................................................ENG-5
3.2 The Remote Control ....................................................................ENG-5
3.3 Customizing the Picture Setting...................................................ENG-6
3.4 Supported Display Setting ...........................................................ENG-7
3.5 Supported Display Setting in PIP Mode.......................................ENG-7
Chapter 4 OSD Menu Settings............................................... ENG-8
4.1 Calling Up the MAIN MENU ........................................................ENG-8
4.2 Menu ...........................................................................................ENG-8
English Polski Magyar Česky Slovenský Български Hrvatski Slovenščina
ENG-1
AVerMedia AVerTV DVI Box 1080i
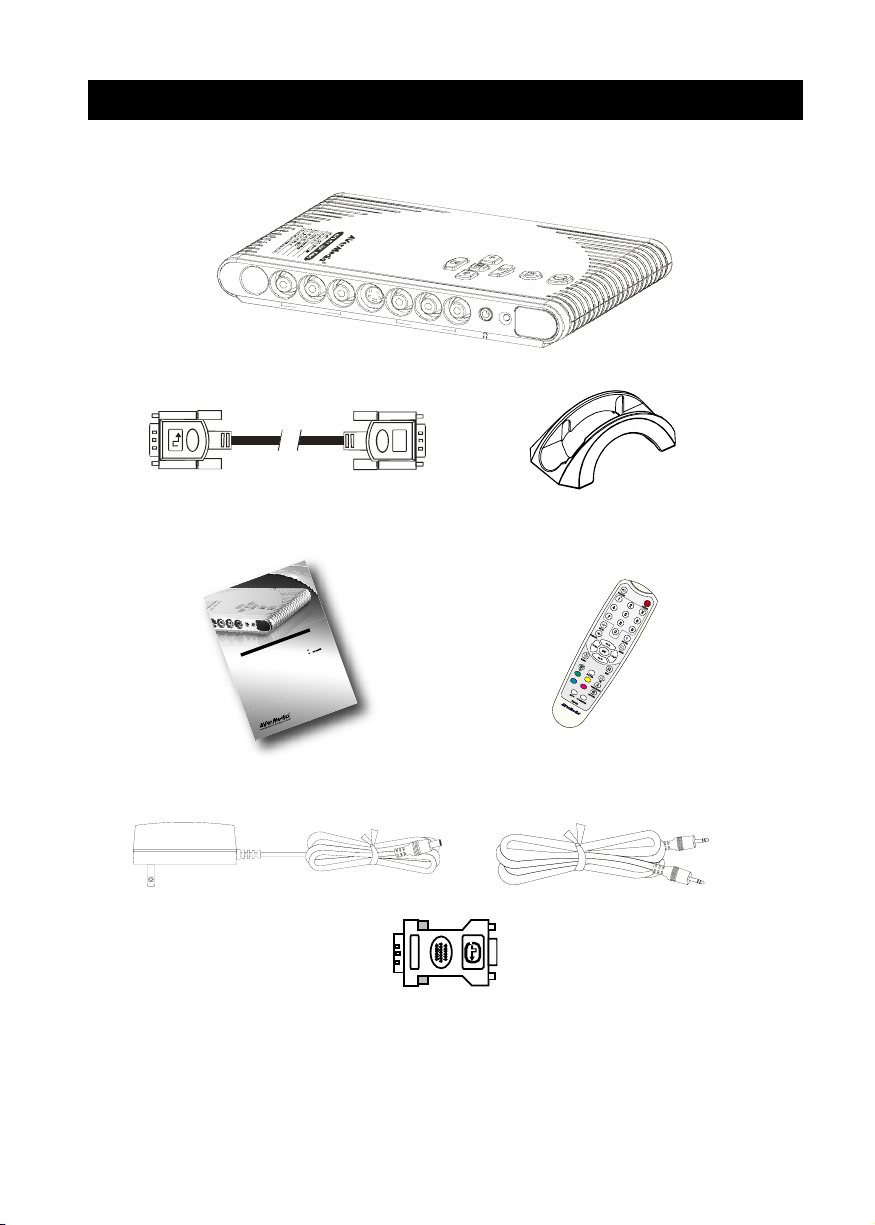
Chapter 1 What’s in the Package
AVerMedia AVerTV DVI Box 1080i package contains the following items:
Y
P
b
P
r
N
I
S
I
-
N
A
/
V
I
N
AVerMedia AVerTV DVI Box 1080i
DVI-D Cable
*Use the DVI-D cable to input or output the DVI signal.
i
0
8
0
1
x
o
B
I
V
l
a
D
u
n
V
a
T
M
r
s
h
e
V
A
s
’
i
r
l
g
e
n
s
E
U
P
Vertical Stand
User’s Manual
Power Adapter Audio Cable
DVI-I to VGA adapter
Remote Control
(with batteries)
ENG-2
User’s Manual
Chapter 2 The Unit Parts
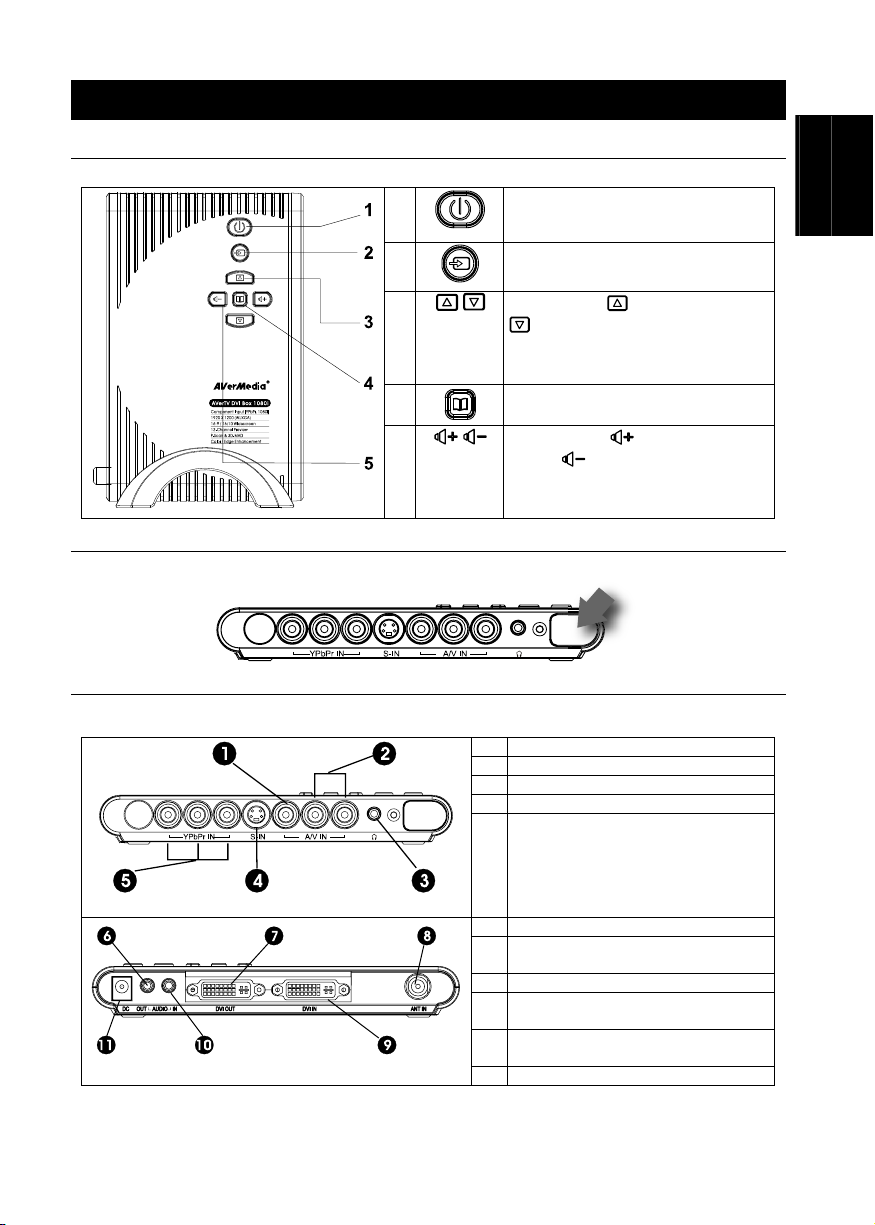
2.1 Touch Button Control Panel
The Touch Button Panel found on the top side of the unit provides quick access to commonly used functions.
1
Turn the unit on /off
2
3
4
5
2.2 Infrared Sensor
When using the remote control, aim it at the Infrared Sensor which is located at the front panel of the unit.
Press this button to toggle between
TV/Video and PC display
/
Press Channel
to go down to the next active TV
channel. Use these buttons to make the
selection in the menu or picture setting
To call up the menu display
/
Press Volume to increase and
Volume
level . Use these buttons to adjust the
menu or picture setting
to go up and Channel
to decrease the volume
English Polski Magyar Česky Slovenský Български Hrvatski Slovenščina
2.3 Connection Ports
The port connectors allow connection of your TV antenna, PC, DVI monitor, VGA monitor (through DVI-I to VGA
Adapter) or LCD projector, speakers, video, or s-video source etc.
Front Panel
Back Panel
The Installation and Setup section provides more information on cable connections.
ENG-3
1 COMPOSITE VIDEO INPUT
2 Left & Right AUDIO INPUT
3 EARPHONE JACK
4 S-VIDEO INPUT
5 COMPONENT VIDEO INPUT
6 Speaker Connection
7 DVI OUTPUT to MONITOR (VGA
supported by DVI-I to VGA Adapter)
8 TV Antenna (75Ω)
9 DVI INPUT from PC (VGA supported
by DVI-I to VGA Adapter)
10 AUDIO INPUT from PC’s SOUND
CARD
11 POWER ADAPTER
AVerMedia AVerTV DVI Box 1080i
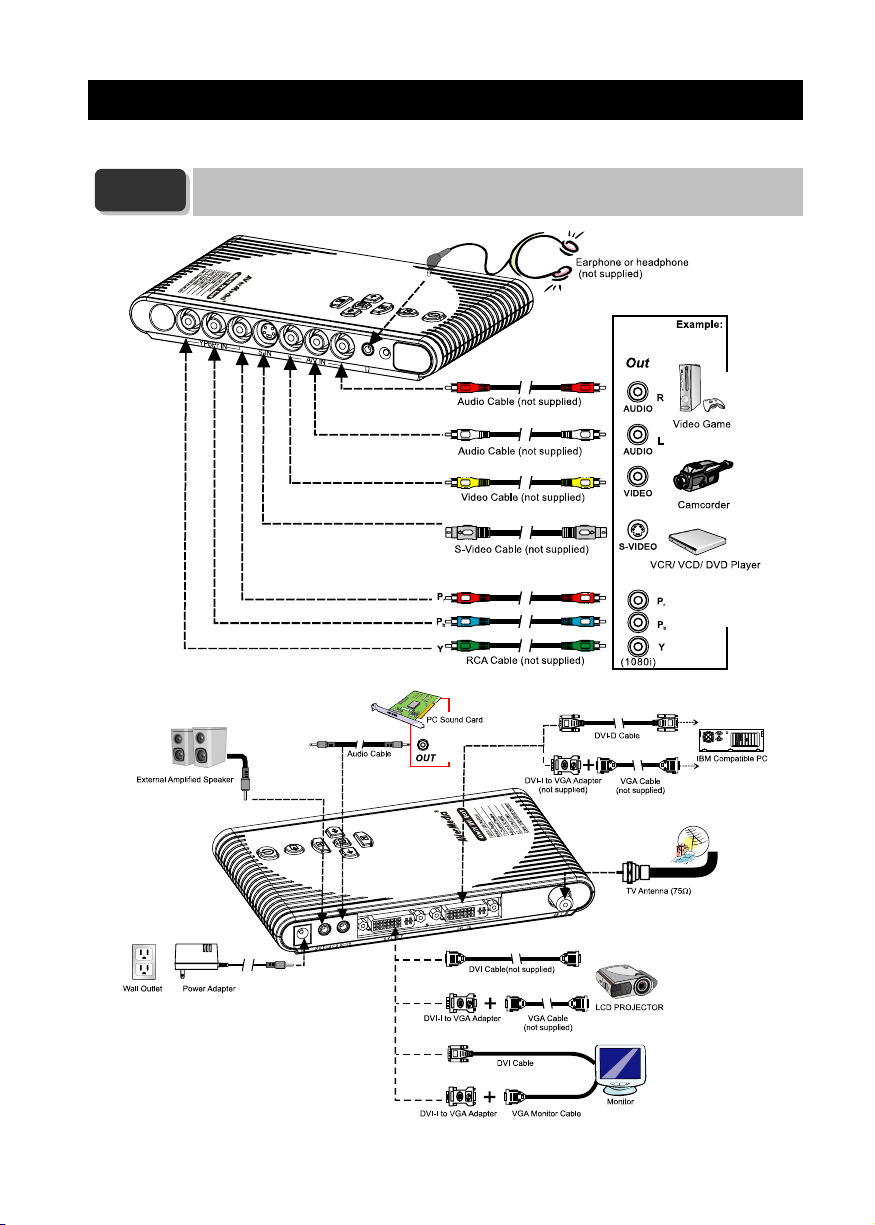
Chapter 3 Installation and Setup
The figure below shows the proper cable connections for installing AVerTV DVI Box 1080i and connecting it to your
audio/video equipment.
NOTE
Please be noted if your signal input and output are not the same type, there will not be able
to detect the signal normally. Please make sure that your input and output are in the same
type (both DVI or both VGA(D-Sub)).
ENG-4
User’s Manual
V
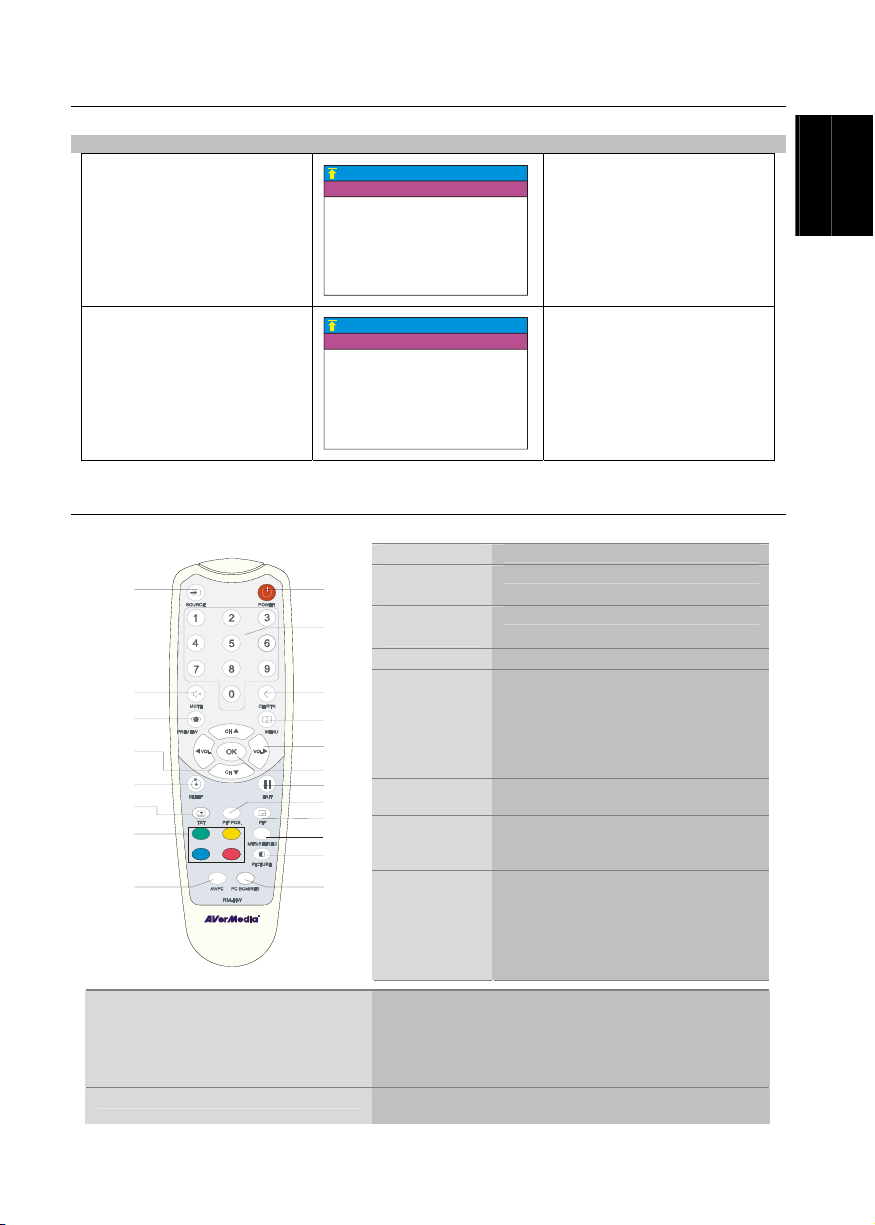
3.1 Using the AVerTV DVI Box 1080i
The first time you power on the AVerTV DVI Box 1080i unit, it will automatically display the following menus:
Note: The text appeared in red is the currently selected setting.
LANGUAGE menu
ENGLISH
RUSSIAN
LANGUAGE
In this menu, choose the
language to use for the menus
and on-screen display (OSD).
English Polski Magyar Česky Slovenský Български Hrvatski Slovenščina
CHANNEL SETUP menu
To access various TV controls, open up the menu displays or press on the remote control buttons.
CHANNEL SETUP
CHANNEL
FREQUENCY <49.75> Mhz
FINE TUNING < 0 >
IDEO SYSTEM AUTO
AUDIO SYSTEM1 D/K
AUDIO SYSTEM2 MONO
FAST TUNING YES
SAVE
1
In this menu, change the TV
frequency assignments of certain
channels, fine tune TV channels,
etc. See details on each
configuration setting in the
CHANNEL SETUP menu.
3.2 The Remote Control
The diagram below shows the remote control unit layout.
Turn the unit on/off
To select a TV channel
Go to the previously selected channel
To call up the menu display
* To increase and decrease volume level
* Use these button to adjust the menu or
picture setting
* In adjusting the PIP window position, use
these buttons to move the menu display to
the left and right of the screen.
In the menu, press this button to confirm
the selection.
To temporarily freeze the image on the
screen. Press the button again to
unfreeze the image.
To move the small TV/Video screen using
the CH▲, CH ▼, Vol◄, and Vol►
buttons in PIP mode. Press this button
again to exit the adjusting mode.
13
14
15
16
17
18
19
20
10
11
1
2
3
4
5
6
7
8
9
12
1.POWER
2.NUMBER
BUTTONS
3.CHANNEL
RETURN
4.MENU
5.VOL ◄/►
6.OK
7.
8.PIP Pos.
9.PIP
10.MTS/ STEREO
Switch between PIP*, PIP See-thru** and Full Screen mode
* To watch TV/Video in a small screen on an always on top of
the PC display.
** Make the small video screen semi-transparent allowing the
image behind the small screen show through.
If the channel offers the multi-language feature, press this
button to toggle between languages.
ENG-5
AVerMedia AVerTV DVI Box 1080i
11.PICTURE
12.PC BGM/ Res.
13.SOURCE
14.MUTE
15.PREVIEW
16.CH▲/▼
17.SLEEP
18.TELETEXT(option)
19.FASTTEXT LINK buttons
To adjust brightness, contrast, color, tint or sharpness
Note: The Tint control will not work with a PAL/SECAM source.
- Switch the audio source when in PC display mode
- Switch display resolution setting to 1024x768 when in
TV/Video mode
Switch between TV or external video sources
To turn off /on the sound
Display 13 consecutive TV channels on-screen.
*Go to the next or previous TV channel line up
*Use these buttons to make the selection in the menu or picture
setting
* In adjusting the PIP window position, use these buttons to
move the menu display up and down of the screen
To automatically turn off the unit after 30, 60, 90, 120 or 150
minutes.
This function is not available for this product.
This function is not available for this product.
(option)
20.AV/PC
To toggle between TV/ Video or PC display
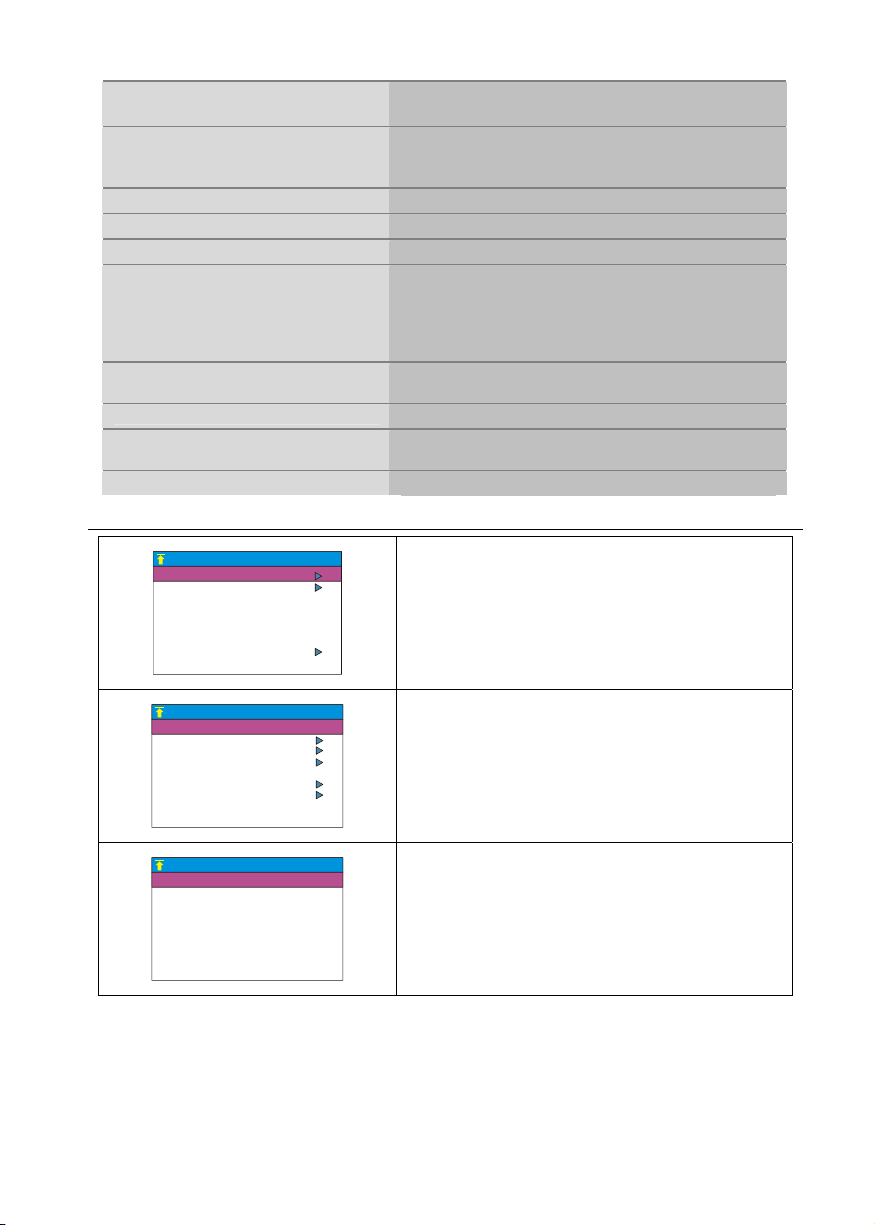
3.3 Customizing the Picture Setting
SCREEN RESOLUTION
PIP SIZE
BRIGHTNESS
CONTRAST
SATURATION
HUE
SHARPNESS
SET DEFAULT
1024X768
1280X1024
1280X768
1360X768
1440X900
1600X1200
1680X1050
1920X1200
1/4
1/9
1/16
PICTURE
SCREEN RESO LUTION
PIP SIZE
10
10
10
10
10
If you want to change the screen resolution, set the PIP
SIZE, or adjust the picture quality, press the PICTURE
button on the remote control. Then, you can use the CH▲ or
CH▼ button to select the items in the PICTURE menu; and
the Vol◄ or Vol ► button to open a submenu or make picture
setting adjustments.
To restore the picture default settings, select SET DEFAULT
and then press Vol ►.
In the SCREEN RESOLUTION submenu, choose the desired
display resolution for your monitor screen. Press the CH▲ or
CH▼ button to move up or down the menu and select a
resolution, then press Vol ► to confirm your selection. If you
don’t confirm the selected resolution by pressing Vol ►
within 15 seconds, the resolution will keep at previous
resolution.
In the PIP SIZE submenu, choose the appropriate PIP
window ratio. Press the CH▲ or CH▼ button to make a
selection, then press Vol ► to confirm your selection.
ENG-6
 Loading...